
Recommended
More Related Content
Similar to ec hr15 (1).pdf
Similar to ec hr15 (1).pdf (20)
Recently uploaded
Recently uploaded (20)
ec hr15 (1).pdf
- 1. EC-1 ENGINE CONTROL SYSTEM B ENGINE CONTENTS C D E F G H I J K L M SECTION EC A EC Revision: 2006 January C11 ENGINE CONTROL SYSTEM MODIFICATION NOTICE ....................................... ..... 8 Major Modification Item ....................................... ..... 8 APPLICATION NOTICE ......................................... ..... 9 How to Check Vehicle Type ................................ ..... 9 HR INDEX FOR DTC ................................................... ... 10 DTC No. Index .................................................... ... 10 Alphabetical Index ............................................... ... 12 ENGINE CONTROL SYSTEM ............................... ... 14 System Diagram .................................................. ... 14 ON BOARD DIAGNOSTIC (OBD) SYSTEM ......... ... 15 Introduction ......................................................... ... 15 Two Trip Detection Logic ..................................... ... 15 Emission-related Diagnostic Information ............. ... 15 TROUBLE DIAGNOSIS ......................................... ... 19 Trouble Diagnosis Introduction ............................ ... 19 DTC Inspection Priority Chart ............................. ... 25 Fail-Safe Chart .................................................... ... 26 Basic Inspection .................................................. ... 27 Symptom Matrix Chart ........................................ ... 32 Engine Control Component Parts Location ......... ... 35 Vacuum Hose Drawing ........................................ ... 40 Wiring Diagram — ECM — ................................. ... 41 ECM Harness Connector Terminal Layout .......... ... 44 ECM Terminals and Reference Value ................. ... 44 CONSULT-II Reference Value in Data Monitor ... ... 52 Major Sensor Reference Graph in Data Monitor Mode ................................................................... ... 55 TROUBLE DIAGNOSIS - SPECIFICATION VALUE ... 57 Description .......................................................... ... 57 Testing Condition ................................................. ... 57 Inspection Procedure .......................................... ... 57 Diagnostic Procedure .......................................... ... 58 TROUBLEDIAGNOSISFORINTERMITTENTINCI- DENT ..................................................................... ... 67 Description .......................................................... ... 67 Diagnostic Procedure .......................................... ... 67 POWER SUPPLY AND GROUND CIRCUIT .......... ... 68 Diagnostic Procedure .......................................... ... 68 Ground Inspection ............................................... ... 71 DTC U1000, U1001 CAN COMMUNICATION LINE... 73 Description ........................................................... ... 73 On Board Diagnosis Logic ................................... ... 73 DTC Confirmation Procedure .............................. ... 73 DTC U1010 CAN COMMUNICATION .................... ... 74 Description ........................................................... ... 74 On Board Diagnosis Logic ................................... ... 74 DTC Confirmation Procedure .............................. ... 74 DTC P0011 IVT CONTROL .................................... ... 75 Description ........................................................... ... 75 CONSULT-IIReferenceValueinDataMonitorMode ... 75 On Board Diagnosis Logic ................................... ... 76 DTC Confirmation Procedure .............................. ... 76 Overall Function Check ....................................... ... 77 DTC P0102, P0103 MAF SENSOR ....................... ... 78 Component Description ....................................... ... 78 CONSULT-IIReferenceValueinDataMonitorMode ... 78 On Board Diagnosis Logic ................................... ... 78 DTC Confirmation Procedure .............................. ... 79 DTC P0117, P0118 ECT SENSOR ........................ ... 80 Component Description ....................................... ... 80 On Board Diagnosis Logic ................................... ... 80 DTC Confirmation Procedure .............................. ... 81 DTC P0122, P0123 TP SENSOR ........................... ... 82 Component Description ....................................... ... 82 CONSULT-IIReferenceValueinDataMonitorMode ... 82 On Board Diagnosis Logic ................................... ... 82 DTC Confirmation Procedure .............................. ... 83 DTC P0132 HO2S1 ................................................ ... 84 Component Description ....................................... ... 84 CONSULT-IIReferenceValueinDataMonitorMode ... 84 On Board Diagnosis Logic ................................... ... 84 DTC Confirmation Procedure .............................. ... 85
- 2. EC-2 Revision: 2006 January C11 DTC P0134 HO2S1 ................................................ ... 86 Component Description ....................................... ... 86 CONSULT-IIReferenceValueinDataMonitorMode ... 86 On Board Diagnosis Logic ................................... ... 86 Overall Function Check ....................................... ... 87 DTC P0138 HO2S2 ................................................ ... 88 Component Description ....................................... ... 88 CONSULT-IIReferenceValueinDataMonitorMode ... 88 On Board Diagnosis Logic ................................... ... 88 DTC Confirmation Procedure .............................. ... 89 DTC P0222, P0223 TP SENSOR ........................... ... 90 Component Description ....................................... ... 90 CONSULT-IIReferenceValueinDataMonitorMode ... 90 On Board Diagnosis Logic ................................... ... 90 DTC Confirmation Procedure .............................. ... 91 DTC P0327, P0328 KS ........................................... ... 92 Component Description ....................................... ... 92 On Board Diagnosis Logic ................................... ... 92 DTC Confirmation Procedure .............................. ... 92 DTC P0335 CKP SENSOR (POS) ......................... ... 93 Component Description ....................................... ... 93 CONSULT-IIReferenceValueinDataMonitorMode ... 93 On Board Diagnosis Logic ................................... ... 93 DTC Confirmation Procedure .............................. ... 94 DTC P0340 CMP SENSOR (PHASE) .................... ... 95 Component Description ....................................... ... 95 On Board Diagnosis Logic ................................... ... 95 DTC Confirmation Procedure .............................. ... 96 DTC P0605 ECM .................................................... ... 97 Component Description ....................................... ... 97 On Board Diagnosis Logic ................................... ... 97 DTC Confirmation Procedure .............................. ... 97 DTC P1065 ECM .................................................... ... 99 Component Description ....................................... ... 99 On Board Diagnosis Logic ................................... ... 99 DTC Confirmation Procedure .............................. ... 99 DTC P1111 IVT CONTROL SOLENOID VALVE .... .100 Component Description ....................................... .100 CONSULT-IIReferenceValueinDataMonitorMode .100 On Board Diagnosis Logic ................................... .100 DTC Confirmation Procedure .............................. .100 DTC P1121 ELECTRIC THROTTLE CONTROL ACTUATOR ............................................................ .101 Component Description ....................................... .101 On Board Diagnosis Logic ................................... .101 DTC Confirmation Procedure .............................. .101 DTC P1122 ELECTRIC THROTTLE CONTROL FUNCTION ............................................................. .103 Description ........................................................... .103 On Board Diagnosis Logic ................................... .103 DTC Confirmation Procedure .............................. .103 DTCP1124,P1126THROTTLECONTROLMOTOR RELAY .................................................................... .104 Component Description ....................................... .104 CONSULT-IIReferenceValueinDataMonitorMode .104 On Board Diagnosis Logic ................................... .104 DTC Confirmation Procedure ............................... .104 DTC P1128 THROTTLE CONTROL MOTOR ........ .106 Component Description ....................................... .106 On Board Diagnosis Logic ................................... .106 DTC Confirmation Procedure ............................... .106 DTC P1217 ENGINE OVER TEMPERATURE ....... .107 System Description .............................................. .107 CONSULT-IIReferenceValueinDataMonitorMode .108 On Board Diagnosis Logic ................................... .108 Overall Function Check ........................................ .109 Main 12 Causes of Overheating .......................... .110 DTC P1225 TP SENSOR ....................................... . 111 Component Description ....................................... . 111 On Board Diagnosis Logic ................................... . 111 DTC Confirmation Procedure ............................... . 111 DTC P1226 TP SENSOR ....................................... .112 Component Description ....................................... .112 On Board Diagnosis Logic ................................... .112 DTC Confirmation Procedure ............................... .112 DTC P1229 SENSOR POWER SUPPLY ............... .113 On Board Diagnosis Logic ................................... .113 DTC Confirmation Procedure ............................... .113 DTC P1706 PNP SWITCH ...................................... .114 Component Description ....................................... .114 CONSULT-IIReferenceValueinDataMonitorMode .114 On Board Diagnosis Logic ................................... .114 DTC Confirmation Procedure ............................... .114 Overall Function Check ........................................ .114 DTC P1805 BRAKE SWITCH ................................ .116 Description ........................................................... .116 CONSULT-IIReferenceValueinDataMonitorMode .116 On Board Diagnosis Logic ................................... .116 FAIL-SAFE MODE ............................................... .116 DTC Confirmation Procedure ............................... .116 DTC P2122, P2123 APP SENSOR ........................ .117 Component Description ....................................... .117 CONSULT-IIReferenceValueinDataMonitorMode .117 On Board Diagnosis Logic ................................... .117 DTC Confirmation Procedure ............................... .118 DTC P2127, P2128 APP SENSOR ........................ .119 Component Description ....................................... .119 CONSULT-IIReferenceValueinDataMonitorMode .119 On Board Diagnosis Logic ................................... .119 DTC Confirmation Procedure ............................... .120 DTC P2135 TP SENSOR ....................................... .121 Component Description ....................................... .121 CONSULT-IIReferenceValueinDataMonitorMode .121 On Board Diagnosis Logic ................................... .121 DTC Confirmation Procedure ............................... .122
- 3. EC-3 C D E F G H I J K L M EC A Revision: 2006 January C11 DTC P2138 APP SENSOR .................................... . 123 Component Description ....................................... . 123 CONSULT-IIReferenceValueinDataMonitorMode . 123 On Board Diagnosis Logic .................................. . 123 DTC Confirmation Procedure .............................. . 124 SERVICE DATA AND SPECIFICATIONS (SDS) ... . 125 Fuel Pressure ...................................................... . 125 Idle Speed and Ignition Timing ............................ . 125 Mass Air Flow Sensor ......................................... . 125 Intake Air Temperature Sensor ........................... . 125 Engine Coolant Temperature Sensor .................. . 125 Heated Oxygen Sensor 1 Heater ........................ . 125 Heated Oxygen sensor 2 Heater ......................... . 125 Throttle Control Motor ......................................... . 125 Fuel Injector ........................................................ . 125 Fuel Pump ........................................................... . 125 MR TYPE 1 INDEX FOR DTC ................................................... . 126 DTC No. Index .................................................... . 126 Alphabetical Index ............................................... . 128 ENGINE CONTROL SYSTEM ............................... . 130 System Diagram .................................................. . 130 ON BOARD DIAGNOSTIC (OBD) SYSTEM ......... . 131 Introduction ......................................................... . 131 Two Trip Detection Logic ..................................... . 131 Emission-related Diagnostic Information ............. . 132 OBD System Operation Chart ............................. . 142 TROUBLE DIAGNOSIS ......................................... . 148 Trouble Diagnosis Introduction ............................ . 148 DTC Inspection Priority Chart ............................. . 154 Fail-Safe Chart .................................................... . 155 Basic Inspection .................................................. . 156 Symptom Matrix Chart ........................................ . 161 Engine Control Component Parts Location ......... . 164 Vacuum Hose Drawing ........................................ . 169 Wiring Diagram — ECM — ................................. . 170 ECM Harness Connector Terminal Layout .......... . 173 ECM Terminals and Reference Value ................. . 173 Generic Scan Tool (GST) Function ..................... . 181 CONSULT-II Reference Value in Data Monitor ... . 183 Major Sensor Reference Graph in Data Monitor Mode ................................................................... . 186 TROUBLE DIAGNOSIS - SPECIFICATION VALUE . 188 Description .......................................................... . 188 Testing Condition ................................................. . 188 Inspection Procedure .......................................... . 188 Diagnostic Procedure .......................................... . 189 TROUBLEDIAGNOSISFORINTERMITTENTINCI- DENT ..................................................................... . 198 Description .......................................................... . 198 Diagnostic Procedure .......................................... . 198 POWER SUPPLY AND GROUND CIRCUIT ......... . 199 Diagnostic Procedure .......................................... . 199 Ground Inspection ............................................... . 202 DTC U1000, U1001 CAN COMMUNICATION LINE . 204 Description .......................................................... . 204 On Board Diagnosis Logic ................................... . 204 DTC Confirmation Procedure .............................. . 204 DTC U1010 CAN COMMUNICATION .................... . 205 Description ........................................................... . 205 On Board Diagnosis Logic ................................... . 205 DTC Confirmation Procedure .............................. . 205 DTC P0011 IVT CONTROL .................................... . 206 Description ........................................................... . 206 CONSULT-IIReferenceValueinDataMonitorMode . 206 On Board Diagnosis Logic ................................... . 207 DTC Confirmation Procedure .............................. . 207 DTC P0102, P0103 MAF SENSOR ....................... . 209 Component Description ....................................... . 209 CONSULT-IIReferenceValueinDataMonitorMode . 209 On Board Diagnosis Logic ................................... . 209 DTC Confirmation Procedure .............................. . 210 DTC P0112, P0113 IAT SENSOR .......................... . 211 Component Description ....................................... . 211 On Board Diagnosis Logic ................................... . 211 DTC Confirmation Procedure .............................. . 211 DTC P0117, P0118 ECT SENSOR ........................ . 213 Component Description ....................................... . 213 On Board Diagnosis Logic ................................... . 213 DTC Confirmation Procedure .............................. . 214 DTC P0122, P0123 TP SENSOR ........................... . 215 Component Description ....................................... . 215 CONSULT-IIReferenceValueinDataMonitorMode . 215 On Board Diagnosis Logic ................................... . 215 DTC Confirmation Procedure .............................. . 216 DTC P0132 HO2S1 ................................................ . 217 Component Description ....................................... . 217 CONSULT-IIReferenceValueinDataMonitorMode . 217 On Board Diagnosis Logic ................................... . 217 DTC Confirmation Procedure .............................. . 218 DTC P0133 HO2S1 ................................................ . 219 Component Description ....................................... . 219 CONSULT-IIReferenceValueinDataMonitorMode . 219 On Board Diagnosis Logic ................................... . 219 DTC Confirmation Procedure .............................. . 220 Overall Function Check ....................................... . 221 DTC P0134 HO2S1 ................................................ . 222 Component Description ....................................... . 222 CONSULT-IIReferenceValueinDataMonitorMode . 222 On Board Diagnosis Logic ................................... . 222 DTC Confirmation Procedure .............................. . 223 Overall Function Check ....................................... . 224 DTC P0135 HO2S1 HEATER ................................ . 225 Description ........................................................... . 225 CONSULT-IIReferenceValueinDataMonitorMode . 225 On Board Diagnosis Logic ................................... . 225 DTC Confirmation Procedure .............................. . 226
- 4. EC-4 Revision: 2006 January C11 DTC P0138 HO2S2 ................................................ .227 Component Description ....................................... .227 CONSULT-IIReferenceValueinDataMonitorMode .227 On Board Diagnosis Logic ................................... .227 DTC Confirmation Procedure .............................. .228 REVVING ENGINE FROM IDLE TO 3,000 RPM QUICKLYAFTERTHEFOLLOWINGCONDITIONS ARE MET.DTC P0139 HO2S2 ............................... .229 Component Description ....................................... .229 CONSULT-IIReferenceValueinDataMonitorMode .229 On Board Diagnosis Logic ................................... .229 DTC Confirmation Procedure .............................. .230 Overall Function Check ....................................... .231 DTC P0141 HO2S2 HEATER ................................. .232 Description ........................................................... .232 CONSULT-IIReferenceValueinDataMonitorMode .232 On Board Diagnosis Logic ................................... .232 DTC Confirmation Procedure .............................. .233 DTCP0171FUELINJECTIONSYSTEMFUNCTION .234 On Board Diagnosis Logic ................................... .234 DTC Confirmation Procedure .............................. .234 DTCP0172FUELINJECTIONSYSTEMFUNCTION .236 On Board Diagnosis Logic ................................... .236 DTC Confirmation Procedure .............................. .236 DTC P0222, P0223 TP SENSOR ........................... .238 Component Description ....................................... .238 CONSULT-IIReferenceValueinDataMonitorMode .238 On Board Diagnosis Logic ................................... .238 DTC Confirmation Procedure .............................. .239 DTC P0300 - P0304 MULTIPLE CYLINDER MIS- FIRE, NO. 1 - 4 CYLINDER MISFIRE .................... .240 On Board Diagnosis Logic ................................... .240 DTC Confirmation Procedure .............................. .241 DTC P0327, P0328 KS ........................................... .242 Component Description ....................................... .242 On Board Diagnosis Logic ................................... .242 DTC Confirmation Procedure .............................. .242 DTC P0335 CKP SENSOR (POS) ......................... .243 Component Description ....................................... .243 CONSULT-IIReferenceValueinDataMonitorMode .243 On Board Diagnosis Logic ................................... .243 DTC Confirmation Procedure .............................. .244 DTC P0340 CMP SENSOR (PHASE) .................... .245 Component Description ....................................... .245 On Board Diagnosis Logic ................................... .245 DTC Confirmation Procedure .............................. .245 DTC P0420 THREE WAY CATALYST FUNCTION.247 On Board Diagnosis Logic ................................... .247 DTC Confirmation Procedure .............................. .247 Overall Function Check ....................................... .248 DTC P0444 EVAP CANISTER PURGE VOLUME CONTROL SOLENOID VALVE .............................. .250 Description ........................................................... .250 CONSULT-IIReferenceValueinDataMonitorMode .250 On Board Diagnosis Logic ................................... .250 DTC Confirmation Procedure ............................... .251 DTC P0500 VSS ..................................................... .252 Description ........................................................... .252 On Board Diagnosis Logic ................................... .252 DTC Confirmation Procedure ............................... .252 Overall Function Check ........................................ .253 DTC P0605 ECM .................................................... .254 Component Description ....................................... .254 On Board Diagnosis Logic ................................... .254 DTC Confirmation Procedure ............................... .254 DTC P1111 IVT CONTROL SOLENOID VALVE .... .256 Component Description ....................................... .256 CONSULT-IIReferenceValueinDataMonitorMode .256 On Board Diagnosis Logic ................................... .256 DTC Confirmation Procedure ............................... .256 DTC P1121 ELECTRIC THROTTLE CONTROL ACTUATOR ............................................................ .257 Component Description ....................................... .257 On Board Diagnosis Logic ................................... .257 DTC Confirmation Procedure ............................... .257 DTC P1122 ELECTRIC THROTTLE CONTROL FUNCTION ............................................................. .259 Description ........................................................... .259 On Board Diagnosis Logic ................................... .259 DTC Confirmation Procedure ............................... .259 DTCP1124,P1126THROTTLECONTROLMOTOR RELAY .................................................................... .260 Component Description ....................................... .260 CONSULT-IIReferenceValueinDataMonitorMode .260 On Board Diagnosis Logic ................................... .260 DTC Confirmation Procedure ............................... .260 DTC P1128 THROTTLE CONTROL MOTOR ........ .262 Component Description ....................................... .262 On Board Diagnosis Logic ................................... .262 DTC Confirmation Procedure ............................... .262 DTC P1143 HO2S1 ................................................. .263 Component Description ....................................... .263 CONSULT-IIReferenceValueinDataMonitorMode .263 On Board Diagnosis Logic ................................... .263 DTC Confirmation Procedure ............................... .264 Overall Function Check ........................................ .265 DTC P1144 HO2S1 ................................................. .266 Component Description ....................................... .266 CONSULT-IIReferenceValueinDataMonitorMode .266 On Board Diagnosis Logic ................................... .266 DTC Confirmation Procedure ............................... .267 Overall Function Check ........................................ .268 DTC P1146 HO2S2 ................................................. .269 Component Description ....................................... .269 CONSULT-IIReferenceValueinDataMonitorMode .269 On Board Diagnosis Logic ................................... .269
- 5. EC-5 C D E F G H I J K L M EC A Revision: 2006 January C11 DTC Confirmation Procedure .............................. . 270 Overall Function Check ....................................... . 271 DTC P1147 HO2S2 ................................................ . 272 Component Description ....................................... . 272 CONSULT-IIReferenceValueinDataMonitorMode . 272 On Board Diagnosis Logic .................................. . 272 DTC Confirmation Procedure .............................. . 273 Overall Function Check ....................................... . 274 DTC P1217 ENGINE OVER TEMPERATURE ...... . 275 System Description ............................................. . 275 CONSULT-IIReferenceValueinDataMonitorMode . 276 On Board Diagnosis Logic .................................. . 276 Overall Function Check ....................................... . 276 Main 12 Causes of Overheating .......................... . 278 DTC P1225 TP SENSOR ....................................... . 279 Component Description ....................................... . 279 On Board Diagnosis Logic .................................. . 279 DTC Confirmation Procedure .............................. . 279 DTC P1226 TP SENSOR ....................................... . 280 Component Description ....................................... . 280 On Board Diagnosis Logic .................................. . 280 DTC Confirmation Procedure .............................. . 280 DTC P1229 SENSOR POWER SUPPLY ............... . 281 On Board Diagnosis Logic .................................. . 281 DTC Confirmation Procedure .............................. . 281 DTC P1706 PNP SWITCH ..................................... . 282 Component Description ....................................... . 282 CONSULT-IIReferenceValueinDataMonitorMode . 282 On Board Diagnosis Logic .................................. . 282 DTC Confirmation Procedure .............................. . 282 Overall Function Check ....................................... . 283 DTC P1715 INPUT SPEED SENSOR (TURBINE REVOLUTION SENSOR) ...................................... . 284 Description .......................................................... . 284 CONSULT-IIReferenceValueinDataMonitorMode . 284 On Board Diagnosis Logic .................................. . 284 DTC P1805 BRAKE SWITCH ............................... . 285 Description .......................................................... . 285 CONSULT-IIReferenceValueinDataMonitorMode . 285 On Board Diagnosis Logic .................................. . 285 DTC Confirmation Procedure .............................. . 285 DTC P2122, P2123 APP SENSOR ....................... . 286 Component Description ....................................... . 286 CONSULT-IIReferenceValueinDataMonitorMode . 286 On Board Diagnosis Logic .................................. . 286 DTC Confirmation Procedure .............................. . 287 DTC P2127, P2128 APP SENSOR ....................... . 288 Component Description ....................................... . 288 CONSULT-IIReferenceValueinDataMonitorMode . 288 On Board Diagnosis Logic .................................. . 288 DTC Confirmation Procedure .............................. . 289 DTC P2135 TP SENSOR ....................................... . 290 Component Description ....................................... . 290 CONSULT-IIReferenceValueinDataMonitorMode . 290 On Board Diagnosis Logic ................................... . 290 DTC Confirmation Procedure .............................. . 291 DTC P2138 APP SENSOR .................................... . 292 Component Description ....................................... . 292 CONSULT-IIReferenceValueinDataMonitorMode . 292 On Board Diagnosis Logic ................................... . 292 DTC Confirmation Procedure .............................. . 293 SERVICE DATA AND SPECIFICATIONS (SDS) ... . 294 Fuel Pressure ...................................................... . 294 Idle Speed and Ignition Timing ............................ . 294 Calculated Load Value ......................................... . 294 Mass Air Flow Sensor .......................................... . 294 Intake Air Temperature Sensor ............................ . 294 Engine Coolant Temperature Sensor .................. . 294 Heated Oxygen Sensor 1 Heater ........................ . 294 Heated Oxygen sensor 2 Heater ......................... . 294 Throttle Control Motor .......................................... . 294 Fuel Injector ......................................................... . 295 Fuel Pump ........................................................... . 295 MR TYPE 2 INDEX FOR DTC .................................................... . 296 DTC No. Index ..................................................... . 296 Alphabetical Index ............................................... . 298 ENGINE CONTROL SYSTEM ............................... . 300 System Diagram .................................................. . 300 ON BOARD DIAGNOSTIC (OBD) SYSTEM ......... . 301 Introduction .......................................................... . 301 Two Trip Detection Logic ..................................... . 301 Emission-related Diagnostic Information ............. . 301 TROUBLE DIAGNOSIS ......................................... . 305 Trouble Diagnosis Introduction ............................ . 305 DTC Inspection Priority Chart .............................. . 311 Fail-Safe Chart .................................................... . 312 Basic Inspection .................................................. . 313 Symptom Matrix Chart ......................................... . 318 Engine Control Component Parts Location ......... . 321 Vacuum Hose Drawing ........................................ . 326 Wiring Diagram — ECM — .................................. . 327 ECM Harness Connector Terminal Layout .......... . 330 ECM Terminals and Reference Value .................. . 330 CONSULT-II Reference Value in Data Monitor .... . 338 Major Sensor Reference Graph in Data Monitor Mode .................................................................... . 341 TROUBLE DIAGNOSIS - SPECIFICATION VALUE . 343 Description ........................................................... . 343 Testing Condition ................................................. . 343 Inspection Procedure ........................................... . 343 Diagnostic Procedure .......................................... . 344 TROUBLEDIAGNOSISFORINTERMITTENTINCI- DENT ...................................................................... . 353 Description ........................................................... . 353 Diagnostic Procedure .......................................... . 353
- 6. EC-6 Revision: 2006 January C11 POWER SUPPLY AND GROUND CIRCUIT .......... .354 Diagnostic Procedure .......................................... .354 Ground Inspection ............................................... .357 DTC U1000, U1001 CAN COMMUNICATION LINE.359 Description ........................................................... .359 On Board Diagnosis Logic ................................... .359 DTC Confirmation Procedure .............................. .359 DTC U1010 CAN COMMUNICATION .................... .360 Description ........................................................... .360 On Board Diagnosis Logic ................................... .360 DTC Confirmation Procedure .............................. .360 DTC P0011 IVT CONTROL .................................... .361 Description ........................................................... .361 CONSULT-IIReferenceValueinDataMonitorMode .361 On Board Diagnosis Logic ................................... .362 DTC Confirmation Procedure .............................. .362 Overall Function Check ....................................... .363 DTC P0102, P0103 MAF SENSOR ........................ .364 Component Description ....................................... .364 CONSULT-IIReferenceValueinDataMonitorMode .364 On Board Diagnosis Logic ................................... .364 DTC Confirmation Procedure .............................. .365 DTC P0117, P0118 ECT SENSOR ......................... .366 Component Description ....................................... .366 On Board Diagnosis Logic ................................... .366 DTC Confirmation Procedure .............................. .367 DTC P0122, P0123 TP SENSOR ........................... .368 Component Description ....................................... .368 CONSULT-IIReferenceValueinDataMonitorMode .368 On Board Diagnosis Logic ................................... .368 DTC Confirmation Procedure .............................. .369 DTC P0132 HO2S1 ................................................ .370 Component Description ....................................... .370 CONSULT-IIReferenceValueinDataMonitorMode .370 On Board Diagnosis Logic ................................... .370 DTC Confirmation Procedure .............................. .371 DTC P0134 HO2S1 ................................................ .372 Component Description ....................................... .372 CONSULT-IIReferenceValueinDataMonitorMode .372 On Board Diagnosis Logic ................................... .372 Overall Function Check ....................................... .373 DTC P0135 HO2S1 HEATER ................................. .374 Description ........................................................... .374 CONSULT-IIReferenceValueinDataMonitorMode .374 On Board Diagnosis Logic ................................... .374 DTC Confirmation Procedure .............................. .375 DTC P0141 HO2S2 HEATER ................................. .376 Description ........................................................... .376 CONSULT-IIReferenceValueinDataMonitorMode .376 On Board Diagnosis Logic ................................... .376 DTC Confirmation Procedure .............................. .377 DTC P0222, P0223 TP SENSOR ........................... .378 Component Description ....................................... .378 CONSULT-IIReferenceValueinDataMonitorMode .378 On Board Diagnosis Logic ................................... .378 DTC Confirmation Procedure ............................... .379 DTC P0327, P0328 KS ........................................... .380 Component Description ....................................... .380 On Board Diagnosis Logic ................................... .380 DTC Confirmation Procedure ............................... .380 DTC P0335 CKP SENSOR (POS) ......................... .381 Component Description ....................................... .381 CONSULT-IIReferenceValueinDataMonitorMode .381 On Board Diagnosis Logic ................................... .381 DTC Confirmation Procedure ............................... .382 DTC P0340 CMP SENSOR (PHASE) .................... .383 Component Description ....................................... .383 On Board Diagnosis Logic ................................... .383 DTC Confirmation Procedure ............................... .384 DTC P0444 EVAP CANISTER PURGE VOLUME CONTROL SOLENOID VALVE .............................. .385 Description ........................................................... .385 CONSULT-IIReferenceValueinDataMonitorMode .385 On Board Diagnosis Logic ................................... .385 DTC Confirmation Procedure ............................... .386 DTC P0500 VSS ..................................................... .387 Description ........................................................... .387 On Board Diagnosis Logic ................................... .387 DTC Confirmation Procedure ............................... .387 Overall Function Check ........................................ .388 DTC P0605 ECM .................................................... .389 Component Description ....................................... .389 On Board Diagnosis Logic ................................... .389 DTC Confirmation Procedure ............................... .389 DTC P1111 IVT CONTROL SOLENOID VALVE .... .391 Component Description ....................................... .391 CONSULT-IIReferenceValueinDataMonitorMode .391 On Board Diagnosis Logic ................................... .391 DTC Confirmation Procedure ............................... .391 DTC P1121 ELECTRIC THROTTLE CONTROL ACTUATOR ............................................................ .392 Component Description ....................................... .392 On Board Diagnosis Logic ................................... .392 DTC Confirmation Procedure ............................... .392 DTC P1122 ELECTRIC THROTTLE CONTROL FUNCTION ............................................................. .394 Description ........................................................... .394 On Board Diagnosis Logic ................................... .394 DTC Confirmation Procedure ............................... .394 DTCP1124,P1126THROTTLECONTROLMOTOR RELAY .................................................................... .395 Component Description ....................................... .395 CONSULT-IIReferenceValueinDataMonitorMode .395 On Board Diagnosis Logic ................................... .395 DTC Confirmation Procedure ............................... .395
- 7. EC-7 C D E F G H I J K L M EC A Revision: 2006 January C11 DTC P1128 THROTTLE CONTROL MOTOR ....... . 397 Component Description ....................................... . 397 On Board Diagnosis Logic .................................. . 397 DTC Confirmation Procedure .............................. . 397 DTC P1217 ENGINE OVER TEMPERATURE ...... . 398 System Description ............................................. . 398 CONSULT-IIReferenceValueinDataMonitorMode . 399 On Board Diagnosis Logic .................................. . 399 Overall Function Check ....................................... . 399 Main 12 Causes of Overheating .......................... . 400 DTC P1225 TP SENSOR ....................................... . 402 Component Description ....................................... . 402 On Board Diagnosis Logic .................................. . 402 DTC Confirmation Procedure .............................. . 402 DTC P1226 TP SENSOR ....................................... . 403 Component Description ....................................... . 403 On Board Diagnosis Logic .................................. . 403 DTC Confirmation Procedure .............................. . 403 DTC P1229 SENSOR POWER SUPPLY ............... . 404 On Board Diagnosis Logic .................................. . 404 DTC Confirmation Procedure .............................. . 404 DTC P1706 PNP SWITCH ..................................... . 405 Component Description ....................................... . 405 CONSULT-IIReferenceValueinDataMonitorMode . 405 On Board Diagnosis Logic .................................. . 405 Overall Function Check ....................................... . 405 DTC P1715 INPUT SPEED SENSOR (TURBINE REVOLUTION SENSOR) ...................................... . 406 Description .......................................................... . 406 CONSULT-IIReferenceValueinDataMonitorMode . 406 On Board Diagnosis Logic .................................. . 406 DTC P1805 BRAKE SWITCH ............................... . 407 Description .......................................................... . 407 CONSULT-IIReferenceValueinDataMonitorMode . 407 On Board Diagnosis Logic ................................... . 407 DTC Confirmation Procedure .............................. . 407 DTC P2122, P2123 APP SENSOR ........................ . 408 Component Description ....................................... . 408 CONSULT-IIReferenceValueinDataMonitorMode . 408 On Board Diagnosis Logic ................................... . 408 DTC Confirmation Procedure .............................. . 409 DTC P2127, P2128 APP SENSOR ........................ . 410 Component Description ....................................... . 410 CONSULT-IIReferenceValueinDataMonitorMode . 410 On Board Diagnosis Logic ................................... . 410 DTC Confirmation Procedure .............................. . 411 DTC P2135 TP SENSOR ....................................... . 412 Component Description ....................................... . 412 CONSULT-IIReferenceValueinDataMonitorMode . 412 On Board Diagnosis Logic ................................... . 412 DTC Confirmation Procedure .............................. . 413 DTC P2138 APP SENSOR .................................... . 414 Component Description ....................................... . 414 CONSULT-IIReferenceValueinDataMonitorMode . 414 On Board Diagnosis Logic ................................... . 414 DTC Confirmation Procedure .............................. . 415 SERVICE DATA AND SPECIFICATIONS (SDS) ... . 416 Fuel Pressure ...................................................... . 416 Idle Speed and Ignition Timing ............................ . 416 Mass Air Flow Sensor .......................................... . 416 Intake Air Temperature Sensor ............................ . 416 Engine Coolant Temperature Sensor .................. . 416 Heated Oxygen Sensor 1 Heater ........................ . 416 Heated Oxygen sensor 2 Heater ......................... . 416 Throttle Control Motor .......................................... . 416 Fuel Injector ......................................................... . 416 Fuel Pump ........................................................... . 416
- 8. EC-8 MODIFICATION NOTICE Revision: 2006 January C11 MODIFICATION NOTICE PFP:00000 Major Modification Item GBS006MT ● MR18DE engine models have been applied.
- 9. APPLICATION NOTICE EC-9 C D E F G H I J K L M A EC Revision: 2006 January C11 APPLICATION NOTICE PFP:00000 How to Check Vehicle Type GBS006N2 Service information Remarks MR TYPE 1 ● Models for Australia MR TYPE 2 ●Models except for Australia
- 10. EC-10 [HR] INDEX FOR DTC Revision: 2006 January C11 [HR] INDEX FOR DTC PFP:00024 DTC No. Index GBS001I0 NOTE: ● If DTC U1000 or U1001 is displayed with other DTC, first perform the trouble diagnosis for DTC U1000, U1001. Refer to EC-73, "DTC U1000, U1001 CAN COMMUNICATION LINE" . ● If DTC U1010 is displayed with other DTC, first perform the trouble diagnosis for DTC U1010. Refer to EC-74, "DTC U1010 CAN COMMUNICATION" . DTC*1 Items (CONSULT-II screen terms) Reference page CONSULT-II ECM*2 U1000 1000*3, *5 CAN COMM CIRCUIT EC-73 U1001 1001*3 CAN COMM CIRCUIT EC-73 U1010 1010 CONTROL UNIT(CAN) EC-74 P0000 Flashing*4 NO DTC IS DETECTED. FURTHER TESTING MAY BE REQUIRED. — P0000 0000 NO DTC IS DETECTED. FURTHER TESTING MAY BE REQUIRED. — P0011 0011 INT/V TIM CONT-B1 EC-75 P0102 0102 MAF SEN/CIRCUIT EC-78 P0103 0103 MAF SEN/CIRCUIT EC-78 P0117 0117 ECT SEN/CIRC EC-80 P0118 0118 ECT SEN/CIRC EC-80 P0122 0122 TP SEN 2/CIRC EC-82 P0123 0123 TP SEN 2/CIRC EC-82 P0132 0132 HO2S1 (B1) EC-84 P0134 0134 HO2S1 (B1) EC-86 P0138 0138 HO2S2 (B1) EC-88 P0222 0222 TP SEN 1/CIRC EC-90 P0223 0223 TP SEN 1/CIRC EC-90 P0327 0327 KNOCK SEN/CIRC-B1 EC-92 P0328 0328 KNOCK SEN/CIRC-B1 EC-92 P0335 0335 CKP SEN/CIRCUIT EC-93 P0340 0340 CMP SEN/CIRC-B1 EC-95 P0605 0605 ECM EC-97 P1065 1065 ECM BACK UP/CIRCUIT EC-99 P1111 1111 INT/V TIM V/CIR-B1 EC-100 P1121 1121 ETC ACTR EC-101 P1122 1122 ETC FUNCTION/CIRC EC-103 P1124 1124 ETC MOT PWR EC-104 P1126 1126 ETC MOT PWR EC-104 P1128 1128 ETC MOT EC-106 P1217 1217 ENG OVER TEMP EC-107 P1225 1225 CTP LEARNING EC-111 P1226 1226 CTP LEARNING EC-112 P1229 1229 SENSOR POWER/CIRC EC-113
- 11. INDEX FOR DTC EC-11 [HR] C D E F G H I J K L M A EC Revision: 2006 January C11 *1: 1st trip DTC No. is the same as DTC No. *2: In Diagnostic Test Mode II (Self-diagnostic results). *3: The troubleshooting for this DTC needs CONSULT-II. *4: When engine is running, MIL may flash. *5: For A/T models P1610 - P1615 1610 - 1615 NATS MALFUNCTION BL-42 P1706 1706 P-N POS SW/CIRCUIT EC-114 P1805 1805 BRAKE SW/CIRCUIT EC-116 P2122 2122 APP SEN 1/CIRC EC-117 P2123 2123 APP SEN 1/CIRC EC-117 P2127 2127 APP SEN 2/CIRC EC-119 P2128 2128 APP SEN 2/CIRC EC-119 P2135 2135 TP SENSOR EC-121 P2138 2138 APP SENSOR EC-123 DTC*1 Items (CONSULT-II screen terms) Reference page CONSULT-II ECM*2
- 12. EC-12 [HR] INDEX FOR DTC Revision: 2006 January C11 Alphabetical Index GBS001I1 NOTE: ● If DTC U1000 or U1001 is displayed with other DTC, first perform the trouble diagnosis for DTC U1000, U1001. Refer to EC-73, "DTC U1000, U1001 CAN COMMUNICATION LINE" . ● If DTC U1010 is displayed with other DTC, first perform the trouble diagnosis for DTC U1010. Refer to EC-74, "DTC U1010 CAN COMMUNICATION" . Items (CONSULT-II screen terms) DTC*1 Reference page CONSULT-II ECM*2 APP SEN 1/CIRC P2122 2122 EC-117 APP SEN 1/CIRC P2123 2123 EC-117 APP SEN 2/CIRC P2127 2127 EC-119 APP SEN 2/CIRC P2128 2128 EC-119 APP SENSOR P2138 2138 EC-123 BRAKE SW/CIRCUIT P1805 1805 EC-116 CAN COMM CIRCUIT U1000 1000*3, *5 EC-73 CAN COMM CIRCUIT U1001 1001*3 EC-73 CONTROL UNIT(CAN) U1010 1010 EC-74 CKP SEN/CIRCUIT P0335 0335 EC-93 CMP SEN/CIRC-B1 P0340 0340 EC-95 CTP LEARNING P1225 1225 EC-111 CTP LEARNING P1226 1226 EC-112 ECM P0605 0605 EC-97 ECM BACK UP/CIRCUIT P1065 1065 EC-99 ECT SEN/CIRC P0117 0117 EC-80 ECT SEN/CIRC P0118 0118 EC-80 ENG OVER TEMP P1217 1217 EC-107 ETC ACTR P1121 1121 EC-101 ETC FUNCTION/CIRC P1122 1122 EC-103 ETC MOT P1128 1128 EC-106 ETC MOT PWR P1124 1124 EC-104 ETC MOT PWR P1126 1126 EC-104 HO2S1 (B1) P0132 0132 EC-84 HO2S1 (B1) P0134 0134 EC-86 HO2S2 (B1) P0138 0138 EC-88 INT/V TIM CONT-B1 P0011 0011 EC-75 INT/V TIM V/CIR-B1 P1111 1111 EC-100 KNOCK SEN/CIRC-B1 P0327 0327 EC-92 KNOCK SEN/CIRC-B1 P0328 0328 EC-92 MAF SEN/CIRCUIT P0102 0102 EC-78 MAF SEN/CIRCUIT P0103 0103 EC-78 NATS MALFUNCTION P1610 - P1615 1610 - 1615 BL-42 NO DTC IS DETECTED. FURTHER TESTING MAY BE REQUIRED. No DTC Flashing*4 — NO DTC IS DETECTED. FURTHER TESTING MAY BE REQUIRED. P0000 0000 —
- 13. INDEX FOR DTC EC-13 [HR] C D E F G H I J K L M A EC Revision: 2006 January C11 *1: 1st trip DTC No. is the same as DTC No. *2: In Diagnostic Test Mode II (Self-diagnostic results). *3: The troubleshooting for this DTC needs CONSULT-II. *4: When engine is running, MIL may flash. *5: For A/T models P-N POS SW/CIRCUIT P1706 1706 EC-114 SENSOR POWER/CIRC P1229 1229 EC-113 TP SEN 1/CIRC P0222 0222 EC-90 TP SEN 1/CIRC P0223 0223 EC-90 TP SEN 2/CIRC P0122 0122 EC-82 TP SEN 2/CIRC P0123 0123 EC-82 TP SENSOR P2135 2135 EC-121 Items (CONSULT-II screen terms) DTC*1 Reference page CONSULT-II ECM*2
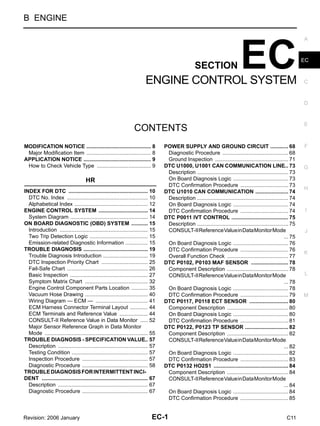
- 14. EC-14 [HR] ENGINE CONTROL SYSTEM Revision: 2006 January C11 ENGINE CONTROL SYSTEM PFP:23710 System Diagram GBS001I8 PBIB2945E
- 15. ON BOARD DIAGNOSTIC (OBD) SYSTEM EC-15 [HR] C D E F G H I J K L M A EC Revision: 2006 January C11 ON BOARD DIAGNOSTIC (OBD) SYSTEM PFP:00028 Introduction GBS001IK The ECM has an on board diagnostic system, which detects malfunctions related to engine sensors or actua- tors. The ECM also records various emission-related diagnostic information including: The above information can be checked using procedures listed in the table below. ×: Applicable —: Not applicable *: When DTC and 1st trip DTC simultaneously appear on the display, they cannot be clearly distinguished from each other. The malfunction indicator lamp (MIL) on the instrument panel lights up when the same malfunction is detected in two consecutive trips (Two trip detection logic), or when the ECM enters fail-safe mode. (Refer to EC-26, "Fail-Safe Chart" .) Two Trip Detection Logic GBS001IL When a malfunction is detected for the first time, 1st trip DTC and 1st trip Freeze Frame data are stored in the ECM memory. The MIL will not light up at this stage. <1st trip> If the same malfunction is detected again during the next drive, the DTC and Freeze Frame data are stored in the ECM memory, and the MIL lights up. The MIL lights up at the same time when the DTC is stored. <2nd trip> The “trip” in the “Two Trip Detection Logic” means a driving mode in which self-diagnosis is performed during vehicle operation. When there is an open circuit on MIL circuit, the ECM cannot warn the driver by lighting up MIL when there is malfunction on engine control system. Therefore, when electrical controlled throttle and part of ECM related diagnoses are continuously detected as NG for 5 trips, ECM warns the driver that engine control system malfunctions and MIL circuit is open by means of operating fail-safe function. The fail-safe function also operates when above diagnoses except MIL circuit are detected and demands the driver to repair the malfunction. Emission-related Diagnostic Information GBS001IM EMISSION-RELATED DIAGNOSTIC INFORMATION ITEMS ×:Applicable —: Not applicable Emission-related diagnostic information Diagnostic Trouble Code (DTC) Freeze Frame data 1st Trip Diagnostic Trouble Code (1st Trip DTC) 1st Trip Freeze Frame data DTC 1st trip DTC Freeze Frame data 1st trip Freeze Frame data CONSULT-II × × × × ECM × ×* — — Engine operating condition in fail-safe mode Engine speed will not rise more than 2,500 rpm due to the fuel cut Items (CONSULT-II screen terms) DTC*1 Trip MIL Reference page CONSULT-II ECM*2 CAN COMM CIRCUIT U1000 1000*3, *5 2 — EC-73 CAN COMM CIRCUIT U1001 1001*3 2 — EC-73 CONTROL UNIT(CAN) U1010 1010 2 — EC-74 NO DTC IS DETECTED. FURTHER TESTING MAY BE REQUIRED. P0000 0000 — Flashing*4 — INT/V TIM CONT-B1 P0011 0011 2 — EC-75 MAF SEN/CIRCUIT P0102 0102 1 × EC-78 MAF SEN/CIRCUIT P0103 0103 1 × EC-78 ECT SEN/CIRC P0117 0117 2 × EC-80
- 16. EC-16 [HR] ON BOARD DIAGNOSTIC (OBD) SYSTEM Revision: 2006 January C11 *1: 1st trip DTC No. is the same as DTC No. *2: In Diagnostic Test Mode II (Self-diagnostic results), this number is controlled by NISSAN. *3: The troubleshooting for this DTC needs CONSULT-II. *4: When engine is running, MIL may flash. *5: For A/T models DTC AND 1ST TRIP DTC The 1st trip DTC (whose number is the same as the DTC number) is displayed for the latest self-diagnostic result obtained. If the ECM memory was cleared previously, and the 1st trip DTC did not reoccur, the 1st trip DTC will not be displayed. If a malfunction is detected during the 1st trip, the 1st trip DTC is stored in the ECM memory. The MIL will not light up (two trip detection logic). If the same malfunction is not detected in the 2nd trip (meeting the required driving pattern), the 1st trip DTC is cleared from the ECM memory. If the same malfunction is detected in the 2nd trip, both the 1st trip DTC and DTC are stored in the ECM memory and the MIL lights up. In other words, ECT SEN/CIRC P0118 0118 2 × EC-80 TP SEN 2/CIRC P0122 0122 1 × EC-82 TP SEN 2/CIRC P0123 0123 1 × EC-82 HO2S1 (B1) P0132 0132 2 × EC-84 HO2S1 (B1) P0134 0134 2 × EC-86 HO2S2 (B1) P0138 0138 2 × EC-88 TP SEN 1/CIRC P0222 0222 1 × EC-90 TP SEN 1/CIRC P0223 0223 1 × EC-90 KNOCK SEN/CIRC-B1 P0327 0327 2 — EC-92 KNOCK SEN/CIRC-B1 P0328 0328 2 — EC-92 CKP SEN/CIRCUIT P0335 0335 2 × EC-93 CMP SEN/CIRC-B1 P0340 0340 2 × EC-95 ECM P0605 0605 1 or 2 × or — EC-97 ECM BACK UP/CIRCUIT P1065 1065 2 × EC-99 INT/V TIM V/CIR-B1 P1111 1111 2 × EC-100 ETC ACTR P1121 1121 1 × EC-101 ETC FUNCTION/CIRC P1122 1122 1 × EC-103 ETC MOT PWR P1124 1124 1 × EC-104 ETC MOT PWR P1126 1126 1 × EC-104 ETC MOT P1128 1128 1 × EC-106 ENG OVER TEMP P1217 1217 1 × EC-107 CTP LEARNING P1225 1225 2 — EC-111 CTP LEARNING P1226 1226 2 — EC-112 SENSOR POWER/CIRC P1229 1229 1 × EC-113 NATS MALFUNCTION P1610 - P1615 1610 - 1615 2 — BL-42 P-N POS SW/CIRCUIT P1706 1706 2 × EC-114 BRAKE SW/CIRCUIT P1805 1805 1 × EC-116 APP SEN 1/CIRC P2122 2122 1 × EC-117 APP SEN 1/CIRC P2123 2123 1 × EC-117 APP SEN 2/CIRC P2127 2127 1 × EC-119 APP SEN 2/CIRC P2128 2128 1 × EC-119 TP SENSOR P2135 2135 1 × EC-121 APP SENSOR P2138 2138 1 × EC-123 Items (CONSULT-II screen terms) DTC*1 Trip MIL Reference page CONSULT-II ECM*2
- 17. ON BOARD DIAGNOSTIC (OBD) SYSTEM EC-17 [HR] C D E F G H I J K L M A EC Revision: 2006 January C11 the DTC is stored in the ECM memory and the MIL lights up when the same malfunction occurs in two consec- utive trips. If a 1st trip DTC is stored and a non-diagnostic operation is performed between the 1st and 2nd trips, only the 1st trip DTC will continue to be stored. For malfunctions that blink or light up the MIL during the 1st trip, the DTC and 1st trip DTC are stored in the ECM memory. Procedures for clearing the DTC and the 1st trip DTC from the ECM memory are described in EC-17, "HOW TO ERASE EMISSION-RELATED DIAGNOSTIC INFORMATION" . When a 1st trip DTC is detected, check, print out or write down and erase (1st trip) DTC and Freeze Frame data as specified in Work Flow procedure Step 2, refer to EC-20, "WORK FLOW" . Then perform DTC Confir- mation Procedure or Overall Function Check to try to duplicate the malfunction. If the malfunction is dupli- cated, the item requires repair. How to Read DTC and 1st Trip DTC DTC and 1st trip DTC can be read by the following methods. With CONSULT-II CONSULT-II displays the DTC in “SELF-DIAG RESULTS” mode. Examples: P0117, P0340, P1217, etc. (CONSULT-II also displays the malfunctioning component or system.) Without CONSULT-II The number of blinks of the MIL in the Diagnostic Test Mode II (Self-Diagnostic Results) indicates the DTC. Example: 0117, 0340, 1217, etc. ● 1st trip DTC No. is the same as DTC No. ● Output of a DTC indicates a malfunction. However, the Diagnostic Test Mode II do not indicate whether the malfunction is still occurring or has occurred in the past and has returned to normal. CONSULT-II can identify malfunction status as shown below. Therefore, using CONSULT-II (if avail- able) is recommended. A sample of CONSULT-II display for DTC and 1st trip DTC is shown below. DTC or 1st trip DTC of a malfunc- tion is displayed in SELF-DIAGNOSTIC RESULTS mode of CONSULT-II. Time data indicates how many times the vehicle was driven after the last detection of a DTC. If the DTC is being detected currently, the time data will be [0]. If a 1st trip DTC is stored in the ECM, the time data will be [1t]. FREEZE FRAME DATA AND 1ST TRIP FREEZE FRAME DATA The ECM records the driving conditions such as fuel system status, calculated load value, engine coolant tem- perature, short term fuel trim, long term fuel trim, engine speed, vehicle speed, base fuel schedule and intake air temperature at the moment a malfunction is detected. Data which are stored in the ECM memory, along with the 1st trip DTC, are called 1st trip freeze frame data. The data, stored together with the DTC data, are called freeze frame data and displayed on CONSULT-II. Only one set of freeze frame data (either 1st trip freeze frame data or freeze frame data) can be stored in the ECM. 1st trip freeze frame data is stored in the ECM memory along with the 1st trip DTC. There is no priority for 1st trip freeze frame data and it is updated each time a different 1st trip DTC is detected. However, once freeze frame data (2nd trip detection/MIL ON) is stored in the ECM memory, 1st trip freeze frame data is no longer stored. Remember, only one set of freeze frame data can be stored in the ECM. Both 1st trip freeze frame data and freeze frame data (along with the DTCs) are cleared when the ECM mem- ory is erased. Procedures for clearing the ECM memory are described in EC-17, "HOW TO ERASE EMIS- SION-RELATED DIAGNOSTIC INFORMATION" . HOW TO ERASE EMISSION-RELATED DIAGNOSTIC INFORMATION How to Erase DTC WITH CONSULT-II PBIB0911E
- 18. EC-18 [HR] ON BOARD DIAGNOSTIC (OBD) SYSTEM Revision: 2006 January C11 The emission related diagnostic information in the ECM can be erased by selecting “ERASE” in the “SELF- DIAG RESULTS” mode with CONSULT-II. 1. If the ignition switch stays ON after repair work, be sure to turn ignition switch OFF once. Wait at least 10 seconds and then turn it ON (engine stopped) again. 2. Touch “ENGINE”. 3. Touch “SELF-DIAG RESULTS”. 4. Touch “ERASE”. (The DTC in the ECM will be erased.) Without CONSULT-II 1. If the ignition switch stays ON after repair work, be sure to turn ignition switch OFF once. 2. Wait at least 10 seconds and then turn it ON (engine stopped) again. 3. Change the diagnostic test mode from Mode II to Mode I by depressing the accelerator pedal. ● If the battery is disconnected, the emission-related diagnostic information will be lost within 24 hours. ● The following data are cleared when the ECM memory is erased. – Diagnostic trouble codes – 1st trip diagnostic trouble codes – Freeze frame data – 1st trip freeze frame data Actual work procedures are explained using a DTC as an example. Be careful so that not only the DTC, but all of the data listed above, are cleared from the ECM memory during work procedures. PBIB2454E
- 19. TROUBLE DIAGNOSIS EC-19 [HR] C D E F G H I J K L M A EC Revision: 2006 January C11 TROUBLE DIAGNOSIS PFP:00004 Trouble Diagnosis Introduction GBS001IU INTRODUCTION The engine has an ECM to control major systems such as fuel con- trol, ignition control, idle air control system, etc. The ECM accepts input signals from sensors and instantly drives actuators. It is essen- tial that both input and output signals are proper and stable. At the same time, it is important that there are no malfunctions such as vac- uum leaks, fouled spark plugs, or other malfunctions with the engine. It is much more difficult to diagnose an incident that occurs intermit- tently rather than continuously. Most intermittent incidents are caused by poor electric connections or improper wiring. In this case, careful checking of suspected circuits may help prevent the replace- ment of good parts. A visual check only may not find the cause of the incidents. A road test with CONSULT-II or a circuit tester connected should be per- formed. Follow the Work Flow on EC-20, "WORK FLOW" . Before undertaking actual checks, take a few minutes to talk with a customer who approaches with a driveability complaint. The cus- tomer can supply good information about such incidents, especially intermittent ones. Find out what symptoms are present and under what conditions they occur. A Diagnostic Worksheet like the example on EC-24, "Worksheet Sample" should be used. Start your diagnosis by looking for conventional malfunctions first. This will help troubleshoot driveability malfunctions on an electroni- cally controlled engine vehicle. MEF036D SEF233G SEF234G
- 20. EC-20 [HR] TROUBLE DIAGNOSIS Revision: 2006 January C11 WORK FLOW Overall Sequence PBIB3126E
- 21. TROUBLE DIAGNOSIS EC-21 [HR] C D E F G H I J K L M A EC Revision: 2006 January C11 Detailed Flow 1. GET INFORMATION FOR SYMPTOM Get the detailed information from the customer about the symptom (the condition and the environment when the incident/malfunction occurred) using the EC-23, "DIAGNOSTIC WORKSHEET" . >> GO TO 2. 2. CHECK DTC*1 1. Check DTC*1 . 2. Perform the following procedure if DTC*1 is displayed. – Record DTC*1 and freeze frame data*2 . (Print them out with CONSULT-II.) – Erase DTC*1 . (Refer to EC-17, "HOW TO ERASE EMISSION-RELATED DIAGNOSTIC INFORMATION" .) – Study the relationship between the cause detected by DTC*1 and the symptom described by the cus- tomer. (Symptom Matrix Chart is useful. Refer to EC-32, "Symptom Matrix Chart" .) 3. Check related service bulletins for information. Is any symptom described and any DTC detected? Symptom is described, DTC*1 is displayed>>GO TO 3. Symptom is described, DTC*1 is not displayed>>GO TO 4. Symptom is not described, DTC*1 is displayed>>GO TO 5. 3. CONFIRM THE SYMPTOM Try to confirm the symptom described by the customer (except MIL ON). DIAGNOSIS WORK SHEET is useful to verify the incident. Connect CONSULT-II to the vehicle in “DATA MONITOR (AUTO TRIG)” mode and check real time diagnosis results. Verify relation between the symptom and the condition when the symptom is detected. >> GO TO 5. 4. CONFIRM THE SYMPTOM Try to confirm the symptom described by the customer. DIAGNOSIS WORK SHEET is useful to verify the incident. Connect CONSULT-II to the vehicle in “DATA MONITOR (AUTO TRIG)” mode and check real time diagnosis results. Verify relation between the symptom and the condition when the symptom is detected. >> GO TO 6.
- 22. EC-22 [HR] TROUBLE DIAGNOSIS Revision: 2006 January C11 5. PERFORM DTC CONFIRMATION PROCEDURE Perform DTC Confirmation Procedure for the displayed DTC*1 , and then make sure that DTC*1 is detected again. At this time, always connect CONSULT-II to the vehicle, and check diagnostic results in real time on “DATA MONITOR (AUTO TRIG)”. If two or more DTCs*1 are detected, refer to EC-25, "DTC Inspection Priority Chart" and determine trouble diagnosis order. NOTE: ● Freeze frame data*2 is useful if the DTC*1 is not detected. ● Perform Overall Function Check if DTC Confirmation Procedure is not included on Service Manual. This simplified check procedure is an effective alternative though DTC*1 cannot be detected during this check. If the result of Overall Function Check is NG, it is the same as the detection of DTC*1 by DTC Confirma- tion Procedure. Is DTC*1 detected? Yes >> GO TO 10. No >> Check according to EC-67, "TROUBLE DIAGNOSIS FOR INTERMITTENT INCIDENT" . 6. PERFORM BASIC INSPECTION Perform EC-27, "Basic Inspection" . With CONSULT-II>>GO TO 7. Without CONSULT-II>>GO TO 9. 7. PERFORM DATA MONITOR (SPEC) MODE With CONSULT-II Make sure that “MAS A/F SE-B1”, “B/FUEL SCHDL”, and “A/F ALPHA-B1” are within the SP value using CONSULT-II “DATA MON- ITOR (SPEC)” mode. Refer to EC-57, "Inspection Procedure" . Are they within the SP value? Yes >> GO TO 9. No >> GO TO 8. 8. DETECT MALFUNCTIONING PART BY TROUBLE DIAGNOSIS - SPECIFICATION VALUE Detect malfunctioning part according to EC-58, "Diagnostic Procedure" . Is malfunctioning part detected? Yes >> GO TO 11. No >> GO TO 9. 9. DETECT MALFUNCTIONING SYSTEM BY SYMPTOM MATRIX CHART Detect malfunctioning system according to EC-32, "Symptom Matrix Chart" based on the confirmed symptom in step 4, and determine the trouble diagnosis order based on possible causes and symptom. >> GO TO 10. SEF601Z
- 23. TROUBLE DIAGNOSIS EC-23 [HR] C D E F G H I J K L M A EC Revision: 2006 January C11 10. DETECT MALFUNCTIONING PART Inspect the system. Is malfunctioning part detected? Yes >> GO TO 11. No >> Monitor input data from related sensors or check voltage of related ECM terminals using CON- SULT-II. Refer to EC-44, "ECM Terminals and Reference Value" , EC-52, "CONSULT-II Reference Value in Data Monitor" . 11. REPAIR OR REPLACE THE MALFUNCTIONING PART 1. Repair or replace the malfunctioning part. 2. Reconnect parts or connectors after repair and replacement. 3. Check DTC. If DTC is displayed, erase it, refer to EC-17, "HOW TO ERASE EMISSION-RELATED DIAG- NOSTIC INFORMATION" . >> GO TO 12. 12. FINAL CHECK When DTC was detected in step 2, perform DTC Confirmation Procedure or Overall Function Check again, and then make sure that the malfunction have been repaired securely. When symptom was described from the customer, refer to confirmed symptom in step 3 or 4, and make sure that the symptom is not detected. OK or NG NG (DTC*1 is detected)>>GO TO 10. NG (Symptom remains)>>GO TO 6. OK >> 1. Before returning the vehicle to the customer, make sure to erase unnecessary DTC*1 in ECM. (Refer to EC-17, "HOW TO ERASE EMISSION-RELATED DIAGNOSTIC INFORMATION" .) 2. INSPECTION END *1: Include 1st trip DTC. *2: Include 1st trip freeze frame data. DIAGNOSTIC WORKSHEET Description There are many operating conditions that lead to the malfunction of engine components. A good grasp of such conditions can make trou- bleshooting faster and more accurate. In general, each customer feels differently about a incident. It is important to fully understand the symptoms or conditions for a cus- tomer complaint. Utilize a diagnostic worksheet like the one on the next page in order to organize all the information for troubleshooting. SEF907L
- 24. EC-24 [HR] TROUBLE DIAGNOSIS Revision: 2006 January C11 Worksheet Sample MTBL0017
- 25. TROUBLE DIAGNOSIS EC-25 [HR] C D E F G H I J K L M A EC Revision: 2006 January C11 DTC Inspection Priority Chart GBS001IV If some DTCs are displayed at the same time, perform inspections one by one based on the following priority chart. NOTE: ● If DTC U1000 or U1001 is displayed with other DTC, first perform the trouble diagnosis for DTC U1000, U1001. Refer to EC-73, "DTC U1000, U1001 CAN COMMUNICATION LINE" . ● If DTC U1010 is displayed with other DTC, first perform the trouble diagnosis for DTC U1010. Refer to EC-74, "DTC U1010 CAN COMMUNICATION" . Priority Detected items (DTC) 1 ● U1000 U1001 CAN communication line ● U1010 CAN communication ● P0102 P0103 Mass air flow sensor ● P0117 P0118 Engine coolant temperature sensor ● P0122 P0123 P0222 P0223 P1225 P1226 P2135 Throttle position sensor ● P0327 P0328 Knock sensor ● P0335 Crankshaft position sensor (POS) ● P0340 Camshaft position sensor (PHASE) ● P0605 ECM ● P1229 Sensor power supply ● P1610 - P1615 NATS ● P1706 Park/Neutral position (PNP) switch ● P2122 P2123 P2127 P2128 P2138 Accelerator pedal position sensor 2 ● P0132 P0134 Heated oxygen sensor 1 ● P0138 Heated oxygen sensor 2 ● P1065 ECM ● P1111 Intake valve timing control solenoid valve ● P1122 Electric throttle control function ● P1124 P1126 Throttle control motor relay ● P1128 Throttle control motor ● P1217 Engine over temperature (OVERHEAT) ● P1805 Brake switch 3 ● P0011 Intake valve timing control ● P1121 Electric throttle control actuator
- 26. EC-26 [HR] TROUBLE DIAGNOSIS Revision: 2006 January C11 Fail-Safe Chart GBS001IW When the DTC listed below is detected, the ECM enters fail-safe mode and the MIL lights up. ● When there is an open circuit on MIL circuit, the ECM cannot warn the driver by lighting up MIL when there is malfunction on engine control system. Therefore, when electrical controlled throttle and part of ECM related diagnoses are continuously detected as NG for 5 trips, ECM warns the driver that engine control system malfunctions and MIL circuit is open by means of operating fail-safe function. The fail-safe function also operates when above diagnoses except MIL circuit are detected and demands the driver to repair the malfunction. DTC No. Detected items Engine operating condition in fail-safe mode P0102 P0103 Mass air flow sensor circuit Engine speed will not rise more than 2,400 rpm due to the fuel cut. P0122 P0123 P0222 P0223 P2135 Throttle position sensor The ECM controls the electric throttle control actuator in regulating the throttle opening in order for the idle position to be within +10 degrees. The ECM regulates the opening speed of the throttle valve to be slower than the nor- mal condition. So, the acceleration will be poor. P1121 Electric throttle control actu- ator (When electric throttle control actuator does not function properly due to the return spring malfunction:) ECM controls the electric throttle actuator by regulating the throttle opening around the idle position. The engine speed will not rise more than 2,000 rpm. (When throttle valve opening angle in fail-safe mode is not in specified range:) ECM controls the electric throttle control actuator by regulating the throttle opening to 20 degrees or less. (When ECM detects the throttle valve is stuck open:) While the vehicle is driving, it slows down gradually by fuel cut. After the vehicle stops, the engine stalls. The engine can restart in N or P (A/T), Neutral (M/T) position, and engine speed will not exceed 1,000 rpm or more. P1122 Electric throttle control func- tion ECM stops the electric throttle control actuator control, throttle valve is maintained at a fixed opening (approx. 5 degrees) by the return spring. P1124 P1126 Throttle control relay ECM stops the electric throttle control actuator control, throttle valve is maintained at a fixed opening (approx. 5 degrees) by the return spring. P1128 Throttle control motor ECM stops the electric throttle control actuator control, throttle valve is maintained at a fixed opening (approx. 5 degrees) by the return spring. P1229 Sensor power supply ECM stops the electric throttle control actuator control, throttle valve is maintained at a fixed opening (approx. 5 degrees) by the return spring. P1805 Brake switch ECM controls the electric throttle control actuator by regulating the throttle opening to a small range. Therefore, acceleration will be poor. Vehicle condition Driving condition When engine is idling Normal When accelerating Poor acceleration P2122 P2123 P2127 P2128 P2138 Accelerator pedal position sensor The ECM controls the electric throttle control actuator in regulating the throttle opening in order for the idle position to be within +10 degrees. The ECM regulates the opening speed of the throttle valve to be slower than the nor- mal condition. So, the acceleration will be poor. Engine operating condition in fail-safe mode Engine speed will not rise more than 2,500 rpm due to the fuel cut
- 27. TROUBLE DIAGNOSIS EC-27 [HR] C D E F G H I J K L M A EC Revision: 2006 January C11 Basic Inspection GBS001IO 1. INSPECTION START 1. Check service records for any recent repairs that may indicate a related malfunction, or a current need for scheduled maintenance. 2. Open engine hood and check the following: – Harness connectors for improper connections – Wiring harness for improper connections, pinches and cut – Vacuum hoses for splits, kinks and improper connections – Hoses and ducts for leaks – Air cleaner clogging – Gasket 3. Confirm that electrical or mechanical loads are not applied. – Headlamp switch is OFF. – Air conditioner switch is OFF. – Rear window defogger switch is OFF. – Steering wheel is in the straight-ahead position, etc. 4. Start engine and warm it up until engine coolant temperature indicator points the middle of gauge. Ensure engine stays below 1,000 rpm. 5. Run engine at about 2,000 rpm for about 2 minutes under no load. 6. Make sure that no DTC is displayed with CONSULT-II. OK or NG OK >> GO TO 3. NG >> GO TO 2. 2. REPAIR OR REPLACE Repair or replace components as necessary. >> GO TO 3 SEF983U SEF976U SEF977U
- 28. EC-28 [HR] TROUBLE DIAGNOSIS Revision: 2006 January C11 3. CHECK TARGET IDLE SPEED With CONSULT-II 1. Run engine at about 2,000 rpm for about 2 minutes under no load. 2. Rev engine (2,000 to 3,000 rpm) two or three times under no load, then run engine at idle speed for about 1 minute. 3. Read idle speed in “DATA MONITOR” mode with CONSULT-II. Without CONSULT-II 1. Run engine at about 2,000 rpm for about 2 minutes under no load. 2. Rev engine (2,000 to 3,000 rpm) two or three times under no load, then run engine at idle speed for about 1 minute. 3. Check idle speed. OK or NG OK >> GO TO 10. NG >> GO TO 4. 4. PERFORM ACCELERATOR PEDAL RELEASED POSITION LEARNING 1. Stop engine. 2. Perform Accelerator Pedal Released Position Learning. >> GO TO 5. 5. PERFORM THROTTLE VALVE CLOSED POSITION LEARNING Perform Throttle Valve Closed Position Learning. >> GO TO 6. PBIA8513J A/T: 700 ± 50 rpm (in P or N position) M/T: 650 ± 50 rpm (in Neutral position) SEF058Y A/T: 700 ± 50 rpm (in P or N position) M/T: 650 ± 50 rpm (in Neutral position)
- 29. TROUBLE DIAGNOSIS EC-29 [HR] C D E F G H I J K L M A EC Revision: 2006 January C11 6. PERFORM IDLE AIR VOLUME LEARNING Perform Idel Air Volume Learning. Is Idle Air Volume Learning carried out successfully? Yes or No Yes >> GO TO 7. No >> 1. Follow the instruction of Idle Air Volume Learning. 2. GO TO 4. 7. CHECK TARGET IDLE SPEED AGAIN With CONSULT-II 1. Start engine and warm it up to normal operating temperature. 2. Read idle speed in “DATA MONITOR” mode with CONSULT-II. Without CONSULT-II 1. Start engine and warm it up to normal operating temperature. 2. Check idle speed. OK or NG OK >> GO TO 10. NG >> GO TO 8. 8. DETECT MALFUNCTIONING PART Check the Following. ● Check camshaft position sensor (PHASE) and circuit. Refer to EC-95, "DTC P0340 CMP SENSOR (PHASE)" . ● Check crankshaft position sensor (POS) and circuit. Refer to EC-93, "DTC P0335 CKP SENSOR (POS)" . OK or NG OK >> GO TO 9. NG >> 1. Repair or replace. 2. GO TO 4. 9. CHECK ECM FUNCTION 1. Substitute another known-good ECM to check ECM function. (ECM may be the cause of an incident, but this is a rare case.) 2. Perform initialization of NATS system and registration of all NATS ignition key IDs. Refer to BL-42, "ECM Re-communicating Function" . >> GO TO 4. A/T: 700 ± 50 rpm (in P or N position) M/T: 650 ± 50 rpm (in Neutral position) A/T: 700 ± 50 rpm (in P or N position) M/T: 650 ± 50 rpm (in Neutral position) SEF174Y
- 30. EC-30 [HR] TROUBLE DIAGNOSIS Revision: 2006 January C11 10. CHECK IGNITION TIMING 1. Run engine at idle. 2. Check ignition timing with a timing light. – Timing indicator (1) OK or NG OK >> INSPECTION END NG >> GO TO 11. 11. PERFORM ACCELERATOR PEDAL RELEASED POSITION LEARNING 1. Stop engine. 2. Perform Accelerator Pedal Released Position Learning. >> GO TO 12. 12. PERFORM THROTTLE VALVE CLOSED POSITION LEARNING Perform Throttle Valve Closed Position Learning. >> GO TO 13. 13. PERFORM IDLE AIR VOLUME LEARNING Perform Idel Air Volume Learning. Is Idle Air Volume Learning carried out successfully? Yes or No Yes >> GO TO 14. No >> 1. Follow the instruction of Idle Air Volume Learning. 2. GO TO 4. 14. CHECK TARGET IDLE SPEED AGAIN With CONSULT-II 1. Start engine and warm it up to normal operating temperature. 2. Read idle speed in “DATA MONITOR” mode with CONSULT-II. Without CONSULT-II 1. Start engine and warm it up to normal operating temperature. 2. Check idle speed. OK or NG OK >> GO TO 15. NG >> GO TO 17. A/T: 6 ± 5° BTDC (in P or N position) M/T: 6 ± 5° BTDC (in Neutral position) PBIB2954E A/T: 700 ± 50 rpm (in P or N position) M/T: 650 ± 50 rpm (in Neutral position) A/T: 700 ± 50 rpm (in P or N position) M/T: 650 ± 50 rpm (in Neutral position) SEF174Y
- 31. TROUBLE DIAGNOSIS EC-31 [HR] C D E F G H I J K L M A EC Revision: 2006 January C11 15. CHECK IGNITION TIMING AGAIN 1. Run engine at idle. 2. Check ignition timing with a timing light. – Timing indicator (1) OK or NG OK >> INSPECTION END NG >> GO TO 16. 16. CHECK TIMING CHAIN INSTALLATION Check timing chain installation. Refer to EM-18, "TIMING CHAIN" . OK or NG OK >> GO TO 17. NG >> 1. Repair the timing chain installation. 2. GO TO 4. 17. DETECT MALFUNCTIONING PART Check the following. ● Check camshaft position sensor (PHASE) and circuit. Refer to EC-95, "DTC P0340 CMP SENSOR (PHASE)" . ● Check crankshaft position sensor (POS) and circuit. Refer to EC-93, "DTC P0335 CKP SENSOR (POS)" . OK or NG OK >> GO TO 18. NG >> 1. Repair or replace. 2. GO TO 4. 18. CHECK ECM FUNCTION 1. Substitute another known-good ECM to check ECM function. (ECM may be the cause of an incident, but this is a rare case.) 2. Perform initialization of NATS system and registration of all NATS ignition key IDs. Refer to BL-42, "ECM Re-communicating Function" . >> GO TO 4. A/T: 6 ± 5° BTDC (in P or N position) M/T: 6 ± 5° BTDC (in Neutral position) PBIB2954E
- 32. EC-32 [HR] TROUBLE DIAGNOSIS Revision: 2006 January C11 Symptom Matrix Chart GBS001IX SYSTEM — BASIC ENGINE CONTROL SYSTEM 1 - 6: The numbers refer to the order of inspection. (continued on next page) SYMPTOM HARD/NO START/RESTART (EXCP. HA) ENGINE STALL HESITATION/SURGING/FLAT SPOT SPARK KNOCK/DETONATION LACK OF POWER/POOR ACCELERATION HIGH IDLE/LOW IDLE ROUGH IDLE/HUNTING IDLING VIBRATION SLOW/NO RETURN TO IDLE OVERHEATS/WATER TEMPERATURE HIGH EXCESSIVE FUEL CONSUMPTION EXCESSIVE OIL CONSUMPTION BATTERY DEAD (UNDER CHARGE) Warranty symptom code AA AB AC AD AE AF AG AH AJ AK AL AM HA Fuel Fuel pump circuit 1 1 2 3 2 2 2 3 2 Fuel pressure regulator system 3 3 4 4 4 4 4 4 4 4 Fuel injector circuit 1 1 2 3 2 2 2 2 Evaporative emission system 3 3 4 4 4 4 4 4 4 4 Air Positive crankcase ventilation system 3 3 4 4 4 4 4 4 4 4 1 Incorrect idle speed adjustment 1 1 1 1 1 Electric throttle control actuator 1 1 2 3 3 2 2 2 2 2 2 Ignition Incorrect ignition timing adjustment 3 3 1 1 1 1 1 1 Ignition circuit 1 1 2 2 2 2 2 2 Main power supply and ground circuit 2 2 3 3 3 3 3 2 3 Mass air flow sensor circuit 1 1 2 2 2 2 2 2 Engine coolant temperature sensor circuit 3 3 3 Heated oxygen sensor 1 circuit Throttle position sensor circuit 2 2 Accelerator pedal position sensor circuit 3 2 1 Knock sensor circuit 2 3 Crankshaft position sensor (POS) circuit 2 2 Camshaft position sensor (PHASE) circuit 3 2 Vehicle speed signal circuit 2 3 3 3 ECM 2 2 3 3 3 3 3 3 3 3 3 Intake valve timing control solenoid valve circuit 3 2 1 3 2 2 3 3 PNP switch circuit 3 3 3 3 3 Refrigerant pressure sensor circuit 2 3 3 4 Electrical load signal circuit 3 Air conditioner circuit 2 2 3 3 3 3 3 3 3 3 2 ABS actuator and electric unit (control unit) 4
- 33. TROUBLE DIAGNOSIS EC-33 [HR] C D E F G H I J K L M A EC Revision: 2006 January C11 SYSTEM — ENGINE MECHANICAL & OTHER SYMPTOM HARD/NO START/RESTART (EXCP. HA) ENGINE STALL HESITATION/SURGING/FLAT SPOT SPARK KNOCK/DETONATION LACK OF POWER/POOR ACCELERATION HIGH IDLE/LOW IDLE ROUGH IDLE/HUNTING IDLING VIBRATION SLOW/NO RETURN TO IDLE OVERHEATS/WATER TEMPERATURE HIGH EXCESSIVE FUEL CONSUMPTION EXCESSIVE OIL CONSUMPTION BATTERY DEAD (UNDER CHARGE) Warranty symptom code AA AB AC AD AE AF AG AH AJ AK AL AM HA Fuel Fuel tank 5 5 Fuel piping 5 5 5 5 5 5 Vapor lock Valve deposit 5 5 5 5 5 5 5 Poor fuel (Heavy weight gasoline, Low octane) Air Air duct 5 5 5 5 5 5 Air cleaner Air leakage from air duct (Mass air flow sensor — electric throttle control actuator) 5 5 5 5 Electric throttle control actuator Air leakage from intake manifold/Collector/ Gasket Cranking Battery 1 1 1 1 1 1 1 1 Generator circuit Starter circuit 3 Signal plate 6 PNP switch 4 Engine Cylinder head 5 5 5 5 5 5 5 5 Cylinder head gasket 4 3 Cylinder block 6 6 6 6 6 6 6 6 4 Piston Piston ring Connecting rod Bearing Crankshaft Valve mecha- nism Timing chain 5 5 5 5 5 5 5 5 Camshaft Intake valve timing control Intake valve 3 Exhaust valve
- 34. EC-34 [HR] TROUBLE DIAGNOSIS Revision: 2006 January C11 1 - 6: The numbers refer to the order of inspection. Exhaust Exhaust manifold/Tube/Muffler/Gasket 5 5 5 5 5 5 5 5 Three way catalyst Lubrication Oil pan/Oil strainer/Oil pump/Oil filter/Oil gallery 5 5 5 5 5 5 5 5 Oil level (Low)/Filthy oil Cooling Radiator/Hose/Radiator filler cap 5 5 5 5 5 5 5 4 5 Thermostat 5 Water pump Water gallery Cooling fan 5 Coolant level (Low)/Contaminated coolant NATS (Nissan Anti-Theft System) 1 1 SYMPTOM HARD/NO START/RESTART (EXCP. HA) ENGINE STALL HESITATION/SURGING/FLAT SPOT SPARK KNOCK/DETONATION LACK OF POWER/POOR ACCELERATION HIGH IDLE/LOW IDLE ROUGH IDLE/HUNTING IDLING VIBRATION SLOW/NO RETURN TO IDLE OVERHEATS/WATER TEMPERATURE HIGH EXCESSIVE FUEL CONSUMPTION EXCESSIVE OIL CONSUMPTION BATTERY DEAD (UNDER CHARGE) Warranty symptom code AA AB AC AD AE AF AG AH AJ AK AL AM HA
- 35. TROUBLE DIAGNOSIS EC-35 [HR] C D E F G H I J K L M A EC Revision: 2006 January C11 Engine Control Component Parts Location GBS001IY 1. Ignition coil (with power transistor) and spark plug 2. Intake valve timing control solenoid valve 3. Refrigerant pressure sensor 4. Knock sensor 5. Fuel injector 6. Cooling fan motor 7. Camshaft position sensor (PHASE) 8. IPDM E/R 9. ECM 10. Mass air flow sensor (with intake air temperature sensor) 11. Engine coolant temperature sensor 12. Electric throttle control actuator (with built-in throttle position sensor, throttle control motor) 13. EVAP canister purge volume control solenoid valve PBIB2939E
- 36. EC-36 [HR] TROUBLE DIAGNOSIS Revision: 2006 January C11 : Vehicle front 1. Mass air flow sensor (with intake air temperature sensor) 2. Engine coolant temperature sensor 3. Electric throttle control actuator 4. Camshaft position sensor (PHASE) 5. Ignition coil (with power transistor) 6. Fuel injector 7. EVAP canister purge volume control solenoid valve PBIB2940E
- 37. TROUBLE DIAGNOSIS EC-37 [HR] C D E F G H I J K L M A EC Revision: 2006 January C11 : Vehicle front 1. ECM harness connectors 2. ECM 3. IPDM E/R 4. Fuel pump fuse (15A) 5. Intake valve timing control solenoid valve 6. Knock sensor 7. Refrigerant pressure sensor 8. PCV valve PBIB2941E
- 38. EC-38 [HR] TROUBLE DIAGNOSIS Revision: 2006 January C11 PBIB2942E : Vehicle front 1. Exhaust manifold 2. Heated oxygen sensor 1 3. Heated oxygen sensor 2 4. Heated oxygen sensor 2 harness connector PBIB2943E
- 39. TROUBLE DIAGNOSIS EC-39 [HR] C D E F G H I J K L M A EC Revision: 2006 January C11 1. Cooling fan motor 2. Crankshaft position sensor (POS) 3. Stop lamp switch 4. Brake pedal 5. Accelerator pedal position sensor harness connector 6. Accelerator pedal position sensor 7. Accelerator pedal 8. Fuel level sensor unit and fuel pump harness connector 9. Fuel pressure regulator 10. Fuel pump PBIB2944E
- 40. EC-40 [HR] TROUBLE DIAGNOSIS Revision: 2006 January C11 Vacuum Hose Drawing GBS001IZ Refer to EC-14, "System Diagram" for Vacuum Control System. : Vehicle front : To EVAP canister 1. Intake manifold 2. EVAP canister purge volume control solenoid valve 3. EVAP purge resonator NOTE: Do not use soapy water or any type of solvent while installing vacuum hoses or purge hoses. PBIB2946E
- 41. TROUBLE DIAGNOSIS EC-41 [HR] C D E F G H I J K L M A EC Revision: 2006 January C11 Wiring Diagram — ECM — GBS001J0 TBWB1171E
- 42. EC-42 [HR] TROUBLE DIAGNOSIS Revision: 2006 January C11 TBWB0984E
- 43. TROUBLE DIAGNOSIS EC-43 [HR] C D E F G H I J K L M A EC Revision: 2006 January C11 TBWB0985E
- 44. EC-44 [HR] TROUBLE DIAGNOSIS Revision: 2006 January C11 ECM Harness Connector Terminal Layout GBS001J1 ECM Terminals and Reference Value GBS001J2 PREPARATION 1. ECM (1) is located in the engine room left side near battery. ● : Vehicle front 2. Disconnect ECM harness connector. ● When disconnecting ECM harness connector, loosen (A) it with levers (1) as far as they will go as shown in the figure. – ECM (2) – Fasten (B) 3. Connect a break-out box (SST) and Y-cable adapter (SST) between the ECM and ECM harness connector. ● Use extreme care not to touch 2 pins at one time. ● Data is for comparison and may not be exact. ECM INSPECTION TABLE Specification data are reference values and are measured between each terminal and ground. Pulse signal is measured by CONSULT-II. CAUTION: Do not use ECM ground terminals when measuring input/output voltage. Doing so may result in dam- age to the ECMs transistor. Use a ground other than ECM terminals, such as the ground. PBIA9221J PBIB2959E PBIB2947E TERMI- NAL NO. WIRE COLOR ITEM CONDITION DATA (DC Voltage) 1 L Throttle control motor (Open) [Ignition switch: ON] ● Engine stopped ● Shift lever: D (A/T), 1st (M/T) ● Accelerator pedal: Fully depressed Approximately 3.2V 2 SB Throttle control motor power supply [Ignition switch: ON] BATTERY VOLTAGE (11 - 14V) PBIA8150J
- 45. TROUBLE DIAGNOSIS EC-45 [HR] C D E F G H I J K L M A EC Revision: 2006 January C11 3 G Heated oxygen sensor 1 heater [Engine is running] ● Warm-up condition ● Engine speed: Below 3,600 rpm. Approximately 10V [Ignition switch: ON] ● Engine stopped [Engine is running] ● Engine speed: Above 3,600 rpm. BATTERY VOLTAGE (11 - 14V) 4 P Throttle control motor (Close) [Ignition switch: ON] ● Engine stopped ● Shift lever: D (A/T), 1st (M/T) ● Accelerator pedal: Fully released Approximately 1.8V 5 G Heated oxygen sensor 2 heater [Engine is running] ● Below 3,600 rpm after the following con- ditions are met. – Engine: After warming up – Keeping the engine speed between 3,500 and 4,000 rpm for 1 minute and at idle for 1 minute under no load Approximately 10V [Ignition switch: ON] ● Engine stopped [Engine is running] ● Engine speed: Above 3,600 rpm. BATTERY VOLTAGE (11 - 14V) 9 P EVAP canister purge vol- ume control solenoid valve [Engine is running] ● Idle speed BATTERY VOLTAGE (11 - 14V) [Engine is running] ● Engine speed: About 2,000 rpm (More than 100 seconds after starting engine) NOTE: Voltage and Duty percent may vary. Approximately 10V 10 11 B B ECM ground [Engine is running] ● Idle speed Body ground TERMI- NAL NO. WIRE COLOR ITEM CONDITION DATA (DC Voltage) PBIA8148J PBIA8149J PBIA8148J PBIB0050E PBIB0520E
- 46. EC-46 [HR] TROUBLE DIAGNOSIS Revision: 2006 January C11 13 L Tachometer signal [Engine is running] ● Warm-up condition ● Idle speed NOTE: The pulse cycle changes depending on rpm at idle. 3 - 5V [Engine is running] ● Warm-up condition ● Engine speed is 2,000 rpm. 3 - 5V 15 Y Throttle control motor relay [Ignition switch: OFF] BATTERY VOLTAGE (11 - 14V) [Ignition switch: ON] 0 - 1.0V 17 18 21 22 R LG G SB Ignition signal No. 1 Ignition signal No. 2 Ignition signal No. 4 Ignition signal No. 3 [Engine is running] ● Warm-up condition ● Idle speed NOTE: The pulse cycle changes depending on rpm at idle. 0 - 0.3V [Engine is running] ● Warm-up condition ● Engine speed is 2,500 rpm. 0.2 - 0.5V 23 GR Fuel pump relay [Ignition switch: ON] ● For 1 second after turning ignition switch ON [Engine is running] 0 - 1.0V [Ignition switch: ON] ● More than 1 second after turning ignition switch ON BATTERY VOLTAGE (11 - 14V) TERMI- NAL NO. WIRE COLOR ITEM CONDITION DATA (DC Voltage) PBIA8164J PBIA8165J PBIA9265J PBIA9266J
- 47. TROUBLE DIAGNOSIS EC-47 [HR] C D E F G H I J K L M A EC Revision: 2006 January C11 25 29 30 31 V Y O L Fuel injector No. 4 Fuel injector No. 3 Fuel injector No. 2 Fuel injector No. 1 [Engine is running] ● Warm-up condition ● Idle speed NOTE: The pulse cycle changes depending on rpm at idle. BATTERY VOLTAGE (11 - 14V) [Engine is running] ● Warm-up condition ● Engine speed is 2,000 rpm BATTERY VOLTAGE (11 - 14V) 32 P ECM relay (Self shut-off) [Engine is running] [Ignition switch: OFF] ● For a few seconds after turning ignition switch OFF 0 - 1.0V [Ignition switch: OFF] ● More than a few seconds after turning ignition switch OFF BATTERY VOLTAGE (11 - 14V) 33 LG Throttle position sensor 1 [Ignition switch: ON] ● Engine stopped ● Shift lever: D (A/T), 1st (M/T) ● Accelerator pedal: Fully released More than 0.36V [Ignition switch: ON] ● Engine stopped ● Shift lever: D (A/T), 1st (M/T) ● Accelerator pedal: Fully depressed Less than 4.75V 34 O Throttle position sensor 2 [Ignition switch: ON] ● Engine stopped ● Shift lever: D (A/T), 1st (M/T) ● Accelerator pedal: Fully released Less than 4.75V [Ignition switch: ON] ● Engine stopped ● Shift lever: D (A/T), 1st (M/T) ● Accelerator pedal: Fully depressed More than 0.36V 36 Y Sensor ground (Throttle position sensor) [Engine is running] ● Warm-up condition ● Idle speed Approximately 0V 37 W Knock sensor [Engine is running] ● Idle speed Approximately 2.5V 38 P Engine coolant temperature sensor [Engine is running] Approximately 0 - 4.8V Output voltage varies with engine coolant temperature. TERMI- NAL NO. WIRE COLOR ITEM CONDITION DATA (DC Voltage) PBIB0529E PBIA4943J
- 48. EC-48 [HR] TROUBLE DIAGNOSIS Revision: 2006 January C11 40 — Sensor ground (Knock sensor) [Engine is running] ● Warm-up condition ● Idle speed Approximately 0V 41 GR Refrigerant pressure sensor [Engine is running] ● Warm-up condition ● Both A/C switch and blower switch are ON (Compressor operates.) 1.0 - 4.0V 44 B Sensor ground (Engine coolant temperature sensor) [Engine is running] ● Warm-up condition ● Idle speed Approximately 0V 45 G Mass air flow sensor [Ignition switch: ON] ● Engine stopped Approximately 0.4V [Engine is running] ● Warm-up condition ● Idle speed 1.0 - 1.3V [Engine is running] ● Warm-up condition ● Engine is revving from idle to about 4,000 rpm 1.0 - 1.3 to Approximately 2.4V (Check for linear voltage rise in response to engine being increased to about 4,000 rpm.) 46 V Intake air temperature sensor [Engine is running] Approximately 0 - 4.8V Output voltage varies with intake air temperature. 48 BR Sensor ground (Refrigerant pressure sen- sor) [Engine is running] ● Warm-up condition ● Idle speed Approximately 0V 49 SB Heated oxygen sensor 1 [Engine is running] ● Warm-up condition ● Engine speed is 2,000 rpm 0 - Approximately 1.0V (Periodically change) 50 W Heated oxygen sensor 2 [Engine is running] ● Revving engine from idle to 3,000 rpm quickly after the following conditions are met. – Engine: After warming up – Keeping the engine speed between 3,500 and 4,000 rpm for 1 minute and at idle for 1 minute under no load 0 - Approximately 1.0V 52 LG Sensor ground (Mass air flow sensor) [Engine is running] ● Warm-up condition ● Idle speed Approximately 0V 55 O Sensor ground (Intake air temperature sen- sor) [Engine is running] ● Warm-up condition ● Idle speed Approximately 0V 56 P Sensor ground (Heated oxygen sensor 1) [Engine is running] ● Warm-up condition ● Idle speed Approximately 0V 59 O Sensor ground (Heated oxygen sensor 2) [Engine is running] ● Warm-up condition ● Idle speed Approximately 0V TERMI- NAL NO. WIRE COLOR ITEM CONDITION DATA (DC Voltage)
- 49. TROUBLE DIAGNOSIS EC-49 [HR] C D E F G H I J K L M A EC Revision: 2006 January C11 61 W Crankshaft position sensor (POS) [Engine is running] ● Warm-up condition ● Idle speed NOTE: The pulse cycle changes depending on rpm at idle. Approximately 4.0V [Engine is running] ● Engine speed is 2,000 rpm Approximately 4.0V 62 R Sensor ground [Crankshaft position sensor (POS)] [Engine is running] ● Warm-up condition ● Idle speed Approximately 0V 63 BR Sensor ground [Camshaft position sensor (PHASE)] [Engine is running] ● Warm-up condition ● Idle speed Approximately 0V 65 G Camshaft position sensor (PHASE) [Engine is running] ● Warm-up condition ● Idle speed NOTE: The pulse cycle changes depending on rpm at idle. 1.0 - 2.0V [Engine is running] ● Engine speed is 2,000 rpm. 1.0 - 2.0V 69 L Park/Neutral position (PNP) switch [Ignition switch: ON] ● Shift lever: P or N (A/T models) ● Shift lever: Neutral (M/T models) BATTERY VOLTAGE (11 - 14V) [Ignition switch: ON] ● Except above position Approximately 0V 72 V Sensor power supply (Throttle position sensor) [Ignition switch: ON] Approximately 5V TERMI- NAL NO. WIRE COLOR ITEM CONDITION DATA (DC Voltage) PBIB2998E PBIB2999E PBIB2986E PBIB2987E
- 50. EC-50 [HR] TROUBLE DIAGNOSIS Revision: 2006 January C11 73 P Intake valve timing control solenoid valve [Engine is running] ● Warm-up condition ● Idle speed BATTERY VOLTAGE (11 - 14V) [Engine is running] ● Warm-up condition ● Engine speed: 2,000 rpm 7 - 10V 74 W Sensor power supply (Refrigerant pressure sensor) [Ignition switch: ON] Approximately 5V 75 BR Sensor power supply [Crankshaft position sensor (POS)] [Ignition switch: ON] Approximately 5V 78 O Sensor power supply [Camshaft position sensor (PHASE)] [Ignition switch: ON] Approximately 5V 83 P CAN communication line [Ignition switch: ON] Approximately 1.7 - 2.3V 84 L CAN communication line [Ignition switch: ON] Approximately 2.6 - 3.2V 88 LG DATA link connector [Ignition switch: ON] ● CONSULT-II or GST is disconnected. Approximately 10.5V 92 G Clutch switch [Ignition switch: OFF] ● Clutch pedal: Fully released Approximately 0V [Ignition switch: OFF] ● Clutch pedal: Slightly depressed BATTERY VOLTAGE (11 - 14V) 93 O Ignition switch [Ignition switch: OFF] 0V [Ignition switch: ON] BATTERY VOLTAGE (11 - 14V) 99 R Stop lamp switch [Ignition switch: OFF] ● Brake pedal: Fully released Approximately 0V [Ignition switch: OFF] ● Brake pedal: Slightly depressed BATTERY VOLTAGE (11 - 14V) 102 SB Sensor power supply (Accelerator pedal position sensor 2) [Ignition switch: ON] Approximately 5V 103 GR Accelerator pedal position sensor 2 [Ignition switch: ON] ● Engine stopped ● Accelerator pedal: Fully released 0.3 - 0.6V [Ignition switch: ON] ● Engine stopped ● Accelerator pedal: Fully depressed 1.95 - 2.4V 104 Y Sensor ground (Accelerator pedal position sensor 2) [Engine is running] ● Warm-up condition ● Idle speed Approximately 0V 105 G Power supply for ECM [Ignition switch: ON] BATTERY VOLTAGE (11 - 14V) TERMI- NAL NO. WIRE COLOR ITEM CONDITION DATA (DC Voltage) PBIA4937J
- 51. TROUBLE DIAGNOSIS EC-51 [HR] C D E F G H I J K L M A EC Revision: 2006 January C11 : Average voltage for pulse signal (Actual pulse signal can be confirmed by oscilloscope.) 106 P Sensor power supply (Accelerator pedal position sensor 1) [Ignition switch: ON] Approximately 5V 108 B ECM ground [Engine is running] ● Idle speed Body ground 110 G Accelerator pedal position sensor 1 [Ignition switch: ON] ● Engine stopped ● Accelerator pedal: Fully released 0.6 - 0.9V [Ignition switch: ON] ● Engine stopped ● Accelerator pedal: Fully depressed 3.9 - 4.7V 111 R Sensor ground (Accelerator pedal position sensor 1) [Engine is running] ● Warm-up condition ● Idle speed Approximately 0V TERMI- NAL NO. WIRE COLOR ITEM CONDITION DATA (DC Voltage)
- 52. EC-52 [HR] TROUBLE DIAGNOSIS Revision: 2006 January C11 CONSULT-II Reference Value in Data Monitor GBS001J4 Remarks: ● Specification data are reference values. ● Specification data are output/input values which are detected or supplied by the ECM at the connector. * Specification data may not be directly related to their components signals/values/operations. i.e. Adjust ignition timing with a timing light before monitoring IGN TIMING, because the monitor may show the specification data in spite of the ignition timing not being adjusted to the specification data. This IGN TIMING monitors the data calculated by the ECM according to the signals input from the camshaft position sensor and other ignition timing related sensors. MONITOR ITEM CONDITION SPECIFICATION ENG SPEED ● Run engine and compare CONSULT-II value with the tachometer indica- tion. Almost the same speed as the tachometer indication. MAS A/F SE-B1 See EC-57, "TROUBLE DIAGNOSIS - SPECIFICATION VALUE" . B/FUEL SCHDL See EC-57, "TROUBLE DIAGNOSIS - SPECIFICATION VALUE" . A/F ALPHA-B1 See EC-57, "TROUBLE DIAGNOSIS - SPECIFICATION VALUE" . COOLAN TEMP/S ● Engine: After warming up More than 70°C (158°F) HO2S1 (B1) ● Engine: After warming up Maintaining engine speed at 2,000 rpm 0 - 0.3V ←→ Approx. 0.6 - 1.0V HO2S2 (B1) ● Revving engine from idle to 3,000 rpm quickly after the following conditions are met. – Engine: After warming up – Keeping the engine speed between 3,500 and 4,000 rpm for 1 minute and at idle for 1 minute under no load 0 - 0.3V ←→ Approx. 0.6 - 1.0V HO2S1 MNTR (B1) ● Engine: After warming up Maintaining engine speed at 2,000 rpm LEAN ←→ RICH Changes more than 5 times during 10 seconds. HO2S2 MNTR (B1) ● Revving engine from idle to 3,000 rpm quickly after the following conditions are met. – Engine: After warming up – Keeping the engine speed between 3,500 and 4,000 rpm for 1 minute and at idle for 1 minute under no load LEAN ←→ RICH VHCL SPEED SE ● Turn drive wheels and compare CONSULT-II value with the speedometer indication. Almost the same speed as the speedometer indication. BATTERY VOLT ● Ignition switch: ON (Engine stopped) 11 - 14V ACCEL SEN 1 ● Ignition switch: ON (Engine stopped) Accelerator pedal: Fully released 0.6 - 0.9V Accelerator pedal: Fully depressed 4.0 - 4.8V ACCEL SEN 2* ● Ignition switch: ON (Engine stopped) Accelerator pedal: Fully released 0.6 - 0.9V Accelerator pedal: Fully depressed 3.9 - 4.8V THRTL SEN 1 THRTL SEN 2* ● Ignition switch: ON (Engine stopped) Accelerator pedal: Fully released More than 0.36V ● Shift lever: D (A/T), 1st (M/T) Accelerator pedal: Fully depressed Less than 4.75V START SIGNAL ● Ignition switch: ON → START → ON OFF → ON → OFF CLSD THL POS ● Ignition switch: ON Accelerator pedal: Fully released ON Accelerator pedal: Slightly depressed OFF AIR COND SIG ● Engine: After warming up, idle the engine Air conditioner switch: OFF OFF Air conditioner switch: ON (Compressor operates.) ON P/N POSI SW ● Ignition switch: ON Shift lever: P or N (A/T), Neutral (M/T) ON Shift lever: Except above OFF PW/ST SIGNAL ● Engine: After warming up, idle the engine Steering wheel: Not turned. OFF Steering wheel: Turned. ON
- 53. TROUBLE DIAGNOSIS EC-53 [HR] C D E F G H I J K L M A EC Revision: 2006 January C11 LOAD SIGNAL ● Ignition switch: ON Rear window defogger switch: ON and/or Lighting switch: 2nd ON Rear window defogger switch and lighting switch: OFF OFF IGNITION SW ● Ignition switch: ON → OFF → ON ON → OFF → ON HEATER FAN SW ● Ignition switch: ON Heater fan: Operating. ON Heater fan: Not operating OFF BRAKE SW ● Ignition switch: ON Brake pedal: Fully released OFF Brake pedal: Slightly depressed ON INJ PULSE-B1 ● Engine: After warming up ● Air conditioner switch: OFF ● Shift lever: P or N (A/T), Neutral (M/T) ● No load Idle 2.0 - 3.0 msec 2,000 rpm 1.9 - 2.9 msec IGN TIMING ● Engine: After warming up ● Air conditioner switch: OFF ● Shift lever: P or N (A/T), Neutral (M/T) ● No load Idle 1° - 11° BTDC 2,000 rpm 25° - 45° BTDC PURG VOL C/V ● Engine: After warming up ● Air conditioner switch: OFF ● Shift lever: P or N (A/T), Neutral (M/T) ● No load Idle 0% 2,000 rpm 0 - 50% INT/V TIM (B1) ● Engine: After warming up ● Air conditioner switch: OFF ● Shift lever: P or N (A/T), Neutral (M/T) ● No load Idle −5° - 5°CA 2,500 rpm Approx. 0° - 40°CA INT/V SOL (B1) ● Engine: After warming up ● Air conditioner switch: OFF ● Shift lever: P or N (A/T), Neutral (M/T) ● No load Idle 0% - 2% 2,500 rpm Approx. 0% - 90% AIR COND RLY ● Engine: After warming up, idle the engine Air conditioner switch: OFF OFF Air conditioner switch: ON (Compressor operates) ON FUEL PUMP RLY ● For 1 second after turning ignition switch ON ● Engine running or cranking ON ● Except above conditions OFF THRTL RELAY ● Ignition switch: ON ON COOLING FAN ● Engine: After warming up, idle the engine ● Air conditioner switch: OFF Engine coolant temperature is 94°C (201°F) or less OFF Engine coolant temperature is between 95°C (203°F) and 99°C (210°F) LOW Engine coolant temperature is 100°C (212°F) or more HIGH MONITOR ITEM CONDITION SPECIFICATION