SlideShare a Scribd company logo
1 of 29
Download to read offline
Product: TRACK-TYPE TRACTOR
Model: D6M TRACK-TYPE TRACTOR 6LR
Configuration: D6M Track-Type Tractor XL Power Shift 6LR00001-UP (MACHINE) POWERED BY 3116 Engine
Disassembly and Assembly
D6M Track-Type Tractor Power Train
Media Number -SENR8387-06 Publication Date -01/11/2010 Date Updated -31/07/2018
i04026196
Final Drive - Disassemble
SMCS - 4050-015
Disassembly Procedure
Table 1
Required Tools
Tool Part Number Part Description Qty
A 138-7573 Link Bracket 3
B 1P-0510 Driver Group 1
C
1P-0520 Driver Group 1
4C-4865 Hand Hydraulic Pump 1
FT-1934 Beam 1
6V-3160 Hydraulic Cylinder 1
5F-7353 Washer 4
- Bolt (20 mm by 200 mm) 4
D 138-7574 Link Bracket 3
Start By:
a. Remove the final drives. Refer to Disassembly and Assembly, "Final Drive - Remove".
Note: Cleanliness is an important factor. Before the disassembly procedure, the exterior of
the component should be thoroughly cleaned. This will help to prevent dirt from entering
the internal mechanism. Dirt and contaminants can damage the precision components. All
Disassembly and Assembly procedures must be performed on a clean work surface. Clean
1/5
D6M Track-Type Tractor XL Power Shift 6LR00001-UP (MACHINE) POWERED B...
2021/12/4
https://127.0.0.1/sisweb/sisweb/techdoc/techdoc_print_page.jsp?returnurl=/sis...
all the interior components in clean solvent. Dry all the interior components with
compressed air. Plug ports and plug hoses on the machine during repair.
Illustration 1 g02210755
1. Remove the bolts that hold carrier (1) to the hub.
2. Attach a suitable lifting device and Tooling (A) to carrier (1). Remove the carrier. The
weight of the carrier is approximately 98 kg (215 lb). Remove the O-ring seal from the
carrier.
Illustration 2 g00743498
3. Remove bolts (2) and retainers (3).
2/5
D6M Track-Type Tractor XL Power Shift 6LR00001-UP (MACHINE) POWERED B...
2021/12/4
https://127.0.0.1/sisweb/sisweb/techdoc/techdoc_print_page.jsp?returnurl=/sis...
Illustration 3 g00743501
Illustration 4 g00743502
4. Use a suitable press and Tooling (B) in order to push shafts (4) out of carrier (1).
5. Remove gear (7) and bearing cones (5) and (8) from the carrier.
6. If necessary, remove bearing cups (6) from gear (7).
Illustration 5 g00743503
7. Remove bolts (9) and retainer (10).
3/5
D6M Track-Type Tractor XL Power Shift 6LR00001-UP (MACHINE) POWERED B...
2021/12/4
https://127.0.0.1/sisweb/sisweb/techdoc/techdoc_print_page.jsp?returnurl=/sis...
Illustration 6 g02210775
8. Attach a suitable lifting device to hub (12). Remove the hub and gear (11) as an assembly.
The weight of the gear and the hub is approximately 34 kg (75 lb).
Illustration 7 g02210777
9. Remove ring (13) and hub (12) from gear (11).
Illustration 8 g02210778
Note: Do not lift the hub too high. The hub must not contact the fittings on the hydraulic
cylinder.
10. Install Tooling (C), as shown.
11. Raise the temperature of bearing cone (14) to a maximum temperature of 120°C (248°F).
Use Tooling (C) to remove bearing cone (14) from the spindle.
12. Remove Tooling (C) and the bearing cone.
13. Attach a suitable lifting device and Tooling (D) to hub (15). Remove the hub from spindle
(16). The weight of the hub is approximately 159 kg (350 lb).
4/5
D6M Track-Type Tractor XL Power Shift 6LR00001-UP (MACHINE) POWERED B...
2021/12/4
https://127.0.0.1/sisweb/sisweb/techdoc/techdoc_print_page.jsp?returnurl=/sis...
Illustration 9 g02210855
14. Remove Duo-Cone seal (17) from the hub.
15. If necessary, remove bearing cups (18) from the hub.
Illustration 10 g02210858
16. Remove Duo-Cone seal (20) and seal (19) from spindle (16).
17. Remove bearing cone (21) from the spindle.
5/5
D6M Track-Type Tractor XL Power Shift 6LR00001-UP (MACHINE) POWERED B...
2021/12/4
https://127.0.0.1/sisweb/sisweb/techdoc/techdoc_print_page.jsp?returnurl=/sis...
Product: TRACK-TYPE TRACTOR
Model: D6M TRACK-TYPE TRACTOR 6LR
Configuration: D6M Track-Type Tractor XL Power Shift 6LR00001-UP (MACHINE) POWERED BY 3116 Engine
Disassembly and Assembly
D6M Track-Type Tractor Power Train
Media Number -SENR8387-06 Publication Date -01/11/2010 Date Updated -31/07/2018
i04026199
Final Drive - Assemble
SMCS - 4050-016
Assembly Procedure
Table 1
Required Tools
Tool Part Number Part Description Qty
A 138-7573 Link Bracket 3
B 1P-0510 Driver Gp 1
D 138-7574 Link Bracket 3
E 1P-0520 Driver Gp 1
F 8T-5289 Spacer 1
G
1U-6436
or
1U-6437
Duo-Cone Seal Installer As 1
H 1U-6396 O-Ring Assembly Compound -
Note: Cleanliness is an important factor. Before assembly, all parts should be thoroughly
cleaned in cleaning fluid. Allow the parts to air dry. Wiping cloths or rags should not be
used to dry parts. Lint may be deposited on the parts which may cause later trouble. Inspect
all parts. If any parts are worn or damaged, use new parts for replacement. Dirt and other
contaminants can damage the precision components. All disassembly and all assembly
procedures must be performed on a clean work surface and in a clean area. Keep cleaned
parts covered and protected at all times.
Note: O-ring seals, gaskets, and seals should always be replaced. A used O-ring may not
have the same sealing properties as a new O-ring seal. A reconditioning procedure should
1/6
D6M Track-Type Tractor XL Power Shift 6LR00001-UP (MACHINE) POWERED B...
2021/12/4
https://127.0.0.1/sisweb/sisweb/techdoc/techdoc_print_page.jsp?returnurl=/sis...
not be degraded because of a low-cost component such as an O-ring seal or a gasket. Use
Tooling (H) during the assembly procedure.
Illustration 1 g02213653
1. Use Tooling (E) in order to install seal (19) in spindle (16). The lip of the seal must face
upward, as shown.
Note: Make sure that the lip of seal (19) is not damaged during the installation of the axle.
2. Raise the temperature of bearing cone (21) to a maximum temperature of 120°C (248°F)
and install bearing cone (21) on spindle (16).
Note: Before installing any of the Duo-Cone seals, refer to Disassembly and Assembly,
"Duo-Cone Floating Seals - Install".
3. Use Tooling (G) in order to install the Duo-Cone seal on spindle (16).
Illustration 2 g02210855
4. Lower the temperature of bearing cups (18) and install bearing cups (18) in the hub.
5. Use Tooling (G) in order to install Duo-Cone seal (17) in the hub.
2/6
D6M Track-Type Tractor XL Power Shift 6LR00001-UP (MACHINE) POWERED B...
2021/12/4
https://127.0.0.1/sisweb/sisweb/techdoc/techdoc_print_page.jsp?returnurl=/sis...
Illustration 3 g02213733
6. Attach Tooling (D) and a suitable lifting device to hub (15). The weight of the hub is
approximately 159 kg (350 lb). Lower hub (15) into position on spindle (16).
7. Raise the temperature of bearing cone (14) to a maximum temperature of 120°C (248°F)
and install bearing cone (14) on spindle (16).
Illustration 4 g02213813
Note: If Tooling (F) is not available or does not fit the spindle, skip to Step 10. Use hub
(12) to press bearing cone (14) into position. Press hub (12) until the surface of hub (12) is
even with the surface on the spindle.
8. While bearing cone (14) is still hot, position Tooling (F) and install retainer (10) and bolts
(9). Tighten bolts (9) to a torque of 135 ± 15 N·m (100 ± 11 lb ft).
9. After bearing cone (14) has cooled, remove retainer (10) and Tooling (F).
3/6
D6M Track-Type Tractor XL Power Shift 6LR00001-UP (MACHINE) POWERED B...
2021/12/4
https://127.0.0.1/sisweb/sisweb/techdoc/techdoc_print_page.jsp?returnurl=/sis...
Illustration 5 g02210777
10. Position hub (12) in gear (11) and install ring (13).
Illustration 6 g02210775
11. Attach a suitable lifting device to hub (12). The weight of the gear and the hub is
approximately 34 kg (75 lb). Install hub (12) and gear (11) on the spindle.
Illustration 7 g00743601
12. Install retainer (10) and bolts (9). Tighten bolts (9) to a torque of 135 ± 15 N·m
(100 ± 11 lb ft).
4/6
D6M Track-Type Tractor XL Power Shift 6LR00001-UP (MACHINE) POWERED B...
2021/12/4
https://127.0.0.1/sisweb/sisweb/techdoc/techdoc_print_page.jsp?returnurl=/sis...
13. Use a feeler gauge in order to verify that there is metal to metal contact between retainer
(10) and the spindle.
Illustration 8 g00743602
Illustration 9 g00743604
14. If bearing cups (6) were removed from gear (7), lower the temperature of bearing cups (6)
and install bearing cups (6) in gear (7).
15. Install bearing cones (5) and (8) in gear (7).
16. Position the bearing cones and gear (7) in carrier (1). Lower the temperature of shaft (4).
Use a suitable press in order to install shaft (4) in the carrier. Install shaft (4) until the end of
shaft (4) is even with the outer surface of carrier (1).
5/6
D6M Track-Type Tractor XL Power Shift 6LR00001-UP (MACHINE) POWERED B...
2021/12/4
https://127.0.0.1/sisweb/sisweb/techdoc/techdoc_print_page.jsp?returnurl=/sis...
Illustration 10 g00743605
17. Install retainers (3) and bolts (2). There must be metal to metal contact between retainers (3)
and the shafts.
Illustration 11 g02210755
18. Position the O-ring seal on carrier (1).
19. Attach Tooling (A) and a suitable lifting device to carrier (1). The weight of the carrier is
approximately 98 kg (215 lb). Position carrier (1) on the hub assembly and install the bolts
that hold carrier (1) in place.
End By:
a. Install the final drives. Refer to Disassembly and Assembly, "Final Drive - Install".
6/6
D6M Track-Type Tractor XL Power Shift 6LR00001-UP (MACHINE) POWERED B...
2021/12/4
https://127.0.0.1/sisweb/sisweb/techdoc/techdoc_print_page.jsp?returnurl=/sis...
Product: TRACK-TYPE TRACTOR
Model: D6M TRACK-TYPE TRACTOR 6LR
Configuration: D6M Track-Type Tractor XL Power Shift 6LR00001-UP (MACHINE) POWERED BY 3116 Engine
Disassembly and Assembly
D6M Track-Type Tractor Power Train
Media Number -SENR8387-06 Publication Date -01/11/2010 Date Updated -31/07/2018
i00963997
Final Drive - Install
SMCS - 4050-012
Installation Procedure
Table 1
Required Tools
Tool Part Number Part Description Qty
A
8T-3207 Lifting Bracket 1
5P-8622 Shackle 1
6V-9667 Bolt 2
9S-9076 Spacer 2
Illustration 1 g00743487
1/3
D6M Track-Type Tractor XL Power Shift 6LR00001-UP (MACHINE) POWERED B...
2021/12/4
https://127.0.0.1/sisweb/sisweb/techdoc/techdoc_print_page.jsp?returnurl=/sis...
Note: O-rings, gaskets, and seals should always be replaced. A used O-ring may not have
the same sealing properties as a new O-ring. A reconditioning procedure should not be
degraded because of a low cost component such as an O-ring or a gasket. Use 1U-6396 O-
Ring Assembly Compound during the assembly procedure.
1. Put O-ring seal (8) in position on the housing.
Illustration 2 g00743488
Illustration 3 g00743489
2. Fasten a suitable lifting device and Tooling (A) to final drive (5).
3. Put the final drive in position on the housing and install bolts (4) and (6).
4. Remove Tooling (A) from the final drive.
2/3
D6M Track-Type Tractor XL Power Shift 6LR00001-UP (MACHINE) POWERED B...
2021/12/4
https://127.0.0.1/sisweb/sisweb/techdoc/techdoc_print_page.jsp?returnurl=/sis...
Illustration 4 g00745347
5. Install two bolts (2).
6. Install sprocket segment (1). Torque the bolts to 175 ± 40 N·m (130.0 ± 30.0 lb ft). Torque
the bolts again to 380 N·m (280.0 lb ft).
Note: Refer to Operation and Maintenance Manual, "Lubricant Viscosities and Refill
Capacities" for all fluid capacities and the proper filling procedures.
7. Fill the final drive with oil to the correct level.
End By:
a. Install the axles. Refer to Disassembly and Assembly, "Axle - Remove and Install".
b. Connect the tracks. Refer to Disassembly and Assembly, "Track - Connect".
3/3
D6M Track-Type Tractor XL Power Shift 6LR00001-UP (MACHINE) POWERED B...
2021/12/4
https://127.0.0.1/sisweb/sisweb/techdoc/techdoc_print_page.jsp?returnurl=/sis...
Product: TRACK-TYPE TRACTOR
Model: D6M TRACK-TYPE TRACTOR 6LR
Configuration: D6M Track-Type Tractor XL Power Shift 6LR00001-UP (MACHINE) POWERED BY 3116 Engine
Disassembly and Assembly
D6M Track-Type Tractor Power Train
Media Number -SENR8387-06 Publication Date -01/11/2010 Date Updated -31/07/2018
i00964194
Steering Clutch and Brake - Remove
SMCS - 4100-011
Removal Procedure
Table 1
Required Tools
Tool Part Number Part Description Qty
A
8T-3207 Lifting Bracket 1
5P-8622 Shackle 1
6V-9667 Bolt 2
9S-9076 Spacer 2
Start By:
a. Separate the tracks. Refer to Disassembly and Assembly, "Track - Separate".
b. Remove the axles. Refer to Disassembly and Assembly, "Axle - Remove and Install".
NOTICE
Care must be taken to ensure that fluids are contained during
performance of inspection, maintenance, testing, adjusting and repair
of the product. Be prepared to collect the fluid with suitable containers
before opening any compartment or disassembling any component
containing fluids.
1/4
D6M Track-Type Tractor XL Power Shift 6LR00001-UP (MACHINE) POWERED B...
2021/12/4
https://127.0.0.1/sisweb/sisweb/techdoc/techdoc_print_page.jsp?returnurl=/sis...
Refer to Special Publication, NENG2500, "Caterpillar Tools and Shop
Products Guide" for tools and supplies suitable to collect and contain
fluids on Caterpillar products.
Dispose of all fluids according to local regulations and mandates.
1. Drain the oil from the final drive.
Illustration 1 g00745347
2. Turn the final drive until sprocket segment (1) is above the pivot shaft housing. Remove the
bolts and sprocket segment (1).
3. Remove two bolts (2) from the top of the final drive.
Illustration 2 g00747077
4. Adjust bracket (3) on Tooling (A) until the bracket is against the stop on Tooling (A).
2/4
D6M Track-Type Tractor XL Power Shift 6LR00001-UP (MACHINE) POWERED B...
2021/12/4
https://127.0.0.1/sisweb/sisweb/techdoc/techdoc_print_page.jsp?returnurl=/sis...
Illustration 3 g00743489
Illustration 4 g00743488
5. Fasten Tooling (A) to final drive (5). Fasten a suitable lifting device to Tooling (A).
Note: Do not remove bolts (6) that hold the steering clutch and brake assembly to the final
drive.
6. Remove bolts (4) and (7). Remove the final drive and steering clutch assembly. The weight
of the final drive and steering clutch and brake is 544 kg (1200 lb).
Illustration 5 g00747076
3/4
D6M Track-Type Tractor XL Power Shift 6LR00001-UP (MACHINE) POWERED B...
2021/12/4
https://127.0.0.1/sisweb/sisweb/techdoc/techdoc_print_page.jsp?returnurl=/sis...
7. Remove O-ring seals (8) and (9) from the housing.
4/4
D6M Track-Type Tractor XL Power Shift 6LR00001-UP (MACHINE) POWERED B...
2021/12/4
https://127.0.0.1/sisweb/sisweb/techdoc/techdoc_print_page.jsp?returnurl=/sis...
Product: TRACK-TYPE TRACTOR
Model: D6M TRACK-TYPE TRACTOR 6LR
Configuration: D6M Track-Type Tractor XL Power Shift 6LR00001-UP (MACHINE) POWERED BY 3116 Engine
Disassembly and Assembly
D6M Track-Type Tractor Power Train
Media Number -SENR8387-06 Publication Date -01/11/2010 Date Updated -31/07/2018
i00964182
Steering Clutch and Brake - Disassemble
SMCS - 4100-015
Disassembly Procedure
Table 1
Required Tools
Tool Part Number Part Description Qty
A 138-7575 Link Bracket 3
Start By:
a. Separate the final drive, steering clutches and brakes. Refer to Disassembly and Assembly,
"Final Drive, Steering Clutch, and Brakes - Separate".
Note: Cleanliness is an important factor. Before the disassembly procedure, the exterior of the
component should be thoroughly cleaned. This will help to prevent dirt from entering the internal
mechanism. Dirt and contaminants can damage the precision components. All disassembly and
assembly procedures must be performed on a clean work surface. Clean all the interior
components in clean solvent. Dry all the interior components with compressed air. Plug ports and
plug hoses on the machine during repair.
1/7
D6M Track-Type Tractor XL Power Shift 6LR00001-UP (MACHINE) POWERED B...
2021/12/4
https://127.0.0.1/sisweb/sisweb/techdoc/techdoc_print_page.jsp?returnurl=/sis...
Illustration 1 g00746866
1. Remove bolts (1) and plate (2).
Illustration 2 g00746867
2. Remove sleeve bearings (3) from plate (2).
Illustration 3 g00746868
3. Remove input hub (4).
2/7
D6M Track-Type Tractor XL Power Shift 6LR00001-UP (MACHINE) POWERED B...
2021/12/4
https://127.0.0.1/sisweb/sisweb/techdoc/techdoc_print_page.jsp?returnurl=/sis...
Illustration 4 g00746869
4. Remove clutch plates (5) and friction discs (6) from hub assembly (7).
Illustration 5 g00746870
Illustration 6 g00746872
5. Remove piston (8) from hub assembly (7).
6. Remove sleeve bearing (9).
7. Remove seals (10) and (11) from piston (8).
3/7
D6M Track-Type Tractor XL Power Shift 6LR00001-UP (MACHINE) POWERED B...
2021/12/4
https://127.0.0.1/sisweb/sisweb/techdoc/techdoc_print_page.jsp?returnurl=/sis...
Illustration 7 g00746873
8. Turn over the brake assembly.
9. Remove ring (12) from hub assembly (7).
Illustration 8 g00746874
10. Fasten a suitable lifting device and Tooling (A) to housing (13), and remove the brake
assembly from hub assembly (7). The weight of the brake assembly is 86 kg (190.0 lb).
Illustration 9 g00746875
11. Remove bearing (14) from housing (13).
4/7
D6M Track-Type Tractor XL Power Shift 6LR00001-UP (MACHINE) POWERED B...
2021/12/4
https://127.0.0.1/sisweb/sisweb/techdoc/techdoc_print_page.jsp?returnurl=/sis...
Illustration 10 g00746876
12. Remove three rings (15) from hub assembly (7).
13. Remove bearing (16) from hub assembly.
Illustration 11 g00746877
Personal injury can result from being struck by parts propelled by a
released spring force.
Make sure to wear all necessary protective equipment.
Follow the recommended procedure and use all recommended tooling to
release the spring force.
Note: Bolts (19) hold a spring under compression behind the piston. It is important to
remove bolts (17) before removing bolts (19).
14. Remove bolts (17) and plate (18) from housing (13).
5/7
D6M Track-Type Tractor XL Power Shift 6LR00001-UP (MACHINE) POWERED B...
2021/12/4
https://127.0.0.1/sisweb/sisweb/techdoc/techdoc_print_page.jsp?returnurl=/sis...
Illustration 12 g00746878
15. Remove brake plates (20) and friction discs (21) from the housing.
Illustration 13 g00746879
Note: Bolts (19) hold a spring under compression. Loosen bolts (19) slowly and loosen
bolts (19) evenly.
16. Remove bolts (19) and the manifold assembly (22) from housing (13).
Illustration 14 g00746880
17. Remove seals (23) and (24) from manifold assembly (22).
6/7
D6M Track-Type Tractor XL Power Shift 6LR00001-UP (MACHINE) POWERED B...
2021/12/4
https://127.0.0.1/sisweb/sisweb/techdoc/techdoc_print_page.jsp?returnurl=/sis...
Illustration 15 g00746881
18. Remove piston (25) from housing (13).
Illustration 16 g00746882
19. Remove springs (26) from housing (13).
Note: Note the direction of spring (26) before removing.
20. Remove O-ring seal (27) and (28).
7/7
D6M Track-Type Tractor XL Power Shift 6LR00001-UP (MACHINE) POWERED B...
2021/12/4
https://127.0.0.1/sisweb/sisweb/techdoc/techdoc_print_page.jsp?returnurl=/sis...
Product: TRACK-TYPE TRACTOR
Model: D6M TRACK-TYPE TRACTOR 6LR
Configuration: D6M Track-Type Tractor XL Power Shift 6LR00001-UP (MACHINE) POWERED BY 3116 Engine
Disassembly and Assembly
D6M Track-Type Tractor Power Train
Media Number -SENR8387-06 Publication Date -01/11/2010 Date Updated -31/07/2018
i00964177
Steering Clutch and Brake - Assemble
SMCS - 4100-016
Assembly Procedure
Table 1
Required Tools
Tool Part number Part Description Qty
A 138-7575 Link Bracket 3
B 1P-510 Driver Group 1
Note: Cleanliness is an important factor. Before assembly, all parts should be thoroughly cleaned
in cleaning fluid. Allow the parts to air dry. Wiping cloths or rags should not be used to dry parts.
Lint may be deposited on the parts which may cause later trouble. Inspect all parts. If any parts are
worn or damaged, use new parts for replacement. Dirt and other contaminants can damage the
precision components. All disassembly and all assembly procedures must be performed on a clean
work surface and in a clean area. Keep cleaned parts covered and protected at all times.
Improper assembly of parts that are spring loaded can cause bodily
injury.
To prevent possible injury, follow the established assembly procedure
and wear protective equipment.
1/9
D6M Track-Type Tractor XL Power Shift 6LR00001-UP (MACHINE) POWERED B...
2021/12/4
https://127.0.0.1/sisweb/sisweb/techdoc/techdoc_print_page.jsp?returnurl=/sis...
Illustration 1 g00746882
1. Install springs (26) in housing (13).
Note: O-rings, gaskets, and seals should always be replaced. A used O-ring may not have
the same sealing properties as a new O-ring. A reconditioning procedure should not be
degraded because of a low cost component such as an O-ring or a gasket. Use 1U-6396 O-
Ring Assembly Compound during the assembly procedure.
2. Install O-ring seals (27) and (28).
Illustration 2 g00746973
3. Put piston (25) in position in housing (13).
2/9
D6M Track-Type Tractor XL Power Shift 6LR00001-UP (MACHINE) POWERED B...
2021/12/4
https://127.0.0.1/sisweb/sisweb/techdoc/techdoc_print_page.jsp?returnurl=/sis...
Suggest:
If the above button click is invalid.
Please download this document
first, and then click the above link
to download the complete manual.
Thank you so much for reading
Illustration 3 g00746880
4. Install seals (23) and (24) on manifold assembly (22). Put clean oil on the lip of the seals.
Illustration 4 g00746879
5. Align the oil holes in manifold assembly (22) with the holes in housing (13). Install the
manifold assembly and bolts (19).
Illustration 5 g00746977
This is the correct method in order to make new seal rings ready for installation.
Illustration 6 g00746979
3/9
D6M Track-Type Tractor XL Power Shift 6LR00001-UP (MACHINE) POWERED B...
2021/12/4
https://127.0.0.1/sisweb/sisweb/techdoc/techdoc_print_page.jsp?returnurl=/sis...

More Related Content

More from f8ioseoodkmmd

Caterpillar Cat D7H TRACK-TYPE TRACTOR (Prefix 2SB) Service Repair Manual Ins...
Caterpillar Cat D7H TRACK-TYPE TRACTOR (Prefix 2SB) Service Repair Manual Ins...Caterpillar Cat D7H TRACK-TYPE TRACTOR (Prefix 2SB) Service Repair Manual Ins...
Caterpillar Cat D7H TRACK-TYPE TRACTOR (Prefix 2SB) Service Repair Manual Ins...f8ioseoodkmmd
 
Caterpillar Cat D7H TRACK-TYPE TRACTOR (Prefix 3XG) Service Repair Manual Ins...
Caterpillar Cat D7H TRACK-TYPE TRACTOR (Prefix 3XG) Service Repair Manual Ins...Caterpillar Cat D7H TRACK-TYPE TRACTOR (Prefix 3XG) Service Repair Manual Ins...
Caterpillar Cat D7H TRACK-TYPE TRACTOR (Prefix 3XG) Service Repair Manual Ins...f8ioseoodkmmd
 
Caterpillar Cat D9R TRACK-TYPE TRACTOR (Prefix 8BL) Service Repair Manual Ins...
Caterpillar Cat D9R TRACK-TYPE TRACTOR (Prefix 8BL) Service Repair Manual Ins...Caterpillar Cat D9R TRACK-TYPE TRACTOR (Prefix 8BL) Service Repair Manual Ins...
Caterpillar Cat D9R TRACK-TYPE TRACTOR (Prefix 8BL) Service Repair Manual Ins...f8ioseoodkmmd
 
Volvo L220E Wheel Loader Service Repair Manual Instant Download.pdf
Volvo L220E Wheel Loader Service Repair Manual Instant Download.pdfVolvo L220E Wheel Loader Service Repair Manual Instant Download.pdf
Volvo L220E Wheel Loader Service Repair Manual Instant Download.pdff8ioseoodkmmd
 
Volvo L220G Wheel Loader Service Repair Manual Instant Download.pdf
Volvo L220G Wheel Loader Service Repair Manual Instant Download.pdfVolvo L220G Wheel Loader Service Repair Manual Instant Download.pdf
Volvo L220G Wheel Loader Service Repair Manual Instant Download.pdff8ioseoodkmmd
 
Volvo L220F Wheel Loader Service Repair Manual Instant Download.pdf
Volvo L220F Wheel Loader Service Repair Manual Instant Download.pdfVolvo L220F Wheel Loader Service Repair Manual Instant Download.pdf
Volvo L220F Wheel Loader Service Repair Manual Instant Download.pdff8ioseoodkmmd
 
Caterpillar Cat D10 TRACK-TYPE TRACTOR (Prefix 76X) Service Repair Manual Ins...
Caterpillar Cat D10 TRACK-TYPE TRACTOR (Prefix 76X) Service Repair Manual Ins...Caterpillar Cat D10 TRACK-TYPE TRACTOR (Prefix 76X) Service Repair Manual Ins...
Caterpillar Cat D10 TRACK-TYPE TRACTOR (Prefix 76X) Service Repair Manual Ins...f8ioseoodkmmd
 
Volvo EC360C L EC360CL Excavator Service Repair Manual Instant Download.pdf
Volvo EC360C L EC360CL Excavator Service Repair Manual Instant Download.pdfVolvo EC360C L EC360CL Excavator Service Repair Manual Instant Download.pdf
Volvo EC360C L EC360CL Excavator Service Repair Manual Instant Download.pdff8ioseoodkmmd
 
Volvo L50D Wheel Loader Service Repair Manual Instant Download.pdf
Volvo L50D Wheel Loader Service Repair Manual Instant Download.pdfVolvo L50D Wheel Loader Service Repair Manual Instant Download.pdf
Volvo L50D Wheel Loader Service Repair Manual Instant Download.pdff8ioseoodkmmd
 
Volvo EC380D L EC380DL Excavator Service Repair Manual Instant Download.pdf
Volvo EC380D L EC380DL Excavator Service Repair Manual Instant Download.pdfVolvo EC380D L EC380DL Excavator Service Repair Manual Instant Download.pdf
Volvo EC380D L EC380DL Excavator Service Repair Manual Instant Download.pdff8ioseoodkmmd
 
Caterpillar Cat M315D WHEELED Excavator (Prefix W5M) Service Repair Manual In...
Caterpillar Cat M315D WHEELED Excavator (Prefix W5M) Service Repair Manual In...Caterpillar Cat M315D WHEELED Excavator (Prefix W5M) Service Repair Manual In...
Caterpillar Cat M315D WHEELED Excavator (Prefix W5M) Service Repair Manual In...f8ioseoodkmmd
 
Caterpillar Cat D9R TRACK-TYPE TRACTOR (Prefix 7TL) Service Repair Manual Ins...
Caterpillar Cat D9R TRACK-TYPE TRACTOR (Prefix 7TL) Service Repair Manual Ins...Caterpillar Cat D9R TRACK-TYPE TRACTOR (Prefix 7TL) Service Repair Manual Ins...
Caterpillar Cat D9R TRACK-TYPE TRACTOR (Prefix 7TL) Service Repair Manual Ins...f8ioseoodkmmd
 
Caterpillar Cat D7R TRACK-TYPE TRACTOR (Prefix 3DN) Service Repair Manual Ins...
Caterpillar Cat D7R TRACK-TYPE TRACTOR (Prefix 3DN) Service Repair Manual Ins...Caterpillar Cat D7R TRACK-TYPE TRACTOR (Prefix 3DN) Service Repair Manual Ins...
Caterpillar Cat D7R TRACK-TYPE TRACTOR (Prefix 3DN) Service Repair Manual Ins...f8ioseoodkmmd
 
Caterpillar Cat D7R TRACK-TYPE TRACTOR (Prefix 3ZR) Service Repair Manual Ins...
Caterpillar Cat D7R TRACK-TYPE TRACTOR (Prefix 3ZR) Service Repair Manual Ins...Caterpillar Cat D7R TRACK-TYPE TRACTOR (Prefix 3ZR) Service Repair Manual Ins...
Caterpillar Cat D7R TRACK-TYPE TRACTOR (Prefix 3ZR) Service Repair Manual Ins...f8ioseoodkmmd
 
Caterpillar Cat D7R II TRACK-TYPE TRACTOR (Prefix AGN) Service Repair Manual ...
Caterpillar Cat D7R II TRACK-TYPE TRACTOR (Prefix AGN) Service Repair Manual ...Caterpillar Cat D7R II TRACK-TYPE TRACTOR (Prefix AGN) Service Repair Manual ...
Caterpillar Cat D7R II TRACK-TYPE TRACTOR (Prefix AGN) Service Repair Manual ...f8ioseoodkmmd
 
Caterpillar Cat D7R II WATER FORDING TRACTOR (Prefix DJT) Service Repair Manu...
Caterpillar Cat D7R II WATER FORDING TRACTOR (Prefix DJT) Service Repair Manu...Caterpillar Cat D7R II WATER FORDING TRACTOR (Prefix DJT) Service Repair Manu...
Caterpillar Cat D7R II WATER FORDING TRACTOR (Prefix DJT) Service Repair Manu...f8ioseoodkmmd
 
Lamborghini nitro 110 t4i vrt Tractor Service Repair Manual Instant Download.pdf
Lamborghini nitro 110 t4i vrt Tractor Service Repair Manual Instant Download.pdfLamborghini nitro 110 t4i vrt Tractor Service Repair Manual Instant Download.pdf
Lamborghini nitro 110 t4i vrt Tractor Service Repair Manual Instant Download.pdff8ioseoodkmmd
 
Caterpillar Cat M315D WHEELED Excavator (Prefix K5E) Service Repair Manual In...
Caterpillar Cat M315D WHEELED Excavator (Prefix K5E) Service Repair Manual In...Caterpillar Cat M315D WHEELED Excavator (Prefix K5E) Service Repair Manual In...
Caterpillar Cat M315D WHEELED Excavator (Prefix K5E) Service Repair Manual In...f8ioseoodkmmd
 
Caterpillar Cat M315D WHEELED Excavator (Prefix J5B) Service Repair Manual In...
Caterpillar Cat M315D WHEELED Excavator (Prefix J5B) Service Repair Manual In...Caterpillar Cat M315D WHEELED Excavator (Prefix J5B) Service Repair Manual In...
Caterpillar Cat M315D WHEELED Excavator (Prefix J5B) Service Repair Manual In...f8ioseoodkmmd
 

More from f8ioseoodkmmd (20)

Caterpillar Cat D7H TRACK-TYPE TRACTOR (Prefix 2SB) Service Repair Manual Ins...
Caterpillar Cat D7H TRACK-TYPE TRACTOR (Prefix 2SB) Service Repair Manual Ins...Caterpillar Cat D7H TRACK-TYPE TRACTOR (Prefix 2SB) Service Repair Manual Ins...
Caterpillar Cat D7H TRACK-TYPE TRACTOR (Prefix 2SB) Service Repair Manual Ins...
 
Caterpillar Cat D7H TRACK-TYPE TRACTOR (Prefix 3XG) Service Repair Manual Ins...
Caterpillar Cat D7H TRACK-TYPE TRACTOR (Prefix 3XG) Service Repair Manual Ins...Caterpillar Cat D7H TRACK-TYPE TRACTOR (Prefix 3XG) Service Repair Manual Ins...
Caterpillar Cat D7H TRACK-TYPE TRACTOR (Prefix 3XG) Service Repair Manual Ins...
 
Caterpillar Cat D9R TRACK-TYPE TRACTOR (Prefix 8BL) Service Repair Manual Ins...
Caterpillar Cat D9R TRACK-TYPE TRACTOR (Prefix 8BL) Service Repair Manual Ins...Caterpillar Cat D9R TRACK-TYPE TRACTOR (Prefix 8BL) Service Repair Manual Ins...
Caterpillar Cat D9R TRACK-TYPE TRACTOR (Prefix 8BL) Service Repair Manual Ins...
 
Volvo L220E Wheel Loader Service Repair Manual Instant Download.pdf
Volvo L220E Wheel Loader Service Repair Manual Instant Download.pdfVolvo L220E Wheel Loader Service Repair Manual Instant Download.pdf
Volvo L220E Wheel Loader Service Repair Manual Instant Download.pdf
 
Volvo L220G Wheel Loader Service Repair Manual Instant Download.pdf
Volvo L220G Wheel Loader Service Repair Manual Instant Download.pdfVolvo L220G Wheel Loader Service Repair Manual Instant Download.pdf
Volvo L220G Wheel Loader Service Repair Manual Instant Download.pdf
 
Volvo L220F Wheel Loader Service Repair Manual Instant Download.pdf
Volvo L220F Wheel Loader Service Repair Manual Instant Download.pdfVolvo L220F Wheel Loader Service Repair Manual Instant Download.pdf
Volvo L220F Wheel Loader Service Repair Manual Instant Download.pdf
 
Caterpillar Cat D10 TRACK-TYPE TRACTOR (Prefix 76X) Service Repair Manual Ins...
Caterpillar Cat D10 TRACK-TYPE TRACTOR (Prefix 76X) Service Repair Manual Ins...Caterpillar Cat D10 TRACK-TYPE TRACTOR (Prefix 76X) Service Repair Manual Ins...
Caterpillar Cat D10 TRACK-TYPE TRACTOR (Prefix 76X) Service Repair Manual Ins...
 
Volvo EC360C L EC360CL Excavator Service Repair Manual Instant Download.pdf
Volvo EC360C L EC360CL Excavator Service Repair Manual Instant Download.pdfVolvo EC360C L EC360CL Excavator Service Repair Manual Instant Download.pdf
Volvo EC360C L EC360CL Excavator Service Repair Manual Instant Download.pdf
 
Volvo L50D Wheel Loader Service Repair Manual Instant Download.pdf
Volvo L50D Wheel Loader Service Repair Manual Instant Download.pdfVolvo L50D Wheel Loader Service Repair Manual Instant Download.pdf
Volvo L50D Wheel Loader Service Repair Manual Instant Download.pdf
 
Volvo EC380D L EC380DL Excavator Service Repair Manual Instant Download.pdf
Volvo EC380D L EC380DL Excavator Service Repair Manual Instant Download.pdfVolvo EC380D L EC380DL Excavator Service Repair Manual Instant Download.pdf
Volvo EC380D L EC380DL Excavator Service Repair Manual Instant Download.pdf
 
Caterpillar Cat M315D WHEELED Excavator (Prefix W5M) Service Repair Manual In...
Caterpillar Cat M315D WHEELED Excavator (Prefix W5M) Service Repair Manual In...Caterpillar Cat M315D WHEELED Excavator (Prefix W5M) Service Repair Manual In...
Caterpillar Cat M315D WHEELED Excavator (Prefix W5M) Service Repair Manual In...
 
Caterpillar Cat D9R TRACK-TYPE TRACTOR (Prefix 7TL) Service Repair Manual Ins...
Caterpillar Cat D9R TRACK-TYPE TRACTOR (Prefix 7TL) Service Repair Manual Ins...Caterpillar Cat D9R TRACK-TYPE TRACTOR (Prefix 7TL) Service Repair Manual Ins...
Caterpillar Cat D9R TRACK-TYPE TRACTOR (Prefix 7TL) Service Repair Manual Ins...
 
Caterpillar Cat D9R TRACK-TYPE TRACTOR (Prefix 7TL) Service Repair Manual Ins...
Caterpillar Cat D9R TRACK-TYPE TRACTOR (Prefix 7TL) Service Repair Manual Ins...Caterpillar Cat D9R TRACK-TYPE TRACTOR (Prefix 7TL) Service Repair Manual Ins...
Caterpillar Cat D9R TRACK-TYPE TRACTOR (Prefix 7TL) Service Repair Manual Ins...
 
Caterpillar Cat D7R TRACK-TYPE TRACTOR (Prefix 3DN) Service Repair Manual Ins...
Caterpillar Cat D7R TRACK-TYPE TRACTOR (Prefix 3DN) Service Repair Manual Ins...Caterpillar Cat D7R TRACK-TYPE TRACTOR (Prefix 3DN) Service Repair Manual Ins...
Caterpillar Cat D7R TRACK-TYPE TRACTOR (Prefix 3DN) Service Repair Manual Ins...
 
Caterpillar Cat D7R TRACK-TYPE TRACTOR (Prefix 3ZR) Service Repair Manual Ins...
Caterpillar Cat D7R TRACK-TYPE TRACTOR (Prefix 3ZR) Service Repair Manual Ins...Caterpillar Cat D7R TRACK-TYPE TRACTOR (Prefix 3ZR) Service Repair Manual Ins...
Caterpillar Cat D7R TRACK-TYPE TRACTOR (Prefix 3ZR) Service Repair Manual Ins...
 
Caterpillar Cat D7R II TRACK-TYPE TRACTOR (Prefix AGN) Service Repair Manual ...
Caterpillar Cat D7R II TRACK-TYPE TRACTOR (Prefix AGN) Service Repair Manual ...Caterpillar Cat D7R II TRACK-TYPE TRACTOR (Prefix AGN) Service Repair Manual ...
Caterpillar Cat D7R II TRACK-TYPE TRACTOR (Prefix AGN) Service Repair Manual ...
 
Caterpillar Cat D7R II WATER FORDING TRACTOR (Prefix DJT) Service Repair Manu...
Caterpillar Cat D7R II WATER FORDING TRACTOR (Prefix DJT) Service Repair Manu...Caterpillar Cat D7R II WATER FORDING TRACTOR (Prefix DJT) Service Repair Manu...
Caterpillar Cat D7R II WATER FORDING TRACTOR (Prefix DJT) Service Repair Manu...
 
Lamborghini nitro 110 t4i vrt Tractor Service Repair Manual Instant Download.pdf
Lamborghini nitro 110 t4i vrt Tractor Service Repair Manual Instant Download.pdfLamborghini nitro 110 t4i vrt Tractor Service Repair Manual Instant Download.pdf
Lamborghini nitro 110 t4i vrt Tractor Service Repair Manual Instant Download.pdf
 
Caterpillar Cat M315D WHEELED Excavator (Prefix K5E) Service Repair Manual In...
Caterpillar Cat M315D WHEELED Excavator (Prefix K5E) Service Repair Manual In...Caterpillar Cat M315D WHEELED Excavator (Prefix K5E) Service Repair Manual In...
Caterpillar Cat M315D WHEELED Excavator (Prefix K5E) Service Repair Manual In...
 
Caterpillar Cat M315D WHEELED Excavator (Prefix J5B) Service Repair Manual In...
Caterpillar Cat M315D WHEELED Excavator (Prefix J5B) Service Repair Manual In...Caterpillar Cat M315D WHEELED Excavator (Prefix J5B) Service Repair Manual In...
Caterpillar Cat M315D WHEELED Excavator (Prefix J5B) Service Repair Manual In...
 

Recently uploaded

How Do I Know If My Volvo Has Throttle Position Sensor Problems
How Do I Know If My Volvo Has Throttle Position Sensor ProblemsHow Do I Know If My Volvo Has Throttle Position Sensor Problems
How Do I Know If My Volvo Has Throttle Position Sensor ProblemsHeynneman European
 
5 Signs Your VW Key Fob Battery Needs Replacement
5 Signs Your VW Key Fob Battery Needs Replacement5 Signs Your VW Key Fob Battery Needs Replacement
5 Signs Your VW Key Fob Battery Needs ReplacementSanta Barbara Autowerks
 
一比一定制加拿大安大略理工大学毕业证(UOIT毕业证书)学位证书
一比一定制加拿大安大略理工大学毕业证(UOIT毕业证书)学位证书一比一定制加拿大安大略理工大学毕业证(UOIT毕业证书)学位证书
一比一定制加拿大安大略理工大学毕业证(UOIT毕业证书)学位证书egfdgfd
 
原版定制(UniSA毕业证书)澳大利亚南澳大学毕业证原件一模一样
原版定制(UniSA毕业证书)澳大利亚南澳大学毕业证原件一模一样原版定制(UniSA毕业证书)澳大利亚南澳大学毕业证原件一模一样
原版定制(UniSA毕业证书)澳大利亚南澳大学毕业证原件一模一样yuslkdal
 
Auto Glass Repair in Redwood City What to Do When Disaster Strikes.pdf
Auto Glass Repair in Redwood City What to Do When Disaster Strikes.pdfAuto Glass Repair in Redwood City What to Do When Disaster Strikes.pdf
Auto Glass Repair in Redwood City What to Do When Disaster Strikes.pdfDuran's Auto Glass
 
原版制作加州理工学院毕业证成绩单原件一模一样
原版制作加州理工学院毕业证成绩单原件一模一样原版制作加州理工学院毕业证成绩单原件一模一样
原版制作加州理工学院毕业证成绩单原件一模一样hbgfewda
 
Benefits of Load Planning in Fleet Management
Benefits of Load Planning in Fleet ManagementBenefits of Load Planning in Fleet Management
Benefits of Load Planning in Fleet Managementjennifermiller8137
 
mechanical vibrations pebbles.pptbbbbbbbbx
mechanical vibrations pebbles.pptbbbbbbbbxmechanical vibrations pebbles.pptbbbbbbbbx
mechanical vibrations pebbles.pptbbbbbbbbxjoshuaclack73
 
Charging Forward: Bringing Electric Vehicle Charging Infrastructure to Rural ...
Charging Forward: Bringing Electric Vehicle Charging Infrastructure to Rural ...Charging Forward: Bringing Electric Vehicle Charging Infrastructure to Rural ...
Charging Forward: Bringing Electric Vehicle Charging Infrastructure to Rural ...Forth
 
What Might Be Behind Your Mercedes' Inoperative Cruise Control
What Might Be Behind Your Mercedes' Inoperative Cruise ControlWhat Might Be Behind Your Mercedes' Inoperative Cruise Control
What Might Be Behind Your Mercedes' Inoperative Cruise ControlM Service Inc
 
一比一原版曼彻斯特城市大学毕业证成绩单原件一模一样
一比一原版曼彻斯特城市大学毕业证成绩单原件一模一样一比一原版曼彻斯特城市大学毕业证成绩单原件一模一样
一比一原版曼彻斯特城市大学毕业证成绩单原件一模一样fsdfdsgf
 
一比一原版(McMaste毕业证书)加拿大麦克马斯特大学毕业证成绩单原件一模一样
一比一原版(McMaste毕业证书)加拿大麦克马斯特大学毕业证成绩单原件一模一样一比一原版(McMaste毕业证书)加拿大麦克马斯特大学毕业证成绩单原件一模一样
一比一原版(McMaste毕业证书)加拿大麦克马斯特大学毕业证成绩单原件一模一样AD
 
Preparing for Transportation Electrification: The Electric Coop Perspective
Preparing for Transportation Electrification: The Electric Coop PerspectivePreparing for Transportation Electrification: The Electric Coop Perspective
Preparing for Transportation Electrification: The Electric Coop PerspectiveForth
 
EV Charging Resources and Technical Assistance for Rural Communities and Trib...
EV Charging Resources and Technical Assistance for Rural Communities and Trib...EV Charging Resources and Technical Assistance for Rural Communities and Trib...
EV Charging Resources and Technical Assistance for Rural Communities and Trib...Forth
 
Is Your Porsche Cayenne Radio On The Fritz Here's What It Could Mean
Is Your Porsche Cayenne Radio On The Fritz Here's What It Could MeanIs Your Porsche Cayenne Radio On The Fritz Here's What It Could Mean
Is Your Porsche Cayenne Radio On The Fritz Here's What It Could MeanHuron Automotive
 
原版定制(UCSC毕业证书)美国格林威尔大学毕业证原件一模一样
原版定制(UCSC毕业证书)美国格林威尔大学毕业证原件一模一样原版定制(UCSC毕业证书)美国格林威尔大学毕业证原件一模一样
原版定制(UCSC毕业证书)美国格林威尔大学毕业证原件一模一样rgdasda
 
一比一定制加拿大新喀里多尼亚学院毕业证(UofL毕业证书)学位证书
一比一定制加拿大新喀里多尼亚学院毕业证(UofL毕业证书)学位证书一比一定制加拿大新喀里多尼亚学院毕业证(UofL毕业证书)学位证书
一比一定制加拿大新喀里多尼亚学院毕业证(UofL毕业证书)学位证书egfdgfd
 
一比一原版北雷克斯学院毕业证成绩单原件一模一样
一比一原版北雷克斯学院毕业证成绩单原件一模一样一比一原版北雷克斯学院毕业证成绩单原件一模一样
一比一原版北雷克斯学院毕业证成绩单原件一模一样CC
 
一比一原版(CCA毕业证书)加利福尼亚艺术学院毕业证成绩单原件一模一样
一比一原版(CCA毕业证书)加利福尼亚艺术学院毕业证成绩单原件一模一样一比一原版(CCA毕业证书)加利福尼亚艺术学院毕业证成绩单原件一模一样
一比一原版(CCA毕业证书)加利福尼亚艺术学院毕业证成绩单原件一模一样zovambe
 
一比一原版(Temple毕业证书)美国天普大学毕业证成绩单原件一模一样
一比一原版(Temple毕业证书)美国天普大学毕业证成绩单原件一模一样一比一原版(Temple毕业证书)美国天普大学毕业证成绩单原件一模一样
一比一原版(Temple毕业证书)美国天普大学毕业证成绩单原件一模一样fsdfdsgf
 

Recently uploaded (20)

How Do I Know If My Volvo Has Throttle Position Sensor Problems
How Do I Know If My Volvo Has Throttle Position Sensor ProblemsHow Do I Know If My Volvo Has Throttle Position Sensor Problems
How Do I Know If My Volvo Has Throttle Position Sensor Problems
 
5 Signs Your VW Key Fob Battery Needs Replacement
5 Signs Your VW Key Fob Battery Needs Replacement5 Signs Your VW Key Fob Battery Needs Replacement
5 Signs Your VW Key Fob Battery Needs Replacement
 
一比一定制加拿大安大略理工大学毕业证(UOIT毕业证书)学位证书
一比一定制加拿大安大略理工大学毕业证(UOIT毕业证书)学位证书一比一定制加拿大安大略理工大学毕业证(UOIT毕业证书)学位证书
一比一定制加拿大安大略理工大学毕业证(UOIT毕业证书)学位证书
 
原版定制(UniSA毕业证书)澳大利亚南澳大学毕业证原件一模一样
原版定制(UniSA毕业证书)澳大利亚南澳大学毕业证原件一模一样原版定制(UniSA毕业证书)澳大利亚南澳大学毕业证原件一模一样
原版定制(UniSA毕业证书)澳大利亚南澳大学毕业证原件一模一样
 
Auto Glass Repair in Redwood City What to Do When Disaster Strikes.pdf
Auto Glass Repair in Redwood City What to Do When Disaster Strikes.pdfAuto Glass Repair in Redwood City What to Do When Disaster Strikes.pdf
Auto Glass Repair in Redwood City What to Do When Disaster Strikes.pdf
 
原版制作加州理工学院毕业证成绩单原件一模一样
原版制作加州理工学院毕业证成绩单原件一模一样原版制作加州理工学院毕业证成绩单原件一模一样
原版制作加州理工学院毕业证成绩单原件一模一样
 
Benefits of Load Planning in Fleet Management
Benefits of Load Planning in Fleet ManagementBenefits of Load Planning in Fleet Management
Benefits of Load Planning in Fleet Management
 
mechanical vibrations pebbles.pptbbbbbbbbx
mechanical vibrations pebbles.pptbbbbbbbbxmechanical vibrations pebbles.pptbbbbbbbbx
mechanical vibrations pebbles.pptbbbbbbbbx
 
Charging Forward: Bringing Electric Vehicle Charging Infrastructure to Rural ...
Charging Forward: Bringing Electric Vehicle Charging Infrastructure to Rural ...Charging Forward: Bringing Electric Vehicle Charging Infrastructure to Rural ...
Charging Forward: Bringing Electric Vehicle Charging Infrastructure to Rural ...
 
What Might Be Behind Your Mercedes' Inoperative Cruise Control
What Might Be Behind Your Mercedes' Inoperative Cruise ControlWhat Might Be Behind Your Mercedes' Inoperative Cruise Control
What Might Be Behind Your Mercedes' Inoperative Cruise Control
 
一比一原版曼彻斯特城市大学毕业证成绩单原件一模一样
一比一原版曼彻斯特城市大学毕业证成绩单原件一模一样一比一原版曼彻斯特城市大学毕业证成绩单原件一模一样
一比一原版曼彻斯特城市大学毕业证成绩单原件一模一样
 
一比一原版(McMaste毕业证书)加拿大麦克马斯特大学毕业证成绩单原件一模一样
一比一原版(McMaste毕业证书)加拿大麦克马斯特大学毕业证成绩单原件一模一样一比一原版(McMaste毕业证书)加拿大麦克马斯特大学毕业证成绩单原件一模一样
一比一原版(McMaste毕业证书)加拿大麦克马斯特大学毕业证成绩单原件一模一样
 
Preparing for Transportation Electrification: The Electric Coop Perspective
Preparing for Transportation Electrification: The Electric Coop PerspectivePreparing for Transportation Electrification: The Electric Coop Perspective
Preparing for Transportation Electrification: The Electric Coop Perspective
 
EV Charging Resources and Technical Assistance for Rural Communities and Trib...
EV Charging Resources and Technical Assistance for Rural Communities and Trib...EV Charging Resources and Technical Assistance for Rural Communities and Trib...
EV Charging Resources and Technical Assistance for Rural Communities and Trib...
 
Is Your Porsche Cayenne Radio On The Fritz Here's What It Could Mean
Is Your Porsche Cayenne Radio On The Fritz Here's What It Could MeanIs Your Porsche Cayenne Radio On The Fritz Here's What It Could Mean
Is Your Porsche Cayenne Radio On The Fritz Here's What It Could Mean
 
原版定制(UCSC毕业证书)美国格林威尔大学毕业证原件一模一样
原版定制(UCSC毕业证书)美国格林威尔大学毕业证原件一模一样原版定制(UCSC毕业证书)美国格林威尔大学毕业证原件一模一样
原版定制(UCSC毕业证书)美国格林威尔大学毕业证原件一模一样
 
一比一定制加拿大新喀里多尼亚学院毕业证(UofL毕业证书)学位证书
一比一定制加拿大新喀里多尼亚学院毕业证(UofL毕业证书)学位证书一比一定制加拿大新喀里多尼亚学院毕业证(UofL毕业证书)学位证书
一比一定制加拿大新喀里多尼亚学院毕业证(UofL毕业证书)学位证书
 
一比一原版北雷克斯学院毕业证成绩单原件一模一样
一比一原版北雷克斯学院毕业证成绩单原件一模一样一比一原版北雷克斯学院毕业证成绩单原件一模一样
一比一原版北雷克斯学院毕业证成绩单原件一模一样
 
一比一原版(CCA毕业证书)加利福尼亚艺术学院毕业证成绩单原件一模一样
一比一原版(CCA毕业证书)加利福尼亚艺术学院毕业证成绩单原件一模一样一比一原版(CCA毕业证书)加利福尼亚艺术学院毕业证成绩单原件一模一样
一比一原版(CCA毕业证书)加利福尼亚艺术学院毕业证成绩单原件一模一样
 
一比一原版(Temple毕业证书)美国天普大学毕业证成绩单原件一模一样
一比一原版(Temple毕业证书)美国天普大学毕业证成绩单原件一模一样一比一原版(Temple毕业证书)美国天普大学毕业证成绩单原件一模一样
一比一原版(Temple毕业证书)美国天普大学毕业证成绩单原件一模一样
 

Caterpillar Cat D6M TRACK-TYPE TRACTOR (Prefix 6LR) Service Repair Manual Instant Download.pdf

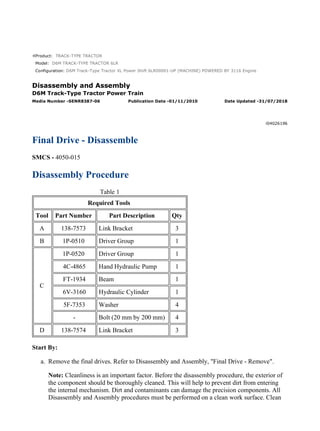
  • 1. Product: TRACK-TYPE TRACTOR Model: D6M TRACK-TYPE TRACTOR 6LR Configuration: D6M Track-Type Tractor XL Power Shift 6LR00001-UP (MACHINE) POWERED BY 3116 Engine Disassembly and Assembly D6M Track-Type Tractor Power Train Media Number -SENR8387-06 Publication Date -01/11/2010 Date Updated -31/07/2018 i04026196 Final Drive - Disassemble SMCS - 4050-015 Disassembly Procedure Table 1 Required Tools Tool Part Number Part Description Qty A 138-7573 Link Bracket 3 B 1P-0510 Driver Group 1 C 1P-0520 Driver Group 1 4C-4865 Hand Hydraulic Pump 1 FT-1934 Beam 1 6V-3160 Hydraulic Cylinder 1 5F-7353 Washer 4 - Bolt (20 mm by 200 mm) 4 D 138-7574 Link Bracket 3 Start By: a. Remove the final drives. Refer to Disassembly and Assembly, "Final Drive - Remove". Note: Cleanliness is an important factor. Before the disassembly procedure, the exterior of the component should be thoroughly cleaned. This will help to prevent dirt from entering the internal mechanism. Dirt and contaminants can damage the precision components. All Disassembly and Assembly procedures must be performed on a clean work surface. Clean 1/5 D6M Track-Type Tractor XL Power Shift 6LR00001-UP (MACHINE) POWERED B... 2021/12/4 https://127.0.0.1/sisweb/sisweb/techdoc/techdoc_print_page.jsp?returnurl=/sis...
  • 2. all the interior components in clean solvent. Dry all the interior components with compressed air. Plug ports and plug hoses on the machine during repair. Illustration 1 g02210755 1. Remove the bolts that hold carrier (1) to the hub. 2. Attach a suitable lifting device and Tooling (A) to carrier (1). Remove the carrier. The weight of the carrier is approximately 98 kg (215 lb). Remove the O-ring seal from the carrier. Illustration 2 g00743498 3. Remove bolts (2) and retainers (3). 2/5 D6M Track-Type Tractor XL Power Shift 6LR00001-UP (MACHINE) POWERED B... 2021/12/4 https://127.0.0.1/sisweb/sisweb/techdoc/techdoc_print_page.jsp?returnurl=/sis...
  • 3. Illustration 3 g00743501 Illustration 4 g00743502 4. Use a suitable press and Tooling (B) in order to push shafts (4) out of carrier (1). 5. Remove gear (7) and bearing cones (5) and (8) from the carrier. 6. If necessary, remove bearing cups (6) from gear (7). Illustration 5 g00743503 7. Remove bolts (9) and retainer (10). 3/5 D6M Track-Type Tractor XL Power Shift 6LR00001-UP (MACHINE) POWERED B... 2021/12/4 https://127.0.0.1/sisweb/sisweb/techdoc/techdoc_print_page.jsp?returnurl=/sis...
  • 4. Illustration 6 g02210775 8. Attach a suitable lifting device to hub (12). Remove the hub and gear (11) as an assembly. The weight of the gear and the hub is approximately 34 kg (75 lb). Illustration 7 g02210777 9. Remove ring (13) and hub (12) from gear (11). Illustration 8 g02210778 Note: Do not lift the hub too high. The hub must not contact the fittings on the hydraulic cylinder. 10. Install Tooling (C), as shown. 11. Raise the temperature of bearing cone (14) to a maximum temperature of 120°C (248°F). Use Tooling (C) to remove bearing cone (14) from the spindle. 12. Remove Tooling (C) and the bearing cone. 13. Attach a suitable lifting device and Tooling (D) to hub (15). Remove the hub from spindle (16). The weight of the hub is approximately 159 kg (350 lb). 4/5 D6M Track-Type Tractor XL Power Shift 6LR00001-UP (MACHINE) POWERED B... 2021/12/4 https://127.0.0.1/sisweb/sisweb/techdoc/techdoc_print_page.jsp?returnurl=/sis...
  • 5. Illustration 9 g02210855 14. Remove Duo-Cone seal (17) from the hub. 15. If necessary, remove bearing cups (18) from the hub. Illustration 10 g02210858 16. Remove Duo-Cone seal (20) and seal (19) from spindle (16). 17. Remove bearing cone (21) from the spindle. 5/5 D6M Track-Type Tractor XL Power Shift 6LR00001-UP (MACHINE) POWERED B... 2021/12/4 https://127.0.0.1/sisweb/sisweb/techdoc/techdoc_print_page.jsp?returnurl=/sis...
  • 6. Product: TRACK-TYPE TRACTOR Model: D6M TRACK-TYPE TRACTOR 6LR Configuration: D6M Track-Type Tractor XL Power Shift 6LR00001-UP (MACHINE) POWERED BY 3116 Engine Disassembly and Assembly D6M Track-Type Tractor Power Train Media Number -SENR8387-06 Publication Date -01/11/2010 Date Updated -31/07/2018 i04026199 Final Drive - Assemble SMCS - 4050-016 Assembly Procedure Table 1 Required Tools Tool Part Number Part Description Qty A 138-7573 Link Bracket 3 B 1P-0510 Driver Gp 1 D 138-7574 Link Bracket 3 E 1P-0520 Driver Gp 1 F 8T-5289 Spacer 1 G 1U-6436 or 1U-6437 Duo-Cone Seal Installer As 1 H 1U-6396 O-Ring Assembly Compound - Note: Cleanliness is an important factor. Before assembly, all parts should be thoroughly cleaned in cleaning fluid. Allow the parts to air dry. Wiping cloths or rags should not be used to dry parts. Lint may be deposited on the parts which may cause later trouble. Inspect all parts. If any parts are worn or damaged, use new parts for replacement. Dirt and other contaminants can damage the precision components. All disassembly and all assembly procedures must be performed on a clean work surface and in a clean area. Keep cleaned parts covered and protected at all times. Note: O-ring seals, gaskets, and seals should always be replaced. A used O-ring may not have the same sealing properties as a new O-ring seal. A reconditioning procedure should 1/6 D6M Track-Type Tractor XL Power Shift 6LR00001-UP (MACHINE) POWERED B... 2021/12/4 https://127.0.0.1/sisweb/sisweb/techdoc/techdoc_print_page.jsp?returnurl=/sis...
  • 7. not be degraded because of a low-cost component such as an O-ring seal or a gasket. Use Tooling (H) during the assembly procedure. Illustration 1 g02213653 1. Use Tooling (E) in order to install seal (19) in spindle (16). The lip of the seal must face upward, as shown. Note: Make sure that the lip of seal (19) is not damaged during the installation of the axle. 2. Raise the temperature of bearing cone (21) to a maximum temperature of 120°C (248°F) and install bearing cone (21) on spindle (16). Note: Before installing any of the Duo-Cone seals, refer to Disassembly and Assembly, "Duo-Cone Floating Seals - Install". 3. Use Tooling (G) in order to install the Duo-Cone seal on spindle (16). Illustration 2 g02210855 4. Lower the temperature of bearing cups (18) and install bearing cups (18) in the hub. 5. Use Tooling (G) in order to install Duo-Cone seal (17) in the hub. 2/6 D6M Track-Type Tractor XL Power Shift 6LR00001-UP (MACHINE) POWERED B... 2021/12/4 https://127.0.0.1/sisweb/sisweb/techdoc/techdoc_print_page.jsp?returnurl=/sis...
  • 8. Illustration 3 g02213733 6. Attach Tooling (D) and a suitable lifting device to hub (15). The weight of the hub is approximately 159 kg (350 lb). Lower hub (15) into position on spindle (16). 7. Raise the temperature of bearing cone (14) to a maximum temperature of 120°C (248°F) and install bearing cone (14) on spindle (16). Illustration 4 g02213813 Note: If Tooling (F) is not available or does not fit the spindle, skip to Step 10. Use hub (12) to press bearing cone (14) into position. Press hub (12) until the surface of hub (12) is even with the surface on the spindle. 8. While bearing cone (14) is still hot, position Tooling (F) and install retainer (10) and bolts (9). Tighten bolts (9) to a torque of 135 ± 15 N·m (100 ± 11 lb ft). 9. After bearing cone (14) has cooled, remove retainer (10) and Tooling (F). 3/6 D6M Track-Type Tractor XL Power Shift 6LR00001-UP (MACHINE) POWERED B... 2021/12/4 https://127.0.0.1/sisweb/sisweb/techdoc/techdoc_print_page.jsp?returnurl=/sis...
  • 9. Illustration 5 g02210777 10. Position hub (12) in gear (11) and install ring (13). Illustration 6 g02210775 11. Attach a suitable lifting device to hub (12). The weight of the gear and the hub is approximately 34 kg (75 lb). Install hub (12) and gear (11) on the spindle. Illustration 7 g00743601 12. Install retainer (10) and bolts (9). Tighten bolts (9) to a torque of 135 ± 15 N·m (100 ± 11 lb ft). 4/6 D6M Track-Type Tractor XL Power Shift 6LR00001-UP (MACHINE) POWERED B... 2021/12/4 https://127.0.0.1/sisweb/sisweb/techdoc/techdoc_print_page.jsp?returnurl=/sis...
  • 10. 13. Use a feeler gauge in order to verify that there is metal to metal contact between retainer (10) and the spindle. Illustration 8 g00743602 Illustration 9 g00743604 14. If bearing cups (6) were removed from gear (7), lower the temperature of bearing cups (6) and install bearing cups (6) in gear (7). 15. Install bearing cones (5) and (8) in gear (7). 16. Position the bearing cones and gear (7) in carrier (1). Lower the temperature of shaft (4). Use a suitable press in order to install shaft (4) in the carrier. Install shaft (4) until the end of shaft (4) is even with the outer surface of carrier (1). 5/6 D6M Track-Type Tractor XL Power Shift 6LR00001-UP (MACHINE) POWERED B... 2021/12/4 https://127.0.0.1/sisweb/sisweb/techdoc/techdoc_print_page.jsp?returnurl=/sis...
  • 11. Illustration 10 g00743605 17. Install retainers (3) and bolts (2). There must be metal to metal contact between retainers (3) and the shafts. Illustration 11 g02210755 18. Position the O-ring seal on carrier (1). 19. Attach Tooling (A) and a suitable lifting device to carrier (1). The weight of the carrier is approximately 98 kg (215 lb). Position carrier (1) on the hub assembly and install the bolts that hold carrier (1) in place. End By: a. Install the final drives. Refer to Disassembly and Assembly, "Final Drive - Install". 6/6 D6M Track-Type Tractor XL Power Shift 6LR00001-UP (MACHINE) POWERED B... 2021/12/4 https://127.0.0.1/sisweb/sisweb/techdoc/techdoc_print_page.jsp?returnurl=/sis...
  • 12. Product: TRACK-TYPE TRACTOR Model: D6M TRACK-TYPE TRACTOR 6LR Configuration: D6M Track-Type Tractor XL Power Shift 6LR00001-UP (MACHINE) POWERED BY 3116 Engine Disassembly and Assembly D6M Track-Type Tractor Power Train Media Number -SENR8387-06 Publication Date -01/11/2010 Date Updated -31/07/2018 i00963997 Final Drive - Install SMCS - 4050-012 Installation Procedure Table 1 Required Tools Tool Part Number Part Description Qty A 8T-3207 Lifting Bracket 1 5P-8622 Shackle 1 6V-9667 Bolt 2 9S-9076 Spacer 2 Illustration 1 g00743487 1/3 D6M Track-Type Tractor XL Power Shift 6LR00001-UP (MACHINE) POWERED B... 2021/12/4 https://127.0.0.1/sisweb/sisweb/techdoc/techdoc_print_page.jsp?returnurl=/sis...
  • 13. Note: O-rings, gaskets, and seals should always be replaced. A used O-ring may not have the same sealing properties as a new O-ring. A reconditioning procedure should not be degraded because of a low cost component such as an O-ring or a gasket. Use 1U-6396 O- Ring Assembly Compound during the assembly procedure. 1. Put O-ring seal (8) in position on the housing. Illustration 2 g00743488 Illustration 3 g00743489 2. Fasten a suitable lifting device and Tooling (A) to final drive (5). 3. Put the final drive in position on the housing and install bolts (4) and (6). 4. Remove Tooling (A) from the final drive. 2/3 D6M Track-Type Tractor XL Power Shift 6LR00001-UP (MACHINE) POWERED B... 2021/12/4 https://127.0.0.1/sisweb/sisweb/techdoc/techdoc_print_page.jsp?returnurl=/sis...
  • 14. Illustration 4 g00745347 5. Install two bolts (2). 6. Install sprocket segment (1). Torque the bolts to 175 ± 40 N·m (130.0 ± 30.0 lb ft). Torque the bolts again to 380 N·m (280.0 lb ft). Note: Refer to Operation and Maintenance Manual, "Lubricant Viscosities and Refill Capacities" for all fluid capacities and the proper filling procedures. 7. Fill the final drive with oil to the correct level. End By: a. Install the axles. Refer to Disassembly and Assembly, "Axle - Remove and Install". b. Connect the tracks. Refer to Disassembly and Assembly, "Track - Connect". 3/3 D6M Track-Type Tractor XL Power Shift 6LR00001-UP (MACHINE) POWERED B... 2021/12/4 https://127.0.0.1/sisweb/sisweb/techdoc/techdoc_print_page.jsp?returnurl=/sis...
  • 15. Product: TRACK-TYPE TRACTOR Model: D6M TRACK-TYPE TRACTOR 6LR Configuration: D6M Track-Type Tractor XL Power Shift 6LR00001-UP (MACHINE) POWERED BY 3116 Engine Disassembly and Assembly D6M Track-Type Tractor Power Train Media Number -SENR8387-06 Publication Date -01/11/2010 Date Updated -31/07/2018 i00964194 Steering Clutch and Brake - Remove SMCS - 4100-011 Removal Procedure Table 1 Required Tools Tool Part Number Part Description Qty A 8T-3207 Lifting Bracket 1 5P-8622 Shackle 1 6V-9667 Bolt 2 9S-9076 Spacer 2 Start By: a. Separate the tracks. Refer to Disassembly and Assembly, "Track - Separate". b. Remove the axles. Refer to Disassembly and Assembly, "Axle - Remove and Install". NOTICE Care must be taken to ensure that fluids are contained during performance of inspection, maintenance, testing, adjusting and repair of the product. Be prepared to collect the fluid with suitable containers before opening any compartment or disassembling any component containing fluids. 1/4 D6M Track-Type Tractor XL Power Shift 6LR00001-UP (MACHINE) POWERED B... 2021/12/4 https://127.0.0.1/sisweb/sisweb/techdoc/techdoc_print_page.jsp?returnurl=/sis...
  • 16. Refer to Special Publication, NENG2500, "Caterpillar Tools and Shop Products Guide" for tools and supplies suitable to collect and contain fluids on Caterpillar products. Dispose of all fluids according to local regulations and mandates. 1. Drain the oil from the final drive. Illustration 1 g00745347 2. Turn the final drive until sprocket segment (1) is above the pivot shaft housing. Remove the bolts and sprocket segment (1). 3. Remove two bolts (2) from the top of the final drive. Illustration 2 g00747077 4. Adjust bracket (3) on Tooling (A) until the bracket is against the stop on Tooling (A). 2/4 D6M Track-Type Tractor XL Power Shift 6LR00001-UP (MACHINE) POWERED B... 2021/12/4 https://127.0.0.1/sisweb/sisweb/techdoc/techdoc_print_page.jsp?returnurl=/sis...
  • 17. Illustration 3 g00743489 Illustration 4 g00743488 5. Fasten Tooling (A) to final drive (5). Fasten a suitable lifting device to Tooling (A). Note: Do not remove bolts (6) that hold the steering clutch and brake assembly to the final drive. 6. Remove bolts (4) and (7). Remove the final drive and steering clutch assembly. The weight of the final drive and steering clutch and brake is 544 kg (1200 lb). Illustration 5 g00747076 3/4 D6M Track-Type Tractor XL Power Shift 6LR00001-UP (MACHINE) POWERED B... 2021/12/4 https://127.0.0.1/sisweb/sisweb/techdoc/techdoc_print_page.jsp?returnurl=/sis...
  • 18. 7. Remove O-ring seals (8) and (9) from the housing. 4/4 D6M Track-Type Tractor XL Power Shift 6LR00001-UP (MACHINE) POWERED B... 2021/12/4 https://127.0.0.1/sisweb/sisweb/techdoc/techdoc_print_page.jsp?returnurl=/sis...
  • 19. Product: TRACK-TYPE TRACTOR Model: D6M TRACK-TYPE TRACTOR 6LR Configuration: D6M Track-Type Tractor XL Power Shift 6LR00001-UP (MACHINE) POWERED BY 3116 Engine Disassembly and Assembly D6M Track-Type Tractor Power Train Media Number -SENR8387-06 Publication Date -01/11/2010 Date Updated -31/07/2018 i00964182 Steering Clutch and Brake - Disassemble SMCS - 4100-015 Disassembly Procedure Table 1 Required Tools Tool Part Number Part Description Qty A 138-7575 Link Bracket 3 Start By: a. Separate the final drive, steering clutches and brakes. Refer to Disassembly and Assembly, "Final Drive, Steering Clutch, and Brakes - Separate". Note: Cleanliness is an important factor. Before the disassembly procedure, the exterior of the component should be thoroughly cleaned. This will help to prevent dirt from entering the internal mechanism. Dirt and contaminants can damage the precision components. All disassembly and assembly procedures must be performed on a clean work surface. Clean all the interior components in clean solvent. Dry all the interior components with compressed air. Plug ports and plug hoses on the machine during repair. 1/7 D6M Track-Type Tractor XL Power Shift 6LR00001-UP (MACHINE) POWERED B... 2021/12/4 https://127.0.0.1/sisweb/sisweb/techdoc/techdoc_print_page.jsp?returnurl=/sis...
  • 20. Illustration 1 g00746866 1. Remove bolts (1) and plate (2). Illustration 2 g00746867 2. Remove sleeve bearings (3) from plate (2). Illustration 3 g00746868 3. Remove input hub (4). 2/7 D6M Track-Type Tractor XL Power Shift 6LR00001-UP (MACHINE) POWERED B... 2021/12/4 https://127.0.0.1/sisweb/sisweb/techdoc/techdoc_print_page.jsp?returnurl=/sis...
  • 21. Illustration 4 g00746869 4. Remove clutch plates (5) and friction discs (6) from hub assembly (7). Illustration 5 g00746870 Illustration 6 g00746872 5. Remove piston (8) from hub assembly (7). 6. Remove sleeve bearing (9). 7. Remove seals (10) and (11) from piston (8). 3/7 D6M Track-Type Tractor XL Power Shift 6LR00001-UP (MACHINE) POWERED B... 2021/12/4 https://127.0.0.1/sisweb/sisweb/techdoc/techdoc_print_page.jsp?returnurl=/sis...
  • 22. Illustration 7 g00746873 8. Turn over the brake assembly. 9. Remove ring (12) from hub assembly (7). Illustration 8 g00746874 10. Fasten a suitable lifting device and Tooling (A) to housing (13), and remove the brake assembly from hub assembly (7). The weight of the brake assembly is 86 kg (190.0 lb). Illustration 9 g00746875 11. Remove bearing (14) from housing (13). 4/7 D6M Track-Type Tractor XL Power Shift 6LR00001-UP (MACHINE) POWERED B... 2021/12/4 https://127.0.0.1/sisweb/sisweb/techdoc/techdoc_print_page.jsp?returnurl=/sis...
  • 23. Illustration 10 g00746876 12. Remove three rings (15) from hub assembly (7). 13. Remove bearing (16) from hub assembly. Illustration 11 g00746877 Personal injury can result from being struck by parts propelled by a released spring force. Make sure to wear all necessary protective equipment. Follow the recommended procedure and use all recommended tooling to release the spring force. Note: Bolts (19) hold a spring under compression behind the piston. It is important to remove bolts (17) before removing bolts (19). 14. Remove bolts (17) and plate (18) from housing (13). 5/7 D6M Track-Type Tractor XL Power Shift 6LR00001-UP (MACHINE) POWERED B... 2021/12/4 https://127.0.0.1/sisweb/sisweb/techdoc/techdoc_print_page.jsp?returnurl=/sis...
  • 24. Illustration 12 g00746878 15. Remove brake plates (20) and friction discs (21) from the housing. Illustration 13 g00746879 Note: Bolts (19) hold a spring under compression. Loosen bolts (19) slowly and loosen bolts (19) evenly. 16. Remove bolts (19) and the manifold assembly (22) from housing (13). Illustration 14 g00746880 17. Remove seals (23) and (24) from manifold assembly (22). 6/7 D6M Track-Type Tractor XL Power Shift 6LR00001-UP (MACHINE) POWERED B... 2021/12/4 https://127.0.0.1/sisweb/sisweb/techdoc/techdoc_print_page.jsp?returnurl=/sis...
  • 25. Illustration 15 g00746881 18. Remove piston (25) from housing (13). Illustration 16 g00746882 19. Remove springs (26) from housing (13). Note: Note the direction of spring (26) before removing. 20. Remove O-ring seal (27) and (28). 7/7 D6M Track-Type Tractor XL Power Shift 6LR00001-UP (MACHINE) POWERED B... 2021/12/4 https://127.0.0.1/sisweb/sisweb/techdoc/techdoc_print_page.jsp?returnurl=/sis...
  • 26. Product: TRACK-TYPE TRACTOR Model: D6M TRACK-TYPE TRACTOR 6LR Configuration: D6M Track-Type Tractor XL Power Shift 6LR00001-UP (MACHINE) POWERED BY 3116 Engine Disassembly and Assembly D6M Track-Type Tractor Power Train Media Number -SENR8387-06 Publication Date -01/11/2010 Date Updated -31/07/2018 i00964177 Steering Clutch and Brake - Assemble SMCS - 4100-016 Assembly Procedure Table 1 Required Tools Tool Part number Part Description Qty A 138-7575 Link Bracket 3 B 1P-510 Driver Group 1 Note: Cleanliness is an important factor. Before assembly, all parts should be thoroughly cleaned in cleaning fluid. Allow the parts to air dry. Wiping cloths or rags should not be used to dry parts. Lint may be deposited on the parts which may cause later trouble. Inspect all parts. If any parts are worn or damaged, use new parts for replacement. Dirt and other contaminants can damage the precision components. All disassembly and all assembly procedures must be performed on a clean work surface and in a clean area. Keep cleaned parts covered and protected at all times. Improper assembly of parts that are spring loaded can cause bodily injury. To prevent possible injury, follow the established assembly procedure and wear protective equipment. 1/9 D6M Track-Type Tractor XL Power Shift 6LR00001-UP (MACHINE) POWERED B... 2021/12/4 https://127.0.0.1/sisweb/sisweb/techdoc/techdoc_print_page.jsp?returnurl=/sis...
  • 27. Illustration 1 g00746882 1. Install springs (26) in housing (13). Note: O-rings, gaskets, and seals should always be replaced. A used O-ring may not have the same sealing properties as a new O-ring. A reconditioning procedure should not be degraded because of a low cost component such as an O-ring or a gasket. Use 1U-6396 O- Ring Assembly Compound during the assembly procedure. 2. Install O-ring seals (27) and (28). Illustration 2 g00746973 3. Put piston (25) in position in housing (13). 2/9 D6M Track-Type Tractor XL Power Shift 6LR00001-UP (MACHINE) POWERED B... 2021/12/4 https://127.0.0.1/sisweb/sisweb/techdoc/techdoc_print_page.jsp?returnurl=/sis...
  • 28. Suggest: If the above button click is invalid. Please download this document first, and then click the above link to download the complete manual. Thank you so much for reading
  • 29. Illustration 3 g00746880 4. Install seals (23) and (24) on manifold assembly (22). Put clean oil on the lip of the seals. Illustration 4 g00746879 5. Align the oil holes in manifold assembly (22) with the holes in housing (13). Install the manifold assembly and bolts (19). Illustration 5 g00746977 This is the correct method in order to make new seal rings ready for installation. Illustration 6 g00746979 3/9 D6M Track-Type Tractor XL Power Shift 6LR00001-UP (MACHINE) POWERED B... 2021/12/4 https://127.0.0.1/sisweb/sisweb/techdoc/techdoc_print_page.jsp?returnurl=/sis...