

Recommended
More Related Content
What's hot
What's hot (14)
Similar to Chapter 2: How to Image Echo Views
Similar to Chapter 2: How to Image Echo Views (20)
Recently uploaded
Recently uploaded (20)
Chapter 2: How to Image Echo Views
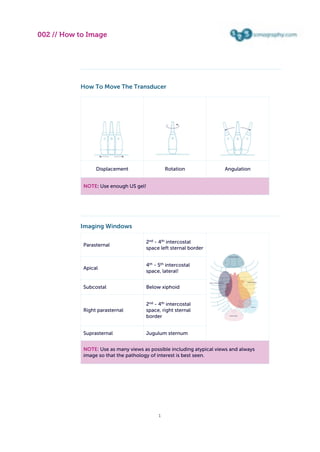
- 1. How To Move The Transducer Displacement Rotation Angulation NOTE: Use enough US gel!NOTE: Use enough US gel!NOTE: Use enough US gel! Imaging Windows Parasternal 2nd - 4th intercostal space left sternal border Apical 4th - 5th intercostal space, lateral! Subcostal Below xiphoid Right parasternal 2nd - 4th intercostal space, right sternal border Suprasternal Jugulum sternum NOTE: Use as many views as possible including atypical views and always image so that the pathology of interest is best seen. NOTE: Use as many views as possible including atypical views and always image so that the pathology of interest is best seen. NOTE: Use as many views as possible including atypical views and always image so that the pathology of interest is best seen. 002 // How to Image 1
- 2. Image View Parasternal long axis viewsParasternal long axis views Parasternal long axis viewParasternal long axis view Right parasternal long axisRight parasternal long axis 002 // How to Image 2
- 3. Parasternal short axis viewsParasternal short axis views Parasternal short axis – BaseParasternal short axis – Base Parasternal short axis – MVParasternal short axis – MV Parasternal short axis – Mid VentricleParasternal short axis – Mid Ventricle 002 // How to Image 3
- 4. Apical ViewsApical ViewsApical ViewsApical Views Rotate counterclockwiseRotate counterclockwiseRotate counterclockwise 4 chamber view 2 chamber view 3 chamber view The orientation of the septum denotes whether you are in a lateral or medial position relative to the true apex. Use all views to fully examine all aspects of the left and right ventricle. The orientation of the septum denotes whether you are in a lateral or medial position relative to the true apex. Use all views to fully examine all aspects of the left and right ventricle. The orientation of the septum denotes whether you are in a lateral or medial position relative to the true apex. Use all views to fully examine all aspects of the left and right ventricle. The orientation of the septum denotes whether you are in a lateral or medial position relative to the true apex. Use all views to fully examine all aspects of the left and right ventricle. Orientation of the apical viewsOrientation of the apical viewsOrientation of the apical viewsOrientation of the apical views 5 chamber view5 chamber view5 chamber view5 chamber view 002 // How to Image 4
- 5. Coronary sinus viewCoronary sinus viewCoronary sinus viewCoronary sinus view NOTE: Avoid foreshortening, place the transducer as lateral and caudal as possible NOTE: Avoid foreshortening, place the transducer as lateral and caudal as possible NOTE: Avoid foreshortening, place the transducer as lateral and caudal as possible NOTE: Avoid foreshortening, place the transducer as lateral and caudal as possible Subcostal ViewsSubcostal Views Subcostal 4 chamber viewSubcostal 4 chamber view Inferior vena cava view (rotate counterclockwise)Inferior vena cava view (rotate counterclockwise) NOTE: In some patients it is also possible to visualize the superior vena cava in this view. NOTE: In some patients it is also possible to visualize the superior vena cava in this view. Subcostal short axis view (rotate clockwise)Subcostal short axis view (rotate clockwise) NOTE: Perform subcostal views in all patientNOTE: Perform subcostal views in all patient 002 // How to Image 5
- 6. Subcostal ViewsSubcostal Views Subcostal 4 chamber viewSubcostal 4 chamber view Inferior vena cava view (rotate counterclockwise)Inferior vena cava view (rotate counterclockwise) NOTE: In some patients it is also possible to visualize the superior vena cava in this view. NOTE: In some patients it is also possible to visualize the superior vena cava in this view. Subcostal short axis view (rotate clockwise)Subcostal short axis view (rotate clockwise) NOTE: Perform subcostal views in all patientNOTE: Perform subcostal views in all patient 002 // How to Image 6
- 7. Reference Values — MModeReference Values — MModeReference Values — MModeReference Values — MMode NOTE: MMode - LA is measured in its largest extension at end-systole. Aortic dimension is measured at end-diastole, shortly before the aortic valve opens! NOTE: MMode - LA is measured in its largest extension at end-systole. Aortic dimension is measured at end-diastole, shortly before the aortic valve opens! NOTE: MMode - LA is measured in its largest extension at end-systole. Aortic dimension is measured at end-diastole, shortly before the aortic valve opens! NOTE: MMode - LA is measured in its largest extension at end-systole. Aortic dimension is measured at end-diastole, shortly before the aortic valve opens! Aorta (mm) < 40 LVEDD (mm) 42 - 59 Left atrium (mm) 30 - 40 Posterior wall (mm) 6 - 10 IVS (mm) 6 - 10 Fractional Shortening (%) > 25 Tricuspid Annular Plane Systolic Excursion (TAPSE) > 16mm MAPSE (longitudinal LV function) > 12mm Reference Values — DopplerReference Values — DopplerReference Values — DopplerReference Values — Doppler Aortic valve velocity (m/sec)Aortic valve velocity (m/sec) CW 0.9 - 1.7 LVOT velocity (m/sec)LVOT velocity (m/sec) PW < 1.3 Pulmonic valve velocity (m/sec)Pulmonic valve velocity (m/sec) CW 0.5 - 1.0 Tricuspid valveTricuspid valve PW 0.3 - 0.7 Tricuspid regurgitation (m/sec)Tricuspid regurgitation (m/sec) CW 1.7— 2.3 E wave (m/sec)E wave (m/sec) PW < 1.3 Mitral annulus e‘ (cm/sec)Mitral annulus e‘ (cm/sec) TDI PW 0.8 - 1.3 Right ventricular lateral wall (cm/sec)Right ventricular lateral wall (cm/sec) TDI PW 12.2 (41-60a) / 10.4 (>60a) Color DopplerColor Doppler 2D before color! Look for aliasing to detect jets Reduce PRF to detect low velocity flow (e.g. ASD, PFO) Use higher frame rates Use multiple views Color as guide for CW/ PW NOTE: Don´t expect to see the full extent and size of a color Doppler jet if 2D image quality is poor NOTE: Don´t expect to see the full extent and size of a color Doppler jet if 2D image quality is poor NOTE: Don´t expect to see the full extent and size of a color Doppler jet if 2D image quality is poor 002 // How to Image 7