3. 9/24/2014
3
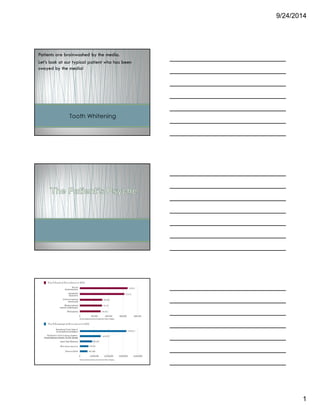
How much American’s spent on over the
counter tooth whitening products in drug
stores and in 2012.!!!
CVS --- 123.13 billion
Walgreens-- 70.79 billion
Rite Aid--- 26.1 billion
Why isn’t whitening a staple in all of our
practices?
Teenage whitening=Who is doing it?
4. 9/24/2014
4
The need for multiple whitening options in
our practices.
Light vs. no light
Pola Office+
The World’s Fastest Bleach
5. 9/24/2014
5
37.5% Hydrogen peroxide
High pH activation for super
fast release of peroxide ions
The World’s Fastest Bleach
Clear gel:
37.5% hydrogen peroxide
Thickeners
Water
Composition of Pola Office+
•Potassium nitrate –
•R
Built-in Desensitizer
6. 9/24/2014
6
Flexible Gingival Barrier:
Light Cured
Protects the soft tissue
Directly apply a thin layer of gel to all
teeth undergoing treatment
L 8
N C
7. 9/24/2014
7
S
C 4
A
R G B
Before After – Case 1
Photos courtesy Dr I Franchi,
(University of Modena, Italy)
11. 9/24/2014
11
Take home
Worn in a custom made tray.
N H
High viscosity,neutral pH advanced
tooth whitening gels.
Pola Day: 3%, 7.5%, 9.5%
hydrogen peroxide
Pola Night: 10%, 15%, 22%
carbamide peroxide
Concentrations
12. 9/24/2014
12
35% Carbamide
Take home whitening.
30-60 min per day.
Reduces dehydration of the
enamel decreases patient
sensitivity
High water content
Ensures the full release of
the peroxide without
jeopardizing patient
comfort.
Neutral pH
13. 9/24/2014
13
The Pola Day Pola Night gels contain a
desensitizing agent which acts on the
nerve endings, and desensitizes them at
the pulp dentin border, in turn minimizing
sensitivity maximizing patient comfort.
Contains desensitizing agent
•8
• G
•E
•PEG60
•P
•S
• F
C
14. 9/24/2014
14
•W
•W
Indications
Brush teeth
Apply leave on
Avoid food drinks for at least 30 minutes
Use twice per day for 2 weeks.
Procedure
Millions of people in the United States suffer from chronic
headaches that can be attributed to clenching or grinding of
their teeth.
Many dentists fail to look for obvious signs of dental damage
that can be attributed to our clenchers and grinders.
By looking out for damage cause by bruxism, we can
establish a simple effective treatment protcol that is not only
very helpful for our patients but can be profitable for us in
the office.
15. 9/24/2014
15
Many TMJ-related symptoms are caused by the effects of
physical stress on the structures around the joint. These
structures include:
Cartilage disk at the joint
Muscles of the jaw, face, and neck
Nearby ligaments, blood vessels, and nerves
Teeth
Worn teeth or worn edges of teeth
Fractures of teeth
Loosening of existing restorations
Shiny spot on amalgams.
Jaw clicking or pain
Inability to open the mouth fully (trismus) or deviation of the jaw to one
side upon opening.(usually opposite side of injury)
Intraoral and extra oral muscle pain
Neck pain or shoulder pain
HEADACHES- especially in the early part of the day
Signs and symptoms of TMJ disorders may include:
Pain or tenderness of your jaw
Aching pain in and around your ear
Difficulty chewing or discomfort while chewing
Aching facial pain
Locking of the joint, making it difficult to open or
close your mouth
Headaches
16. 9/24/2014
16
TMJ disorders can also cause a clicking sound or grating
sensation when you open your mouth or chew. But if
there's no pain or limitation of movement associated with
your jaw clicking, you probably don't need treatment for
a TMJ disorder.
TMJ disorders most commonly occur in women
between the ages of 20 and 40, but may occur
at any age.
Misalignment and shifting of teeth due to
Periodontal disease can contribute to bruxing.
Open and Closed TMJ Images
CBCT of the Joint
17. 9/24/2014
17
Thorough review of medical history
Do they report a history of migraines?
Jaw pain, tightness, tenderness in face or scalp
Stress?
Thorough head and neck exam, palpating the
muscles that assist in open and closing the jaw as
well as muscles of the head and neck
During the physical exam, your doctor or dentist will probably:
Listen to and feel your jaw when you open and close your mouth
Observe the range of motion in your jaw
Press on areas around your jaw to identify sites of pain or discomfort
If your doctor or dentist suspects a problem with your teeth, you may
need X-rays. A CT scan can provide detailed images of the bones
involved in the joint, and MRIs can reveal problems with the joint's disk.
Masetter- Superficial and deep
Lateral and medial Pterygoid ( intra oral)
Temporalis
When these muscles are tender and the patient complains
of headache and jaw pain we may elect to treat the
patient in a non invasive way
20. 9/24/2014
20
Check centric occlusion.
Check lateral excursions.( is something getting hung up)
Check for balancing side interferences.
Do you hear the squeak?
Tip
Use Accufilm and rub Vaseline on both sides. This will
enhance the ability of the colored carbon to show on
teeth and porcelain.
In an acute situation treatment options may include, soft diet,
rest for the jaw, ibuprofen or prescription anti inflammatory
medications (Mobic) soft diet, heat,and impressions for a night
guard.
Severe long term problems- surgery, but not always successful
Botox for acute muscle pain is helpful as well.
Issues-
Night guard usually must be sent out to the lab after taking
impressions and patients continue to suffer in pain.
Botox even if administered has a 5 to 7 days onset period
21. 9/24/2014
21
Patients get some relief if done properly but if the vertical
dimension is opened too much further pain and damage can
occur.
Full coverage night guards can protect the teeth from damage
but will not relieve the clenching patient. Maximum clenching
occurs when the posterior dentition is in maximum habitual
intercuspation.
Keystone- In office custom fit appliance that uses the
body’s natural reflexology to relive the patients symptoms.
The device takes only a few minutes to fit, is low profile
and allows the patient to begin feeling better very quickly
NiteBite is thin and designed for placement in the patient’s
freeway space – the distance between the normal centric rest
position of the mandible and the first point of contact of the upper
and lower teeth when the jaws are in centric closureNiteBite
triggers the jaw opening reflex, known as proprioception, but does
not force the mandible to open beyond its normal physiological
rest position.
Each time the mandible closes, and lower teeth contact the NiteBite
device, the jaw muscles are triggered to relax exactly where the
patient’s rest position belongs, which is the mandible’s centric
relation.
22. 9/24/2014
22
NiteBite does not force the mandible to open beyond its rest
position, as other night guard devices may tend to do. NiteBite
triggers the rest position, so parafunction, clenching and grinding
are signaled to stop. Thus, teeth and restorative dentistry are
protected and symptoms associated with TMJ dysfunction get
relief.
Before I describe how to make a NiteBite device, I’ll
describe its components.
The hard outer shell is a biocompatible medical grade
polycarbonate.
The inner lining is a moldable, biocompatible, low
temperature thermoplastic resin.
NiteBite is a patented product and is FDA cleared for
use.
23. 9/24/2014
23
Molded
resin
Hard outer
shell
•The NiteBite is placed on the upper anterior teeth and pushed up
evenly until the incisal edges touch the inner surface of the hard
outer shell. Complete seating of the appliance is critical to ensure it
is as thin as possible at the point of contact with lower anterior
teeth. Wile seating, do not push up on the palatal aspect. While
holding the appliance in place, the clinician can smooth any edges
with a finger where flash has appeared.
After holding the device firmly in place for 2 minutes, remove it for
inspection. p You want to make sure there is a complete and accurate
registration of the teeth and palate. The thermoplastic liner will
cool and begin to return the opaque state
Immediately after inspection, return the appliance to the mouth and hold
firmly in place for 2 to 3 more minutes. It can be withdrawn and reseated
slightly to ensure against locking into contours or undercuts. The
thermoplastic liner will become more opaque.
After the final set, remove and inspect the NiteBite for accuracy of
impression, registered sharp edges, and the presence of material that
may have squeezed into the interproximals. Some interproximal flash can
be removed with a sharp scissor or a ceramic acrylic bur.. This will make
the NiteBite more comfortable for the patient. However, snugness is
important for fit. If you remove too much of the interproximal flash, the fit
may become too loose.
24. 9/24/2014
24
Once fitted have the patient sit for ten minutes relaxed
with Nite Bite in place.
Remove Nite Bite and ask patient if they feel differently?
Recheck occlusion with Accufilm.
26. 9/24/2014
26
Place a slight lubricant on the teeth prior to custom fitting
the nite bite. This will insure ease of removal.
If a diastema exists block out the diastema with either
liquid rubber dam, cavit or flowable composite.
The same is true for large embrasures around implants or
crown and bridge.
Once the material reverts from its clear appearance
back to its milky original color place it into a bowl with
cold water to finalize the set.
Ceramic pear shape acrylic bur from
Komet.
Straight hand piece low speed….material
will heat up a bit and gum up if use at too
high a speed.
While Nite Bite will be the perfect solution for most
patients, it is contraindicated for patients with advanced
periodontal disease, severe incisor crowding and flaring,
provisional restorations, or upper anterior restorations
with severe undercuts or very large gingival embrasures
that can’t be blocked out.
27. 9/24/2014
27
Patients are followed up in 7 days.
Patients should report substantial decrease in symptoms.
If patient reports not feeling any better( almost never),
question the frequency of wearing the appliance.
If muscular pain still exists examine the amount of opening.
If there is room, reduce opening on appliance so that teeth
clear in excursive movements and not much more.
Botox or Xeomin- sometimes may be necessary when all
else fails.
28. 9/24/2014
28
Many dentists have relied on the same technique
for years despite the introduction of newer
materials that make sense and despite the failures
we see with older systems.
What are the most
common types of post and
core failures?
1. Post Loosening
2. Root fracture
3. Endodontic failure
4. Root perforation
5. Bent/fractured post
6.Caries
7. Periodontal failure
29. 9/24/2014
29
D choose a plastic sprue
- 14-gauge solid plastic
sprue (williams)
- Spee Dee pins
D adjust the sprue (passive fit
into the canal)
DD lubricate the canal
(saliva, anesthesia, water)
30. 9/24/2014
30
D Apply monomer on sprue
D apply duralay or GC pattern
on the tip of sprue
D insert inside lubricated
canal, wait 30-45 seconds,
pump pattern in and out to
avoid locking of acrylic into any
undercuts
D acrylic should reproduce
the exact anatomy of the canal.
Length of the radicular part
should be equal to the length of
the canal
Traditional methods include cementing a
laboratory made metal/gold post and core into
a canal.
Preparation design critical to success( Ferrule,
post length)
Problems: Extra appointment ,teeth fracture, post
loosening, lab cost.
31. 9/24/2014
31
. Accident
Attributed to design of post
(tapered, parallel sided or
threaded)
Hydraulic pressure during
cementation
Absence of ferrule
Traditionally, metal post cemented in tooth followed by
some sort of a composite as a buildup material.
Metal post weak link.
Problems: loosening of post and core, fracture of core
from post, time consuming( waiting for cement to set.
Today with the newest bonding agents and with fiber
reinforced composite posts we can quickly and
effectively create a monoblock( from apex to crown)
and bond our post and cores into place.
Created a strong, long lasting restoration.
32. 9/24/2014
32
New Endo Tip for root canal application
Voco
Using Futurabond DC and Rebilda Post and core system,
quickly create that bonded tooth from apex to crown.
Advantages
Dentin-like elasticity behavior, high transverse strength
High radiopacity (350% Al)
Translucency like dentine
Anatomical shape
Adhesive luting
Removable
All materials in the set match each other
Post insertion and core-build-up in one step
41. 9/24/2014
41
E Prognosis.com
Men
If you are in the top 25th % health-wise at 70 you have a
predicted life span of 18 years but if you’re in the bottom
25th% only 6.7 years
At 80, if you are in the top 25th% you have a predicted
lifespan of 10.8 years versus 1.5!
Women
21.3 years for the top 25th% at 70 and 9.5 for bottom 25%
13 years for the top 25th% at 80 and 4.6 for the bottom 25%
Conservative/Tooth preserving ideology
A periodontal/restorative approach with state
of the art periodontal therapies
Hygiene based growth
Diagnostic tools that enable my team to follow
the philosophy
Prevention at every age
Age/Health related dentistry
Cases in Point….
Patient Paradigms
43. 9/24/2014
43
Transillumination Technology
It can find caries and cracks
often not seen on X-ray
It can help identify recurrent
caries
Can be stored in patients file
Used for insurance documentation
44. 9/24/2014
44
Red Areas showing areas of
porphrine absorption from
carious bacteria via Spectra
Doppler Affect
Medium sized Wedge to
seal gingival margin
Burnished band
Mesial groove beveled
over
45. 9/24/2014
45
Total or Selective
Approach
Followed by All Bond
Universal Bonding Agent
Surefil SDR
Kalore A2 in 2 layers
maximizing B/L cuspal
placement and low stress
48. 9/24/2014
48
2% Chlorhexidine for 30 to 60 seconds or NaHypochlorite, or
Ozone or micro-etching
Rinse…suction or blot dry
LEAVE MILDLY MOIST (Technique Tip: Dip a micro-brush in a
dappen dish with water, then remove excess on gauze and
lightly moisten the dentin)
Place TheraCal and light cure for 20 seconds at least
No more than 1mm in thickness
One can re-prep excess away once light cured
Then etch, bond and complete restoration
52. 9/24/2014
52
Selecting the Right Matrix
They are broken down into sizes for Maxillary Centrals and large
Laterals
The Canines are differentiated by curvature of the incisal
Separate matrixes for lower anterior teeth
Options also include extremely large black triangles and
extremely large diastemas
Traditional Diastemas
55. 9/24/2014
55
Remove all plaque, tartar, via ultrasonics
We micro etch each surface…PrepStart by Danville
Other options exist, many office utilize micro-etchers with
water spray that remove stain, etc
For lower incisors and upper
lateral incisors
56. 9/24/2014
56
I pre-wedge often to get the matrixes into place, they are a bit thick
When they are in place, one can manipulate to hold them in place
during the procedure to etch and bond
Insure they are tucked into the sulcus to prevent overhangs
Remove as much excess prior to curing with multiple traditional
brush tips.
57. 9/24/2014
57
Mastering the Single
Tooth IMPRESSION
With a whole new twist!
NO Cord !!
89%
1-Samet N, Shofat M, Livny A, Weiss EI. A clinical evaluation of fixed partial denture
impressions. J Prosthet Dent 2005; 94:112-117.
61. 9/24/2014
61
Delivery Tip
Comparisons
Type Back‐fill
Impregum 50 ml
teal
50 ml
yellow
digit®
regula
r
Root
canal
power
flow TM
OD .100 .072 .062 .057 .072 .041 .034
ID .042 .037 .022 .024 .046 .031 .022
Digit loaded for impression
Regulator for pressure…1-4
62. 9/24/2014
62
Superb Tear Strength, Hydrophilic, Excellent flow
All t t t ti to retract tissue, and capture an excellent impression with thus far, far fewer
voids, pulls and fins
63. 9/24/2014
63
•I took a traditional Aquasil with
retraction after my Cordless
impression to compare
•Sent to my lab to compare and
returned with the comment, “My docs
would love this!”
64. 9/24/2014
64
An absorbent paste that provides hemostasis and minor retraction to
soft tissue:
15% Aluminum Chloride (AlCl)
Paste is preloaded into disposable syringes
Material is dispensed through a bendable tip Clay absorbs
fluids expands – helps dry the sulcus and enhance tissue
displacement. Has an affinity to blood.
In 2 minutes…this stops bleeding!
I use this very often without the caps in so
many clinical situations.
65. 9/24/2014
65
Retraction Caps for tissue compression
3 sizes, small for lower incisors, medium for
bicuspids and upper anterior teeth, large for
molars
Simply cut them down in size, place over your
2nd cord if retracting and if using cordless place
over the paste directly and OMG….just wait the
2 (cordless) or 5 minutes and the tissue looks
great!!
Seriously…every impression
66. 9/24/2014
66
The material sheers as it exits out the tip, this allows the flow
Without the air pressure, you couldn’t express the material
67. 9/24/2014
67
Size Color Work
Time
Mouth
Removal
Time
(MRT)
One
tooth
MAX!
No. of
Teeth
Fill
Amount
Single Light 35” 3’00” 1 ‐2 .7 mL
Purpl
e
Multi Light
Blue
1’00” 4’30” 3 ‐4 1.6 mL
• Scannable
• Eliminates waste compared to traditional 50mL
gun
68. 9/24/2014
68
Save time on
• Retraction 5 minutes per tooth
• Waiting time 5 minutes for retraction
Distance
Close up
69. 9/24/2014
69
Ivoclean to remove the contaminated
pellicle after the crown was rinsed and
dried
70. 9/24/2014
70
• Injected into the crown
2.5-3 minutes of work time Easy clean up
The Core Question…..
Do you remove this large amalgam
buildup if the margins seem solid?
72. 9/24/2014
72
A cement that seals and has great retention
A cement that resists micro-leakage and is acid resistant
Inhibition of caries and plaque
Low solubility
A cement that is thin and simple to apply
A cement that is easy to clean
A cement with long term studies that ensures peace of mind because
it integrates with dentin and creates remineralization
A universal cement for metal, zirconia and all ceramics
6 year fractured crown Micro-leakage, Recurrent Decay, Solubility??? Seal ???
73. 9/24/2014
73
Property Result
Working time 2 min…TIME TO GET THOSE CROWNS
INTO PLACE
Net Setting time 5 min….CLEAN UP BEGINS AT 3
MINUTES…
Film thickness 15μm NICE AND THIN
Compressive strength ( 24 h) 160 Mpa
Radiopacity 1.5 mmAl NO TRANSLUCENCY
In the intro pack, you get the plunger a
gun, you only need your triturator
So you activate for 3 second
Triturate for 5 or 8 seconds
Then turn the nozzle 180◦ and inject int
the crown
2 unidose packages:
Single units (triturate 5 seconds)
Multipack for up to 3 units (8 seconds)
74. 9/24/2014
74
• Cementations are booked for 15 minutes
• It’s about removing the temporary cement
and the cement being on the temporary
and the patient NOT being numb
• Trying in the restoration and minmal
adjustments
• Cleansing the tooth and the internal
surface
• Final Cementation that has great
properties and easy to use
Cling² by Clinicians Choice
GC Forceps
Ceramir
GC FORCEPS
Removes temporaries, permanent crowns that are temporarily cemented,
implant crowns that are cemented in….
75. 9/24/2014
75
Short height
Bisco’s Cavity Cleanser
2% Chlorhexidine
Simply then place moist
gauze while cement was
mixed
76. 9/24/2014
76
Zirconia Crown
After 3 minutes…peel the excess cement
floss down initially and at 5 minutes
I floss up…full set for retention and say bye-bye at 5 min!
78. 9/24/2014
78
56 years old
Wanted some old PFM’s on 9 and 10 replaced
Did NOT want to crown 7 and 8
Liked her natural color
Post Laser Crown lengthening
First off replacing an ugly crown on 28
Margin
LG:
Tissue sounding
allows the
practitioner to
properly place the
margins of the
preparation. Rule
of thumb: If the
tissue probes 2-3
mm, prepare .5mm
sub-gingival and no
deeper, probing of 4
mm means the
margins should be
placed 1-1.5 mm
below the tissue
and for 5 mm
probing, 2mm plus
sub-gingival
Closing black
spaces and
diastemas ,
interproximal
probing applies
79. 9/24/2014
79
Stump shade (not required due to preparation
thickness)…Used LT e Max Ingot
Pictures with color shade tabs for each 1/3 of the
tooth
Multiple pictures from different angles with
comparative pictures for surface texture and
coloration
Clear directions make this possible
Lubricated Teeth with “Wink” as separator
Cured Dentsply’s Integrity Buccal and Lingual and removed in 20 seconds
Triimmed, Microetched and used Flowable to redo any margins or
contacts