This document is a textbook about proximity sensors and handling and processing technology. It provides information on different types of proximity sensors including mechanical, magnetic, inductive, capacitive, optical, ultrasonic, and pneumatic sensors. For each sensor type, it describes the basic function, technical characteristics, notes on application, and examples of applications. It also discusses selection criteria for proximity sensors and connection and circuit technology considerations. The overall document serves as a reference guide on proximity sensors for industrial applications.


![3. Magnetic proximity sensors
© Festo Didactic GmbH & Co. KG • FP 1110 47
Maximum passing speed
Calculate the maximum passing speed of a cylinder piston, the position of which is
to be sensed by means of a reed contact. To do this, assume that the switching time
of the proximity sensor used is 2 ms and take the response travel from table 3.4.1.
Calculate the value for a Festo cylinder, type DNNZ with a diameter of 32 mm as an
example.
What is the change in maximum speed if, for instance, a valve is to be switched with
a switching time of 15 ms?
Piston
diameter [mm]
Type Hysteresis Hmax [mm] Response travel Smin [mm]
SME SMP SME SMP
8 ESN, DSN 2 1.5 7 9
10 ESN, DSN 2 1.5 5 9
12 ESN, DSN 2 2 8 11
16 ESN, DSN 2 2 6 9
ESN, DSN 2 2.5 7 920
DGS
ESN, DSN 1.5 2 6 1725
DGS 2 1.5 7 10
ESW, DSW 2 1.5 10 12
DN, DNZ 2.5 4 7 15
32
DNNZ 2.5 4 7 15
ESW, DSW 2 2 9.5 12
DN, DNZ 2.5 4.5 8 15
40
DNNZ 2.5 4.5 8 15
ESW, DSW 2 2 10.5 12
DN, DNZ 3 5 8 17
50
DNNZ 3 5 8 17
Table 3.4.1: Hysteresis and response travel of various cylinders (example)
3.4
Exercises
Exercise 3.1](https://image.slidesharecdn.com/festo-sensorsforhandlingandcopy-141111162049-conversion-gate02/75/Festo-sensors-for-handling-and-copy-47-2048.jpg)


![5. Capacitive proximity sensors
62 © Festo Didactic GmbH & Co. KG • FP 1110
The sensitivity (switching distance) of most capacitive proximity sensors can be
adjusted by means of a potentiometer. In this way it is possible to suppress the
detection of certain media. For instance, it is possible to determine the fluid level of
hydrous solutions through the wall of a bottle.
The switching distance of a capacitive proximity sensor is determined by means of
an earthed metal plate. The table below lists the variation in switching point
distances in respect of different materials. The maximum obtainable switching
distance of industrial capacitive sensors is approximately 60 mm.
Material thickness [mm] Switching distance [mm]
1.5 –
3.0 0.2
4.5 1.0
6.0 2.0
7.5 2.3
9.0 2.5
10.5 2.5
12.0 2.5
Table 5.1.1:
Variation of switching distance as a function of the material thickness using a cardboard strip (width = 30 mm)](https://image.slidesharecdn.com/festo-sensorsforhandlingandcopy-141111162049-conversion-gate02/75/Festo-sensors-for-handling-and-copy-62-2048.jpg)


![7. Ultrasonic proximity sensors
© Festo Didactic GmbH & Co. KG • FP 1110 111
7.3.1 Minimum distances
With the installation of ultrasonic proximity sensors, as with that of inductive and
capacitive sensors, different minimum distances must be observed between
adjacent proximity sensors.
When assembling ultrasonic proximity sensors without the option for
synchronisation, make sure that mutual influence of the proximity sensors does not
occur. Observe the following listed minimum distances in relation to the detection
range of the proximity sensors used. These values apply if the object to be tested is
moved in front and vertically to the proximity sensor. The values indicated merely
provide examples. Deviations may occur depending on type and manufacturer's
instructions.
Detection range [cm] Typical minimum distance [cm]
6 – 30 >15
20 – 100 >60
80 – 600 >250
Table 7.3.1: Lateral minimum distance between two parallel ultrasonic proximity sensors
Under other operating conditions, the minimum distances are established
experimentally for the respective assembly.
If two ultrasonic proximity sensors are opposite one another, then the values given
in the table below are to be observed.
Detection range [cm] Typical minimum distance [cm]
6 – 30 >120
20 – 100 >400
80 – 600 >2500
Table 7.3.2: Minimum distances between opposing ultrasonic proximity sensors
7.3
Notes on application](https://image.slidesharecdn.com/festo-sensorsforhandlingandcopy-141111162049-conversion-gate02/75/Festo-sensors-for-handling-and-copy-111-2048.jpg)
![7. Ultrasonic proximity sensors
112 © Festo Didactic GmbH & Co. KG • FP 1110
In cases where a wall or other reflecting objects are adjacent to an ultrasonic sensor,
the following values apply:
Detection range [cm] Typical minimum distance [cm]
6 – 30 >3
20 – 100 >15
80 – 600 >40
Table 7.3.3: Minimum distances between ultrasonic proximity sensors and a lateral, reflecting wall
7.3.2 Required minimum size of the object
The required object size depends on the acceptance angle of the ultrasonic beam. If
the ultrasonic sound waves travel past an object which is too small, then any objects
which may be alongside or in the background may interfere. As there is often
insufficient data provided by the manufacturer, a preliminary test is recommended
by moving the test plate from the side towards the object to be detected whilst
observing the switching distance.
1 2 3 4
Ultrasonic sensor (1) Sound cone (3)
Acceptance angle of sound cone (2) Object (4)
Fig. 7.3.1: Detection area of an ultrasonic sensor](https://image.slidesharecdn.com/festo-sensorsforhandlingandcopy-141111162049-conversion-gate02/75/Festo-sensors-for-handling-and-copy-112-2048.jpg)


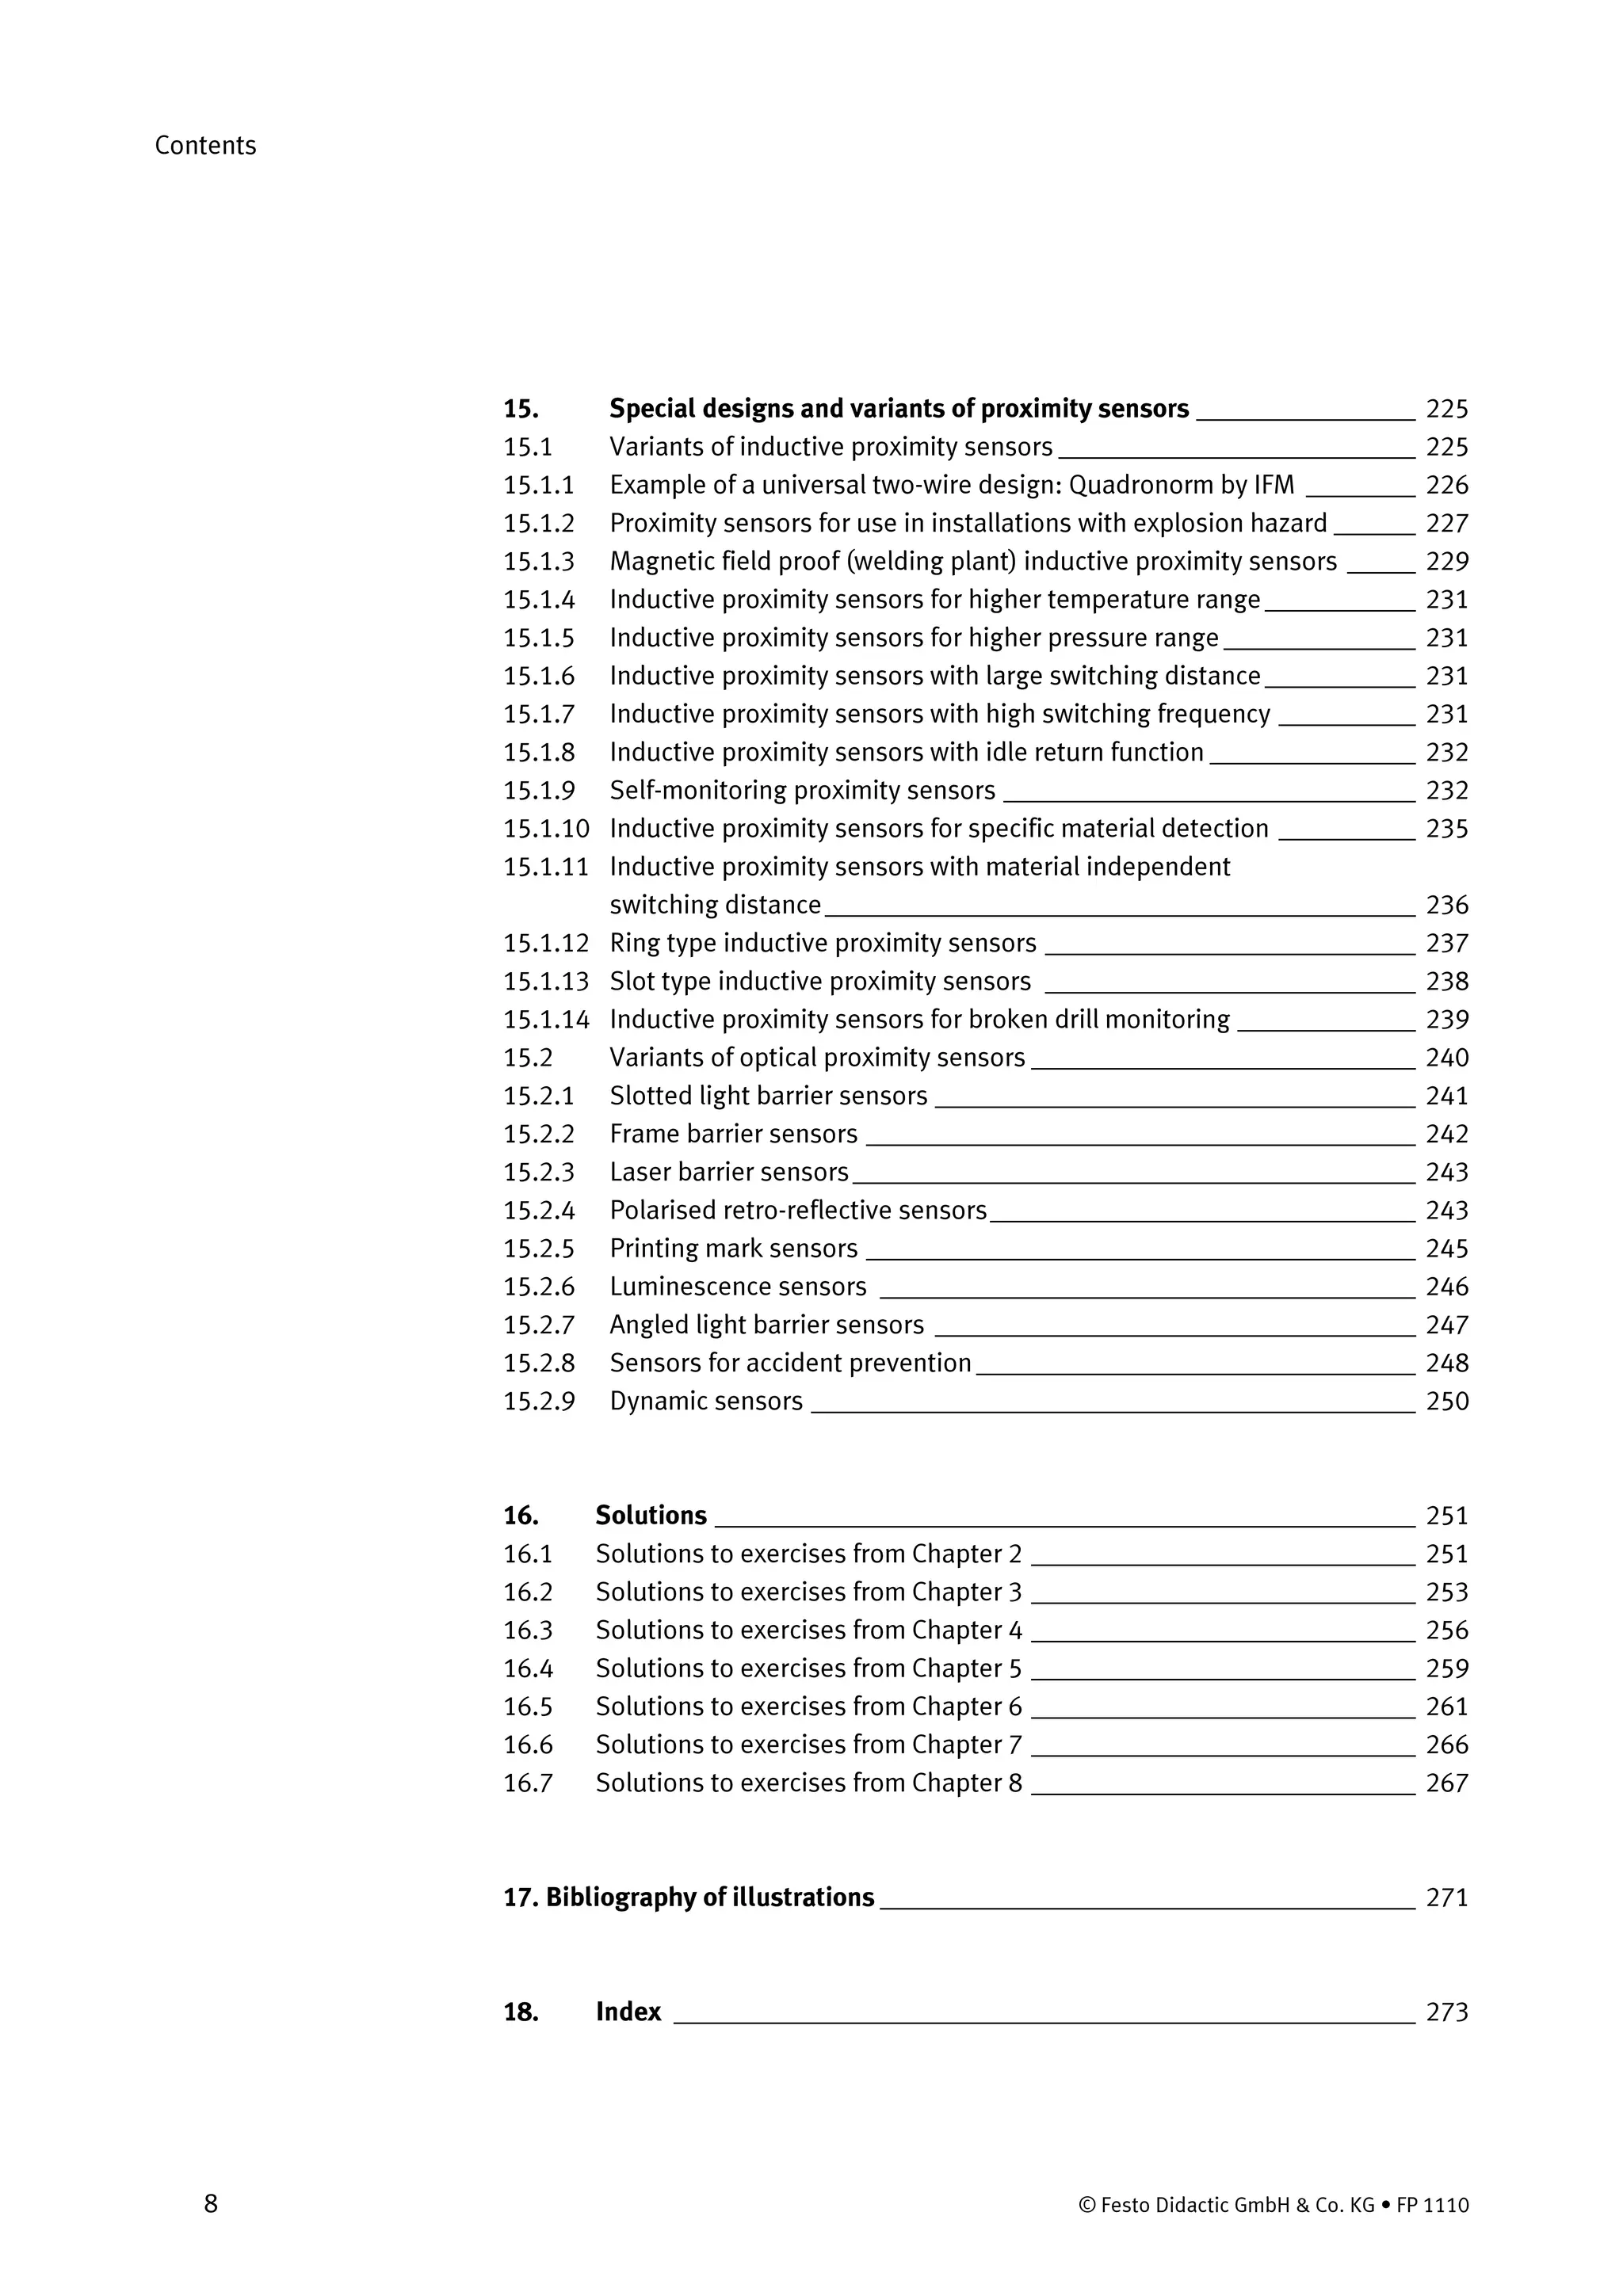
![8. Pneumatic proximity sensors
120 © Festo Didactic GmbH & Co. KG • FP 1110
s [mm]
s [mm]
s [mm]
0
4
0
5
0,5
15
5
a)
1 1 12 2
1 2
1 2 1 2 1 2
1 2
1 1
1 2
2
b)
c)
10040
Supply pressure (1) Output pressure (signal pressure) (2) Sensing distance (s)
a) Back pressure sensors
b) Reflex sensors
c) Air barriers
Fig. 8.1.1: Typical sensing distances of various pneumatic proximity sensors
Supply pressure can vary, but is generally in the region of 0 – 800 kPa (0 – 8 bar).
The signal pressure generated depends on the supply pressure and the distance
between the nozzle and the object.](https://image.slidesharecdn.com/festo-sensorsforhandlingandcopy-141111162049-conversion-gate02/75/Festo-sensors-for-handling-and-copy-120-2048.jpg)


![11. Physical fundamentals
© Festo Didactic GmbH & Co. KG • FP 1110 163
The skin thickness, within which the current amplitude has decreased by the amount
1/e (= 1/2.718), is described as the penetration depth d. The following formula
applies:
f
1
d
0r ⋅κ⋅µ⋅µ⋅π
=
Whereby µ0 = 1.257 ⋅ 10-6
Vs/Am = Magnetic field constant
µr = Relative permeability
κ = Conductivity
f = Frequency
It can be seen that the greater the permeability and the conductivity of the material,
the smaller the penetration depth. If the material thickness of the object being
detected by an inductive proximity sensor is less than the penetration depth of the
field, then a part of the field is outside the plate, thus resulting in greater switching
distances.
Materials Penetration depth [mm]
Copper 0.073
Aluminium 0.094
Brass 0.16
Table 11.1.3: Field penetration depths at a frequency of f = 800 kHz
Penetration depth](https://image.slidesharecdn.com/festo-sensorsforhandlingandcopy-141111162049-conversion-gate02/75/Festo-sensors-for-handling-and-copy-163-2048.jpg)


![11. Physical fundamentals
© Festo Didactic GmbH & Co. KG • FP 1110 177
Solids (at 20 °C) v [m/s]
Aluminium 5110
Iron 5180
Gold 2000
Cork 500
Copper 3800
Brass 3500
Steel 5100
Fluids (at 20 °C) v [m/s]
Benzene 1320
Chloroform 1000
Glycerine 1923
Petroleum 1320
Mercury 1415
Water, distilled 1483
Gases (at 0 °C and 101.3 kPa) v [m/s]
Argon 308
Helium 971
Carbon dioxide 258
Carbon monoxide 337
Air 332
Hydrogen 1286
Table 11.3.1: Speed of sound in various materials](https://image.slidesharecdn.com/festo-sensorsforhandlingandcopy-141111162049-conversion-gate02/75/Festo-sensors-for-handling-and-copy-177-2048.jpg)


![11. Physical fundamentals
© Festo Didactic GmbH & Co. KG • FP 1110 187
The speed of light in a vacuum is roughly 300,000 km/s. The table below lists some
values for the speed of light in respect of different materials.
Medium v [km/s] Refractive index
Vacuum 300,000 1
Air 300,000 1.0003
Water 225,000 1.33
Crown glass (Dependent on type) 198,000 1.51
Flint glass (Dependent on type) 186,000 1.61
Diamond 124,000 2.42
Polymethylmethacrylate (PMMA) 200,000 1.49
Table 11.4.1: Speed of light and refractive index
11.4.1 Reflection
The following principle applies with regard to reflection of light:
Angle of incidence = Angle of reflection
Here the angles are measured between the vertical and the angle of incidence.
α α
Fig. 11.4.2: Reflection of light beams](https://image.slidesharecdn.com/festo-sensorsforhandlingandcopy-141111162049-conversion-gate02/75/Festo-sensors-for-handling-and-copy-187-2048.jpg)


![11. Physical fundamentals
190 © Festo Didactic GmbH & Co. KG • FP 1110
For receiving elements, photodiodes or phototransistors are generally used. In
addition, photoresistors are also of some signficance, e.g. in photoelectric exposure
meters.
Luminescent diodes (LED) are semiconductor diodes which emit light beams when
an electrical current passes through. Depending on the composition of the semi-
conductor material, light beams of varying wavelength are created, see Table 11.4.2.
Material Colour Wave length [nm]
Gallium arsenide infrared 950
Gallium aluminium arsenide infrared 880
Gallium aluminium arsenide red 660
Gallium arsenide phosphide red 660
Gallium arsenide phosphide red 635
Gallium arsenide phosphide yellow 590
Gallium phosphide green 565
Gallium nitride blue 480
Table 11.4.2: Typical materials and wavelengths of luminscent diodes
Luminescent diodes in the infrared and red spectral range are mainly used in
sensors, because this produces good adaption to the sensitivity of photodiodes
when receiving light emissions.
Luminescent diodes](https://image.slidesharecdn.com/festo-sensorsforhandlingandcopy-141111162049-conversion-gate02/75/Festo-sensors-for-handling-and-copy-190-2048.jpg)


![14. Standards and protection classes
220 © Festo Didactic GmbH & Co. KG • FP 1110
Design A1 •
flush mounted
Design A2 •
non-flush mounted
Size Nominal switching-distance sn [mm] Size Nominal switching-distance sn [mm]
• • 1 1 – –
• • 2 2 • • 2 4
• • 3 5 • • 3 8
• • 4 10 • • 4 15
Design Minimum Switching frequency f [Hz]
A11 1000
A12 800
A13 500
A14 300
A22 400
A23 200
A24 100
Table 14.4.2: Nominal switching distances in millimetres and minimum switching frequencies](https://image.slidesharecdn.com/festo-sensorsforhandlingandcopy-141111162049-conversion-gate02/75/Festo-sensors-for-handling-and-copy-220-2048.jpg)


![14. Standards and protection classes
© Festo Didactic GmbH & Co. KG • FP 1110 223
Design Nominal switching distance sn [mm]
D 21 25
D 22 40
Design Switching frequency fmin [Hz]
D 21 50
D 22 10
Table 14.4.4:
Nominal switching distances in millimetres and minimum attainable switching frequencies (design D)](https://image.slidesharecdn.com/festo-sensorsforhandlingandcopy-141111162049-conversion-gate02/75/Festo-sensors-for-handling-and-copy-223-2048.jpg)


![15. Special designs and variants of proximity sensors
230 © Festo Didactic GmbH & Co. KG • FP 1110
By using a special core material for the oscillator coil and an electronic circuit which
recognises the presence of a welding field and blocks the switch output during the
short welding pulse, it is possible to use these sensors in welding lines such as in
the automotive industry. Just how large these magnetic fields are, can for instance
be seen by the fact that a steel wrist watch at a distance of approximately 30 cm
from the current-carrying conductor is easily attracted by this.
• Sizes M 12 x 1, M 18 x 1 and M 30 x 1.5 with switching distances of 2 mm, 5 mm
and 10 mm. These proximity sensors are magnetic field proof in continuous and
alternating fields with magnetic currents of up to 25 kA. A Teflon protective
screwed cover is available for the protection of active surface against welding
splashes.
• Magnetic field proof inductive proximity sensors in stainless steel design with a
ceramic front surface. A version in PBTP housing material is available for welding
currents of up to 100 kA.
Welding currents Distance [mm]
I [kA] 12.5 25 50 100
5 80 mT 40 mT 20 mT 10 mT
10 160 mT 80 mT 40 mT 20 mT
20 320 mT 160 mT 80 mT 40 mT
50 800 mT 400 mT 200 mT 100 mT
100 1600 mT 800 mT 400 mT 200 mT
Table 15.1.1: Reference values for magnetic induction
The proximity-related calculation of magnetic induction B in mT can be made using
the following formula:
mm/a
A/I
2.0
mT
B
⋅≈
I = Current in amps
a = Distance in mm
Examples](https://image.slidesharecdn.com/festo-sensorsforhandlingandcopy-141111162049-conversion-gate02/75/Festo-sensors-for-handling-and-copy-230-2048.jpg)


![16. Solutions
254 © Festo Didactic GmbH & Co. KG • FP 1110
Piston
diameter
[mm]
Typ Hysteresis
Hmax [mm]
Response travel
Smin [mm]
SME SMP SME SMP
8 ESN, DSN 2 1.5 7 9
10 ESN, DSN 2 1.5 5 9
12 ESN, DSN 2 2 8 11
16 ESN, DSN 2 2 6 9
ESN, DSN 2 2.5 7 920
DGS
ESN, DSN 1.5 2 6 1725
DGS 2 1.5 7 10
ESW, DSW 2 1.5 10 12
DN, DNZ 2.5 4 7 15
32
DNNZ 2.5 4 7 15
ESW, DSW 2 2 9.5 12
DN, DNZ 2.5 4.5 8 15
40
DNNZ 2.5 4.5 8 15
ESW, DSW 2 2 10.5 12
DN, DNZ 3 5 8 17
50
DNNZ 3 5 8 17
Table 16.2.1: Hysteris and response range of various cylinders (example)
Again for the Festo cylinder DNNZ with a diameter of 32 mm, a value for
vmax of 0.467 m/s is obtained for a valve with a response time of 15 ms.](https://image.slidesharecdn.com/festo-sensorsforhandlingandcopy-141111162049-conversion-gate02/75/Festo-sensors-for-handling-and-copy-254-2048.jpg)


