communicate with instrument by using lan
•
0 likes•328 views

How to communicate with instruments by using LAN and VB6

Recommended
More Related Content
Similar to communicate with instrument by using lan
Similar to communicate with instrument by using lan (20)
Recently uploaded
Recently uploaded (20)
communicate with instrument by using lan
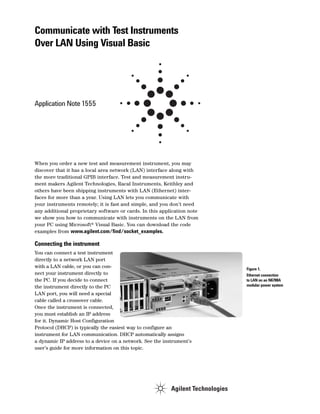
- 1. Communicate with Test Instruments Over LAN Using Visual Basic Application Note 1555 When you order a new test and measurement instrument, you may discover that it has a local area network (LAN) interface along with the more traditional GPIB interface. Test and measurement instru-ment makers Agilent Technologies, Racal Instruments, Keithley and others have been shipping instruments with LAN (Ethernet) inter-faces for more than a year. Using LAN lets you communicate with your instruments remotely; it is fast and simple, and you don’t need any additional proprietary software or cards. In this application note we show you how to communicate with instruments on the LAN from your PC using Microsoft® Visual Basic. You can download the code examples from www.agilent.com/find/socket_examples. Connecting the instrument You can connect a test instrument directly to a network LAN port with a LAN cable, or you can con-nect your instrument directly to the PC. If you decide to connect the instrument directly to the PC LAN port, you will need a special cable called a crossover cable. Once the instrument is connected, you must establish an IP address for it. Dynamic Host Configuration Protocol (DHCP) is typically the easiest way to configure an instrument for LAN communication. DHCP automatically assigns a dynamic IP address to a device on a network. See the instrument’s user’s guide for more information on this topic. Figure 1. Ethernet connection to LAN on an N6700A modular power system
- 2. Testing communication using the Windows command prompt Once you have an IP address, test the IP address from your PC. Go to the MS DOS command prompt window (in Windows 2000 the menu sequence is Start>Programs> Accessories>Command Prompt). At the command prompt, type ping <IP address>. The IP address is four groups of numbers separat-ed 2 by decimal points. If everything is working, your instrument will respond. Figure 2 shows a suc-cessful ping response. Testing communication using HyperTerminal Alternately, you can test the communication to the instrument with the Windows HyperTerminal program (Start >Programs >Accessories >Com-munications >HyperTerminal). When the Connection Description dialog box appears, type a name and click OK. The name will be used to save your settings. Next, in the Connect To dialog box, select TCP/IP (Winsock) and type in the IP address for the instrument. The port num-ber determines the protocol for the communication. We will use ASCII characters and instrument SCPI commands. The Internet Assigned Number Authority (IANA) registered port number for the instrument SCPI interface is 5025. Some instrument manufac-tures may choose to use a unique port number; check the instrument documentation for the the port num-ber. Now go to the File>Properties menu and select the Settings tab and click ASCII Setup…. Select Send line ends with line feed and Echo typed characters locally (see Figure 3). Click OK to close the dialog boxes. In the terminal window type in *IDN?, and hit Enter. Do not use the backspace key or any editing keys. If every-thing is working, you will get back the manufacturer and model number. Save the settings with Save as… In order to communicate with the instrument from Visual Basic, you will need both the port number and the IP address. It is a good practice to verify both before you begin programming. Using MS Visual Basic to communicate Now that the connections are confirmed, we are ready to use Visual Basic. Visual Basic 6.0 comes with Winsock control. From the Components dialog box (Ctrl-T), find and select the Microsoft Winsock control. Once the Winsock control is available in the Toolbox, place it on the form. There are three steps to make a connection to the instrument in the Form Load event: first you Figure 2. Response to a ping for a working LAN connection Figure 3. ASCII setup for Windows HyperTerminal for LAN communications
- 3. must insert the IP address (RemoteHost), as well as the port number (RemotePort), then invoke the connect method. The code created by the Winsock control is shown below. If (Winsock1.State = sckClosed) Then ' Invoke the Connect method to initiate a connection. Winsock1.RemotePort = "5025" Winsock1.RemoteHost = "177.140.77.204" Winsock1.Connect 3 End If The connection may take a bit of time, so this is a good place to add a wait statement or to test the connection status. You can test the connection status with this code Dim status as Long If Winsock1.State = sckConnected then debug.Print "Connected" Once connected, the Windows Sockets object is ready for communication. Sending instrument commands Sending a string to the instrument is straightforward. Note that we add a carriage-return line feed at the end of the command. Winsock1.SendData "*IDN?" & vbCrLf You can get the response in one of two ways. If the above string is in a button, clicking the button sends the string command and then exits the subroutine. When exiting the subroutine, Visual Basic is idle and events can be executed. In that case, receiving the data is just a matter of waiting for the DataArrival event to fire and then retrieving the data like this: Private Sub Winsock1_DataArrival(ByVal bytesTotal As Long) Dim strData As String Winsock1.GetData strData, vbString End Sub
- 4. However, most of the time you want to write and read several times without exiting the subroutine. To do this, we wrote a simple ReadString routine that will allow you to do just that. The ReadString routine immediately checks the connection buffer and then executes a DoEvents until the buffer has increased in size indicating the arrival of the latest data. DoEvents allows VB to pause the subroutine and capture an event such as the instrument response to a query on the LAN. This is a shortened version of the ReadString subroutine contained in the example VB project. Public Function ReadString(skt As Winsock) As String Dim strData As String Dim numbBytes As Long Dim i As Long numbBytes = skt.BytesReceived DoEvents ' check repeatedly if there is new data. For i = 1 To 10000 If skt.BytesReceived > numbBytes Then Exit For DoEvents Next i ' Gets the data and Clears buffer skt.GetData strData, vbString ReadString = strData End Function Rather than add a carriage return line feed every time we send a string, we also wrote a WriteString routine that adds the vbCrLf Public Sub WriteString(skt As Winsock, ByVal cmd As String) skt.SendData cmd & vbCrLf Using these two routines, you can check the ID of an instrument and place it into a text box with the following code: 4 End Sub WriteString Winsock1, "*idn?" txtID.Text = ReadString(Winsock1)
- 5. 5 Examples downloads A complete Visual Basic and C++ project that demonstrates sockets with Agilent instruments is available for the Agilent 33220A function generator and the N6700A modular power system at www.agilent. com/find/socket_examples. All the instrument-specific code is in one command button subroutine. You can easily modify either of these projects for other instruments. The example Visual Basic code brings up a dialog box for making the LAN connection. The port number is set to 5025. If it needs to be changed, change the constant RemPort in the modWinSock module. Start the code. Type in the IP address and click on Connect. The progress of the connection will be shown in the Messages field. The instru-ment- specific code is in the click event for the button labeled Start. Conclusion Using sockets in Visual Basic with LAN-enabled instruments eliminates the need for proprietary I/O library code loaded to the PC. This approach is very fast, it enables remote operation, and it is easy to implement in Microsoft Visual Basic. Figure 4. User interface of VB software example to make connection to instrument with sockets Related Agilent literature Publication title Publication Publication Web address type number 33220A 20MHz Function Arbitrary Waveform Data sheet 5988-8544EN http://cp.literature.agilent.com/litweb/pdf/5988-8544EN.pdf Generator N6700-series Modular Data sheet 5989-1411EN http://cp.literature.agilent.com/litweb/pdf/5989-1411EN.pdf DC Power Supply
- 6. By internet, phone, or fax, get assistance with all your test & measurement needs. Online assistance: www.agilent.com/find/assist Phone or Fax United States: (tel) 800 829 4444 (fax) 800 829 4433 Canada: (tel) 877 894 4414 (fax) 800 746 4866 China: (tel) 800 810 0189 (fax) 800 820 2816 Europe: (tel) (31 20) 547 2111 (fax) (31 20) 547 2390 Japan: (tel) (81) 426 56 7832 (fax) (81) 426 56 7840 Korea: (tel) (82 2) 2004 5004 (fax) (82 2) 2004 5115 Latin America: (tel) (650) 752 5000 Taiwan: (tel) 0800 047 866 (fax) 0800 286 331 Other Asia Pacific Countries: (tel) (65) 6375 8100 (fax) (65) 6836 0252 Email: tm_ap@agilent.com Product specifications and descriptions in this document subject to change without notice. 02/18/2005 © Agilent Technologies, Inc. 2005 Printed in USA February 18, 2005 5989-2316EN www.agilent.com www.agilent.com/find/emailupdates Get the latest information on the products and applications you select. Agilent Open: Agilent simplifies the process of connecting and programming test systems to help engineers design, validate and manufacture electronic products. Agilent's broad range of system-ready instruments, open industry software, PC-standard I/O and global support all combine to accelerate test system development. More information is available at www.Agilent.com/find/systemcomponents Microsoft is a U.S. registered trademark of Microsoft Corporation.