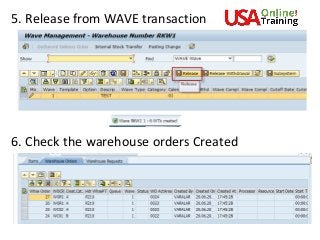
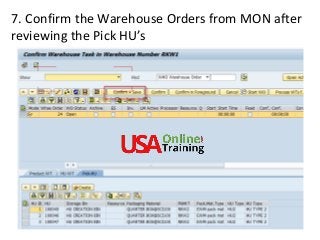
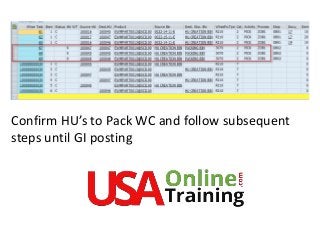
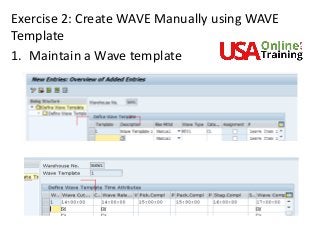
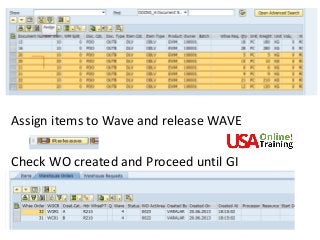
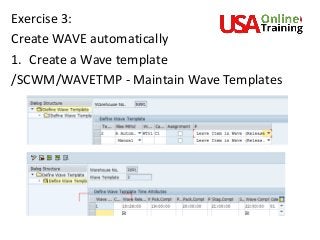
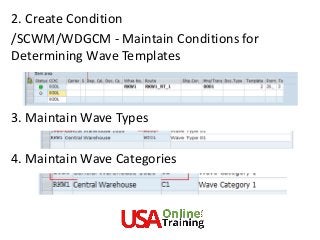
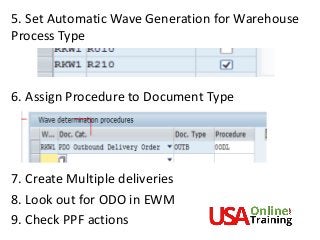
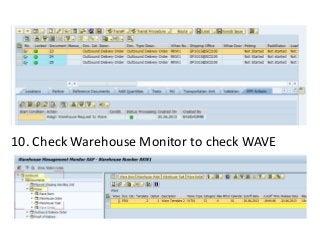
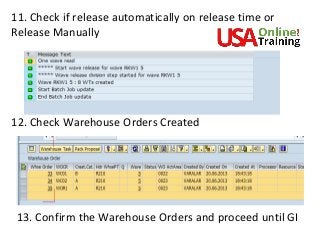
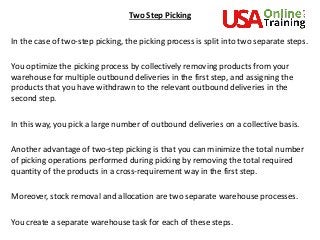
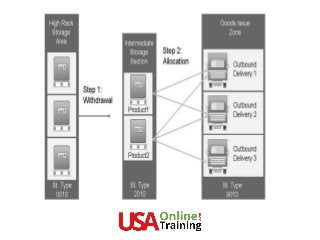
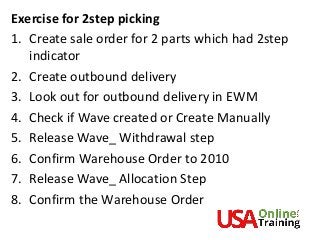
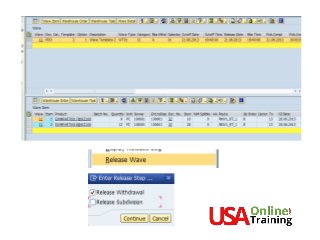
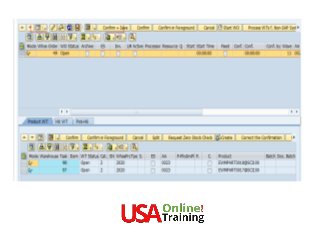
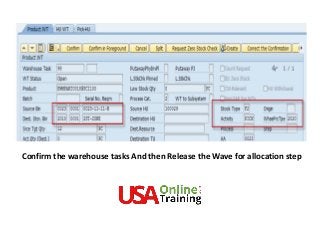
SAP EWM
Wave Management
https://www.usaonlinetraining.com
Call / WhatsApp : +91 9160401016
Several deliveries often leave the warehouse at the same
time, combined together in a shipment or loaded in one
truck.
To combine deliveries, you create waves, which gives you
better control over the time for picking and the workload
Waves are groupings of warehouse request items (that is,
the items of outbound delivery orders) to control
warehouse activities, like picking.
These groupings are then processed together in
subsequent processes, for example the transfer of all
warehouse request items assigned to a wave to warehouse
task creation.
Extended Warehouse Management can combine warehouse
request items and split items into waves on the basis of
criteria such as activity area, route, or product.
You can create waves automatically or manually with the use
of existing wave templates.
If you want to manually create a wave, on the SAP Easy
Access screen, choose Extended Warehouse Management →
Work Scheduling → Wave Management → /SCWM/WAVE
Maintain Waves and then choose Create.
EWM creates an empty wave. You must manually enter the
remaining information, for example, the assignment of
warehouse request items.
Automatic Wave Assignment
You can automate the assignment of warehouse request items to
waves.
Extended Warehouse Management uses the condition technique to
determine wave templates.
This enables EWM to determine which wave template corresponds
to certain data from the header, item, or split item of a warehouse
request.
Looking for SAP EWM Online Training
Visit : https://www.usaonlinetraining.com/sap-ewm-training
Contact / WhatsApp : +91 9160401016
Prerequisites are that you:
• Have created wave templates
• Have defined the conditions for wave template
determination
• Have created condition records that connect the
conditions and wave templates
• Have set the Automatic Wave Creation indicator for
the warehouse process type that is found for the
warehouse request item
EWM performs automatic wave assignment as follows:
EWM has multiple warehouse request items.
1. After you or EWM have created or changed a warehouse request, EWM
creates a Post Processing Framework action (PPF action).
2. When this PPF action is processed, EWM uses the condition technique to
determine valid wave templates for the delivery for each warehouse
request item. Depending on your settings for the condition technique,
EWM determines one or more valid wave templates for each item or split
item in the warehouse request.
3. EWM reads the attribute data for each wave template.
4. For each wave template, EWM determines whether the wave to be
created lies within the period of time between the actual point in time
and the planned completion time for the warehouse request item. The
actual point in time is the current system date and system time.
Depending on whether a relevant wave exists already, and whether it has
already been released, EWM uses this wave or creates a new one.
5. EWM attempts to find a valid wave template.
6. EWM determines the sequence for the best wave template and wave
template option.
7. EWM transfers the results, in other words, all valid wave templates and wave
template options for each item or split item, in a warehouse request to
Business Add-In (BAdI) /SCWM/EX_WAVE_PLAN, method CHANGE_WAVES.
8. EWM assigns a wave or wave template to each item or split item in a
warehouse request. EWM checks whether a wave already exists for this wave
template option.
Wave Templates
A wave template is a schema that defines the attributes of all the
waves that are based on it.
It serves as the infrastructure for automatic wave assignment. Wave
templates enable the same wave attributes to be reused for
different warehouse request items that comply with the same
conditions.
You can also use wave templates to manually create waves, or, in the
case of automatic wave assignment, to assign items or split items
from the warehouse requests to existing waves that are based on
the wave templates.
Structure
A wave template may consist of one or more wave template options.
Wave Template Attributes
The following attributes are available for wave templates:
Release method with the possible values Automatic, Immediate, and Manual
Wave type that enables specific monitoring in the warehouse management
monitor
Wave category that you can use as a filteror warehouse order creation rules
Wave Assignment Also Possible After Wave Release indicator that you
can use to assign additional warehouse request items to a wave that has
already been released
Control for bin denial, where you can choose between the following:
- You can leave an item in a wave, in other words, release it again later.
- You can remove an item from a wave, in other words, reassign the item.
- You can have the system immediately create a warehouse task with an
alternative source bin.
Wave Template Option Attributes
The following attributes are available for wave templates options:
Data for date and time:
- Lock time: The time up to which you can add items to the wave
- The number of days before the wave completion date that is used to define the lock date (lock
days)
- Release time: The time by which the wave must be released
- The number of days before the wave completion date that is used to define the release date
(release days)
- Picking completion time: the time by which you must have completed picking for the wave
- The number of days before the wave completion date that is used to define the picking
completion date (pick completion days)
- Packing completion time: The time by which you must have completed packing for the wave.
- The number of days before the wave completion date that is used to define the packing
completion date (packing completion days)
- Staging completion time: The time by which you must have completed material staging for the
wave
- The number of days before the wave completion date that is used to define the staging
completion date (staging completion days)
- Wave completion time: The time when the completion of all processing operations for the wave
is planned
Calendar for defining workdays
Staging area group for the resulting warehouse tasks (WTs)
Staging area for the resulting WTs
Indicator for special activity that determines another activity: You can use this activity to change
the activity category that is defined by the warehouse request. All WTs created when the wave is
released receive the new activity (and thus the corresponding activity area and pick path).
Mode that applies to all WTs created when the wave is released
A mode is a state that determines the following:
- Weighting factors used for warehouse order prioritization
- Time intervals and units of measure for rounding latest starting dates (LSDs)
Capacity profile for defining capacity limits
Wave Processing
You can process waves and thereby control your warehouse activities in the
following ways:
• Lock or unlock
You can lock a wave with the status I (initial). As a result, the status of the
wave becomes H (locked). When you unlock a wave, EWM resets the
status of the wave to I. You cannot release locked waves automatically.
• Merge
You can merge as many waves as you want. The prerequisites are:
The waves have not yet been released, in other words, they have the
status I (initial, wave is created) or H (hold, wave is locked).
All the waves have the same status, either I or H.
EWM assigns warehouse request items to the waves. When you merge
waves, EWM assigns all the warehouse request items for the selected
waves to the first wave selected. EWM always uses the name of the top
row.
• Release
Waves are used to create warehouse tasks and warehouse orders. They
can be released in the following ways:
– Automatically
EWM creates a job that automatically releases waves on the release
day and at the release time.
– Immediately
When you or EWM create a wave, EWM releases this wave
immediately.
– Manually
You can manually release a wave at any point in time in the monitor or
in wave processing. When you manually release waves, you can also
release locked waves. In this case, EWM sets the status Locked for
the warehouse orders created. As a result, these warehouse orders are
locked for further processing for the time being.
• Assign or remove assignment
You can assign warehouse request items to a wave or remove the assignment.
Here, the lock time for the wave must not have expired yet. Moreover, the
wave must not have been released yet. If you have set the Wave Assignment
Also Possible After Wave Release indicator as an attribute in the wave
template, you can, however, assign an additional warehouse request item to
waves that have already been released.
• Split
You can select a warehouse request item and remove it from the current
wave. EWM creates a copy of the wave and assigns the warehouse request
item to the copy.
• Assign automatically
EWM automatically assigns the chosen warehouse request items to waves.
To do this, the system uses the same logic as for the automatic wave
assignment.
• Delete
When EWM deletes a wave, it removes the assignment of all the warehouse
request items to the wave. EWM deletes a wave completely; in other words,
you can no longer archive it.
Exercise 1:
Create a Wave Manually
1. Create one Sale order with 6 items
2. Create multiple deliveries
3. Look out for all deliveries in EWM
4. Create Wave Manually /SCWM/WAVE
.
5. Release from WAVE transaction
6. Check the warehouse orders Created
7. Confirm the Warehouse Orders from MON after
reviewing the Pick HU’s
Confirm HU’s to Pack WC and follow subsequent
steps until GI posting
Exercise 2: Create WAVE Manually using WAVE
Template
1. Maintain a Wave template
2. Create multiple deliveries in ERP
3. Look out for deliveries in EWM
4. Create Wave Manually using Wave template
Assign items to Wave and release WAVE
Check WO created and Proceed until GI
Exercise 3:
Create WAVE automatically
1. Create a Wave template
/SCWM/WAVETMP - Maintain Wave Templates
2. Create Condition
/SCWM/WDGCM - Maintain Conditions for
Determining Wave Templates
3. Maintain Wave Types
4. Maintain Wave Categories
5. Set Automatic Wave Generation for Warehouse
Process Type
6. Assign Procedure to Document Type
7. Create Multiple deliveries
8. Look out for ODO in EWM
9. Check PPF actions
10. Check Warehouse Monitor to check WAVE
11. Check if release automatically on release time or
Release Manually
12. Check Warehouse Orders Created
13. Confirm the Warehouse Orders and proceed until GI
Two Step Picking
In the case of two-step picking, the picking process is split into two separate steps.
You optimize the picking process by collectively removing products from your
warehouse for multiple outbound deliveries in the first step, and assigning the
products that you have withdrawn to the relevant outbound deliveries in the
second step.
In this way, you pick a large number of outbound deliveries on a collective basis.
Another advantage of two-step picking is that you can minimize the total number
of picking operations performed during picking by removing the total required
quantity of the products in a cross-requirement way in the first step.
Moreover, stock removal and allocation are two separate warehouse processes.
You create a separate warehouse task for each of these steps.
Two-step picking splits the picking process in the warehouse into two separate
steps:
1. In the first picking step, the withdrawal, the following sub-steps occur:
a) You combine the outbound deliveries into a wave.
b) As soon as you form a group of outbound deliveries, EWM determines the relevance
of the corresponding products to two-step picking You can change the relevance of the
entire wave to two-step picking by changing the value in the Two-Step Pick. field on the
user interface for wave maintenance (no entry = not relevant, Two = two-step picking).
c) You create the withdrawal warehouse tasks for the wave, in other words, wave
release for the withdrawal step.
d) You pick the entire product quantity to fulfill the requirements from multiple
deliveries.
e) You confirm the warehouse tasks for the withdrawal step and, in doing so, you
confirm that the necessary products are in the intermediate storage section.
2. In the second picking step, the allocation, the following sub-steps
occur:
a) You create warehouse tasks for the allocation step, in other words, wave
release for the allocation step. In doing so, you distribute the total quantity
that has been picked among the individual requirements.
b) You transport the products that belong to a wave from the intermediate
storage section to the destination storage bins (for example, to a goods issue
zone or packing station).
c) You confirm the warehouse tasks for the allocation step and, in doing so,
you confirm that the necessary products are in the destination storage bins.
Set up:
Set Up Two-Step Picking
Define Warehouse Process Type
Specify Storage Type Search Sequence (STSS for the Allocation
step)
Determine Storage Type Search Sequence for Stock
Removal
Optimization of Access Strategies for Stock. Type
Determination in Stock Removal
Maintain 2 Step relevance at Product Master
Exercise for 2step picking
1. Create sale order for 2 parts which had 2step
indicator
2. Create outbound delivery
3. Look out for outbound delivery in EWM
4. Check if Wave created or Create Manually
5. Release Wave_ Withdrawal step
6. Confirm Warehouse Order to 2010
7. Release Wave_ Allocation Step
8. Confirm the Warehouse Order
Confirm the warehouse tasks And then Release the Wave for allocation step
Display the Warehouse Order and Confirm
And it can be seen that Picking in done in two steps
SAP EWM, S4HANA Embedded,
WM, MM,REFX ,PS, SAP TM
Oil & Gas,S4 HANA..and more
Other Courses
https://www.usaonlinetraining.com
Call / WhatsApp : +91 9160401016

SAP EWM Wave Management

  • 1.
  • 2.
    Several deliveries oftenleave the warehouse at the same time, combined together in a shipment or loaded in one truck. To combine deliveries, you create waves, which gives you better control over the time for picking and the workload Waves are groupings of warehouse request items (that is, the items of outbound delivery orders) to control warehouse activities, like picking. These groupings are then processed together in subsequent processes, for example the transfer of all warehouse request items assigned to a wave to warehouse task creation.
  • 3.
    Extended Warehouse Managementcan combine warehouse request items and split items into waves on the basis of criteria such as activity area, route, or product. You can create waves automatically or manually with the use of existing wave templates. If you want to manually create a wave, on the SAP Easy Access screen, choose Extended Warehouse Management → Work Scheduling → Wave Management → /SCWM/WAVE Maintain Waves and then choose Create. EWM creates an empty wave. You must manually enter the remaining information, for example, the assignment of warehouse request items.
  • 5.
    Automatic Wave Assignment Youcan automate the assignment of warehouse request items to waves. Extended Warehouse Management uses the condition technique to determine wave templates. This enables EWM to determine which wave template corresponds to certain data from the header, item, or split item of a warehouse request. Looking for SAP EWM Online Training Visit : https://www.usaonlinetraining.com/sap-ewm-training Contact / WhatsApp : +91 9160401016
  • 7.
    Prerequisites are thatyou: • Have created wave templates • Have defined the conditions for wave template determination • Have created condition records that connect the conditions and wave templates • Have set the Automatic Wave Creation indicator for the warehouse process type that is found for the warehouse request item
  • 8.
    EWM performs automaticwave assignment as follows: EWM has multiple warehouse request items. 1. After you or EWM have created or changed a warehouse request, EWM creates a Post Processing Framework action (PPF action). 2. When this PPF action is processed, EWM uses the condition technique to determine valid wave templates for the delivery for each warehouse request item. Depending on your settings for the condition technique, EWM determines one or more valid wave templates for each item or split item in the warehouse request. 3. EWM reads the attribute data for each wave template. 4. For each wave template, EWM determines whether the wave to be created lies within the period of time between the actual point in time and the planned completion time for the warehouse request item. The actual point in time is the current system date and system time. Depending on whether a relevant wave exists already, and whether it has already been released, EWM uses this wave or creates a new one.
  • 9.
    5. EWM attemptsto find a valid wave template. 6. EWM determines the sequence for the best wave template and wave template option. 7. EWM transfers the results, in other words, all valid wave templates and wave template options for each item or split item, in a warehouse request to Business Add-In (BAdI) /SCWM/EX_WAVE_PLAN, method CHANGE_WAVES. 8. EWM assigns a wave or wave template to each item or split item in a warehouse request. EWM checks whether a wave already exists for this wave template option.
  • 10.
    Wave Templates A wavetemplate is a schema that defines the attributes of all the waves that are based on it. It serves as the infrastructure for automatic wave assignment. Wave templates enable the same wave attributes to be reused for different warehouse request items that comply with the same conditions. You can also use wave templates to manually create waves, or, in the case of automatic wave assignment, to assign items or split items from the warehouse requests to existing waves that are based on the wave templates.
  • 11.
    Structure A wave templatemay consist of one or more wave template options. Wave Template Attributes The following attributes are available for wave templates: Release method with the possible values Automatic, Immediate, and Manual Wave type that enables specific monitoring in the warehouse management monitor Wave category that you can use as a filteror warehouse order creation rules Wave Assignment Also Possible After Wave Release indicator that you can use to assign additional warehouse request items to a wave that has already been released Control for bin denial, where you can choose between the following: - You can leave an item in a wave, in other words, release it again later. - You can remove an item from a wave, in other words, reassign the item. - You can have the system immediately create a warehouse task with an alternative source bin.
  • 12.
    Wave Template OptionAttributes The following attributes are available for wave templates options: Data for date and time: - Lock time: The time up to which you can add items to the wave - The number of days before the wave completion date that is used to define the lock date (lock days) - Release time: The time by which the wave must be released - The number of days before the wave completion date that is used to define the release date (release days) - Picking completion time: the time by which you must have completed picking for the wave - The number of days before the wave completion date that is used to define the picking completion date (pick completion days) - Packing completion time: The time by which you must have completed packing for the wave. - The number of days before the wave completion date that is used to define the packing completion date (packing completion days) - Staging completion time: The time by which you must have completed material staging for the wave - The number of days before the wave completion date that is used to define the staging completion date (staging completion days) - Wave completion time: The time when the completion of all processing operations for the wave is planned
  • 13.
    Calendar for definingworkdays Staging area group for the resulting warehouse tasks (WTs) Staging area for the resulting WTs Indicator for special activity that determines another activity: You can use this activity to change the activity category that is defined by the warehouse request. All WTs created when the wave is released receive the new activity (and thus the corresponding activity area and pick path). Mode that applies to all WTs created when the wave is released A mode is a state that determines the following: - Weighting factors used for warehouse order prioritization - Time intervals and units of measure for rounding latest starting dates (LSDs) Capacity profile for defining capacity limits
  • 14.
    Wave Processing You canprocess waves and thereby control your warehouse activities in the following ways: • Lock or unlock You can lock a wave with the status I (initial). As a result, the status of the wave becomes H (locked). When you unlock a wave, EWM resets the status of the wave to I. You cannot release locked waves automatically. • Merge You can merge as many waves as you want. The prerequisites are: The waves have not yet been released, in other words, they have the status I (initial, wave is created) or H (hold, wave is locked). All the waves have the same status, either I or H. EWM assigns warehouse request items to the waves. When you merge waves, EWM assigns all the warehouse request items for the selected waves to the first wave selected. EWM always uses the name of the top row.
  • 15.
    • Release Waves areused to create warehouse tasks and warehouse orders. They can be released in the following ways: – Automatically EWM creates a job that automatically releases waves on the release day and at the release time. – Immediately When you or EWM create a wave, EWM releases this wave immediately. – Manually You can manually release a wave at any point in time in the monitor or in wave processing. When you manually release waves, you can also release locked waves. In this case, EWM sets the status Locked for the warehouse orders created. As a result, these warehouse orders are locked for further processing for the time being.
  • 16.
    • Assign orremove assignment You can assign warehouse request items to a wave or remove the assignment. Here, the lock time for the wave must not have expired yet. Moreover, the wave must not have been released yet. If you have set the Wave Assignment Also Possible After Wave Release indicator as an attribute in the wave template, you can, however, assign an additional warehouse request item to waves that have already been released. • Split You can select a warehouse request item and remove it from the current wave. EWM creates a copy of the wave and assigns the warehouse request item to the copy. • Assign automatically EWM automatically assigns the chosen warehouse request items to waves. To do this, the system uses the same logic as for the automatic wave assignment. • Delete When EWM deletes a wave, it removes the assignment of all the warehouse request items to the wave. EWM deletes a wave completely; in other words, you can no longer archive it.
  • 17.
    Exercise 1: Create aWave Manually 1. Create one Sale order with 6 items 2. Create multiple deliveries 3. Look out for all deliveries in EWM 4. Create Wave Manually /SCWM/WAVE
  • 18.
  • 19.
    5. Release fromWAVE transaction 6. Check the warehouse orders Created
  • 20.
    7. Confirm theWarehouse Orders from MON after reviewing the Pick HU’s
  • 21.
    Confirm HU’s toPack WC and follow subsequent steps until GI posting
  • 22.
    Exercise 2: CreateWAVE Manually using WAVE Template 1. Maintain a Wave template
  • 23.
    2. Create multipledeliveries in ERP 3. Look out for deliveries in EWM 4. Create Wave Manually using Wave template
  • 24.
    Assign items toWave and release WAVE Check WO created and Proceed until GI
  • 25.
    Exercise 3: Create WAVEautomatically 1. Create a Wave template /SCWM/WAVETMP - Maintain Wave Templates
  • 26.
    2. Create Condition /SCWM/WDGCM- Maintain Conditions for Determining Wave Templates 3. Maintain Wave Types 4. Maintain Wave Categories
  • 27.
    5. Set AutomaticWave Generation for Warehouse Process Type 6. Assign Procedure to Document Type 7. Create Multiple deliveries 8. Look out for ODO in EWM 9. Check PPF actions
  • 28.
    10. Check WarehouseMonitor to check WAVE
  • 29.
    11. Check ifrelease automatically on release time or Release Manually 12. Check Warehouse Orders Created 13. Confirm the Warehouse Orders and proceed until GI
  • 30.
    Two Step Picking Inthe case of two-step picking, the picking process is split into two separate steps. You optimize the picking process by collectively removing products from your warehouse for multiple outbound deliveries in the first step, and assigning the products that you have withdrawn to the relevant outbound deliveries in the second step. In this way, you pick a large number of outbound deliveries on a collective basis. Another advantage of two-step picking is that you can minimize the total number of picking operations performed during picking by removing the total required quantity of the products in a cross-requirement way in the first step. Moreover, stock removal and allocation are two separate warehouse processes. You create a separate warehouse task for each of these steps.
  • 32.
    Two-step picking splitsthe picking process in the warehouse into two separate steps: 1. In the first picking step, the withdrawal, the following sub-steps occur: a) You combine the outbound deliveries into a wave. b) As soon as you form a group of outbound deliveries, EWM determines the relevance of the corresponding products to two-step picking You can change the relevance of the entire wave to two-step picking by changing the value in the Two-Step Pick. field on the user interface for wave maintenance (no entry = not relevant, Two = two-step picking). c) You create the withdrawal warehouse tasks for the wave, in other words, wave release for the withdrawal step. d) You pick the entire product quantity to fulfill the requirements from multiple deliveries. e) You confirm the warehouse tasks for the withdrawal step and, in doing so, you confirm that the necessary products are in the intermediate storage section.
  • 33.
    2. In thesecond picking step, the allocation, the following sub-steps occur: a) You create warehouse tasks for the allocation step, in other words, wave release for the allocation step. In doing so, you distribute the total quantity that has been picked among the individual requirements. b) You transport the products that belong to a wave from the intermediate storage section to the destination storage bins (for example, to a goods issue zone or packing station). c) You confirm the warehouse tasks for the allocation step and, in doing so, you confirm that the necessary products are in the destination storage bins.
  • 34.
    Set up: Set UpTwo-Step Picking Define Warehouse Process Type
  • 35.
    Specify Storage TypeSearch Sequence (STSS for the Allocation step) Determine Storage Type Search Sequence for Stock Removal
  • 36.
    Optimization of AccessStrategies for Stock. Type Determination in Stock Removal Maintain 2 Step relevance at Product Master
  • 37.
    Exercise for 2steppicking 1. Create sale order for 2 parts which had 2step indicator 2. Create outbound delivery 3. Look out for outbound delivery in EWM 4. Check if Wave created or Create Manually 5. Release Wave_ Withdrawal step 6. Confirm Warehouse Order to 2010 7. Release Wave_ Allocation Step 8. Confirm the Warehouse Order
  • 40.
    Confirm the warehousetasks And then Release the Wave for allocation step
  • 41.
    Display the WarehouseOrder and Confirm And it can be seen that Picking in done in two steps
  • 42.
    SAP EWM, S4HANAEmbedded, WM, MM,REFX ,PS, SAP TM Oil & Gas,S4 HANA..and more Other Courses https://www.usaonlinetraining.com Call / WhatsApp : +91 9160401016