
Recommended
More Related Content
What's hot
What's hot (20)
Similar to Capstone ms2
Similar to Capstone ms2 (20)
Recently uploaded
Recently uploaded (20)
Capstone ms2
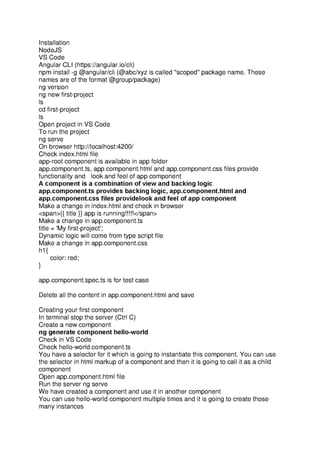
- 1. Installation NodeJS VS Code Angular CLI (https://angular.io/cli) npm install -g @angular/cli (@abc/xyz is called "scoped" package name. These names are of the format @group/package) ng version ng new first-project Is cd first-project Is Open project in VS Code To run the project ng serve On browser http://localhost:4200/ Check index.html file app-root component is available in app folder app.component.ts, app.component.html and app.component.css files provide functionality and look and feel of app component A component is a combination of view and backing logic app.component.ts provides backing logic, app.component.html and app.component.css files providelook and feel of app component Make a change in index.html and check in browser Make a change in app.component.ts title = 'My first-project'’; Dynamic logic will come from type script file Make a change in app.component.css h1{ color: red; } app.component.spec.ts is for test case Delete all the content in app.component.html and save Creating your first component In terminal stop the server (Ctrl C) Create a new component ng generate component hello-world Check in VS Code Check hello-world.component.ts You have a selector for it which is going to instantiate this component. You can use the selector in html markup of a component and then it is going to call it as a child component Open app.component.html file Run the server ng serve We have created a component and use it in another component You can use hello-world component multiple times and it is going to create those many instances
- 2. Check in browser Anatomy of a component We want to make a date component which prints current date Open terminal in VS Code ng generate component date Open date-component.ts and see the selector In app.component.html <app-date></app-date> Check it Every angular component is mainly a typescript class. Think of the HTML and CSS as just extra "attachments" to the main typescript file. So angular CLI creates a class for a component. Or in order to create a component you have to create a typescript class (if you were to do it yourself). After you have created the class you need to register the class as an angular componert. It is done with @Component annotation. You can try changing selector template Url attributes and also do required changes and can try it out(In date.component.ts file ) Binding data from component class Create a member variable in DateComponent class message: string = "hello"; In date.component.html file {{message}} Check it in browser Now instead of "hello" text change it to new Date() message: string = new Date().toDateString(); (or toString) In date.component.html file <div> <p>The date is:</p> <p> {{message}} </p> </div> Data binding in Angular refers to binding the data in the component instance to the HTML template. Any change to the data get automatically updated in the view. Right now it is one way flow of data - from component to html Data binding and async We want to constantly update time export class DateComponent implements Onlnit { dateMessage: string; constructor() { let currentDate=new Date() this.dateMessage=currentDate.toDateString()+' '+currentDate.toLocaleTimeString() } ngOnInit(): void { } }
- 3. And in html file <div> <p>The date is:</p> <p> {{dateMessage}} </p> </div> Right now the new Date object is created in constructor. So, it currently only executes when the page is loaded which causes the component instance to be created. In oorder to update time we need to create new Date object every second. So we'll use setlnterval in constructor export class DateComponent implements Onlnit { dateMessage: string | undefined; constructor() { setinterval(() => { let currentDate = new Date() this.dateMessage = currentDate.toDateString() + '' + currentDate.toLocaleTimeString() }, 1000) } ngOnInit(): void { } } Check in browser Template Interpolation Text interpolation lets you incorporate dynamic string values into your HTML templates.Interpolation refers to embedding expressions into marked up text. By default, interpolation uses the double curly braces {{ and }} as delimiters. {{dateMessage}}-double curly brackets trigger angular to do string interpolation In html {{1+1}} Define a num variable in class {{num*2}} Now double curly brackets with function call import { Component, Onlnit } from ‘@angular/core’; @Component({ selector: 'app-date’, templateUrl: './date.component.htm’, styleUrls: ['./date.component.css'] }) export class DateComponent implements Onlnit { dateMessage: string | undefined; num: number=1 2; constructor() { setinterval(() => { let currentDate = new Date()
- 4. this.dateMessage = currentDate.toDateString() + '' + currentDate.toLocaleTimeString() }, 1000) } ngOnlnit(): void { add(a:number,b:number}{ return a+b } } And in html file <div> <p>The date is:</p> <p> {{dateMessage}} </p> {{num*2}}<br> {{add(num,2)}} </div> Check it this is required in class but not in html import { Component, Onlnit } from '@angular/core’; @Component({ selector: 'app-date’, templateUrl: './date.component.htm’, styleUrls: ['./date.component.css'] }) export class DateComponent implements Onlnit { dateMessage: string | undefined; num: number=1 2; constructor() { setinterval(() => { let currentDate = new Date() this.dateMessage = currentDate.toDateString() + '' + currentDate.toLocaleTimeString() }, 1000) } ngOnlnit(): void { add(a:number,b:number}{
- 5. return a+b } someMeth() //here this.add(this.num,2) } } Looping with ngFor Make a new seconc-project Clear code from app.component.htm| and delete line title = 'app'; in app.component.ts Check with ng serve Stop the server and create new component address card ng generate component address-card It get registered in app.module.ts To check address-card component works, from address-card.component.ts file take the selector and use it in app.component.html file <app-address-card></app-address-card> Now in address-card.component.html <div> <h1>NU</hi> <h3>Computer</h3> <p>NH 8, Delhi - Jaipur Expy, Neemrana, Rajasthan 301705</p> <div> <p>Phone:</p> <p>123-456-7890</p> <p>345-789-1234</p> </div> </div> Now we con't want it to be hard coded we want it dynamic So in address-card.component.ts we'll create a user object import { Component, Onlnit } from ‘@angular/core’; @Component({ selector: 'app-address-card’, templateUrl: './address-card.component.htm'’, styleUrls: ['./address-card.component.css'] }) export class AddressCardComponent implements Onlnit { user={ name:'NU', title:‘Computer’, address:'NH 8, Delhi - Jaipur Expy, Neemrana, Rajasthan 301705’, phone: 123-456-7890", 345-789-1234" |
- 6. } constructor() { } ngOnInit(): void { } } Now this user object needs to be in constructor import { Component, Onlnit } from '@angular/core’; @Component({ selector: 'app-address-card’, templateUrl: './address-card.component.htm'’, styleUrls: ['./address-card.component.css'] }) export class AddressCardComponent implements Onlnit { user: any; constructor() { this.user={ name:NU’, title:‘Computer’, address:'NH 8, Delhi - Jaipur Expy, Neemrana, Rajasthan 301705’, phone:| 123-456-7890", "345-789-1234" | } } ngOnInit(): void { } } Now in address-card.component.html file <div> <h1>{{user.name}}</h1> <h3>{{user.title}}</h3> <p>{{user.address}}</p> <div> <p>Phone:</p> <p>{{user.phone[0]}}</p> <p>{{user.phone[1]}}</p> </div> </div> Now we want to loop through phone values <div>
- 7. <h1>{{user.name}}</h1> <h3>{{user.title}}</h3> <p>{{user.address}}</p> <div> <p>Phone:</p> <p *ngFor="let phNum of user.phone">{{phNum}}</p> </div> </div> Now add another phone number in address-card.component.ts file and check ngFor is a directive. A directive is something that you add to an element. nglf What if there is no phone number import { Component, Onlnit } from '@angular/core’; @Component({ selector: 'app-address-card’, templateUrl: './address-card.component.htm'’, styleUrls: ['./address-card.component.css'] }) export class AddressCardComponent implements Onlnit { user: any; constructor() { this.user={ name:NU’, title:‘Computer’, address:'NH 8, Delhi - Jaipur Expy, Neemrana, Rajasthan 301705’, } } ngOnInit(): void { } } But Phone: still appears Now we con't want to display when there are no phone numbers <div> <h1>{{user.name}}</h1> <h3>{{user.title}}</h3> <p>{{user.address}}</p> <div *nglf="user.phone.length>0"> <p>Phone:</p> <p *ngFor="let phNum of user.phone">{{phNum}}</p> </div>
- 8. </div> nglf is not hiding the div element, it is removing it from the dom, if the expression evaluates to false This will also work <div *nglf="user.phone.length"> Also check by adding phone numbers import { Component, Onlnit} from '@angular/core’; @Component({ selector: 'app-address-card’, templateUrl: './address-card.component.htm'’, styleUrls: ['./address-card.component.css'] }) export class AddressCardComponent implements Onlnit { user: any; constructor() { this.user={ name:NU’, title:‘Computer’, address:'NH 8, Delhi - Jaipur Expy, Neemrana, Rajasthan 301705’, phone:| 123-456-7890", "345-789-1234" | } } ngOnInit(): void { } } Passing input to component We want to pass the data <app-address-card name="NIIT University"></app-address-card> and in address-card.component.ts (Move the code from constructor to ngOnInit()) import { Component, Input, Onlnit } from '@angular/core’; @Component({ selector: 'app-address-card’, templateUrl: './address-card.component.htm'’, styleUrls: ['./address-card.component.css'] }) export class AddressCardComponent implements Onlnit { user: any; @Input(‘name') userName: string | undefined; constructor() {
- 9. } ngOnlnit(): void { this.user={ name:this.userName, title:‘Computer’, address:'NH 8, Delhi - Jaipur Expy, Neemrana, Rajasthan 301705’, ngOninit - executes code when component is fully initialized. A lifecycle hook that is called after Angular has initialized all data-bound properties of a directive. https://v2.angular.io/docs/ts/latest/guide/lifecycle-hooks.html https ://angular.io/guide/lifecycle-hooks When you use a selector angular creates an instance of a class. So the constructor is executed constructor - you can write code when object is created. (e.g. to populate data) Angular also does few other things after object is created (e.g. @Input). So after creating object it populates the values. It is after the creation of object that angular populates the value. You want to run the code once object has been fully created and initialized. You cannot run that code in the constructor. Angular provides Life cycle hooks for it. When angular object is fully initialized it will call ngOnInit method(). So you can write your @Input code in ngOnInit method. You can write the code without “implements Onlnit". It is only for compile checking for developer. The code would run the same. Angular is not looking for the interface, it is looking for the method (e.g. ngOnInit()) Passing member variables to components Apart from name passing we can pass other attributes of Address. That would be tedious. Instead we can pass an object which will contain all the values that the address-card component need. In order to create that object we need to create a class as an API for our component. In address-card folder create a new file user.model.ts export class User{ name: string designation: string address: string phone: string [] } The definite assignment assertion is a feature that allows a! to be placed after
- 10. instance property and variable declarations to relay to TypeScript that a variable is indeed assigned for all intents and purposes, even if TypeScript’s analyses cannot detect so. Now in address-card.component.ts import { Component, Input, Onlnit} from '@angular/core’; import { User } from './user.model'; @Component({ selector: 'app-address-card’, templateUrl: './address-card.component.htm'’, styleUrls: ['./address-card.component.css'] }) export class AddressCardComponent implements Onlnit { user: any; @Input(‘user') userOb}!: User; constructor() { } ngOnlnit(): void { this.user={ name:this.userObj.name, title:this. userObj.designation, address:this.userObj.address, phone:this.userObj.phone } In order to pass an instance of user - you need to first create that instance in app.component.ts file. App component is using address card component. App component need to pass instance of user to address-card component. In order to do that it need to create that instance first. Now in app.component.ts file (we'll make an instance of User) import { Component } from '@angular/core’; import { User } from './address-card/user.model'; @Component({ selector: 'app-root’, templateUrl: './app.component.htm’, styleUrls: ['./app.component.css'] }) export class AppComponent { user!: User; constructor(){
- 11. this.user=new User() this.user.name="NU" this.user.designation="Computer" this. user.address="Neemrana" this.user.phone=[ '123-456-7890' ] } Now in app.component.html <app-address-card user="user"></app-address-card> will give error (because user is being assigned a string value - user) To evaluate the user <app-address-card [user]="user"></app-address-card> This telles angular not to take the value inline , instead evaluate it and take the member variable that it refers to. Styling angular components address-card.component.css .address-card{ border: 1px gray solid; padding: 15px; } -name{ font-family: "verdana", sans-serif; } .title{ font-style: italic; } .address{ font-size: 15x; } .phone{ border-left: 1px gray solid; padding-left: 5px; } Now | want class name, title etc only if the class happen in address-card class element (<div class="address-card">). So if there is another class title in html and you don't want it to be style like italic. You want only want "title" which is inside address-card to be style with italic. And in address-card.component.html <div class="address-card"> <h1 class="name">{f{fuser.name}}</h1>
- 12. <h3 class="title">{{user.title}}</n3> <p class="address">{{user.address}}</p> <div class="phone" *nglf="user.phone.length"> <p>Phone:</p> <p *ngFor="let phNum of user.phone">{{phNum}}</p> </div> </div> Now in app.component.html add a line <p class="title">Sample text</p> But it doesn't turn italic. Because the style that we apply in our address-card.component.css applies only to the markup inside the component. Now move this line <p class="title">Sample text</p> in address-card-component.html. Now it would work. This works because the way angular manages styling. Check in browser console.(An additional style has been appended to it). The [property] selector is used in CSS to style elements that have that particular property. This is angular trying to insulate styling that you are applying only to that component. It is intentional. Now how to apply global style?. You have global styles.css file (in src folder) Handling click event Expand and Collapse button for address Open address-card.component.ts file isCollapsed:boolean =true; Now in address-card.component.html file (address and phone should be in a div - because we want expand/collapse for both of them together) <div class="address-card"> <h1 class="name">{f{fuser.name}}</h1> <h3 class="title">{{user.title}}</n3> <div *nglf="tisCollapsed"> <p class="address">{{user.address}}</p> <div class="phone" *nglf="user.phone.length"> <p>Phone:</p> <p “ngFor="let phNum of user.phone">{{phNum}}</p> </div> </div> </div> <p class="title">Sample text</p> Now add a button in html (Expand/Collapse) <div class="address-card"> <h1 class="name">{f{fuser.name}}</h1> <h3 class="title">{{user.title}}</n3> <button>Expand / Collapse</button> <div *nglf="tisCollapsed"> <p class="address">{{user.address}}</p> <div class="phone" *nglf="user.phone.length"> <p>Phone:</p> <p “ngFor="let phNum of user.phone">{{phNum}}</p>
- 13. </div> </div> </div> <p class="title">Sample text</p> Define a function in address-card.component.ts file toggleCollapse(){ this.isCollapsed=!this.isCollapsed; } Now to call that function we will not use browser click event handler like <button onclick="abc()">. We want to call API of angular. So in address-card.component.html file <div class="address-card"> <h1 class="name">{f{fuser.name}}</h1> <h3 class="title">{{user.title}}</h3> <button (click)="toggleCollapse()">Expand / Collapse</button> <div *nglf="tisCollapsed"> <p class="address">{{user.address}}</p> <div class="phone" *nglf="user.phone.length"> <p>Phone:</p> <p “ngFor="let phNum of user.phone">{{phNum}}</p> </div> </div> </div> <p class="title">Sample text</p> Now to show right text - Expand or Collapse <div class="address-card"> <h1 class="name">{f{fuser.name}}</h1> <h3 class="title">{{user.title}}</h3> <button *nglf="isCollapsed" (click)="toggleCollapse()">Expand</button> <button *nglf="!isCollapsed" (click)="toggleCollapse()">Collapse</button> <div *nglf="tisCollapsed"> <p class="address">{{user.address}}</p> <div class="phone" *nglf="user.phone.length"> <p>Phone:</p> <p “ngFor="let phNum of user.phone">{{phNum}}</p> </div> </div> </div> <p class="title">Sample text</p> Two way data binding with ngModel (it can be used with forms) You update the component and view gets updated and vice versa. Open app.component.html file <input type="text'/> In app.component.ts file add instance variable inputText: string="Manish"
- 14. And in app.component.html file <input type="text" value="inputText"/> In order to angular evaluate it put it in [] <input type="text" [value]="inputText"/> Now to map it In app.component.html file <app-address-card [user]="user"></app-address-card> <input type="text" [value]="inputT ext"/><br> {{inputText}} Check it. Right now it is not showing the change. Because right now there is only one way data binding. To use two way data binding use ngModel directive In app.component.html file <app-address-card [user]="user"></app-address-card> <input type="text" ngModel="inputText"/><br> {{inputText}} In order to use ngModel we need to make one more change - module. To use ngModel you need to import standard angular module in app.module.ts In app.module.ts (in NgModule section->imports) imports: [ BrowserMocule, AppRoutingModule, FormsModule 1, and the right import for FormsModule import { FormsModule } from '@angular/forms'; In app.component.html file (use [] with ngModel) <app-address-card [user]="user"></app-address-card> <input type="text" [ngModel]="inputText"/><br> {{inputText}} But it still doesn't works (because right now it is one way binding) To make it two way use [()] <app-address-card [user]="user"></app-address-card> <input type="text" [(ngModel)]="inputText"/><br><br> {{inputText}} The [()] syntax is referred to as banana-in-a-box. It helps to remember the order: brackets outside, parenthesis inside. 0 -> data flowing from the component to the view ()-> data from view to component (Compare click event made above) Creating and using multiple Create a new project third-project ng new third-project
- 15. and delete the content of app.component.html file Open app.module.ts A module is a thing that consolidates different components. It does a lot more than that. Think of a module as some kind of container, some kind of namspace tha contains different things (e.g. AppComponent). So AppComponent is a part of AppModule. You can create multiple modules ina project and each module is going to contain components within it. So AppModule is a container for AppComponent. So modules might be required for big applications. To create a module ng generate module view It has created a folder view in app folder and a class in it And it does not have any declarations (there are no components associated with it now) It just have one import - CommonModule Now to create a component inside this module ng generate component view-component //don't run it But by default angular cli will create this component in app.module.ts (because that's where the root is (we are executing this command from the root - will assume that this component in app module)) But we want to create this component in view module So prefix with module name ng generate component view/view-component Notice it update view.module.ts file In declarations of view.module.ts file ViewComponentComponent has been added. We can also co all these things manually (without angular cli- by createing respective files and folders) Now ViewComponent is part of View Module (and it is nota part of app module) Open view-component.component.ts file and look at the selector. Now use this selector (in app module) app.component.html. It fails to compile. In browser inspector it will show app-view-component not known. To make it work in app.module.ts import ViewModule But it still doesn't works Because view.module.ts is working with a component that it is not exporting it. So in view.module.ts import { NgModule } from '@angular/core’; import { CommonModule } from '@angular/common'; import { ViewComponentComponent } from " view-component/view-component.component’; @NgModcule({ declarations: [ ViewComponentComponent 1 imports: [ CommonModule ], exports: [
- 16. ViewComponentComponent ] }) export class ViewModule { } So all in all 1. The module that need it, needs to import the module, whatever module the component is declared in 2. Whatever module the component is declared in has to export the component Create a service If you want to create business functionality which doesn't have a view - you can create services. Services are like classes as components are. ng generate service test It will create a service in app location Open test.service.ts file @Injectable annotation tells angular that this class is a service. (@Component - Angular Component) (@NgModule - Angular module) (@Injectable - Angular service) Its reference is not added in app.module.ts file Now if you want test.service.ts to be part of app module then you need to declare in @NgModule. Services that you use in your modules need to be listed in providers section of your @NgModule providers:| TestService | In test.service.ts file import { Injectable } from '@angular/core’; @Injectable({ providedIn: 'root' }) export class TestService { printToConsole(arg: any){ console.log(arg) } constructor() { } } Now to call this method printToConsole we'll use Dependency Injection Dependency Injection We want to call printfoConsole method from AppComponent class First - let us call the method by using instance constructor(){ let svc=new TestService() svc.printtoConsole("Manish") } But in this scenario we are binding TestService with AppComponent class
- 17. Second way - Dependeny Injection The idea of dependency injection is that when yo have a class that is dependent on another class - you don't have that class create that instance. What you do instead have the class declare its dependency and have that dependency injected. All you need to do declare a dependency on other services is just to create constructor arguments. Angular is going to look at the constructor and its arguments and it is going to see if any of these arguments are @Injectable. If there are services - angular is going to find that service (otherwise it will create one) and then it is going to pass that into the constructor (when this component is being created) In app.component.ts file import { Component } from '@angular/core’; import { TestService } from './test.service'; @Component({ selector: 'app-root’, templateUrl: './app.component.html’, styleUrls: ['./app.component.css'] }) export class AppComponent { constructor(svc: TestService){ svc.printtoConsole("Manish") } title = 'third-project’; } Check it in browser console. Now it is available till the constructor runs. We can store it in instance variable. A shortcut for doing it. import { Component } from '‘@angular/core’; import { TestService } from './test.service'; @Component({ selector: 'app-root’, templateUrl: './app.component.htm', styleUrls: ['./app.component.css'] }) export class AppComponent { private svc:TestService constructor(svc: TestService){ this.svc=svc; svc.printTtoConsole("Manish") } title = 'third-project’; } Or a shortcut import { Component } from '@angular/core’; import { TestService } from './test.service'; @Component({
- 18. selector: 'app-root’, templateUrl: './app.component.htm', styleUrls: ['./app.component.css'] }) export class AppComponent { ‘private svc:TestService constructor(private svc: TestService){ //this.svc=svc; this.svc.printToConsole("Manish") } title = 'third-project’; } Service Injection Context Difference between the components operate and the services operate in the context of module. A component can be declared inside module, in which case the component is only available to other components in the module. If you want to make it available outside the module you need to mark it in export; you need to add component in the exports and then other module needs it has to import. Ifa component has to be used outside its module - 2 rules 1. Owning module needs to export it 2. Then the module thats trying to use it needs to import the module. But in case of services it works differently. In app.module.ts - TestService has been provided in App module. You have added it in the providers section in the module. Now you can cdo dependency injection inside app.component.ts. Now there is another component - view component in the same project. Now what happens if we use dependency injection in view-component.component.ts and get access to TestService import { Component, Onlnit} from '@angular/core’; import { TestService } from ‘src/app/test.service'; @Component({ selector: 'app-view-component, templateUrl: './view-component.component.html’, styleUrls: ['.view-component.component.css'] }) export class ViewComponentComponent implements Onlnit { constructor(private svc: TestService) { svc.printtoConsole("From view module") } ngOnInit(): void { } } Now view.module.ts is not dependent on App module. It is other way round. The App module imports the view module. So can the view component access the service
- 19. that is inside App component? We have seen it works. How is it possible? It is possible because of the way services works in Angular. Services are not restricted to the module that they are provided in. App module has TestService in providers. In the case of a component (e.g.AppComponent) that component is only available in the module. But i case of service (or providers) Angular creates a common shared space for services. There is a common area that contains all the services in your application that anybody cann add too. Let's suppos you have 3 different modules (each having different providers). Those providers are not restricted to that module. They become part of this common shared service space and any other component that makes a dependency injection which declares its dependency on any of the services is going to get the instance of that service. It doesn't have to be part of the module. The shared service space is referred as Injection context (Dependency Injection context). This list is available to all the components in your application. This is the reason why when Angular CLI created service it did not automatically added to any of the module. It did not Know where to provide TestService. REST with HttpClient How co you make REST API call with Angular? There is a service called HttpClient. In order to use that service import the module that the service comes with. The module contains service and the providers section. So when you import that module that service get added in injection context so that it is available to all your components. In app.module.ts import { NgModule } from '@angular/core’; import { BrowserModule } from '@angular/platform-browser'; import { HttpClientModule } from '@angular/common/http’; import { AppRoutingModule } from './app-routing. module’; import { AppComponent } from './app.component; import { TestService } from '/test.service'; import { ViewModule } from '/view/view.module’; @NgModcule({ declarations: [ AppComponent 1 imports: [ BrowserModule, HttpClientModule, AppRoutingModule, ViewModule 1, providers: [TestService], bootstrap: [AppComponent] }) export class AppModule { }
- 20. Now in app.component.ts (we'll inject service HttpClient) ngOnInit(}{ //let response =this. http.get(‘https://api.github.com/users/koushikkothagal’) //Can't do since you get an async object and in Angular world it is called Observable (earlier in Angular JS it was called promise) } In app.component.ts import { HttpClient } from '‘@angular/common/http’; import { Component } from '@angular/core’; import { TestService } from './test.service'; @Component({ selector: 'app-root’, templateUrl: './app.component.htm', styleUrls: ['./app.component.css'] }) export class AppComponent { ‘private svc:TestService constructor(private svc: TestService, private http:HttpClient){ //this.svc=svc; this.svc.printToConsole("Manish") } ngOniInit(){ //let response =this. http.get(‘https://api.github.com/users/koushikkothagal’) //Can't do since it is an async request let obs=this.http.get(‘https://api.github.com/users/koushikkothagal’) obs.subscribe(()=>console.log("Got the response")) } title = 'third-project’; } Check in browser Change it to obs.subscribe((response)=>console.log(response))
- 21. Installation NodeJS VS Code Angular CLI (https://angular.io/cli) npm install -g @angular/cli (@abc/xyz is called "scoped" package name. These names are of the format @group/package) ng version ng new first-project Is cd first-project Is Open project in VS Code To run the project ng serve On browser http://localhost:4200/ Check index.html file app-root component is available in app folder app.component.ts, app.component.html and app.component.css files provide functionality and look and feel of app component A component is a combination of view and backing logic app.component.ts provides backing logic, app.component.html and app.component.css files providelook and feel of app component Make a change in index.html and check in browser Make a change in app.component.ts title = 'My first-project'’; Dynamic logic will come from type script file Make a change in app.component.css h1{ color: red; } app.component.spec.ts is for test case Delete all the content in app.component.html and save Creating your first component In terminal stop the server (Ctrl C) Create a new component ng generate component hello-world Check in VS Code Check hello-world.component.ts You have a selector for it which is going to instantiate this component. You can use the selector in html markup of a component and then it is going to call it as a child component Open app.component.html file Run the server ng serve We have created a component and use it in another component You can use hello-world component multiple times and it is going to create those many instances
- 22. Check in browser Anatomy of a component We want to make a date component which prints current date Open terminal in VS Code ng generate component date Open date-component.ts and see the selector In app.component.html <app-date></app-date> Check it Every angular component is mainly a typescript class. Think of the HTML and CSS as just extra "attachments" to the main typescript file. So angular CLI creates a class for a component. Or in order to create a component you have to create a typescript class (if you were to do it yourself). After you have created the class you need to register the class as an angular componert. It is done with @Component annotation. You can try changing selector template Url attributes and also do required changes and can try it out(In date.component.ts file ) Binding data from component class Create a member variable in DateComponent class message: string = "hello"; In date.component.html file {{message}} Check it in browser Now instead of "hello" text change it to new Date() message: string = new Date().toDateString(); (or toString) In date.component.html file <div> <p>The date is:</p> <p> {{message}} </p> </div> Data binding in Angular refers to binding the data in the component instance to the HTML template. Any change to the data get automatically updated in the view. Right now it is one way flow of data - from component to html Data binding and async We want to constantly update time export class DateComponent implements Onlnit { dateMessage: string; constructor() { let currentDate=new Date() this.dateMessage=currentDate.toDateString()+' '+currentDate.toLocaleTimeString() } ngOnInit(): void { } }
- 23. And in html file <div> <p>The date is:</p> <p> {{dateMessage}} </p> </div> Right now the new Date object is created in constructor. So, it currently only executes when the page is loaded which causes the component instance to be created. In oorder to update time we need to create new Date object every second. So we'll use setlnterval in constructor export class DateComponent implements Onlnit { dateMessage: string | undefined; constructor() { setinterval(() => { let currentDate = new Date() this.dateMessage = currentDate.toDateString() + '' + currentDate.toLocaleTimeString() }, 1000) } ngOnInit(): void { } } Check in browser Template Interpolation Text interpolation lets you incorporate dynamic string values into your HTML templates.Interpolation refers to embedding expressions into marked up text. By default, interpolation uses the double curly braces {{ and }} as delimiters. {{dateMessage}}-double curly brackets trigger angular to do string interpolation In html {{1+1}} Define a num variable in class {{num*2}} Now double curly brackets with function call import { Component, Onlnit } from ‘@angular/core’; @Component({ selector: 'app-date’, templateUrl: './date.component.htm’, styleUrls: ['./date.component.css'] }) export class DateComponent implements Onlnit { dateMessage: string | undefined; num: number=1 2; constructor() { setinterval(() => { let currentDate = new Date()
- 24. this.dateMessage = currentDate.toDateString() + '' + currentDate.toLocaleTimeString() }, 1000) } ngOnlnit(): void { add(a:number,b:number}{ return a+b } } And in html file <div> <p>The date is:</p> <p> {{dateMessage}} </p> {{num*2}}<br> {{add(num,2)}} </div> Check it this is required in class but not in html import { Component, Onlnit } from '@angular/core’; @Component({ selector: 'app-date’, templateUrl: './date.component.htm’, styleUrls: ['./date.component.css'] }) export class DateComponent implements Onlnit { dateMessage: string | undefined; num: number=1 2; constructor() { setinterval(() => { let currentDate = new Date() this.dateMessage = currentDate.toDateString() + '' + currentDate.toLocaleTimeString() }, 1000) } ngOnlnit(): void { add(a:number,b:number}{
- 25. return a+b } someMeth() //here this.add(this.num,2) } } Looping with ngFor Make a new seconc-project Clear code from app.component.htm| and delete line title = 'app'; in app.component.ts Check with ng serve Stop the server and create new component address card ng generate component address-card It get registered in app.module.ts To check address-card component works, from address-card.component.ts file take the selector and use it in app.component.html file <app-address-card></app-address-card> Now in address-card.component.html <div> <h1>NU</hi> <h3>Computer</h3> <p>NH 8, Delhi - Jaipur Expy, Neemrana, Rajasthan 301705</p> <div> <p>Phone:</p> <p>123-456-7890</p> <p>345-789-1234</p> </div> </div> Now we con't want it to be hard coded we want it dynamic So in address-card.component.ts we'll create a user object import { Component, Onlnit } from ‘@angular/core’; @Component({ selector: 'app-address-card’, templateUrl: './address-card.component.htm'’, styleUrls: ['./address-card.component.css'] }) export class AddressCardComponent implements Onlnit { user={ name:'NU', title:‘Computer’, address:'NH 8, Delhi - Jaipur Expy, Neemrana, Rajasthan 301705’, phone: 123-456-7890", 345-789-1234" |
- 26. } constructor() { } ngOnInit(): void { } } Now this user object needs to be in constructor import { Component, Onlnit } from '@angular/core’; @Component({ selector: 'app-address-card’, templateUrl: './address-card.component.htm'’, styleUrls: ['./address-card.component.css'] }) export class AddressCardComponent implements Onlnit { user: any; constructor() { this.user={ name:NU’, title:‘Computer’, address:'NH 8, Delhi - Jaipur Expy, Neemrana, Rajasthan 301705’, phone:| 123-456-7890", "345-789-1234" | } } ngOnInit(): void { } } Now in address-card.component.html file <div> <h1>{{user.name}}</h1> <h3>{{user.title}}</h3> <p>{{user.address}}</p> <div> <p>Phone:</p> <p>{{user.phone[0]}}</p> <p>{{user.phone[1]}}</p> </div> </div> Now we want to loop through phone values <div>
- 27. <h1>{{user.name}}</h1> <h3>{{user.title}}</h3> <p>{{user.address}}</p> <div> <p>Phone:</p> <p *ngFor="let phNum of user.phone">{{phNum}}</p> </div> </div> Now add another phone number in address-card.component.ts file and check ngFor is a directive. A directive is something that you add to an element. nglf What if there is no phone number import { Component, Onlnit } from '@angular/core’; @Component({ selector: 'app-address-card’, templateUrl: './address-card.component.htm'’, styleUrls: ['./address-card.component.css'] }) export class AddressCardComponent implements Onlnit { user: any; constructor() { this.user={ name:NU’, title:‘Computer’, address:'NH 8, Delhi - Jaipur Expy, Neemrana, Rajasthan 301705’, } } ngOnInit(): void { } } But Phone: still appears Now we con't want to display when there are no phone numbers <div> <h1>{{user.name}}</h1> <h3>{{user.title}}</h3> <p>{{user.address}}</p> <div *nglf="user.phone.length>0"> <p>Phone:</p> <p *ngFor="let phNum of user.phone">{{phNum}}</p> </div>
- 28. </div> nglf is not hiding the div element, it is removing it from the dom, if the expression evaluates to false This will also work <div *nglf="user.phone.length"> Also check by adding phone numbers import { Component, Onlnit} from '@angular/core’; @Component({ selector: 'app-address-card’, templateUrl: './address-card.component.htm'’, styleUrls: ['./address-card.component.css'] }) export class AddressCardComponent implements Onlnit { user: any; constructor() { this.user={ name:NU’, title:‘Computer’, address:'NH 8, Delhi - Jaipur Expy, Neemrana, Rajasthan 301705’, phone:| 123-456-7890", "345-789-1234" | } } ngOnInit(): void { } } Passing input to component We want to pass the data <app-address-card name="NIIT University"></app-address-card> and in address-card.component.ts (Move the code from constructor to ngOnInit()) import { Component, Input, Onlnit } from '@angular/core’; @Component({ selector: 'app-address-card’, templateUrl: './address-card.component.htm'’, styleUrls: ['./address-card.component.css'] }) export class AddressCardComponent implements Onlnit { user: any; @Input(‘name') userName: string | undefined; constructor() {
- 29. } ngOnlnit(): void { this.user={ name:this.userName, title:‘Computer’, address:'NH 8, Delhi - Jaipur Expy, Neemrana, Rajasthan 301705’, ngOninit - executes code when component is fully initialized. A lifecycle hook that is called after Angular has initialized all data-bound properties of a directive. https://v2.angular.io/docs/ts/latest/guide/lifecycle-hooks.html https ://angular.io/guide/lifecycle-hooks When you use a selector angular creates an instance of a class. So the constructor is executed constructor - you can write code when object is created. (e.g. to populate data) Angular also does few other things after object is created (e.g. @Input). So after creating object it populates the values. It is after the creation of object that angular populates the value. You want to run the code once object has been fully created and initialized. You cannot run that code in the constructor. Angular provides Life cycle hooks for it. When angular object is fully initialized it will call ngOnInit method(). So you can write your @Input code in ngOnInit method. You can write the code without “implements Onlnit". It is only for compile checking for developer. The code would run the same. Angular is not looking for the interface, it is looking for the method (e.g. ngOnInit()) Passing member variables to components Apart from name passing we can pass other attributes of Address. That would be tedious. Instead we can pass an object which will contain all the values that the address-card component need. In order to create that object we need to create a class as an API for our component. In address-card folder create a new file user.model.ts export class User{ name: string designation: string address: string phone: string [] } The definite assignment assertion is a feature that allows a! to be placed after
- 30. instance property and variable declarations to relay to TypeScript that a variable is indeed assigned for all intents and purposes, even if TypeScript’s analyses cannot detect so. Now in address-card.component.ts import { Component, Input, Onlnit} from '@angular/core’; import { User } from './user.model'; @Component({ selector: 'app-address-card’, templateUrl: './address-card.component.htm'’, styleUrls: ['./address-card.component.css'] }) export class AddressCardComponent implements Onlnit { user: any; @Input(‘user') userOb}!: User; constructor() { } ngOnlnit(): void { this.user={ name:this.userObj.name, title:this. userObj.designation, address:this.userObj.address, phone:this.userObj.phone } In order to pass an instance of user - you need to first create that instance in app.component.ts file. App component is using address card component. App component need to pass instance of user to address-card component. In order to do that it need to create that instance first. Now in app.component.ts file (we'll make an instance of User) import { Component } from '@angular/core’; import { User } from './address-card/user.model'; @Component({ selector: 'app-root’, templateUrl: './app.component.htm’, styleUrls: ['./app.component.css'] }) export class AppComponent { user!: User; constructor(){
- 31. this.user=new User() this.user.name="NU" this.user.designation="Computer" this. user.address="Neemrana" this.user.phone=[ '123-456-7890' ] } Now in app.component.html <app-address-card user="user"></app-address-card> will give error (because user is being assigned a string value - user) To evaluate the user <app-address-card [user]="user"></app-address-card> This tells angular not to take the value inline , instead evaluate it and take the member variable that it refers to. Styling angular components address-card.component.css .address-card{ border: 1px gray solid; padding: 15px; } -name{ font-family: "verdana", sans-serif; } .title{ font-style: italic; } .address{ font-size: 15x; } .phone{ border-left: 1px gray solid; padding-left: 5px; } Now | want class name, title etc only if the class happen in address-card class element (<div class="address-card">). So if there is another class title in html and you don't want it to be style like italic. You want only want "title" which is inside address-card to be style with italic. And in address-card.component.html <div class="address-card"> <h1 class="name">{f{fuser.name}}</h1>
- 32. <h3 class="title">{{user.title}}</n3> <p class="address">{{user.address}}</p> <div class="phone" *nglf="user.phone.length"> <p>Phone:</p> <p *ngFor="let phNum of user.phone">{{phNum}}</p> </div> </div> Now in app.component.html add a line <p class="title">Sample text</p> But it doesn't turn italic. Because the style that we apply in our address-card.component.css applies only to the markup inside the component. Now move this line <p class="title">Sample text</p> in address-card-component.html. Now it would work. This works because the way angular manages styling. Check in browser console.(An additional style has been appended to it). The [property] selector is used in CSS to style elements that have that particular property. This is angular trying to insulate styling that you are applying only to that component. It is intentional. Now how to apply global style?. You have global styles.css file (in src folder) Handling click event Expand and Collapse button for address Open address-card.component.ts file isCollapsed:boolean =true; Now in address-card.component.html file (address and phone should be in a div - because we want expand/collapse for both of them together) <div class="address-card"> <h1 class="name">{f{fuser.name}}</h1> <h3 class="title">{{user.title}}</n3> <div *nglf="tisCollapsed"> <p class="address">{{user.address}}</p> <div class="phone" *nglf="user.phone.length"> <p>Phone:</p> <p “ngFor="let phNum of user.phone">{{phNum}}</p> </div> </div> </div> <p class="title">Sample text</p> Now add a button in html (Expand/Collapse) <div class="address-card"> <h1 class="name">{f{fuser.name}}</h1> <h3 class="title">{{user.title}}</n3> <button>Expand / Collapse</button> <div *nglf="tisCollapsed"> <p class="address">{{user.address}}</p> <div class="phone" *nglf="user.phone.length"> <p>Phone:</p> <p “ngFor="let phNum of user.phone">{{phNum}}</p>
- 33. </div> </div> </div> <p class="title">Sample text</p> Define a function in address-card.component.ts file toggleCollapse(){ this.isCollapsed=!this.isCollapsed; } Now to call that function we will not use browser click event handler like <button onclick="abc()">. We want to call API of angular. So in address-card.component.html file <div class="address-card"> <h1 class="name">{f{fuser.name}}</h1> <h3 class="title">{{user.title}}</h3> <button (click)="toggleCollapse()">Expand / Collapse</button> <div *nglf="tisCollapsed"> <p class="address">{{user.address}}</p> <div class="phone" *nglf="user.phone.length"> <p>Phone:</p> <p “ngFor="let phNum of user.phone">{{phNum}}</p> </div> </div> </div> <p class="title">Sample text</p> Now to show right text - Expand or Collapse <div class="address-card"> <h1 class="name">{f{fuser.name}}</h1> <h3 class="title">{{user.title}}</h3> <button *nglf="isCollapsed" (click)="toggleCollapse()">Expand</button> <button *nglf="!isCollapsed" (click)="toggleCollapse()">Collapse</button> <div *nglf="tisCollapsed"> <p class="address">{{user.address}}</p> <div class="phone" *nglf="user.phone.length"> <p>Phone:</p> <p “ngFor="let phNum of user.phone">{{phNum}}</p> </div> </div> </div> <p class="title">Sample text</p> Two way data binding with ngModel (it can be used with forms) You update the component and view gets updated and vice versa. Open app.component.html file <input type="text'/> In app.component.ts file add instance variable inputText: string="Manish"
- 34. And in app.component.html file <input type="text" value="inputText"/> In order to angular evaluate it put it in [] <input type="text" [value]="inputText"/> Now to map it In app.component.html file <app-address-card [user]="user"></app-address-card> <input type="text" [value]="inputT ext"/><br> {{inputText}} Check it. Right now it is not showing the change. Because right now there is only one way data binding. To use two way data binding use ngModel directive In app.component.html file <app-address-card [user]="user"></app-address-card> <input type="text" ngModel="inputText"/><br> {{inputText}} In order to use ngModel we need to make one more change - module. To use ngModel you need to import standard angular module in app.module.ts In app.module.ts (in NgModule section->imports) imports: [ BrowserMocule, AppRoutingModule, FormsModule 1, and the right import for FormsModule import { FormsModule } from '@angular/forms'; In app.component.html file (use [] with ngModel) <app-address-card [user]="user"></app-address-card> <input type="text" [ngModel]="inputText"/><br> {{inputText}} But it still doesn't works (because right now it is one way binding) To make it two way use [()] <app-address-card [user]="user"></app-address-card> <input type="text" [(ngModel)]="inputText"/><br><br> {{inputText}} The [()] syntax is referred to as banana-in-a-box. It helps to remember the order: brackets outside, parenthesis inside. 0 -> data flowing from the component to the view ()-> data from view to component (Compare click event made above) Creating and using multiple modules Create a new project third-project ng new third-project
- 35. and delete the content of app.component.html file Open app.module.ts A module is a thing that consolidates different components. It does a lot more than that. Think of a module as some kind of container, some kind of namspace tha contains different things (e.g. AppComponent). So AppComponent is a part of AppModule. You can create multiple modules ina project and each module is going to contain components within it. So AppModule is a container for AppComponent. So modules might be required for big applications. To create a module ng generate module view It has created a folder view in app folder and a class in it And it does not have any declarations (there are no components associated with it now) It just have one import - CommonModule Now to create a component inside this module ng generate component view-component //don't run it But by default angular cli will create this component in app.module.ts (because that's where the root is (we are executing this command from the root - will assume that this component in app module)) But we want to create this component in view module So prefix with module name ng generate component view/view-component Notice it update view.module.ts file In declarations of view.module.ts file ViewComponentComponent has been added. We can also co all these things manually (without angular cli- by createing respective files and folders) Now ViewComponent is part of View Module (and it is nota part of app module) Open view-component.component.ts file and look at the selector. Now use this selector (in app module) app.component.html. It fails to compile. In browser inspector it will show app-view-component not known. To make it work in app.module.ts import ViewModule But it still doesn't works Because view.module.ts is working with a component that it is not exporting it. So in view.module.ts import { NgModule } from '@angular/core’; import { CommonModule } from '@angular/common'; import { ViewComponentComponent } from " view-component/view-component.component’; @NgModcule({ declarations: [ ViewComponentComponent 1 imports: [ CommonModule ], exports: [
- 36. ViewComponentComponent ] }) export class ViewModule { } So all in all 1. The module that need it, needs to import the module, whatever module the component is declared in 2. Whatever module the component is declared in has to export the component Create a service If you want to create business functionality which doesn't have a view - you can create services. Services are like classes as components are. ng generate service test It will create a service in app location Open test.service.ts file @Injectable annotation tells angular that this class is a service. (@Component - Angular Component) (@NgModule - Angular module) (@Injectable - Angular service) Its reference is not added in app.module.ts file Now if you want test.service.ts to be part of app module then you need to declare in @NgModule. Services that you use in your modules need to be listed in providers section of your @NgModule providers:| TestService | In test.service.ts file import { Injectable } from '@angular/core’; @Injectable({ providedIn: 'root' }) export class TestService { printToConsole(arg: any){ console.log(arg) } constructor() { } } Now to call this method printToConsole we'll use Dependency Injection Dependency Injection We want to call printfoConsole method from AppComponent class First - let us call the method by using instance constructor(){ let svc=new TestService() svc.printtoConsole("Manish") } But in this scenario we are binding TestService with AppComponent class
- 37. Second way - Dependeny Injection The idea of dependency injection is that when you have a class that is dependent on another class - you don't have that class create that instance. What you do instead have the class declare its dependency and have that dependency injected. All you need to do declare a dependency on other services is just to create constructor arguments. Angular is going to look at the constructor and its arguments and it is going to see if any of these arguments are @Injectable. If there are services - angular is going to find that service (otherwise it will create one) and then it is going to pass that into the constructor (when this component is being created) In app.component.ts file import { Component } from '@angular/core’; import { TestService } from './test.service'; @Component({ selector: 'app-root’, templateUrl: './app.component.html’, styleUrls: ['./app.component.css'] }) export class AppComponent { constructor(svc: TestService){ svc.printtoConsole("Manish") } title = 'third-project’; } Check it in browser console. Now it is available till the constructor runs. We can store it in instance variable. A shortcut for doing it. import { Component } from '‘@angular/core’; import { TestService } from './test.service'; @Component({ selector: 'app-root’, templateUrl: './app.component.htm', styleUrls: ['./app.component.css'] }) export class AppComponent { private svc:TestService constructor(svc: TestService){ this.svc=svc; svc.printTtoConsole("Manish") } title = 'third-project’; } Or a shortcut import { Component } from '@angular/core’; import { TestService } from './test.service'; @Component({
- 38. selector: 'app-root’, templateUrl: './app.component.htm', styleUrls: ['./app.component.css'] }) export class AppComponent { ‘private svc:TestService constructor(private svc: TestService){ //this.svc=svc; this.svc.printToConsole("Manish") } title = 'third-project’; } Service Injection Context Difference between the components operate and the services operate in the context of module. A component can be declared inside module, in which case the component is only available to other components in the module. If you want to make it available outside the module you need to mark it in export; you need to add component in the exports and then other module needs it has to import. Ifa component has to be used outside its module - 2 rules 1. Owning module needs to export it 2. Then the module thats trying to use it needs to import the module. But in case of services it works differently. In app.module.ts - TestService has been provided in App module. You have added it in the providers section in the module. Now you can cdo dependency injection inside app.component.ts. Now there is another component - view component in the same project. Now what happens if we use dependency injection in view-component.component.ts and get access to TestService import { Component, Onlnit} from '@angular/core’; import { TestService } from ‘src/app/test.service'; @Component({ selector: 'app-view-component, templateUrl: './view-component.component.html’, styleUrls: ['.view-component.component.css'] }) export class ViewComponentComponent implements Onlnit { constructor(private svc: TestService) { svc.printtoConsole("From view module") } ngOnInit(): void { } } Now view.module.ts is not dependent on App module. It is other way round. The App module imports the view module. So can the view component access the service
- 39. that is inside App component? We have seen it works. How is it possible? It is possible because of the way services works in Angular. Services are not restricted to the module that they are provided in. App module has TestService in providers. In the case of a component (e.g.AppComponent) that component is only available in the module. But i case of service (or providers) Angular creates a common shared space for services. There is a common area that contains all the services in your application that anybody cann add too. Let's suppos you have 3 different modules (each having different providers). Those providers are not restricted to that module. They become part of this common shared service space and any other component that makes a dependency injection which declares its dependency on any of the services is going to get the instance of that service. It doesn't have to be part of the module. The shared service space is referred as Injection context (Dependency Injection context). This list is available to all the components in your application. This is the reason why when Angular CLI created service it did not automatically added to any of the module. It did not Know where to provide TestService. REST with HttpClient How co you make REST API call with Angular? There is a service called HttpClient. In order to use that service import the module that the service comes with. The module contains service and the providers section. So when you import that module that service get added in injection context so that it is available to all your components. In app.module.ts import { NgModule } from '@angular/core’; import { BrowserModule } from '@angular/platform-browser'; import { HttpClientModule } from '@angular/common/http’; import { AppRoutingModule } from './app-routing. module’; import { AppComponent } from './app.component; import { TestService } from '/test.service'; import { ViewModule } from '/view/view.module’; @NgModcule({ declarations: [ AppComponent 1 imports: [ BrowserModule, HttpClientModule, AppRoutingModule, ViewModule 1, providers: [TestService], bootstrap: [AppComponent] }) export class AppModule { }
- 40. Now in app.component.ts (we'll inject service HttpClient) ngOnInit(}{ //let response =this. http.get(‘https://api.github.com/users/koushikkothagal’) //Can't do since you get an async object and in Angular world it is called Observable (earlier in Angular JS it was called promise) } In app.component.ts import { HttpClient } from '‘@angular/common/http’; import { Component } from '@angular/core’; import { TestService } from './test.service'; @Component({ selector: 'app-root’, templateUrl: './app.component.htm', styleUrls: ['./app.component.css'] }) export class AppComponent { ‘private svc:TestService constructor(private svc: TestService, private http:HttpClient){ //this.svc=svc; this.svc.printToConsole("Manish") } ngOniInit(){ //let response =this. http.get(‘https://api.github.com/users/koushikkothagal’) //Can't do since it is an async request let obs=this.http.get(‘https://api.github.com/users/koushikkothagal’) obs.subscribe(()=>console.log("Got the response")) } title = 'third-project’; } Check in browser Change it to obs.subscribe((response)=>console.log(response)) Github API access with username in form Update the view component In view-component.component.html file User Name : <input type="text"><br> <button>Search</button> We need to bind the input to member variable and then bind search click to a function
- 41. So User Name : <input type="text" [(ngModel)]="UserName"><br> <button>Search</button> For this to work we need FormModule in our View Module. So in view.module.ts file import { NgModule } from '@angular/core’; import { CommonModule } from '@angular/common'; import { ViewComponentComponent } from " view-component/view-component.component’; import { FormsModule } from '@angular/forms'; @NgModcule({ declarations: [ ViewComponentComponent 1, imports: [ CommonModule, FormsModule ], exports:[ViewComponentComponent] }) export class ViewModule { } Again in view-component.component.html file User Name : <input type="text" [(ngModel)]="UserName"><br> <button (click)="search()">Search</button> Now in view-component.component.ts file import { HttpClient } from '@angular/common/http'; import { Component, Onlnit } from ‘@angular/core’; import { TestService } from ‘src/app/test.service'; @Component({ selector: 'app-view-component, templateUrl: './view-component.component.html’, styleUrls: ['.view-component.component.css'] }) export class ViewComponentComponent implements Onlnit { userName: string="" response: any; constructor(private http: HttpClient) { search(){ let obs=this.http.get(‘https://api.github.com/users/'+this.userName) obs.subscribe((response)=>this.response=response) console.log(this.response) }
- 42. ngOnlnit(): void { } } Remove Git API code from app.component.ts file Check it in browser console Now we want to print the result in browser In view-component.component.html file User Name : <input type="text" [(ngModel)]="UserName"><br> <button (click)="search()">Search</button> <br><br> {{response. login} Check it (Ignore the errors in the browser console (it is because when the component loads up initially it has a blank response (because userName is blanl))) Again in view-component.component.html file User Name : <input type="text" [(ngModel)]="UserName"><br> <button (click)="search()">Search</button> <br><br> <p>Login Name : {{response.login}}</p> <p>Number of repos : {{response.public_repos}}</p> <p>Number of gists : {{response.public_gists}}</p> <p>Number of followers : {{response.followers}}</p> Check it Now we don't want Login Name :,Number of repos,etc to be displayed (click refresh) when there is no name. So use nglf User Name : <input type="text" [(ngModel)]="UserName"><br> <button (click)="search()">Search</button> <br><br> <div *nglf="response"> <p>Login Name : {{response.login}}</p> <p>Number of repos : {{response.public_repos}}</p> <p>Number of gists : {{response.public_gists}}</p> <p>Number of followers : {{response.followers}}</p> </div> Check it. Now errors in browser console has gone. Otherway to do it (apart from nglf (use 7?)) User Name : <input type="text" [(ngModel)]="UserName"><br> <button (click)="search()">Search</button> <br><br>
- 43. <p>Login Name: {{response?.login}}</p> <p>Number of repos : {{response?.public_repos}}</p> <p>Number of gists : {{response?.public_gists}}</p> <p>Number of followers : {{response?.followers}}</p> But in this case text is appearing. So use nglf Building an Angular Application Using ng serve we get a simple dev server. And it is very handy. You make a change in codebase, it automatically updates it and it automatically refreshes your browser By default we get hot reload in Angular. But when you'll be hosting this application, you con't need it. This is a waste. Secondly, when you create Angular application you are having a lot of code that could be optimized (when you are hosting on server). When you run ng serve command - Angular looks at your codebase and bundles up all your module and it creates a local server. Now this is a development server. Now how does it matter. Open your browser inpector and come to Network tab and refresh the page again. There are bunch of JS files that are loading. (runtime.js, styles.js, vendor.js). These are all pretty big files. And they are not even minified. We need to minify these files. If we want a simple component (three files) without any server side code, this is something you can host and deploy on CDN and have the user loaded without needing a server running at all times. This is static content. To generate this static content of the project - ng build ng build runs the Angular CLI which looks at your project and generates HTML, CSS and JS into one folder and that is going to be independent of Angular CLI, Node version. It is just static asset that you can deploy A dist folder is created. And it again has a bunch of files in it that can be hosted. You can deploy this folder into CDN To do it install nom package npm install http-server -g http-server lets you to host a directory on your machine as if you are hosting it ona CDN. You can access it locally. To run it http-server <dir name> http-server dist/third-project It is by default ng build --configuration production It also creates hashes (e.g. main.#value). The reason being if you update a file and build it again a new hash would be generated. So you cache your values on the server. Knowing that when there is a new build you'll get a new file name (that's referred to by index.html}. As long as you are not caching index.html it is going to fetch these new file names. So you get latest build while leveraging caching. Check it on browser http://127.0.0.1 :8081/ and it runs without ng serve So we are now running it without Angular. Check browser inspector. The message which was appearing earlier (Angular is running in development mode.) has gone. Check the Network Tab also and click runtime.js and the file is minified.
- 44. Project with routing ng new fourth-project Open in VS Code Check in package.json - you have a dependency on router Check in app.module.ts AppRoutingModule has been included And you have a file app-routing.module.ts - Open it. It has a class AppRoutingModule. It has some constant called routes (which is an empty array (which is fo type Routes). Routes is basically an array of Route class (position mouse array on Routes) It is for configuring your routes. And then you pass this configuration in @NgModcule({ imports: [RouterModule.forRoot(routes)], Now we want to create 2 routes. Let us first create 2 components home and settings ng g c home ng gc settings In your app.module.ts file both of them are imported In app-routing.module.ts file import { NgModule } from '@angular/core’; import{ RouterModule, Routes } from '@angular/router'; import { HomeComponent } from './nome/home.component'’; import { SettingsComponent } from './settings/settings.component; const routes: Routes = [ {path:'home' component:domeComponent}, {path:'settings' ,component:SettingsComponeni}, 1; @NgModcule({ imports: [RouterModule.forRoot(routes)], exports: [RouterModule] }) export class AppRoutingModule { } Now in order to provide a window for angular to put component in the view - Go in your app.component.html file and delete all lines except <router-outlet></router-outlet> This is required by Angular to know where to put the components Check in browser localhost:4200/home localhost:4200/settings Route Redirects and Wildcard Setup a default route - so that when user is not entering the URL It should automatically redirect to home We want to make home as the default route and we also want to handle errors (if
- 45. somebody enters wrong URL) One way is (in app-routing.module.ts file) import { NgModule } from '@angular/core’; import{ RouterModule, Routes } from '@angular/router’; import { HomeComponent } from './home/home.component'; import { SettingsComponent } from '/settings/settings.component’; const routes: Routes = [ {path: ", component:HomeComponent}, {path:'home' component:domeComponent}, {path:'settings' ,component:SettingsComponeni}, 1; @NgModcule({ imports: [RouterModule.forRoot(routes)], exports: [RouterModule] }) export class AppRoutingModule { } Check in browser So you can have multiple paths mapped to same component. But we would like to do it with a redirect. import import import import NgModule } from '@angular/core’; RouterModule, Routes } from '@angular/router’; HomeComponent } from './nome/home.component'’; SettingsComponent } from './settings/settings.component; “aa const routes: Routes = [ {path: ", redirectTo:'/home',pathMatch:'full’}, {path:'home' component:domeComponent}, {path:'settings' ,component:SettingsComponeni}, 1; @NgModcule({ imports: [RouterModule.forRoot(routes)], exports: [RouterModule] }) export class AppRoutingModule { } Check it. This can also be used {path: ", redirectTo:'/home',pathMatch:'prefix’}, Now for error handling. Specifying a component when a path doesn't exists. e.g. localhost:4200/manish It doesn't shows anything. Check error in browser inspector.
- 46. We want to show error message by component when someone tries to access a URL which doesn't exists. Use wildcard ng g c page-not-found import { NgModule } from '@angular/core’; import{ RouterModule, Routes } from '@angular/router'; import { HomeComponent } from './home/home.component'’; import { PageNotFoundComponent } from " /page-not-found/page-not-found.component'’; import { SettingsComponent } from './settings/settings.component’; const routes: Routes = [ {path: ", redirectTo:'/home',pathMatch:'full’}, {path:'home' component:domeComponent}, {path:'settings' ,component:SettingsComponeni}, {path: '**' component:PageNotFoundComponent} 1; @NgModcule({ imports: [RouterModule.forRoot(routes)], exports: [RouterModule] }) export class AppRoutingModule { } Check it Configuring Child routes You want a route resolution inside a route. We want to configure settings/profile and settings/contact and this we want to do within settings component. So profile and contact needed to be rendered in a small window within settings. In settings.component.html file <h1>Settings Page</h1> Check localhost:4200/settings Now we want component to be rendered below this Settings Page header when we enter settings/profile or settings/contact. ng g c settings-profile ng g c settings-contact We want it to match to a sub component or sub route or child route. Now in app-routing.module.ts file can we add path like {path:'settings/profile',component:SettingsComponent}, Doing this will not give angular a clue that it is child route. So to do it we need to add another property in settings url - children and its datatype is again Route array. (Route array has aproperty called children and the value of that is another Route array. You can specify an array of Route as children to an existing Route. That's how you have child Route) In app-routing.module.ts file
- 47. import { NgModule } from '@angular/core’; import{ RouterModule, Routes } from '@angular/router’; import { HomeComponent } from './nome/home.component'’; import { PageNotFoundComponent } from " /page-not-found/page-not-found.component'’; import { SettingsContactComponent } from " /settings-contact/settings-contact.component'; import { SettingsProfileComponent } from ./settings-profile/settings-profile.component’; import { SettingsComponent } from './settings/settings.component; const routes: Routes = [ {path: ", redirectTo:'/home',pathMatch:'full’}, {path:'home' component:domeComponent}, path:'settings’, component:SettingsComponent, children: [ {path:'profile’,component:SettingsProfileComponent}, {path:'contact',component:SettingsContactComponent}, ] }, {path: '**' component:PageNotFoundComponent} 1; @NgModcule({ imports: [RouterModule.forRoot(routes)], exports: [RouterModule] }) export class AppRoutingModule { } Now the point is where Angular is going to put this rendered component? You have one router-outlet at application level (app.component.html). This is where Settings component went. Now where the child is going to go in Settings component. For it you have to create a router-outlet in Settings component as well. So in settings.component.html file <h1>Settings Page</h1> <router-outlet></router-outlet> This is where child of Settings component will get plugged in. Check it with settings/profile and settings/contact Now we want setting url default to profile import { NgModule } from '@angular/core’; import{ RouterModule, Routes } from '@angular/router’; import { HomeComponent } from './nome/home.component'’; import { PageNotFoundComponent } from " /page-not-found/page-not-found.component'’;
- 48. import { SettingsContactComponent } from " /settings-contact/settings-contact.component'; import { SettingsProfileComponent } from ./settings-profile/settings-profile.component’; import { SettingsComponent } from '/settings/settings.component’; const routes: Routes = [ {path: ", redirectTo:'/home',pathMatch:'full’}, {path:'home' component:domeComponent}, path:'settings’, component:SettingsComponent, children: [ {path: ", redirectTo:'profile’,pathMatch:"full’}, {path:'profile’,component:SettingsProfileComponent}, {path:'contact',component:SettingsContactComponent}, ] }, {path: '**' component:PageNotFoundComponent} 1; @NgModcule({ imports: [RouterModule.forRoot(routes)], exports: [RouterModule] }) export class AppRoutingModule { } Again one more (for settings/not found) import { NgModule } from '@angular/core’; import{ RouterModule, Routes } from '@angular/router'; import { HomeComponent } from './home/home.component'’; import { PageNotFoundComponent } from " /page-not-found/page-not-found.component'’; import { SettingsContactComponent } from " /settings-contact/settings-contact.component'; import { SettingsProfileComponent } from ./settings-profile/settings-profile.component’; import { SettingsComponent } from '/settings/settings.component’; const routes: Routes = [ {path: ", redirectTo:'/home',pathMatch:'full’}, {path:'home' component:domeComponent}, path:'settings’, component:SettingsComponent, children: [ {path: ", redirectTo:'profile’,pathMatch:"full’},
- 49. {path:'profile’,component:SettingsProfileComponent}, {path:'contact',component:SettingsContactComponent}, {path: '**' redirectTo:'profile’, pathMatch:'full'} | }, {path: '**' component:PageNotFoundComponent} 1; @NgModcule({ imports: [RouterModule.forRoot(routes)], exports: [RouterModule] }) export class AppRoutingModule { } For a wrong settings URL it will redirect it to profile page. Showing Navigation for routes In app.component.html Check in browser Now the problem is when you click these link it is doing full page refresh. Also check it by going into browser inspector - network tab. This is not we want. We ware building SPA. The whole page is loading because when you do <a href=...It is actually instruction for the browser to load the URL. But you don't want the browser to load the full page URL. Now how to tell angular to change the route. It can be done using routerLink directive. <h1>My App</h1> <a routerLink="home">Home</a> <a routerLink="settings">Settings</a> <router-outlet></router-outlet> Now it works. It doesn't do a full page refresh. Now same thing with class property resolution. In app.component.ts file import { Component } from '@angular/core’; @Component({ selector: 'app-root’, templateUrl: './app.component.html’, styleUrls: ['./app.component.css'] }) export class AppComponent { homeRoute="home" settingsRoute="settings" title = 'fourth-project'’; }
- 50. And In app.component.html <h1>My App</h1> <a [routerLink]="homeRoute">Home</a> <a [routerLink]="settingsRoute">Settings</a> <router-outlet></router-outlet> Another good way for it In app.component.ts file import { Component } from '@angular/core’; @Component({ selector: 'app-root’, templateUrl: './app.component.htm', styleUrls: ['./app.component.css'] }) export class AppComponent { homeRoute="home" routes=[ {linkName: ‘Home’ url:'‘home’}}, {linkName: 'Settings',url:'settings'}, ] } And In app.component.html <h1>My App</h1> <a *ngFor="let route of routes" [routerLink]="route.url">{{route.linkKName}}</a> <router-outlet></router-outlet> Check it Now to add sub nav In settings.component.html file <h1>Settings Page</h1> <a *ngFor="let route of routes" [routerLink]="route.url">{{route.linkKName}}</a> <router-outlet></router-outlet> And in settings.component.ts file import { Component, Onlnit} from '@angular/core’; @Component({ selector: 'app-settings’, templateUrl: './settings.component.htm'’, styleUrls: ['./settings.component.css'] }) export class SettingsComponent implements Onlnit { routes=[ {linkName: 'Profile’,url:'profile’}, {linkName: ‘Contact Info',url:‘contact'’},
- 51. ] constructor() { } ngOnInit(): void { } } Check it
- 52. Angular Technologies @ Angular @ JavaScript / TypeScript @ Angular CLI @ Reactive programming, RxJS, Observables, operators @ Jasmine, Karma @ Redux, ngRx
- 53. HTML JS
- 54. Show current date and time
- 55. HTML Add a div and paragraph Add button JS Code to get date/time Get the paragraph DOM element Update value Code function to handle button click
- 64. Root component pe Ne, header main footer /oN summary details sidebar foN nav updates
- 65. HTML Add a div and paragraph Add button JS Code to get date/time Get the paragraph DOM element Update value Code function to handle button click
- 66. date click
- 70. Compute the current date date.component.html — DateComponent Class Show the computed date
- 71. export class DateComponent implements OnInit { J constructor() { } neOnInit() { } | }
- 72. Angular Routing
- 73. Routing
- 74. Routing eK
- 75. Routing
- 76. Routing
- 77. Routing
- 78. Routing
- 80. URL based routing foo.com/view1 foo.com/view2
- 85. One component per view Component 1 Component 2 Component 3
- 86. One root component per view Component 1 Component 2 Component 3
- 87. One root component per view Component 1 Component 2 Component 3
- 88. URL based routing +~ Component based routing
- 89. Views URL Component View 1 View 2
- 90. Views URL Component View 1 foo.com/view1 View 2 foo.com/view2
- 91. Views View 1 View 2 URL foo.com/view1 foo.com/view2 Component Component 1 Component 2
- 92. Routing in Angular @ Define your route URLs @ Create Angular components for each view (one for each route) @ Configure Angular to map route URLs to components
- 93. https://nodejs.org/en/ Node.js® is a JavaScript runtime built on Chrome's V8 JavaScript engine. NVM installation link https://github.com/nvm-sh/nvm For mac curl -o- https://raw.githubusercontent.com/nvm-sh/nvm/v0.38.0/install.sh | bash Copy the commands from above command export NVM_DIR="$HOME/.nvm" [ -s "BNVM_DIR/nvm.sh" ] && . "BNVM_DIR/nvm.sh" # This loads nvm [ -s "BNVM_DIR/bash_completion" ] && . "BNVM_DIR/bash_completion" # This loads nvm bash_completion and put it in ~/.bash_profile Close the terminal and open new terminal nvm -v If it doesn't runs source ~/.bash_profile Now come to Usage section of https://github.com/nvm-sh/nvm and run nvm install node If you install older version like nvm install 6.14.4 then node switches automatically to that version. Check it by node -v NVM for windows download https://github.com/coreybutler/nvm-windows REPL - Read Evaluate Print Loop node Node prompt lets you write JS code and execute it 243 vara a=10 a a*3 var b=a*4 b For multiline commands if(a>10){ console.log("Greater than 10") } To exit ctrl+c - ctrl+c or ctrl+d or .exit After exiting memory gets cleared vi one.js
- 94. console.log("Hello World"); node one var a=10; var b=20; var c=a+b; console.log(c}; Editor VSCode Module - Every JS file is a module in itself. Make a addjs file function add(a,b) return a+b; console.log(add(1,2)); Make another file first.js require('./add.js'); function greet(name){ console.log("Hello "+name); } greet("Manish"); require - is the way to import a module Move require('./add.js'); at the end of file and run again Now what if we want to call the add function in first.js require('./add.js'); function greet(name){ console.log("Hello "+name); } greet("Manish"); add(3,4); node first - will give an error - add is not defined Node modules are encapsulated by default. So once require("./add.js") finishes - add function is not available. How do we do it? In add.js function add(a,b) { } return a+b;
- 95. console.log(add(1 ,2)); module.exports=add; and in first.js var addFn= requie('./add.js’); function greet(name){ console.log("Hello "+name); } greet("Manish"); console.log(addFn(3,4)):; What if you have more functions to be exported? In add.js function add(a,b) { } function subtract(a,b) { return a+b; return a-b; } console.log(add(1 ,2)); module.exports={ add: add, subtract: subtract }; O //module.exports={ // add, // subtract I}; //So this time we are exporting object So in first.js var operObj= requie('./add.js'); function greet(name){ console.log("Hello "+name); } greet("Manish"); console.log(operObj.add(3,4)); Another way to export is In add.js function add(a,b) { } function subtract(a,b) { } return a+b; return a-b;
- 96. console.log(add(1 ,2)); module.exports.add=add; module.exports.subtract=subtract; Run it and check again There is a shortcut code - instead of module.exports.add=add; write exports.add=add; (Actually nodejs is running var exports=module.exports; So exports is available as an alias) Another code for add.js exports.add=(a,b)=>a+b; // Arrow function and in first.js var {add}= requie('./add.js'); //Using Destructuring function greet(name){ console.log("Hello "+name); } greet("Manish"); console.log(add(3,4)); Require with node api nodejs.org/api/index.htm! Search for read Click on the Reacline on left Copy the line const reacdLine=require(‘readLine’) Create a new file greet.js Copy the usage sample const readLine=require(‘readLine’) const readline = require(‘readline’); const rl = readline.createlnterface({ input: process.stdin, output: process.stdout }); rl.question(‘What do you think of Node.js? ', (answer) => { /! TODO: Log the answer in a database console.log( Thank you for your valuable feedback: ${answer})); rl.close(); }); Change it to const readline = require(‘readline’); const rl = readline.createlnterface({ input: process.stdin, output: process.stdout
- 97. }); rl.question(‘What is your name? ', (name)=>{ console.log( Hello {$name} ); rl.close(); }); WAP to add 2 numbers Writing user input to a file nodejs.org/api/index.html - there is a FilSystem link Click on fs.writeFile and check the documentation Make a file greet-to-file.js const fs=require(‘fs'); fs.writeFile(‘greeting.txt’,'Hello World',err=>{ console.log('Error occured’); }); Check it. Actually you should check const fs=require(‘fs'); fs.writeFile(‘greeting.txt','Hello World’ ,err=>{ ifferr) { console.log('Error occured’); } }); Another one with arguments const fs=require(‘fs'); const writeGreetingToFile=(name)=>{ fs.writeFile(‘greeting. txt’, Hello ${name} ,err=>{ if(err) { console.log('Error occured’); } ys } writeGreeting ToFile('Manish’); Take input from user and store it in a file const fs=require(‘fs'); const readline = require(‘readline’); const writeGreetingToFile=(name)=>{ fs.writeFile(‘greeting. txt’, Hello ${name} ,err=>{ if(err) { console.log('Error occured’);
- 98. const rl = readline.createlnterface({ input: process.stdin, output: process.stdout }); rl.question(‘What is your name? ', (name)=>{ /Iconsole.log( Hello {$name} ); rl.close(); writeGreeting ToFile(name); }); Making a project npm -v mkdir timezone cd timezone npm init Is Make index.js file console.log(‘Hello World’); To run node index Or (a common command) In package.json "scripts" add "start" :"node index.js", Now run it with npm start npm test You can create your own script like "myscript":"Is" You run it with npm myscript — //It will fail npm run myscript We'll use moments - a tz utility Open momenitjs.com npm install moment (it will download in your current folder) In index.js file let moment=require(‘moment'’) console.log(moment().format('ddda’) Run using npm start Now we con't want to share the downloaded libraries with others. We share the project code. (Delete node_modules folder). The other person will run npm install Creating a command line utility npm init
- 99. npm install moment npm install moment-timezone Make an index.js file const moment=require(‘moment); moment.tz.setDefault(‘America/Los_Angeles'); const targetTimezone="Europe/Paris"; console.log(moment().tz(targetTimezone).format()); /iconsole.log(-The time at the ${targetTimezone} is ${moment().tz(targetTimezone).format()} ); Now we want to do it from command line arguments node index.js "Asia/Kolkata" But it doesn't take the arguments The way to get to command line arguments is using an object called process.argv which is available to Node const moment=require(‘moment); moment.tz.setDefault(‘America/Los_Angeles'); const targetTimezone="Europe/Paris"; console.log(process.argv); console.log(-The time at the ${targetTimezone} is ${moment().tz(targetTimezone).format()} ); node index.js "Asia/Kolkata" const moment=require(‘moment); moment.tz.setDefault(‘America/Los_Angeles'); let targetTimezone; if(process.argv.length!=3)}{ console.log("Usage : node <script> <tz>"); } else { } //const targetTimezone="Europe/Paris"; //console.log(process.argv); console.log(The time at the ${targetTimezone} is ${moment().tz(targetTimezone).format()} ); targetTimezone=process.argv[2]; node index.js "Asia/Kolkata" Callbacks in Node.js Make a file file-api-.js let fs=require(‘fs’); //fs.writeFileSync(‘test.txt',,A sample text’); //console.log(‘After file is written’); fs.writeFile(‘test.txt’,"Text written async’ (err)=>{ console.log(‘After file is writtem’); }) console.log(‘This should print after previous line’);
- 100. node file-api.js Take 2 nos. from user and print their sum Take 3 nos. from user and find out the greatest number Basic function abc(}{} console.log(abc()); var fn=function (){ console.log("Sample output"); } fn(); setTimeout(fn,5000); function placeAnOrder(orderNumber) { console.log("Customer Order : ",orderNumber); cookAndDeliverFood(function(){ console.log("Delivered Food Order : ",orderNumber); }); } function cookAndDeliverFood(callback){ setTimeout(callback,5000); } placeAnOrder(1) placeAnOrder(2) placeAnOrder(3); placeAnOrder(4):; (5) (6) (7) placeAnOrder placeAnOrder placeAnOrder Reference to an Object var amit={ favFood: "DalChaval", favMovie: "3 Idiots" } var person=amit; person.favFood="Dosa"; console.log(amit.favFood); this reference var person={
- 101. printFirstName: function(){ console.log("Amit’); console.log(this===person); } } person.printFirstName(); //The default calling context is global function sam(){ console.log("Naveen"); console.log(this===global); } sam(); Prototype function User(){ this.name=""" this.life=100; this.giveLife=function (targetPlayer){ targetPlayer.life+=1; console.log(this.name +" give 1 life to "+targetPlayer.name); } } var amit=new User(); var naveen=new User‘(); amit.name="Amit"; naveen.name="Naveen"; amit.giveLife(naveen); console.log("Amit : "+amit.life); console.log("Naveen : "+naveen life); //Add function to all objects User.prototype .uppercut=function(targetPlayer){ targetPlayer.life-=3; console.log(this.name +" gave uppercut to "+targetPlayer.name); } naveen.uppercut(amit); console.log("Amit : "+amit.life); console.log("Naveen : "+naveen life); //Add properties to all objects User.prototype.magic=50; console.log("Amit : "+amit.magic); console.log("Naveen : "+naveen.magic); Shared state of modules (Default behaviour of NodeJS - Any time you export an Object from a module that object gets shared among every other modules)
- 102. Make movies.js module.exports={ favMovies: "" } Make naveen.js var movies=require("./movies"); movies.favMovie="3 Idiots"; console.log("Amit's favourite movie is : "+movies.favMovie); Make amit.js var movies=require("./movies"); console.log("Amit's favourite movie is : "+movies.favMovie); Make app.js require("./naveen.js"); require("./amit.js"); Object Factory (Default behaviour of NodeJS - Any time you export an Object from a module that object gets shared among every other modules. So anytime we want to create a new object we actually need to export a function that creates a new Object. This is what Object factory is - It is an Object which creates another Object) In movie.js module.exports=function(}{ return { favMovie: } } Now ian naveen.js var movies=require("./movies"); var naveenMovies=movies(); naveenMovies.favMovie="3 Idiots"; console.log("Naveen's favourite movie is : "+naveenMovies.favMovie); Now in amit.js var movies=require("./movies"); var amitMovies=movies(); console.log("Amit's favourite movie is : "+amitMovies.favMovie); Core Modules var fs=require('fs'); fs.writeFileSync(“abc.txt","A sample text")| console.log(fs.readFileSync("abc.txt").toString); var path=require("path"); var abc="DesktopDataabc.txt"; console.log(path.normalize(abc);
- 103. console.log(path.dirname(abc); console.log(path.baseame(abc}); console.log(path.extname(abc); setinterval(function(){ console.log("Hello"); },200); console.log(__ dirname); console.log(__ pathname); Basic Server Make server.js var http = require(‘http’); function onRequest(request, response) { console.log("A user made a request " + request.url); response.writeHead(200, { "Content-Type": "text/plain" }); response.write("Hi user"); response.end(); } http.createServer(onRequest).listen(8888); console.log("Server is running..."); Simple Web File Server Make index.html file <h1>My Page</h1> In server.js var http = require(‘http’); var fs=require('fs'); function send404Response(response){ response.writeHead(200, { "Content-Type": "text/plain" }); response.write("Error 404:Page not found"); response.end(); } function onRequest(request, response) { if(request.method=="GET" && request.url=="/"}{ response. .writeHead(200, { "Content-Type": "text/html" }); fs.createReadStream("./index.html").pipe(response); jelse{ send404Response(response); } } http.createServer(onRequest).listen(8888); console.log("Server is running..."); Connect (Server Framework)(With this middleware you can stack the function calls)
- 104. npm install connect In server.js var connect = require(‘connect'’); var http = require(‘http’); var app=connect()}; http.createServer(app).listen(8888); console.log("Server is running..."); Now var connect = require(‘connect'’); var http = require(‘http’); var app=connect()}; function doFirst(request,response,next){ console.log("Hello"); } app.use(doFirst) http.createServer(app).listen(8888); console.log("Server is running..."); With this middleware you can stack the function calls var connect = require(‘connect'’); var http = require(‘http’); var app=connect()}; function doFirst(request,response,next){ console.log("Hello"); next(); } function doSecond(request,response,next){ console.log("Bye"); next(); } app.use(doFirst) app.use(doSecond) http.createServer(app) listen(8888); console.log("Server is running..."); Remark next(} and check var connect = require(‘connect'’); var http = require(‘http’); var app=connect()}; function doFirst(request,response,next){ console.log("Hello"); //next(); function doSecond(request,response,next){ console.log("Bye"); next(); app.use(doFirst) app.use(doSecond)
- 105. http.createServer(app).listen(8888); console.log("Server is running..."); var connect = require(‘connect'’); var http = require(‘http’); var app=connect()}; function profile(request,response){ console.log("User profile"); } function forum(request,response){ console.log("User forum"); } app.use("/profile" profile); app.use("/forum",forum); http.createServer(app).listen(8888); console.log("Server is running..."); Template PUG index.pug file html head title= title body hi= message (Also show the difference of title = title) index.js file var express = require(‘express'); var app = express(); app.set('view engine',‘pug') app.get(‘/’, function(req, res){ res.render(‘index', { title: "My Page", message:"A sample message" }); }); app.listen(3000); Show the generated page in Inspector If you want to add doctype Then do it with title= abc
- 106. It will dissapear Again do it with title= "abc" Then p Asample paragraph Show the difference with p= A sample paragraph (Will give an error) p = "A sample paragraph" Then a(href="https://nucleus.niituniversity.in/") NU Website Now show the anchor tag within p tag (by indenting) Then ul li Dosa li Idli li Parantha Then put this ul tag in div tag For form input element input(name="fname", type="text", id="fn") With placeholder input(name="fname", type="text", id="fn" placeholder="First Name") Then adding a label to it label(for="fn") Enter Name Show input for password Now table table tr td label First Name td input(name="fn" id="fn") tr td label Last Name td input(name="In",id="In") Now form tag form(method="post" action="get") label(for="{n") Enter Name input(name="fname", type="text", id="fn") input(type="submit",value="Save")