1. Notes to read for capstone presentation
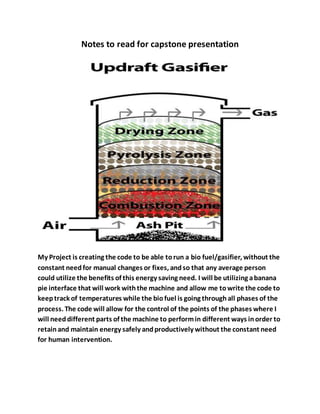
My Project is creating the code to be able torun a bio fuel/gasifier, without the
constant needfor manual changes or fixes, andso that any average person
could utilize the benefits of this energy saving need. I will be utilizing abanana
pie interface that will work withthe machine and allow me towrite the code to
keeptrack of temperatures while the biofuel is going throughall phases of the
process. The code will allow for the control of the points of the phases where I
will needdifferent parts of the machine to performin different ways inorder to
retainand maintain energy safely andproductively without the constant need
for human intervention.
2. Just being able to understandbits andpieces of what my client neededhis
machine to do, help me find a beginning point tostart the process. Just
knowing the differences of eachphase of the machine helpedme to further
understandwhat I neededtodo in order to beginthis project. Understanding
the ranges in temperaturesandwhat parts of the machine neededto react
according to those different ranges intemperatureshelpedme gainmore
knowledge inorder to beginthe project. Having the ability tofind the correct
hardware (meaning the interface that might client neededfor this project to
work, allowedme to get a better understanding of the programI would be using
withthe hardware soI coulddo preparationresearch. Just knowing the
language I wouldbe using helpedme by directing my researchtoPython
specific online research.
3. I utilizedsome of the Agile Scrumprocess inthat I did originally break up my
tasks intosmaller workable sprints, but when it came toworking on the code I
really usedKanban because I am a one persongroup and was able to combine
most of the sprints intoone workable sprint.
5. Explain Ed’s code
We have 2 LED lights and to prove the concept of being able
to control when the gasifier needs to either do something or
nothing we are having the LED lights blink, blink in different
variables of time, or stop blinkingto signal that something
needs to be done with the machine
/* Stacey Dreher: explained code for first sprint of capstone project */
/* Red led1 simulating when temperature is to hot. */
/* Yellow led2 simulating when temperature is to cold.
/* Simulating a thermometer. */
/* A flag that tracks the value of the thermometer. */
/* Simulating a blink on the led light. */
/* Used to label each variable when printed to the screen so we can see what
is happening. */
6. int led1 = 13;
int led2 = 11; */
int thermometer = 0;
int up_down = 0; int blinker = 0;
String labelVar;
/* Configures the red led1 light to behave as output. */
/* Configures the yellow led2 light to behave as output. */
/* Baud rate, meaning how fast the communication is with the machine. */
void setup() {
// put your setup code here, to run once:
pinMode(led1, OUTPUT);
pinMode(led2, OUTPUT);
Serial.begin(9600);
}
/* When the thermometer is greater than 1500 up_down switches to 1 */
/* else when the thermometer is less than zero up_down switches to 0. */
void loop() {
// Put your main code here, to run repeatedly:
if(thermometer > 1500){
up_down=1;
}else if(thermometer < 0){
up_down = 0;
}
/*when up_down is equal to zero, thermometer increments else when up_down is
equal to 1, thermometer decrements and the delay allows us to see this on the
consol. */
if(up_down == 0){
thermometer++;
}else if(up_down==1){
thermometer--;
}
delay(50);
/* label to see thermometer variable on console. */
/* label to be able to see both thermometer variables concatenated on the
console. */
/* label to see up_down variable on console. */
/* label to be able to see both up_down variables concatenated on the
console. */
/* label to be able to see the blinker variable on the console. */
/* label to be able to see both blinker variables concatenated on the
console. */
labelVar = "thermometer: ";
labelVar.concat(thermometer);
labelVar.concat(" up_down: ");
labelVar.concat(up_down);
labelVar.concat(" blinker: ");
labelVar.concat(blinker);
7. /* Prints data to the console for the character variable strings as is. */
/* when thermometer is less than or equal to 400 the red led light is on. */
/*when thermometer is greater than 400 and less than 600 and the blinker is
less than 21, which only cycles on the console up to the count of 40 for a
simulated variable of time, the red light is on. */
/* when thermometer is greater than 400 and less than 600 and the blinker is
greater than 21, which only cycles on the console up to the count of 40 for a
simulated variable of time, the red light is off. */
/* when thermometer is greater than or equal to 600 and the blinker is
greater than 21, which only cycles on the console up to the count of 40 for a
simulated variable of time, the yellow light is on. */
/* when thermometer is greater than or equal to 600 and less than 1300 and
the blinker is less than 21, which only cycles on the console up to the count
of 40 for a simulated variable of time, the yellow is off. */
/* when thermometer is greater than 1300 the yellow light is on. */
/* when the blinker equals 40 the blinker count starts back at zero */
/*for the variable of time count to increment. */
Serial.println(labelVar);
if(thermometer <= 400){
digitalWrite(led1,HIGH);
}
else if(thermometer >400 && thermometer < 600 && blinker<21){
digitalWrite(led1,HIGH);
}
else if(thermometer >400 && thermometer < 600 && blinker>21){
digitalWrite(led1,LOW);
}
else if(thermometer >= 600 && blinker >21){
digitalWrite(led2,HIGH);
}
else if(thermometer >=600 && thermometer < 1300 && blinker <21){
digitalWrite(led2,LOW);
}
else if(thermometer>1300){
digitalWrite(led2,HIGH);
}
if(blinker == 40){
blinker = 0;
}
blinker++;
}
8. Utilizing Python code
The # symbol marks comments in Python syntax.
Python is a line-orientedandstatements are not terminatedby a semicolon, but
by the end of the line.
The first line is a special meaning for UNIX type systems andit specifieswhat
program shouldinterpret the file.
Basically I am having the console print from1 to 50 and if we reach10 we will
have the machine do something. If we reach 35 we will have the machine do
something else, andif we reach50 we will stopsomething. This just proves the
same concept as before withEd’s Arduino, but I wanted touse Python because
it’s the language I will be using withthe banana pie interface once I receive it.
9. #!/usr/bin/python
a = 0
while a < 51:
print a,
if a == 10:
print "do something!"
elif a == 35:
print "do something else!"
elif a == 50:
print "Stop!"
a = a + 1
10. When I finally spoke with my client about what he ultimately wanted his machine to doI was
then able to begin narrowing down the process and I wasn’t going off trackon other
tangents.
When I was able to break down the processes into smaller sprints it gave me more of an
understanding on where to begin with the coding process.
Just being able to utilize my teachers Arduino interface helped me the most because I was
able to actually see the concept be proven and then work on that same concept except with
the language that I knew I had to use for the banana pie interface instead.
When I was able to find a tutorial based program online that dealt with the Python language I
was able to mess around with the code and ultimately prove the concept again, but this time
with the language I needed to learn for the project.
11. My client and I ordered the banana pie interface but my client had the shipping set to 14 day
delivery and somehow the ordering process with UPS was messed up and we had to re-order
it so I was unable to begin the coding process so I had to find other things to work on while I
was waiting.
I ordered the Arduinofor the project and also for me to learn more, but UPS took longer than
they should have to deliver the interface, but also when it was delivered I never received it
and I have to re order it.
Having a 9 year old a husband and living with a sister who has issues didn’t help me when I
needed to be working on this project at home, and I should have spent more time at school
either after hours or before in order to buckle down and get more done.
When I first decided on this project after I had spoken with my client who is my dad, I was all
over the place with ideas and the project became overwhelming because of how big I made
it, but when I actually did the interview process to narrow things down and the user stories it
wasn’t as overwhelming.
12. I waited too long to work on researching the Python language and I know that if I would have
been researching once I knew the language I would have been using I could have moved
further with the coding process.
Last Slide and What I Learned
I learned that you can have an idea on a project, but in order to keep it within a scope
that you can work with you need to utilize the user stories breakdown and ask the
right questions from your client or yourself.
I learned that UPS is not that great when it comes to shipping and because of the
setbacks in receiving the interface/s that I needed I will always have a just in case list
prepared for these types of possible setbacks and ways to get around them in future
projects.
I learned that it is hard to work by yourself on these types of projects and if I were to
have other group members to bounce my ideas off of it would have made the process
easier because two minds are always better than one.
I learned that when interviewing a client you need to be just as, if not, more prepared
than the client and it’s always a good idea to have others lookover your interview
questions for possible changes.
I learned how an interface works and I learned some key concepts between the
differences when it comes to digital and analog with baud rate(meaning how fast the
communication is with the machine and the interface.)
I learned what procrastination causes and why not toprocrastinate.
I learned basic information on howto utilize the Python language.