
Recommended
Recommended
More Related Content
Viewers also liked
Viewers also liked (13)
Recently uploaded
Recently uploaded (20)
Thedifferenteffectsiused 160209181024
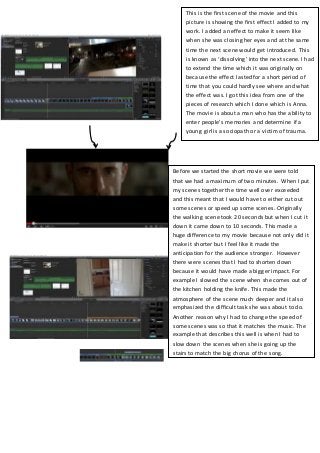
- 1. This is the first scene of the movie and this picture is showing the first effect I added to my work. I added an effect to make it seem like when she was closing her eyes and at the same time the next scene would get introduced. This is known as ‘dissolving’ into the next scene. I had to extend the time which it was originally on because the effect lasted for a short period of time that you could hardly see where and what the effect was. I got this idea from one of the pieces of research which I done which is Anna. The movie is about a man who has the ability to enter people’s memories and determine if a young girl is a sociopath or a victim of trauma. Before we started the short movie we were told that we had a maximum of two minutes. When I put my scenes together the time well over exceeded and this meant that I would have to either cut out some scenes or speed up some scenes. Originally the walking scene took 20 seconds but when I cut it down it came down to 10 seconds. This made a huge difference to my movie because not only did it make it shorter but I feel like it made the anticipation for the audience stronger. However there were scenes that I had to shorten down because it would have made a bigger impact. For example I slowed the scene when she comes out of the kitchen holding the knife. This made the atmosphere of the scene much deeper and it also emphasized the difficult task she was about to do. Another reason why I had to change the speed of some scenes was so that it matches the music. The example that describes this well is when I had to slow down the scenes when she is going up the stairs to match the big chorus of the song.
- 2. Another effect that I used was masking the sound of one scene and putting another one. This was because in some scenes there was a lot of background sound such as someone on the phone and the neighbours speaking. The top scenes are all muted because there was a lot of noise. The bottom scene is the sound that I actually wanted but putting it at the bottom means that it doesn’t come with a picture. There were also times when I had to have two of the same scenes over each other. The difference is that I didn’t mute the top one I just put it on maximum volume and the bottom one was also put on a high volume. I then had to make sure that the sounds match in terms of the time that it comes in. this was because I wanted to overemphasize the sound or the scene was to quiet. Examples of when I used this method is when she opened the door (the sound of her opening the door is very clear because I used that method), when she closed her laptop (this emphasized the frustration that she must have felt when the answer didn’t come up), when she puts down the cup and the plate and there are many more other examples of when I used this method. I also had to put titles in appropriate places. The titles had the actors or actresses real name. It could only be put in specific places before the end of the movie because I had put them after the movie had finished it would have took more time. I also had to make sure that the title was on for a suitable amount of time and that the font and colours were good. At the end I decided to put the name of the movie and I chose an effect that makes it look like its dissolving. I think that this is a good effect and it relates to my movie. I also made the soundtrack last for 2 seconds more from when the movie finished. I also made it slowly get quieter and this would have an impact on the audience because it leaves them with a sense of curiosity since they want to know what happened next and a time of reflection.
- 3. Hardware: The Camera that I used was from the school and it is the Digital HD Recorder, Sony HDR-CX280E and I also used a basic domestic tripod in some scenes. The video camera was extremely easy to use and to navigate. I found that it took good clips but the quality of some clips were sometimes extremely poor. This is shown from the beginning of my product, it wasn’t able to pick up the light correctly and it made the scene a bit blurred. For that scene in particular I found it extremely hard to make sure that both of the actor and actress are seen / in focus because the lighting was too bright. I tried to overcome this problem by adjusting the blinds and testing different angles for the camera to see which one is the most suitable. I found that the angle I chose (over the shoulder shot) was the best one because it didn’t blur any of the characters out but it did however have a bit of light. If I done this again I would use a better quality camera and film when the sun has slightly gone down. Thisis the evidence of howthe lightingwasa problem.