
Recommended
Recommended
More Related Content
Similar to Course Sources and Causes of Conducive Conditions.doc.pptx
Similar to Course Sources and Causes of Conducive Conditions.doc.pptx (20)
More from PestCEUs
More from PestCEUs (20)
Recently uploaded
Recently uploaded (20)
Course Sources and Causes of Conducive Conditions.doc.pptx
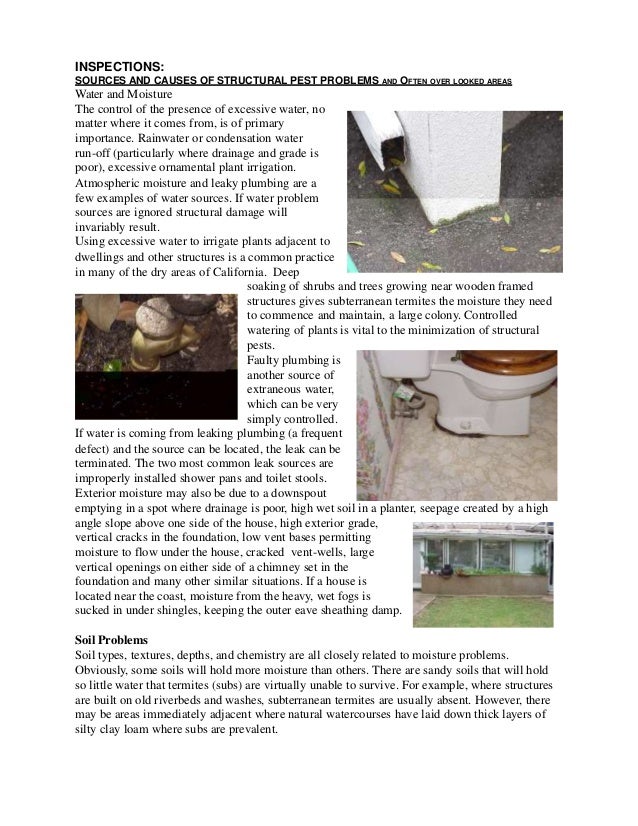
- 1. INSPECTIONS: SOURCES AND CAUSES OF STRUCTURAL PEST PROBLEMS AND OFTEN OVER LOOKED AREAS Water and Moisture The control of the presence of excessive water, no matter where it comes from, is of primary importance. Rainwater or condensation water run-off (particularly where drainage and grade is poor), excessive ornamental plant irrigation. Atmospheric moisture and leaky plumbing are a few examples of water sources. If water problem sources are ignored structural damage will invariably result. Using excessive water to irrigate plants adjacent to dwellings and other structures is a common practice in many of the dry areas of California. Deep soaking of shrubs and trees growing near wooden framed structures gives subterranean termites the moisture they need to commence and maintain, a large colony. Controlled watering of plants is vital to the minimization of structural pests. Faulty plumbing is another source of extraneous water, which can be very simply controlled. If water is coming from leaking plumbing (a frequent defect) and the source can be located, the leak can be terminated. The two most common leak sources are improperly installed shower pans and toilet stools. Exterior moisture may also be due to a downspout emptying in a spot where drainage is poor, high wet soil in a planter, seepage created by a high angle slope above one side of the house, high exterior grade, vertical cracks in the foundation, low vent bases permitting moisture to flow under the house, cracked vent-wells, large vertical openings on either side of a chimney set in the foundation and many other similar situations. If a house is located near the coast, moisture from the heavy, wet fogs is sucked in under shingles, keeping the outer eave sheathing damp. Soil Problems Soil types, textures, depths, and chemistry are all closely related to moisture problems. Obviously, some soils will hold more moisture than others. There are sandy soils that will hold so little water that termites (subs) are virtually unable to survive. For example, where structures are built on old riverbeds and washes, subterranean termites are usually absent. However, there may be areas immediately adjacent where natural watercourses have laid down thick layers of silty clay loam where subs are prevalent.
- 2. Earth to Wood Contact If proper soil conditions prevail any direct contact between earth and wood is an invitation to attack by subterranean termites and fungus decay. Some earth to wood contacts are readily visible and some may be inaccessible. Around the exterior of a building, we may find any of a number of wooden structures in contact with the ground. These may include wooden vent frame, a fence or gate post attached to the house or to the garage, wood siding, flower boxes, deck posts and steps, lower steps of wooden stairways, trellis stakes, wooden dividers between concrete or masonry squares in a patio, wooden or stucco-covered archways, carport supporting post, and many others too numerous to mention. If a house has a crawl space some of the many possibilities of earth-to-wood contacts include stakes (either grade or form supports), temporary wood posts left in place under hearths or under heavy appliance installations, angular bracing extending into the soil. Wood and cardboard boxes used as storage under houses, wood blocks supporting plumbing and or heating ducts, and earth-filled porches and patios where the earth makes contact with some part of the wood framing of the substructure. Slab on Grade Construction Slab on grade construction may also have problems from the subterranean termite attack. When not monolithically poured, shrinkage cracks often occur between porches or patios and the main floor slab in modern concrete slab construction. Cold joints and plumbing penetrations in slab construction also allow gaps that subterranean termites can enter. Cold joints are common in residential garages, sunken living rooms, porch/patio additions and room additions. Often the cold joint is covered by tile or carpeting. Occasionally the cold joint has the bottom plate of the wall covering it either partially or completely. As the inspector you need to recognize signs that cold joints may be present.
- 3. INSPECTION TECHNIQUES EQUIPMENT Agood light is essential such as a rechargeable Mag or Stream light. The inspector should carry an extra flashlight to prevent unnecessary delays during inspections. Aheavy jackknife, an awl or dental tools for probing into the wood is also a necessity. A thick piece of spring steel or a hacksaw blade is needed for testing earth filled porches. Ascrewdriver, measuring tape or wheel and a small hammer should be included with your equipment. Alight, strong 6-foot stepladder is essential. Coveralls, a stocking cap, gloves and kneepads, chalk; respirator, telescoping mirror, hand microscope, magnifying glass and moisture meter make up the balance of the essential equipment. Some inspectors carry cameras with flash attachments to photograph special conditions. Alegal size clipboard equipped with inspection tags, ruler and pencil is handy to sketch a diagram of the structure and make notes of findings. PROCEDURE Procedure will be divided into 4 parts: ● The examination of the exterior ● The interior ● The attic ● The sub-structural area Before proceeding with the inspection the inspector should explain his mission to the occupant. A few questions concerning his or her observations regarding insect occurrence, damage, plumbing leaks or other irregularities, may be very helpful.
- 4. Exterior Examination Walk slowly around the structure making measurements with a measuring wheel and draw a diagram. On a full inspection draw in the porches, patios, vents, vent wells, columns, pilasters and abutments o partial inspections on draw the areas inspected. Also, record the moist areas in the soil and evidence of moisture from misdirected sprinkler heads that cause water to hit exterior walls and posts, exterior grade conditions, vertical foundation cracks and exterior earth-to-wood contacts. If the structure is stucco finished, tap the stucco below the top of the foundation with a heavy pocketknife, hammer or some object heavy enough to produce a hollow sound if the stucco is loose. The exterior phase of the inspection is very important whether the structure is on a slab or a crawl. Many of the earlier concrete slab-type houses have an exterior plumbing vent or hatch which should be removed and the inside checked. Many stucco-finished structures are decorated with columns, pilaster and arches as well as buttress-walls. These construction details are usually framed inside by wood making them ideal for termite infestation or fungal infections. Note shrinkage cracks between the foundation and such attachments as concrete porches patios, vent-wells, masonry or concrete planters, stone facings, and masonry chimneys. Check for cracks in stucco that may allow water. In areas where shrubbery or vines make areas inaccessible for inspection a recommendation should be made to provide access. Heavy plantings may also cause a build up of excessive moisture in walls from lack of ventilation that won’t necessarily be visually noticeable from the interior but with the help of a moisture meter elevated moisture can be easily confirmed. Don't forget to look up as well as down! Exposed wood framing or wood trim may show indications of drywood termite colonization, subterranean termite infestations or fungus decay. Fecal pellets of drywood termites are quite often caught in spider webs or a few may be resting on a projecting ledge. Use your inspection mirror to look up under protruding stucco and wood lips. It isn’t uncommon to find fecal pellets or sub tubes coming out of cracks or wood joints. In coastal locations check the outer trim boards where moisture collects and fungus infection is likely to occur.
- 5. Watch for clogged gutters. If it is a two-story structure and suspicious discolorations are in evidence, you may need to recommend a further inspection by a licensed contractor. In multi-story apartment buildings, front, rear or side stairways are provided for access to the upper level. If either the stairs or stair landings are enclosed by stucco, be sure to note the presence or absence of access doors and/or ventilation of the enclosed portions. If found to be inaccessible, these enclosed areas may be seriously attacked by fungus, termites or both.Anytime an inspector encounters inaccessible areas it should be documented on the report with recommendations for making the area accessible for further inspection. During these exterior observations make careful notations on your diagram and do not trust your memory as findings in other areas may distract you and earlier observations may be forgotten. Make note of any areas preventing access to the structure such as storage sheds, decks or other material that blocks the structure. Ares such as these should be marked as inaccessible for inspection, with a recommendation to make them accessible for further inspection.
- 6. Exterior inspection of houses with concrete slabs is similar to crawl-space houses but there are certain points which should be stressed. The combination of high exterior grade and loose stucco is "dynamite" in slab construction. Planters are more often a hazard and vertical cracks in the main slab may result in both moisture penetration and infestation by subterranean termites. Open and inspect plumbing hatches and electrical meter and fuse-boxes. Normal cracks between porches and patios and the main slab should be inspected. Make sure to check concrete attachments installed by the owner. If these are poured without prior stucco removal they may present a serious hazard. Cold joints in cement that run under the exterior stucco, finished walls or posts present a virtually undetectable area for entrance of termites. Fence and gateposts adjacent to a slab type house are hazardous, especially where the soil is built up. Wood siding in contact with the soil is earth to wood contact and may involve other findings such as termites or fungus. Inspection of the Interior
- 7. The interior inspection is partly an extension of the exterior inspection. For example, if you noticed moisture stains from sprinkler heads on the exterior a careful inspection in those areas in the interior shouldn’t be overlooked. Pulling back he carpet along these areas in addition to the corners of the rooms is highly recommended. Inspectors not checking these areas are opening themselves up for missed areas of infestations or infection. Generally speaking, the condition of plumbing fixtures and plumbed appliances are the most important part of interior inspection for subterranean termites. Although the shower pan is most often the prime source of water leakage the inspector should not overlook a built-in tub, which may have insufficient wall protection or calking. A leaking faucet, dishwasher, washing machine, water heater, garbage disposal and/or the drainage system under sinks and washstands are always suspected. Evidence of excessive moisture or water intrusion is often visible on ceilings from staining or pealing paint. Leakage of stall showers is a prime source of moisture accumulation. Visual inspection alone will not always verify a leaking shower pan. Using a plumber’s plug to check a shower pan is the only way to accurately determine if there is a leak in the pan. The use of toilet paper, rubber flaps or sink stoppers allow water to escape giving a false indication in the condition of the pan. The addition of a moisture meter in the inspection process will greatly aid in determining the absence or presence of moisture and verify beyond a reasonable doubt if a problem exists. Leaks in valve-packing and water intrusion through unsealed grout around wall tile can also lead to a build up of excessive moisture inside walls. Don't forget to check the toilet stool for leakage. This latter type of leak has the potential to rot out the entire bathroom floor in crawl-space houses. In homes built close to the ocean or inland salt-water bays, the oxidation of iron water pipes is very rapid and leakage in the wall areas is frequent. Wooden window sashes are always subject to moisture deterioration and the attacks of drywood termites.
- 8. Windows should be opened to inspect for drywood termites that may have entered into the window sash. Often the bottom of wooden window sash are left unpainted making them a prime area for infestations that are overlooked by many inspectors. Your inspection mirror can be used to look along the bottom of the sash. Interior inspection of houses on slabs does not vary much from that in crawl-space homes. However, there are a few special points which should be stressed. Interior inspections should also include looking in the less obvious places for infestations such as behind refrigerators, under carpeting, in closets, inside heat vents and areas where day-to-day cleaning is unusual. Since these are the areas undisturbed you are more likely to find infestations that in frequently cleaned areas would be missed. The interior may also have areas that are inaccessible for inspection. Any areas that you cannot physically inspect should be marked as inaccessible for inspection with a recommendation for further inspection.
- 9. TheAtticArea Indications of drywood termite attack such as wings or frass, may often be found even though no piles of pellets or active colonies are located. The tops of ceiling-joists, insulation directly beneath the ridge-board and the area adjacent to or just beneath attic vents are locations that should always be checked for drywood termite pellets, wings and/or frass. If you note what appears to be a pile of sawdust on the upper plate near the eaves and you find it impossible to get close enough for a good look, moisten your hack saw blade and pick up a sample for accurate identification. Fungus infections due to roof drain stoppage or leaks around flashing may be in evidence in these areas. It is not uncommon to find shelter tubes of subterranean termites in portions of the attic directly above earth-filled porches, hearths and closed in concrete patios. In recent years the presence of wood-boring beetle damage in the attic area has become more noticeable. Some of this damage may have occurred in the forest but the extensive building program of the last few years has allowed less time for lumber curing and active beetle colonies are not uncommon. This is especially true in the case of bark beetles. In the event that no way of access into the attic can be found, estimate its accessibility from the exterior and recommend the cutting of a hatch if you are satisfied that sufficient clearance exists. Sometimes excessive bracing, roof additions and blown-in insulation limit the accessibility of the attic area and these facts must be set down in the notes. If the simple removal and replacement of a single brace or the opening of an abandoned roof section is all that is necessary to make the entire attic accessible, do not shirk your responsibility by failing to recommend these areas be opened for inspection. Crawl-space Inspection ( SubstructureArea)
- 10. In the past, the conventional pattern of the sub-area inspection was nearly always made in a narrow path around the under area adjacent to the foundation. An exception would be in the case of large buildings where cross-walls (pier walls) interfered. Although cross-walls are utilized under single story structures. They are always found under bearing partitions in buildings of 2 or more stories. In contemporary homes, many things interfere with the so-called "conventional pattern." These interferences are the relocation of appliances such as automatic washing machines, driers, water heaters and dishwashers and the fact that bathrooms are not always contingent with the foundation as they always were in the past. Leaking water lines and plumbing connections may now occur several feet away from the foundation. We can no longer be satisfied with the fact that the plumbing along the foundation appears dry. All this points to a wider path of inspection and a route beneath each bath, half-bath or relocated water-connected appliance. Having already examined both the exterior and interior, the inspector should have the strategic points well in mind. Most likely these will be the location of earth-filled porches, patios, embedded vent-frames, planters, damp areas, bathrooms and water-connected appliance locations. The general practice in checking an earth-filled porch is to slip a thin metal probe under the mudsill (sill) to locate either a void or the fill itself. If the probe penetrates the area beneath a porch cap freely, no "seal" exists, but if it strikes a hard surface back of the mudsill, a question arises as to the presence of a contact. In the latter case the earth-fill is either sealed off or some structure has interfered and the seal is questionable. Where a porch-seal is in question, make a diligent search for the presence of shelter tubes of subterranean termites before reaching any conclusion. Experience has shown that a probe may fail to penetrate all but a small section so don't give up after a few tries . . . blade it all! Inspectors should use light colored chalk to make arrows on the foundation indicating penetration points or evidence of infestation. These are valuable guides when reinspections or treatments are made at later dates.
- 11. Within reasonable sight-range, most vertical shelter tubes of subterranean termites attached to the foundation and freestanding swarmer or exploratory tubes are readily visible. Inspectors must be much more alert to spot horizontal tunnels extended along the mudsill, in subfloor cracks, at the edges of blocking and those extending along floor joists and girders. If possible the latter should be traced to their point of origin. The colony may have originated in an earth-filled porch, an exterior planter, an embedded exterior vent frame, a vertical foundation crack, some loose stucco, a wooden structure attached to the house or some other earth-to-wood contact. As previously stated. Good visibility cannot be obtained at distances of more than 15 to 18 feet. Therefore, if the structure exceeds 36 feet in width, 1 or 2 extra routes traversing the central portion becomes necessary. Known locations of drywood termite colonies in the periphery of the attic or at approximate interior locations help the inspector to spot accumulations of excrement pellets in the subarea. Large piles of dropping spill over the mudsill onto the ground and are more easily discovered. Compact piles of drywood termite pellets indicate a source close at hand while scattered pellets suggest a more distant origin. Some locations in the sub-area which should be given particular notice are: areas directly beneath floor furnaces, soil pipe openings through foundations, wood forms or stakes left in place by the builder, cellulose debris, tree stumps, plumbing or heating ducts supported on wood blocks, moist areas, vertical foundation cracks and piled up earth. Check carefully under the stall shower which has been previously water-tested. If it is damp or dripping, determine source of the leak. Probe the subfloor for softness. This goes for stained areas whether dry or wet. Don't overlook the flooring and joists directly beneath the toilet stool.Although everything may look "ship-shape" in the bathroom, the real story will reveal itself directly beneath the stool. Dry dormant fungus decay beneath a toilet indicates that the toilet was reset without floor-repair. Such a condition is a serious hazard because a new leak will reactivate the fungus development. Garages One of the primary problems involved in garage inspection is storage. If the inspector cannot reach all the strategic portions of the garage due to storage, make note of this and suggest a supplemental inspection and report when these can be made available. Sometimes garages are partially or completely "finished" on the inside and except for the door and doorjamb, a garage like this may be inaccessible for inspection. In California where both subterranean and drywood termites occur a proper inspection includes the mudsill, studding, upper plates, and rafters. Flat roofed garages are subject to fungus decay adjacent to the drain or downspout area. The header above the door is a spot that is easily missed, especially when there is an open overhead door. Shrinkage cracks adjacent to the foundation and diagonal cracks passing under the mudsill are definite garage hazards. Some garage-owners have built-in colonies of drywood termites with infested shelving, storage rooms, benches and the like. Sometimes infested stored furniture, and firewood may be the source of the garage infestation of drywood termites or wood-boring beetles. Small temporary-type structures built onto the sides or rear of the garage may not be properly insulated from the ground. Where the garage is an integral part of the house it becomes as important as any other portion. If the garage has a laundry area check all
- 12. water-connected appliances. A locked garage or storage that prevents a thorough inspection means a supplementary inspection and report should be recommended. High exterior grade conditions and piles of trash or stored lumber adjacent to the outer walls of the garage are definite hazards and should be noted on the report with recommendations for correction.