
Recommended
Recommended
More Related Content
Recently uploaded
Recently uploaded (20)
Featured
Featured (20)
Barn Owl's House step by-step assembly
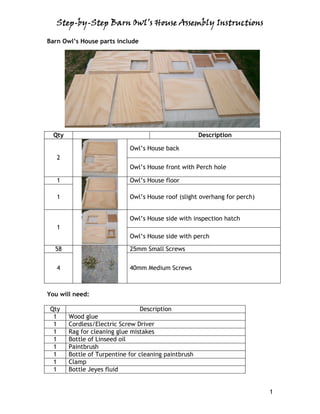
- 1. Step-by- Step-by-Step Barn Owl’s House Assembly Instructions Barn Owl’s House parts include Qty Description Owl’s House back 2 Owl’s House front with Perch hole 1 Owl’s House floor 1 Owl’s House roof (slight overhang for perch) Owl’s House side with inspection hatch 1 Owl’s House side with perch 58 25mm Small Screws 4 40mm Medium Screws You will need: Qty Description 1 Wood glue 1 Cordless/Electric Screw Driver 1 Rag for cleaning glue mistakes 1 Bottle of Linseed oil 1 Paintbrush 1 Bottle of Turpentine for cleaning paintbrush 1 Clamp 1 Bottle Jeyes fluid 1
- 2. Step-by- Step-by-Step Barn Owl’s House Assembly Instructions • Ensure all Owl’s House parts have been received. Refer 1. to the above list. • Select the perch and front of the owl house. 2. • Spread glue on the perch flat side with pre-drilled screw holes. • Clamp the perch to the front of the owl house under the 3. opening (front door) for the Barn Owl. • Select 2 small screws and drive home on either side of 4. the perch. • Spread glue on either sides of the roof of the Owl’s House following the pre-drilled screw holes. • Put roof aside. • Place the sides of the Owl’s House in front of you in an 5. upright position. • Place the roof on top. (you might need an extra pair of hands) 2
- 3. Step-by- Step-by-Step Barn Owl’s House Assembly Instructions Right Hand Side • Using one hand, square up any corner of the roof with a side of the Owl’s House to ensure it is flush. • Place small screw in pre-drilled corner hole. Hold the squared corner firm and using the opposite hand with the Cordless/Electric Screw Driver, drive in the screw until fixed. 6. • Go to the top pre-drilled screw hole. Square up the roof with the side of the Owl’s House. • Place small screw in pre-drilled corner hole. Hold the squared corner firm and using the opposite hand with the Cordless/Electric Screw Driver, drive in the screw until fixed. • Complete the row. Left Hand Side • Using one hand, square up any corner of the roof with a side of the Owl’s House to ensure it is flush. • Place small screw in pre-drilled corner hole. Hold the squared corner firm and using the opposite hand with the Cordless/Electric Screw Driver, drive in the screw until fixed. 7. • Go to the top pre-drilled screw hole. Square up the roof with the side of the Owl’s House. • Place small screw in pre-drilled corner hole. Hold the squared corner firm and using the opposite hand with the Cordless/Electric Screw Driver, drive in the screw until fixed. • Complete the row. • Turn the structure onto its roof. 8. • Apply glue along both sides. (The glue seals and is an extra measure of building a secure Owl’s House.) 9. • Place the floor/base on top of the glued sides. 3
- 4. Step-by- Step-by-Step Barn Owl’s House Assembly Instructions Right Hand Side • Using one hand, square up any corner of the floor/base with a side of the Owl’s House to ensure it is flush. • Place small screw in pre-drilled corner hole. Hold the squared corner firm and using the opposite hand with the Cordless/Electric Screw Driver, drive in the screw until fixed. 10. • Go to the top pre-drilled screw hole. Square up the floor/base with the side of the Owl’s House. • Place small screw in pre-drilled corner hole. Hold the squared corner firm and using the opposite hand with the Cordless/Electric Screw Driver, drive in the screw until fixed. • Complete the row. Left Hand Side • Using one hand, square up any corner of the floor/base with a side of the Owl’s House to ensure it is flush. • Place small screw in pre-drilled corner hole. Hold the squared corner firm and using the opposite hand with the Cordless/Electric Screw Driver, drive in the screw until fixed. 11. • Go to the top pre-drilled screw hole. Square up the floor/base with the side of the Owl’s House. • Place small screw in pre-drilled corner hole. Hold the squared corner firm and using the opposite hand with the Cordless/Electric Screw Driver, drive in the screw until fixed. • Complete the row. • Take the back part of the Owl’s House. 12. • Apply glue along all the pre-drilled screw holes. The back end pulls the entire Owl’s House square. • Using one hand, square up any corner of the back with a side of the Owl’s House to ensure it is flush. 13. • Place small screw in pre-drilled corner hole. Hold the squared corner firm and using the opposite hand with the Cordless/Electric Screw Driver, drive in the screw until fixed. • Drive screws home and fix in place along all sides. 4
- 5. Step-by- Step-by-Step Barn Owl’s House Assembly Instructions • Turn the Owl’s House with the open front end toward the top. 14. • Take the inspection hatch side of the Owl’s House. • Apply glue along all the pre-drilled screw holes. • Using one hand, square up any corner of the inspection hatch side with a side of the Owl’s House to ensure it is flush. • Place small screw in pre-drilled corner hole. Hold the 15. squared corner firm and using the opposite hand with the Cordless/Electric Screw Driver, drive in the screw until fixed. • Drive screws home and fix in place along all sides. • Select the 4 medium screws. • Place small screw in pre-drilled corner hole. Hold the squared corner firm and using the opposite hand with 16. the Cordless/Electric Screw Driver, drive in the screw until fixed. 17. • Select the inspection hatch door and slide into place. CONGRATULATIONS on assembling your first Owl’s House! We know you will have lots of pleasure from it! 18. Before positioning, apply 2 or 3 coats of linseed oil and also Jeyes fluid to ensure the owl house does not become a home for bees. 5
- 6. Step-by- Step-by-Step Barn Owl’s House Assembly Instructions Why a Barn Owl House needs an inspection hatch: Boxes will need to be cleaned out periodically when debris has built up. This is easier if an ‘inspection hatch’ is added when the box is built. Hinge the hatch along the top edge, and secure firmly with a catch. Jackdaws and grey squirrels, which often use nest boxes, will unfortunately fill up a box with debris very quickly. Great care should be taken when inspecting boxes or removing any material from them. The material may contain sharp objects such as thorns, and a squirrel or even a tawny owl may remain in the box until the last moment, bolting out only as you put a hand in the box. Do not breathe in the dust from the nesting material and dried droppings. 6