1. 30/09/2002 Copyright 2002 Crystal Decisions, Inc. All Rights Reserved. Page 1
OLAP Reporting with Crystal Reports 9
OLAP and Analytics
Overview
Crystal Reports has established itself as the reporting tool of choice for many companies and excels in
providing high quality formatted information based on data stores throughout an organization.
Typically Crystal Reports is associated with relational data stores, but it can also be used to build high
quality reports from OLAP cubes. Version 9 includes several new enhancements which make its OLAP
reporting capabilities even more powerful.
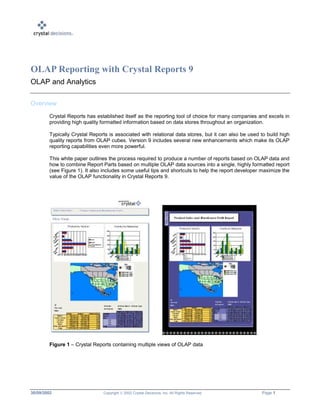
This white paper outlines the process required to produce a number of reports based on OLAP data and
how to combine Report Parts based on multiple OLAP data sources into a single, highly formatted report
(see Figure 1). It also includes some useful tips and shortcuts to help the report developer maximize the
value of the OLAP functionality in Crystal Reports 9.
Figure 1 – Crystal Reports containing multiple views of OLAP data
2. OLAP Reporting with Crystal Reports 9 OLAP and Analytics
30/09/2002 Copyright 2002 Crystal Decisions, Inc. All Rights Reserved. Page 2
cr9_olap.pdf
Contents
DESIGNING A SALES REPORT BASED ON OLAP DATA.............................................................................................................3
OLAP Grid Layout.........................................................................................................................................................5
Insert Variance Calculation...........................................................................................................................................7
Formatting .....................................................................................................................................................................7
Charting.......................................................................................................................................................................11
BUILD A GEOGRAPHICAL WAREHOUSE OLAP REPORT ........................................................................................................13
Insert Contribution and Total Calculations.................................................................................................................14
Mapping.......................................................................................................................................................................15
Filtering and Sorting....................................................................................................................................................17
CRYSTAL REPORTS FUNCTIONALITIES THAT ARE INHERITED .................................................................................................18
Report Template...........................................................................................................................................................18
Exporting capabilities..................................................................................................................................................19
Hyperlinks and Report Parts........................................................................................................................................19
DISTRIBUTION VIA CRYSTAL ENTERPRISE.............................................................................................................................19
ADVANCED OLAP VIA CRYSTAL ANALYSIS .........................................................................................................................20
3. OLAP Reporting with Crystal Reports 9 OLAP and Analytics
30/09/2002 Copyright 2002 Crystal Decisions, Inc. All Rights Reserved. Page 3
cr9_olap.pdf
Designing a Sales Report based on OLAP Data
In this section, you will design a Sales report that will display sales indicators to help sales management
monitor the performance of various products. This report can be created using the OLAP Report
Creation Wizard to access the “Sales Reports” OLAP cube provided as part of the Crystal Samples MS
OLAP data source.
1. Launch Crystal Reports and select “File”, then “New”.
2. Select “Using the Report Wizard”, Choose “OLAP” and then click “OK”.
Figure 2 - Crystal Reports Creation Dialog
3. The “OLAP Report Creation Wizard” dialog box opens. Click “Select Cube” and select the “Sales
Reports” cube located in the Crystal Samples catalog under your MSOLAP server and click “Open”.
Figure 3 - OLAP Connection Browser
4. OLAP Reporting with Crystal Reports 9 OLAP and Analytics
30/09/2002 Copyright 2002 Crystal Decisions, Inc. All Rights Reserved. Page 4
cr9_olap.pdf
4. Define the rows and columns dimensions:
a. In the “OLAP Data” screen of the OLAP Report Creation Wizard dialog box, click “Next”.
The Rows/Columns dialog box displays. This screen enables you to define the rows and
columns dimensions that you choose to display in your OLAP Grid. OLAP grid objects
provide true multi-dimensional reporting and are used to display and format OLAP data as
well as navigate through them within an OLAP report.
The default “Rows/Columns” layout is the underlying cube layout.
b. Add the “Version” dimension in the “Columns” list box and remove the “Measures”
dimension from it.
c. Add the “Measures” dimension in the “Rows” list box in second position after the “Products”
dimension.
d. Select the “Version” dimension in columns. Click “Select Column Members” and check that
“Actual” and “Budget” members are selected. Click on “Cancel”.
5. Define Slice/Page dimensions:
a. In the “Rows/Columns” screen of the OLAP Report Creation Wizard dialog box, click “Next”,
the “Slice/Page” screen displays. This screen enables you to define rules for the dimensions
that are displayed in the OLAP Grid rows or columns.
b. Select the “Week=All Weeks” slice and click “Select Slice”. In the “Member Selector” dialog
box, expand the “All Weeks” dimension tree by clicking on the + and select “week 40” in the
list. Click “OK”.
c. Select the “Year=All Years” slice and add it to the “Page” list box. In the “Member Selector”
dialog box, select the “All Years” parent member and click “Select > Move Selection Down
One Level”.
d. Expand the “All Years” dimension tree by clicking on the + sign and check that “Last Year”
member and “This Year” member check boxes are selected. Click “OK”.
NOTE You could very easily create a parameterized report based on a slice and/or a page dimension
using the “Link to Parameter” option by clicking on the “Create/Edit” button. This feature would
enable designers to create report from OLAP data based upon user input parameters.
5. OLAP Reporting with Crystal Reports 9 OLAP and Analytics
30/09/2002 Copyright 2002 Crystal Decisions, Inc. All Rights Reserved. Page 5
cr9_olap.pdf
6. Apply a Style:
a. In the “Slice/Page” screen of the “OLAP Report Creation Wizard” dialog, click “Next”, the
“Style” screen displays.
b. Select the “Basic – Gold” style in the list box on the left and click “Finish”. The Crystal
Reports designer is now activated and your report is displayed. Click the “Preview” tab, two
OLAP grids are displayed, one for “Last Year” and one for “This Year”.
7. Quick formatting:
a. Click on the “Design” tab, the “Design” screen displays the OLAP Grid design layout.
b. Click on the Value cell, the cell gets selected. Expand its width with the right handle.
c. Click on the “Preview” tab, the “Preview” screen displays. Double click on the “All Products”
row member in the “Last Year” OLAP Grid, the “All Parents” node expands and all the
children gets displayed in the OLAP Grid.
OLAP Grid Layout
Figure 5 below displays the “Preview” screen of our OLAP report. An OLAP Report can have 4 types of
dimensions: the rows dimension, the columns dimension, the slice dimension and the page dimension.
This depends on the number of dimensions you have in your cube and on the OLAP Grid design
choices.
The “Sales Reports” sample cube contains 5 dimensions: Week, Version, Year, Product and Measures
and our OLAP report contains the 4 possible dimension types described above. Let’s describe each of
these dimension types and relate them to Figure 5.
Figure 5 - Preview screen of an OLAP Grid
6. OLAP Reporting with Crystal Reports 9 OLAP and Analytics
30/09/2002 Copyright 2002 Crystal Decisions, Inc. All Rights Reserved. Page 6
cr9_olap.pdf
Rows and Columns dimensions
Rows and columns dimension types can be described together as they operate in the same way. Rows
and columns dimensions are basically the dimensions displayed in rows or columns in an OLAP grid.
The important point to note is that you can add several dimensions to rows and/or columns in your
OLAP grid to ease your analysis, display more data within the same view, compare more easily some
related values, etc… This is called “stacking” dimensions and in our example the “Measures” row
dimension is stacked within the “Products” row dimension.
The “Measures” dimension is called the row inner dimension and the “Products” dimension is called the
row outer dimension.
The number of rows and/or columns dimensions you can stack is only limited by the number of
dimensions you can have in your cube and the display space available in your report.
Slice dimensions
The slice dimensions are the dimensions that do not appear in rows or columns in the OLAP grid. In our
example, the “Week” and “Year” dimensions are slice dimensions. “Week” is sliced on the week “40”
member when “Year” is sliced on the “Last Year” member.
The number of slice dimensions is equal to the total number of dimensions in your cube minus the
number of dimensions in rows and columns.
Page dimensions
Page dimensions are dimensions that map slice dimensions and enables you to create multiple
occurrences of your OLAP grid, one occurrence for each paged dimensions member.
In our example (see Figure 6), the page dimension is the “Year” dimension. The page dimension
members are “Last Year” and “This Year” which enables us to have two occurrences of our OLAP grid
displayed in the “Preview” screen, one for “Last Year” and one for “This Year”.
Figure 6 - Page dimension
7. OLAP Reporting with Crystal Reports 9 OLAP and Analytics
30/09/2002 Copyright 2002 Crystal Decisions, Inc. All Rights Reserved. Page 7
cr9_olap.pdf
You can stack several page dimensions in your OLAP report and create a hierarchical tree between the
page dimensions members as depicted in Figure 7.
Figure 7 - Stacked page dimensions
Hierarchical dimensions
Dimensions can have their members organized hierarchically. For instance, the ‘Bakery’: ‘Wine and
Spirits’ fields are the children of the top parent ‘All Products’ field.
You will notice when exploring the OLAP reporting capabilities detailed in this document that the filtering,
sorting, formatting, charting, mapping, etc. of OLAP grid members are all controlled by the members
hierarchical level.
This is an important point to note as this enables you to apply OLAP reporting capabilities very quickly to
a large set of members and warranty a good performance.
Insert Variance Calculation
One of the new Crystal Reports 9 features is the ability to easily add calculations to your OLAP grid.
These calculations are retained in the report and are refreshed when the report data change.
Let’s add a Variance calculation to our OLAP Grid in order to quickly view how our products are
performing by measures.
1. In the OLAP Grid, right click on the “Budget” member and select “Add Calculated Member”
2. In the “Calculated Members” dialog, select the Variance “Calculation Type” and “Compare” Actual
“To target of” Budget. Select “Values less than the target are bad”. Rename the “Calculation Name”
Variance (instead of Variance(Actual vs Budget)) and click “OK”.
The variance calculation now appears after the “Budget” member in the OLAP grid and we can see that
a positive or a negative variance result doesn’t mean the same thing whether it is for a “Sales” or a
“Cost” measure. Indeed, a positive result for “Sales” means that we are above target when for “Costs” it
means that we have spent more than our budget. In the next section, we will add some color coding to
distinguish what is a good or a bad performance.
Formatting
Format and Formula Editors
In this section, we will color the cell background of the variance calculation in green or red, green
representing good performance and red representing bad performance. To do this we need to add
conditional formatting using the Formula Editor and, as it is for a particular attribute, we will access the
Formula Editor via the Format Editor to change the the “Background color”.
8. OLAP Reporting with Crystal Reports 9 OLAP and Analytics
30/09/2002 Copyright 2002 Crystal Decisions, Inc. All Rights Reserved. Page 8
cr9_olap.pdf
1. Right click on any “Variance” cell in the OLAP Grid and select “Format Field”. In the “Format Editor”
dialog, click on the “Border” tab. Check the Background checkbox and click the Formula button. The
Formula Editor dialog box opens
2. In the Formula Editor, paste the following formula:
// positive variance for sales or margin
if (CurrentFieldValue > 0 and GridRowColumnValue ("Version, level 0")="Variance" and
(GridRowColumnValue ("Measures, level 0")="Sales"
or GridRowColumnValue ("Measures, level 0")="Margin"))
or
// or negative variance for costs
(CurrentFieldValue < 0 and GridRowColumnValue ("Version, level 0")="Variance" and
GridRowColumnValue ("Measures, level 0")="Cost")
// means a good result
then crGreen
//
// negative
else
// negative variance for sales or margin
if (CurrentFieldValue < 0 and GridRowColumnValue ("Version, level 0")="Variance"
and
(GridRowColumnValue ("Measures, level 0")="Sales"
or GridRowColumnValue ("Measures, level 0")="Margin"))
// or positive variance for costs
or
(CurrentFieldValue > 0 and GridRowColumnValue ("Version, level 0")="Variance"
and GridRowColumnValue ("Measures, level 0")="Cost")
// means a bad result
then crRed
else crWhite
3. Click the “Save and Close” icon.
9. OLAP Reporting with Crystal Reports 9 OLAP and Analytics
30/09/2002 Copyright 2002 Crystal Decisions, Inc. All Rights Reserved. Page 9
cr9_olap.pdf
4. In the Format Editor, click “OK”.
The OLAP Grid cells gets color coded according to the formula logic (see Figure 8). It is now really easy
to identify which product categories are performing well and which are not.
Figure 8 - Conditional formatting on column “Variance”
Conditional formatting gives you great control to do any kind of formatting required by your users. In this
specific example, conditional formatting has been applied at cell level using formulas.
Highlighting Expert
Another way to apply conditional formatting at a hierarchical level is to use the Highlighting Expert. The
Highlighting Expert is easy to use and enables you to modify several formatting attributes at one time -
font color, background color, font style and border style.
1. Right click on any “Budget” cell in the OLAP Grid and select “Highlighting expert”. In the
“Highlighting Expert” dialog, click “New”. Set “Value of” “Version, Level 0”, “equal to”, “Actual”. Select
the “Background” as “Yellow”.
2. Click “New” and repeat the same operation with “Value of” “Budget” “equal to” “Budget” and set the
“Background” to “Yellow”.
3. Click on “OK”
10. OLAP Reporting with Crystal Reports 9 OLAP and Analytics
30/09/2002 Copyright 2002 Crystal Decisions, Inc. All Rights Reserved. Page 10
cr9_olap.pdf
For “This Year” data, you will see the following OLAP grid (Figure 9).
Figure 9 - Conditional Formatting on columns “Actual” and “Budget”
You can immediately see that for “This Year” data, “Frozen goods” and “Fruit and vegetable” sales are
under performing.
If you double click “Fruit and Vegetable”, you will get the split between these 2 sub-categories and notice
that the problem is related to the “Fruit” category only.
Figure 10 - Drill down on “Fruit and Vegetable” member
These types of formatting are all design-time formatting and do not require access to a live data source.
This means that:
• Formatting added to a report retains its meaning even when the underlying data is refreshed.
• Users can create formatting to flag conditions that do not exist in the current view of the data.
For example, a condition might highlight in red cells whose value is > 1000. There might not be
any such values initially, but the user will see them if they occur when the data changes in the
future.
11. OLAP Reporting with Crystal Reports 9 OLAP and Analytics
30/09/2002 Copyright 2002 Crystal Decisions, Inc. All Rights Reserved. Page 11
cr9_olap.pdf
• Formatting information is very efficient and scalable for extremely large reports.
Charting
You can use charting on OLAP data in Crystal Reports 9 as a powerful visualization technique.
Charting capabilities are dependant on the OLAP grid layout and your report needs to contain an OLAP
grid in order to add OLAP chart capabilities.
In this section, we will enhance the OLAP report with 2 types of charts: a pie chart and a bar chart.
1. Contribution Chart
An interesting chart would be a contribution chart to see how much each category of products is
contributing to the overall total. This can be very quickly achieved by completing the following steps:
a. Select the entire OLAP grid, right click and select “Insert Chart”. Under the “Type” tab, select “Pie”
for the chart type.
b. Click the “Data” tab and select “On change of” “Products, Level 2”.
c. Click “Other dimensions” and check that “Measures=Sales” and “Version=Actual”. Click “OK”
d. The “Chart Expert” dialog box appears. Click “OK”. A section with the Contribution Pie chart is
created in your report
e. Change the chart title by clicking on the chart and selecting “Chart Options > Titles”. Rename the
chart “Actual Sales Figures for Product Categories”. Click “OK”.
f. Repeat the same renaming operation with “This Year” chart.
Bakery
Frozen Goods
Fruit and Vegetable
Grocery
Meat
Wine and Spirits
Bakery 8.5%
Frozen Goods 3.6%
Fruit and Vegetable 16.7%
Grocery 43.4%
Meat 20.1%
Wine and Spirits 7.6%
Total: 100.0%
Actual Sales Figures for Product Categories
Figure 11 - “This Year” Actual Sales Figures Pie Chart by Product Categories
12. OLAP Reporting with Crystal Reports 9 OLAP and Analytics
30/09/2002 Copyright 2002 Crystal Decisions, Inc. All Rights Reserved. Page 12
cr9_olap.pdf
“This Year” chart shows that “Fruit and Vegetable” is an important sales budget for the store (16.7% this
year against 18.5% last year) whereas “Frozen Goods” is not as strategic (3.6% this year against 3.2%
last year). We will now focus our analysis on the “Fruit and Vegetable” category.
2. Comparative Chart
Another good chart to add would be a comparative chart between “Actual” sales vs “Budget” sales in
order to illustrate graphically what are the product categories with sales performing under budget. This
can be very quickly achieved by completing the following steps:
a. Select the entire OLAP grid, right click and select “Insert Chart”. Under the “Type” tab, select the
“Bar” chart type.
b. Click the “Data” tab and select “On change of” “Products, Level 2”. Select “Subdivided by” “Version,
Level 1”.
c. Click “Other dimensions” and check that “Measures=Sales” and “Version=Actual”. Click “OK”.
d. The “Chart Expert” dialog box appears. Click “OK”. A section with the Comparative Bar chart is
created in your report
e. Change the chart title by clicking on the chart and select “Chart Options > Titles”. Rename the chart
“Actual vs Budget Sales for Product Categories”. Click “OK”.
f. Repeat the same renaming operation with “This Year” chart.
-100K
0K
100K
200K
300K
400K
500K
600K
700K
800K
Bakery
Frozen
G
oods
Fruitand
Vegetable
G
rocery
M
eat
W
ine
and
Spirits
Actual
Budget
Variance
Actual vs Budget Sales for Product Categories
Figure 12 - “This year” Actual vs Budget Sales Bar Chart by Product Categories
g. Save the new report on your desktop and name it “Top Level OLAP Sales Reports”.
NOTE Crystal Reports 9 enables you to include calculated members results into your chart. It is
not relevant to this example however, as the chart scale is too large.
13. OLAP Reporting with Crystal Reports 9 OLAP and Analytics
30/09/2002 Copyright 2002 Crystal Decisions, Inc. All Rights Reserved. Page 13
cr9_olap.pdf
Build a Geographical Warehouse OLAP Report
You can add multiple cubes from the same or different OLAP vendors (MSOLAP, Crystal Holos, SAP
BW, Hyperion Essbase, DB2, HDC) to the same OLAP report if your data are stored in different OLAP
data sources.
In this section, we will create a new report to demonstrate the other new Crystal Reports 9 OLAP
features.
1. Create a new OLAP report using the “MSOLAP Foodmart 2000 > Warehouse” cube following the
steps described in the first section of this document “Build a Top Level OLAP Sales Reports”.
a. Select the “Warehouse” dimension in rows and the “Measures” dimension in columns.
In the “Measures” dimension, invoke the “Member Selector” and uncheck “Store Invoice”,
“Supply Time”, “Units Shipped” and “Units Ordered”. The only members you must have left
checked are “Warehouse Sales”, “Warehouse Cost” and “Warehouse Profit”.
b. Click “Next” twice (skip the “Slice/Page” screen). In the Style screen, select “Basic – Indigo”.
The report is generated with the following OLAP Grid.
Figure 13 - “Warehouse” OLAP Grid
2. Double click on the “All Warehouses” member and notice that there is no data for “Canada” and
“Mexico”. To find out on which dimension member we should slice to locate data for these cells, we
are going to launch the OLAP Grid Analyzer.
3. Right click on the OLAP Grid and select “Launch Analyzer”.
a. Under the “Cube View” tab, you can now see your OLAp Worksheet. You can then swap
dimensions, stack them in rows and columns, change the slice dimension member, reorder
dimension members in rows and columns, add calculation, etc. in order to get the data
layout you expect.
b. Click on the “Time” dimension and select “1998” as a slice member.
c. Rename the “Measures” member name by right clicking on the member name and select
“Change Caption”.
d. Rename “Warehouse Cost” into “Cost”.
e. Rename “Warehouse Sales” into “Sales”.
f. Rename “Warehouse Profit” into “Profit”.
14. OLAP Reporting with Crystal Reports 9 OLAP and Analytics
30/09/2002 Copyright 2002 Crystal Decisions, Inc. All Rights Reserved. Page 14
cr9_olap.pdf
g. Invoke the “Member Selector” on the “Warehouse” dimension and select the following
members:
Figure 14 - Member Selector dialog on “Warehouse” dimension
4. Click on the “Preview” tab, and note that the OLAP Grid layout has changed accordingly to the
“Cube view” layout.
We have chosen to use the Worksheet through the Launch Analyzer command (Cube View tab) to
change the OLAP grid layout, however, this could have also been done by:
a. dragging and dropping dimensions in the OLAP grid itself (swapping dimensions as well as
stacking)
b. invoking the OLAP Report Creation wizard (right click on the OLAP grid and select “OLAP
Expert”) and altering the layout through the Rows/Columns and Slice/Page tabs
5. Click on the Value cell to select it. Expand its width using the right handle.
Insert Contribution and Total Calculations
We have seen earlier on how easy it is to add calculation to your report. Let’s repeat this operation with
a Contribution calculation in order to show which country contributes the most to the overall sales total.
1. Right click on the “Profit” member and select “Add Calculated Member”.
2. In the “Calculated Member” dialog box, choose “Contribution of” “Sales” “To Dimension”
“Warehouse”. “Calculate contribution to the overall total” and change “Calculation Name” from
“Contribution(Sales)” to “Contribution”. It is now easy to identify that USA contributes to 55% of the
sales, Mexico 35.49 % and Canada only 8.95 %.
3. Right click on the “Contribution” member and select “Automatic Totals > Columns (Down)”. The
“Total” member gets added in rows and gives you a better idea of the cost, sales and profit
contribution by country (see Figure 15).
15. OLAP Reporting with Crystal Reports 9 OLAP and Analytics
30/09/2002 Copyright 2002 Crystal Decisions, Inc. All Rights Reserved. Page 15
cr9_olap.pdf
Figure 15 - “Warehouse” OLAP Grid with Contribution and Total calculations
4. Remove the “Contribution” calculated member. Right click on “Contribution” and select “Remove
Calculated member”.
Mapping
As another visualization technique, you can apply the mapping feature in Crystal Reports 9 to OLAP
data.
Charting and Mapping capabilities are very similar. As charts, OLAP maps are dependant on the layout
of an OLAP grid.
1. Select an OLAP grid, right click and select “Insert Map”.
2. In the “Map Expert” dialog box, click on the “Data” tab and select “on change of” as “Warehouse”
and “subdivided by” as “None”. Then, click on the “Type” tab and select “Color of highest interval” as
“Navy” and “Color of lowest interval” as “Yellow”. Click “OK”
Crystal Reports generates automatically the following “Cost by World” map in your report (see Figure
16).
World
by Cost
87,898.5315 to 87,898.5315 (1)
56,156.8606 to 87,898.5315 (1)
14,199.8606 to 56,156.8606 (1)
Figure 16 - “Warehouse” Cost by World map
16. OLAP Reporting with Crystal Reports 9 OLAP and Analytics
30/09/2002 Copyright 2002 Crystal Decisions, Inc. All Rights Reserved. Page 16
cr9_olap.pdf
3. In the OLAP Grid, double click on the “USA” member (drill down). Note that the map operates a drill
down on the “USA” member.
The OLAP grid layout enables you to drive the navigation through the map object.
This feature could also have been demonstrated with a chart object.
4. Double click on the “Mexico” member (drill down) and your OLAP Grid should now looks like the
following (see Figure 17):
Figure 17 - Expanded “Warehouse” OLAP Grid
Here again the drill down happens simultaneously on the map.
Note that performing a drill up on a parent field also impacts the map layout.
5. Right click on the map and select “Map Expert”. Under “Data”, select “Subdivided by” “Measures,
Level 1”. You can now graphically see the split between sales, cost and profit by location within a
country (see Figure 18).
Mexico
75,000
37,500
7,500
Cost
Sales
Profit
Contribution
Mexico
75,000
37,500
7,500
Cost
Sales
Profit
Contribution
AGUASCALIENTES
NIA SUR
CAMPECHE
COAHUILA
COLIMA
CHIAPAS
CHIHUAHUA
DURANGO
GUANAJUATO
GUERRERO
MORELOS
NUEVO LEON
OAXACA
A
TABASCO
VERACRUZ
YUCATAN
ZACATECAS
Figure 18 - “Warehouse” Mexico map by Cost, Sales and Profit
17. OLAP Reporting with Crystal Reports 9 OLAP and Analytics
30/09/2002 Copyright 2002 Crystal Decisions, Inc. All Rights Reserved. Page 17
cr9_olap.pdf
Filtering and Sorting
Another new OLAP feature in Crystal Reports 9 is the ability to sort and filter on OLAP Grids to quickly
re-arrange grid data in a useful manner.
Filter
The “Warehouse” dimension in the OLAP Grid is now quite expanded (see Figure 17) and it could be
interesting to apply a filter to identify the top 5 profitable warehouses.
To apply a filter, follow the steps below:
1. In the OLAP Grid, right click on the “Profit” member and select “Add Filter”.
2. In the “Define Filter” dialog box, select “Filter/Type” “Top / bottom n”. Select “Display rows” which
are in the “top” “5” of the member: Profit.
Your OLAP Grid now has the following layout (see Figure 19).
Figure 19 - Top 5 Profitable Warehouses
“USA” and “Mexico” are logically ahead as these members are the top hierarchical parents. However, it
is interesting to note the classification order for “WA”, “OR” and “CA” in the US.
Note that the “Total” Calculation has been split between “Total Displayed” and “Total Excluded” for
consistency.
Sort
A similar result can be achieved using the sorting capabilities as follows:
1. In the OLAP grid, right click on member “Profit” and select “Remove Filter”. The OLAP grid gets
back to its initial state (see Figure 17).
2. Right click on member profit and select “Add First Sort > Descending”. Your OLAP Grid now has got
the following layout (see Figure 20).
18. OLAP Reporting with Crystal Reports 9 OLAP and Analytics
30/09/2002 Copyright 2002 Crystal Decisions, Inc. All Rights Reserved. Page 18
cr9_olap.pdf
Figure 20 - “Warehouse” OLAP Grid sorted by “Profit” (Descending)
Note that the sort is applied within the dimension hierarchy.
3. Right click on member profit and select “Break Hierarchies”. Your OLAP Grid now has the following
layout (see Figure 21). You can then see same order as the one displayed with the “Filter” option.
Figure 21 - “Warehouse” OLAP Grid sorted by “Profit” (Descending and Break Hierarchies)
Crystal Reports functionalities that are inherited
Report Template
Crystal OLAP reports inherit the new Custom Template capabilities in Crystal Reports 9. A template is
an existing report file whose formatting can be applied across multiple reports – you no longer have to
format each one individually.
To apply a template to your report, follow the steps below:
1. On the “Report” menu, click on “Template Expert”.
19. OLAP Reporting with Crystal Reports 9 OLAP and Analytics
30/09/2002 Copyright 2002 Crystal Decisions, Inc. All Rights Reserved. Page 19
cr9_olap.pdf
2. In the “Template Expert”, choose a predefined template and click “OK”.
The report samples displayed in Figure 1 in this document have been generated using the “Block
Sample (Blue)” template and the “Contrast Index Sample” template.
Exporting capabilities
Crystal OLAP reports inherit of the exporting capabilities in Crystal Reports 9 within the designer as well
as within the different Crystal Enterprise viewers.
Within the Crystal Reports designer, the various exporting format are:
• Acrobat Format (PDF)
• Crystal Reports (RPT)
• HTML 3.2
• HTML 4.0
• MS Excel 97-2000
• MS Excel 97-2000 (Data only)
• MS Word
• ODBC
• Record style (columns no spaces)
• Record style (columns with spaces)
• Report Definition
• Rich Text Format
• Separated Values (CSV)
• Tab-separated text
• Text
• XML
Within the Crystal Enterprise viewers, the various exporting format are:
• Crystal Reports (.rpt)
• Microsoft Excel 7.0 (.xls)
• Microsoft Word (.doc)
• Portable Document Format (.pdf)
• Rich Text Format (.rtf)
Hyperlinks and Report Parts
Crystal OLAP reports also inherit of the hyperlinks and Report Parts capabilities in Crystal Reports 9
within the designer as well as within the Report Application Server 9 (integrated with Crystal Reports 9).
Report Parts are report objects that can be displayed individually in a viewer (without the rest of the
report page). More precisely, Report Parts are hyperlink definitions that points from a home report object
to a destination object.
This enables report designers to create navigation links between report objects within the same report
or from/to another existing report.
Distribution via Crystal Enterprise
An OLAP report is distributed through Crystal Enterprise the same way as a relational report. You can
save it to the Crystal Enterprise APS directly from the Crystal Reports designer or you can import it into
the Crystal Enterprise framework using the Crystal Enterprise Publishing Wizard.