Cost Analysis of ComFrame: A Communication Framework for Data Management in ...
Plant Layout Guide
1. Management Guide Vol. 34, No. 1, Fall 1999
CENTER FOR INDUSTRIAL RESEARCH AND SERVICE
APartnering with the Iowa Manufacturing Technology Center
University Extension College of Engineering
When manufacturing firms find themselves in the
enviable position of scrambling to keep pace with rising
demands, they are faced with the following questions:
1. How can we increase throughput using our existing
facility and resources?
2. How can we increase throughput by adding resources
to our existing facility?
3. How can we increase throughput by adding to our
facility or relocating to a larger facility?
One of the many answers to each of the above questions is
by improving plant layout. According to D. R. Sule in his
book (1994) Manufacturing Facilities, plant layout is
important for two reasons: 1) material handling costs
comprise 30-75% of total manufacturing costs and 2)
modifications or rearrangements are usually costly in
terms of both time AND money.
While you may not be able to “optimize” your facility in
the mathematical sense of the term, you should be able to
make improvements in areas such as:
• time spent handling materials
• cost of material handling
• distance traveled by materials and personnel
• number of moves made by materials and personnel
• congestion
• process flow
How does one go about improving plant layout? If you
have done it before you know it is not an easy task! You
must take into account every phase of plant operations
plus diverse considerations such as order taking, employee
break room, utilities, special ventilation requirements as
well as all processes and activities. In other words, many
factors must be considered. Since it is difficult to take that
many different factors into account in any one problem, a
systematic approach is needed in order to arrive at the
“best” layout for you. One approach is documented in
Richard Muther’s Simplified Systematic Layout Planning
(1994). This method is broken down into six basic steps.
The steps and a brief description of each are shown below.
1. Chart the relationships.
This begins by identifying departments, activities, or work
centers to be included in the project. It’s best to keep the
number in the range of 10-15 different work centers with a
maximum of 20. More than that and the number of
possible arrangements inhibits arriving at an agreed upon
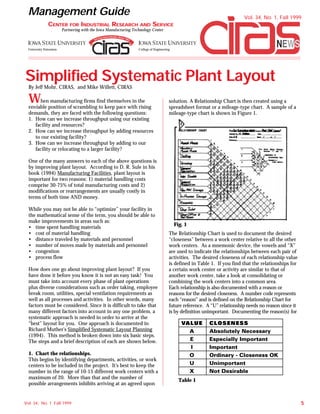
solution. A Relationship Chart is then created using a
spreadsheet format or a mileage-type chart. A sample of a
mileage-type chart is shown in Figure 1.
The Relationship Chart is used to document the desired
“closeness” between a work center relative to all the other
work centers. As a mnemonic device, the vowels and “X”
are used to indicate the relationships between each pair of
activities. The desired closeness of each relationship value
is defined in Table 1. If you find that the relationships for
a certain work center or activity are similar to that of
another work center, take a look at consolidating or
combining the work centers into a common area.
Each relationship is also documented with a reason or
reasons for the desired closeness. A number code represents
each “reason” and is defined on the Relationship Chart for
future reference. A “U” relationship needs no reason since it
is by definition unimportant. Documenting the reason(s) for
Simplified Systematic Plant Layout
By Jeff Mohr, CIRAS, and Mike Willett, CIRAS
Table 1
5
Fig. 1
Vol. 34, No. 1 Fall 1999
2. a relationship is very important when past or future changes
are considered. It provides historical documentation on why
a particular closeness was desirable or undesirable. Some
examples of reasons for a specific relationship value are:
Shared equipment
Shared personnel
Movement of material
Movement of personnel
Shared utilities
Noise
This is by no means a complete list but it should give you
an idea of what is meant by the reason for a closeness
value or relationship.
2. Establish space requirements.
The next step in Muther’s method is to prepare an
“Activities Area & Feature Sheet.” At this point you will
need to determine the area required for each activity, work
center, or department. The information needed is overall
square footage as well as length and width dimensions.
You should also document other physical features that
may be required, such as:
Overhead clearance
Maximum overhead
supported load
Maximum floor loading
Minimum column spacing
Water and drains
The above features are included on the form but should
not be considered all-inclusive. Each manufacturing
facility will have its own unique considerations and the
form should be amended to include any necessary features.
A sample of a completed Activities Area & Features Sheet
is shown in Figure 2.
3. Diagram activity relationships.
In this step, a node diagram is constructed, showing a
graphical representation of the activities and their
closeness relationships. Each node represents an activity.
Starting with the “A” relationships, draw in nodes for the
activities that share an “A” relationship. Then, connect
the nodes with four parallel lines. These four lines
represent an “A” relationship. Once the “A” related
activities have all been placed and the relationship lines
drawn, rearrange and redraw as necessary to achieve the
best arrangement.
Follow this procedure through the rest of the relationships
and activities using three lines for an “E,” two lines for an
“I,” and one line for an “O” relationship. No lines are
used for a “U” and a zigzag or wiggly line represents an
“X” relationship. Again, after adding each set of
relationships and the necessary activities, rearrange or
redraw as necessary to achieve the best arrangement. It is
helpful to think of each line as a rubber band that you are
stretching across the space between each pair of related
work centers. The object is to minimize the tension
present in a given arrangement. This analogy will facilitate
creating an arrangement that will keep the A relationships
closest, then E’s, then I’s and so on. Think of the wiggly
line for an X relationship as a spring in compression that is
trying to push the related work centers apart. Once a final
diagram is created, add the square footage requirements next
to each activity node for future reference. A sample of a
completed diagram is shown in Figure 3.
4. Draw space relationship layouts.
The next step is to combine the relationships diagram with
the space requirements for each activity. When doing this
by hand, it’s best to use paper with a grid and to set a scale
such that the entire drawing will fit on one sheet. Draw in
each activity on the grid according to its square footage
requirements. Adjustments should be made in order to fit
realistic exterior wall configurations. Make sure to show
any dominant physical features such as columns, access
doors, walls, etc.
If the building or addition already exists, overlay your
layouts on the building outline. In the case of an existing
building, depict permanent physical features like load-
bearing walls, docks, windows and doors, etc. Replicate
this activity for all the various layout options being
considered. The more options you consider, the more
confidence you can have in the final layout. A sample
space relationship layout is shown in Figure 4.
Management Guide
CIRAS News6
Dirt
Contamination
Fumes
Shared dock
Supervision
Cost of material handling
Steam
Compressed air
Foundations or pits
Fire or explosion hazard
Ventilation
Electrical
Fig. 3
Fig. 2
3. Fig. 6
5. Evaluate alternative arrangements.
The first step in evaluating different arrangements is to
decide on the criteria by which each layout will be
evaluated. These criteria may include such things as ease
of supervision, flexibility in expansion, cost, material
flow, etc. These criteria or factors must then be prioritized
and assigned a weight value with the highest priority
factor being a 10, the second a lower weight, the third
lower, etc.
Then, evaluate and rate each alternative layout by these
factors using the same A,E,I,O,U ratings as used
previously. After rating each alternative, convert the
letters to numbers (A=4, E=3, I=2, O=1, U=0) and
multiply by the respective weight values. Total the
weighted rate values for each layout. The layout with the
highest total score should be the best alternative. A
sample of a completed evaluation is shown in Figure 5.
6. Detail the selected layout plan.
Up to this point, the layout consists of blocks or various
shapes for departments and areas. In this step you will be
developing the final plan that will be used as a guide to show
precisely where everything goes when you install the plan.
Reproduce the selected layout plan, preferably to a scale of
1/8- or 1/4-inch equals a foot. Identify and draw in the
activities and major features, major equipment, and
primary services not already included. Then begin to draw
in the details of individual equipment, machinery, utilities,
or auxiliary services, and label them.
As you begin to do this, you will find yourself re-evaluating
the fit of these details and making minor adjustments for
such things as free door swings, adequate aisle space, space
for maintenance or service, etc. Make sure that the
arrangement is functionally sound. One of the best ways of
accomplishing this is to involve employees from the
individual areas in this step.
Finally, indicate the type of scale used. Add the compass
points (or at least “north” to orient users), mark any key
dimensions, and add the title block. You are then prepared
to install the plan. A sample of a detailed area is shown in
Figure 6.
Summary
Using this six-step, systematic approach will take much of the
guesswork out of developing a new layout, resulting in
increased confidence in your final plan. As suggested earlier,
this system works best when employee teams are utilized for
each step. Indeed, Muther designed his method to be used by
self-directed work teams to arrange their own work areas. By
using teams, not only will you find that you will come out
with a better layout, but you will have less resistance in
installing the plan because employees will take ownership of a
plan they helped develop.
Management Guide
Fig. 4
Vol. 34, No. 1 Fall 1999 7
Fig. 5
4. Management Guide
Simplified Systematic Layout Planning is especially useful
in job shops or process layouts, where there are many
different products that are produced in limited quantities.
Where there is no consistent process flow, the
development of a relationship chart may be the best data
you have to determine relative placement of separate work
areas. The value of a relationship chart should not be
ignored in product-oriented layouts or production lines.
The six-step process will aid you in locating all the
necessary support functions.
Muther does caution that this simplified method should
be limited to layout projects that include individual office
areas up to 3000 square feet, individual shop areas no
larger then 5000 square feet, and individual storage areas
up to 10,000 square feet. When proceeding with the
method manually, increasing the size and number of work
centers drastically increases the difficulty in creating
alternatives and evaluating them. (See Software & The
Six-Step Method.)
Software & The Six-Step method
While Muther’s Six-Step Simplified Systematic Layout
Planning is a manual method, there are software packages
that guide you through the same process. The use of
software for this type of project effectively increases the
number and size of work areas that can be considered.
Engineering Animation, Inc. (EAI), an Ames, IA company,
has one such software in its Factory Group of products.
FactoryPLAN®, one component of EAI’s VisFactory™,
was developed by David Sly, an Iowa State industrial
engineering graduate. FactoryPLAN® runs in tandem with
AutoCAD and helps manage the process of rearranging
areas into alternative layouts and evaluating them.
With FactoryPLAN®, the user inputs: 1) the work
centers, activities, or departments; 2) square footage and
length and width of each department; and 3) the
relationships and reasons. The software then guides the
user through a process that approximates steps 3 and 4
and shows a visual representation of the relationships for
each alternative layout created. The software then
performs the calculation for the evaluation in step 5 and
presents a score for each alternative block layout.
With software like FactoryPLAN®, it is possible to
effectively use the six-step method on much larger layout
projects. Larger projects are extremely difficult , if not
impossible, to evaluate using the manual method. Like the
manual six-step method, FactoryPLAN® helps promote a
team approach that offers participants ownership of the
new layout and makes the most of minimal data.
Case Study
An eastern Iowa company, having experienced astounding
growth, planned to build a new facility that would triple
the size of their current building. A CIRAS specialist
worked with a team of 10 persons representing
departments throughout the plant. The group received
training in Muther’s six-step process, gathered data, and
estimated square footage requirements and relationships
between work centers. During this process, the team
considered environmental and safety concerns, material
flow, constraints, and monetary factors. The data was
then input into EAI’s FactoryPLAN® software. Several
alternative layouts were developed by the team and scored
using FactoryPLAN®. Finally, the team chose the best of
the alternative arrangements and after a series of revisions
and re-scorings, arrived at a final layout.
According to the company project leader, the process was
invaluable in prompting the team to think through
relationships between areas that wouldn’t have been
considered otherwise. There was also a great benefit in
bringing the team together so that individuals could see
the “big picture” instead of only looking at how each area
related to their area of expertise.
References
Richard Muther & John D. Wheeler, Simplified Systematic
Layout Planning (Management and Industrial Research
Publications, 1994)
D. R. Sule, Manufacturing Facilities: Location, Planning,
and Design (PWS Publishing Company, 1994)
James A. Tompkins & John A. White, Facilities Planning
(John Wiley & Sons, 1996)
For more information about how CIRAS can assist your
company with plant layout, contact the CIRAS Simulation
Team: phone 515-294-3420; FAX 515-294-4925; e-mail
Mike Willett at mwillett@ciras.iastate.edu or
CIRAS News8
John Van Engelenhoven at jve@ciras.iastate.edu.