
Recommended
More Related Content
What's hot
What's hot (20)
Similar to BED MAKING Procedure
Similar to BED MAKING Procedure (20)
Recently uploaded
Recently uploaded (20)
BED MAKING Procedure
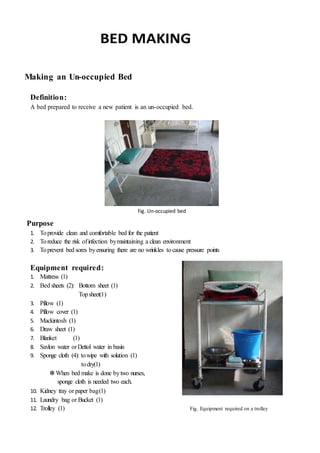
- 1. BED MAKING Making an Un-occupied Bed Definition: A bed prepared to receive a new patient is an un-occupied bed. Fig. Un-occupied bed Purpose 1. Toprovide clean and comfortable bed for the patient 2. Toreduce the risk ofinfection bymaintaining a clean environment 3. Toprevent bed sores byensuring there are no wrinkles tocause pressure points Equipment required: 1. Mattress (1) 2. Bed sheets (2): Bottom sheet (1) Topsheet(1) 3. Pillow (1) 4. Pillow cover (1) 5. Mackintosh (1) 6. Draw sheet (1) 7. Blanket (1) 8. Savlon water orDettol water in basin 9. Sponge cloth (4): towipe with solution (1) todry(1) ✽When bed make is done bytwo nurses, sponge cloth is needed two each. 10. Kidney tray or paper bag(1) 11. Laundry bag or Bucket (1) 12. Trolley (1) Fig. Equipment required on a trolley
- 2. Procedure: by one nurse Care Action Rationale 1. Explain the purpose and procedure to the client. Providing information fosters cooperation. 2. Perform hand hygiene. Toprevent the spread ofinfection. 3. Prepare all required equipments and bring the articles to the bedside. Organization facilitates accurate skill performance 4. Move the chair and bed side locker It makes space for bed making and helps effective action. 5. Clean Bed-side locker: Wipe with wet and dry. To maintain the cleanliness 6. Clean the mattress: 1) Stand in right side. 2) Start wet wiping from top to center and from center tobottom in right side ofmattress. 3) Gather the dust and debris tothe bottom. 4) Collect them into kidney tray. 5) Give dry wiping assame asprocedure 2). 6) Move to left side. 7) Wipe with wet and drythe left side. Toprevent the spread ofinfection 7. Move to right side. Bottom sheet: 1) Place and slide the bottom sheet upward over the top ofthe bed leaving the bottom edge of the sheet. 2) Open it lengthwise with the center fold along the bed center. 3) Fold back the upper layer ofthe sheet toward the opposite side ofthe bed. 4) Tuck the bottom sheet securely under the head of the mattress (approximately 20-30cm). Make amitered corner. ➀Pick up the selvage edge with your hand nearest the hand of the bed. ➁Lay a triangle over the side of the bed ➂Tuck the hanging part of the sheet under the mattress. ➃Drop the triangle over the side ofthe bed. ⑤Tuck the sheet under the entire side of bed. 5) Repeat the same procedure at the end of the corner of the bed 6) Tuck theremainder in along the side Unfolding the sheet in this manner allows you to make the bed onone side. A mitered corner has a neat appearance and keeps the sheet securely under the mattress. Tucking the bottom sheet will be done by turn, the corner of top firstly and the corner of the bottom later. Tosecure the bottom sheet onone side ofthe bed.
- 3. 8. Mackintosh and draw sheet: 1) Place a mackintosh atthe middle ofthe bed (if used), folded half, with the fold in the center of the bed. used), folded half, with the fold in the center of thebed. 2) Lift the right half and spread it forward the near Side. Mackintosh and draw sheet are additional protection for the bed and serves as a lifting or turning sheet for animmobile client.
- 4. Fig. Tuck the bottomsheet underthe mattress Fig. Putting and holding the sheet bedside the mattress at the level of top Fig.Picking the selvage and laying a triangle on the bed Fig. Tucking the hanging part ofthe sheet under the mattress Fig. Dropping the triangle overthe side of the bed Fig. Tucking the sheetunder the entire side ofthe bed
- 5. Care Action Rationale 3) Tuck themackintosh under the mattress. 4) Place the draw sheet on the mackintosh. Spread and tuck assame asprocedure (1-3). 9.Move to the left side of the bed. Bottom sheet, mackintosh and draw sheet: 1) Fold and tuck the bottom sheet as in the above procedure 7. 2) Fold and tuck both the mackintosh and the draw sheet under the mattress asin theabove procedure 8. Secure the bottom sheet, mackintosh and draw sheet onone side ofthe bed 10. Return tothe right side. Top sheet and blanket: 1) Place the top sheet evenly onthe bed, centering it in the below 20-30cm from the top of the mattress. 2) Spread it downward. 3) Cover the top sheet with blanket in the below 1 feet from the top of the mattress and spread downward. 4) Fold the cuff (approximately 1 feet) in the neck part 5) Tuck all these together under the bottom of mattress. Miter the corner. 6) Tuck the remainder in along the side Ablanket provides warmth. Making the cuff at the neck part prevents irritation from blanket edge. Tucking all these pieces together saves time and provides aneat appearance. 11. Repeat the same as in the above procedure 10 in left side. Tosave time in this manner 12. Return to the right side. Pillow and pillow cover: 1) Put a clean pillow cover onthe pillow. 2) Place a pillow at the top of the bed in the center with the open end away from the door. Apillow is a comfortable measure. Pillow cover keeps cleanliness of the pillow and neat. The open end may collect dust ororganisms. The open end away from the door also makes neat. 13. Return the bed, the chair and bed-side table to their proper place. Bedside necessities will be within easy reach for the client . 14. Replace all equipments in proper place. Discard lines appropriately. Itmakes well-setting for the next. Proper line disposal prevents the spread of infection. 15. Perform hand hygiene Toprevent the spread ofinfection. Nursing Alert: Donot let your uniform touch the bed and thefloor not tocontaminate yourself. Never throw soiled lines onthe floor not tocontaminate the floor. Staying one side of the bed until one step completely made saves steps and time to do effectively and save the time.
- 6. Changing an Occupied Bed Definition: The procedure that usedlinesare changedtoa hospitalizedpatientisanoccupiedbed. Fig. Occupied bed Purpose: 1. Toprovidecleanandcomfortablebedforthepatient 2. Treducetheriskof infectionbymaintainingacleanenvironment 3. Topreventbedsoresbyensuringthereare nowrinklestocausepressurepoints Equipment required: Bedsheets(2):Bottomsheet(orbedcover) Topsheet(1) Draw sheet (1) Mackintosh (1) (ifcontaminatedor neededtochange) Blanket (1) (if contaminatedorneededtochange) Pillowcover (1) SavlonwaterorDettolwaterinbucket Spongecloth(2):towipewithsolution(1) todry(1) ✽ Whenthe procedure isdone bytwonurses,sponge clothisneededtwoeach. Kidneytray orpaperbag(1) Laundry bagorbucket(1) Trolley (1)
- 7. Procedure: by one nurse Care Action Rationale 1.Checkthe client’sidentificationandcondition. Toassessnecessityandsufficientcondition 2.Explain the purpose and procedure to the client Providinginformationfosterscooperation 3. Performhandhygiene Topreventthespreadof infection. 4.Prepare all requiredequipmentsandbringthe articles to the bedside. Organizationfacilitatesaccurate skillperformance 5.Close the curtainordoor tothe room.Put screen. Tomaintaintheclient’sprivacy. 6. Remove the client’s personal belongings from bed-side and putthenintothe bed-sidelockeror safeplace. Topreventpersonal belongingsfromdamage and loss. 7.Lift the client’sheadandmove pillowfromcentertothe leftside. Thepillowiscomfortablemeasurefortheclient. 8.Assistthe client to turn toward left side of the bed. Adjustthepillow.Leavestopsheetinplace. Moving the clientas close tothe other side of the bedas possiblegivesyou more roomto makethe bed. Topsheetkeepsthe clientwarmandprotect hisor her privacy. 9.Stand in right side: Loose bottom bed linens. Fanfold (or roll) soiled linens from the side ofthe bed and wedge them close to the client. Placing folded (or rolled) soiled linen close to the client allowsmore space to placethe clean bottomsheets. 10. Wipe the surface of mattress by sponge cloth with wetand dry. Topreventthespreadof infection. 11. Bottom sheet, mackintosh and draw sheet: 1) Place the clean bottom sheet evenlyon the bedfolded lengthwise with the center fold as close to the client’s backaspossible. 2) Adjust and tuck the sheettightly underthe head of the mattress, makingmitered the uppercorner. 3) Tighten the sheet under the end of the mattress and makemiteredthelowercorner. 4) Tuckin alongside. 5) Place the mackintoshandthe drawsheetonthe bottom sheetandtuckinthemtogether. Soiled linenscan easily be removedand clean linensare positionedto makethe otherside of thebed. 12. Assistthe clientto roll over the folded(rolled) linento rightside of thebed.Readjustthe pillowand topsheet. Movingthe clienttothebed’sothersideallowsyouto makethebedonthatside. 13. Move to left side: Discard the soiled linens appropriately. Hold them away fromyouruniform. Place theminthe laundrybag (orbucket). Soiledlinenscancontaminate youruniform, whichmay come intocontact withotherclients. 14. Wipe the surface of the mattress by sponge cloth with wetand dry. Topreventthespreadof infection. 15. Bottom sheet, mackintosh and draw sheet: 1) Grasp cleanlinensandgentlypullthemoutfromunder theclient. 2) Spreadthemoverthe bed’sunmadeside.Pullthelinens taut Wrinkledlinenscancauseskinirritation.
- 8. Care Action Rationale 3) Tuckthe bottomsheettightlyunderthe headof the mattressandmiterthecorner. 4) Tightenthe sheetunderthe endof the mattress and makemiteredthelowercorner. 5) Tuckinalongside. 6) Tuckthe mackintosh andthe draw sheetunderthe mattress. 16. Assist the client back to the center of the bed. Adjust the pillow. Thepillowiscomfortmeasurefortheclient. 17. Return to right side: Clean top sheet, blanket: 1) Placethe cleantopsheetatthetopsideof thesoiled topsheet. 2) Askthe clienttoholdtheupperedgeof thecleantop sheet. 3) Hold boththe topof the soiledsheetand the endof the clean sheetwithrighthand and withdraw to downward. Removethe soiledtop sheetand putitintoalaundrybag (orabucket). 4) Place the blanketoverthe topsheet.Foldtop sheetback overthe blanketovertheclient. 5) Tuck the lower ends securely under themattress. Miter corners. 6) Afterfinishingtherightside,repeatthe leftside. Tuckingthese piecestogethersavestime and provides neat,tightcorners. 18. Remove the pillowand replace the pillow cover with clean one andrepositionthepillowto the bed undertheclient’shead. Thepillowisacomfortablemeasuresforaclient 19. Replace personal belongingsback. Return the bed-side lockerandthe bedasusual. Topreventpersonal belongingsfromlossandprovide safesurroundings 20. Returnall equipmentstoproperplace. Toprepareforthenextprocedure 21. Discardlinensappropriately.Performhand hygiene. Topreventthespreadof infection.
- 9. Making a Post-operative Bed Definition: It isa special bedpreparedtoreceive andtake care of a patientreturningfromsurgery. Fig. Post-operative bed Purpose: 1. Toreceivethe post-operativeclientfromsurgeryandtransferhim/herfromastretchertoabed 2. Toarrange client’sconvenienceandsafety Equipment required: 1. Bedsheets:Bottomsheet(1) Top sheet (1) 2. Draw sheet(1-2) 3. Mackintoshorrubbersheet(1-2) ✽ According to the type of operation, the number required of mackintosh and draw sheet is different. 4. Blanket(1) 5. Hotwaterbagwithhotwater(104- 140 ℉ ) if needed(1) 6. Tray1(1) 7. Thermometer, stethoscope, sphygmomanometer:1each 8. Spiritswab 9. Arteryforceps(1) 10. Gauze pieces 11. Adhesivetape(1) 12. Kidneytray(1) 13. Trolley(1) 14. IVstand 15. Client’schart 16. Client’skardex 17. Accordingtodoctor’s orders: - Oxygencylinderwithflowmeter - O2cannulaorsimplemask - Suctionmachine withsuctiontube - Airway - Tonguedepressor - SpO2monitor - ECG - Infusionpump,syringepump
- 10. Procedure: by one nurse Care Action Rationale 1. Perform hand hygiene Toprevent the spread ofinfection 2.Assemble equipments and bring bed-side Organization facilitates accurate skill performance 3. Strip bed. Make foundation bed as usual with a large mackintosh, and cotton draw sheet. Mackintosh prevents bottom sheet from wetting or soiled bysweat, drain or excrement. Place mackintosh according to operative technique. Cotton draw sheet makes the client felt dry or comfortable without touching the mackintosh directly. 4. Place top bedding as for closed bed but do not tuck at foot Tuck at foot may hamper the client to enter the bed from astretcher 5. Fold back top bedding at the foot of bed. Tomake the client ‘stransfer smooth 6. Tuck the top bedding on one side only. Tucking the top bedding on one side stops the bed linens from slipping out ofplace and 7. On the other side, do not tuck the top sheet. 1) Bring head and foot corners of it at the center of bed and form right angles. 2) Fold back suspending portion in 1/3and repeat folding top bedding twice toopposite side of bed The open side of bed is more convenient for receiving client than the other closed side. 8. Remove the pillow. To maintain the airway 9 Place a kidney-tray on bed-side. To receive secretion 10. Place IV stand near the bed. Toprepare it tohang I/V soon 11. Check locked wheel of the bed. To prevent moving the bed accidentally when the client is shifted from a stretcher tothe bed. 12.Place hot water bags(or hot bottles) in the middle of the bed and cover with fanfolded top if needed Hot water bags (or hot bottles) prevent the client from taking hypothermia 13.When the patient comes, remove hot water bags if put before Toprepare enough space for receiving the client 14. Transfer the client: 1) Help lifting the client into the bed 2) Cover the client by the top sheet and blanket immediately 3) Tuck top bedding and miter a corner in the end of the bed. To prevent the client from chilling and /or having hypothermia
- 11. Fig. Folding back top bedding at the foot Fig. Tucking the top bedding on left side Fig. Bringing both head andfoot corners to thecenter and forming right angles Fig. Folding 1/3 side of top bedding at right side Fig. Rolling top bedding again Fig. Folding it again and complete top bedding
- 12. VITAL SIGNS Temperature, Pulse, Respiration, Blood pressure, Pain Definition: Taking vital signs are defined as the procedure that takes the sign of basic physiology that includes temperature , pulse, respiration and blood pressure. If anyabnormality occurs in the body, vital signs change immediately. Purpose: 1. Toassesstheclient’s condition 2. Todetermine the baseline values forfuture comparisons 3. Todetect changesand abnormalities in the condition ofthe client Equipments required: 1. Oral/ axilla /rectalthermometer (1) 2. Stethoscope (1) 3. Sphygmomanometer with appropriate cuffsize (1) 4. Watchwith a second hand (1) 5. Spirit swaborcotton (1) 6. Sponge towel(1) 7. Paperbag(2):forclean (1) for discard (1) 8. Record form 9. Ball- point pen: blue (1) black (1) red (1) 10. Steeltray (1): tosetallmaterials Fig.23 Equipments required of taking a vital signs
- 13. Fig.24 Stethoscope Astethoscope consists of : ear pieces, tubing, two heads such as the bell and the diaphragm. Fig.25 The bell of head of stethoscope The bellhas cup-shapedandis usedto correctlow- frequency sounds,such as abnormal heart sounds. Fig. 26 The diaphragm of head of stethoscope The diaphragm is flat side of the head and is used to testhigh- frequency sounds:breath, normal breath, and bowel sounds. Fig. 27 Aneroid manometer
- 14. Aneroid manometer is a kind ofsphygmomanometer. Sphygmomanometer consistsof:an inflatable bladder, attached to a bulb and a diameter, enclosed in a cuff, with a deflating mechanism
- 15. a. Taking axillary temperature by glass thermometer Definition: Measuring/ monitoring patient’s body temperature using clinical thermometer Purpose: 1. Todetermine body temperature 2. Toassist indiagnosis 3. Toevaluate patient’s recovery from illness 4. Todetermine if immediate measures should be implemented to reduce dangerously elevated body temperature or converse body heatwhen body temperature is dangerous low 5. Toevaluate patient’s response once heat conserving or healreducing measures have been implemented Procedure: Care Action Rationale 1. Wash your hands. Handwashing prevents the spreadofinfection 2. Prepare allrequired equipments Organization facilitates accurate skill performance. 3. Check the client’s identification. Toconfirm thenecessity 4. Explain the purpose and the procedure to the client. Providing information fasters cooperation and understanding 5. Close doors and/or use a screen. Maintains client’s privacy and minimize embarrassment. 6. Takethe thermometer and wipe it with cotton swab from bulb towards the tube. Wipe from the area where few organisms are present to the area where more organisms are present to limit spread of infection 7.Shake the thermometer with strong wrist movements until the mercury line falls to at least 95 ℉(35 ℃). Lower the mercury level within the stem so that it is less than the client’s potential body temperature 8. Assist the client to a supine or sitting position. Toprovide easyaccesstoaxilla. 9. Move clothing away from shoulder and arm Toexpose axilla for correct thermometer bulb placement 10. Be sure the client’saxilla is dry. If it is moist, pat it dry gently before inserting the thermometer. Moisture will alter the reading. Under the condition moistening, temperature isgenerally measured lower than the real. 11. Place the bulb ofthermometer in hollow ofaxilla at anteriorinferior with 45 degree orhorizontally. (Fig.28) Tomaintain proper position of bulb against blood vessels inaxilla. 12. Keep the arm flexed across the chest, close to the side of the body ( Fig. 29) Close contact of the bulb of the thermometer with the superficial blood vessels in the axilla ensures a more accurate temperature registration. 13.Hold the glass thermometer in place for 3 minutes. Toensure anaccuratereading
- 16. Care Action Rationale 14.Remove and read the level of mercury of thermometer at eye level. Toensure anaccuratereading 15. Shake mercury down carefully and wipe the thermometer from the stem to bulb with spirit swab. Toprevent the spreadofinfection 16. Explain the result and instruct him/her if he/she has fever or hypothermia. Toshare his/her data and provide care needed immediately 17. Dispose of the equipment properly. Washyour hands. Toprevent the spreadofinfection 18. Replace all equipments in proper place. Toprepare for the next procedure 19. Record in the client’s chart and give signature on the chart. Axillary temperature readings usually are lower than oral readings. Giving signature maintains professional accountability 20. Report an abnormal reading to the senior staff. Documentation provides ongoing data collection Fig.28 Placing the glass thermometer intothe axilla Fig. 29 Keeping the forearm across the chest
- 17. b. Measuring a Radial Pulse Definition: Checking presence,rate, rhythm and volume of throbbing of artery. Purpose: 1. Todetermine number ofheartbeatsoccurring perminute( rate) 2. Togatherinformation about heartrhythm andpattern ofbeats 3. Toevaluate strength ofpulse 4. Toassessheart'sability todeliver blood todistant areasofthe blood viz. fingers and lower extremities 5. Toassessresponse ofheart tocardiac medications, activity, blood volume and gasexchange 6. Toassessvascular status oflimbs Procedure: Care Action Rationale 1. Wash hands. Handwashing prevents the spreadofinfection 2. Prepare allequipments required on tray. Organization facilitates accurate skill problems 3. Check the client’s identification Toconfirm thenecessity 4. Explain the procedure and purpose to the client. Providing information fosters cooperation and understanding 5. Assist the client in assuming a supine or sitting position. 1) If supine, place client’s forearm straight alongside body with extended straight (Fig.30ⓐ) or upper abdomen with extended straight( Fig.30ⓑ) 2) Ifsitting, bend client’s elbow 90 degreesand support lower arm on chair (Fig.31ⓐ) or on nurse’s arm slightly flex the wrist (Fig. 31ⓑ) Toprovide easyaccesstopulse sites Relaxed position of forearm and slight flexion of wrist promotes exposure of artery to palpation without restriction. 6. Count and examine the pulse 1) Place the tips ofyour first, index, and third finger over the client's radial artery on the inside of the wrist onthe thumb side. 2) Apply only enough pressure to radialpulse 3) Using watch, count the pulse beatsfor a full minute. 4) Examine the rhythm and the strength of the pulse. The fingertips are sensitive and better able to feel the pulse. Do not use your thumb because it hasa strong pulse ofits own. Moderate pressure facilitates palpation of the pulsations. Too much pressure obliterates the pulse, whereas the pulse is imperceptible with too little pressure Counting a full minute permits a more accurate reading and allows assessment of pulse strength and rhythm. Strength reflects volume of blood ejected against arterial wall with eachheartcontraction. 7.Record the rate on the client’s chart. Sign on the chart. Documentation provides ongoing data collection Tomaintain professional accountability 8. Wash your hands. Handwashing prevents the spreadofinfection 9. Report to the senior staff if you find any abnormalities. Toprovide nursing care and medication properly and continuously
- 18. Fig. 30 ⓐ Care Action 5. 1) →6. Placing the client's forearm straight alongside bodyand putting the fingertips over the radial pulse Fig. 30 ⓑ 5.1) →6. Placing the client’s forearm straight of across upper abdomen and putting the fingertips over the radial pulse Fig. 31 ⓐ Care Action 5. 2) →6. Placing the client’s forearm on the armrest ofchair and putting your the fingertips over the radial pulse Fig. 31 ⓑ 5.2) →6. Supporting the client’s forearm by nurse’s palm with extended straight and your putting three fingertips
- 19. a. Counting Respiration Definition: Monitoring the involuntary process ofinspiration and expiration in a patient Purposes: 1. Todetermine number ofrespiration occurring per minute 2. Togather information about rhythm and depth 3. Toassess response of patient toanyrelated therapy/ medication Procedure: Care Action Rationale 1. Close the door and/or use screen. To maintain privacy 2. Make the client's position comfortable, preferably sitting or lying with the head of the elevated 45 to 60 degrees. To ensure clear view of chest wall and abdominal movements. If necessary, move the bed linen. 3. Prepare count respirations by keeping your fingertips on the client’s pulse. A client who knows are counting respirations may not breathe naturally. 4. Counting respiration: 1) Observe the rise and fall of the client’s (one inspiration and oneexpiration). 2) Count respirations for one full minute. 3) Examine the depth, rhythm, facial expression, cyanosis, cough and movement accessory. One full cycle consists of an inspiration and an expiration. Allow sufficient time to assess respirations, especially when the rate is with an irregular Children normally have an irregular, more rapid rate. Adults with an irregular rate require more careful assessment including depth and rhythm of respirations. 5. Replace bed linens if necessary. Record the rate on the client’s chart. Sign the chart Documentation provides ongoing datacollection. Giving signature maintains professional accountability 6. Perform hand hygiene Toprevent the spread ofinfection 7. Report any irregular findings to the senior staff. Toprovide continuity ofcare
- 20. b. Measuring Blood Pressure Definition: Monitoring blood pressure using palpation and/or sphygmomanometer Purpose: 1. Toobtain baseline data for diagnosis and treatment 2. Tocompare with subsequent changes that may occur during care of patient 3. Toassist in evaluating status ofpatient’s blood volume, cardiac output and vascular system 4. To evaluate patient’s response to changes in physical condition as a result of treatment with fluids or medications Procedure: by palpation and aneroid manometer Care Action Rationale 1. Wash your hands. Handwashing prevents the spread ofinfection 2. Gather all equipments. Cleanse the stethoscope 's ear pieces and diaphragm with a spirit swab wipe. Organization facilitates performance ofthe skill. Cleansing the stethoscope prevents spread of infection. 3. Check the client’s identification. Explain the purpose and procedure to the client. Providing information fosters the client’s cooperation and understanding. 4. Have the client rest at least 5 minutes before measurement. Allow the client to relax and helps to avoid falsely elevate readings. 5. Determine the previous baseline blood pressure , if available, from the client’s record. To avoid misreading of the client’s blood pressure and find any changes his/her blood pressure from the usual 6. Identify factors likely to interfere which accuracy of blood pressure measurement : exercise, coffee and smoking Exercise and smoking can cause false elevations in blood pressure. 7. Setting the position: 1) Assist the client toa comfortable position. Be sure room is warm, quiet and relaxing. 2) Support the selected arm. Turn the palm upward. (Fig. 32) 3) Remove any constrictive clothing. The client's perceptions that the physical or interpersonal environment is stressful affect the blood pressure measurement. Ideally, the arm is at heart level for accurate measurement. Rotate the arm so the brachial pulse is easily accessible. Not constricted by clothing is allowed to access the brachial pulse easily and measure accurately. Do not use an arm where circulation is compromised in any way. Fig. 32 CareAction 7. 2) Placing the selected arm onthe bed and turn the palm upward
- 21. Care Action Rationale 8. Checking brachial artery and wrapping the cuff: 1) Palpate brachial artery. 2) Center the cuff’s bladder approximately 2.5 cm (1 inch) above the site where you palpated the brachial pulse 3) Wrap the cuff snugly around the client’s arm and secure the end approximately(Fig. 33) 4) Check the manometer whether if it is at level with the client’s heart (Fig. 34). Center the bladder to ensure even cuff inflation over thebrachial artery Loose-fitting cuff causes false high readings. Appropriate way to wrap is that you can put only 2 fingers between the arm and cuff. (Fig. 33) Improper height can alter perception of reading. Fig. 33 Care Action 8. 3) Wrapping the cuff with appropriate way Fig. 34 Care Action 8. 4) Placing manometer at the level of heart
- 22. Care Action Rationale 9.Meausre blood pressure by two step method: (A) Palpatory method 1) Palpate brachial pulse distal to the cuff with fingertips of nondominant hand. 2) Close the screw clamp onthe bulb. 3) Inflate the cuff while still checking the pulse with other hand. (Fig. 35) 4) Observe the point where pulse is not longer palpable. 5) Inflate cuff to pressure 20-30 mmHg above point at which pulse disappears. 6) Open the screw clamp, deflate the cuff fully and wait 30seconds. (B) Auscultation 1) Position the stethoscope’s earpieces comfortably in your ears( turn tips slightly forward). Be sure sounds are clear, not muffled. 2) Place the diaphragm over the client’s brachial artery. Do not allow chestpiece to touch cuff or clothing. (Fig. 36) Palpation identifies the approximate systolic reading. Estimating prevents false low readings, which may result in the presence of an auscultory gap. Maximal inflation point for accurate reading can be determined bypalpation. Short interval eases any venous congestion that may have occurred. Each earpiece should follow angle of ear canal to facilitate hearing. Proper stethoscope placement ensures optimal sound reception. Stethoscope improperly positioned sounds that often result in false low systolic and high diastolic readings.
- 23. Care Action Rationale 9. (B) 3) Close the screw clamp onthe bulb and inflate the cuff to a pressure30 mmHg above the point where the pulse had disappeared 4) Open the clamp and allow the aneroid dial tofall at rate of2 to 3mmHg per second. 5) Note the point on the dial when first clear sound is heard. The sound will slowly increase in intensity. 6) Continue deflating the cuff and note the point where the sound disappears. Listen for 10to20 mmHg after the last sound. 7) Release any remaining air quickly in the cuff and remove it. 8) If you must recheck the reading for any reason, allow a 1 minute interval before taking blood pressure again. Ensure that the systolic reading is not underestimated. If deflation occurs too rapidly, reading may be inaccurate. This first sound heard represents the systolic pressure or the point where the heart is able to force blood into the brachial artery. This is the adult diastolic pressure. It represents the pressure that the artery walls exert on the blood at rest. Continuous cuff inflation causes arterial occlusion, resulting in numbness and tingling of client’s arm. The interval eases any venous congestion and provides for anaccurate reading when you repeat the measurement. 10. Assist the client to a comfortable position. Advise the client of the reading. Indicate your interest in the client's well-being and allow him/her to participate in care. 11. Wash your hands. Handwashing prevents the spread ofinfection. 12. Record blood pressure on the client’s chart. Sign on the chart. Report any findings to senior staffs. Documentation provides ongoing datacollection. Giving signature maintains professional acountability 13. Replace the instruments to proper place and discard. Toprepare for the next procedure. Fig. 35 Care Action 9. (A)3) : Palpatory method Inflating the cuff while checking brachial artery Fig. 36 CareAction 9.(B) 2) : Auscultation Placingthe diaphragmwithout touching the cuf
- 24. Pain assessment and measurement Introduction: Pain assessment is crucial if pain management is to be effective. Nurses are in a unique position to assess pain as they have the most contact with the patient and their family in hospital. Pain is the most common symptom patient experience in hospital.. o ) Pain assessment: is a multidimensional observational assessment of a patients’ experience of pain. Pain measurement tools: are instruments designed to measure pain. Pain Assessment Tools: There are three main tools used for the neonate, infant and child 3-18 years these tools reflect a combination of self-report and behavioural assessment. 1. FLACC - The acronym FLACC stands for Face, Legs, Activity, Cry and Consolability behavioural o 2 months-8 years and also used up to 18 years for children with cognitive impairment and/or developmental disability (always elicit support from parents or carers to help with pain assessment) o It may be difficult to assess children with cognitive impairment and/or are non-verbal. Ask the parent or carer to help you explain their child’s pain behaviour. How to use FLACC Each category (Face, Legs etc) is scored on a 0-2 scale, which results in a total pain score between 0 and 10. The person assessing the child should observe them briefly and then score each category according to the description supplied. FLACC has a high degree of usefulness for cognitively impaired and many critically ill children
- 25. 2. Wong-Baker faces pain scale 3-18yo Self report How to use? Explain to the person that each face is for a person who feels happy because he has no pain (hurt) or sad because he has some or a lot of pain. Face 0 is very happy because he doesn't hurt at all. Face 2 hurts just a little bit. Face 4 hurts a little more. Face 6 hurts even more. Face 8 hurts a whole lot. Face 10 hurts as much as you can imagine, although you don't have to be crying to feel this bad. Ask the person to choose the face that best describes how he is feeling. 3. Visual Analogue scale 8-years and older Self report How to use?
- 26. Ask the child using numbers from 0 = no pain through to 10 being the worst pain Physiological indicators: o heart rate may increase o respiratory rate and pattern may shift from normal ie: increase,decrease or change pattern o blood pressure may increase o oxygen saturation may decrease