2. 5/26/2015 Create a Crumbnet
https://release2.thetuscorp.com/help/Content/Crumbnet/CreatingACrumbnet/CreateACrumbnet.htm 2/4
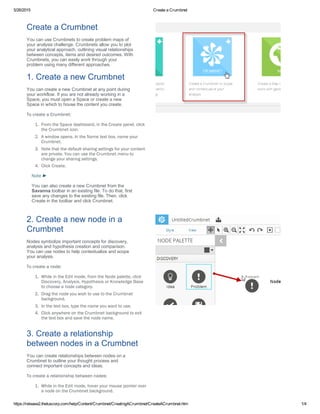
2. Multiple icons are displayed. Click the arrow at the
bottom of a node and drag a line to any other node on
your Crumbnet.
3. The line visually represents the relationship between
the nodes.
Note ►
To automatically create a new relationship and
node, hover over the existing node and click the +
icon.
To delete a relationship, click the relationship and
press Delete on your keyboard.
4. Add supporting evidence to a
Crumbnet
You can add documents, images, videos, Maps,
Notes, and Occurrences from Search or the Space
Content window onto a Crumbnet.
To add supporting evidence:
1. In Search or from the Space Content window,
navigate to the file you wish to add to a Crumbnet.
2. In Crumbnet, ensure that you are in the Edit mode.
Drag the evidence to the Crumbnet background.
3. To relate an image, video, Occurrence,Map, or
document to a specific node, just drag it over the
node. A line is automatically displayed to signify the
relationship.
4. To relate Crumbnets or Notes, you must add a link
manually.
Note ►
To relate multiple files to a node at once, press
Shift and select the files, then drag them over the
node. Multiple lines are displayed to signify the
relationships.
5. Save a Crumbnet
You can easily save the changes that you have made
to your Crumbnet. When you save a Crumbnet, it is
automatically added to the Space in which you are
working.
To save:
1. While in the Edit mode, in the Crumbnet toolbar, click
Done.
2. The Crumbnet is added to the Space you are currently
working in, and a save confirmation message is
displayed at the top of the window.
3. 5/26/2015 Create a Crumbnet
https://release2.thetuscorp.com/help/Content/Crumbnet/CreatingACrumbnet/CreateACrumbnet.htm 3/4
3. To view the contents of the Space, click the Space
Content icon on the left side of the window.
Note ►
You can also save a Crumbnet by clicking the
Crumbnet menu and clicking Save.
Creating a Crumbnet
Create a Crumbnet
Customizing a Crumbnet
Add a description to a node in a Crumbnet
Add a hyperlink to a Crumbnet
Add supporting evidence to a Crumbnet
Align nodes in a Crumbnet
Cancel changes to a Crumbnet
Change the layout of a Crumbnet
Change the line color of a relationship in a Crumbnet
Change the line style of a relationship in a Crumbnet
Change the node color in a Crumbnet
Change the node size in a Crumbnet
Change the node type in a Crumbnet
Change the relationship type in a Crumbnet
Copy a node in a Crumbnet
Create a new node in a Crumbnet
Create a relationship between nodes in a Crumbnet
Cut a node in a Crumbnet
Delete a node in a Crumbnet
Delete a relationship in a Crumbnet
Detach supporting evidence from a node
Edit a Crumbnet
Edit an existing hyperlink in a Crumbnet
Hide child nodes in a Crumbnet
Hide node descriptions in a Crumbnet
Hide node type labels in a Crumbnet
Hide relationship type labels in a Crumbnet
Hide supporting evidence in a Crumbnet
Mask a node in a Crumbnet
Move a relationship in a Crumbnet
Name a node in a Crumbnet
Paste a node in a Crumbnet
Redo or undo an action in a Crumbnet
Resize the text label of a node in a Crumbnet
Reverse the direction of a relationship in a Crumbnet
Set the node type color in a Crumbnet
Naming and Saving a Crumbnet
Add a Crumbnet to a Space
Change the sharing settings of a Crumbnet
Close a Crumbnet
Delete a Crumbnet
Export a Crumbnet
Move a Crumbnet to another Space
Name a Crumbnet
Remove a Crumbnet from a Space
Save a Crumbnet
Save an existing Crumbnet as a new Crumbnet
Share a Crumbnet
Take a screenshot of a Crumbnet
Navigating in a Crumbnet
Deselect all in a Crumbnet
Display the Crumbnet background as a grid
Fit to screen in a Crumbnet
Hide the Crumbnet Node palette
Open supporting evidence from a Crumbnet
Pan in a Crumbnet
Select all in a Crumbnet
Select a node in a Crumbnet
Select a relationship in a Crumbnet
Select multiple nodes in a Crumbnet
View a Crumbnet with an Overview box
Zoom in a Crumbnet
Zoom out in a Crumbnet
Working with the Details sidebar in a Crumbnet
Add a comment to a Crumbnet
Add an attachment to a Crumbnet
Add a source to a Crumbnet
Add a tag to a Crumbnet
Change the workflow status of a Crumbnet
Delete an attachment in a Crumbnet
Delete a source in Crumbnet
Edit the details of a Crumbnet
Edit the details of a node in a Crumbnet