SlideShare a Scribd company logo
1 of 30
BEFORE YOU BEGIN
CREATING A DATABASE FOLDER
To get started, there are somepreliminary steps that must betaken toensure
successfuloperation. It is a goodidea tofollow thesesteps closely, as this will
allow for maximum benefit out of theuse of the database.
We recommendcreating a folder in which all thedatabasefiles will be stored. To
do this:
1) Findthe drive in which you wish tostorethe
folder; our example uses ourdefault C drive.
2) Once theC drive has been accessed via double
click, right click in the blank space andselect
create new folder, as shown below.
1
2
3) Once thenew folder has been created, edit thename to“Database”.
Note: The name doesn’thave tobe database specifically, itis justa
suggestion to keepall files in one, easy tolocate, place.
You now have successfully completed thecreation of your new folder.
3
MOVING THE FILES INTO YOUR NEW FOLDER
Ournext taskis tomovethe databasefiles into thenew folder soweknow where
to find them when opening our primary interface, SQL Server 2012.
1) Begin by locating thedatabase files; thedatabase files are located on the
disk provided, in yourcase.
2) Highlight both thefiles titled “AHSBCA” and“AHSBCA_log”, right click
and click copy to copy the files.
3) Once thefiles
have been copied,
locate the newly
created “Database”
folder.
2
3
4) Access the folder by double clicking theDatabasefolder.
5) Once accessed, right click in theblank whitespace of the Databasefolder and
click “Paste”.
You should now seethe databasefiles containedwithin the Databasefolder,
as shown below:
5
ATTACHING THE DATABASE
To gain access totheAHSBCA database, wemust first attach thefiles we just
copied using the following steps.
WARNING: This stepis critical in settingup the database and mustbe completed in
full before trying to use it.
1) Locate thefolder for “Microsoft SQL Server 2012”
2) Once located, expandthe folder and search for “SQL Server Management
Studio.”
3) Once found, right click and select more, ending with theselection of “Run
as administrator”.
4) You may be faced with a UserControl Box with a Yes or No option. Should
this happen, select Yes; otherwise, continue toStep 5.
1
5) Once theloading has
finished you will be
presented with this
dialogue box.
6) Simply click connect to
continue.
7) After theconnection process is complete,
locate the Object Explorer on the left-hand
side of thescreen.
8) Notice a databasefolder under yourserver
name.
9) Right click that folder andclick the “Attach”
option.
3
9
10) An “Attach Databases” dialoguebox pops up.
11)Click the“Add” button locatedtowards themiddle of thedialogue box.
12)Locate yourdatabase folder and find theAHSBCA.mdf file within it.
13)Click on the AHSBCA.mdf file and click Ok.
14)Click Okagain toclose thedialogue box and finish theattachment.
You are now ready tobegin working in thedatabase.
10
13
WORKING WITH THE DATABASE
ADDING AND EDITING DATA
Now that wehave successfully set up our databasefrom theprevious
instructions, weare ready tostart using the databasetogenerate useful
information, as well as inputting new dataentries in. Wewill begin by how to
properly inset data.
It is important that careful attention is placed in the exact methods usedfor
inputting data, as not doing so correctly can result in error messages.
1)Begin by expanding
(clicking the“+” sign) the
Databasefolder located in
theObject Explorer, or the
left-hand side.
2)You should see thenewly
attached AHSBCA
database.
Note: If you donot see the
AHSBCA folder listed, goback
and carefully repeatthe
“Before You Begin”
procedures, payingcareful
attention to the details of the
instructions.
2
3)Expandthe AHSBCA folder.
Notice the several foldersyou
have available.
4)To add new data tothe tables,
weare interestedin the
“Table” folder of thelisted
options.
5)Click the“+” sign toexpandthe Tables
folder.
6)This will reveal all the available tables in
which data can be entered.
7)Forour example, weare going toadd data
tothe “Member” tablefirst. In the database, it
is referred toas “dbo.Member”.
Note: The dbo.TableName(TableName
referringto whatever that particular table is
called)is a file namingconvention for SQL
Server. Do not be confused as this is normal.
3
5
8)Right click on dbo.Member, or the Membertable, and select the option
“Edit Top 200 Rows” by clicking on it.
9)You will notice all theMember data
currently in thedatabase is shown,
since wedo not have morethan 200
rows of data currently.
Note: If there were more than 200 rows
of data, itwould not show the entire
data set, however the amountdisplayed
can later be changed.
8
9
10)Notice theNULL values listedat thebottom of themember table; this
indicates that there is no datain that particular cell. Consequently, this is
where weadd new data tothetable.
11)Begin toenter a new data entry by clicking on the NULL value under the
column “FirstName”. Thecell highlights to blue, indicating it is ready to
have a valuetyped intoit.
WARNING: Notice, wedid not begin in the first column, MemberID. The
reason being is that this ID is automatically generated sequentially by SQL
server sothat every member has a uniqueID number. This mechanic saves
timewhen entering data and exists in other such places that will be discussed
more later tomake you aware of where they are.
12)Enter whichever first name you wouldlike toenter, for ourexample wewill
usemy name, Justin.
13)Click theadjacent column, LastName, orsimply hit the“Tab” key on your
keyboard to automatically go tothenext column.
14)Enter thelast nameyou wish toenter. Again, for our example, I will be
using my name, Tate.
11
13
14
15)You will notice red exclamation symbols abovethe dataentered. This
simply signifies that data has not been storedyet. It will be storedupon the
correct completion of arow of data.
16)Press Tab, or click again tothe “PhoneNumber” Column.
17)Notice how all the previously entered phonenumber datavalues are
identical in format.
Note: One of the
many benefits of
SQL server is
the ability to
ensure the data
entered is
correctly
formatted.
Upon trying to
enter anythingother than (###) ###-####, an error message willpopup,
and thatdata will notbe saved until the entire row of data is inputted
correctly. Many columns, youwill find, havethis constraintandwillbe
explained, in detail, later on.
18)Enter thephone numberof your choice in this format: (###) ###-####.
Take care in including both theparenthesis, the “-“sign and thespace
between the area code and the number.
19)Press Tabor click intothe next column, EmailAddress.
19
20)Enter thedesired email address tobe storedin the databasetable.
21)Press Tab, or click on thenext column, Status.
22)Like the phonenumber restriction, Status must beentered a certain way to
be recognized in the database. Simply typean “A”, “H”, or“T”, whereA =
Assistant Coach, H= HeadCoach and T = Trainer.
Example: If you wish tostoreyourmember as a trainer, simply typein the
letter “T”. In ourexample, wewill say that Justin is a HeadCoach.
Consequently, wewill put an “H” tomarkhim as such in the database.
22
23)Tab, or click over tothe final column weneed toenter in before thedata is
storedinto thedatabase.
24)Notice that thefinal column requires an “InstitutionID”, something that is
generated in a separate table.
25)To find theInstitution ID, right click on the“dbo.Institution”, orthe
institution table, located on theleft hand side and click on “Edit Top 200
Rows”.
26)Notice thetable of data that is then
loaded up.
27)Thegenerated table, as you will
notice, has the Institution ID we
need tofinish theexample column in
theMember table.
28)To find theappropriate Institution
ID, you must findtheinstitution in
which the memberattends, via the
“Name” column. If it does not exist,
enter thedata needed in the same
way you just learned, using the
“DataInput Checklist” providedlater
on toensuredata is being inputtedcorrectly.
Note: If you need toenter in a new institution, the “InstitutionID” column is
automatically generated, similar tothe “MemberID” in the member table. In other
words, youdo not need toenter data in, nor can you.
26
29)Forour example, Justin happens toattendtheinstitution of “John
Howitzer”, located in the very first row.
30)Notice that the“InstitutionID”, just totheleft of theinstitution name, is 1.
This is the“InstitutionID”that mustbeinputtedin ourlast column of our
Memberrow wewere working on.
29
30
31)Once the“InstitutionID” has been added, tabor click into thenext row. You
will notice theexclamtion marks dissapear, signifying that the datahas
been properly entered and storedintothe database.
**TIP** Toedit data that already exists, simply click on the cell that is desired to
be changed, and typein the new data. It is recommendedthat you refer toour
“DataInput Checklist” tomakesurethe datais entered in a correct format.
DATA INPUT CHECKLIST
ENSURING THE DATA ENTERED IS IN THE CORRECT FORMAT
1) Ifediting the Institution table:
a) The “InstitutionID”columnis automatically generated, do not tryto enter anythinginto it.
b) The “State” column mustbe entered with twocapital letters; I.E. FL,TN, NY.
c) The “Zip” columnmustbe entered using5 and only 5 numbers;I.E. 12345.
2) Ifediting the Locationtable:
a) The “LocationCode”columnmustbe entered usingthree letters in a uniquecombination; I.E.
ABC.
3) Ifediting the Member table:
a) The “Member” columnis automatically generated, do nottry to enter anything into it.
b) The “PhoneNumber”columnmust be specifically entered like (###) ###-####,notethe
spaces,“-“ sign andparenthesis used;I.E. (123) 456-7890.
c) The “Status” columnmust be entered with either an‘H’, ‘A’, or ‘T’, with H=HeadCoach,
A=AssistantCoachandT=Trainer.
4) Ifediting the Presentation table:
a) The “PresentationID”columnis automatically generated, donot try to enter anything into it.
b) The “DateSubmitted” columnvalue must be less than the currentdate and 6/24/16.
c) The “AcceptanceDecision”columnmustbe entered with either a ‘Y’ = Yes or a ‘N’ = No.
5) Ifediting the Registration table:
a) The “RegistrationNo” columnis automatically generated, donot try to enter anything into it.
b) The “Date” columnvalue must be less than orequal to the currentdate, while also being
greater than or equal to 7/1/16and less than or equal to 7/22/16.
6) Ifediting the Review table:
a) The “ReviewID”columnis automatically generated, donot try to enter anything into it.
b) The “DateAssigned”column value mustbe less than orequal tothe currentdate.
c) The “Date Submitted” columnvalue must be within14 days ofthe “DateAssigned”value for
that row.
d) The “Score”columnvalue mustbe between 1 and 5.
7) Ifediting the Session table:
a) The “SessionID”columnis automatically generated, do nottry to enter anything into it.
b) The “Date” columnmust be between 8/5/16and 8/7/16
8) Ifediting the Topic table:
a) The “TopicCode”columnmust be a uniquecombination ofthree capital letters; I.E.ABC,EFG.
ADVANTAGES OF YOUR NEW
DATABASE - VIEWS
ACCESSING VIEWS TO FORM ANALYTICS AND MAKE EDUCATED MANAGEMENT
DECISIONS
Anotheramazing feature of yournew database, is its ability tocalculate figures
and show relations between tables in a fraction of the timethat it wouldnormally
take to do manually with the useof something called a “View”. In ourexamples,
wewill briefly look through the included five views and why you shouldutilize
theseviews for managerial andother business operations purposes.
We will begin by demonstrating how to open aview.
1) With theAHSBBCA folder expanded,
expandthe “View” folderby clicking the
adjacent “+” sign.
2) Notice therevealed dbo files; these files are
your views.
3) To access anyof thefive views,
simply right click on the dbo file and
end by clicking “Edit Top 200 Rows”.
4) Each view has a uniquefunction that will be
discussedin more detail.
1
VIEW ONE - AVERAGE SCORE PER TOPIC
This view is associatedwith the“dbo.AverageScorePerTopic_vw”; toaccess it,
simply follow the“Advantages of Your New Database- Views” instructions.
VIEW TWO – NUMBER OF PURCHASED OPTIONS THAT ARE MADE BEFORE AND AFTER
THE ‘EARLY BIRD’ DATE
This view is associated with the“dbo.EarlyBirdPurchaseUsage_vw”; toaccess it,
simply follow the“Advantages Of YourNew Database - Views” instructions.
Theview depicts the numberof options purchased on agiven date, and the
related totalamount respectively. The numberof purchases madeusing the early
bird option can help determine whetheror not there shouldbe an early bird
option at all, or perhaps if theregular price shouldbe lowered as an incentive to
encourage more people to sign up early. Theview shows thetotalamount of
profits that are made from each registration date and which dates makes more
by comparison.
VIEW THREE – INSTITUTIONS THAT DO AND DO NOT HAVE A MEMBER REGISTERED IN
THIS YEARS CONVENTION
This view is associatedwith the“dbo.InstitutionMembersRegistered_vw”; to
access it, simply follow the“Advantages Of YourNew Database - Views”
instructions.
This view can be an effective marketing
tool. Simply put, it demonstrates the
Institution personnelparticipation. It will
allow thecompanyto see, at any given
moment, which schools personnel have
registered for the convention and which
schools are stillunregistered, but have
members in thedatabase. Marketing
endeavours can then be madesuch
sending out something, such as aflyer,
reminding theunregistered schools that
theconvention dateis coming up to
encourage greater participation.
VIEW FOUR – PURCHASE AMOUNTS PER STATUS OF MEMBERS
This view is associatedwith the“dbo.SpendingHabitPerStatus_vw”; toaccess it,
simply follow the“Advantages Of YourNew Database - Views” instructions.
This view, although simple looking in nature, can give a lot of insight to the
spending habits of members pertaining to their status. Forexample, thedata
shown below could suggest that trainers are being paid significantly more
attention when it comes to the features of the convention. Orperhaps, maybe
not enough is being offered toassistant coaches andhead coaches specifically,
based on the lower numbers in relation totrainers. Thesefigures can lend to
managerial decisions that improve thequality of options offered at the
convention, based on the status of each member.
VIEW FIVE – POPULARITY PER TOPIC
This view is associatedwith the“dbo.TopicPopularity_vw”; toaccess it, simply
follow the“Advantages Of YourNew Database - Views” instructions.
Theview, forthe most part, is relatively self-explanatory. It allows theuser tosee
which topics are themost popular in theentire convention. This can have a
multitudeof business applications. In itself, it could be usedas another tool in
picking which topics shouldbe utilized during the convention. Understanding
which topics are popular could aid in other facets of theconvention. For example,
since “Motivation” appears tobea popular topic, the convention could have extra
“Motivation” manuals orCDs available for purchase. This also goes hand and
hand with inventory management. You wouldn’t want asurplus of “Critical
Thinking” CDs madewhen it doesn’t appear tobe very popular. Overall, this view
can be usedas anothersupport decision factor.
ADVANTAGES OF YOUR NEW
DATABASE - REPORTS
ACCESSING REPORTS TO FORM ANALYTICS AND MAKE EDUCATED MANAGEMENT
DECISIONS
Reports are different then views due totheir more complex nature. As a result,
reports generated are often very detailed and involvemany different figures that
wouldotherwisetake a long timetocalculate manually.
1) To access reports, located your Microsoft SQL Server 2012 folder.
2) Instead of choosing “SQL Server Management Studio”, weare going to
select an option just aboveit known as “SQL Server DataTools”. Run this
as you wouldSQL Server Management Studio, in administratormode.
3) Once theprogram has opened, click “File” and then “Open” in the top left
corner of the screen. A dialogue box will appear.
4) Locate the“AHSBCA Reports” folder included on thedisk and double click.
4
5) Double click the AHSBCA Reports icon.
6) On the right hand side under the“Solution Explorer”, double click any
report wishing tobe accessed. Thefiles will end in “.rdl”
7) Select the“Preview” tabin thetop left corner of the screen topull up the
report.
8) Thereport can then be printed or exported in different file formats using
thetoolbar right above thereport.
7
5
REPORT ONE – MEMBER PURCHASES
Note: The printout of this report is located in “Appendix C”. Below is an explanation
of why this particular reportshould be utilized.
The“MemberPurchases” report is accessed by double clicking the Member
Purchases.rdl file in the “Solution Explorer” on theright hand side after following
the“Advantages of Your New Database – Reports” instructions.
TheMember Purchases report is critical not only tothe tracking of whohas paid
for what, but alsoin thecalculation of total proceeds. At first glance, you’ll the
name of the member, the options that memberedpurchased forregistration,
when that memberbought it, thequantity of each option andthe respective
amounts paidfor each option. Only members whohave purchasedsomething
are included in this list. The subtotalamounts arecalculated undereach member;
this allows the tracking of whohas spent themost on theconvention and also
who has spent the least, shouldthat be necessary. Thegrand totalis also
included at theend of thereport toshow the totalnet profits that theconvention
will be receiving. It is wiseto usethis report tomake sureall themoney has been
accounted for, but also could be usedfor something as simple as sending thank
you cards for members spending acertain amount.
REPORT TWO – OPTION DYNAMICS
Note: The printout of this report is located in “Appendix C”. Below is an explanation
of why this particular reportshould be utilized.
The“Option Dynamics” report is accessed by double clicking the Option
Dynamics.rdlfile in the“Solution Explorer” on theright hand sideafter following
the“Advantages of Your New Database – Reports” instructions.
The“Option Dynamics” report quantifies theaverage price paid for each option,
as well as themaximum price and minimum price. Its purposeis toanswerthe
question of what people may or may not be willing topay more for each option.
In addition, thequantity soldof each product is included. This can also be usedas
an indication as to what products, otherthan mandatory products, are in popular
demand, lending tothesupply management aspect of the convention.
REPORT THREE – REVIEW TURNAROUND TIME
Note: The printout of this report is located in “Appendix C”. Below is an explanation
of why this particular reportshould be utilized.
The“Review TurnaroundTime” report is accessed by double clicking the Review
TurnaroundTime.rdlfile in the“Solution Explorer” on theright hand side after
following the“Advantages of YourNew Database – Reports” instructions.
REPORT FOUR – TOPIC APPROVALS VS REJECTIONS
Note: The printout of this report is located in “Appendix C”. Below is an explanation
of why this particular reportshould be utilized.
The“TopicApprovals VSRejections” report is accessed by double clicking the
TopicApprovals VSRejections.rdl file in the “Solution Explorer” on the right hand
side after following the “Advantages of YourNew Database –Reports”
instructions.
REPORT FIVE – UNREGISTERED MEMBERS
Note: The printout of this report is located in “Appendix C”. Below is an explanation
of why this particular reportshould be utilized.
The“Unregistered Members” report is accessed by double clicking the
Unregistered Members.rdlfile in the“Solution Explorer” on theright hand side
after following the “Advantages of Your New Database– Reports” instructions.

More Related Content

What's hot

Advanced app building with PowerApps expressions and rules
Advanced app building with PowerApps expressions and rulesAdvanced app building with PowerApps expressions and rules
Advanced app building with PowerApps expressions and rulesMicrosoft Tech Community
 
Access 2007 tut
Access 2007 tutAccess 2007 tut
Access 2007 tutfeezy11
 
SQL Basic and conceptual Explained with Examples,Graphs, pictures etc
SQL Basic and conceptual Explained with Examples,Graphs, pictures etc SQL Basic and conceptual Explained with Examples,Graphs, pictures etc
SQL Basic and conceptual Explained with Examples,Graphs, pictures etc maheshpharale
 
Access 2003 tutorial 2
Access 2003 tutorial 2Access 2003 tutorial 2
Access 2003 tutorial 2catacata1976
 
Enterprise Content Managementwith Office Share Point Server2007
Enterprise Content Managementwith Office Share Point Server2007Enterprise Content Managementwith Office Share Point Server2007
Enterprise Content Managementwith Office Share Point Server2007LiquidHub
 
Technical_Writing_Example.PDF
Technical_Writing_Example.PDFTechnical_Writing_Example.PDF
Technical_Writing_Example.PDFSteve Rollins
 
Lesson Two Exploring An Access Database
Lesson Two   Exploring An Access DatabaseLesson Two   Exploring An Access Database
Lesson Two Exploring An Access Databaseguevarra_2000
 
New Perspectives: Access.01
New Perspectives: Access.01New Perspectives: Access.01
New Perspectives: Access.01Anna Stirling
 
New Perspectives: Access.02
New Perspectives: Access.02New Perspectives: Access.02
New Perspectives: Access.02Anna Stirling
 
Creating%20a%20 Custom%20 Site%20 Definition%20for%20 Microsoft%20 Windows%20...
Creating%20a%20 Custom%20 Site%20 Definition%20for%20 Microsoft%20 Windows%20...Creating%20a%20 Custom%20 Site%20 Definition%20for%20 Microsoft%20 Windows%20...
Creating%20a%20 Custom%20 Site%20 Definition%20for%20 Microsoft%20 Windows%20...LiquidHub
 
Advanced database
Advanced databaseAdvanced database
Advanced databasenasir1024
 
Microsoft access 2007 tutorial
Microsoft access 2007 tutorialMicrosoft access 2007 tutorial
Microsoft access 2007 tutorialGhazali_MFP
 

What's hot (18)

L6-information-systems
L6-information-systemsL6-information-systems
L6-information-systems
 
Advanced app building with PowerApps expressions and rules
Advanced app building with PowerApps expressions and rulesAdvanced app building with PowerApps expressions and rules
Advanced app building with PowerApps expressions and rules
 
Access 2007 tut
Access 2007 tutAccess 2007 tut
Access 2007 tut
 
SQL Basic and conceptual Explained with Examples,Graphs, pictures etc
SQL Basic and conceptual Explained with Examples,Graphs, pictures etc SQL Basic and conceptual Explained with Examples,Graphs, pictures etc
SQL Basic and conceptual Explained with Examples,Graphs, pictures etc
 
Advanced find
Advanced findAdvanced find
Advanced find
 
Access 2003 tutorial 2
Access 2003 tutorial 2Access 2003 tutorial 2
Access 2003 tutorial 2
 
Advanced Excel, Day 3
Advanced Excel, Day 3Advanced Excel, Day 3
Advanced Excel, Day 3
 
Enterprise Content Managementwith Office Share Point Server2007
Enterprise Content Managementwith Office Share Point Server2007Enterprise Content Managementwith Office Share Point Server2007
Enterprise Content Managementwith Office Share Point Server2007
 
Technical_Writing_Example.PDF
Technical_Writing_Example.PDFTechnical_Writing_Example.PDF
Technical_Writing_Example.PDF
 
Tips n tricks
Tips n tricksTips n tricks
Tips n tricks
 
Search++ Manual
Search++ ManualSearch++ Manual
Search++ Manual
 
Advexcellp
AdvexcellpAdvexcellp
Advexcellp
 
Lesson Two Exploring An Access Database
Lesson Two   Exploring An Access DatabaseLesson Two   Exploring An Access Database
Lesson Two Exploring An Access Database
 
New Perspectives: Access.01
New Perspectives: Access.01New Perspectives: Access.01
New Perspectives: Access.01
 
New Perspectives: Access.02
New Perspectives: Access.02New Perspectives: Access.02
New Perspectives: Access.02
 
Creating%20a%20 Custom%20 Site%20 Definition%20for%20 Microsoft%20 Windows%20...
Creating%20a%20 Custom%20 Site%20 Definition%20for%20 Microsoft%20 Windows%20...Creating%20a%20 Custom%20 Site%20 Definition%20for%20 Microsoft%20 Windows%20...
Creating%20a%20 Custom%20 Site%20 Definition%20for%20 Microsoft%20 Windows%20...
 
Advanced database
Advanced databaseAdvanced database
Advanced database
 
Microsoft access 2007 tutorial
Microsoft access 2007 tutorialMicrosoft access 2007 tutorial
Microsoft access 2007 tutorial
 

Viewers also liked

Modern & Authentic Indian Dish Plating
Modern & Authentic Indian Dish PlatingModern & Authentic Indian Dish Plating
Modern & Authentic Indian Dish PlatingCHEF SHAEEM QURAISHI
 
(주)스토리지솔루션포닥터스 발표자료
(주)스토리지솔루션포닥터스 발표자료(주)스토리지솔루션포닥터스 발표자료
(주)스토리지솔루션포닥터스 발표자료sanghyuk1120
 
Contents page print screeen
Contents page print screeenContents page print screeen
Contents page print screeenkw05063221
 
The Imaging Picture Gets a Lot Clearer at Intermountain Healthcare
The Imaging Picture Gets a Lot Clearer at Intermountain HealthcareThe Imaging Picture Gets a Lot Clearer at Intermountain Healthcare
The Imaging Picture Gets a Lot Clearer at Intermountain HealthcareLiz Wong
 
As revoluções de 1830 e 1848
As revoluções de 1830 e 1848As revoluções de 1830 e 1848
As revoluções de 1830 e 1848Wilton Moretto
 
Dock chock, truck chock, wheel chock
Dock chock, truck chock, wheel chockDock chock, truck chock, wheel chock
Dock chock, truck chock, wheel chockErgonomic Wheel Chock
 
Embedding research at the heart of the UK’s financial capability strategy
Embedding research at the heart of the UK’s financial capability strategyEmbedding research at the heart of the UK’s financial capability strategy
Embedding research at the heart of the UK’s financial capability strategyMRS
 
CV Amine KECHAOU -En
CV Amine KECHAOU -EnCV Amine KECHAOU -En
CV Amine KECHAOU -EnAmine KECHAOU
 
Predictive testing of opportunities example report
Predictive testing of opportunities example reportPredictive testing of opportunities example report
Predictive testing of opportunities example reportThe Inovo Group
 
Mohd Syafiq Asyraaf Bin Mohd Talmizi (A160583)
Mohd Syafiq Asyraaf Bin Mohd Talmizi (A160583)Mohd Syafiq Asyraaf Bin Mohd Talmizi (A160583)
Mohd Syafiq Asyraaf Bin Mohd Talmizi (A160583)syafiq asyraaf
 
Przetwarzanie ryb, mięczaków i skorupiaków
Przetwarzanie ryb, mięczaków i skorupiakówPrzetwarzanie ryb, mięczaków i skorupiaków
Przetwarzanie ryb, mięczaków i skorupiakówMichał Łazarz
 
Panel Session: The Generation Game
Panel Session: The Generation GamePanel Session: The Generation Game
Panel Session: The Generation GameMRS
 
Persona inspirada martha
Persona inspirada  marthaPersona inspirada  martha
Persona inspirada marthaftejera
 

Viewers also liked (19)

Dissertation(diploma)
Dissertation(diploma)Dissertation(diploma)
Dissertation(diploma)
 
Types of houses
Types of housesTypes of houses
Types of houses
 
Modern & Authentic Indian Dish Plating
Modern & Authentic Indian Dish PlatingModern & Authentic Indian Dish Plating
Modern & Authentic Indian Dish Plating
 
Storyboard
Storyboard Storyboard
Storyboard
 
Explicación de una página web
Explicación de una página webExplicación de una página web
Explicación de una página web
 
(주)스토리지솔루션포닥터스 발표자료
(주)스토리지솔루션포닥터스 발표자료(주)스토리지솔루션포닥터스 발표자료
(주)스토리지솔루션포닥터스 발표자료
 
Contents page print screeen
Contents page print screeenContents page print screeen
Contents page print screeen
 
The Imaging Picture Gets a Lot Clearer at Intermountain Healthcare
The Imaging Picture Gets a Lot Clearer at Intermountain HealthcareThe Imaging Picture Gets a Lot Clearer at Intermountain Healthcare
The Imaging Picture Gets a Lot Clearer at Intermountain Healthcare
 
As revoluções de 1830 e 1848
As revoluções de 1830 e 1848As revoluções de 1830 e 1848
As revoluções de 1830 e 1848
 
Dock chock, truck chock, wheel chock
Dock chock, truck chock, wheel chockDock chock, truck chock, wheel chock
Dock chock, truck chock, wheel chock
 
Embedding research at the heart of the UK’s financial capability strategy
Embedding research at the heart of the UK’s financial capability strategyEmbedding research at the heart of the UK’s financial capability strategy
Embedding research at the heart of the UK’s financial capability strategy
 
CV Amine KECHAOU -En
CV Amine KECHAOU -EnCV Amine KECHAOU -En
CV Amine KECHAOU -En
 
Sex with ex
Sex with exSex with ex
Sex with ex
 
Predictive testing of opportunities example report
Predictive testing of opportunities example reportPredictive testing of opportunities example report
Predictive testing of opportunities example report
 
Mohd Syafiq Asyraaf Bin Mohd Talmizi (A160583)
Mohd Syafiq Asyraaf Bin Mohd Talmizi (A160583)Mohd Syafiq Asyraaf Bin Mohd Talmizi (A160583)
Mohd Syafiq Asyraaf Bin Mohd Talmizi (A160583)
 
Przetwarzanie ryb, mięczaków i skorupiaków
Przetwarzanie ryb, mięczaków i skorupiakówPrzetwarzanie ryb, mięczaków i skorupiaków
Przetwarzanie ryb, mięczaków i skorupiaków
 
Panel Session: The Generation Game
Panel Session: The Generation GamePanel Session: The Generation Game
Panel Session: The Generation Game
 
Persona inspirada martha
Persona inspirada  marthaPersona inspirada  martha
Persona inspirada martha
 
2016 Annual Partnership Awards Benefit
2016 Annual Partnership Awards Benefit2016 Annual Partnership Awards Benefit
2016 Annual Partnership Awards Benefit
 

Similar to Database Course Project-Usage Documentation

How to Download IDEA for Windows Based ComputersSelect the dow.docx
How to Download IDEA for Windows Based ComputersSelect the dow.docxHow to Download IDEA for Windows Based ComputersSelect the dow.docx
How to Download IDEA for Windows Based ComputersSelect the dow.docxwellesleyterresa
 
INTRODUCTION TO ACCESSOBJECTIVESDefine th.docx
INTRODUCTION TO ACCESSOBJECTIVESDefine th.docxINTRODUCTION TO ACCESSOBJECTIVESDefine th.docx
INTRODUCTION TO ACCESSOBJECTIVESDefine th.docxmariuse18nolet
 
OBIEE 11g : Repository Creation Steps
OBIEE 11g : Repository Creation StepsOBIEE 11g : Repository Creation Steps
OBIEE 11g : Repository Creation StepsDharmaraj Borse
 
Create a basic performance point dashboard epc
Create a basic performance point dashboard   epcCreate a basic performance point dashboard   epc
Create a basic performance point dashboard epcEPC Group
 
Operate Spreadsheet applications ppt.pptx
Operate Spreadsheet applications ppt.pptxOperate Spreadsheet applications ppt.pptx
Operate Spreadsheet applications ppt.pptxEsubalew21
 
Module 08 Access & Use Database Application.pptx
Module 08 Access & Use Database Application.pptxModule 08 Access & Use Database Application.pptx
Module 08 Access & Use Database Application.pptxEsubalew21
 
Access2003
Access2003Access2003
Access2003mrh1222
 
Access2003
Access2003Access2003
Access2003tanik363
 
Microsoft Access 2007
Microsoft Access 2007Microsoft Access 2007
Microsoft Access 2007Reshma Arun
 
CS1100 Access Lab 1 Creating and Querying Database.docx
CS1100 Access Lab 1  Creating and Querying Database.docxCS1100 Access Lab 1  Creating and Querying Database.docx
CS1100 Access Lab 1 Creating and Querying Database.docxfaithxdunce63732
 
Multiple files single target single interface
Multiple files single target single interfaceMultiple files single target single interface
Multiple files single target single interfaceDharmaraj Borse
 
Phpmyadmin administer mysql
Phpmyadmin administer mysqlPhpmyadmin administer mysql
Phpmyadmin administer mysqlMohd yasin Karim
 
Using microsoftaccess1 gettingstarted
Using microsoftaccess1 gettingstartedUsing microsoftaccess1 gettingstarted
Using microsoftaccess1 gettingstartedjcjo05
 
Tutorial for using SQL in Microsoft Access
Tutorial for using SQL in Microsoft AccessTutorial for using SQL in Microsoft Access
Tutorial for using SQL in Microsoft Accessmcclellm
 

Similar to Database Course Project-Usage Documentation (20)

How to Download IDEA for Windows Based ComputersSelect the dow.docx
How to Download IDEA for Windows Based ComputersSelect the dow.docxHow to Download IDEA for Windows Based ComputersSelect the dow.docx
How to Download IDEA for Windows Based ComputersSelect the dow.docx
 
INTRODUCTION TO ACCESSOBJECTIVESDefine th.docx
INTRODUCTION TO ACCESSOBJECTIVESDefine th.docxINTRODUCTION TO ACCESSOBJECTIVESDefine th.docx
INTRODUCTION TO ACCESSOBJECTIVESDefine th.docx
 
OBIEE 11g : Repository Creation Steps
OBIEE 11g : Repository Creation StepsOBIEE 11g : Repository Creation Steps
OBIEE 11g : Repository Creation Steps
 
Access1
Access1Access1
Access1
 
Access1
Access1Access1
Access1
 
Access2007
Access2007Access2007
Access2007
 
Create a basic performance point dashboard epc
Create a basic performance point dashboard   epcCreate a basic performance point dashboard   epc
Create a basic performance point dashboard epc
 
lecture 5
 lecture 5 lecture 5
lecture 5
 
154090896 installation-of-oracle-database-12c
154090896 installation-of-oracle-database-12c154090896 installation-of-oracle-database-12c
154090896 installation-of-oracle-database-12c
 
Operate Spreadsheet applications ppt.pptx
Operate Spreadsheet applications ppt.pptxOperate Spreadsheet applications ppt.pptx
Operate Spreadsheet applications ppt.pptx
 
Module 08 Access & Use Database Application.pptx
Module 08 Access & Use Database Application.pptxModule 08 Access & Use Database Application.pptx
Module 08 Access & Use Database Application.pptx
 
Access2007
Access2007Access2007
Access2007
 
Access2003
Access2003Access2003
Access2003
 
Access2003
Access2003Access2003
Access2003
 
Microsoft Access 2007
Microsoft Access 2007Microsoft Access 2007
Microsoft Access 2007
 
CS1100 Access Lab 1 Creating and Querying Database.docx
CS1100 Access Lab 1  Creating and Querying Database.docxCS1100 Access Lab 1  Creating and Querying Database.docx
CS1100 Access Lab 1 Creating and Querying Database.docx
 
Multiple files single target single interface
Multiple files single target single interfaceMultiple files single target single interface
Multiple files single target single interface
 
Phpmyadmin administer mysql
Phpmyadmin administer mysqlPhpmyadmin administer mysql
Phpmyadmin administer mysql
 
Using microsoftaccess1 gettingstarted
Using microsoftaccess1 gettingstartedUsing microsoftaccess1 gettingstarted
Using microsoftaccess1 gettingstarted
 
Tutorial for using SQL in Microsoft Access
Tutorial for using SQL in Microsoft AccessTutorial for using SQL in Microsoft Access
Tutorial for using SQL in Microsoft Access
 

Database Course Project-Usage Documentation

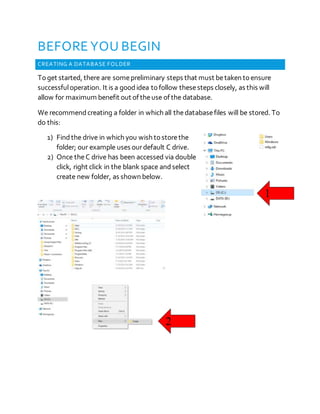
  • 1. BEFORE YOU BEGIN CREATING A DATABASE FOLDER To get started, there are somepreliminary steps that must betaken toensure successfuloperation. It is a goodidea tofollow thesesteps closely, as this will allow for maximum benefit out of theuse of the database. We recommendcreating a folder in which all thedatabasefiles will be stored. To do this: 1) Findthe drive in which you wish tostorethe folder; our example uses ourdefault C drive. 2) Once theC drive has been accessed via double click, right click in the blank space andselect create new folder, as shown below. 1 2
  • 2. 3) Once thenew folder has been created, edit thename to“Database”. Note: The name doesn’thave tobe database specifically, itis justa suggestion to keepall files in one, easy tolocate, place. You now have successfully completed thecreation of your new folder. 3
  • 3. MOVING THE FILES INTO YOUR NEW FOLDER Ournext taskis tomovethe databasefiles into thenew folder soweknow where to find them when opening our primary interface, SQL Server 2012. 1) Begin by locating thedatabase files; thedatabase files are located on the disk provided, in yourcase. 2) Highlight both thefiles titled “AHSBCA” and“AHSBCA_log”, right click and click copy to copy the files. 3) Once thefiles have been copied, locate the newly created “Database” folder. 2 3
  • 4. 4) Access the folder by double clicking theDatabasefolder. 5) Once accessed, right click in theblank whitespace of the Databasefolder and click “Paste”. You should now seethe databasefiles containedwithin the Databasefolder, as shown below: 5
  • 5. ATTACHING THE DATABASE To gain access totheAHSBCA database, wemust first attach thefiles we just copied using the following steps. WARNING: This stepis critical in settingup the database and mustbe completed in full before trying to use it. 1) Locate thefolder for “Microsoft SQL Server 2012” 2) Once located, expandthe folder and search for “SQL Server Management Studio.” 3) Once found, right click and select more, ending with theselection of “Run as administrator”. 4) You may be faced with a UserControl Box with a Yes or No option. Should this happen, select Yes; otherwise, continue toStep 5. 1
  • 6. 5) Once theloading has finished you will be presented with this dialogue box. 6) Simply click connect to continue. 7) After theconnection process is complete, locate the Object Explorer on the left-hand side of thescreen. 8) Notice a databasefolder under yourserver name. 9) Right click that folder andclick the “Attach” option. 3 9
  • 7. 10) An “Attach Databases” dialoguebox pops up. 11)Click the“Add” button locatedtowards themiddle of thedialogue box. 12)Locate yourdatabase folder and find theAHSBCA.mdf file within it. 13)Click on the AHSBCA.mdf file and click Ok. 14)Click Okagain toclose thedialogue box and finish theattachment. You are now ready tobegin working in thedatabase. 10 13
  • 8. WORKING WITH THE DATABASE ADDING AND EDITING DATA Now that wehave successfully set up our databasefrom theprevious instructions, weare ready tostart using the databasetogenerate useful information, as well as inputting new dataentries in. Wewill begin by how to properly inset data. It is important that careful attention is placed in the exact methods usedfor inputting data, as not doing so correctly can result in error messages. 1)Begin by expanding (clicking the“+” sign) the Databasefolder located in theObject Explorer, or the left-hand side. 2)You should see thenewly attached AHSBCA database. Note: If you donot see the AHSBCA folder listed, goback and carefully repeatthe “Before You Begin” procedures, payingcareful attention to the details of the instructions. 2
  • 9. 3)Expandthe AHSBCA folder. Notice the several foldersyou have available. 4)To add new data tothe tables, weare interestedin the “Table” folder of thelisted options. 5)Click the“+” sign toexpandthe Tables folder. 6)This will reveal all the available tables in which data can be entered. 7)Forour example, weare going toadd data tothe “Member” tablefirst. In the database, it is referred toas “dbo.Member”. Note: The dbo.TableName(TableName referringto whatever that particular table is called)is a file namingconvention for SQL Server. Do not be confused as this is normal. 3 5
  • 10. 8)Right click on dbo.Member, or the Membertable, and select the option “Edit Top 200 Rows” by clicking on it. 9)You will notice all theMember data currently in thedatabase is shown, since wedo not have morethan 200 rows of data currently. Note: If there were more than 200 rows of data, itwould not show the entire data set, however the amountdisplayed can later be changed. 8 9
  • 11. 10)Notice theNULL values listedat thebottom of themember table; this indicates that there is no datain that particular cell. Consequently, this is where weadd new data tothetable. 11)Begin toenter a new data entry by clicking on the NULL value under the column “FirstName”. Thecell highlights to blue, indicating it is ready to have a valuetyped intoit. WARNING: Notice, wedid not begin in the first column, MemberID. The reason being is that this ID is automatically generated sequentially by SQL server sothat every member has a uniqueID number. This mechanic saves timewhen entering data and exists in other such places that will be discussed more later tomake you aware of where they are. 12)Enter whichever first name you wouldlike toenter, for ourexample wewill usemy name, Justin. 13)Click theadjacent column, LastName, orsimply hit the“Tab” key on your keyboard to automatically go tothenext column. 14)Enter thelast nameyou wish toenter. Again, for our example, I will be using my name, Tate. 11 13 14
  • 12. 15)You will notice red exclamation symbols abovethe dataentered. This simply signifies that data has not been storedyet. It will be storedupon the correct completion of arow of data. 16)Press Tab, or click again tothe “PhoneNumber” Column. 17)Notice how all the previously entered phonenumber datavalues are identical in format. Note: One of the many benefits of SQL server is the ability to ensure the data entered is correctly formatted. Upon trying to enter anythingother than (###) ###-####, an error message willpopup, and thatdata will notbe saved until the entire row of data is inputted correctly. Many columns, youwill find, havethis constraintandwillbe explained, in detail, later on. 18)Enter thephone numberof your choice in this format: (###) ###-####. Take care in including both theparenthesis, the “-“sign and thespace between the area code and the number. 19)Press Tabor click intothe next column, EmailAddress. 19
  • 13. 20)Enter thedesired email address tobe storedin the databasetable. 21)Press Tab, or click on thenext column, Status. 22)Like the phonenumber restriction, Status must beentered a certain way to be recognized in the database. Simply typean “A”, “H”, or“T”, whereA = Assistant Coach, H= HeadCoach and T = Trainer. Example: If you wish tostoreyourmember as a trainer, simply typein the letter “T”. In ourexample, wewill say that Justin is a HeadCoach. Consequently, wewill put an “H” tomarkhim as such in the database. 22
  • 14. 23)Tab, or click over tothe final column weneed toenter in before thedata is storedinto thedatabase. 24)Notice that thefinal column requires an “InstitutionID”, something that is generated in a separate table. 25)To find theInstitution ID, right click on the“dbo.Institution”, orthe institution table, located on theleft hand side and click on “Edit Top 200 Rows”. 26)Notice thetable of data that is then loaded up. 27)Thegenerated table, as you will notice, has the Institution ID we need tofinish theexample column in theMember table. 28)To find theappropriate Institution ID, you must findtheinstitution in which the memberattends, via the “Name” column. If it does not exist, enter thedata needed in the same way you just learned, using the “DataInput Checklist” providedlater on toensuredata is being inputtedcorrectly. Note: If you need toenter in a new institution, the “InstitutionID” column is automatically generated, similar tothe “MemberID” in the member table. In other words, youdo not need toenter data in, nor can you. 26
  • 15. 29)Forour example, Justin happens toattendtheinstitution of “John Howitzer”, located in the very first row. 30)Notice that the“InstitutionID”, just totheleft of theinstitution name, is 1. This is the“InstitutionID”that mustbeinputtedin ourlast column of our Memberrow wewere working on. 29 30
  • 16. 31)Once the“InstitutionID” has been added, tabor click into thenext row. You will notice theexclamtion marks dissapear, signifying that the datahas been properly entered and storedintothe database. **TIP** Toedit data that already exists, simply click on the cell that is desired to be changed, and typein the new data. It is recommendedthat you refer toour “DataInput Checklist” tomakesurethe datais entered in a correct format.
  • 17. DATA INPUT CHECKLIST ENSURING THE DATA ENTERED IS IN THE CORRECT FORMAT 1) Ifediting the Institution table: a) The “InstitutionID”columnis automatically generated, do not tryto enter anythinginto it. b) The “State” column mustbe entered with twocapital letters; I.E. FL,TN, NY. c) The “Zip” columnmustbe entered using5 and only 5 numbers;I.E. 12345. 2) Ifediting the Locationtable: a) The “LocationCode”columnmustbe entered usingthree letters in a uniquecombination; I.E. ABC. 3) Ifediting the Member table: a) The “Member” columnis automatically generated, do nottry to enter anything into it. b) The “PhoneNumber”columnmust be specifically entered like (###) ###-####,notethe spaces,“-“ sign andparenthesis used;I.E. (123) 456-7890. c) The “Status” columnmust be entered with either an‘H’, ‘A’, or ‘T’, with H=HeadCoach, A=AssistantCoachandT=Trainer. 4) Ifediting the Presentation table: a) The “PresentationID”columnis automatically generated, donot try to enter anything into it. b) The “DateSubmitted” columnvalue must be less than the currentdate and 6/24/16. c) The “AcceptanceDecision”columnmustbe entered with either a ‘Y’ = Yes or a ‘N’ = No. 5) Ifediting the Registration table: a) The “RegistrationNo” columnis automatically generated, donot try to enter anything into it. b) The “Date” columnvalue must be less than orequal to the currentdate, while also being greater than or equal to 7/1/16and less than or equal to 7/22/16. 6) Ifediting the Review table: a) The “ReviewID”columnis automatically generated, donot try to enter anything into it. b) The “DateAssigned”column value mustbe less than orequal tothe currentdate. c) The “Date Submitted” columnvalue must be within14 days ofthe “DateAssigned”value for that row. d) The “Score”columnvalue mustbe between 1 and 5. 7) Ifediting the Session table: a) The “SessionID”columnis automatically generated, do nottry to enter anything into it. b) The “Date” columnmust be between 8/5/16and 8/7/16 8) Ifediting the Topic table: a) The “TopicCode”columnmust be a uniquecombination ofthree capital letters; I.E.ABC,EFG.
  • 18. ADVANTAGES OF YOUR NEW DATABASE - VIEWS ACCESSING VIEWS TO FORM ANALYTICS AND MAKE EDUCATED MANAGEMENT DECISIONS Anotheramazing feature of yournew database, is its ability tocalculate figures and show relations between tables in a fraction of the timethat it wouldnormally take to do manually with the useof something called a “View”. In ourexamples, wewill briefly look through the included five views and why you shouldutilize theseviews for managerial andother business operations purposes. We will begin by demonstrating how to open aview. 1) With theAHSBBCA folder expanded, expandthe “View” folderby clicking the adjacent “+” sign. 2) Notice therevealed dbo files; these files are your views. 3) To access anyof thefive views, simply right click on the dbo file and end by clicking “Edit Top 200 Rows”. 4) Each view has a uniquefunction that will be discussedin more detail. 1
  • 19. VIEW ONE - AVERAGE SCORE PER TOPIC This view is associatedwith the“dbo.AverageScorePerTopic_vw”; toaccess it, simply follow the“Advantages of Your New Database- Views” instructions.
  • 20. VIEW TWO – NUMBER OF PURCHASED OPTIONS THAT ARE MADE BEFORE AND AFTER THE ‘EARLY BIRD’ DATE This view is associated with the“dbo.EarlyBirdPurchaseUsage_vw”; toaccess it, simply follow the“Advantages Of YourNew Database - Views” instructions. Theview depicts the numberof options purchased on agiven date, and the related totalamount respectively. The numberof purchases madeusing the early bird option can help determine whetheror not there shouldbe an early bird option at all, or perhaps if theregular price shouldbe lowered as an incentive to encourage more people to sign up early. Theview shows thetotalamount of profits that are made from each registration date and which dates makes more by comparison.
  • 21. VIEW THREE – INSTITUTIONS THAT DO AND DO NOT HAVE A MEMBER REGISTERED IN THIS YEARS CONVENTION This view is associatedwith the“dbo.InstitutionMembersRegistered_vw”; to access it, simply follow the“Advantages Of YourNew Database - Views” instructions. This view can be an effective marketing tool. Simply put, it demonstrates the Institution personnelparticipation. It will allow thecompanyto see, at any given moment, which schools personnel have registered for the convention and which schools are stillunregistered, but have members in thedatabase. Marketing endeavours can then be madesuch sending out something, such as aflyer, reminding theunregistered schools that theconvention dateis coming up to encourage greater participation.
  • 22. VIEW FOUR – PURCHASE AMOUNTS PER STATUS OF MEMBERS This view is associatedwith the“dbo.SpendingHabitPerStatus_vw”; toaccess it, simply follow the“Advantages Of YourNew Database - Views” instructions. This view, although simple looking in nature, can give a lot of insight to the spending habits of members pertaining to their status. Forexample, thedata shown below could suggest that trainers are being paid significantly more attention when it comes to the features of the convention. Orperhaps, maybe not enough is being offered toassistant coaches andhead coaches specifically, based on the lower numbers in relation totrainers. Thesefigures can lend to managerial decisions that improve thequality of options offered at the convention, based on the status of each member.
  • 23. VIEW FIVE – POPULARITY PER TOPIC This view is associatedwith the“dbo.TopicPopularity_vw”; toaccess it, simply follow the“Advantages Of YourNew Database - Views” instructions. Theview, forthe most part, is relatively self-explanatory. It allows theuser tosee which topics are themost popular in theentire convention. This can have a multitudeof business applications. In itself, it could be usedas another tool in picking which topics shouldbe utilized during the convention. Understanding which topics are popular could aid in other facets of theconvention. For example, since “Motivation” appears tobea popular topic, the convention could have extra “Motivation” manuals orCDs available for purchase. This also goes hand and hand with inventory management. You wouldn’t want asurplus of “Critical Thinking” CDs madewhen it doesn’t appear tobe very popular. Overall, this view can be usedas anothersupport decision factor.
  • 24. ADVANTAGES OF YOUR NEW DATABASE - REPORTS ACCESSING REPORTS TO FORM ANALYTICS AND MAKE EDUCATED MANAGEMENT DECISIONS Reports are different then views due totheir more complex nature. As a result, reports generated are often very detailed and involvemany different figures that wouldotherwisetake a long timetocalculate manually. 1) To access reports, located your Microsoft SQL Server 2012 folder. 2) Instead of choosing “SQL Server Management Studio”, weare going to select an option just aboveit known as “SQL Server DataTools”. Run this as you wouldSQL Server Management Studio, in administratormode. 3) Once theprogram has opened, click “File” and then “Open” in the top left corner of the screen. A dialogue box will appear. 4) Locate the“AHSBCA Reports” folder included on thedisk and double click. 4
  • 25. 5) Double click the AHSBCA Reports icon. 6) On the right hand side under the“Solution Explorer”, double click any report wishing tobe accessed. Thefiles will end in “.rdl” 7) Select the“Preview” tabin thetop left corner of the screen topull up the report. 8) Thereport can then be printed or exported in different file formats using thetoolbar right above thereport. 7 5
  • 26. REPORT ONE – MEMBER PURCHASES Note: The printout of this report is located in “Appendix C”. Below is an explanation of why this particular reportshould be utilized. The“MemberPurchases” report is accessed by double clicking the Member Purchases.rdl file in the “Solution Explorer” on theright hand side after following the“Advantages of Your New Database – Reports” instructions. TheMember Purchases report is critical not only tothe tracking of whohas paid for what, but alsoin thecalculation of total proceeds. At first glance, you’ll the name of the member, the options that memberedpurchased forregistration, when that memberbought it, thequantity of each option andthe respective amounts paidfor each option. Only members whohave purchasedsomething are included in this list. The subtotalamounts arecalculated undereach member; this allows the tracking of whohas spent themost on theconvention and also who has spent the least, shouldthat be necessary. Thegrand totalis also included at theend of thereport toshow the totalnet profits that theconvention will be receiving. It is wiseto usethis report tomake sureall themoney has been accounted for, but also could be usedfor something as simple as sending thank you cards for members spending acertain amount.
  • 27. REPORT TWO – OPTION DYNAMICS Note: The printout of this report is located in “Appendix C”. Below is an explanation of why this particular reportshould be utilized. The“Option Dynamics” report is accessed by double clicking the Option Dynamics.rdlfile in the“Solution Explorer” on theright hand sideafter following the“Advantages of Your New Database – Reports” instructions. The“Option Dynamics” report quantifies theaverage price paid for each option, as well as themaximum price and minimum price. Its purposeis toanswerthe question of what people may or may not be willing topay more for each option. In addition, thequantity soldof each product is included. This can also be usedas an indication as to what products, otherthan mandatory products, are in popular demand, lending tothesupply management aspect of the convention.
  • 28. REPORT THREE – REVIEW TURNAROUND TIME Note: The printout of this report is located in “Appendix C”. Below is an explanation of why this particular reportshould be utilized. The“Review TurnaroundTime” report is accessed by double clicking the Review TurnaroundTime.rdlfile in the“Solution Explorer” on theright hand side after following the“Advantages of YourNew Database – Reports” instructions.
  • 29. REPORT FOUR – TOPIC APPROVALS VS REJECTIONS Note: The printout of this report is located in “Appendix C”. Below is an explanation of why this particular reportshould be utilized. The“TopicApprovals VSRejections” report is accessed by double clicking the TopicApprovals VSRejections.rdl file in the “Solution Explorer” on the right hand side after following the “Advantages of YourNew Database –Reports” instructions.
  • 30. REPORT FIVE – UNREGISTERED MEMBERS Note: The printout of this report is located in “Appendix C”. Below is an explanation of why this particular reportshould be utilized. The“Unregistered Members” report is accessed by double clicking the Unregistered Members.rdlfile in the“Solution Explorer” on theright hand side after following the “Advantages of Your New Database– Reports” instructions.