1. 68 MONITORING TIMES June 2008
Imagine you’re trying to monitor that
rare shortwave DX catch or Dxpedition
station, only to have signal fading, atmo-
spheric crashes and station interference make
it impossible! It’s happened to all of us. But a
program called Diamond Cut Seven (DC 7)
could possibly save the day by digging the
station’s audio out of the muck. Not a record-
ing of it, but in real time, using the audio from
your radio.
“Magic,” you say? Perhaps. But as the late
Arthur C. Clarke postulated in his third laws
of prediction, “Any sufficiently advanced tech-
nology is indistinguishable from magic.” So,
let’s take a glimpse behind the wizard’s curtain
to see and, of course, hear if this monitoring
“magic” is real.
❖ Our World
Humans are analog creatures. A continu-
ous range of sensory intensities stimulates our
senses. For example, our tympanic membrane,
the eardrum, responds to air pressure waves,
which we called sound. We catalog sounds as
louder or softer and higher or lower in pitch.
Our sensory perceptions are all relative, based
on our recent experiences. This is the essence
of our analog world.
We don’t see, feel, taste, or hear in dis-
crete steps of ones and zeros. But, these are
the makings of the digital world where signals
are absolute and do not rely on relative levels.
However, once analog signals are converted
into the digital domain, they can be manipu-
lated, enhanced and then reconstituted in ways
that we analog beings can only conceive of as
magic.
❖ DV Seven
DC Seven (DC 7) from Enhanced Audio
(www.Enhancedaudio.com) bridges the gap
between the two worlds, analog and digital, in
the audio spectrum. It works all the magic that
the digital world can muster, using powerful
digital signal processing algorithms. And then
DC 7 returns the data back to the analog human
audio interface, which is sound.
DC 7 is not cheap at $159 (on line) and
$199 on CD. But, based on its feature set, it
is comparable to competitor software suites
which start at $799 and go way, way up from
there. So, if it works as advertised, DC 7’s price
is a steal for audiophiles, hams, radio moni-
tors, professional audio studios, and, shall we
say, government work? We may not be able
to evaluate the package to the satisfaction of
all these groups, but let’s see what we can do
with DC 7 as radio monitors with little or no
professional audio processing experience.
It is said that necessity is the mother of
invention. DC 7, developed over a 13-year
period, is the brainchild of two recording
engineers. They had a goal to build an audio
archive using old recordings, which in many
cases were almost unintelligible. In order to
restore these audio recordings, they created the
first version of this program. Over the past year
it has been updated, improved, and developed
into its present version, DC 7.
DC 7 can optimize audio intelligibility
and in many cases make it understandable. The
list of applications includes audio recordings
from vinyl records (anyone remember those?),
magnetic tape recordings, compact disks, and
computer files, such as wave files. However,
its use is not limited to just pre-recorded audio.
Using the “Live” feature of DC 7, audio from
live sources such as telephone and (yes!) radio
receivers/ham transceivers can be restored in
near-real time.
In this two-part series we will cover the
capabilities, installation and basic functions of
DC 7. Once we become familiar with DC 7, we
will perform detailed applications covering a
number of the above uses, including, of course,
live radio and ham monitoring applications.
So you can actually hear and judge for
yourself the difference DC 7 makes, we will
post the “before” and “after” audio files of each
our endeavors on the MT website.
❖ A LOT to Cover
Keep in mind that DC 7 is a very powerful
program with filter presets, multi-filter com-
binations, audio preamps with various built-
in equalization curves, comprehensive tube
amplifier simulations and much, much more.
The User’s Manual for DC 7 is a whopping
450+ pages – of which 367 pages are directed
to instructions and applications of the program.
A 30-page section includes useful general
audio information including a rich glossary of
terms, and 50+ pages of the manual contain a
collection of not-to-be-missed standard charts,
graphs and very interesting audio informa-
tion.
Clearly we can’t begin to cover what DC
7 can do in detail. Instead, we’ll do our best
to give you a flavor of DC 7’s basic operation
for radio monitors and hams in this first two
articles.
Okay, so let’s get started down the road
of audio restoration magic.
❖ What is DC 7?
The program is actually a collection of
DSP (Digital Signal Processing) routines.
Some simulate audio filters of various types.
Others perform specialized amplification func-
tions. Many of these have complex characteris-
tics tailored to audio applications. High levels
of audio customization for specific applications
are achieved using multiple filters and function
blocks. And, getting more sophisticated, these
can be chained together in various sequences.
(Now you can see why the manual is 357
pages.)
But how is an audiophile, radio monitor
or ham to know which DSP routines to use
and how to put them together? DC 7’s answer
is simple. You don’t have to know anything
about DSP routines. The creators of DC 7
have arranged the menu-driven program by
Diamond Cut Seven
Bridging Analog Audio
to the Magic of Digital
By John F. Catalano
MT
REVIEW
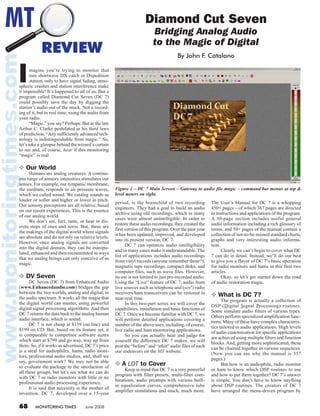
Figure 1 – DC 7 Main Screen – Gateway to audio file magic – command bar menus at top &
level meters on right.
2. June 2008 MONITORING TIMES 69
audio application using preset filters. Over
800 preset filters are included. However,
for the adventuresome and experienced, DC
7 provides the user control over just about
every filter parameters! This allows detailed
customization to the user’s exact and specific
audio needs.
In most cases we’ll follow the simpler
preset route for this article. For example, if you
have a recording made from a vinyl record, you
can probably hear clicks, pops and other noise.
The clicks are the result of surface scratches.
The pops are the result of static discharge,
not unlike atmospheric noise (QRN) heard on
shortwave signals.
We’ll see how, with just three mouse
clicks on DC 7, we can greatly reduce or even
remove these annoying noises complete. That’s
what I call simple!
❖ System Requirements
Clearly these powerful DSP routines
require more than a 486 processor, but, sur-
prisingly, not much more. DC 7’s minimum
PC processor requirement is the eight-year-old
750 MHz Pentium, not exactly state of the art.
(More like state of the ark.) However, if you
are going to string together multiple functional
blocks or use the Live feature, a faster PC may
be required.
To start, a reasonable quality 16 bit sound
card with line level inputs is needed. Since we
are definitely going to use the Live feature for
real time radio monitoring, a full duplex sound
card is required. A full duplex sound card al-
lows playback and recording of an audio signal
at the same time.
Don’t forget lots of hard drive space. The
program occupies about 20 MB. But you will
need 2.5 GB for each full audio CD you intend
to create:At a sample rate of 44.1 kHz, a stereo
recording uses 10.5 MB of hard drive space per
minute. And finally, since the program comes
on CD, a CD ROM player is required. If you
intend to register the program via the Internet,
an Internet connection is needed.
DC 7 runs on Windows XP with the SP3
update and 512 Mbytes of RAM, or Windows
Vista with 1024 Mbytes RAM. For XP users,
DirectX 5.0 or higher is required.
We used a Toshiba A135-S2276 lap-
top with a 1.6 GHz Duo Core T2060 CPU,
2048Mbytes of RAM and a Vista Home Basic
operating system. The Vista OS has DirectX
10 installed and our hard drive had 22 GB of
free space. The laptop has an IXP SB450 High
DefinitionAudio Controller using the Realtek
High Definition Audio Suite. This sound card
combo performed perfectly with DC 7.
❖ Install, Register, Configure
Installation from the CD is easy and takes
about three minutes. Once the program loads,
the unique serial number must be entered,
along with the owner’s name exactly as it was
entered when the program was purchased.
Finally, we must register the program with
Diamond Cut before the program will run. If
you have an Internet connection, the program
can do the registration automatically. Email
or telephone registration is also
possible.
We’re almost ready to run
… Next, turn off all background
tasks on the PC. If you have a
screen saver enabled, turn it off.
These tasks may interfere with the
DC 7’s operation by competing
with it for the processor’s atten-
tion. Now we’re ready to go.
❖ Running DC 7
You might think that access-
ing all the power, features, and
functions would require tons of
complex menu screens. Not so.
The authors of DC 7 have done
a great job creating a simple user gateway, as
seen in Figure 1. The Command Icon rows can
be seen at the top of Figure 1. Level meters are
displayed vertically on the right side. Signal
waveform display and function block applica-
tions take place in the center in the screen.
The User Manual is very well written and
takes the reader from basic concepts to full
applications. It is rich with audio theory and
is an excellent “everything you want to know”
audio filter resource. It is well worth the time
to read this voluminous document. But with our
limited time we are going to use an OJT, On the
Job Training approach. We’ll start each of our
work-through examples by stating a particular
audio need that requires our help. Here are the
three we will cover in these two articles:
A scratched and worn vinyl record of music
with clicks and pops.
Recording of audio (voice) from a receiver, at a
very low level that is barely intelligible.
Live audio (voice), from a SWL or Ham receiver
with signal fading, atmospheric noise QRN
and signal interference QRM.
Our first project will provide a very simple
learning exercise. This will be useful to learn
first principles, but will also appeal to the vinyl
worshipping audiophiles among us. Then we
will build on our experience and advance to
enhancing a recording of a signal made from
a shortwave broadcast. And finally, we’ll take
on the task of cleaning up live audio taken right
from a receiver/transceiver’s speaker output, for
real-time audio restoration.
As we work though each example, we’ll
learn the basics of capturing the
audio, filter and function block
choices, application of the blocks
to audio, listening to the modified
audio, possible re-application,
and finally, saving the restored
audio. Again, keep in mind that
we are just touching the surface
of what DC 7 can do.
❖ Starting Slow
Let’s try a relatively simple
task to start. How about cleaning
up the music from an old Korean
vinyl recording? (Okay, so it’s
not exactly U2. But the audio was
provided by Diamond Cut and is
a good first example.) We start by attaching a
cable from the line output of our stereo to the
line-in of our PC’s sound card. Alternatively,
using DC 7’s Virtual Preamp and adding gain,
we can go right from the turntable outputs to
the sound card. The Virtual Phono Pre-Amp is
shown in Figure 2.
Notice the wide range of preset choices
that are available, as seen in the open box at
the bottom.You can choose one of these presets
or set your own bass mid and high tones, along
with the other preamp settings. You can then
save it as a new preset if you wish.
We’re going to go simple and pick the de-
fault: flat tone levels, Preamp Standard RIAA,
Record Type RIAAVinyl LP/45, Rumble Filter
Off, and Volume Control set to mid range.
Next, we play our record selection and
have DC 7 save it as a “Source” file in the
wav format. We will limit the selection time
to about 30 seconds to make it easier for you
to download from the MT website. We have
named this Vinyl 1 Source.wav
Now display the Source file by selecting
“Open Source” under the “File” menu. Figure
3 is the resulting display, showing the audio
waveform and the elapsed playtime in seconds
at the bottom. Notice that our audio piece starts
at approximately 3 seconds into the recording
and ends at 30.6967 seconds.
Pressing the Space bar starts and stops the
playback of the opened file, which can be heard
on the PC speakers. A vertical line marker
travels across the waveform from left to right,
indicating exactly what we are hearing at any
instant. In Figure 3 you can see the marker just
left of the 23.4996 second timing mark.
Figure 2 - Virtual phono pre-amp in the default preset ready
to play/record vinyl LP
Figure 3 – Displaying & playback of our captured 30.6967
seconds of Korean music from LP. Notice the playback mark
to the left of 23.4996 seconds.
3. 70 MONITORING TIMES June 2008
❖ EZ Does It
There are many, many different methods
of restoring vinyl LPaudio in DC 7. We are go-
ing to use the very simplest for our first project.
In fact, it is called the EZ Impulse Noise Filter.
Access it from the first Icon on the left of the
second row of icons in Figure 3: Click on the
letters EZ. We can also get to the EZ Impulse
Noise Filter via the dropdown Filter menu at
the top of the display.
With the Source file (Vinyl 1 Source.
wav) displayed, click the EZ Impulse Filter
icon. Now the EZ Impulse Filter Box will be
displayed as shown in Figure 4. If the user hits
the F1 key while a functional block box is be-
ing displayed, instructions for its use will also
be displayed. This makes using the Help file a
pleasure instead of a chore.
In order to really scrub the audio clean, we
have selected one of the filter’s sixteen presets,
“Aggressive Scratch and Crackle Remover.”
Notice in Figure 4, the three buttons on the
right side of the filter box. The Preview button
allows the user to hear the results of applying
the chosen filter preset or custom settings.
If it results in sound to your liking, the
Run Filter button does the job and places it in
a Destination file. Using the “Save Destination
As” under the File menu, the filtered/restored
file has been resaved as Vinyl 1 EZ Impulse-
Filter Aggressive S&P.wav.
❖ Hear for Yourself
Go to this column’s website at www.mon-
itoringtimes.com/html/computers-radio.
html. Then download and listen
to the two files using Windows
Media Player or other player
that is wav compatible. Now you
can be the judge of how much a
difference applying the simplest
method of DC 7 restoration has
on the audio. Remember, we did
this with just three clicks and
even less audio technical know-
how!
Okay, let’s review: We
have now learned how to capture
and store audio sources, apply a
“magical” filter with one click,
listen to the “cleaned” audio and
store the cleaned audio in a des-
tination file. These processes will be useful in
our other DC 7 projects.
❖ Want More Control?
Don’t we all? But, if it’s more filter con-
trol that you want, the Expert Impulse Noise
Filter is for you. This can be used instead of
the EZ version used in the above example. The
Expert version provides much greater control
of all filter parameters. However, given all the
possible combinations of parameter settings,
taking the Expert route could be an all-day
endeavor without more of an understanding of
the filter operations. That said, for those users
who either have the filter design knowledge or
who invest time in reading the DC 7 manual,
the Expert Impulse Noise Filter will provide
a clean result with minimum reduction of the
audio’s fidelity.
The important point here is DC 7’s Simple
and Expert approach. Most all features and
function in the program can be used at either
level, depending on the expertise and/or critical
need of the user. This is an excellent concept
that the authors of DC 7 have consciously
designed into DC 7. Other software writers
should follow this approach.
❖ A Simple Radio Application
Since you are reading this in Monitor-
ing Times, you’re all about radio. Before we
get really fancy and go live, let’s try a simple
application of DC 7 on a file recorded from
shortwave.
If you are following along using the wav
files on the MT site, download and play Radio
Recording 1.wav. This is an
audio file of a German language
shortwave news broadcast. You
will hear two major problems
with the signal. The modulation
of the female announcer is very
low, while the background radio
noise is quite high. While keep-
ing it very simple, what can we
do with DC 7?
DC 7 power comes from
its ability to combine a number
of filters and functional audio
blocks into an audio process-
ing chain. Each filter/block is
independently customizable in
its audio parameters and relative
placement in audio processing chain. DC 7 calls
this feature “Multi-Filter.”
Start by opening our source file Radio
Recording 1.wav using the File menu. Next,
select MultiFilter from the Filter menu on the
top Command line. We’ll cover this powerful
feature in more depth in Part 2. For now, let’s
just select the MultiFilter preset titled “Live
Mode Demo Cleanup – SW Radio.” Figure 5
is a close-up of the MultiFilter window.
Notice the top line. Here the audio process-
ing chain and all of its functional blocks are
displayed. Remember, this is the configuration
for the preset we have just chosen. Starting from
the left side of the top diagram in Figure 5, we
see that the input first goes to a Continuous
Noise 1 block. This filter is used to remove
the white noise hiss on our signal. The “1”
indicates that it is the first functional block in
our processing chain.
From Figure 5 we see that a Median filter
is next in line. This filter reduces small impulse
noises, such as crackle or (on a radio signal)
atmospheric static discharge noise.
Then comes a functional block with the
pugilistic sounding name “Punch & Crunch.” It
is actually a multi-channel dynamic compressor
and expander: hence the name. Here, a weak
low-level audio signal, such as we have in our
example, is “punched” to a higher level. Don’t
be confused: this does not simply increase the
gain of the audio. If that were all it did, we
would increase the level of the background
noise as well and achieve very little. Instead,
this block picks the program out of the noise.
Then it just expands the program material (for
our example, a female voice), leaving most of
the noise down in the dust.
The fourth and final block, Graphical
Equalizer, acts as a sophisticated tone con-
trol.
Now we’ll run the filter chain and save the
destination file.
❖ So, How Does It Sound?
Go back to the MT website. Download
and listen to the file titled Radio Recording 1
MultiFilter Preset LMDC-SW Radio.wav.
Now re-listen to Radio Recording 1.wav.
What do you think?
There is no question that this is a great
improvement. The noise is way down and the
voice has been pulled out of the mud. Again,
stop and think. We have done all this with just
a few mouse clicks and NO knowledge of audio
processing. That’s quite a feat for us, and quite
a tribute to DC 7.
❖ Next Month – Live
There is an old adage in the audio business.
“No one hears or likes the same things. That’s
why God created tone controls.” Next month
we’ll dig a bit deeper into the filter blocks and
see (i.e., hear) the effect of various filter adjust-
ments. In fact, we’ll do a little tweaking of our
own and re-do our second example above.
So far, we have DC 7 working on recorded
files. How well will DC 7 work in real time with
audio from our shortwave receiver? Find out in
Part 2, next month.
Figure 5 – MultiFilter windows processing our shortwave
recording. Notice at the top the functional blocks in process-
ing chain
Figure 4 - EZ Impulse Filter about to clean out the crackle
and pops with one click!
4. July 2008 MONITORING TIMES 67
Using Diamond Cut 7 – Part 2
Live Audio Clean-up
By John F. Catalano
MT
REVIEW
As we saw last month in Part 1, Diamond
Cut 7 (DC7) is an audio restoration pro-
gram suite that can really clean up audio
recording. Using DC7, noise and background
hum alike can be dynamically filtered out. Then,
using other DC7 functions, the resulting audio
can be further enhanced, digging it right out of
the “dirt” and making the recorded audio very
intelligible.
But, DC 7 claims to be able to work its
magic on live audio signals from our receivers
in real time. No recordings here! Is this possible?
Can we really take a live signal in the mud of
atmospheric noise (QRN) and signal fading and
move it from un-intelligible to intelligible? In
Part 2 we will attempt to answer these ques-
tions.
❖ Quick Review
DC 7 has three basic parts: first is digitizing
the analog audio signal. Next, its many, many
functional blocks that the user can string to-
gether to perform very complex audio functions
in the digital domain. And finally, DC 7 returns
the digital audio to analog so we can hear it.
Sounds simple, but as we saw in Part 1,
the eight hundred or so functional filter blocks
that DC 7 provides can do virtually anything to
recorded audio, if we take the time to learn how
or if we are audio experts. DC 7 also provides
easy to use “canned” routines for us casual users
that choose the correct function blocks for our
required application.
❖ Hardware Required
DC 7 runs on Windows XP with the SP3
update and 512 Mbytes of RAM, or Windows
Vista with 1024 Mbytes RAM. For XP users,
DirectX 5.0 or higher is required. A full duplex
sound card that can record and play at the same
time is essential.
We’ll use the same Toshiba A135-S2276
laptop with a 1.6 GHz Duo Core T2060 CPU,
2048Mbytes of RAM and a Vista Home Basic
operating system. One difference from Part 1 is
that we have now installed the SP 1 upgrade to
the Vista OS. To date, I have found no problems
with previously installed programs running
under Vista SP 1.
❖ Receiver Hardware
Any shortwave receiver or scanner audio
output will work. We will use the audio output
of the venerable Icom IC-R71 shortwave re-
ceiver. The R71’s front panel Line-Out jack is
connected to the PCs audio card’s Line-In.
❖ The Multi-Filter
Okay, so now that we have
audio, what is the easiest way to
use DC7 to filter the audio? The
answer lies in the use of the DC
7’s Multi-Filter, see Figure 1.
This function allows the user to
“stick together” any of the filters
included in the program. But DC7
does not stop there. The user can
choose the sequence in which the
filters are used simply by drag-
ging and dropping them into the
order we need. Each filter section
can then be customized to our
specific monitoring conditions.
We can hear the effect of each individual
filter section on the signal by using the filter’s
“Preview” button. In a similar manner, we can
hear the effect of the whole string of filters via
the Multi-Filter’s “Preview” button.
DC7 provides users with a number of
ready-made multi-filters. The Multi-Filter that
we created, shown in Figure 1, is very simple,
having only three filter sections.We have tailored
each filter section and saved the result as “C&R
SW Off Air Filter 1.” Let’s look at each section
in our simple Multi-Filter.
❖ Starting at the Beginning
All the files mentioned in this article can
be found at www.monitoringtimes.com/mt-
subscriber (required password found in current
issue) and you may listen to them with Windows
Media Player or any audio player capable playing
“.wav” files.
Start by playing our original, live, off air
signal, OFF_AIR_Orig.WAV. You can hear that
this signal has two severe problems: high and
varying background noise levels and signal
fading due to propagation. Not easy problems to
solve. In fact, where the signal has faded below
the noise, no program, not even DC 7, can do the
impossible and recover the audio.
Perhaps we can make parts of this
signal very difficult signal more
“listenable.”
The first filter section seen
at the top left of Figure 1 is the
“BandPass1.” The “1” denotes
that this is the first filter section
of our multi-filter. If we double
left-click on the BandPass filter,
Figure 2 is displayed. From here
we can adjust the filter’s param-
eters. In the BandPass filter we
will try to remove some noise
signals outside the speech range
of frequencies.
I used an empirical method of adjusting the
slider controls and then listening to the result via
the “Preview” button. This was repeated a num-
ber of times until the resulting signal sounded
the best – not easy with an ever-changing live
off-air shortwave signal. But you can get a good
result after a few tries.
❖ Noise and Lots of It!
In the next filter section we will try to filter
out more noise. The Continuous Noise filter is
one of the most important in cleaning up SWL
signal.
The User Manual’s tutorial on this filter
suggests the following set-up procedure, fol-
lowed by spending “… about an hour playing
around with it in order to become familiar with
its behavior.” To give you an idea of the filter set-
up procedure, below is an abbreviated version
of what is described in the DC 7 User manual.
Continuous Noise Filter Procedure
(condensed by J. Catalano)
1. Highlight a quiet portion of the Source .wav
file.
2 With the left mouse button, click on “Filter.”
3. Next, click on “Continuous Noise.”
4. When the Continuous Noise Dialog Box ap-
Figure 1-2 Diamond Cut 7 (DC7) Multi-Filter that we custom-
ized for live shortwave monitoring.
Figure 2-2 Customizing the Bandpass Filter to our condi-
tions.
5. 68 MONITORING TIMES July 2008
pears, click on “Sample Noise.”
5. A graph will appear showing the Amplitude (in
dB) versus the Frequency of the .wav file noise
floor.
6. The measured sample noise spectrum is shown
in red. The noise threshold value vs frequency
is in blue.
*
7. To change the graphical threshold contour, fol-
low the procedure outlined in steps 7 through
10. Using your mouse, place the pointer on the
left-most blue threshold marker on the graph
(one of ten blue dots).
8. Depress the left mouse button and move the
dot either up or down so that it remains some-
where above the red line graph at the bottom
end of the spectrum.
9. Move the next blue threshold marker just to the
right of the first one, and using the mouse, set
it somewhere above that particular frequency
on the spectrum graph.
10. Repeat process until all ten threshold mark-
ers are located somewhere above the “noise
floor” graphical representation of your .wav
file. The blue line should be located above
the red line at all frequency locations. The
best contour can only be achieved by moving
both the markers along the vertical axis and
the horizontal (frequency) axis.
*
11. Set the “Attack” time initially to 25 millisec-
onds.
12. Set the “Release” time initially to 50 or 100
milliseconds. (The “Release” time constant
should always be set longer than the “Attack”
time constant for a realistic sounding operation
of the filter.)
13. Set the “Attenuation” control initially to 10
dB. (Higher numbers results in higher levels of
noise reduction.)
14. Highlight the portion of your .wav file on
which you desire to apply the Continuous
Noise Filter.
15. Run the Filter.
16. Play the section that you have just processed,
and determine which parameters need modi-
fication.
17. When you are satisfied with the results, re-
run the .wav file
As you can now appreciate, although DC7
has many pre-loaded filters and multi-filters,
special situations require time and effort for good
results. Figure 3 shows our Continuous Noise
filter in the process of being set up.
❖ Punch & Crunch
This describes what I feel like I’ve been
through after writing a piece on a complex topic!
But in this case it is also the name of the DC7 filter
that tries to compensate for the wild signal fading
on our signal.As we said, realistically no software
can recover audio that just is not there!And for part
of our signal, the fading is so severe the
signal is gone completely.
Figure 4 displays the P&C filter in
operation. Notice that we have broken the
audio into four distinct frequency bands:
0 to 294 Hz, 294 to 2454 Hz, 2454 to 6932
Hz and 6932 and higher. The red lines
indicate at what level the “Expander” or
amplification will take place.
Since most human voice lies in the
frequencies between 300 to 3000 Hz the
red line has been set at zero in this range.
This means that expansion/amplification
takes place at all input levels for these
frequencies. The effect is to amplify
the voice frequencies, leaving the noise
frequencies behind at a lower level.
Now that we have the all the filter
elements set up for our terrible shortwave
monitoring conditions, we can do some live off air
listening with DC 7’s assistance.
❖ A Tough One
You can hear the results for yourself. Listen
again to the unfiltered signal at the above MT link.
Now go to OFF_AIR_FILTERED.WAV and listen
to the resulting multi-filter signal. Then judge for
yourself. I think you will find parts of the filtered
signal have been greatly improved, while others
parts are just asking the impossible.
We can see the results in Figure 5. The top
graph is the off air input signal. Notice the wide
horizontal area in the center of the graph. This is
our signal with all of its noise.
Now take a look at the bottom graph. Notice
that the broad wide swath is gone, replaced with
spikes, which in most cases corresponds to voice
Figure 3-2 The Continuous Noise Filter hearing and learning our signal
Figure 4-2 Punch & Crunch Filter. Notice the four
distinct audio bands we have created
6. July 2008 MONITORING TIMES 69
Figure 5-2 Seeing is believing! Top graph is as received off air. Bottom is put through our Multi-
filter. Notice the “thinning” of the bottom trace.
modulation. However, where the signal fades com-
pletely, relatively wide regions are visible. Since
the voice signal is gone, the program is trying to
still find and expand it. The result is amplified
noise.
❖ A Fair Chance
Again, the signals we attempted to clean up
had high levels of noise (QRN) and deep signal
fading, a very hard combination of problems.
The current shortwave conditions are some of
the worst I have experienced in my 45 years of
SWLing! However, no one can ever accuse this
writer of choosing examples that make his job
easy.
But to be fair to DC 7, let’s see what it can
do with the very hard, instead of the impos-
sible. We have made a file of just the last part
of the intercept. This is the part that has a male
announcer with lots of noise on top of him. You
can hear the original MAN_ORIG.WAV
Now listen to MAN_Filtered.WAV. I think
you will agree that DC7 really cleaned up this
signal and made it listenable. You can listen to
a third example of “before” and “after” files by
listening to EX2_Orig.wav and EX2_Filtered.
wav, respectively.
We found that DC 7 operated the same
when used on live audio or audio files. However,
slower PC processor may cause these two modes
to operate very differently.
❖ Precious Gems
Diamond Cut 7 can be downloaded from
www.Enhancedaudio.com for the price of
$159. Or call toll free 866-260-6376 to order
over the phone. An excellent training DVD,
which walks the user through many uses of DC
7, is available. A download bundle of the DC7,
PDF help file, plus a mailed training video (no
charge for shipping) is available for $188.
If you do any music restoration, DC 7 is
a must. For voice and monitoring applications,
with reading, practice, and patience, DC 7 can
yield very good results for both “live” and stored
audio.
LLiisstteenniinngg iiss oonnllyy hhaallff tthhee ffuunn......
PPOOPPUULLAARR
CCOOMMMMUUNNIICCAATTIIOONNSS
iiss tthhee ootthheerr hhaallff!!
If you enjoy radio communications in all its variety, you’ll love
POPULAR COMMUNICAPOPULAR COMMUNICATIONSTIONS
Since 1982 Pop’Comm has delivered thousands of pages of great reading for
both the radio enthusiast and the professional communicator.
Every month Pop’Comm is crammed with scanner frequencies, shortwave
listings, broadcast and utility loggings, radio nostalgia, and technical
information. Plus you’ll find great features on amateur radio, public service
communications, DXing, pirates, clandestines, and much, much more.
USA Canada/Mexico Foreign
1 Year � 32.95 � 42.95 � 52.95
2 Years � 58.95 � 78.95 � 98.95
3 Years � 85.95 � 115.95 � 145.95
Popular Communications, 25 Newbridge Road, Hicksville, NY11801 • Phone: 516-681-2922 • Fax 516-681-2926
Visit our web site: www.popular-communications.com
Name _______________________________________________________
Address______________________________________________________
City _______________________________Sate _________Zip _________
� Check � MasterCard � VISA � AMEX � Discover
Card No. _____________________________________Expires _________
Signature ____________________________________________________
YES! Enter my subscription to Popular Communications today!