SlideShare a Scribd company logo
1 of 276
Download to read offline
Engine data
Engine code 1Z AHU
Manufactured 06.95 > 08.96 >
Capacity ltr 1.9 1.9
Power output kW at rpm 66/4000 66/4000
Torque Nm at rpm 202 202
1900 1900
Bore mm 79.5 79.5
Stroke mm 95.5 95.5
Compression ratio 19.5: 1 19.5: 1
CN not less than 45 45
Firing order 1-3-4-2 1-3-4-2
Catalytic converter yes yes
Exhaust gas recirculation yes yes
Charging yes yes
Charge air cooler yes yes
Engine code 1Z AHU
Valve timing
At 1 mm valve lift and 0 mm valve clearance
Inlet opens after TDC 16° 16°
Inlet closes after BDC 25° 25°
Exhaust opens before BDC 28° 28°
Exhaust closes before TDC 19° 19°
CUT
Removing and installing engine
Special tools and workshop
equipment required
‹ Engine support bracket 10-222 A
‹ Lifting tackle 2024 A
‹ Special tool 3147
‹ V.A.G 1202 A
‹ V.A.G 1306
‹ Special tool Matra V/175
Removing
Notes:
‹ The engine is lifted out without the gearbox.
‹ Catch drained-off coolant in a clean container for re-use or
disposal.
‹ All cable ties which are opened or cut open when removing
the engine must be replaced in the same position when
installing the engine.
- Obtain radio code on vehicles with coded radio.
- With ignition switched off disconnect battery earth strap.
Warning!
Hot steam can escape when the cap on the expansion tank
is opened. Cover the cap with a cloth, and open it carefully.
- Open cap on coolant expansion tank.
-
Õ Remove noise insulation (two sections) -arrows-.
- Place drip tray V.A.G 1306 below engine.
900058 Type
4A
Type description
-
Õ Turn drain screw -arrow- on radiator anti-clockwise, if
necessary fit drain hose to connection.
-
Õ To drain off remaining coolant, disconnect coolant hoses
-arrows-.
900058 Type
4A
Type description
-
Õ Slacken bolts 2 ... 6.
- Slacken V-belt by loosening tensioning nut -1-.
- Remove V-belt.
900058 Type
4A
-
Õ Unbolt vane pump for power steering and bracket (at rear)
-arrows-. Do not disconnect hydraulic connections.
- Secure vane pump to body with wire to avoid overtensioning
the hydraulic connections.
-
Õ Disconnect positive wire to fan motor at series resistance
-arrow-.
- Installation position: behind front bumper, on left.
- Move wiring clear.
900058 Type
4A
Type description
-
Õ Unbolt torque reaction support from engine and cross member
-arrows-.
-
Õ Disconnect bottom air hose -3- from charge air cooler.
- Disconnect wiring-1-from alternator.
- Unbolt earth wire -2- from longitudinal member.
900058 Type
4A
Type description
-
Õ Unbolt starter from engine/gearbox and secure as necessary.
Note:
Starter cables do not have to be disconnected.
Vehicles with automatic gearbox
-
Õ Unscrew 3 torque converter nuts through starter opening using
Matra V/175 15 mm A/F socket attachment (turn crankshaft 1/3
turn each time).
Note:
When loosening torque converter bolts, counterhold crankshaft
by applying spanner to central bolt on vibration damper.
All models
- Unscrew engine/gearbox securing bolts accessible from below
900058 Type
4A
Type description
-
Õ Remove engine cover panel -arrows-.
-
Õ Remove air intake pipe -arrow- between lock carrier and air
cleaner housing.
900058 Type
4A
Type description
-
Õ Unscrew earth connection to fan motor at earth point -arrow- at
front left of engine compartment.
- Unbolt radiator fan cowl from radiator and lift out.
-
Õ Disconnect wires/unplug connectors as follows:
1 -Exhaust gas recirculation valve -N18
2 -Air mass meter -G70
4 -Charge pressure control solenoid valve -N75
5 -Intake manifold temperature sender -G72
- Disconnect vacuum hose from mechanical exhaust gas
recirculation valve-3-.
- Disconnect thin hose-6-from bottom of valve for exhaust gas
recirculation -N18.
- Move wiring and hoses clear.
- Disconnect air hose from air mass meter.
- Remove upper section of air cleaner housing with air mass
meter.
900058 Type
4A
Type description
-
Õ Unbolt charge pressure control solenoid valve -2- from air duct
-1-. Do not disconnect hoses.
- Remove air duct-1-between charge air cooler and intake
manifold.
- Remove air intake hose between charge air cooler and
turbocharger.
Vehicles with air conditioner:
- Remove ribbed belt => Page 13-11.
- Remove lower section of air cleaner housing.
- Disconnect connector on A/C compressor.
Warning!
The air conditioner refrigerant circuit must not be opened.
- Remove A/C compressor and secure to body with wire.
All models
-
Õ Unscrew bolts securing turbocharger to catalytic converter
-arrows-.
- Disconnect front exhaust pipe with catalytic converter from
turbocharger.
Note:
Secure the flange of the front exhaust pipe to the right
suspension turret with wire. It is then not necessary to remove
the front exhaust pipe.
900058 Type
4A
Type description
-
Õ Disconnect wires/unplug connectors as follows:
1 -Injection pump
2 -Injection pump
3 -Wiring for engine speed sender -G28
4 -Needle lift sender -G80
5 -Coolant temperature sender -G62
6 -Electronic thermo switch -F76
7 -Oil pressure switch -F1
8 -Oil temperature sender -G8
- Unplug connectors from glow plugs.
- Unplug connector from speedometer sender -G22 on left of
gearbox, and move wire clear.
900058 Type
4A
Type description
- Unplug connector for reversing light switch on gearbox, and
move wire clear.
All models
-
Õ Disconnect diesel supply and return pipes -arrows- at injection
pump and move clear to one side.
Note:
Use clean plugs to block off the pipes.
-
Õ Disconnect coolant hoses -arrows-.
- Remove hose with non-return valve from exhauster pump.
- Unscrew upper engine/gearbox securing bolts. Leave one bolt
in place (hand-tight).
Vehicles with manual gearbox:
4A
-
Õ Unscrew top nuts -arrow- on left and right engine mounts.
-
Õ Position support bar 10-222 A on bolted flanges of wing panels
-arrows-.
Note:
Support bar must be positioned behind gas strut for bonnet, and
spindles must face forwards.
- Engage gearbox support 3147 in top right bolt hole in bell
housing on gearbox, as illustrated.
Notes:
‹ The height of the gearbox can be adjusted via the wing nut on
the lifting hook.
‹ Do not overtension, otherwise the pressure pipe for the clutch
slave cylinder could be damaged (on manual gearbox).
‹ The illustration shows the engine removed.
-
Õ Attach lifting tackle 2024 A to engine and hook onto workshop
crane V.A.G 1202 A.
Note:
To balance the centre of gravity of the engine, position the hook
attachments as shown in the illustration.
Warning
The hook attachments and locating pins on the lifting tackle
must be secured with locking pins (arrows in illustration).
- Remove the last securing bolt.
Note:
Check that all hoses and other connections between engine and
body have been detached.
- Lift engine over studs of engine mounts.
- Tighten spindle of support bar 10-222 A.
- Raise engine carefully and lift out.
Vehicles with automatic gearbox
- Secure torque converter in gearbox to prevent it falling out.
Attaching engine to engine stand
Special tools and workshop equipment required
‹ Engine and gearbox support VW 540
Work sequence
Õ When working on the engine, secure it to the engine stand using
engine bracket VW 540.
Installing
Installation is carried out in the reverse order, when doing this
note the following:
Notes:
‹ When performing repairs, renew seals, gaskets, self-locking
nuts and bolts which have a specified tightening angle.
‹ Secure all hose connections with the correct hose clips (same
as original equipment)
=> Parts catalogue
- Check whether the two dowel sleeves for centring engine and
gearbox are in the cylinder block, install if necessary.
- Push intermediate plate onto dowel sleeves.
Vehicles with manual gearbox
- Clean input shaft splines and (in the case of used clutch plates)
the hub splines. Remove corrosion and apply only a very thin
coating of grease G 000 100 to the splines. Do not grease
guide sleeve.
- Check clutch release bearing for wear and renew if necessary.
- Check that clutch plate is properly centred in vehicles with
manual gearbox.
- A needle bearing must be fitted in the crankshaft on vehicles
with manual gearbox. Install needle bearing if necessary =>
Page 13-53.
Vehicles with automatic gearbox
- In vehicles with automatic gearbox, no needle bearing must be
fitted in the crankshaft. Remove needle bearing if necessary
=> Page 13-53.
- To secure the torque converter on the drive plate only use the
correct nuts as specified in the parts catalogue.
=> Parts catalogue
- Tighten torque converter nuts with special tool Matra V/175.
- Before installing engine, rotate torque converter and drive plate
so that one hole and one stud are level with the aperture for the
starter motor.
Checking position of torque converter
Õ If the torque converter has been installed correctly, distance-A
-between the joint surface on the torque converter bellhousing
and the bottom contact surface on the torque converter studs
should be approx 23 mm.
If the torque converter has not been installed properly, the
distance will be about 13 mm.
If the torque converter is incorrectly inserted in the gearbox,
the driver of the torque converter or the ATF pump will be
severely damaged when the gearbox is attached to the
engine.
- Check ATF level:
=> Automatic gearbox 01N; Repair group 37; Checking and
changing ATF; Checking ATF level and topping up ATF=>
All models
- Ensure that engine mounts are free of stress by shaking engine
to align it before tightening engine mounts.
- Allow stop for torque reaction support to rest on rubber buffer
for torque reaction support under its own weight, and tighten
bolts.
- Install ribbed belt =>Page 13-12.
- Fill up with coolant=> Page 19-7.
1Z CUT
‹ Drained-off coolant may only be used again if the original
cylinder head or cylinder block are re-installed.
‹ Coolant must not be used again if it is dirty.
- Stress-free alignment of exhaust system => Page 26-10.
- Electrical connections and routing:
=> Current flow diagrams, Electrical fault finding and Fitting
locations
- Connect EGR hoses and pipes => Diagram of vacuum hose
connections, Page 26-15.
- Connect hoses and pipes for charge pressure control system
=> Diagram of connections, Page 21-2.
- After connecting battery, enter anti-theft code for radio
=> Radio operating instructions
The electronic control units can be damaged if a rapid
charger is used to start the engine.
- Close windows fully using electric window switches.
- Then operate all electric window switches again for at least one
second in the "close" direction to activate the automatic one
-touch function.
- Set clock to correct time.
- Check oil level before starting engine.
- Interrogate fault memory:
=> Diesel direct injection and glow plug system (4-cyl. TDI);
Repair group 01; Interrogating and erasing fault memory=>
Note:
Faults will have been stored in the memory because connectors
have been unplugged. Therefore interrogate and erase fault
memory after installing engine.
Notes:
Tightening torques
Notes:
‹ The tightening torques listed on this page apply only to lightly
greased, oiled, phosphated, or black-finished nuts and bolts.
‹ Additional lubricant such as engine or gearbox oil may be
used, but do not use graphite lubricant.
‹ Do not use degreased parts.
‹ Tolerance for tightening torques is ±15%.
Õ Engine/gearbox mountings (manual gearbox)
Item No. Bolt Nm
1, 3, 4 M12 x 67 65
2, 6 M12 x 90 65
5, 11 M12 x 110 65
7, 8 1), 9, 10 M10 x 45 45
1)M8 bolt fitted up to approx. 07.96: tightening torque 25 Nm
A: centering sleeves
Õ Engine/gearbox mountings (automatics)
Item No. Bolt Nm
1, 8, 9, 10 M10 x 45 45
2, 3, 4, 11 M12 x 67 65
5 M12 x 110 65
6 M12 x 90 65
7 M10 x 60 45
A: centering sleeves
Component Nm
Bolts/nuts M6 10
M8 20
M10 45
M12 65
Except for the following:
Engine mount to subframe 25
Engine support to engine mount 25
Torque reaction support M8 20
M10 40
Drive plate to
torque converter M10 x1 85
A/C compressor to compressor bracket 25
Power steering pump to bracket 25
Catalytic converter to turbocharger 25
Hose clamps 2
Dismantling and assembling engine
Ribbed belt drive for alternator, V-belt drive for coolant
pump and vane pump
Notes:
‹ The following illustration shows the belt drive on vehicles
without air conditioner.
‹ Mark the direction of rotation before removing the ribbed belt.
If the belt rotates in the wrong direction when it is refitted, this
can cause breakage. Ensure that the belt is properly seated in
the pulleys when installing.
1 - V-belt
‹ For coolant pump
‹ For vane pump
‹ Check for wear
‹ Removing and installing
=> Page 13-9
2 - 25 Nm
‹ If necessary, brace pulley with
strap wrench (oil filter wrench) when
loosening and tightening.
3 - Bolt
‹ Bolt with strength rating 8.8:
tighten to 25 Nm
‹ Bolt with strength rating 10.9:
tighten to 35 Nm
=> Parts catalogue
‹ If necessary, brace pulley with
strap wrench (oil filter wrench) when
loosening and tightening.
4 - Pulley
‹ For vibration damper
‹ V-belt version
5 - Ribbed belt
‹ Check for wear
‹ Removing and installing
=> Page 13-11
6 - Cover cap
‹ Prise off with screwdriver
7 - Tensioning roller
‹ For ribbed belt
‹ Removing and installing ribbed
belt => Page 13-11
8 - 65 Nm
‹ If necessary, brace pulley with
strap wrench (oil filter wrench) when
loosening and tightening.
9 - Pulley
‹ For alternator
‹ For ribbed belt
10 - 25 Nm
11 - Alternator
‹ Removing:
- Disconnect battery earth strap
- Remove ribbed belt
- Loosen bolts on alternator (top and
bottom)
- Detach alternator and unscrew
wiring connections
‹ To facilitate positioning of
alternator, knock back bush for
bottom retaining bolt on bracket
slightly
12 - Lever
‹ For tensioning roller
‹ Engage flats on end of lever in
tensioning element -Item 17-
13 - 25 Nm
14 - Seal
15 - 25 Nm
16 - 10 Nm
17 - Tensioning element
‹ Removing:
- Remove ribbed belt
=>Page 13-11.
‹ Engage on flats on lever for
tensioning roller -Item 12-
18 - Bracket
‹ For alternator
19 - 25 Nm
20 - Vibration damper
‹ For ribbed belt
‹ With pulley for V-belt
‹ Can only be installed in one
position. Holes are off-set
21 - Coolant pump
‹ Check that pump runs freely
‹ Removing and installing
=> Page 19-11
22 - Bolt
‹ Bolt with strength rating 8.8:
tighten to 25 Nm
‹ Bolt with strength rating 10.9:
tighten to 35 Nm
=> Parts catalogue
23 - Bracket
‹ For vane pump
24 - Bolt/nut
‹ Bolt with strength rating 8.8:
tighten to 25 Nm
‹ Bolt with strength rating 10.9:
tighten to 35 Nm
‹ Tighten nut to 25 Nm
=> Parts catalogue
25 - 25 Nm
26 - Rear bracket
‹ For vane pump
27 - Vane pump
‹ For power steering
‹ Removing and installing:
=> Running gear, Front-wheel drive and
four-wheel drive; Repair Group 48;
Assembly overview: Vane pump;
Vehicles with 4-cylinder engine
28 - 25 Nm
29 - Frontbracket
‹ For vane pump
30 - Retainer
31 - 25 Nm
32 - Bolt - 25 Nm
‹ With tensioner nut
33 - Pulley
‹ For vane pump
‹ V-belt version
34 - 25 Nm
‹ If necessary, brace pulley with
strap wrench (oil filter wrench) when
loosening and tightening.
35 - 25 Nm
36 - Pulley
‹ For coolant pump
‹ V-belt version
Ribbed belt drive for alternator, V-belt drive for coolant
pump and vane pump
Notes:
‹ The following illustration shows the belt drive on vehicles
without air conditioner.
‹ Mark the direction of rotation before removing the ribbed belt.
If the belt rotates in the wrong direction when it is refitted, this
can cause breakage. Ensure that the belt is properly seated in
the pulleys when installing.
1 - V-belt
‹ For coolant pump
‹ For vane pump
‹ Check for wear
‹ Removing and installing
=> Page 13-9
2 - 25 Nm
‹ If necessary, brace pulley with
strap wrench (oil filter wrench) when
loosening and tightening.
3 - Bolt
‹ Bolt with strength rating 8.8:
tighten to 25 Nm
‹ Bolt with strength rating 10.9:
tighten to 35 Nm
=> Parts catalogue
‹ If necessary, brace pulley with
strap wrench (oil filter wrench) when
loosening and tightening.
4 - Pulley
‹ For vibration damper
‹ V-belt version
5 - Ribbed belt
‹ Check for wear
‹ Removing and installing
=> Page 13-11
6 - Cover cap
‹ Prise off with screwdriver
7 - Tensioning roller
‹ For ribbed belt
‹ Removing and installing ribbed
belt => Page 13-11
8 - 65 Nm
‹ If necessary, brace pulley with
strap wrench (oil filter wrench) when
loosening and tightening.
9 - Pulley
‹ For alternator
‹ For ribbed belt
10 - 25 Nm
11 - Alternator
‹ Removing:
- Disconnect battery earth strap
- Remove ribbed belt
- Loosen bolts on alternator (top and
bottom)
- Detach alternator and unscrew
wiring connections
‹ To facilitate positioning of
alternator, knock back bush for
bottom retaining bolt on bracket
slightly
12 - Lever
‹ For tensioning roller
‹ Engage flats on end of lever in
tensioning element -Item 17-
13 - 25 Nm
14 - Seal
15 - 25 Nm
16 - 10 Nm
17 - Tensioning element
‹ Removing:
- Remove ribbed belt
=>Page 13-11.
‹ Engage on flats on lever for
tensioning roller -Item 12-
18 - Bracket
‹ For alternator
19 - 25 Nm
20 - Vibration damper
‹ For ribbed belt
‹ With pulley for V-belt
‹ Can only be installed in one
position. Holes are off-set
21 - Coolant pump
‹ Check that pump runs freely
‹ Removing and installing
=> Page 19-11
22 - Bolt
‹ Bolt with strength rating 8.8:
tighten to 25 Nm
‹ Bolt with strength rating 10.9:
tighten to 35 Nm
=> Parts catalogue
23 - Bracket
‹ For vane pump
24 - Bolt/nut
‹ Bolt with strength rating 8.8:
tighten to 25 Nm
‹ Bolt with strength rating 10.9:
tighten to 35 Nm
‹ Tighten nut to 25 Nm
=> Parts catalogue
25 - 25 Nm
26 - Rear bracket
‹ For vane pump
27 - Vane pump
‹ For power steering
‹ Removing and installing:
=> Running gear, Front-wheel drive and
four-wheel drive; Repair Group 48;
Assembly overview: Vane pump;
Vehicles with 4-cylinder engine=>
28 - 25 Nm
29 - Frontbracket
‹ For vane pump
30 - Retainer
31 - 25 Nm
32 - Bolt - 25 Nm
‹ With tensioner nut
33 - Pulley
‹ For vane pump
‹ V-belt version
34 - 25 Nm
‹ If necessary, brace pulley with
strap wrench (oil filter wrench) when
loosening and tightening.
35 - 25 Nm
36 - Pulley
‹ For coolant pump
‹ V-belt version
Removing and installing V-belt
-
Õ Slacken bolts 2 ... 6.
- Slacken V-belt by turning tensioner nut -1-.
- Remove V-belt.
Installation is performed in the reverse order.
- Check that V-belt is properly seated.
- Routing of belt=>Page 13-13
- Tensioning V-belt=>Page 13-10.
Tensioning V-belt
-
Õ Slacken bolts 2 ... 6.
- Adjust belt tension with tensioner nut -1-.
- Check tension of V-belt:
- Press in the belt firmly with the thumb at a point half-way
between the pulleys with the longest run of belt.
The amount of yield should be as follows:
V-belt for coolant pump and and vane pump Belt yield (max.)
‹ New V-belt 2 mm
‹ Used V-belt 5 mm
- TIghten securing bolts on vane pump.
Tightening torques
Component Nm
Vane pump to bracket 25
Vane pump to tensioning bar 25
Removing and installing ribbed belt
Removing
Note:
Mark the direction of rotation with chalk or felt pen before
removing the ribbed belt. If the belt rotates in the wrong direction
when it is refitted, it may break.
- Remove V-belt=>Page 13-9.
- Detach cover cap -Item 6-, Page 13-3, from tensioning roller.
-
Õ To slacken ribbed belt tensioning roller, apply 17 mm socket
with extension to central nut.
- To slacken ribbed belt, turn tensioning element in direction of
arrow.
- Remove ribbed belt and release tensioning element.
-
Õ Turn ribbed belt tensioning element in direction of arrow.
- Fit ribbed belt over alternator pulley last. Release tensioning
element.
Note:
Ensure that the ribbed belt is properly seated in the pulleys when
installing.
- Install V-belt=>Page 13-9.
- Routing of belts=>Page 13-13
- Press on cover cap -Item 6-, Page 13-3, for tensioning roller.
- Start engine and check that belts run properly.
Installing
- Fit ribbed belt over crankshaft pulley and tensioning element.
Routing of belts
-
Õ Routing of ribbed belt on vehicles without air conditioner.
-
Õ Routing of ribbed belt on vehicles with air conditioner.
Toothed belt drive
Note:
Mark the direction of rotation with chalk
or felt pen before removing the toothed
belt. If a used belt rotates in the wrong
direction when refitted, this can result in
breakage.
1 - Toothed belt guard - top
‹ When installing, engage carefully
in bottom toothed belt guard
2 - Toothed belt
‹ Mark direction of rotation with
chalk or felt pen before removing
‹ Check for wear
‹ Removing=>Page 13-20
‹ Installing=>Page 13-26
3 - 20 Nm
4 - Tensioning roller
‹ Checking semi-automatic toothed
belt tensioning roller
=> Page 13-30
‹ Position
=>Fig.1, Page 13-18
5 - 45 Nm
‹ Counter-hold with 3036 to loosen
and tighten
6 - Camshaft sprocket
‹ Release from camshaft taper by
tapping with a hammer (using a drift
through toothed belt guard opening)
7 - 25 Nm
8 - Idler roller
9 - 10 Nm
10 - Toothed belt guard - rear
11 - 10 Nm
12 - 25 Nm
13 - Woodruff key
‹ Check proper seating
14 - Injection pump sprocket
‹ Removing injection pump sprocket
=>Fig. 3, Page 13-19
‹ Check that Woodruff key is fitted
correctly
15 - Intermediate shaft sprocket
‹ Installation position
=>Fig. 2, Page 13-18
‹ Check that Woodruff key is fitted
correctly
16 - Crankshaft sprocket
‹ Contact surface between sprocket
and crankshaft must be free of oil.
‹ Can only be installed in one
position.
17 - 90 Nm + 1/4 turn (90 °) further
‹ Renew
‹ Do not use oil
‹ Use counter-hold tool 3099 or
3415 to loosen and tighten
‹ Bolting on counter-hold tool 3099
=> Page 13-39
18 - 45 Nm
‹ Use counter-hold tool 3036 to
loosen and tighten
19 - 45 Nm
20 - 10 Nm
21 - Toothed belt guard - bottom
‹ To remove, unbolt vibration
damper
22 - Spreader clip
900058 Type
4A
Type description
1Z CUT
Õ Fig.1Position of semi-automatic tensioning roller
The retaining lug must fit in the opening in the rear toothed belt
guard.
Õ Fig.2Installation position of intermediate shaft sprocket
‹ The wider rim -arrows- of the intermediate shaft sprocket is at
the front.
‹ The side of the sprocket with the lettering is at the rear.
900058 Type
4A
Type description
1Z CUT
Õ Fig.3Removing injection pump sprocket
z Toothed belt removed => Page 13-20
- Unscrew nut for injection pump sprocket.
- Release arms of puller 3032 and apply puller.
- Align arms of puller with holes in injection pump sprocket and
secure.
- Apply tension to injection pump sprocket by tightening puller.
- Release injection pump sprocket from taper of injection pump
by lightly tapping spindle of puller (hold sprocket while doing
this so it does not fall out).
Removing and installing toothed belt
Special tools and workshop
equipment required
‹ Mandrel 2064
‹ Setting bar 2065 A
‹ Retainer 3036
‹ Special tool Matra V/159
900058 Type
4A
Type description
-
Õ Remove engine cover panel -arrows-.
- Remove V-belt=>Page 13-9.
- Remove ribbed belt => Page 13-11.
-
Õ Unbolt pulley with vibration damper.
Removing
-
Õ Remove top and bottom sections of toothed belt guard -arrows-.
900058 Type
4A
Type description
-
Õ Turn crankshaft to TDC No. 1 cylinder -arrow- (vehicles with
manual gearbox).
-
Õ Turn crankshaft to TDC No. 1 cylinder -arrow- (vehicles with
automatic gearbox).
Note:
Turning crankshaft to TDC No. 1 cylinder with engine
removed=> page 13-31.
- Remove cylinder head cover =>Page 15-8.
900058 Type
4A
Type description
-
Õ Lock camshaft using setting bar 2065 A.
-
Õ Centralize setting bar as follows:
With setting bar in position, turn camshaft so that one end of
setting bar contacts cylinder head. Using feeler gauge,
measure gap at other end of setting bar. Insert a feeler gauge
corresponding to half the measured gap between setting bar
and cylinder head. Now turn camshaft until setting bar contacts
feeler gauge. Place a 2nd feeler gauge, of the same thickness,
at the other end between setting bar and cylinder head.
-
Õ Lock injection pump sprocket with pin 2064.
- Mark direction of rotation of toothed belt with chalk or felt pen.
- Loosen tensioning roller.
- Remove idler wheel.
- Take off toothed belt.
Installing (adjusting valve timing)
z Camshaft locked in position with setting bar.
z Injection pump locked in position with pin 2064.
Notes:
‹ The position of the toothed belt must be set as described
below, even after repairs in which the belt is only taken off the
camshaft sprocket.
‹ The crankshaft must not be at TDC at any cylinder when the
camshaft is turned. Otherwise there is a risk of damage to
valves and piston crowns.
‹ Never use the setting bar to hold the camshaft when
loosening and tightening the bolt securing the camshaft
sprocket. Counter-hold with 3036.
-
Õ Loosen camshaft sprocket securing bolt 1/2 turn. Release
camshaft sprocket from camshaft taper by tapping with a
hammer (using a drift through rear toothed belt guard opening).
- Check again whether TDC mark on flywheel and reference
mark are aligned.
- Fit toothed belt (check direction of rotation) on crankshaft
sprocket, intermediate shaft sprocket, injection pump sprocket
and tensioning roller.
- Fit camshaft sprocket together with toothed belt and locate with
securing bolt (camshaft sprocket can still turn).
- Install idler wheel.
-
Õ Using a suitable wrench (e.g. Matra V/159), turn eccentric
mounting on tensioning roller clockwise until notch aligns with
raised portion (arrows).
Note:
If the eccentric mounting is turned too far to the right (by mistake)
, slacken completely before re-tensioning.
- Tighten lock nut on tensioning roller to 20 Nm.
- Check again whether TDC mark on flywheel and reference
mark are aligned.
- Tighten bolt securing camshaft sprocket to 45 Nm.
Note:
On no account use the setting bar to hold the camshaft when
loosening and tightening the bolt securing the camshaft sprocket.
Counter-hold with 3036.
- Remove setting bar.
- Remove pin 2064.
- Turn crankshaft two full revolutions in normal direction of
rotation and set again to TDC No. 1 cylinder.
-
Õ Check tension of toothed belt.
- Markings -arrows- should be in line.
- Re-tension toothed belt if necessary.
- Check whether injection pump sprocket can be locked with pin
2064.
- Check position of camshaft with setting bar.
Note:
If the setting bar or pin do not fit in place, repeat adjustment
procedure.
- Remove setting bar.
- Remove pin 2064.
- Install ribbed belt =>Page 13-12.
- Install V-belt=>Page 13-9.
- Check injection pump commencement of delivery (dynamic)
=> Diesel direct injection and glow plug system (4-cylinder TDI);
=> Repair group 23; Servicing diesel direct injection system;=>
=> Dynamically checking and adjusting commencement of
injection
Tightening torques
Component Nm
Toothed belt sprocket to camshaft 45
Idler wheel to console 25
Semi-automatic tensioning roller to cylinder block
20
Bottom section of toothed belt guard to cylinder block
10
Vibration damper with 8.8 25
pulley to crankshaft 10.9 35
Checking semi-automatic toothed belt tensioning roller
Test requirements
z Toothed belt in position and tensioned.
Test sequence
-
Õ Tension toothed belt with firm thumb pressure.
Notch and raised portion -arrows- must move apart.
- Release thumb pressure on toothed belt. The tensioning roller
should move back to its initial position.
- Markings -arrows- should be in line.
Turning crankshaft to TDC with engine removed
Special tools and workshop equipment required
‹ Adjustment bar 2068 A for top dead centre
Vehicles with manual gearbox
z Oil filter removed.
-
Õ Fit TDC adjuster gauge 2068 A with screw as illustrated.
- Set adjuster gauge to 107 mm (the reference point is the left
notch of the vernier -arrow-).
- Turn crankshaft until TDC marking "0" on flywheel coincides
with end of adjuster gauge.
Vehicles with automatic gearbox
z Oil filter removed.
-
Õ Fit TDC adjuster gauge 2068 A with screw as illustrated.
- Set adjuster gauge to 99 mm -arrow- (the reference point is the
left notch of the vernier -arrow-).
- Turn crankshaft until TDC marking "0" on drive plate coincides
with end of adjuster gauge.
Note:
TDC marking "0" is stamped into the cylinder block side of the
drive plate.
Removing and installing sealing
flanges and flywheel/drive plate
Note:
For repairs to the clutch:
=> 5-Speed manual gearbox 012/01W,
Front-wheel drive; Repair group 30;
Servicing clutch=>
1 - Oil seal
‹ To remove, remove sealing flange
-Item 27-
‹ Install with 10-203
‹ Lightly oil sealing lip
2 - Intermediate shaft sprocket
‹ Installation position
=>Fig. 1, Page 13-38
‹ Check position of Woodruff key
-Item 25-
3 - 45 Nm
‹ Use counter-hold 3036 to loosen
and tighten
4 - 25 Nm
5 - Oil seal
‹ Renewing => Page 13-39
‹ Lightly oil sealing lip of oil seal
6 - 10 Nm
7 - Front sealing flange
‹ Before fitting sump, apply a small
amount of sealant
"AMV 174 004 01"to sealing points
between sealing flange and cylinder
block
8 - Gasket
‹ Renew
900058 Type
4A
Type description MY
9 - Cylinder block
‹ Removing and installing crankshaft
=> Page 13-48
‹ Dismantling and assembling
pistons and conrods
=> Page 13-57
10 - Vacuum pump
‹ For brake servo
11 - O ring
‹ Renew
12 - Cover
13 - 10 Nm
14 - 20 Nm
15 - Bracket
‹ For exhauster
16 - O ring
‹ Renew
900058 Type
4A
Type description MY
17 - Oil seal
‹ Renew
18 - 10 Nm
19 - Rear sealing flange
‹ With oil seal
‹ Only renew complete
‹ Lightly oil sealing lip of oil seal
‹ Before fitting sump, apply a small
amount of sealant
"AMV 174 004 01"to sealing points
between sealing flange and cylinder
block
20 - Gasket
‹ Only install gasket if sealing flange
has no sealing lip on cylinder block
side
21 - Flywheel/drive plate
‹ Removing and installing flywheel
=> Page 13-44
‹ Removing and installing drive plate
=>Page 13-45
900058 Type
4A
Type description MY
22 - 60 Nm + 1/4turn (90 °) further
‹ Renewing
23 - Intermediate plate
‹ Must be located on dowel sleeves
‹ Do not damage orbend when
assembling
24 - Intermediate shaft
‹ Axial clearance max. 0.25 mm
25 - Woodruff key
‹ Check that Woodruff key is fitted
correctly
26 - O ring
‹ Renew
27 - Sealing flange for intermediate
shaft
28 - 25 Nm
900058 Type
4A
Type description
1Z CUT
Õ Fig.1Installation position of intermediate shaft sprocket
‹ The wider rim -arrows- of the intermediate shaft sprocket is at
the front.
‹ The side of the sprocket with the lettering is at the rear.
Renewing crankshaft oil seal - pulley
end -
Special tools and workshop
equipment required
‹ Oil seal extractor 2085
‹ Oil seal fitting tool 3083
‹ Counter-hold tool (retainer) 3099
4A
- Remove ribbed belt => Page 13-11.
- Remove toothed belt => Page 13-20.
-
Õ Remove crankshaft toothed belt sprocket. To do this counter
-hold sprocket with 3099.
Note:
Special tool 3415 can be used instead.
-
Õ Screw cheese-head bolt from 3083 five or six turns into
crankshaft before applying oil seal extractor.
- Unscrew inner part of the oil seal extractor 2085 two turns
(approx. 3 mm) out of the outer part and lock with knurled
screw.
Removing
z Engine in vehicle
- Remove V-belt=>Page 13-9.
900058 Type
4A
Type description
-
Õ Lubricate threaded head of oil seal extractor, place it in position
and, exerting firm pressure, screw it as far as possible into oil
seal.
- Loosen knurled screw and turn inner part against crankshaft
until the oil seal is pulled out.
- Clamp flats of oil seal extractor in vice. Remove oil seal with
pliers.
- Clean contact surface and sealing surface.
Installing
- Lightly oil sealing lip of oil seal.
-
Õ Place guide sleeve from 3083 onto crankshaft journal.
- Slide oil seal over guide sleeve.
4A
-
Õ Press oil seal in onto stop using press sleeve and bolt from
3083.
- Renew bolt for toothed belt sprocket.
- Install crankshaft sprocket and lock in position with retainer
3099.
Notes:
‹ Contact surface between toothed belt sprocket and crankshaft
must be free of oil.
‹ Do not grease bolt for toothed belt sprocket.
- Install toothed belt (adjust valve timing) => Page 13-26.
- Allow stop for torque reaction support to rest on rubber buffer
for torque reaction support under its own weight, and tighten
bolts.
- Install ribbed belt =>Page 13-12.
- Install V-belt=>Page 13-9.
Tightening torques
Component Nm
Toothed belt sprocket to crankshaft 90 + 90°1)2)
Torque reaction support M8 20
M10 40
1)Renew bolt
2)90° is a quarter turn
Removing and installing flywheel/ drive plate
Flywheel
Special tools and workshop equipment required
‹ Counter-hold tool 10-201
Work sequence
-
Õ Reverse position of retainer 10-201 for loosening/tightening
bolts.
- Mark position of flywheel relative to engine.
- Renew bolts.
Tightening torque
Component Nm
Flywheel to crankshaft 60 + 90°1)
1)90°= 1/4turn
900058 Type
4A
Type description
‹ Counter-hold tool VW 558
‹ Hexagon bolt M8 x 45 and two M10 hexagon nuts
‹ Depth gauge
Removing
-
Õ Secure counter-hold tool VW 558 to the drive plate with a
hexagon bolt M8x45. Place two M10 hexagon nuts -1- between
counter-hold tool and drive plate.
- Mark position of drive plate relative to engine.
- Loosen securing bolts on drive plate.
Drive plate
Special tools and workshop equipment required
900058 Type
4A
Type description
-
Õ Locate drive plate with shim -2- and packing plate -1- .The lug
-arrow- must face towards torque converter.
- Insert at least 3 old securing bolts and tighten to 30 Nm.
-
Õ Measure distance -a- at three points and calculate average
value.
- Specified distance: 26 ... 28 mm
If the specification is exceeded:
Installing
900058 Type
4A
Type description
-
Õ Remove drive plate again and install without shim -2-. Tighten
bolts to 30 Nm again.
- Measure distance again.
If the specification is attained:
- Fit new bolts and tighten.
Tightening torque
Component Nm
Drive plate to crankshaft 60 + 90°1)
1)90°= 1/4turn
Removing and installing crankshaft
Note:
Secure engine to engine bracket VW
540 on assembly stand when
dismantling/assembling engine.
1 - Thrust washers
‹ For bearing 3
‹ Different versions for cylinder
block and bearing cap
‹ Note fixing arrangement
2 - Bearing shell
‹ Bearing shell with oil groove for
cylinder block
‹ Do not interchange used bearing
shells (mark with waterproof pen)
3 - Crankshaft
‹ Axial clearance new: 0.07...0.17
mm
Wear limit: 0.37 mm
‹ Check radial clearance with
Plastigage
New: 0.03...0.08 mm
Wear limit: 0.17 mm
‹ Do not rotate the crankshaft when
checking the radial clearance
‹ Crankshaft dimensions
=> Page 13-56
4 - Bearing shell
‹ Bearing shell without oil groove for
bearing cap
‹ Do not interchange used bearing
shells (mark with waterproof pen)
5 - Thrust washers
‹ For bearing 3 bearing cap
‹ Different versions for cylinder
block and bearing cap
‹ Note fixing arrangement
6 - 65 Nm + 1/4turn (90 °) further
‹ Renewing
‹ When measuring radial clearance
of crankshaft, tighten to 65 Nm but
do not turn further
7 - Bearing cap
‹ Bearing cap 1: Pulley end
‹ Bearing cap 3 with recesses for
thrust washers
‹ Bearing shell retaining lugs
(cylinder block/bearing cap) must be
on the same side
8 - 10 Nm + 1/4 turn (90 °) further
‹ Renew
‹ Always renew sender wheel if
bolts have been unscrewed
=>Fig.1, Page 13-52
9 - Needle bearing
‹ Pulling out and driving in
=> Page 13-53
10 - Sender wheel
‹ For engine speed sender (G28)
‹ Can only be installed in one
position. Holes are off-set
‹ Always renew sender wheel if
securing bolts have been
unscrewed
‹ Removing and installing
=>Fig. 1, Page 13-52
11 - Fitted pin
‹ Checking projection from
crankshaft=>Fig. 2, Page 13-52
4A 1Z CUT
Õ Fig.1Removing and installing sender wheel
- Always renew sender wheel -2- if securing bolts -1- have been
unscrewed.
Notes:
‹ If the securing bolts are tightened a second time, the seats for
the countersunk bolt heads in the sender wheel will be distorted
to such an extent that the bolt heads will come into direct
contact with the crankshaft -3- (-arrows-) and the sender wheel
will only fit loosely under the bolts.
‹ The mounting holes are asymmetrically spaced, so it is only
possible to install the sender wheel in one position.
Tightening torque
Component Nm
Sender wheel to crankshaft 10 + 90° 1)2)
1)Renew bolts
2)90° is a quarter turn
Õ Fig. 2Checking dowel pin projection out of crankshaft
Dowel pin projection -3- out of crankshaft
‹ a =2.5...3.0 mm
Removing and installing needle bearing in crankshaft
Special tools and workshop equipment required
‹ Drift VW 207 C
‹ Special tool Kukko 21/1 (Item 1) and Kukko 22/1 (Item 4)
Notes:
‹ A needle bearing must be fitted in the crankshaft on vehicles
with manual gearbox. Install needle bearing if necessary.
‹ The needle bearing must not be fitted in the crankshaft on
vehicles with automatic gearbox. Remove needle bearing if
necessary.
900058 Type
4A
Type description
-
Õ Pull out needle bearing using Kukko 21/1 and Kukko 22/1.
Installing
-
Õ Knock in with drift VW 207 C or centring mandrel 3176.
- Lettering on needle bearing must be visible when installed.
Removing
4A 1Z
Õ Installation depth for needle bearing
‹ Distance a = 1.5 mm
Crankshaft dimensions
(in mm)
Honing dimension Main journal dia. Conrod journal
dia.
-0.022 -0.022
Basic dimension 54.00 47.80
-0.042 -0.042
-0.022 -0.022
1st undersize 53.75 47.55
-0.042 -0.042
-0.022 -0.022
2nd undersize 53.50 47.30
-0.042 -0.042
-0.022 -0.022
3rd undersize 53.25 47.05
-0.042 -0.042
Dismantling and assembling pistons
and conrods
Note:
Vehicles can be fitted with two different
types of conrods:
‹ Conrods with fitted pin -item 8-: use
conrod bolts without centring location.
‹ Conrods without fitted pin: use conrod
bolts with centring location(fitted bolts).
1 - 7 Nm
‹ Version fitted>06.96
‹ Apply sealant AMV 188 001 02
when installing
2 - Oil spray jet
‹ For piston cooling
‹ Version fitted>06.96
‹ With pressure relief valve
(opens at 1.3 ... 1.6 bar)
3 - Pressure relief valve, 27 Nm
‹ Version fitted 07.96>(phased in)
‹ opens at:
1.3 ... 1.6 bar
‹ Do not apply locking fluid
4 - Oil spray jet
‹ For piston cooling
‹ Version fitted 07.96>(phased in)
5 - Bearing shell
‹ Note installation position
‹ Do not interchange used bearing
shells (mark with waterproof pen)
‹ Ensure retaining lugs fit tightly in
recesses
‹ Axial clearance
Wear limit: 0.37 mm
‹ Check radial clearance with
Plastigage:
Wear limit: 0.08 mm
Do not rotate crankshaft when
checking radial clearance
6 - Cylinder block
‹ Checking cylinder bores
=>Fig. 4, Page 13-64
‹ Piston and cylinder dimensions
=>Page 13-68
7 - Bearing shell
‹ Note installation position
‹ Do not interchange used bearing
shells (mark with waterproof pen)
‹ Ensure retaining lugs fit tightly in
recesses
‹ Axial clearance
Wear limit: 0.37 mm
‹ Check radial clearance with
Plastigage:
Wear limit: 0.08 mm
Do not rotate crankshaft when
checking radial clearance
8 - Fitted pin
‹ See note
=>Page 13-57
‹ The fitted pin must seat securely in
the conrod, not in the bearing cap
9 - Conrod
‹ See note
=>Page 13-57
‹ Only renew as a set
‹ Mark cylinder number -A-
‹ Installation position:
Marking -B- faces towards pulley
end
10 - Circlip
11 - Piston pin
‹ If difficult to move, heat piston to
approx. 60 °C
‹ Remove and install with VW 222a
12 - Piston
‹ With combustion chamber
‹ Checking=>Fig. 3, Page 13-64
‹ Mark installation position/cylinder
number=> Fig.5, Page 13-65
‹ Renew piston if there are cracks in
piston skirt
‹ Arrow on piston crown points to
pulley end
‹ Install using piston ring clamp
‹ Checking piston projection at TDC
=>Page 13-66
‹ Piston and cylinder dimensions
=>Page 13-68
13 - Piston ring
‹ Offset gaps by 120 °
‹ Remove and install with piston ring
pliers
‹ "TOP" must face towards piston
crown
‹ Checking ring gap
=>Fig. 1, Page 13-63
‹ Checking ring-to-groove clearance
=>Fig. 2, Page 13-63
14 - Conrod bearing cap
‹ Mark cylinder number -A-
‹ Installation position:
Marking -B- faces towards pulley
end
15 - Conrod bolt, 30 Nm + 1/4 turn (90
°) further
‹ See note
=>Page 13-57
‹ Renew
‹ Oil threads and contact surface
‹ To measure radial clearance use
old bolts
4A 1Z
Õ Fig. 1Checking piston ring gap
- Push ring squarely from above down to approx. 15 mm from
bottom end of cylinder.
Piston ring New Wear limit
Dimensions in mm
1st compression ring 0.20...0.40 1.0
2nd compression ring 0.20...0.40 1.0
Oil scraper ring 0.25...0.50 1.0
Õ Fig. 2Checking ring to groove clearance
- Clean groove before checking clearance.
Piston ring New Wear limit
Dimensions in mm
1st compression ring 0.06...0.09 0.25
2nd compression ring 0.05...0.08 0.25
Oil scraper ring 0.03...0.06 0.15
4A Õ Fig. 3Checking piston
- Measure pistons approx. 10 mm from lower edge of skirt, at 90°
to the piston pin axis.
- Deviation from nominal dimension
not more than 0.04 mm
4A 1Z
Õ Fig. 4Checking cylinder bores
Special tools and workshop equipment required
‹ Internal dial gauge 50...100 mm
- Take measurements at 3 positions in both lateral -A- and
longitudinal -B- directions.
- Deviation from nominal dimension
not more than 0.10 mm
4A 1Z CUT
Õ Fig.5Piston installation position and piston/cylinder
allocation
- Mark installation position and cylinder number on inside of
pistons (not on piston crown) with electric scriber or felt-tip pen.
- Pistons in cylinders 1 and 2: larger recess for inlet valve
-arrows- goes towards flywheel end
- Pistons in cylinders 3 and 4: larger recess for inlet valve
-arrows- goes towards pulley end
Note:
On new pistons, allocation to cylinders is shown by a coloured
marking on the piston crown.
‹ Piston for cylinder 1 and 2:
marked 1/2
‹ Piston for cylinder 3 and 4:
marked 3/4
‹ Arrowon piston crown points to pulley end
Checking piston projection at TDC
Special tools and workshop equipment required
‹ Special tool VW 382/7
‹ Special tool VW 385/17
4A 1Z CUT MICLEF
Õ The piston projection at TDC must be measured when installing
new pistons or a short engine. Install the correct cylinder head
gasket for the piston projection - see table below.
Piston projection above top Gasket identification
surface of cylinder block (No. of holes)
0.91 mm ... 1.00 mm 1
1.01 mm ... 1.10 mm 2
1.11 mm ... 1.20 mm 3
4A 1Z
Õ Cylinder head gasket identification
‹ Part No. = arrow 1
‹ Holes = arrow 2
‹ Production code = arrow 3 (can be disregarded)
Notes:
‹ If different values are measured at individual cylinders when
checking piston projection, select the gasket for the highest
value.
‹ Installation position: marking "OBEN / TOP" or Part No. goes
towards cylinder head.
Piston and cylinder dimensions
Honing Piston dia. Cylinder bore
dimension
Basic dimen. mm 79.47 79.51
1st oversize mm 79.72 79.76
2nd oversize mm 79.97 80.01
Removing and installing cylinder head
Notes:
‹ Cylinder heads which have cracks between the valve seats
can continue to be used without reducing service life, provided
there are only small cracks not wider than 0.5 mm.
‹ When fitting a new cylinder head or cylinder head gasket,
drain off all the old coolant and re-fill with new coolant.
‹ The cylinder head on a diesel engine must not be reworked.
‹ When installing an exchange cylinder head with fitted
camshaft, the contact surfaces between tappets and cams
must be oiled after installing the head.
‹ The plastic protectors fitted to protect the open valves must
only be removed immediately before fitting the cylinder head.
‹ Before applying sealant, check updated information:
=> Parts catalogue
1 - Cylinder head
‹ Removing => Page 15-13
‹ Check for distortion
=>Fig. 1, Page 15-6
‹ Installing => Page 15-23
‹ After replacing, fill with fresh
coolant
2 - 25 Nm
3 - Lifting eye
4 - Lower sealing cone
5 - Cylinder head cover gasket
‹ Renew if damaged or leaking
‹ Before fitting gasket apply
AMV 174 004 01at sealing points
=>Fig.3and Fig. 4, Page 15-7
‹ Fit projections into drill holes on
cylinder head
6 - Cylinder head cover
‹ Removing and installing
=> Page 15-8
7 - Upper sealing washer
‹ Renew if damaged
8 - Dished washer
9 - 10 Nm
10 - Cover cap
11 - Gasket
‹ Renew if damaged or leaking
12 - Fillercap
13 - Breather hose
14 - Hose clip
‹ After fitting hose clip on hose,
engage in retaining tab on cylinder
head cover
15 - Pressure regulating valve
‹ For crankcase breather
16 - Gasket
‹ Renew if damaged
17 - Cylinder head bolt
‹ Renew
‹ Note sequence when loosening
=> Page 15-22
‹ Note sequence when tightening
=> Page 15-26
18 - Injector pipes
‹ Tighten to 25 Nm
‹ Remove with 3035
‹ Always remove pipework complete
‹ Do not alter shape
19 - 10 Nm
20 - Coolant flange
‹ With coolant temperature sender
21 - O ring
‹ Renew
22 - Coolant flange
23 - 10 Nm
24 - Connector
‹ For needle lift sender -G80
25 - Return pipe
‹ To injection pump
26 - Cylinder head gasket
‹ Different thicknesses
‹ Note marking
=>Fig. 2, Page 15-6
‹ Renew => Removing cylinder
head, from Page 15-13onwards
‹ Position: Marking "OBEN / TOP"
or Part No. towards cylinder head
‹ After replacing, fill with fresh
coolant
4A 1Z CUT
Õ Fig. 1Checking cylinder head for distortion
- Use knife-edge straightedge and feeler gauge to measure at
several points.
- Max. permissible distortion: 0.1 mm
Note:
Reworking Diesel cylinder heads is not permissible.
4A 1Z CUT
Õ Fig.2Cylinder head gasket identification
‹ Part No. = arrow 1
‹ Holes = arrow 2
‹ Production code = arrow 3 (can be disregarded)
Notes:
‹ Cylinder head gaskets of different thicknesses must be
installed according to the amount of piston projection=>Page
13-66. When only the gasket is being replaced, install a new
gasket with the same identification as the old one.
‹ Installation position: marking "OBEN / TOP" or Part No. goes
towards cylinder head.
4A 1Z CUT
Õ Fig. 3Sealing sides of joint between bearing cap and
cylinder head
- Apply a small quantity of sealant "AMV 174 004 01" to sides of
joints -arrows- on upper sealing surface of cylinder head.
Õ Fig. 4Sealing sides of joint
- Apply a small quantity of sealant "AMV 174 004 01" to sides of
joints -arrows- on upper sealing surface of cylinder head.
Removing and installing cylinder head cover
Removing
-
Õ Remove engine cover panel -arrows-.
-
Õ Slacken hose clamps -arrows- and disconnectcrankcase
breather hoses from pressure control valve.
-
Õ Pull off caps -7-.
- Loosen nuts -6- on cylinder head cover.
- Take off dished washer -5- and upper sealing washer -4-.
- Remove cylinder head cover -3-.
- Remove gasket -2- and lower sealing cone -1-.
If damaged, fit new cylinder head cover gasket, upper sealing
washer and sealing cone.
-
Õ Apply a small quantity of sealant "AMV 174 004 01" to sides of
joints -arrows- on upper sealing surface on cylinder head.
-
Õ Apply a small quantity of sealant "AMV 174 004 01" to sides of
joints -arrows- on upper sealing surface on cylinder head.
- Position cylinder head cover (with attached parts).
Tightening torque
Component Nm
Cylinder head cover to cylinder head 10
Installing
Installation is carried out in the reverse order, when doing this
note the following:
Removing and installing intake manifold
Removing
- Remove turbocharger =>Page 21-29.
-
Õ Slacken hose clamp -1-.
- Unscrew bolts -arrows-.
-
Õ Unscrew nuts -1- and remove heat shield.
- Unscrew bolts -arrows-.
- Remove intake manifold.
Installing
Installation is performed in the reverse order.
Tightening torques
Component Nm
Intake manifold to cylinder head 25
Heat shield to exhaust manifold 25
Mechanical exhaust gas recirculation valve to intake
manifold 25
Removing cylinder head
Special tools and workshop
equipment required
‹ Mandrel 2064
‹ Setting bar 2065 A
‹ Open ring spanner 3035
‹ Counterhold tool 3036
‹ Guide pin 3070
‹ V.A.G 1306
All cable ties which are released or cut open when removing
must be fitted in the same position when installing.
- Obtain radio code on vehicles with coded radio.
- With ignition switched off disconnect battery earth strap.
Warning!
Hot steam can escape when the cap on the expansion tank
is opened. Cover the cap with a cloth, and open it carefully.
- Open cap on coolant expansion tank.
-
Õ Remove engine cover panel -arrows-.
Work sequence
z Engine in vehicle
Note:
-
Õ Remove air intake pipe -arrow- between lock carrier and air
cleaner housing.
-
Õ Disconnect wires/unplug connectors as follows:
1 -Exhaust gas recirculation valve -N18
2 -Air mass meter -G70
4 -Charge pressure control solenoid valve -N75
5 -Intake manifold temperature sender -G72
- Disconnect vacuum hose from mechanical exhaust gas
recirculation valve -3-.
- Disconnect thin hose -6- from bottom of exhaust gas
recirculation valve -N18.
- Move wiring and hoses clear.
- Detach air hose at air mass meter.
4A
- Remove upper section of air cleaner housing together with air
mass meter.
-
Õ Unscrew charge pressure control solenoid valve -2- from air
pipe -1-. Leave hoses connected.
- Remove air pipe -1- between charge air cooler and intake
manifold.
- Remove air intake hose between charge air cooler and
turbocharger.
-
Õ Unscrew bolts securing turbocharger to catalytic converter
-arrows-.
- Disconnect front exhaust pipe with catalytic converter from
turbocharger.
Note:
Tie up flange of front exhaust pipe on right suspension turret with
wire. It is then not necessary to remove front exhaust pipe.
-
Õ Remove noise insulation (two sections -arrows-).
- Place a drip tray underneath.
-
Õ Detach oil return pipe from cylinder block -arrow-.
- Draincooling system=> Page 19-4
-
Õ Disconnect fuel return hose -1- between injectors and injection
pump.
- Disconnect connectors-2 ...5-.
- Disengage connector for engine speed sender from its retainer.
- Disconnect coolant hose at rear of cylinder head -arrow-.
- Remove injector pipes.
Note:
Always remove complete set of injector pipes together. Use
special spanner for injector pipes 3035.
- Unplug connectors from glow plugs.
-
Õ Disconnect coolant hoses -arrows- on left side of cylinder head.
- Remove cylinder head cover =>Page 15-8.
900058 Type
4A
Type description MY Engine ID
1Z
Gearbox ID
CUT
User
MICLEF
Workshop Manual
- 7 -
-
Õ Turn crankshaft to TDC No. 1 cylinder -arrow- (vehicles with
manual gearbox).
-
Õ Turn crankshaft to TDC No. 1 cylinder -arrow- (vehicles with
automatic gearbox).
900058 Type
4A
Type description MY Engine ID
1Z
Gearbox ID
CUT
User
MICLEF
Workshop Manual
- 8 -
-
Õ Lock camshaft with setting bar 2065 A.
- Remove toothed belt guard (upper) => Page 13-14.
-
Õ Unscrew 2 bolts -arrows- securing rear toothed belt guard on
both sides of cylinder head.
900058 Type
4A
Type description MY Engine ID
1Z
Gearbox ID
CUT
User
MICLEF
Workshop Manual
- 9 -
-
Õ Lock injection pump sprocket with pin 2064.
- Mark direction of rotation of toothed belt with chalk or felt pen.
- Loosen tensioning roller.
- Remove idler wheel.
- Take toothed belt off camshaft sprocket.
- Remove toothed belt tensioning roller.
Note:
On no account use the setting bar to hold the camshaft when
loosening and tightening the bolt securing the camshaft sprocket.
Counter-hold with 3036.
-
Õ Loosen camshaft sprocket securing bolt 1/2 turn. Release
camshaft sprocket from camshaft taper by tapping with a
hammer (using a drift through rear toothed belt guard opening).
- Remove camshaft sprocket.
900058 Type
4A
Type description MY Engine ID
1Z
Gearbox ID
CUT
User
MICLEF
Workshop Manual
- 10 -
-
Õ Keep to specified sequence when loosening cylinder head bolts.
- With a second mechanic, lift cylinder head up slightly and
swivel out to the rear.
900058 Type
4A
Type description MY Engine ID
1Z
Gearbox ID
CUT
User
MICLEF
Workshop Manual
- 1 -
Installing cylinder head
Notes:
‹ Always renew cylinder head bolts when assembling.
‹ When performing repairs, renew seals, gaskets, self-locking
nuts and bolts which have a specified tightening angle.
‹ If repairing, carefully remove any remains of gasket material
from the cylinder head and cylinder block. Make sure that no
long scores or scratches are made on the surfaces.
‹ Carefully remove any remaining emery and abrasive material.
‹ No oil or coolant must be allowed to remain in the blind holes
for the cylinder head bolts in the cylinder block.
‹ Remove new cylinder head gasket from packaging just before
installation.
‹ Handle gasket extremely carefully. Damaging the silicone
layer or the indented area will lead to leaks.
‹ After working on the valve gear, turn the engine carefully at
least 2 rotations to ensure that none of the valves make contact
when the starter is operated.
Installation is carried out in the reverse order, when doing this
note the following:
900058 Type
4A
Type description MY Engine ID
1Z
Gearbox ID
CUT
User
MICLEF
Workshop Manual
- 2 -
-
Õ Turn crankshaft and camshaft to TDC of cylinder No. 1 before
fitting cylinder head. It should be possible to insert setting bar
2065 A in camshaft ....
-
Õ ... and TDC marking should be in line with reference edge.
Note:
Illustration shows vehicle with manual gearbox.
900058 Type
4A
Type description MY Engine ID
1Z
Gearbox ID
CUT
User
MICLEF
Workshop Manual
- 3 -
-
Õ Check identification on cylinder head gasket:
- Part No. = arrow 1
- Holes = arrow 2
- Production code = arrow 3 (can be disregarded)
Notes:
‹ If the cylinder head gasket or the cylinder head has been
replaced, select a new gasket according to the number of holes
on the old gasket.
‹ If parts of the crankshaft drive have been replaced, the new
cylinder head gasket must be selected by measuring the piston
projection at TDC => 13-66.
900058 Type
4A
Type description MY Engine ID
1Z
Gearbox ID
CUT
User
MICLEF
Workshop Manual
- 4 -
-
Õ To centre, screw guide pins 3070/9 from 3070 into the outer
holes in the cylinder block.
- Place cylinder head gasket in position.
- Check that centring sleeve in cylinder block is fitted correctly.
- Check installation position of cylinder head gasket: the word
"oben" (top) or the Part No. should face towards the cylinder
head.
- Place cylinder head in position.
- Screw in 8 cylinder head bolts and tighten by hand.
- Unscrew guide pins with removal tool from 3070 through bolt
holes in cylinder head and install remaining cylinder head bolts.
-
Õ Tighten cylinder head bolts in four stages in sequence shown
as follows:
- Tighten using torque wrench:
- 1st stage: 40 Nm
- 2nd stage: 60 Nm
- TIghten with normal fixed wrench:
- 3rd stage:1/4 turn (90°) further
- 4th stage: 1/4 turn (90°) further
Note:
It is not necessary to tighten cylinder head bolts again later after
repairs have been performed.
- Install toothed belt (adjust valve timing) => Page 13-26.
Note:
Follow all instructions for removing and installing toothed belt
=>Page 13-20.
- Install cylinder head cover =>Page 15-9.
900058 Type
4A
Type description MY Engine ID
1Z
Gearbox ID
CUT
User
MICLEF
Workshop Manual
- 5 -
- Aligning exhaust system free of stress =>
Page 26-10.
- Fill cooling system with fresh coolant => Page 19-7.
- After connecting battery, enter anti-theft code for radio
=> Radio operating instructions
- Close windows fully using electric window switches.
- Then operate all electric window switches again for at least one
second in the "close" direction to activate the automatic one
-touch function.
- Set clock to correct time.
Tightening torques
Component Nm
Catalytic converter to turbocharger 25
Oil return pipe to cylinder block 30
Injector pipes to injectors/
injection pump 25
Idler wheel to console 25
Toothed belt sprocket to camshaft 45
Hose clamps 2
900058 Type
4A
Type description MY Engine ID
1Z
Gearbox ID
CUT
User
MICLEF
Workshop Manual
- 1 -
Checking compression pressure
Special tools and workshop
equipment required
‹ Special tool 3220
‹ V.A.G 1763
‹ V.A.G 1381/12
Requirements for test:
900058 Type
4A
Type description MY Engine ID
1Z
Gearbox ID
CUT
User
MICLEF
Workshop Manual
- 2 -
z Engine oil temperature not less than 30 °C
z Battery voltage not less than 12 V
Test sequence
-
Õ Remove engine cover panel -arrows-.
- Unplug connector for fuel cut-off valve on injection pump.
- Disconnect connector to quantity adjuster on injection pump.
- Remove all glow plugs using socket spanner 3220.
-
Õ Screw in adapter V.A.G 1381/12 in place of the glow plugs.
- Check compressions with compression tester
V.A.G 1381/V.A.G 1763.
Note:
Using the compression tester
=> Operating instructions
- Operate starter until tester shows no further pressure increase.
Compression pressure:
New Wear limit Permissible difference
between cylinders
bar bar
bar
25 ... 31 19 max. 5
- Install glow plugs with jointed spanner 3220
Tightening torque: 15 Nm.
- Interrogate and erase fault memory:
900058 Type
4A
Type description MY Engine ID
1Z
Gearbox ID
CUT
User
MICLEF
Workshop Manual
- 3 -
=> Diesel direct injection and glow plug system (4-cylinder TDI);
=> Repair group 01; Interrogating and erasing fault memory=>
Note:
Faults will have been stored in the memory because connectors
have been unplugged from the injection pump. Interrogate and
erase fault memory after checking compression.
Tightening torque
Component Nm
Glow plugs in cylinder head 15
900058 Type
4A
Type description MY Engine ID
1Z
Gearbox ID
CUT
User
MICLEF
Workshop Manual
- 1 -
Servicing valve gear
Notes:
‹ Cylinder heads which have cracks between the valve seats
can continue to be used without reducing service life, provided
there are only small cracks not more than 0.5 mm wide.
‹ After installing the camshaft, wait for about 30 minutes before
starting the engine. The hydraulic tappets must be allowed to
settle, otherwise the valves will contact the pistons.
‹ After working on the valve gear, turn the engine carefully at
least 2 rotations to ensure that none of the valves make contact
when the starter is operated.
‹ Renew all gaskets and seals.
‹ Before applying sealant, check updated information:
=> Parts catalogue
900058 Type
4A
Type description MY Engine ID
1Z
Gearbox ID
CUT
User
MICLEF
Workshop Manual
- 2 -
1 - Cylinder head
‹ See note
=> Page 15-32
‹ Checking valve guides
=>Page 15-54
‹ Reworking valve seats
=> Page 15-51
2 - Oil seal
‹ To remove and install, remove
bearing cap and camshaft sprocket
‹ Removing and installing toothed
belt =>Page 13-20and13-26
3 - Camshaft sprocket
‹ Take off toothed belt before
removing and installing =>Page
13-20or 13-26
‹ Drive off camshaft taper using
hammer and drift through toothed
belt guard openings
900058 Type
4A
Type description MY Engine ID
1Z
Gearbox ID
CUT
User
MICLEF
Workshop Manual
- 3 -
4 - 45 Nm
‹ Counter-hold with 3036 to loosen
and tighten
5 - 20 Nm
6 - Bearing cap
‹ Installation position
=>Fig. 1, Page 15-38
‹ Installation sequence
=> Page 15-40, removing and
installing camshaft
‹ Before installing first bearing cap,
apply a thin coat of sealant "D 454
300 A2" to contact surfaces
‹ ApplyAMV 174 004 01at sealing
points=>Fig.3and Fig.4, Page 15-7
900058 Type
4A
Type description MY Engine ID
1Z
Gearbox ID
CUT
User
MICLEF
Workshop Manual
- 4 -
7 - Camshaft
‹ Checking axial clearance
=> 15-39
‹ Removing and installing
=> Page 15-40
‹ Check radial clearance with
Plastigage
Wear limit: 0.11 mm
‹ Run-out: max. 0.01 mm
8 - Hydraulic bucket tappet
‹ Checking => Page 15-46
‹ Removing and installing
=> Page 15-48
‹ Do not interchange
‹ Store with cam contact surface
downwards
‹ Before installing check camshaft
axial clearance
=> Page 15-39
‹ Oil contact surface
900058 Type
4A
Type description MY Engine ID
1Z
Gearbox ID
CUT
User
MICLEF
Workshop Manual
- 5 -
9 - Valve cotters
10 - Upper valve spring plate
11 - Outer valve spring
‹ Removing and installing:
with cylinder head removed:
use 2037
with head installed: => Page 15-48
12 - Inner valve spring
‹ Removing and installing:
with cylinder head removed:
use 2037
with head installed: => Page 15-48
13 - Valve stem seal
‹ Renewing=> Page 15-48
14 - Valve guide
‹ Checking => Page 15-54
‹ Renew cylinder head if wear limit
is exceeded
900058 Type
4A
Type description MY Engine ID
1Z
Gearbox ID
CUT
User
MICLEF
Workshop Manual
- 6 -
15 - Lower valve spring plate
‹ Use puller 3047 A to remove and
install
16 - Valve
‹ Do not rework; only lapping-in is
permitted
‹ Valve dimensions
=>Fig. 2, Page 15-38
900058 Type
4A
Type description MY Engine ID
1Z
Gearbox ID
CUT
User
MICLEF
Workshop Manual
- 7 -
Õ Fig. 1Fitting position of camshaft bearing caps
Note offset. Before installing camshaft fit bearing caps and
determine fitting position.
Õ Fig. 2Valve dimensions
Note:
Valves must not be reworked. Only lapping-in is permitted.
Dimension Inlet valve Exhaust valve
Dia. -a- mm 35.95 31.45
Dia. -b- mm 6.963 6.943
c mm 96.85 96.85
α <° 45 45
900058 Type
4A
Type description MY Engine ID
1Z
Gearbox ID
CUT
User
MICLEF
Workshop Manual
- 1 -
Checking camshaft axial clearance
Special tools and workshop equipment required
‹ Special tool VW 387
‹ Dial gauge
-
Õ Perform measurement with bucket tappets removed and front
and rear bearing caps fitted.
- Wear limit: 0.15 mm
900058 Type
4A
Type description MY Engine ID
1Z
Gearbox ID
CUT
User
MICLEF
Workshop Manual
- 1 -
Removing and installing camshaft
Special tools and workshop equipment required
‹ Mandrel 2064
‹ Setting bar 2065 A
Removing
z Cylinder head installed
- Remove toothed belt guard (upper) => Page 13-14.
900058 Type
4A
Type description MY Engine ID
1Z
Gearbox ID
CUT
User
MICLEF
Workshop Manual
- 2 -
- Remove cylinder head cover =>Page 15-8.
-
Õ Turn crankshaft to TDC No. 1 cylinder -arrow- (vehicles with
manual gearbox).
-
Õ Turn crankshaft to TDC No. 1 cylinder -arrow- (vehicles with
automatic gearbox).
900058 Type
4A
Type description MY Engine ID
1Z
Gearbox ID
CUT
User
MICLEF
Workshop Manual
- 3 -
-
Õ Lock camshaft with setting bar 2065 A.
-
Õ Lock injection pump sprocket with pin 2064.
- Mark direction of rotation of toothed belt with chalk or felt pen.
Note:
If the belt runs in the wrong direction when it is refitted, it can
break.
- Loosen tensioning roller.
- Remove idler wheel.
- Take toothed belt off camshaft sprocket.
Note:
On no account use the setting bar to hold the camshaft when
loosening and tightening the bolt securing the camshaft sprocket.
Counter-hold with 3036.
900058 Type
4A
Type description MY Engine ID
1Z
Gearbox ID
CUT
User
MICLEF
Workshop Manual
- 4 -
-
Õ Loosen camshaft sprocket securing bolt 1/2 turn. Release
camshaft sprocket from camshaft taper by tapping with a
hammer (using a drift through rear toothed belt guard opening).
- Remove camshaft sprocket.
- First remove bearing caps 1, 3 and 5. Loosen bearing caps 2
and 4 alternately and diagonally.
Installing
Installation is carried out in the reverse order, when doing this
note the following:
Notes:
‹ Renew camshaft oil seal.
‹ When installing the camshaft No. 1 cylinder cams must point
upwards.
‹
Õ When installing the bearing cap note offset. Before installing
camshaft, fit bearing caps and determine correct position.
- Oil camshaft running surfaces.
- Tighten bearing caps 2 and 4 alternately and
diagonally to 20 Nm.
- Install bearing caps 5, 1 and 3 and also tighten to 20 Nm.
- Install toothed belt (adjust valve timing) => Page 13-26.
Notes:
‹ Follow all instructions for removing and installing toothed belt
=>Page 13-20onwards.
‹ After installing the camshaft, wait for about 30 minutes before
starting the engine. The hydraulic tappets must be allowed to
settle, otherwise the valves will contact the pistons.
‹ After working on the valve gear, turn the engine carefully at
least 2 rotations to ensure that none of the valves make contact
when the starter is operated.
- Install cylinder head cover =>Page 15-9.
- Check injection pump commencement of delivery (dynamic)
900058 Type
4A
Type description MY Engine ID
1Z
Gearbox ID
CUT
User
MICLEF
Workshop Manual
- 5 -
=> Diesel direct injection and glow plug system (4-cylinder TDI);
=> Repair group 23; Servicing diesel direct injection system;=>
=> Dynamically checking and adjusting commencement of
injection
Tightening torque
Component Nm
Bearing caps to cylinder head 20
900058 Type
4A
Type description MY Engine ID
1Z
Gearbox ID
CUT
User
MICLEF
Workshop Manual
- 1 -
Checking hydraulic bucket tappets
Special tools and workshop equipment required
‹ Feeler gauge
‹ Wood or plastic wedge
Notes:
‹ Hydraulic tappets cannot be adjusted or repaired.
‹ Irregular valve noises when starting engine are normal.
- Start engine and run until coolant temperature reaches approx.
80 °C.
- Increase engine speed to about 2500 rpm for 2 minutes
(perform road test if necessary).
Note:
If the irregular valve noises stop but recur repeatedly during
short journeys, a new oil retention valve must be fitted. The oil
retention valve is located in the oil filter bracket.
If the hydraulic tappets are still noisy, locate defective tappets as
follows:
- Remove cylinder head cover =>Page 15-8.
- Rotate crankshaft until cams of cylinder to be checked are
pointing upwards.
- Determine play between cam and bucket tappet.
900058 Type
4A
Type description MY Engine ID
1Z
Gearbox ID
CUT
User
MICLEF
Workshop Manual
- 2 -
-
Õ Press tappet down with a wooden or plastic wedge. If an 0.20
mm feeler gauge can be inserted between camshaft and tappet,
renew tappet.
- Renewing tappets, => Removing camshaft, Page 15-40.
Notes:
‹ After installing the camshaft, wait for about 30 minutes before
starting the engine. The hydraulic tappets must be allowed to
settle, otherwise the valves will contact the pistons.
‹ After working on the valve gear, turn the engine carefully at
least 2 rotations to ensure that none of the valves make contact
when the starter is operated.
900058 Type
4A
Type description MY Engine ID
1Z
Gearbox ID
CUT
User
MICLEF
Workshop Manual
- 1 -
Renewing valve stem seals
Special tools and workshop
equipment required
‹ Valve lever VW 541/1A with thrust
piece VW 541/5
‹ Fitting tool 2036
‹ Puller 3047 A
‹ Fitting tool 3129
Removing
z Cylinder head installed
- Remove camshaft => Page 15-40.
900058 Type
4A
Type description MY Engine ID
1Z
Gearbox ID
CUT
User
MICLEF
Workshop Manual
- 2 -
- Remove the bucket tappets and put them down with the
contact surface downwards. When doing this ensure that the
tappets are not interchanged.
- Set piston of respective cylinder to top dead centre (TDC).
-
Õ Position fitting tool 2036 with shaft parallel to sealing edge of
cylinder head cover. Tighten bolts to secure fitting tool.
- Adjust shaft of fitting tool so that it is level with the studs for the
bearing caps.
- Remove valve springs with lever VW 541/1A.
Note:
The valves are supported by the piston crown.
-
Õ Pull off valve stem seals with 3047 A.
Installing
900058 Type
4A
Type description MY Engine ID
1Z
Gearbox ID
CUT
User
MICLEF
Workshop Manual
- 3 -
-
Õ To prevent damage to the new valve stem seals -B-, place
plastic sleeve -A- on valve stem.
- Lightly oil sealing lip of valve stem seal.
- Insert valve stem seal in the tool 3129 and push it down
carefully onto the valve guide.
- Remove plastic sleeve.
- Install camshaft => Page 15-44.
Notes:
‹ After installing the camshaft, wait for about 30 minutes before
starting the engine. The hydraulic tappets must be allowed to
settle, otherwise the valves will contact the pistons.
‹ After working on the valve gear, turn the engine carefully at
least 2 rotations to ensure that none of the valves make contact
when the starter is operated.
900058 Type
4A
Type description MY Engine ID
1Z
Gearbox ID
CUT
User
MICLEF
Workshop Manual
- 1 -
Reworking valve seats
Note:
If a good seating pattern cannot be obtained by grinding the
valve seats (lapping), they must be refaced (reworked):
Special tools and workshop equipment required
‹ Depth gauge
‹ Valve seat refacing tool
Notes:
‹ When repairing engines with leaking valves, it is not sufficient
to reface the valve seats and renew the valves. The valve
guides must also be checked for wear. This is particularly
important on high mileage engines =>Page 15-54.
‹ The valve seats should only be reworked just enough to
produce a perfect seating pattern.
‹ Calculate the maximum permissible reworking dimension
before reworking.
‹ If the maximum permissible reworking dimension is 0 mm or
less than 0 mm, measure again with a new valve. If it is still 0
mm or less than 0 mm, the cylinder head must be replaced.
Calculating max. permissible reworking dimension
- Insert valve and press it firmly against valve seat.
Note:
If the valve is to be renewed as part of a repair, use a new valve
for the calculation.
900058 Type
4A
Type description MY Engine ID
1Z
Gearbox ID
CUT
User
MICLEF
Workshop Manual
- 2 -
-
Õ Measure distance -a- between end of valve stem and upper
edge of cylinder head.
- Calculate max. permissible reworking dimension from
measured distance -a- and minimum dimension.
Minimum dimension:
Inlet valve 35.8 mm
Exhaust valve 36.1 mm
Measured distance minus minimum dimension
= max. permissible reworking dimension.
Example:
Measured distance 36.5 mm
- Minimum dimension 35.8 mm
= max. perm. rework dimension 0.7 mm
Õ Reworking inlet valve seat
a = 35.7 mm ш
b = 1.6 mm
45 ° = Valve seat angle
Note:
The 30 ° lower valve seat chamfer is required for gas flow
characteristics in the inlet port.
900058 Type
4A
Type description MY Engine ID
1Z
Gearbox ID
CUT
User
MICLEF
Workshop Manual
- 3 -
Õ Reworking exhaust valve seat
a = 31.4 mm ш
b = 2.7 mm
45 ° = Valve seat angle
900058 Type
4A
Type description MY Engine ID
1Z
Gearbox ID
CUT
User
MICLEF
Workshop Manual
- 1 -
Checking valve guides
Special tools and workshop equipment required
‹ Special tool VW 387
‹ Dial gauge
-
Õ Insert valve into valve guide until end of valve stem is flush with
end of guide. Due to the slight difference in stem diameters,
ensure that only an inlet valve is used in the inlet guide and an
exhaust valve in the exhaust guide.
Wear limit
Amount of sideways play: not more than 1.3 mm
Notes:
‹ If the wear limit is exceeded, repeat the measurement with
new valves. If the wear limit is again exceeded, renew the
cylinder head.
‹ If the valve is to be renewed as part of a repair, use a new
valve for the calculation.
900058 Type
4A
Type description MY Engine ID
1Z
Gearbox ID
CUT
User
MICLEF
Workshop Manual
- 1 -
Removing and installing parts of the lubrication system
Notes:
‹ If large quantities of metal shavings or particles are found in
the engine oil when repairing the engine, the oil passages must
be cleaned carefully, and the oil cooler renewed in order to
prevent further damage occurring later.
‹ The oil level must not be above the max. mark - danger of
damage to catalytic converter.
‹ Before applying sealant, check updated information:
=> Parts catalogue
Viscosity grades and oil specifications:
=> Maintenance
Oil system capacity:
=> Binder "Emissions test"
900058 Type
4A
Type description MY Engine ID
1Z
Gearbox ID
CUT
User
MICLEF
Workshop Manual
- 1 -
Part I
1 - Oil drain plug, 30 Nm
2 - Gasket
‹ Renew
3 - 18 Nm
‹ Tighten in stages and in diagonal
sequence
4 - Gasket
‹ Renew
‹ Install dry
‹ Apply a small amount of sealant
"AMV 174 004 01" only to sealing
points between sealing flange and
cylinder block (front and rear)
5 - 10 Nm
6 - Suction pipe
‹ Clean strainer if soiled
900058 Type
4A
Type description MY Engine ID
1Z
Gearbox ID
CUT
User
MICLEF
Workshop Manual
- 2 -
7 - O ring
‹ Renew
8 - Pressure relief valve, 27 Nm
‹ opens at:
1.3 ... 1.6 bar
‹ Do not apply locking fluid
‹ Version fitted 07.96 >(phased in)
9 - Oil spray jet
‹ For piston cooling
‹ Version fitted 07.96 >(phased in)
‹ Version fitted>06.96
=>-Item 2-, Page 13-57
10 - Gears
‹ Checking backlash
=>Fig. 1, Page 17-8
‹ Checking axial clearance
=>Fig. 2, Page 17-8
900058 Type
4A
Type description MY Engine ID
1Z
Gearbox ID
CUT
User
MICLEF
Workshop Manual
- 3 -
11 - Oil pump cover with pressure
relief valve
‹ Opening pressure: 5.7...6.7 bar
12 - 10 Nm
13 - 25 Nm
14 - Sump
‹ Removing and installing
=> Page 17-9
‹ Clean sealing surface before
installing
‹ Before installing sump, apply a
small amount of sealant
"AMV 174 004 01" to sealing points
between sealing flange and cylinder
block
900058 Type
4A
Type description MY Engine ID
1Z
Gearbox ID
CUT
User
MICLEF
Workshop Manual
- 4 -
15 - Engine/gearbox support
‹ Remove support in order to
remove sump => Page 17-9
‹ When installing engine/gearbox
support with engine removed from
vehicle, ensure that support is
positioned flush with intermediate
plate at flywheel end (i.e. engine/
gearbox support should protrude 0.8
mm from cylinder block).
16 - 45 Nm
900058 Type
4A
Type description MY Engine ID
1Z
Gearbox ID
CUT
User
MICLEF
Workshop Manual
- 1 -
Part II
1 - Oil filter
‹ Observe change intervals
=> Maintenance manual
‹ Loosen with strap wrench
‹ Observe installation instructions on
oil filter
2 - 25 Nm
3 - Oil cooler
‹ See note
=> Page 17-1
‹ Coolant hose connection diagram
=>Page 19-2
4 - 25 Nm
5 - Oil filter bracket
6 - Gasket
‹ Renew
900058 Type
4A
Type description MY Engine ID
1Z
Gearbox ID
CUT
User
MICLEF
Workshop Manual
- 2 -
7 - 0.9 bar oil pressure switch -F1
- 25 Nm
‹ Grey
‹ Checking => Page 17-15
8 - Seal
‹ If seal is leaking, cut open and
renew.
9 - Oil temperature sender -G8
-10 Nm
10 - Seal
‹ If seal is leaking, cut open and
renew.
11 - O ring
‹ Renew
‹ Engage in projections on oil cooler
900058 Type
4A
Type description MY Engine ID
1Z
Gearbox ID
CUT
User
MICLEF
Workshop Manual
- 3 -
Õ Fig. 1Checking oil pump backlash
New: 0.05 mm
Wear limit: 0.20 mm
Õ Fig. 2Checking oil pump axial clearance
Wear limit: 0.15 mm
900058 Type
4A
Type description MY Engine ID
1Z
Gearbox ID
CUT
User
MICLEF
Workshop Manual
- 1 -
Removing and installing sump
Special tools and workshop equipment required
‹ Workshop crane V.A.G 1202 A
‹ Drip tray
‹ Sealant AMV174 004 01
Removing
-
Õ Remove noise insulation (two sections, -arrows-).
- Drain engine oil.
900058 Type
4A
Type description MY Engine ID
1Z
Gearbox ID
CUT
User
MICLEF
Workshop Manual
- 2 -
-
Õ Support subframe with workshop crane V.A.G 1202 A.
-
Õ Unscrew retaining clamps -arrows- for starter cable from
subframe.
- Unscrew front subframe bolts -1- and -2-.
Note:
The subframe should be detached and lowered only at the front,
otherwise it will be necessary to check wheel alignment.
900058 Type
4A
Type description MY Engine ID
1Z
Gearbox ID
CUT
User
MICLEF
Workshop Manual
- 3 -
-
Õ Lower subframe slowly using workshop crane V.A.G 1202 A.
-
Õ Unscrew bolts -1 ... 8- from engine/gearbox support.
- Take off engine/gearbox support.
- Unbolt and remove sump: if necessary loosen it by striking
lightly with a rubber hammer.
Installing
Installation is carried out in the reverse order, when doing this
note the following:
900058 Type
4A
Type description MY Engine ID
1Z
Gearbox ID
CUT
User
MICLEF
Workshop Manual
- 4 -
Notes:
‹ Renew seals and gaskets.
‹
Õ When installing the engine and gearbox support -3- with the
engine removed from the vehicle, make sure that the support is
positioned flush with the intermediate plate -1- at the flywheel
end. In other words, the engine/gearbox support should
protrude by 0.8 mm (distance a) from cylinder block -2-.
- Clean sealing surfaces before installing sump.
- Lightly coat the sealing points for the sump between sealing
flange and cylinder block (at front and rear) using AMV 174 004
01.
- Tighten bolts securing sump to cylinder block in diagonal
sequence and in two stages, tightening to 18 Nm at second
stage.
- Installsubframe
=> Running gear, Front-wheel drive and four-wheel drive;
=> Repair group 40; Servicing front suspension;=>
=> Removing and installing subframe
- Fill up with engine oil and check oil level.
Tightening torques
900058 Type
4A
Type description MY Engine ID
1Z
Gearbox ID
CUT
User
MICLEF
Workshop Manual
- 5 -
Õ Attachments of engine/gearbox support
Item No. Bolt Nm
1 M10 x 28 45
2, 4, 5 1) M10 x 45 45
3, 7 M10 x 95 45
6 M10 x 50 45
8 M10 x 65 45
1)Vehicles up to approx. 07.96: M8 bolt; tightening torque 25 Nm
Component Nm
Sump to cylinder block1) 18
Oil drain plug 30
1)Special bolts; use only correct type (same as original
equipment)
=> Parts catalogue
900058 Type
4A
Type description MY Engine ID
1Z
Gearbox ID
CUT
User
MICLEF
Workshop Manual
- 1 -
Removing and installing oil pump
Removing
- Remove sump => Page 17-9.
-
Õ Loosen bolts -arrows-.
- Take off oil pump.
Installing
Installation is carried out in the reverse order, when doing this
note the following:
- Installing sump => Page 17-12.
Tightening torque
Component Nm
Oil pump to cylinder block 25
900058 Type
4A
Type description MY Engine ID
1Z
Gearbox ID
CUT
User
MICLEF
Workshop Manual
- 1 -
Testing oil pressure and oil pressure
switch
Special tools and workshop
equipment required
‹ V.A.G 1342
‹ V.A.G 1527 B
‹ V.A.G 1594 A
Requirements for test:
z Oil level ok.
z Oil pressure warning lamp -K3 must come on when ignition is
900058 Type
4A
Type description MY Engine ID
1Z
Gearbox ID
CUT
User
MICLEF
Workshop Manual
- 2 -
switched on.
z In vehicles with auto-check system the "OK" display must
appear (call up symbol).
z Engine oil temperature approx. 80 °C
Testing warning lamp
The oil pressure warning lamp lights up when the ignition is
switched on ("terminal 15 on") with the engine not running (this
does not apply to vehicles with auto-check system).
Testing oil pressure switch
- Disconnect wire from oil pressure switch.
-
Õ Unscrew oil pressure switch and screw in oil pressure tester V.
A.G 1342.
- Screw oil pressure switch -2- intoV.A.G 1342.
- Connect brown wire -1- of tester to earth (-).
- Connect voltage tester V.A.G 1527 B to oil pressure switch and
positive side of battery (+) using test leads from V.A.G 1594 A.
- Test lamp should not light up
- If test lamp lights up, renew oil pressure switch.
- Start engine
Note:
The switching point of the oil pressure switch can be reached
when the engine is cranked on the starter motor, so watch the
tester and the test lamp while starting the engine.
- Test lamp should light up at 0.75...1.05 bar.
If test lamp does not light up, renew oil pressure switch.
Testing oil pressure
- Disconnect wire from oil pressure switch.
900058 Type
4A
Type description MY Engine ID
1Z
Gearbox ID
CUT
User
MICLEF
Workshop Manual
- 3 -
-
Õ Unscrew oil pressure switch and screw in oil pressure tester V.
A.G 1342.
- Screw oil pressure switch -2- intoV.A.G 1342.
- Start engine (engine oil temperature at least 80°C).
- Oil pressure at 2000 rpm: at least 2.0 bar
- Oil pressure at higher engine speeds: max. 7.0 bar
If the specifications are not obtained:
- Pressure relief valve or oil pump defective; renew oil pump =>
Page 17-14.
900058 Type
4A
Type description MY Engine ID
1Z
Gearbox ID
CUT
User
MICLEF
Workshop Manual
- 1 -
Engine oil
A high-quality multigrade oil is put in at the factory: this can be
used all year round, except in extremely cold climates.
Viscosity grades and oil specifications
Viscosity grades and oil specifications:
=> Maintenance
900058 Type
4A
Type description MY Engine ID
1Z
Gearbox ID
CUT
User
MICLEF
Workshop Manual
- 1 -
Checking oil level
Requirements for test:
z Engine oil temperature at least 60 °C
z Vehicle must be level (horizontal)
z After switching off the engine, wait a few minutes to allow the
oil to flow back into the sump.
Test sequence
- Pull out the dipstick, wipe off with a clean cloth and insert it
again as far as it will go.
- Pull out the dipstick again and read off the oil level.
Õ Markings on oil dipstick:
a -Do not top up oil.
b -Oil can be topped up. The oil level may rise as far as area -a-
after topping up.
c -Oil must be topped up. It is sufficient if the oil level is
somewhere in area -b- (grooved area on dipstick) after topping
up.
Note:
The oil level must not be above marking -a- on the dipstick.
900058 Type
4A
Type description MY Engine ID
1Z
Gearbox ID
CUT
User
MICLEF
Workshop Manual
- 1 -
Removing and installing parts of cooling system
Warning!
Hot steam can escape when the cap on the expansion tank
is opened. Cover the cap with a cloth, and open it carefully.
Notes:
‹ When the engine is warm the cooling system is under
pressure. If necessary release pressure before commencing
repair work.
‹ Secure all hose connections with the correct hose clips (same
as original equipment)
=> Parts catalogue
‹ V.A.G 1921 pliers are recommended when installing spring
-type clips.
‹ Renew all gaskets and seals.
‹ The arrow markings on the coolant pipes and on the ends of
the hoses must be aligned with each other.
900058 Type
4A
Type description MY Engine ID
1Z
Gearbox ID
CUT
User
MICLEF
Workshop Manual
- 1 -
Parts of cooling system
Diagram of coolant hose connections
1 - Radiator
‹ Removing and installing
=> Page 19-18
‹ After replacing, fill system with
fresh coolant
2 - Return pipe
‹ To expansion tank
3 - Expansion tank
4 - Fillercap
‹ With pressure relief valve
‹ Testing pressure relief valve
=>Page 19-23
5 - Oil cooler
‹ Removing and installing
=>Page 17-6, item 3
900058 Type
4A
Type description MY Engine ID
1Z
Gearbox ID
CUT
User
MICLEF
Workshop Manual
- 2 -
6 - Return pipe
‹ From heat exchanger (for heater)
7 - Heating system heat exchanger
‹ After replacing, fill system with
fresh coolant
8 - Supply pipe
‹ To heat exchanger
9 - Coolant pump/coolant thermostat
‹ Removing and installing coolant
pump =>Page 19-11
‹ Check for ease of movement
‹ Removing and installing coolant
thermostat =>Page 19-16
‹ Checking =>Page 19-17
900058 Type
4A
Type description MY Engine ID
1Z
Gearbox ID
CUT
User
MICLEF
Workshop Manual
- 1 -
Draining and filling cooling system
Special tools and workshop equipment required
‹ Drip tray V.A.G 1306
‹ Special tool T10007 (for coolant additive G 012 A8 D)
Draining
Note:
Catch drained-off coolant in a clean container for re-use or
disposal.
Warning!
Hot steam can escape when the cap on the expansion tank
is opened. Cover the cap with a cloth, and open it carefully.
- Open cap on coolant expansion tank.
900058 Type
4A
Type description MY Engine ID
1Z
Gearbox ID
CUT
User
MICLEF
Workshop Manual
- 2 -
-
Õ Remove front section of noise insulation -lower arrows-.
- Place drip tray V.A.G 1306 below engine.
-
Õ Turn drain screw -arrow- on radiator anti-clockwise, if
necessary fit drain hose to connection.
900058 Type
4A
Type description MY Engine ID
1Z
Gearbox ID
CUT
User
MICLEF
Workshop Manual
- 3 -
-
Õ To drain off remaining coolant, disconnect coolant hoses
-arrows-.
Filling
Notes:
‹ The cooling system is filled all year round with a mixture of
water and coolant additive (combined anti-freeze and corrosion
protection agent).
‹ Coolant additive G 011 A8 C (green) is used in vehicles up to
06.96.
‹ Only coolant additive G 012 A8 D (red) is used in vehicles
from 07.96 onwards.
Caution
The two different coolant additives G
‹ If the fluid in the expansion tank is brown, this means G 012
A8 D has been mixed with another type of coolant. In this case,
flush out the cooling system and put in fresh coolant. To flush
the system, fill it with clean water and run the engine for about
2 minutes. This should remove very nearly all of the old coolant.
‹ G 011 A8 C and G 012 A8 D (and coolant additives marked
"meeting specification TL VW 774 C" or "meeting specification
TL VW 774 D") prevent frost and corrosion damage, stop
scaling and at the same time raise the boiling point of the
coolant. For these reasons the cooling system must be filled all
year round with the correct anti-freeze and anti-corrosion
additive.
‹ Because of its high boiling point, the coolant improves engine
reliability under heavy loads, particularly in countries with
tropical climates.
‹ Protection against frost must be assured down to about -25
°C (in countries with arctic climate downto about -35 °C).
‹ The coolant concentration must not be reduced by adding
water even in warmer seasons and in warmer countries. The
anti-freeze ratio must be at least 40 %.
‹ If greater frost protection is required in very cold climates, the
amount of G 012 A8 D can be increased, but only up to 60 %
(this gives frost protection to about -40 °C), as otherwise frost
900058 Type
4A
Type description MY Engine ID
1Z
Gearbox ID
CUT
User
MICLEF
Workshop Manual
- 4 -
protection is reduced again and cooling effectiveness is also
reduced.
‹ Only use clean tap water for mixing coolant.
‹ If radiator, heat exchanger, cylinder head or cylinder head
gasket is replaced, do not reuse old coolant.
‹ Special tool T10007 must be used for testing the anti-freeze
concentration if the cooling system contains coolant additive
G012 A8 D.
Recommended mixture ratios:
Anti-freeze Anti-freeze G 012A8 D 1) Water 1)
protection down to concentration
-25 °C 40 % 2.60 ltr. 3.90 ltr.
-35 °C 50 % 3.25 ltr. 3.35 ltr.
1)Cooling system capacity: 6.5 litres (may vary according to
equipment fitted on vehicle)
- Close drain screw on radiator.
-
Õ Fill up with coolant to max. mark on expansion tank.
- Fit expansion tank cap.
- Start engine.
- Then run engine at idling speed until bottom hose on radiator
becomes hot.
- Check coolant level and top-up if necessary. When the engine
is at normal operating temperature, the coolant level must be
on the max. mark, when the engine is cold, between the min.
and max. marks.
Warning!
Hot steam can escape when the cap on the expansion tank
is opened. Cover the cap with a cloth, and open it carefully.
- Stop engine.
900058 Type
4A
Type description MY Engine ID
1Z
Gearbox ID
CUT
User
MICLEF
Workshop Manual
- 1 -
Removing and installing coolant pump
Removing
- Draincooling system=> Page 19-4.
-
Õ Slacken bolts 2 ... 6.
- Slacken V-belt by turning tensioning nut -1-.
- Remove V-belt.
900058 Type
4A
Type description MY Engine ID
1Z
Gearbox ID
CUT
User
MICLEF
Workshop Manual
- 2 -
-
Õ Unbolt vane pump for power steering complete with rear
bracket -arrows-. Do not disconnect hydraulic connections.
- Secure vane pump to body with wire to reduce load on
connections.
-
Õ Disconnect coolant hoses from coolant pump and thermostat
housing -arrows-.
900058 Type
4A
Type description MY Engine ID
1Z
Gearbox ID
CUT
User
MICLEF
Workshop Manual
- 3 -
-
Õ Remove engine cover panel -arrows-.
-
Õ Detach bracket for engine cover panel below injection pump -2-.
- Unbolt bracket for vane pump-1 ... 3-.
900058 Type
4A
Type description MY Engine ID
1Z
Gearbox ID
CUT
User
MICLEF
Workshop Manual
- 4 -
-
Õ Unbolt coolant pump housing from toothed belt guard -4-.
- Unbolt support for injection pump console -1 ... 3-.
- Remove coolant pump.
-
Õ Unbolt bearing housing -1- from pump housing -4-.
Installing
Installation is carried out in the reverse order, when doing this
note the following:
- Clean sealing surfaces on both sections of housing.
- Renew gasket and O-ring.
- Insert hammer-head bolt in drilling in coolant pump.
- Install V-belt =>Page 13-9.
- Fill up with coolant=> Page 19-7.
Tightening torques
Component Nm
Bearing housing to pump housing 10
Pump housing to toothed belt guard 10
Vane pump bracket to cylinder block 25
Bracket for engine cover panel 25
Hose clamps 2
900058 Type
4A
Type description MY Engine ID
1Z
Gearbox ID
CUT
User
MICLEF
Workshop Manual
- 1 -
Removing and installing, checking coolant thermostat
Removing
- Drain cooling system=> Page 19-4
-
Õ Slacken bolts 2 ... 6.
- Slacken V-belt by turning tensioning nut -1-.
900058 Type
4A
Type description MY Engine ID
1Z
Gearbox ID
CUT
User
MICLEF
Workshop Manual
- 2 -
- Remove V-belt.
-
Õ Unbolt vane pump for power steering complete with rear
bracket -arrows-. Do not disconnect hydraulic connections.
- Secure vane pump to body with wire to reduce load on
connections.
900058 Type
4A
Type description MY Engine ID
1Z
Gearbox ID
CUT
User
MICLEF
Workshop Manual
- 3 -
-
Õ Unscrew bolts -4- and remove connection -3-, O-ring -2- and
coolant thermostat -1-.
Installing
- Clean and smooth down sealing surface for O-ring as required.
- Insert coolant thermostat.
- Install V-belt =>Page 13-9.
- Fill up with coolant=> Page 19-7.
Tightening torques
Component Nm
Connection to pump housing 10
Hose clamps 2
Testing coolant thermostat
- Heat thermostat in water bath.
Starts to open Fully open Opening travel
approx. 87 °C approx. 102 °C1) min. 8 mm
1)cannot be tested
900058 Type
4A
Type description MY Engine ID
1Z
Gearbox ID
CUT
User
MICLEF
Workshop Manual
- 1 -
Removing and installing radiator
Removing
- Remove front bumper.
=> General body repairs; Repair group 63; Front bumper=>
- Drain coolant from drain plug on radiator=> Page 19-4
-
Õ Disconnect both coolant hoses at bottom of radiator -arrows-.
- Unplug connector -1- from radiator fan thermoswitch -F54.
- Disconnect coolant hose at top left of radiator.
Vehicles with automatic gearbox
- Removing ATF pipes/hoses from radiator:
=> Automatic gearbox 01N; Repair group 37;=>
=> Dismantling and assembling gearbox; Removing and
installing ATF pipes
Vehicles with air conditioner:
Warning!
The air conditioner refrigerant circuit must not be opened.
Note:
To prevent damage to the condenser and refrigerant pipes/
hoses, ensure that the pipes and hoses are not stretched, kinked
or bent.
- Remove securing bolts for condenser.
- Pull condenser out of its bracket, pivot towards the side and
900058 Type
4A
Type description MY Engine ID
1Z
Gearbox ID
CUT
User
MICLEF
Workshop Manual
- 2 -
secure with wire.
All models
-
Õ Remove securing screw -arrow A- and pull out headlight trim in
direction indicated by arrow.
900058 Type
4A
Type description MY Engine ID
1Z
Gearbox ID
CUT
User
MICLEF
Workshop Manual
- 3 -
-
Õ Remove screw securing bracket -2- for headlight trim on
housing.
- Detach air cowls from radiator -1- and -3- (left and right).
900058 Type
4A
Type description MY Engine ID
1Z
Gearbox ID
CUT
User
MICLEF
Workshop Manual
- 4 -
-
Õ Unscrew nuts -2- on bonded rubber mountings.
- Pull radiator forwards out of bracket for bonded rubber
mounting at the bottom ...
- ... and pull downwards out of top bracket -arrow- (if necessary,
unscrew bolt -1- on radiator support).
Installing
Installation is carried out in the reverse order, when doing this
note the following:
- Fill up with coolant=> Page 19-7.
Tightening torque
Component Nm
Radiator to front end M6 10
M8 20
Condenser to radiator 10
Hose clamps 2
900058 Type
4A
Type description MY Engine ID
1Z
Gearbox ID
CUT
User
MICLEF
Workshop Manual
- 1 -
Checking cooling system for leaks
Special tools and workshop equipment required
‹ V.A.G 1274 with V.A.G 1274/1
Test requirement:
z Engine at operating temperature.
Test sequence
900058 Type
4A
Type description MY Engine ID
1Z
Gearbox ID
CUT
User
MICLEF
Workshop Manual
- 2 -
Warning!
Hot steam can escape when opening cap on expansion tank:
Cover cap with a cloth and open carefully.
- Open cap on coolant expansion tank.
-
Õ Attach tester V.A.G 1274 with adapter V.A.G 1274/1 to
expansion tank.
- Using hand pump on tester, build up a pressure of approx. 1.0
bar.
- If pressure is not maintained, trace leak and rectify fault.
Testing pressure relief valve in filler cap.
900058 Type
4A
Type description MY Engine ID
1Z
Gearbox ID
CUT
User
MICLEF
Workshop Manual
- 3 -
-
Õ Fit tester V.A.G 1274 with adapter V.A.G 1274/1 onto filler cap.
- Operate hand pump.
- Pressure relief valve must open at 1.2 ... 1.5 bar.
900058 Type
4A
Type description MY Engine ID
1Z
Gearbox ID
CUT
User
MICLEF
Workshop Manual
- 1 -
Fuel supply system
Safety precautions when working on the fuel supply system
When removing and installing the fuel gauge sender from a full
or partly full fuel tank, note the following points:
‹ The fuel tank must not be more than2/3full.
‹ If necessary, drain the tank according to instructions:
=> Page 20-6.
‹ Before commencing work, switch on exhaust extraction
system and place an extraction hose close to the sender
opening in the fuel tank to extract escapingfumes.
If no exhaust extraction system is available, a radial fan (as
long as motor is not in air flow) with a displacement greater
than 15 m3/h can be used.
‹ Avoid skin contact with fuel. Wear fuel-resistant gloves.
Drain the fuel tank before removal from the vehicle in order to
reduce weight.
‹ If necessary, drain the tank according to instructions:
=> Page 20-6.
900058 Type
4A
Type description MY Engine ID
1Z
Gearbox ID
CUT
User
MICLEF
Workshop Manual
- 1 -
Rules for cleanliness
When working on the fuel supply/injection system, pay careful
attention to the following "basic rules":
‹ Thoroughly clean all unions and the adjacent areas before
disconnecting.
‹ Place parts that have been removed on a clean surface and
cover them over. Do not use fluffy cloths!
‹ Carefully cover over or seal opened components if the repair
cannot be completed immediately.
‹ Only install clean components:
Only unpack replacement parts immediately prior to installation.
Do not use parts that have been stored loose (e.g. in tool boxes
etc.).
‹ When the system is open:
Do not work with compressed air.
Do not move vehicle unless absolutely necessary.
‹ Also ensure that no Diesel fuel runs onto the coolant hoses. If
necessary hoses must be cleaned immediately. Affected hoses
must be replaced.
900058 Type
4A
Type description MY Engine ID
1Z
Gearbox ID
CUT
User
MICLEF
Workshop Manual
- 1 -
Overview of components: fuel tank
with attachments
Notes:
‹ All hose connections must be secured
with hose clips (same as original parts).
=> Parts catalogue
‹ Always renew gaskets and seals
when performing repairs.
1 - Securing strap
‹ For fuel tank
2 - Fuel tank
‹ Removing and installing
=> Page 20-7
3 - Vent pipe
900058 Type
4A
Type description MY Engine ID
1Z
Gearbox ID
CUT
User
MICLEF
Workshop Manual
- 2 -
4 - Hose for filler pipe
5 - Filler pipe insert
‹ With non-return flap
6 - Filler pipe
7 - Overflow hose
8 - Oval head screw
9 - Clamp
10 - Union nut, 60 Nm
‹ Remove and install with spanner
3217
11 - Fuel gauge sender -G
‹ Testing => Page 20-10
‹ Removing and installing
=> Page 20-13
‹ Internal dia. of supply pipe: 8 mm
‹ Internal dia. of return pipe: 6 mm
900058 Type
4A
Type description MY Engine ID
1Z
Gearbox ID
CUT
User
MICLEF
Workshop Manual
- 3 -
12 - Seal
13 - Clamping washer
14 - Heat shield
‹ For fuel tank
‹ Ensure proper seating on rubber
plugs
‹ Engage on retaining pins on fuel
tank and secure with clamping
washer
15 - Collar nut - 20 Nm
58 dokumen.tips_audi-a4b4-engine-tdi-19-1z-and-ahu-service-manual.pdf

More Related Content

Recently uploaded

Rekha Agarkar Escorts Service Kollam ❣️ 7014168258 ❣️ High Cost Unlimited Har...
Rekha Agarkar Escorts Service Kollam ❣️ 7014168258 ❣️ High Cost Unlimited Har...Rekha Agarkar Escorts Service Kollam ❣️ 7014168258 ❣️ High Cost Unlimited Har...
Rekha Agarkar Escorts Service Kollam ❣️ 7014168258 ❣️ High Cost Unlimited Har...nirzagarg
 
➥🔝 7737669865 🔝▻ Asansol Call-girls in Women Seeking Men 🔝Asansol🔝 Escorts...
➥🔝 7737669865 🔝▻ Asansol Call-girls in Women Seeking Men  🔝Asansol🔝   Escorts...➥🔝 7737669865 🔝▻ Asansol Call-girls in Women Seeking Men  🔝Asansol🔝   Escorts...
➥🔝 7737669865 🔝▻ Asansol Call-girls in Women Seeking Men 🔝Asansol🔝 Escorts...amitlee9823
 
如何办理麦考瑞大学毕业证(MQU毕业证书)成绩单原版一比一
如何办理麦考瑞大学毕业证(MQU毕业证书)成绩单原版一比一如何办理麦考瑞大学毕业证(MQU毕业证书)成绩单原版一比一
如何办理麦考瑞大学毕业证(MQU毕业证书)成绩单原版一比一ozave
 
Vip Mumbai Call Girls Mira Road Call On 9920725232 With Body to body massage ...
Vip Mumbai Call Girls Mira Road Call On 9920725232 With Body to body massage ...Vip Mumbai Call Girls Mira Road Call On 9920725232 With Body to body massage ...
Vip Mumbai Call Girls Mira Road Call On 9920725232 With Body to body massage ...amitlee9823
 
Vip Mumbai Call Girls Panvel Call On 9920725232 With Body to body massage wit...
Vip Mumbai Call Girls Panvel Call On 9920725232 With Body to body massage wit...Vip Mumbai Call Girls Panvel Call On 9920725232 With Body to body massage wit...
Vip Mumbai Call Girls Panvel Call On 9920725232 With Body to body massage wit...amitlee9823
 
Madiwala Call Girls: 🍓 7737669865 🍓 High Profile Model Escorts | Bangalore Es...
Madiwala Call Girls: 🍓 7737669865 🍓 High Profile Model Escorts | Bangalore Es...Madiwala Call Girls: 🍓 7737669865 🍓 High Profile Model Escorts | Bangalore Es...
Madiwala Call Girls: 🍓 7737669865 🍓 High Profile Model Escorts | Bangalore Es...amitlee9823
 
Vip Mumbai Call Girls Mumbai Call On 9920725232 With Body to body massage wit...
Vip Mumbai Call Girls Mumbai Call On 9920725232 With Body to body massage wit...Vip Mumbai Call Girls Mumbai Call On 9920725232 With Body to body massage wit...
Vip Mumbai Call Girls Mumbai Call On 9920725232 With Body to body massage wit...amitlee9823
 
Dubai Call Girls R0yalty O525547819 Call Girls Dubai
Dubai Call Girls R0yalty O525547819 Call Girls DubaiDubai Call Girls R0yalty O525547819 Call Girls Dubai
Dubai Call Girls R0yalty O525547819 Call Girls Dubaikojalkojal131
 
➥🔝 7737669865 🔝▻ pathankot Call-girls in Women Seeking Men 🔝pathankot🔝 Esc...
➥🔝 7737669865 🔝▻ pathankot Call-girls in Women Seeking Men  🔝pathankot🔝   Esc...➥🔝 7737669865 🔝▻ pathankot Call-girls in Women Seeking Men  🔝pathankot🔝   Esc...
➥🔝 7737669865 🔝▻ pathankot Call-girls in Women Seeking Men 🔝pathankot🔝 Esc...nirzagarg
 
What Does The Engine Malfunction Reduced Power Message Mean For Your BMW X5
What Does The Engine Malfunction Reduced Power Message Mean For Your BMW X5What Does The Engine Malfunction Reduced Power Message Mean For Your BMW X5
What Does The Engine Malfunction Reduced Power Message Mean For Your BMW X5Bavarian Workshop
 
Majestic Call Girls: 🍓 7737669865 🍓 High Profile Model Escorts | Bangalore Es...
Majestic Call Girls: 🍓 7737669865 🍓 High Profile Model Escorts | Bangalore Es...Majestic Call Girls: 🍓 7737669865 🍓 High Profile Model Escorts | Bangalore Es...
Majestic Call Girls: 🍓 7737669865 🍓 High Profile Model Escorts | Bangalore Es...amitlee9823
 
Why Does My Porsche Cayenne's Exhaust Sound So Loud
Why Does My Porsche Cayenne's Exhaust Sound So LoudWhy Does My Porsche Cayenne's Exhaust Sound So Loud
Why Does My Porsche Cayenne's Exhaust Sound So LoudRoyalty Auto Service
 
Escorts Service Rajajinagar ☎ 7737669865☎ Book Your One night Stand (Bangalore)
Escorts Service Rajajinagar ☎ 7737669865☎ Book Your One night Stand (Bangalore)Escorts Service Rajajinagar ☎ 7737669865☎ Book Your One night Stand (Bangalore)
Escorts Service Rajajinagar ☎ 7737669865☎ Book Your One night Stand (Bangalore)amitlee9823
 
+97470301568>>buy vape oil,thc oil weed,hash and cannabis oil in qatar doha}}
+97470301568>>buy vape oil,thc oil weed,hash and cannabis oil in qatar doha}}+97470301568>>buy vape oil,thc oil weed,hash and cannabis oil in qatar doha}}
+97470301568>>buy vape oil,thc oil weed,hash and cannabis oil in qatar doha}}Health
 
Call Girls In Kotla Mubarakpur Delhi ❤️8448577510 ⊹Best Escorts Service In 24...
Call Girls In Kotla Mubarakpur Delhi ❤️8448577510 ⊹Best Escorts Service In 24...Call Girls In Kotla Mubarakpur Delhi ❤️8448577510 ⊹Best Escorts Service In 24...
Call Girls In Kotla Mubarakpur Delhi ❤️8448577510 ⊹Best Escorts Service In 24...lizamodels9
 
John Deere 7430 7530 Tractors Diagnostic Service Manual W.pdf
John Deere 7430 7530 Tractors Diagnostic Service Manual W.pdfJohn Deere 7430 7530 Tractors Diagnostic Service Manual W.pdf
John Deere 7430 7530 Tractors Diagnostic Service Manual W.pdfExcavator
 
ELECTRICITÉ TMT 55.pdf electrick diagram manitout
ELECTRICITÉ TMT 55.pdf electrick diagram manitoutELECTRICITÉ TMT 55.pdf electrick diagram manitout
ELECTRICITÉ TMT 55.pdf electrick diagram manitoutssjews46
 
Vip Mumbai Call Girls Colaba Call On 9920725232 With Body to body massage wit...
Vip Mumbai Call Girls Colaba Call On 9920725232 With Body to body massage wit...Vip Mumbai Call Girls Colaba Call On 9920725232 With Body to body massage wit...
Vip Mumbai Call Girls Colaba Call On 9920725232 With Body to body massage wit...amitlee9823
 

Recently uploaded (20)

Rekha Agarkar Escorts Service Kollam ❣️ 7014168258 ❣️ High Cost Unlimited Har...
Rekha Agarkar Escorts Service Kollam ❣️ 7014168258 ❣️ High Cost Unlimited Har...Rekha Agarkar Escorts Service Kollam ❣️ 7014168258 ❣️ High Cost Unlimited Har...
Rekha Agarkar Escorts Service Kollam ❣️ 7014168258 ❣️ High Cost Unlimited Har...
 
➥🔝 7737669865 🔝▻ Asansol Call-girls in Women Seeking Men 🔝Asansol🔝 Escorts...
➥🔝 7737669865 🔝▻ Asansol Call-girls in Women Seeking Men  🔝Asansol🔝   Escorts...➥🔝 7737669865 🔝▻ Asansol Call-girls in Women Seeking Men  🔝Asansol🔝   Escorts...
➥🔝 7737669865 🔝▻ Asansol Call-girls in Women Seeking Men 🔝Asansol🔝 Escorts...
 
如何办理麦考瑞大学毕业证(MQU毕业证书)成绩单原版一比一
如何办理麦考瑞大学毕业证(MQU毕业证书)成绩单原版一比一如何办理麦考瑞大学毕业证(MQU毕业证书)成绩单原版一比一
如何办理麦考瑞大学毕业证(MQU毕业证书)成绩单原版一比一
 
Vip Mumbai Call Girls Mira Road Call On 9920725232 With Body to body massage ...
Vip Mumbai Call Girls Mira Road Call On 9920725232 With Body to body massage ...Vip Mumbai Call Girls Mira Road Call On 9920725232 With Body to body massage ...
Vip Mumbai Call Girls Mira Road Call On 9920725232 With Body to body massage ...
 
Vip Mumbai Call Girls Panvel Call On 9920725232 With Body to body massage wit...
Vip Mumbai Call Girls Panvel Call On 9920725232 With Body to body massage wit...Vip Mumbai Call Girls Panvel Call On 9920725232 With Body to body massage wit...
Vip Mumbai Call Girls Panvel Call On 9920725232 With Body to body massage wit...
 
Call Girls in Patel Nagar, Delhi 💯 Call Us 🔝9953056974 🔝 Escort Service
Call Girls in Patel Nagar, Delhi 💯 Call Us 🔝9953056974 🔝 Escort ServiceCall Girls in Patel Nagar, Delhi 💯 Call Us 🔝9953056974 🔝 Escort Service
Call Girls in Patel Nagar, Delhi 💯 Call Us 🔝9953056974 🔝 Escort Service
 
Madiwala Call Girls: 🍓 7737669865 🍓 High Profile Model Escorts | Bangalore Es...
Madiwala Call Girls: 🍓 7737669865 🍓 High Profile Model Escorts | Bangalore Es...Madiwala Call Girls: 🍓 7737669865 🍓 High Profile Model Escorts | Bangalore Es...
Madiwala Call Girls: 🍓 7737669865 🍓 High Profile Model Escorts | Bangalore Es...
 
Vip Mumbai Call Girls Mumbai Call On 9920725232 With Body to body massage wit...
Vip Mumbai Call Girls Mumbai Call On 9920725232 With Body to body massage wit...Vip Mumbai Call Girls Mumbai Call On 9920725232 With Body to body massage wit...
Vip Mumbai Call Girls Mumbai Call On 9920725232 With Body to body massage wit...
 
Dubai Call Girls R0yalty O525547819 Call Girls Dubai
Dubai Call Girls R0yalty O525547819 Call Girls DubaiDubai Call Girls R0yalty O525547819 Call Girls Dubai
Dubai Call Girls R0yalty O525547819 Call Girls Dubai
 
➥🔝 7737669865 🔝▻ pathankot Call-girls in Women Seeking Men 🔝pathankot🔝 Esc...
➥🔝 7737669865 🔝▻ pathankot Call-girls in Women Seeking Men  🔝pathankot🔝   Esc...➥🔝 7737669865 🔝▻ pathankot Call-girls in Women Seeking Men  🔝pathankot🔝   Esc...
➥🔝 7737669865 🔝▻ pathankot Call-girls in Women Seeking Men 🔝pathankot🔝 Esc...
 
What Does The Engine Malfunction Reduced Power Message Mean For Your BMW X5
What Does The Engine Malfunction Reduced Power Message Mean For Your BMW X5What Does The Engine Malfunction Reduced Power Message Mean For Your BMW X5
What Does The Engine Malfunction Reduced Power Message Mean For Your BMW X5
 
Majestic Call Girls: 🍓 7737669865 🍓 High Profile Model Escorts | Bangalore Es...
Majestic Call Girls: 🍓 7737669865 🍓 High Profile Model Escorts | Bangalore Es...Majestic Call Girls: 🍓 7737669865 🍓 High Profile Model Escorts | Bangalore Es...
Majestic Call Girls: 🍓 7737669865 🍓 High Profile Model Escorts | Bangalore Es...
 
(ISHITA) Call Girls Service Jammu Call Now 8617697112 Jammu Escorts 24x7
(ISHITA) Call Girls Service Jammu Call Now 8617697112 Jammu Escorts 24x7(ISHITA) Call Girls Service Jammu Call Now 8617697112 Jammu Escorts 24x7
(ISHITA) Call Girls Service Jammu Call Now 8617697112 Jammu Escorts 24x7
 
Why Does My Porsche Cayenne's Exhaust Sound So Loud
Why Does My Porsche Cayenne's Exhaust Sound So LoudWhy Does My Porsche Cayenne's Exhaust Sound So Loud
Why Does My Porsche Cayenne's Exhaust Sound So Loud
 
Escorts Service Rajajinagar ☎ 7737669865☎ Book Your One night Stand (Bangalore)
Escorts Service Rajajinagar ☎ 7737669865☎ Book Your One night Stand (Bangalore)Escorts Service Rajajinagar ☎ 7737669865☎ Book Your One night Stand (Bangalore)
Escorts Service Rajajinagar ☎ 7737669865☎ Book Your One night Stand (Bangalore)
 
+97470301568>>buy vape oil,thc oil weed,hash and cannabis oil in qatar doha}}
+97470301568>>buy vape oil,thc oil weed,hash and cannabis oil in qatar doha}}+97470301568>>buy vape oil,thc oil weed,hash and cannabis oil in qatar doha}}
+97470301568>>buy vape oil,thc oil weed,hash and cannabis oil in qatar doha}}
 
Call Girls In Kotla Mubarakpur Delhi ❤️8448577510 ⊹Best Escorts Service In 24...
Call Girls In Kotla Mubarakpur Delhi ❤️8448577510 ⊹Best Escorts Service In 24...Call Girls In Kotla Mubarakpur Delhi ❤️8448577510 ⊹Best Escorts Service In 24...
Call Girls In Kotla Mubarakpur Delhi ❤️8448577510 ⊹Best Escorts Service In 24...
 
John Deere 7430 7530 Tractors Diagnostic Service Manual W.pdf
John Deere 7430 7530 Tractors Diagnostic Service Manual W.pdfJohn Deere 7430 7530 Tractors Diagnostic Service Manual W.pdf
John Deere 7430 7530 Tractors Diagnostic Service Manual W.pdf
 
ELECTRICITÉ TMT 55.pdf electrick diagram manitout
ELECTRICITÉ TMT 55.pdf electrick diagram manitoutELECTRICITÉ TMT 55.pdf electrick diagram manitout
ELECTRICITÉ TMT 55.pdf electrick diagram manitout
 
Vip Mumbai Call Girls Colaba Call On 9920725232 With Body to body massage wit...
Vip Mumbai Call Girls Colaba Call On 9920725232 With Body to body massage wit...Vip Mumbai Call Girls Colaba Call On 9920725232 With Body to body massage wit...
Vip Mumbai Call Girls Colaba Call On 9920725232 With Body to body massage wit...
 

Featured

PEPSICO Presentation to CAGNY Conference Feb 2024
PEPSICO Presentation to CAGNY Conference Feb 2024PEPSICO Presentation to CAGNY Conference Feb 2024
PEPSICO Presentation to CAGNY Conference Feb 2024Neil Kimberley
 
Content Methodology: A Best Practices Report (Webinar)
Content Methodology: A Best Practices Report (Webinar)Content Methodology: A Best Practices Report (Webinar)
Content Methodology: A Best Practices Report (Webinar)contently
 
How to Prepare For a Successful Job Search for 2024
How to Prepare For a Successful Job Search for 2024How to Prepare For a Successful Job Search for 2024
How to Prepare For a Successful Job Search for 2024Albert Qian
 
Social Media Marketing Trends 2024 // The Global Indie Insights
Social Media Marketing Trends 2024 // The Global Indie InsightsSocial Media Marketing Trends 2024 // The Global Indie Insights
Social Media Marketing Trends 2024 // The Global Indie InsightsKurio // The Social Media Age(ncy)
 
Trends In Paid Search: Navigating The Digital Landscape In 2024
Trends In Paid Search: Navigating The Digital Landscape In 2024Trends In Paid Search: Navigating The Digital Landscape In 2024
Trends In Paid Search: Navigating The Digital Landscape In 2024Search Engine Journal
 
5 Public speaking tips from TED - Visualized summary
5 Public speaking tips from TED - Visualized summary5 Public speaking tips from TED - Visualized summary
5 Public speaking tips from TED - Visualized summarySpeakerHub
 
ChatGPT and the Future of Work - Clark Boyd
ChatGPT and the Future of Work - Clark Boyd ChatGPT and the Future of Work - Clark Boyd
ChatGPT and the Future of Work - Clark Boyd Clark Boyd
 
Getting into the tech field. what next
Getting into the tech field. what next Getting into the tech field. what next
Getting into the tech field. what next Tessa Mero
 
Google's Just Not That Into You: Understanding Core Updates & Search Intent
Google's Just Not That Into You: Understanding Core Updates & Search IntentGoogle's Just Not That Into You: Understanding Core Updates & Search Intent
Google's Just Not That Into You: Understanding Core Updates & Search IntentLily Ray
 
Time Management & Productivity - Best Practices
Time Management & Productivity -  Best PracticesTime Management & Productivity -  Best Practices
Time Management & Productivity - Best PracticesVit Horky
 
The six step guide to practical project management
The six step guide to practical project managementThe six step guide to practical project management
The six step guide to practical project managementMindGenius
 
Beginners Guide to TikTok for Search - Rachel Pearson - We are Tilt __ Bright...
Beginners Guide to TikTok for Search - Rachel Pearson - We are Tilt __ Bright...Beginners Guide to TikTok for Search - Rachel Pearson - We are Tilt __ Bright...
Beginners Guide to TikTok for Search - Rachel Pearson - We are Tilt __ Bright...RachelPearson36
 
Unlocking the Power of ChatGPT and AI in Testing - A Real-World Look, present...
Unlocking the Power of ChatGPT and AI in Testing - A Real-World Look, present...Unlocking the Power of ChatGPT and AI in Testing - A Real-World Look, present...
Unlocking the Power of ChatGPT and AI in Testing - A Real-World Look, present...Applitools
 
12 Ways to Increase Your Influence at Work
12 Ways to Increase Your Influence at Work12 Ways to Increase Your Influence at Work
12 Ways to Increase Your Influence at WorkGetSmarter
 
Ride the Storm: Navigating Through Unstable Periods / Katerina Rudko (Belka G...
Ride the Storm: Navigating Through Unstable Periods / Katerina Rudko (Belka G...Ride the Storm: Navigating Through Unstable Periods / Katerina Rudko (Belka G...
Ride the Storm: Navigating Through Unstable Periods / Katerina Rudko (Belka G...DevGAMM Conference
 
Barbie - Brand Strategy Presentation
Barbie - Brand Strategy PresentationBarbie - Brand Strategy Presentation
Barbie - Brand Strategy PresentationErica Santiago
 

Featured (20)

PEPSICO Presentation to CAGNY Conference Feb 2024
PEPSICO Presentation to CAGNY Conference Feb 2024PEPSICO Presentation to CAGNY Conference Feb 2024
PEPSICO Presentation to CAGNY Conference Feb 2024
 
Content Methodology: A Best Practices Report (Webinar)
Content Methodology: A Best Practices Report (Webinar)Content Methodology: A Best Practices Report (Webinar)
Content Methodology: A Best Practices Report (Webinar)
 
How to Prepare For a Successful Job Search for 2024
How to Prepare For a Successful Job Search for 2024How to Prepare For a Successful Job Search for 2024
How to Prepare For a Successful Job Search for 2024
 
Social Media Marketing Trends 2024 // The Global Indie Insights
Social Media Marketing Trends 2024 // The Global Indie InsightsSocial Media Marketing Trends 2024 // The Global Indie Insights
Social Media Marketing Trends 2024 // The Global Indie Insights
 
Trends In Paid Search: Navigating The Digital Landscape In 2024
Trends In Paid Search: Navigating The Digital Landscape In 2024Trends In Paid Search: Navigating The Digital Landscape In 2024
Trends In Paid Search: Navigating The Digital Landscape In 2024
 
5 Public speaking tips from TED - Visualized summary
5 Public speaking tips from TED - Visualized summary5 Public speaking tips from TED - Visualized summary
5 Public speaking tips from TED - Visualized summary
 
ChatGPT and the Future of Work - Clark Boyd
ChatGPT and the Future of Work - Clark Boyd ChatGPT and the Future of Work - Clark Boyd
ChatGPT and the Future of Work - Clark Boyd
 
Getting into the tech field. what next
Getting into the tech field. what next Getting into the tech field. what next
Getting into the tech field. what next
 
Google's Just Not That Into You: Understanding Core Updates & Search Intent
Google's Just Not That Into You: Understanding Core Updates & Search IntentGoogle's Just Not That Into You: Understanding Core Updates & Search Intent
Google's Just Not That Into You: Understanding Core Updates & Search Intent
 
How to have difficult conversations
How to have difficult conversations How to have difficult conversations
How to have difficult conversations
 
Introduction to Data Science
Introduction to Data ScienceIntroduction to Data Science
Introduction to Data Science
 
Time Management & Productivity - Best Practices
Time Management & Productivity -  Best PracticesTime Management & Productivity -  Best Practices
Time Management & Productivity - Best Practices
 
The six step guide to practical project management
The six step guide to practical project managementThe six step guide to practical project management
The six step guide to practical project management
 
Beginners Guide to TikTok for Search - Rachel Pearson - We are Tilt __ Bright...
Beginners Guide to TikTok for Search - Rachel Pearson - We are Tilt __ Bright...Beginners Guide to TikTok for Search - Rachel Pearson - We are Tilt __ Bright...
Beginners Guide to TikTok for Search - Rachel Pearson - We are Tilt __ Bright...
 
Unlocking the Power of ChatGPT and AI in Testing - A Real-World Look, present...
Unlocking the Power of ChatGPT and AI in Testing - A Real-World Look, present...Unlocking the Power of ChatGPT and AI in Testing - A Real-World Look, present...
Unlocking the Power of ChatGPT and AI in Testing - A Real-World Look, present...
 
12 Ways to Increase Your Influence at Work
12 Ways to Increase Your Influence at Work12 Ways to Increase Your Influence at Work
12 Ways to Increase Your Influence at Work
 
ChatGPT webinar slides
ChatGPT webinar slidesChatGPT webinar slides
ChatGPT webinar slides
 
More than Just Lines on a Map: Best Practices for U.S Bike Routes
More than Just Lines on a Map: Best Practices for U.S Bike RoutesMore than Just Lines on a Map: Best Practices for U.S Bike Routes
More than Just Lines on a Map: Best Practices for U.S Bike Routes
 
Ride the Storm: Navigating Through Unstable Periods / Katerina Rudko (Belka G...
Ride the Storm: Navigating Through Unstable Periods / Katerina Rudko (Belka G...Ride the Storm: Navigating Through Unstable Periods / Katerina Rudko (Belka G...
Ride the Storm: Navigating Through Unstable Periods / Katerina Rudko (Belka G...
 
Barbie - Brand Strategy Presentation
Barbie - Brand Strategy PresentationBarbie - Brand Strategy Presentation
Barbie - Brand Strategy Presentation
 

58 dokumen.tips_audi-a4b4-engine-tdi-19-1z-and-ahu-service-manual.pdf

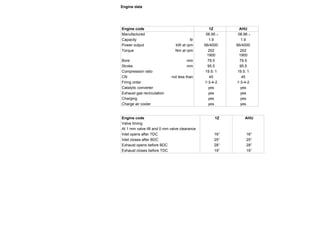
  • 1. Engine data Engine code 1Z AHU Manufactured 06.95 > 08.96 > Capacity ltr 1.9 1.9 Power output kW at rpm 66/4000 66/4000 Torque Nm at rpm 202 202 1900 1900 Bore mm 79.5 79.5 Stroke mm 95.5 95.5 Compression ratio 19.5: 1 19.5: 1 CN not less than 45 45 Firing order 1-3-4-2 1-3-4-2 Catalytic converter yes yes Exhaust gas recirculation yes yes Charging yes yes Charge air cooler yes yes Engine code 1Z AHU Valve timing At 1 mm valve lift and 0 mm valve clearance Inlet opens after TDC 16° 16° Inlet closes after BDC 25° 25° Exhaust opens before BDC 28° 28° Exhaust closes before TDC 19° 19°
  • 2. CUT Removing and installing engine Special tools and workshop equipment required ‹ Engine support bracket 10-222 A ‹ Lifting tackle 2024 A ‹ Special tool 3147 ‹ V.A.G 1202 A ‹ V.A.G 1306 ‹ Special tool Matra V/175
  • 3. Removing Notes: ‹ The engine is lifted out without the gearbox. ‹ Catch drained-off coolant in a clean container for re-use or disposal. ‹ All cable ties which are opened or cut open when removing the engine must be replaced in the same position when installing the engine. - Obtain radio code on vehicles with coded radio. - With ignition switched off disconnect battery earth strap. Warning! Hot steam can escape when the cap on the expansion tank is opened. Cover the cap with a cloth, and open it carefully. - Open cap on coolant expansion tank. - Õ Remove noise insulation (two sections) -arrows-. - Place drip tray V.A.G 1306 below engine.
  • 4. 900058 Type 4A Type description - Õ Turn drain screw -arrow- on radiator anti-clockwise, if necessary fit drain hose to connection. - Õ To drain off remaining coolant, disconnect coolant hoses -arrows-.
  • 5. 900058 Type 4A Type description - Õ Slacken bolts 2 ... 6. - Slacken V-belt by loosening tensioning nut -1-. - Remove V-belt.
  • 6. 900058 Type 4A - Õ Unbolt vane pump for power steering and bracket (at rear) -arrows-. Do not disconnect hydraulic connections. - Secure vane pump to body with wire to avoid overtensioning the hydraulic connections. - Õ Disconnect positive wire to fan motor at series resistance -arrow-. - Installation position: behind front bumper, on left. - Move wiring clear.
  • 7. 900058 Type 4A Type description - Õ Unbolt torque reaction support from engine and cross member -arrows-. - Õ Disconnect bottom air hose -3- from charge air cooler. - Disconnect wiring-1-from alternator. - Unbolt earth wire -2- from longitudinal member.
  • 8. 900058 Type 4A Type description - Õ Unbolt starter from engine/gearbox and secure as necessary. Note: Starter cables do not have to be disconnected. Vehicles with automatic gearbox - Õ Unscrew 3 torque converter nuts through starter opening using Matra V/175 15 mm A/F socket attachment (turn crankshaft 1/3 turn each time). Note: When loosening torque converter bolts, counterhold crankshaft by applying spanner to central bolt on vibration damper. All models - Unscrew engine/gearbox securing bolts accessible from below
  • 9. 900058 Type 4A Type description - Õ Remove engine cover panel -arrows-. - Õ Remove air intake pipe -arrow- between lock carrier and air cleaner housing.
  • 10. 900058 Type 4A Type description - Õ Unscrew earth connection to fan motor at earth point -arrow- at front left of engine compartment. - Unbolt radiator fan cowl from radiator and lift out. - Õ Disconnect wires/unplug connectors as follows: 1 -Exhaust gas recirculation valve -N18 2 -Air mass meter -G70 4 -Charge pressure control solenoid valve -N75 5 -Intake manifold temperature sender -G72 - Disconnect vacuum hose from mechanical exhaust gas recirculation valve-3-. - Disconnect thin hose-6-from bottom of valve for exhaust gas recirculation -N18. - Move wiring and hoses clear. - Disconnect air hose from air mass meter. - Remove upper section of air cleaner housing with air mass meter.
  • 11. 900058 Type 4A Type description - Õ Unbolt charge pressure control solenoid valve -2- from air duct -1-. Do not disconnect hoses. - Remove air duct-1-between charge air cooler and intake manifold. - Remove air intake hose between charge air cooler and turbocharger. Vehicles with air conditioner: - Remove ribbed belt => Page 13-11. - Remove lower section of air cleaner housing. - Disconnect connector on A/C compressor. Warning! The air conditioner refrigerant circuit must not be opened. - Remove A/C compressor and secure to body with wire. All models - Õ Unscrew bolts securing turbocharger to catalytic converter -arrows-. - Disconnect front exhaust pipe with catalytic converter from turbocharger. Note: Secure the flange of the front exhaust pipe to the right suspension turret with wire. It is then not necessary to remove the front exhaust pipe.
  • 12. 900058 Type 4A Type description - Õ Disconnect wires/unplug connectors as follows: 1 -Injection pump 2 -Injection pump 3 -Wiring for engine speed sender -G28 4 -Needle lift sender -G80 5 -Coolant temperature sender -G62 6 -Electronic thermo switch -F76 7 -Oil pressure switch -F1 8 -Oil temperature sender -G8 - Unplug connectors from glow plugs. - Unplug connector from speedometer sender -G22 on left of gearbox, and move wire clear.
  • 13. 900058 Type 4A Type description - Unplug connector for reversing light switch on gearbox, and move wire clear. All models - Õ Disconnect diesel supply and return pipes -arrows- at injection pump and move clear to one side. Note: Use clean plugs to block off the pipes. - Õ Disconnect coolant hoses -arrows-. - Remove hose with non-return valve from exhauster pump. - Unscrew upper engine/gearbox securing bolts. Leave one bolt in place (hand-tight). Vehicles with manual gearbox:
  • 14. 4A - Õ Unscrew top nuts -arrow- on left and right engine mounts. - Õ Position support bar 10-222 A on bolted flanges of wing panels -arrows-. Note: Support bar must be positioned behind gas strut for bonnet, and spindles must face forwards. - Engage gearbox support 3147 in top right bolt hole in bell housing on gearbox, as illustrated. Notes: ‹ The height of the gearbox can be adjusted via the wing nut on the lifting hook. ‹ Do not overtension, otherwise the pressure pipe for the clutch slave cylinder could be damaged (on manual gearbox). ‹ The illustration shows the engine removed.
  • 15. - Õ Attach lifting tackle 2024 A to engine and hook onto workshop crane V.A.G 1202 A. Note: To balance the centre of gravity of the engine, position the hook attachments as shown in the illustration. Warning The hook attachments and locating pins on the lifting tackle must be secured with locking pins (arrows in illustration). - Remove the last securing bolt. Note: Check that all hoses and other connections between engine and body have been detached. - Lift engine over studs of engine mounts. - Tighten spindle of support bar 10-222 A. - Raise engine carefully and lift out. Vehicles with automatic gearbox - Secure torque converter in gearbox to prevent it falling out.
  • 16. Attaching engine to engine stand Special tools and workshop equipment required ‹ Engine and gearbox support VW 540 Work sequence Õ When working on the engine, secure it to the engine stand using engine bracket VW 540.
  • 17. Installing Installation is carried out in the reverse order, when doing this note the following: Notes: ‹ When performing repairs, renew seals, gaskets, self-locking nuts and bolts which have a specified tightening angle. ‹ Secure all hose connections with the correct hose clips (same as original equipment) => Parts catalogue - Check whether the two dowel sleeves for centring engine and gearbox are in the cylinder block, install if necessary. - Push intermediate plate onto dowel sleeves. Vehicles with manual gearbox - Clean input shaft splines and (in the case of used clutch plates) the hub splines. Remove corrosion and apply only a very thin coating of grease G 000 100 to the splines. Do not grease guide sleeve. - Check clutch release bearing for wear and renew if necessary. - Check that clutch plate is properly centred in vehicles with manual gearbox. - A needle bearing must be fitted in the crankshaft on vehicles with manual gearbox. Install needle bearing if necessary => Page 13-53. Vehicles with automatic gearbox - In vehicles with automatic gearbox, no needle bearing must be fitted in the crankshaft. Remove needle bearing if necessary => Page 13-53. - To secure the torque converter on the drive plate only use the correct nuts as specified in the parts catalogue.
  • 18. => Parts catalogue - Tighten torque converter nuts with special tool Matra V/175. - Before installing engine, rotate torque converter and drive plate so that one hole and one stud are level with the aperture for the starter motor. Checking position of torque converter Õ If the torque converter has been installed correctly, distance-A -between the joint surface on the torque converter bellhousing and the bottom contact surface on the torque converter studs should be approx 23 mm. If the torque converter has not been installed properly, the distance will be about 13 mm. If the torque converter is incorrectly inserted in the gearbox, the driver of the torque converter or the ATF pump will be severely damaged when the gearbox is attached to the engine. - Check ATF level: => Automatic gearbox 01N; Repair group 37; Checking and changing ATF; Checking ATF level and topping up ATF=> All models - Ensure that engine mounts are free of stress by shaking engine to align it before tightening engine mounts. - Allow stop for torque reaction support to rest on rubber buffer for torque reaction support under its own weight, and tighten bolts. - Install ribbed belt =>Page 13-12. - Fill up with coolant=> Page 19-7.
  • 19. 1Z CUT ‹ Drained-off coolant may only be used again if the original cylinder head or cylinder block are re-installed. ‹ Coolant must not be used again if it is dirty. - Stress-free alignment of exhaust system => Page 26-10. - Electrical connections and routing: => Current flow diagrams, Electrical fault finding and Fitting locations - Connect EGR hoses and pipes => Diagram of vacuum hose connections, Page 26-15. - Connect hoses and pipes for charge pressure control system => Diagram of connections, Page 21-2. - After connecting battery, enter anti-theft code for radio => Radio operating instructions The electronic control units can be damaged if a rapid charger is used to start the engine. - Close windows fully using electric window switches. - Then operate all electric window switches again for at least one second in the "close" direction to activate the automatic one -touch function. - Set clock to correct time. - Check oil level before starting engine. - Interrogate fault memory: => Diesel direct injection and glow plug system (4-cyl. TDI); Repair group 01; Interrogating and erasing fault memory=> Note: Faults will have been stored in the memory because connectors have been unplugged. Therefore interrogate and erase fault memory after installing engine. Notes:
  • 20. Tightening torques Notes: ‹ The tightening torques listed on this page apply only to lightly greased, oiled, phosphated, or black-finished nuts and bolts. ‹ Additional lubricant such as engine or gearbox oil may be used, but do not use graphite lubricant. ‹ Do not use degreased parts. ‹ Tolerance for tightening torques is ±15%. Õ Engine/gearbox mountings (manual gearbox) Item No. Bolt Nm 1, 3, 4 M12 x 67 65 2, 6 M12 x 90 65 5, 11 M12 x 110 65 7, 8 1), 9, 10 M10 x 45 45 1)M8 bolt fitted up to approx. 07.96: tightening torque 25 Nm A: centering sleeves
  • 21. Õ Engine/gearbox mountings (automatics) Item No. Bolt Nm 1, 8, 9, 10 M10 x 45 45 2, 3, 4, 11 M12 x 67 65 5 M12 x 110 65 6 M12 x 90 65 7 M10 x 60 45 A: centering sleeves Component Nm Bolts/nuts M6 10 M8 20 M10 45 M12 65 Except for the following: Engine mount to subframe 25 Engine support to engine mount 25 Torque reaction support M8 20 M10 40 Drive plate to torque converter M10 x1 85 A/C compressor to compressor bracket 25 Power steering pump to bracket 25 Catalytic converter to turbocharger 25 Hose clamps 2
  • 22. Dismantling and assembling engine Ribbed belt drive for alternator, V-belt drive for coolant pump and vane pump Notes: ‹ The following illustration shows the belt drive on vehicles without air conditioner. ‹ Mark the direction of rotation before removing the ribbed belt. If the belt rotates in the wrong direction when it is refitted, this can cause breakage. Ensure that the belt is properly seated in the pulleys when installing.
  • 23. 1 - V-belt ‹ For coolant pump ‹ For vane pump ‹ Check for wear ‹ Removing and installing => Page 13-9 2 - 25 Nm ‹ If necessary, brace pulley with strap wrench (oil filter wrench) when loosening and tightening. 3 - Bolt ‹ Bolt with strength rating 8.8: tighten to 25 Nm ‹ Bolt with strength rating 10.9: tighten to 35 Nm => Parts catalogue ‹ If necessary, brace pulley with strap wrench (oil filter wrench) when loosening and tightening.
  • 24. 4 - Pulley ‹ For vibration damper ‹ V-belt version 5 - Ribbed belt ‹ Check for wear ‹ Removing and installing => Page 13-11 6 - Cover cap ‹ Prise off with screwdriver 7 - Tensioning roller ‹ For ribbed belt ‹ Removing and installing ribbed belt => Page 13-11 8 - 65 Nm ‹ If necessary, brace pulley with strap wrench (oil filter wrench) when loosening and tightening.
  • 25. 9 - Pulley ‹ For alternator ‹ For ribbed belt 10 - 25 Nm 11 - Alternator ‹ Removing: - Disconnect battery earth strap - Remove ribbed belt - Loosen bolts on alternator (top and bottom) - Detach alternator and unscrew wiring connections ‹ To facilitate positioning of alternator, knock back bush for bottom retaining bolt on bracket slightly 12 - Lever ‹ For tensioning roller ‹ Engage flats on end of lever in tensioning element -Item 17-
  • 26. 13 - 25 Nm 14 - Seal 15 - 25 Nm 16 - 10 Nm 17 - Tensioning element ‹ Removing: - Remove ribbed belt =>Page 13-11. ‹ Engage on flats on lever for tensioning roller -Item 12- 18 - Bracket ‹ For alternator 19 - 25 Nm
  • 27. 20 - Vibration damper ‹ For ribbed belt ‹ With pulley for V-belt ‹ Can only be installed in one position. Holes are off-set 21 - Coolant pump ‹ Check that pump runs freely ‹ Removing and installing => Page 19-11 22 - Bolt ‹ Bolt with strength rating 8.8: tighten to 25 Nm ‹ Bolt with strength rating 10.9: tighten to 35 Nm => Parts catalogue 23 - Bracket ‹ For vane pump
  • 28. 24 - Bolt/nut ‹ Bolt with strength rating 8.8: tighten to 25 Nm ‹ Bolt with strength rating 10.9: tighten to 35 Nm ‹ Tighten nut to 25 Nm => Parts catalogue 25 - 25 Nm 26 - Rear bracket ‹ For vane pump 27 - Vane pump ‹ For power steering ‹ Removing and installing: => Running gear, Front-wheel drive and four-wheel drive; Repair Group 48; Assembly overview: Vane pump; Vehicles with 4-cylinder engine 28 - 25 Nm
  • 29. 29 - Frontbracket ‹ For vane pump 30 - Retainer 31 - 25 Nm 32 - Bolt - 25 Nm ‹ With tensioner nut 33 - Pulley ‹ For vane pump ‹ V-belt version 34 - 25 Nm ‹ If necessary, brace pulley with strap wrench (oil filter wrench) when loosening and tightening. 35 - 25 Nm 36 - Pulley ‹ For coolant pump ‹ V-belt version
  • 30. Ribbed belt drive for alternator, V-belt drive for coolant pump and vane pump Notes: ‹ The following illustration shows the belt drive on vehicles without air conditioner. ‹ Mark the direction of rotation before removing the ribbed belt. If the belt rotates in the wrong direction when it is refitted, this can cause breakage. Ensure that the belt is properly seated in the pulleys when installing.
  • 31. 1 - V-belt ‹ For coolant pump ‹ For vane pump ‹ Check for wear ‹ Removing and installing => Page 13-9 2 - 25 Nm ‹ If necessary, brace pulley with strap wrench (oil filter wrench) when loosening and tightening. 3 - Bolt ‹ Bolt with strength rating 8.8: tighten to 25 Nm ‹ Bolt with strength rating 10.9: tighten to 35 Nm => Parts catalogue ‹ If necessary, brace pulley with strap wrench (oil filter wrench) when loosening and tightening.
  • 32. 4 - Pulley ‹ For vibration damper ‹ V-belt version 5 - Ribbed belt ‹ Check for wear ‹ Removing and installing => Page 13-11 6 - Cover cap ‹ Prise off with screwdriver 7 - Tensioning roller ‹ For ribbed belt ‹ Removing and installing ribbed belt => Page 13-11 8 - 65 Nm ‹ If necessary, brace pulley with strap wrench (oil filter wrench) when loosening and tightening.
  • 33. 9 - Pulley ‹ For alternator ‹ For ribbed belt 10 - 25 Nm 11 - Alternator ‹ Removing: - Disconnect battery earth strap - Remove ribbed belt - Loosen bolts on alternator (top and bottom) - Detach alternator and unscrew wiring connections ‹ To facilitate positioning of alternator, knock back bush for bottom retaining bolt on bracket slightly 12 - Lever ‹ For tensioning roller ‹ Engage flats on end of lever in tensioning element -Item 17-
  • 34. 13 - 25 Nm 14 - Seal 15 - 25 Nm 16 - 10 Nm 17 - Tensioning element ‹ Removing: - Remove ribbed belt =>Page 13-11. ‹ Engage on flats on lever for tensioning roller -Item 12- 18 - Bracket ‹ For alternator 19 - 25 Nm
  • 35. 20 - Vibration damper ‹ For ribbed belt ‹ With pulley for V-belt ‹ Can only be installed in one position. Holes are off-set 21 - Coolant pump ‹ Check that pump runs freely ‹ Removing and installing => Page 19-11 22 - Bolt ‹ Bolt with strength rating 8.8: tighten to 25 Nm ‹ Bolt with strength rating 10.9: tighten to 35 Nm => Parts catalogue 23 - Bracket ‹ For vane pump
  • 36. 24 - Bolt/nut ‹ Bolt with strength rating 8.8: tighten to 25 Nm ‹ Bolt with strength rating 10.9: tighten to 35 Nm ‹ Tighten nut to 25 Nm => Parts catalogue 25 - 25 Nm 26 - Rear bracket ‹ For vane pump 27 - Vane pump ‹ For power steering ‹ Removing and installing: => Running gear, Front-wheel drive and four-wheel drive; Repair Group 48; Assembly overview: Vane pump; Vehicles with 4-cylinder engine=> 28 - 25 Nm
  • 37. 29 - Frontbracket ‹ For vane pump 30 - Retainer 31 - 25 Nm 32 - Bolt - 25 Nm ‹ With tensioner nut 33 - Pulley ‹ For vane pump ‹ V-belt version 34 - 25 Nm ‹ If necessary, brace pulley with strap wrench (oil filter wrench) when loosening and tightening. 35 - 25 Nm 36 - Pulley ‹ For coolant pump ‹ V-belt version
  • 38. Removing and installing V-belt - Õ Slacken bolts 2 ... 6. - Slacken V-belt by turning tensioner nut -1-. - Remove V-belt. Installation is performed in the reverse order. - Check that V-belt is properly seated. - Routing of belt=>Page 13-13 - Tensioning V-belt=>Page 13-10.
  • 39. Tensioning V-belt - Õ Slacken bolts 2 ... 6. - Adjust belt tension with tensioner nut -1-. - Check tension of V-belt: - Press in the belt firmly with the thumb at a point half-way between the pulleys with the longest run of belt. The amount of yield should be as follows: V-belt for coolant pump and and vane pump Belt yield (max.) ‹ New V-belt 2 mm ‹ Used V-belt 5 mm - TIghten securing bolts on vane pump. Tightening torques Component Nm Vane pump to bracket 25 Vane pump to tensioning bar 25
  • 40. Removing and installing ribbed belt Removing Note: Mark the direction of rotation with chalk or felt pen before removing the ribbed belt. If the belt rotates in the wrong direction when it is refitted, it may break. - Remove V-belt=>Page 13-9. - Detach cover cap -Item 6-, Page 13-3, from tensioning roller. - Õ To slacken ribbed belt tensioning roller, apply 17 mm socket with extension to central nut. - To slacken ribbed belt, turn tensioning element in direction of arrow. - Remove ribbed belt and release tensioning element.
  • 41. - Õ Turn ribbed belt tensioning element in direction of arrow. - Fit ribbed belt over alternator pulley last. Release tensioning element. Note: Ensure that the ribbed belt is properly seated in the pulleys when installing. - Install V-belt=>Page 13-9. - Routing of belts=>Page 13-13 - Press on cover cap -Item 6-, Page 13-3, for tensioning roller. - Start engine and check that belts run properly. Installing - Fit ribbed belt over crankshaft pulley and tensioning element.
  • 42. Routing of belts - Õ Routing of ribbed belt on vehicles without air conditioner. - Õ Routing of ribbed belt on vehicles with air conditioner.
  • 43. Toothed belt drive Note: Mark the direction of rotation with chalk or felt pen before removing the toothed belt. If a used belt rotates in the wrong direction when refitted, this can result in breakage. 1 - Toothed belt guard - top ‹ When installing, engage carefully in bottom toothed belt guard 2 - Toothed belt ‹ Mark direction of rotation with chalk or felt pen before removing ‹ Check for wear ‹ Removing=>Page 13-20 ‹ Installing=>Page 13-26
  • 44. 3 - 20 Nm 4 - Tensioning roller ‹ Checking semi-automatic toothed belt tensioning roller => Page 13-30 ‹ Position =>Fig.1, Page 13-18 5 - 45 Nm ‹ Counter-hold with 3036 to loosen and tighten 6 - Camshaft sprocket ‹ Release from camshaft taper by tapping with a hammer (using a drift through toothed belt guard opening) 7 - 25 Nm 8 - Idler roller 9 - 10 Nm 10 - Toothed belt guard - rear
  • 45. 11 - 10 Nm 12 - 25 Nm 13 - Woodruff key ‹ Check proper seating 14 - Injection pump sprocket ‹ Removing injection pump sprocket =>Fig. 3, Page 13-19 ‹ Check that Woodruff key is fitted correctly 15 - Intermediate shaft sprocket ‹ Installation position =>Fig. 2, Page 13-18 ‹ Check that Woodruff key is fitted correctly 16 - Crankshaft sprocket ‹ Contact surface between sprocket and crankshaft must be free of oil. ‹ Can only be installed in one position.
  • 46. 17 - 90 Nm + 1/4 turn (90 °) further ‹ Renew ‹ Do not use oil ‹ Use counter-hold tool 3099 or 3415 to loosen and tighten ‹ Bolting on counter-hold tool 3099 => Page 13-39 18 - 45 Nm ‹ Use counter-hold tool 3036 to loosen and tighten 19 - 45 Nm 20 - 10 Nm 21 - Toothed belt guard - bottom ‹ To remove, unbolt vibration damper 22 - Spreader clip
  • 47. 900058 Type 4A Type description 1Z CUT Õ Fig.1Position of semi-automatic tensioning roller The retaining lug must fit in the opening in the rear toothed belt guard. Õ Fig.2Installation position of intermediate shaft sprocket ‹ The wider rim -arrows- of the intermediate shaft sprocket is at the front. ‹ The side of the sprocket with the lettering is at the rear.
  • 48. 900058 Type 4A Type description 1Z CUT Õ Fig.3Removing injection pump sprocket z Toothed belt removed => Page 13-20 - Unscrew nut for injection pump sprocket. - Release arms of puller 3032 and apply puller. - Align arms of puller with holes in injection pump sprocket and secure. - Apply tension to injection pump sprocket by tightening puller. - Release injection pump sprocket from taper of injection pump by lightly tapping spindle of puller (hold sprocket while doing this so it does not fall out).
  • 49. Removing and installing toothed belt Special tools and workshop equipment required ‹ Mandrel 2064 ‹ Setting bar 2065 A ‹ Retainer 3036 ‹ Special tool Matra V/159
  • 50. 900058 Type 4A Type description - Õ Remove engine cover panel -arrows-. - Remove V-belt=>Page 13-9. - Remove ribbed belt => Page 13-11. - Õ Unbolt pulley with vibration damper. Removing
  • 51. - Õ Remove top and bottom sections of toothed belt guard -arrows-.
  • 52. 900058 Type 4A Type description - Õ Turn crankshaft to TDC No. 1 cylinder -arrow- (vehicles with manual gearbox). - Õ Turn crankshaft to TDC No. 1 cylinder -arrow- (vehicles with automatic gearbox). Note: Turning crankshaft to TDC No. 1 cylinder with engine removed=> page 13-31. - Remove cylinder head cover =>Page 15-8.
  • 53. 900058 Type 4A Type description - Õ Lock camshaft using setting bar 2065 A. - Õ Centralize setting bar as follows: With setting bar in position, turn camshaft so that one end of setting bar contacts cylinder head. Using feeler gauge, measure gap at other end of setting bar. Insert a feeler gauge corresponding to half the measured gap between setting bar and cylinder head. Now turn camshaft until setting bar contacts feeler gauge. Place a 2nd feeler gauge, of the same thickness, at the other end between setting bar and cylinder head.
  • 54. - Õ Lock injection pump sprocket with pin 2064. - Mark direction of rotation of toothed belt with chalk or felt pen. - Loosen tensioning roller. - Remove idler wheel. - Take off toothed belt. Installing (adjusting valve timing) z Camshaft locked in position with setting bar. z Injection pump locked in position with pin 2064. Notes: ‹ The position of the toothed belt must be set as described below, even after repairs in which the belt is only taken off the camshaft sprocket. ‹ The crankshaft must not be at TDC at any cylinder when the camshaft is turned. Otherwise there is a risk of damage to valves and piston crowns. ‹ Never use the setting bar to hold the camshaft when loosening and tightening the bolt securing the camshaft sprocket. Counter-hold with 3036. - Õ Loosen camshaft sprocket securing bolt 1/2 turn. Release camshaft sprocket from camshaft taper by tapping with a hammer (using a drift through rear toothed belt guard opening). - Check again whether TDC mark on flywheel and reference mark are aligned. - Fit toothed belt (check direction of rotation) on crankshaft sprocket, intermediate shaft sprocket, injection pump sprocket and tensioning roller. - Fit camshaft sprocket together with toothed belt and locate with securing bolt (camshaft sprocket can still turn). - Install idler wheel.
  • 55. - Õ Using a suitable wrench (e.g. Matra V/159), turn eccentric mounting on tensioning roller clockwise until notch aligns with raised portion (arrows). Note: If the eccentric mounting is turned too far to the right (by mistake) , slacken completely before re-tensioning. - Tighten lock nut on tensioning roller to 20 Nm. - Check again whether TDC mark on flywheel and reference mark are aligned. - Tighten bolt securing camshaft sprocket to 45 Nm. Note: On no account use the setting bar to hold the camshaft when loosening and tightening the bolt securing the camshaft sprocket. Counter-hold with 3036. - Remove setting bar. - Remove pin 2064. - Turn crankshaft two full revolutions in normal direction of rotation and set again to TDC No. 1 cylinder.
  • 56. - Õ Check tension of toothed belt. - Markings -arrows- should be in line. - Re-tension toothed belt if necessary. - Check whether injection pump sprocket can be locked with pin 2064. - Check position of camshaft with setting bar. Note: If the setting bar or pin do not fit in place, repeat adjustment procedure. - Remove setting bar. - Remove pin 2064. - Install ribbed belt =>Page 13-12. - Install V-belt=>Page 13-9. - Check injection pump commencement of delivery (dynamic) => Diesel direct injection and glow plug system (4-cylinder TDI); => Repair group 23; Servicing diesel direct injection system;=> => Dynamically checking and adjusting commencement of injection Tightening torques Component Nm Toothed belt sprocket to camshaft 45 Idler wheel to console 25 Semi-automatic tensioning roller to cylinder block 20 Bottom section of toothed belt guard to cylinder block 10 Vibration damper with 8.8 25 pulley to crankshaft 10.9 35
  • 57. Checking semi-automatic toothed belt tensioning roller Test requirements z Toothed belt in position and tensioned. Test sequence - Õ Tension toothed belt with firm thumb pressure. Notch and raised portion -arrows- must move apart. - Release thumb pressure on toothed belt. The tensioning roller should move back to its initial position. - Markings -arrows- should be in line.
  • 58. Turning crankshaft to TDC with engine removed Special tools and workshop equipment required ‹ Adjustment bar 2068 A for top dead centre Vehicles with manual gearbox z Oil filter removed. - Õ Fit TDC adjuster gauge 2068 A with screw as illustrated. - Set adjuster gauge to 107 mm (the reference point is the left notch of the vernier -arrow-). - Turn crankshaft until TDC marking "0" on flywheel coincides with end of adjuster gauge. Vehicles with automatic gearbox z Oil filter removed.
  • 59. - Õ Fit TDC adjuster gauge 2068 A with screw as illustrated. - Set adjuster gauge to 99 mm -arrow- (the reference point is the left notch of the vernier -arrow-). - Turn crankshaft until TDC marking "0" on drive plate coincides with end of adjuster gauge. Note: TDC marking "0" is stamped into the cylinder block side of the drive plate.
  • 60. Removing and installing sealing flanges and flywheel/drive plate Note: For repairs to the clutch: => 5-Speed manual gearbox 012/01W, Front-wheel drive; Repair group 30; Servicing clutch=> 1 - Oil seal ‹ To remove, remove sealing flange -Item 27- ‹ Install with 10-203 ‹ Lightly oil sealing lip 2 - Intermediate shaft sprocket ‹ Installation position =>Fig. 1, Page 13-38 ‹ Check position of Woodruff key -Item 25-
  • 61. 3 - 45 Nm ‹ Use counter-hold 3036 to loosen and tighten 4 - 25 Nm 5 - Oil seal ‹ Renewing => Page 13-39 ‹ Lightly oil sealing lip of oil seal 6 - 10 Nm 7 - Front sealing flange ‹ Before fitting sump, apply a small amount of sealant "AMV 174 004 01"to sealing points between sealing flange and cylinder block 8 - Gasket ‹ Renew
  • 62. 900058 Type 4A Type description MY 9 - Cylinder block ‹ Removing and installing crankshaft => Page 13-48 ‹ Dismantling and assembling pistons and conrods => Page 13-57 10 - Vacuum pump ‹ For brake servo 11 - O ring ‹ Renew 12 - Cover 13 - 10 Nm 14 - 20 Nm 15 - Bracket ‹ For exhauster 16 - O ring ‹ Renew
  • 63. 900058 Type 4A Type description MY 17 - Oil seal ‹ Renew 18 - 10 Nm 19 - Rear sealing flange ‹ With oil seal ‹ Only renew complete ‹ Lightly oil sealing lip of oil seal ‹ Before fitting sump, apply a small amount of sealant "AMV 174 004 01"to sealing points between sealing flange and cylinder block 20 - Gasket ‹ Only install gasket if sealing flange has no sealing lip on cylinder block side 21 - Flywheel/drive plate ‹ Removing and installing flywheel => Page 13-44 ‹ Removing and installing drive plate =>Page 13-45
  • 64. 900058 Type 4A Type description MY 22 - 60 Nm + 1/4turn (90 °) further ‹ Renewing 23 - Intermediate plate ‹ Must be located on dowel sleeves ‹ Do not damage orbend when assembling 24 - Intermediate shaft ‹ Axial clearance max. 0.25 mm 25 - Woodruff key ‹ Check that Woodruff key is fitted correctly 26 - O ring ‹ Renew 27 - Sealing flange for intermediate shaft 28 - 25 Nm
  • 65. 900058 Type 4A Type description 1Z CUT Õ Fig.1Installation position of intermediate shaft sprocket ‹ The wider rim -arrows- of the intermediate shaft sprocket is at the front. ‹ The side of the sprocket with the lettering is at the rear.
  • 66. Renewing crankshaft oil seal - pulley end - Special tools and workshop equipment required ‹ Oil seal extractor 2085 ‹ Oil seal fitting tool 3083 ‹ Counter-hold tool (retainer) 3099
  • 67. 4A - Remove ribbed belt => Page 13-11. - Remove toothed belt => Page 13-20. - Õ Remove crankshaft toothed belt sprocket. To do this counter -hold sprocket with 3099. Note: Special tool 3415 can be used instead. - Õ Screw cheese-head bolt from 3083 five or six turns into crankshaft before applying oil seal extractor. - Unscrew inner part of the oil seal extractor 2085 two turns (approx. 3 mm) out of the outer part and lock with knurled screw. Removing z Engine in vehicle - Remove V-belt=>Page 13-9.
  • 68. 900058 Type 4A Type description - Õ Lubricate threaded head of oil seal extractor, place it in position and, exerting firm pressure, screw it as far as possible into oil seal. - Loosen knurled screw and turn inner part against crankshaft until the oil seal is pulled out. - Clamp flats of oil seal extractor in vice. Remove oil seal with pliers. - Clean contact surface and sealing surface. Installing - Lightly oil sealing lip of oil seal. - Õ Place guide sleeve from 3083 onto crankshaft journal. - Slide oil seal over guide sleeve.
  • 69. 4A - Õ Press oil seal in onto stop using press sleeve and bolt from 3083. - Renew bolt for toothed belt sprocket. - Install crankshaft sprocket and lock in position with retainer 3099. Notes: ‹ Contact surface between toothed belt sprocket and crankshaft must be free of oil. ‹ Do not grease bolt for toothed belt sprocket. - Install toothed belt (adjust valve timing) => Page 13-26. - Allow stop for torque reaction support to rest on rubber buffer for torque reaction support under its own weight, and tighten bolts. - Install ribbed belt =>Page 13-12. - Install V-belt=>Page 13-9. Tightening torques Component Nm Toothed belt sprocket to crankshaft 90 + 90°1)2) Torque reaction support M8 20 M10 40 1)Renew bolt 2)90° is a quarter turn
  • 70. Removing and installing flywheel/ drive plate Flywheel Special tools and workshop equipment required ‹ Counter-hold tool 10-201 Work sequence - Õ Reverse position of retainer 10-201 for loosening/tightening bolts. - Mark position of flywheel relative to engine. - Renew bolts. Tightening torque Component Nm Flywheel to crankshaft 60 + 90°1) 1)90°= 1/4turn
  • 71. 900058 Type 4A Type description ‹ Counter-hold tool VW 558 ‹ Hexagon bolt M8 x 45 and two M10 hexagon nuts ‹ Depth gauge Removing - Õ Secure counter-hold tool VW 558 to the drive plate with a hexagon bolt M8x45. Place two M10 hexagon nuts -1- between counter-hold tool and drive plate. - Mark position of drive plate relative to engine. - Loosen securing bolts on drive plate. Drive plate Special tools and workshop equipment required
  • 72. 900058 Type 4A Type description - Õ Locate drive plate with shim -2- and packing plate -1- .The lug -arrow- must face towards torque converter. - Insert at least 3 old securing bolts and tighten to 30 Nm. - Õ Measure distance -a- at three points and calculate average value. - Specified distance: 26 ... 28 mm If the specification is exceeded: Installing
  • 73. 900058 Type 4A Type description - Õ Remove drive plate again and install without shim -2-. Tighten bolts to 30 Nm again. - Measure distance again. If the specification is attained: - Fit new bolts and tighten. Tightening torque Component Nm Drive plate to crankshaft 60 + 90°1) 1)90°= 1/4turn
  • 74. Removing and installing crankshaft Note: Secure engine to engine bracket VW 540 on assembly stand when dismantling/assembling engine. 1 - Thrust washers ‹ For bearing 3 ‹ Different versions for cylinder block and bearing cap ‹ Note fixing arrangement 2 - Bearing shell ‹ Bearing shell with oil groove for cylinder block ‹ Do not interchange used bearing shells (mark with waterproof pen)
  • 75. 3 - Crankshaft ‹ Axial clearance new: 0.07...0.17 mm Wear limit: 0.37 mm ‹ Check radial clearance with Plastigage New: 0.03...0.08 mm Wear limit: 0.17 mm ‹ Do not rotate the crankshaft when checking the radial clearance ‹ Crankshaft dimensions => Page 13-56 4 - Bearing shell ‹ Bearing shell without oil groove for bearing cap ‹ Do not interchange used bearing shells (mark with waterproof pen) 5 - Thrust washers ‹ For bearing 3 bearing cap ‹ Different versions for cylinder block and bearing cap ‹ Note fixing arrangement
  • 76. 6 - 65 Nm + 1/4turn (90 °) further ‹ Renewing ‹ When measuring radial clearance of crankshaft, tighten to 65 Nm but do not turn further 7 - Bearing cap ‹ Bearing cap 1: Pulley end ‹ Bearing cap 3 with recesses for thrust washers ‹ Bearing shell retaining lugs (cylinder block/bearing cap) must be on the same side 8 - 10 Nm + 1/4 turn (90 °) further ‹ Renew ‹ Always renew sender wheel if bolts have been unscrewed =>Fig.1, Page 13-52
  • 77. 9 - Needle bearing ‹ Pulling out and driving in => Page 13-53 10 - Sender wheel ‹ For engine speed sender (G28) ‹ Can only be installed in one position. Holes are off-set ‹ Always renew sender wheel if securing bolts have been unscrewed ‹ Removing and installing =>Fig. 1, Page 13-52 11 - Fitted pin ‹ Checking projection from crankshaft=>Fig. 2, Page 13-52
  • 78. 4A 1Z CUT Õ Fig.1Removing and installing sender wheel - Always renew sender wheel -2- if securing bolts -1- have been unscrewed. Notes: ‹ If the securing bolts are tightened a second time, the seats for the countersunk bolt heads in the sender wheel will be distorted to such an extent that the bolt heads will come into direct contact with the crankshaft -3- (-arrows-) and the sender wheel will only fit loosely under the bolts. ‹ The mounting holes are asymmetrically spaced, so it is only possible to install the sender wheel in one position. Tightening torque Component Nm Sender wheel to crankshaft 10 + 90° 1)2) 1)Renew bolts 2)90° is a quarter turn Õ Fig. 2Checking dowel pin projection out of crankshaft Dowel pin projection -3- out of crankshaft ‹ a =2.5...3.0 mm
  • 79. Removing and installing needle bearing in crankshaft Special tools and workshop equipment required ‹ Drift VW 207 C ‹ Special tool Kukko 21/1 (Item 1) and Kukko 22/1 (Item 4) Notes: ‹ A needle bearing must be fitted in the crankshaft on vehicles with manual gearbox. Install needle bearing if necessary. ‹ The needle bearing must not be fitted in the crankshaft on vehicles with automatic gearbox. Remove needle bearing if necessary.
  • 80. 900058 Type 4A Type description - Õ Pull out needle bearing using Kukko 21/1 and Kukko 22/1. Installing - Õ Knock in with drift VW 207 C or centring mandrel 3176. - Lettering on needle bearing must be visible when installed. Removing
  • 81. 4A 1Z Õ Installation depth for needle bearing ‹ Distance a = 1.5 mm
  • 82. Crankshaft dimensions (in mm) Honing dimension Main journal dia. Conrod journal dia. -0.022 -0.022 Basic dimension 54.00 47.80 -0.042 -0.042 -0.022 -0.022 1st undersize 53.75 47.55 -0.042 -0.042 -0.022 -0.022 2nd undersize 53.50 47.30 -0.042 -0.042 -0.022 -0.022 3rd undersize 53.25 47.05 -0.042 -0.042
  • 83. Dismantling and assembling pistons and conrods Note: Vehicles can be fitted with two different types of conrods: ‹ Conrods with fitted pin -item 8-: use conrod bolts without centring location. ‹ Conrods without fitted pin: use conrod bolts with centring location(fitted bolts). 1 - 7 Nm ‹ Version fitted>06.96 ‹ Apply sealant AMV 188 001 02 when installing 2 - Oil spray jet ‹ For piston cooling ‹ Version fitted>06.96 ‹ With pressure relief valve (opens at 1.3 ... 1.6 bar)
  • 84. 3 - Pressure relief valve, 27 Nm ‹ Version fitted 07.96>(phased in) ‹ opens at: 1.3 ... 1.6 bar ‹ Do not apply locking fluid 4 - Oil spray jet ‹ For piston cooling ‹ Version fitted 07.96>(phased in) 5 - Bearing shell ‹ Note installation position ‹ Do not interchange used bearing shells (mark with waterproof pen) ‹ Ensure retaining lugs fit tightly in recesses ‹ Axial clearance Wear limit: 0.37 mm ‹ Check radial clearance with Plastigage: Wear limit: 0.08 mm Do not rotate crankshaft when checking radial clearance
  • 85. 6 - Cylinder block ‹ Checking cylinder bores =>Fig. 4, Page 13-64 ‹ Piston and cylinder dimensions =>Page 13-68 7 - Bearing shell ‹ Note installation position ‹ Do not interchange used bearing shells (mark with waterproof pen) ‹ Ensure retaining lugs fit tightly in recesses ‹ Axial clearance Wear limit: 0.37 mm ‹ Check radial clearance with Plastigage: Wear limit: 0.08 mm Do not rotate crankshaft when checking radial clearance
  • 86. 8 - Fitted pin ‹ See note =>Page 13-57 ‹ The fitted pin must seat securely in the conrod, not in the bearing cap 9 - Conrod ‹ See note =>Page 13-57 ‹ Only renew as a set ‹ Mark cylinder number -A- ‹ Installation position: Marking -B- faces towards pulley end 10 - Circlip 11 - Piston pin ‹ If difficult to move, heat piston to approx. 60 °C ‹ Remove and install with VW 222a
  • 87. 12 - Piston ‹ With combustion chamber ‹ Checking=>Fig. 3, Page 13-64 ‹ Mark installation position/cylinder number=> Fig.5, Page 13-65 ‹ Renew piston if there are cracks in piston skirt ‹ Arrow on piston crown points to pulley end ‹ Install using piston ring clamp ‹ Checking piston projection at TDC =>Page 13-66 ‹ Piston and cylinder dimensions =>Page 13-68
  • 88. 13 - Piston ring ‹ Offset gaps by 120 ° ‹ Remove and install with piston ring pliers ‹ "TOP" must face towards piston crown ‹ Checking ring gap =>Fig. 1, Page 13-63 ‹ Checking ring-to-groove clearance =>Fig. 2, Page 13-63 14 - Conrod bearing cap ‹ Mark cylinder number -A- ‹ Installation position: Marking -B- faces towards pulley end 15 - Conrod bolt, 30 Nm + 1/4 turn (90 °) further ‹ See note =>Page 13-57 ‹ Renew ‹ Oil threads and contact surface ‹ To measure radial clearance use old bolts
  • 89. 4A 1Z Õ Fig. 1Checking piston ring gap - Push ring squarely from above down to approx. 15 mm from bottom end of cylinder. Piston ring New Wear limit Dimensions in mm 1st compression ring 0.20...0.40 1.0 2nd compression ring 0.20...0.40 1.0 Oil scraper ring 0.25...0.50 1.0 Õ Fig. 2Checking ring to groove clearance - Clean groove before checking clearance. Piston ring New Wear limit Dimensions in mm 1st compression ring 0.06...0.09 0.25 2nd compression ring 0.05...0.08 0.25 Oil scraper ring 0.03...0.06 0.15
  • 90. 4A Õ Fig. 3Checking piston - Measure pistons approx. 10 mm from lower edge of skirt, at 90° to the piston pin axis. - Deviation from nominal dimension not more than 0.04 mm
  • 91. 4A 1Z Õ Fig. 4Checking cylinder bores Special tools and workshop equipment required ‹ Internal dial gauge 50...100 mm - Take measurements at 3 positions in both lateral -A- and longitudinal -B- directions. - Deviation from nominal dimension not more than 0.10 mm
  • 92. 4A 1Z CUT Õ Fig.5Piston installation position and piston/cylinder allocation - Mark installation position and cylinder number on inside of pistons (not on piston crown) with electric scriber or felt-tip pen. - Pistons in cylinders 1 and 2: larger recess for inlet valve -arrows- goes towards flywheel end - Pistons in cylinders 3 and 4: larger recess for inlet valve -arrows- goes towards pulley end Note: On new pistons, allocation to cylinders is shown by a coloured marking on the piston crown. ‹ Piston for cylinder 1 and 2: marked 1/2 ‹ Piston for cylinder 3 and 4: marked 3/4 ‹ Arrowon piston crown points to pulley end
  • 93. Checking piston projection at TDC Special tools and workshop equipment required ‹ Special tool VW 382/7 ‹ Special tool VW 385/17
  • 94. 4A 1Z CUT MICLEF Õ The piston projection at TDC must be measured when installing new pistons or a short engine. Install the correct cylinder head gasket for the piston projection - see table below. Piston projection above top Gasket identification surface of cylinder block (No. of holes) 0.91 mm ... 1.00 mm 1 1.01 mm ... 1.10 mm 2 1.11 mm ... 1.20 mm 3
  • 95. 4A 1Z Õ Cylinder head gasket identification ‹ Part No. = arrow 1 ‹ Holes = arrow 2 ‹ Production code = arrow 3 (can be disregarded) Notes: ‹ If different values are measured at individual cylinders when checking piston projection, select the gasket for the highest value. ‹ Installation position: marking "OBEN / TOP" or Part No. goes towards cylinder head.
  • 96. Piston and cylinder dimensions Honing Piston dia. Cylinder bore dimension Basic dimen. mm 79.47 79.51 1st oversize mm 79.72 79.76 2nd oversize mm 79.97 80.01
  • 97. Removing and installing cylinder head Notes: ‹ Cylinder heads which have cracks between the valve seats can continue to be used without reducing service life, provided there are only small cracks not wider than 0.5 mm. ‹ When fitting a new cylinder head or cylinder head gasket, drain off all the old coolant and re-fill with new coolant. ‹ The cylinder head on a diesel engine must not be reworked. ‹ When installing an exchange cylinder head with fitted camshaft, the contact surfaces between tappets and cams must be oiled after installing the head. ‹ The plastic protectors fitted to protect the open valves must only be removed immediately before fitting the cylinder head. ‹ Before applying sealant, check updated information: => Parts catalogue
  • 98. 1 - Cylinder head ‹ Removing => Page 15-13 ‹ Check for distortion =>Fig. 1, Page 15-6 ‹ Installing => Page 15-23 ‹ After replacing, fill with fresh coolant 2 - 25 Nm 3 - Lifting eye 4 - Lower sealing cone 5 - Cylinder head cover gasket ‹ Renew if damaged or leaking ‹ Before fitting gasket apply AMV 174 004 01at sealing points =>Fig.3and Fig. 4, Page 15-7 ‹ Fit projections into drill holes on cylinder head
  • 99. 6 - Cylinder head cover ‹ Removing and installing => Page 15-8 7 - Upper sealing washer ‹ Renew if damaged 8 - Dished washer 9 - 10 Nm 10 - Cover cap 11 - Gasket ‹ Renew if damaged or leaking 12 - Fillercap 13 - Breather hose 14 - Hose clip ‹ After fitting hose clip on hose, engage in retaining tab on cylinder head cover
  • 100. 15 - Pressure regulating valve ‹ For crankcase breather 16 - Gasket ‹ Renew if damaged 17 - Cylinder head bolt ‹ Renew ‹ Note sequence when loosening => Page 15-22 ‹ Note sequence when tightening => Page 15-26 18 - Injector pipes ‹ Tighten to 25 Nm ‹ Remove with 3035 ‹ Always remove pipework complete ‹ Do not alter shape 19 - 10 Nm 20 - Coolant flange ‹ With coolant temperature sender
  • 101. 21 - O ring ‹ Renew 22 - Coolant flange 23 - 10 Nm 24 - Connector ‹ For needle lift sender -G80 25 - Return pipe ‹ To injection pump 26 - Cylinder head gasket ‹ Different thicknesses ‹ Note marking =>Fig. 2, Page 15-6 ‹ Renew => Removing cylinder head, from Page 15-13onwards ‹ Position: Marking "OBEN / TOP" or Part No. towards cylinder head ‹ After replacing, fill with fresh coolant
  • 102. 4A 1Z CUT Õ Fig. 1Checking cylinder head for distortion - Use knife-edge straightedge and feeler gauge to measure at several points. - Max. permissible distortion: 0.1 mm Note: Reworking Diesel cylinder heads is not permissible.
  • 103. 4A 1Z CUT Õ Fig.2Cylinder head gasket identification ‹ Part No. = arrow 1 ‹ Holes = arrow 2 ‹ Production code = arrow 3 (can be disregarded) Notes: ‹ Cylinder head gaskets of different thicknesses must be installed according to the amount of piston projection=>Page 13-66. When only the gasket is being replaced, install a new gasket with the same identification as the old one. ‹ Installation position: marking "OBEN / TOP" or Part No. goes towards cylinder head.
  • 104. 4A 1Z CUT Õ Fig. 3Sealing sides of joint between bearing cap and cylinder head - Apply a small quantity of sealant "AMV 174 004 01" to sides of joints -arrows- on upper sealing surface of cylinder head. Õ Fig. 4Sealing sides of joint - Apply a small quantity of sealant "AMV 174 004 01" to sides of joints -arrows- on upper sealing surface of cylinder head.
  • 105. Removing and installing cylinder head cover Removing - Õ Remove engine cover panel -arrows-. - Õ Slacken hose clamps -arrows- and disconnectcrankcase breather hoses from pressure control valve.
  • 106. - Õ Pull off caps -7-. - Loosen nuts -6- on cylinder head cover. - Take off dished washer -5- and upper sealing washer -4-. - Remove cylinder head cover -3-. - Remove gasket -2- and lower sealing cone -1-.
  • 107. If damaged, fit new cylinder head cover gasket, upper sealing washer and sealing cone. - Õ Apply a small quantity of sealant "AMV 174 004 01" to sides of joints -arrows- on upper sealing surface on cylinder head. - Õ Apply a small quantity of sealant "AMV 174 004 01" to sides of joints -arrows- on upper sealing surface on cylinder head. - Position cylinder head cover (with attached parts). Tightening torque Component Nm Cylinder head cover to cylinder head 10 Installing Installation is carried out in the reverse order, when doing this note the following:
  • 108. Removing and installing intake manifold Removing - Remove turbocharger =>Page 21-29. - Õ Slacken hose clamp -1-. - Unscrew bolts -arrows-. - Õ Unscrew nuts -1- and remove heat shield. - Unscrew bolts -arrows-. - Remove intake manifold. Installing Installation is performed in the reverse order. Tightening torques Component Nm Intake manifold to cylinder head 25 Heat shield to exhaust manifold 25 Mechanical exhaust gas recirculation valve to intake manifold 25
  • 109. Removing cylinder head Special tools and workshop equipment required ‹ Mandrel 2064 ‹ Setting bar 2065 A ‹ Open ring spanner 3035 ‹ Counterhold tool 3036 ‹ Guide pin 3070 ‹ V.A.G 1306
  • 110. All cable ties which are released or cut open when removing must be fitted in the same position when installing. - Obtain radio code on vehicles with coded radio. - With ignition switched off disconnect battery earth strap. Warning! Hot steam can escape when the cap on the expansion tank is opened. Cover the cap with a cloth, and open it carefully. - Open cap on coolant expansion tank. - Õ Remove engine cover panel -arrows-. Work sequence z Engine in vehicle Note:
  • 111. - Õ Remove air intake pipe -arrow- between lock carrier and air cleaner housing. - Õ Disconnect wires/unplug connectors as follows: 1 -Exhaust gas recirculation valve -N18 2 -Air mass meter -G70 4 -Charge pressure control solenoid valve -N75 5 -Intake manifold temperature sender -G72 - Disconnect vacuum hose from mechanical exhaust gas recirculation valve -3-. - Disconnect thin hose -6- from bottom of exhaust gas recirculation valve -N18. - Move wiring and hoses clear. - Detach air hose at air mass meter.
  • 112. 4A - Remove upper section of air cleaner housing together with air mass meter. - Õ Unscrew charge pressure control solenoid valve -2- from air pipe -1-. Leave hoses connected. - Remove air pipe -1- between charge air cooler and intake manifold. - Remove air intake hose between charge air cooler and turbocharger. - Õ Unscrew bolts securing turbocharger to catalytic converter -arrows-. - Disconnect front exhaust pipe with catalytic converter from turbocharger. Note: Tie up flange of front exhaust pipe on right suspension turret with wire. It is then not necessary to remove front exhaust pipe.
  • 113. - Õ Remove noise insulation (two sections -arrows-). - Place a drip tray underneath. - Õ Detach oil return pipe from cylinder block -arrow-. - Draincooling system=> Page 19-4
  • 114. - Õ Disconnect fuel return hose -1- between injectors and injection pump. - Disconnect connectors-2 ...5-. - Disengage connector for engine speed sender from its retainer. - Disconnect coolant hose at rear of cylinder head -arrow-. - Remove injector pipes. Note: Always remove complete set of injector pipes together. Use special spanner for injector pipes 3035. - Unplug connectors from glow plugs. - Õ Disconnect coolant hoses -arrows- on left side of cylinder head. - Remove cylinder head cover =>Page 15-8.
  • 115. 900058 Type 4A Type description MY Engine ID 1Z Gearbox ID CUT User MICLEF Workshop Manual - 7 - - Õ Turn crankshaft to TDC No. 1 cylinder -arrow- (vehicles with manual gearbox). - Õ Turn crankshaft to TDC No. 1 cylinder -arrow- (vehicles with automatic gearbox).
  • 116. 900058 Type 4A Type description MY Engine ID 1Z Gearbox ID CUT User MICLEF Workshop Manual - 8 - - Õ Lock camshaft with setting bar 2065 A. - Remove toothed belt guard (upper) => Page 13-14. - Õ Unscrew 2 bolts -arrows- securing rear toothed belt guard on both sides of cylinder head.
  • 117. 900058 Type 4A Type description MY Engine ID 1Z Gearbox ID CUT User MICLEF Workshop Manual - 9 - - Õ Lock injection pump sprocket with pin 2064. - Mark direction of rotation of toothed belt with chalk or felt pen. - Loosen tensioning roller. - Remove idler wheel. - Take toothed belt off camshaft sprocket. - Remove toothed belt tensioning roller. Note: On no account use the setting bar to hold the camshaft when loosening and tightening the bolt securing the camshaft sprocket. Counter-hold with 3036. - Õ Loosen camshaft sprocket securing bolt 1/2 turn. Release camshaft sprocket from camshaft taper by tapping with a hammer (using a drift through rear toothed belt guard opening). - Remove camshaft sprocket.
  • 118. 900058 Type 4A Type description MY Engine ID 1Z Gearbox ID CUT User MICLEF Workshop Manual - 10 - - Õ Keep to specified sequence when loosening cylinder head bolts. - With a second mechanic, lift cylinder head up slightly and swivel out to the rear.
  • 119. 900058 Type 4A Type description MY Engine ID 1Z Gearbox ID CUT User MICLEF Workshop Manual - 1 - Installing cylinder head Notes: ‹ Always renew cylinder head bolts when assembling. ‹ When performing repairs, renew seals, gaskets, self-locking nuts and bolts which have a specified tightening angle. ‹ If repairing, carefully remove any remains of gasket material from the cylinder head and cylinder block. Make sure that no long scores or scratches are made on the surfaces. ‹ Carefully remove any remaining emery and abrasive material. ‹ No oil or coolant must be allowed to remain in the blind holes for the cylinder head bolts in the cylinder block. ‹ Remove new cylinder head gasket from packaging just before installation. ‹ Handle gasket extremely carefully. Damaging the silicone layer or the indented area will lead to leaks. ‹ After working on the valve gear, turn the engine carefully at least 2 rotations to ensure that none of the valves make contact when the starter is operated. Installation is carried out in the reverse order, when doing this note the following:
  • 120. 900058 Type 4A Type description MY Engine ID 1Z Gearbox ID CUT User MICLEF Workshop Manual - 2 - - Õ Turn crankshaft and camshaft to TDC of cylinder No. 1 before fitting cylinder head. It should be possible to insert setting bar 2065 A in camshaft .... - Õ ... and TDC marking should be in line with reference edge. Note: Illustration shows vehicle with manual gearbox.
  • 121. 900058 Type 4A Type description MY Engine ID 1Z Gearbox ID CUT User MICLEF Workshop Manual - 3 - - Õ Check identification on cylinder head gasket: - Part No. = arrow 1 - Holes = arrow 2 - Production code = arrow 3 (can be disregarded) Notes: ‹ If the cylinder head gasket or the cylinder head has been replaced, select a new gasket according to the number of holes on the old gasket. ‹ If parts of the crankshaft drive have been replaced, the new cylinder head gasket must be selected by measuring the piston projection at TDC => 13-66.
  • 122. 900058 Type 4A Type description MY Engine ID 1Z Gearbox ID CUT User MICLEF Workshop Manual - 4 - - Õ To centre, screw guide pins 3070/9 from 3070 into the outer holes in the cylinder block. - Place cylinder head gasket in position. - Check that centring sleeve in cylinder block is fitted correctly. - Check installation position of cylinder head gasket: the word "oben" (top) or the Part No. should face towards the cylinder head. - Place cylinder head in position. - Screw in 8 cylinder head bolts and tighten by hand. - Unscrew guide pins with removal tool from 3070 through bolt holes in cylinder head and install remaining cylinder head bolts. - Õ Tighten cylinder head bolts in four stages in sequence shown as follows: - Tighten using torque wrench: - 1st stage: 40 Nm - 2nd stage: 60 Nm - TIghten with normal fixed wrench: - 3rd stage:1/4 turn (90°) further - 4th stage: 1/4 turn (90°) further Note: It is not necessary to tighten cylinder head bolts again later after repairs have been performed. - Install toothed belt (adjust valve timing) => Page 13-26. Note: Follow all instructions for removing and installing toothed belt =>Page 13-20. - Install cylinder head cover =>Page 15-9.
  • 123. 900058 Type 4A Type description MY Engine ID 1Z Gearbox ID CUT User MICLEF Workshop Manual - 5 - - Aligning exhaust system free of stress => Page 26-10. - Fill cooling system with fresh coolant => Page 19-7. - After connecting battery, enter anti-theft code for radio => Radio operating instructions - Close windows fully using electric window switches. - Then operate all electric window switches again for at least one second in the "close" direction to activate the automatic one -touch function. - Set clock to correct time. Tightening torques Component Nm Catalytic converter to turbocharger 25 Oil return pipe to cylinder block 30 Injector pipes to injectors/ injection pump 25 Idler wheel to console 25 Toothed belt sprocket to camshaft 45 Hose clamps 2
  • 124. 900058 Type 4A Type description MY Engine ID 1Z Gearbox ID CUT User MICLEF Workshop Manual - 1 - Checking compression pressure Special tools and workshop equipment required ‹ Special tool 3220 ‹ V.A.G 1763 ‹ V.A.G 1381/12 Requirements for test:
  • 125. 900058 Type 4A Type description MY Engine ID 1Z Gearbox ID CUT User MICLEF Workshop Manual - 2 - z Engine oil temperature not less than 30 °C z Battery voltage not less than 12 V Test sequence - Õ Remove engine cover panel -arrows-. - Unplug connector for fuel cut-off valve on injection pump. - Disconnect connector to quantity adjuster on injection pump. - Remove all glow plugs using socket spanner 3220. - Õ Screw in adapter V.A.G 1381/12 in place of the glow plugs. - Check compressions with compression tester V.A.G 1381/V.A.G 1763. Note: Using the compression tester => Operating instructions - Operate starter until tester shows no further pressure increase. Compression pressure: New Wear limit Permissible difference between cylinders bar bar bar 25 ... 31 19 max. 5 - Install glow plugs with jointed spanner 3220 Tightening torque: 15 Nm. - Interrogate and erase fault memory:
  • 126. 900058 Type 4A Type description MY Engine ID 1Z Gearbox ID CUT User MICLEF Workshop Manual - 3 - => Diesel direct injection and glow plug system (4-cylinder TDI); => Repair group 01; Interrogating and erasing fault memory=> Note: Faults will have been stored in the memory because connectors have been unplugged from the injection pump. Interrogate and erase fault memory after checking compression. Tightening torque Component Nm Glow plugs in cylinder head 15
  • 127. 900058 Type 4A Type description MY Engine ID 1Z Gearbox ID CUT User MICLEF Workshop Manual - 1 - Servicing valve gear Notes: ‹ Cylinder heads which have cracks between the valve seats can continue to be used without reducing service life, provided there are only small cracks not more than 0.5 mm wide. ‹ After installing the camshaft, wait for about 30 minutes before starting the engine. The hydraulic tappets must be allowed to settle, otherwise the valves will contact the pistons. ‹ After working on the valve gear, turn the engine carefully at least 2 rotations to ensure that none of the valves make contact when the starter is operated. ‹ Renew all gaskets and seals. ‹ Before applying sealant, check updated information: => Parts catalogue
  • 128. 900058 Type 4A Type description MY Engine ID 1Z Gearbox ID CUT User MICLEF Workshop Manual - 2 - 1 - Cylinder head ‹ See note => Page 15-32 ‹ Checking valve guides =>Page 15-54 ‹ Reworking valve seats => Page 15-51 2 - Oil seal ‹ To remove and install, remove bearing cap and camshaft sprocket ‹ Removing and installing toothed belt =>Page 13-20and13-26 3 - Camshaft sprocket ‹ Take off toothed belt before removing and installing =>Page 13-20or 13-26 ‹ Drive off camshaft taper using hammer and drift through toothed belt guard openings
  • 129. 900058 Type 4A Type description MY Engine ID 1Z Gearbox ID CUT User MICLEF Workshop Manual - 3 - 4 - 45 Nm ‹ Counter-hold with 3036 to loosen and tighten 5 - 20 Nm 6 - Bearing cap ‹ Installation position =>Fig. 1, Page 15-38 ‹ Installation sequence => Page 15-40, removing and installing camshaft ‹ Before installing first bearing cap, apply a thin coat of sealant "D 454 300 A2" to contact surfaces ‹ ApplyAMV 174 004 01at sealing points=>Fig.3and Fig.4, Page 15-7
  • 130. 900058 Type 4A Type description MY Engine ID 1Z Gearbox ID CUT User MICLEF Workshop Manual - 4 - 7 - Camshaft ‹ Checking axial clearance => 15-39 ‹ Removing and installing => Page 15-40 ‹ Check radial clearance with Plastigage Wear limit: 0.11 mm ‹ Run-out: max. 0.01 mm 8 - Hydraulic bucket tappet ‹ Checking => Page 15-46 ‹ Removing and installing => Page 15-48 ‹ Do not interchange ‹ Store with cam contact surface downwards ‹ Before installing check camshaft axial clearance => Page 15-39 ‹ Oil contact surface
  • 131. 900058 Type 4A Type description MY Engine ID 1Z Gearbox ID CUT User MICLEF Workshop Manual - 5 - 9 - Valve cotters 10 - Upper valve spring plate 11 - Outer valve spring ‹ Removing and installing: with cylinder head removed: use 2037 with head installed: => Page 15-48 12 - Inner valve spring ‹ Removing and installing: with cylinder head removed: use 2037 with head installed: => Page 15-48 13 - Valve stem seal ‹ Renewing=> Page 15-48 14 - Valve guide ‹ Checking => Page 15-54 ‹ Renew cylinder head if wear limit is exceeded
  • 132. 900058 Type 4A Type description MY Engine ID 1Z Gearbox ID CUT User MICLEF Workshop Manual - 6 - 15 - Lower valve spring plate ‹ Use puller 3047 A to remove and install 16 - Valve ‹ Do not rework; only lapping-in is permitted ‹ Valve dimensions =>Fig. 2, Page 15-38
  • 133. 900058 Type 4A Type description MY Engine ID 1Z Gearbox ID CUT User MICLEF Workshop Manual - 7 - Õ Fig. 1Fitting position of camshaft bearing caps Note offset. Before installing camshaft fit bearing caps and determine fitting position. Õ Fig. 2Valve dimensions Note: Valves must not be reworked. Only lapping-in is permitted. Dimension Inlet valve Exhaust valve Dia. -a- mm 35.95 31.45 Dia. -b- mm 6.963 6.943 c mm 96.85 96.85 α <° 45 45
  • 134. 900058 Type 4A Type description MY Engine ID 1Z Gearbox ID CUT User MICLEF Workshop Manual - 1 - Checking camshaft axial clearance Special tools and workshop equipment required ‹ Special tool VW 387 ‹ Dial gauge - Õ Perform measurement with bucket tappets removed and front and rear bearing caps fitted. - Wear limit: 0.15 mm
  • 135. 900058 Type 4A Type description MY Engine ID 1Z Gearbox ID CUT User MICLEF Workshop Manual - 1 - Removing and installing camshaft Special tools and workshop equipment required ‹ Mandrel 2064 ‹ Setting bar 2065 A Removing z Cylinder head installed - Remove toothed belt guard (upper) => Page 13-14.
  • 136. 900058 Type 4A Type description MY Engine ID 1Z Gearbox ID CUT User MICLEF Workshop Manual - 2 - - Remove cylinder head cover =>Page 15-8. - Õ Turn crankshaft to TDC No. 1 cylinder -arrow- (vehicles with manual gearbox). - Õ Turn crankshaft to TDC No. 1 cylinder -arrow- (vehicles with automatic gearbox).
  • 137. 900058 Type 4A Type description MY Engine ID 1Z Gearbox ID CUT User MICLEF Workshop Manual - 3 - - Õ Lock camshaft with setting bar 2065 A. - Õ Lock injection pump sprocket with pin 2064. - Mark direction of rotation of toothed belt with chalk or felt pen. Note: If the belt runs in the wrong direction when it is refitted, it can break. - Loosen tensioning roller. - Remove idler wheel. - Take toothed belt off camshaft sprocket. Note: On no account use the setting bar to hold the camshaft when loosening and tightening the bolt securing the camshaft sprocket. Counter-hold with 3036.
  • 138. 900058 Type 4A Type description MY Engine ID 1Z Gearbox ID CUT User MICLEF Workshop Manual - 4 - - Õ Loosen camshaft sprocket securing bolt 1/2 turn. Release camshaft sprocket from camshaft taper by tapping with a hammer (using a drift through rear toothed belt guard opening). - Remove camshaft sprocket. - First remove bearing caps 1, 3 and 5. Loosen bearing caps 2 and 4 alternately and diagonally. Installing Installation is carried out in the reverse order, when doing this note the following: Notes: ‹ Renew camshaft oil seal. ‹ When installing the camshaft No. 1 cylinder cams must point upwards. ‹ Õ When installing the bearing cap note offset. Before installing camshaft, fit bearing caps and determine correct position. - Oil camshaft running surfaces. - Tighten bearing caps 2 and 4 alternately and diagonally to 20 Nm. - Install bearing caps 5, 1 and 3 and also tighten to 20 Nm. - Install toothed belt (adjust valve timing) => Page 13-26. Notes: ‹ Follow all instructions for removing and installing toothed belt =>Page 13-20onwards. ‹ After installing the camshaft, wait for about 30 minutes before starting the engine. The hydraulic tappets must be allowed to settle, otherwise the valves will contact the pistons. ‹ After working on the valve gear, turn the engine carefully at least 2 rotations to ensure that none of the valves make contact when the starter is operated. - Install cylinder head cover =>Page 15-9. - Check injection pump commencement of delivery (dynamic)
  • 139. 900058 Type 4A Type description MY Engine ID 1Z Gearbox ID CUT User MICLEF Workshop Manual - 5 - => Diesel direct injection and glow plug system (4-cylinder TDI); => Repair group 23; Servicing diesel direct injection system;=> => Dynamically checking and adjusting commencement of injection Tightening torque Component Nm Bearing caps to cylinder head 20
  • 140. 900058 Type 4A Type description MY Engine ID 1Z Gearbox ID CUT User MICLEF Workshop Manual - 1 - Checking hydraulic bucket tappets Special tools and workshop equipment required ‹ Feeler gauge ‹ Wood or plastic wedge Notes: ‹ Hydraulic tappets cannot be adjusted or repaired. ‹ Irregular valve noises when starting engine are normal. - Start engine and run until coolant temperature reaches approx. 80 °C. - Increase engine speed to about 2500 rpm for 2 minutes (perform road test if necessary). Note: If the irregular valve noises stop but recur repeatedly during short journeys, a new oil retention valve must be fitted. The oil retention valve is located in the oil filter bracket. If the hydraulic tappets are still noisy, locate defective tappets as follows: - Remove cylinder head cover =>Page 15-8. - Rotate crankshaft until cams of cylinder to be checked are pointing upwards. - Determine play between cam and bucket tappet.
  • 141. 900058 Type 4A Type description MY Engine ID 1Z Gearbox ID CUT User MICLEF Workshop Manual - 2 - - Õ Press tappet down with a wooden or plastic wedge. If an 0.20 mm feeler gauge can be inserted between camshaft and tappet, renew tappet. - Renewing tappets, => Removing camshaft, Page 15-40. Notes: ‹ After installing the camshaft, wait for about 30 minutes before starting the engine. The hydraulic tappets must be allowed to settle, otherwise the valves will contact the pistons. ‹ After working on the valve gear, turn the engine carefully at least 2 rotations to ensure that none of the valves make contact when the starter is operated.
  • 142. 900058 Type 4A Type description MY Engine ID 1Z Gearbox ID CUT User MICLEF Workshop Manual - 1 - Renewing valve stem seals Special tools and workshop equipment required ‹ Valve lever VW 541/1A with thrust piece VW 541/5 ‹ Fitting tool 2036 ‹ Puller 3047 A ‹ Fitting tool 3129 Removing z Cylinder head installed - Remove camshaft => Page 15-40.
  • 143. 900058 Type 4A Type description MY Engine ID 1Z Gearbox ID CUT User MICLEF Workshop Manual - 2 - - Remove the bucket tappets and put them down with the contact surface downwards. When doing this ensure that the tappets are not interchanged. - Set piston of respective cylinder to top dead centre (TDC). - Õ Position fitting tool 2036 with shaft parallel to sealing edge of cylinder head cover. Tighten bolts to secure fitting tool. - Adjust shaft of fitting tool so that it is level with the studs for the bearing caps. - Remove valve springs with lever VW 541/1A. Note: The valves are supported by the piston crown. - Õ Pull off valve stem seals with 3047 A. Installing
  • 144. 900058 Type 4A Type description MY Engine ID 1Z Gearbox ID CUT User MICLEF Workshop Manual - 3 - - Õ To prevent damage to the new valve stem seals -B-, place plastic sleeve -A- on valve stem. - Lightly oil sealing lip of valve stem seal. - Insert valve stem seal in the tool 3129 and push it down carefully onto the valve guide. - Remove plastic sleeve. - Install camshaft => Page 15-44. Notes: ‹ After installing the camshaft, wait for about 30 minutes before starting the engine. The hydraulic tappets must be allowed to settle, otherwise the valves will contact the pistons. ‹ After working on the valve gear, turn the engine carefully at least 2 rotations to ensure that none of the valves make contact when the starter is operated.
  • 145. 900058 Type 4A Type description MY Engine ID 1Z Gearbox ID CUT User MICLEF Workshop Manual - 1 - Reworking valve seats Note: If a good seating pattern cannot be obtained by grinding the valve seats (lapping), they must be refaced (reworked): Special tools and workshop equipment required ‹ Depth gauge ‹ Valve seat refacing tool Notes: ‹ When repairing engines with leaking valves, it is not sufficient to reface the valve seats and renew the valves. The valve guides must also be checked for wear. This is particularly important on high mileage engines =>Page 15-54. ‹ The valve seats should only be reworked just enough to produce a perfect seating pattern. ‹ Calculate the maximum permissible reworking dimension before reworking. ‹ If the maximum permissible reworking dimension is 0 mm or less than 0 mm, measure again with a new valve. If it is still 0 mm or less than 0 mm, the cylinder head must be replaced. Calculating max. permissible reworking dimension - Insert valve and press it firmly against valve seat. Note: If the valve is to be renewed as part of a repair, use a new valve for the calculation.
  • 146. 900058 Type 4A Type description MY Engine ID 1Z Gearbox ID CUT User MICLEF Workshop Manual - 2 - - Õ Measure distance -a- between end of valve stem and upper edge of cylinder head. - Calculate max. permissible reworking dimension from measured distance -a- and minimum dimension. Minimum dimension: Inlet valve 35.8 mm Exhaust valve 36.1 mm Measured distance minus minimum dimension = max. permissible reworking dimension. Example: Measured distance 36.5 mm - Minimum dimension 35.8 mm = max. perm. rework dimension 0.7 mm Õ Reworking inlet valve seat a = 35.7 mm ш b = 1.6 mm 45 ° = Valve seat angle Note: The 30 ° lower valve seat chamfer is required for gas flow characteristics in the inlet port.
  • 147. 900058 Type 4A Type description MY Engine ID 1Z Gearbox ID CUT User MICLEF Workshop Manual - 3 - Õ Reworking exhaust valve seat a = 31.4 mm ш b = 2.7 mm 45 ° = Valve seat angle
  • 148. 900058 Type 4A Type description MY Engine ID 1Z Gearbox ID CUT User MICLEF Workshop Manual - 1 - Checking valve guides Special tools and workshop equipment required ‹ Special tool VW 387 ‹ Dial gauge - Õ Insert valve into valve guide until end of valve stem is flush with end of guide. Due to the slight difference in stem diameters, ensure that only an inlet valve is used in the inlet guide and an exhaust valve in the exhaust guide. Wear limit Amount of sideways play: not more than 1.3 mm Notes: ‹ If the wear limit is exceeded, repeat the measurement with new valves. If the wear limit is again exceeded, renew the cylinder head. ‹ If the valve is to be renewed as part of a repair, use a new valve for the calculation.
  • 149. 900058 Type 4A Type description MY Engine ID 1Z Gearbox ID CUT User MICLEF Workshop Manual - 1 - Removing and installing parts of the lubrication system Notes: ‹ If large quantities of metal shavings or particles are found in the engine oil when repairing the engine, the oil passages must be cleaned carefully, and the oil cooler renewed in order to prevent further damage occurring later. ‹ The oil level must not be above the max. mark - danger of damage to catalytic converter. ‹ Before applying sealant, check updated information: => Parts catalogue Viscosity grades and oil specifications: => Maintenance Oil system capacity: => Binder "Emissions test"
  • 150. 900058 Type 4A Type description MY Engine ID 1Z Gearbox ID CUT User MICLEF Workshop Manual - 1 - Part I 1 - Oil drain plug, 30 Nm 2 - Gasket ‹ Renew 3 - 18 Nm ‹ Tighten in stages and in diagonal sequence 4 - Gasket ‹ Renew ‹ Install dry ‹ Apply a small amount of sealant "AMV 174 004 01" only to sealing points between sealing flange and cylinder block (front and rear) 5 - 10 Nm 6 - Suction pipe ‹ Clean strainer if soiled
  • 151. 900058 Type 4A Type description MY Engine ID 1Z Gearbox ID CUT User MICLEF Workshop Manual - 2 - 7 - O ring ‹ Renew 8 - Pressure relief valve, 27 Nm ‹ opens at: 1.3 ... 1.6 bar ‹ Do not apply locking fluid ‹ Version fitted 07.96 >(phased in) 9 - Oil spray jet ‹ For piston cooling ‹ Version fitted 07.96 >(phased in) ‹ Version fitted>06.96 =>-Item 2-, Page 13-57 10 - Gears ‹ Checking backlash =>Fig. 1, Page 17-8 ‹ Checking axial clearance =>Fig. 2, Page 17-8
  • 152. 900058 Type 4A Type description MY Engine ID 1Z Gearbox ID CUT User MICLEF Workshop Manual - 3 - 11 - Oil pump cover with pressure relief valve ‹ Opening pressure: 5.7...6.7 bar 12 - 10 Nm 13 - 25 Nm 14 - Sump ‹ Removing and installing => Page 17-9 ‹ Clean sealing surface before installing ‹ Before installing sump, apply a small amount of sealant "AMV 174 004 01" to sealing points between sealing flange and cylinder block
  • 153. 900058 Type 4A Type description MY Engine ID 1Z Gearbox ID CUT User MICLEF Workshop Manual - 4 - 15 - Engine/gearbox support ‹ Remove support in order to remove sump => Page 17-9 ‹ When installing engine/gearbox support with engine removed from vehicle, ensure that support is positioned flush with intermediate plate at flywheel end (i.e. engine/ gearbox support should protrude 0.8 mm from cylinder block). 16 - 45 Nm
  • 154. 900058 Type 4A Type description MY Engine ID 1Z Gearbox ID CUT User MICLEF Workshop Manual - 1 - Part II 1 - Oil filter ‹ Observe change intervals => Maintenance manual ‹ Loosen with strap wrench ‹ Observe installation instructions on oil filter 2 - 25 Nm 3 - Oil cooler ‹ See note => Page 17-1 ‹ Coolant hose connection diagram =>Page 19-2 4 - 25 Nm 5 - Oil filter bracket 6 - Gasket ‹ Renew
  • 155. 900058 Type 4A Type description MY Engine ID 1Z Gearbox ID CUT User MICLEF Workshop Manual - 2 - 7 - 0.9 bar oil pressure switch -F1 - 25 Nm ‹ Grey ‹ Checking => Page 17-15 8 - Seal ‹ If seal is leaking, cut open and renew. 9 - Oil temperature sender -G8 -10 Nm 10 - Seal ‹ If seal is leaking, cut open and renew. 11 - O ring ‹ Renew ‹ Engage in projections on oil cooler
  • 156. 900058 Type 4A Type description MY Engine ID 1Z Gearbox ID CUT User MICLEF Workshop Manual - 3 - Õ Fig. 1Checking oil pump backlash New: 0.05 mm Wear limit: 0.20 mm Õ Fig. 2Checking oil pump axial clearance Wear limit: 0.15 mm
  • 157. 900058 Type 4A Type description MY Engine ID 1Z Gearbox ID CUT User MICLEF Workshop Manual - 1 - Removing and installing sump Special tools and workshop equipment required ‹ Workshop crane V.A.G 1202 A ‹ Drip tray ‹ Sealant AMV174 004 01 Removing - Õ Remove noise insulation (two sections, -arrows-). - Drain engine oil.
  • 158. 900058 Type 4A Type description MY Engine ID 1Z Gearbox ID CUT User MICLEF Workshop Manual - 2 - - Õ Support subframe with workshop crane V.A.G 1202 A. - Õ Unscrew retaining clamps -arrows- for starter cable from subframe. - Unscrew front subframe bolts -1- and -2-. Note: The subframe should be detached and lowered only at the front, otherwise it will be necessary to check wheel alignment.
  • 159. 900058 Type 4A Type description MY Engine ID 1Z Gearbox ID CUT User MICLEF Workshop Manual - 3 - - Õ Lower subframe slowly using workshop crane V.A.G 1202 A. - Õ Unscrew bolts -1 ... 8- from engine/gearbox support. - Take off engine/gearbox support. - Unbolt and remove sump: if necessary loosen it by striking lightly with a rubber hammer. Installing Installation is carried out in the reverse order, when doing this note the following:
  • 160. 900058 Type 4A Type description MY Engine ID 1Z Gearbox ID CUT User MICLEF Workshop Manual - 4 - Notes: ‹ Renew seals and gaskets. ‹ Õ When installing the engine and gearbox support -3- with the engine removed from the vehicle, make sure that the support is positioned flush with the intermediate plate -1- at the flywheel end. In other words, the engine/gearbox support should protrude by 0.8 mm (distance a) from cylinder block -2-. - Clean sealing surfaces before installing sump. - Lightly coat the sealing points for the sump between sealing flange and cylinder block (at front and rear) using AMV 174 004 01. - Tighten bolts securing sump to cylinder block in diagonal sequence and in two stages, tightening to 18 Nm at second stage. - Installsubframe => Running gear, Front-wheel drive and four-wheel drive; => Repair group 40; Servicing front suspension;=> => Removing and installing subframe - Fill up with engine oil and check oil level. Tightening torques
  • 161. 900058 Type 4A Type description MY Engine ID 1Z Gearbox ID CUT User MICLEF Workshop Manual - 5 - Õ Attachments of engine/gearbox support Item No. Bolt Nm 1 M10 x 28 45 2, 4, 5 1) M10 x 45 45 3, 7 M10 x 95 45 6 M10 x 50 45 8 M10 x 65 45 1)Vehicles up to approx. 07.96: M8 bolt; tightening torque 25 Nm Component Nm Sump to cylinder block1) 18 Oil drain plug 30 1)Special bolts; use only correct type (same as original equipment) => Parts catalogue
  • 162. 900058 Type 4A Type description MY Engine ID 1Z Gearbox ID CUT User MICLEF Workshop Manual - 1 - Removing and installing oil pump Removing - Remove sump => Page 17-9. - Õ Loosen bolts -arrows-. - Take off oil pump. Installing Installation is carried out in the reverse order, when doing this note the following: - Installing sump => Page 17-12. Tightening torque Component Nm Oil pump to cylinder block 25
  • 163. 900058 Type 4A Type description MY Engine ID 1Z Gearbox ID CUT User MICLEF Workshop Manual - 1 - Testing oil pressure and oil pressure switch Special tools and workshop equipment required ‹ V.A.G 1342 ‹ V.A.G 1527 B ‹ V.A.G 1594 A Requirements for test: z Oil level ok. z Oil pressure warning lamp -K3 must come on when ignition is
  • 164. 900058 Type 4A Type description MY Engine ID 1Z Gearbox ID CUT User MICLEF Workshop Manual - 2 - switched on. z In vehicles with auto-check system the "OK" display must appear (call up symbol). z Engine oil temperature approx. 80 °C Testing warning lamp The oil pressure warning lamp lights up when the ignition is switched on ("terminal 15 on") with the engine not running (this does not apply to vehicles with auto-check system). Testing oil pressure switch - Disconnect wire from oil pressure switch. - Õ Unscrew oil pressure switch and screw in oil pressure tester V. A.G 1342. - Screw oil pressure switch -2- intoV.A.G 1342. - Connect brown wire -1- of tester to earth (-). - Connect voltage tester V.A.G 1527 B to oil pressure switch and positive side of battery (+) using test leads from V.A.G 1594 A. - Test lamp should not light up - If test lamp lights up, renew oil pressure switch. - Start engine Note: The switching point of the oil pressure switch can be reached when the engine is cranked on the starter motor, so watch the tester and the test lamp while starting the engine. - Test lamp should light up at 0.75...1.05 bar. If test lamp does not light up, renew oil pressure switch. Testing oil pressure - Disconnect wire from oil pressure switch.
  • 165. 900058 Type 4A Type description MY Engine ID 1Z Gearbox ID CUT User MICLEF Workshop Manual - 3 - - Õ Unscrew oil pressure switch and screw in oil pressure tester V. A.G 1342. - Screw oil pressure switch -2- intoV.A.G 1342. - Start engine (engine oil temperature at least 80°C). - Oil pressure at 2000 rpm: at least 2.0 bar - Oil pressure at higher engine speeds: max. 7.0 bar If the specifications are not obtained: - Pressure relief valve or oil pump defective; renew oil pump => Page 17-14.
  • 166. 900058 Type 4A Type description MY Engine ID 1Z Gearbox ID CUT User MICLEF Workshop Manual - 1 - Engine oil A high-quality multigrade oil is put in at the factory: this can be used all year round, except in extremely cold climates. Viscosity grades and oil specifications Viscosity grades and oil specifications: => Maintenance
  • 167. 900058 Type 4A Type description MY Engine ID 1Z Gearbox ID CUT User MICLEF Workshop Manual - 1 - Checking oil level Requirements for test: z Engine oil temperature at least 60 °C z Vehicle must be level (horizontal) z After switching off the engine, wait a few minutes to allow the oil to flow back into the sump. Test sequence - Pull out the dipstick, wipe off with a clean cloth and insert it again as far as it will go. - Pull out the dipstick again and read off the oil level. Õ Markings on oil dipstick: a -Do not top up oil. b -Oil can be topped up. The oil level may rise as far as area -a- after topping up. c -Oil must be topped up. It is sufficient if the oil level is somewhere in area -b- (grooved area on dipstick) after topping up. Note: The oil level must not be above marking -a- on the dipstick.
  • 168. 900058 Type 4A Type description MY Engine ID 1Z Gearbox ID CUT User MICLEF Workshop Manual - 1 - Removing and installing parts of cooling system Warning! Hot steam can escape when the cap on the expansion tank is opened. Cover the cap with a cloth, and open it carefully. Notes: ‹ When the engine is warm the cooling system is under pressure. If necessary release pressure before commencing repair work. ‹ Secure all hose connections with the correct hose clips (same as original equipment) => Parts catalogue ‹ V.A.G 1921 pliers are recommended when installing spring -type clips. ‹ Renew all gaskets and seals. ‹ The arrow markings on the coolant pipes and on the ends of the hoses must be aligned with each other.
  • 169. 900058 Type 4A Type description MY Engine ID 1Z Gearbox ID CUT User MICLEF Workshop Manual - 1 - Parts of cooling system Diagram of coolant hose connections 1 - Radiator ‹ Removing and installing => Page 19-18 ‹ After replacing, fill system with fresh coolant 2 - Return pipe ‹ To expansion tank 3 - Expansion tank 4 - Fillercap ‹ With pressure relief valve ‹ Testing pressure relief valve =>Page 19-23 5 - Oil cooler ‹ Removing and installing =>Page 17-6, item 3
  • 170. 900058 Type 4A Type description MY Engine ID 1Z Gearbox ID CUT User MICLEF Workshop Manual - 2 - 6 - Return pipe ‹ From heat exchanger (for heater) 7 - Heating system heat exchanger ‹ After replacing, fill system with fresh coolant 8 - Supply pipe ‹ To heat exchanger 9 - Coolant pump/coolant thermostat ‹ Removing and installing coolant pump =>Page 19-11 ‹ Check for ease of movement ‹ Removing and installing coolant thermostat =>Page 19-16 ‹ Checking =>Page 19-17
  • 171. 900058 Type 4A Type description MY Engine ID 1Z Gearbox ID CUT User MICLEF Workshop Manual - 1 - Draining and filling cooling system Special tools and workshop equipment required ‹ Drip tray V.A.G 1306 ‹ Special tool T10007 (for coolant additive G 012 A8 D) Draining Note: Catch drained-off coolant in a clean container for re-use or disposal. Warning! Hot steam can escape when the cap on the expansion tank is opened. Cover the cap with a cloth, and open it carefully. - Open cap on coolant expansion tank.
  • 172. 900058 Type 4A Type description MY Engine ID 1Z Gearbox ID CUT User MICLEF Workshop Manual - 2 - - Õ Remove front section of noise insulation -lower arrows-. - Place drip tray V.A.G 1306 below engine. - Õ Turn drain screw -arrow- on radiator anti-clockwise, if necessary fit drain hose to connection.
  • 173. 900058 Type 4A Type description MY Engine ID 1Z Gearbox ID CUT User MICLEF Workshop Manual - 3 - - Õ To drain off remaining coolant, disconnect coolant hoses -arrows-. Filling Notes: ‹ The cooling system is filled all year round with a mixture of water and coolant additive (combined anti-freeze and corrosion protection agent). ‹ Coolant additive G 011 A8 C (green) is used in vehicles up to 06.96. ‹ Only coolant additive G 012 A8 D (red) is used in vehicles from 07.96 onwards. Caution The two different coolant additives G ‹ If the fluid in the expansion tank is brown, this means G 012 A8 D has been mixed with another type of coolant. In this case, flush out the cooling system and put in fresh coolant. To flush the system, fill it with clean water and run the engine for about 2 minutes. This should remove very nearly all of the old coolant. ‹ G 011 A8 C and G 012 A8 D (and coolant additives marked "meeting specification TL VW 774 C" or "meeting specification TL VW 774 D") prevent frost and corrosion damage, stop scaling and at the same time raise the boiling point of the coolant. For these reasons the cooling system must be filled all year round with the correct anti-freeze and anti-corrosion additive. ‹ Because of its high boiling point, the coolant improves engine reliability under heavy loads, particularly in countries with tropical climates. ‹ Protection against frost must be assured down to about -25 °C (in countries with arctic climate downto about -35 °C). ‹ The coolant concentration must not be reduced by adding water even in warmer seasons and in warmer countries. The anti-freeze ratio must be at least 40 %. ‹ If greater frost protection is required in very cold climates, the amount of G 012 A8 D can be increased, but only up to 60 % (this gives frost protection to about -40 °C), as otherwise frost
  • 174. 900058 Type 4A Type description MY Engine ID 1Z Gearbox ID CUT User MICLEF Workshop Manual - 4 - protection is reduced again and cooling effectiveness is also reduced. ‹ Only use clean tap water for mixing coolant. ‹ If radiator, heat exchanger, cylinder head or cylinder head gasket is replaced, do not reuse old coolant. ‹ Special tool T10007 must be used for testing the anti-freeze concentration if the cooling system contains coolant additive G012 A8 D. Recommended mixture ratios: Anti-freeze Anti-freeze G 012A8 D 1) Water 1) protection down to concentration -25 °C 40 % 2.60 ltr. 3.90 ltr. -35 °C 50 % 3.25 ltr. 3.35 ltr. 1)Cooling system capacity: 6.5 litres (may vary according to equipment fitted on vehicle) - Close drain screw on radiator. - Õ Fill up with coolant to max. mark on expansion tank. - Fit expansion tank cap. - Start engine. - Then run engine at idling speed until bottom hose on radiator becomes hot. - Check coolant level and top-up if necessary. When the engine is at normal operating temperature, the coolant level must be on the max. mark, when the engine is cold, between the min. and max. marks. Warning! Hot steam can escape when the cap on the expansion tank is opened. Cover the cap with a cloth, and open it carefully. - Stop engine.
  • 175. 900058 Type 4A Type description MY Engine ID 1Z Gearbox ID CUT User MICLEF Workshop Manual - 1 - Removing and installing coolant pump Removing - Draincooling system=> Page 19-4. - Õ Slacken bolts 2 ... 6. - Slacken V-belt by turning tensioning nut -1-. - Remove V-belt.
  • 176. 900058 Type 4A Type description MY Engine ID 1Z Gearbox ID CUT User MICLEF Workshop Manual - 2 - - Õ Unbolt vane pump for power steering complete with rear bracket -arrows-. Do not disconnect hydraulic connections. - Secure vane pump to body with wire to reduce load on connections. - Õ Disconnect coolant hoses from coolant pump and thermostat housing -arrows-.
  • 177. 900058 Type 4A Type description MY Engine ID 1Z Gearbox ID CUT User MICLEF Workshop Manual - 3 - - Õ Remove engine cover panel -arrows-. - Õ Detach bracket for engine cover panel below injection pump -2-. - Unbolt bracket for vane pump-1 ... 3-.
  • 178. 900058 Type 4A Type description MY Engine ID 1Z Gearbox ID CUT User MICLEF Workshop Manual - 4 - - Õ Unbolt coolant pump housing from toothed belt guard -4-. - Unbolt support for injection pump console -1 ... 3-. - Remove coolant pump. - Õ Unbolt bearing housing -1- from pump housing -4-. Installing Installation is carried out in the reverse order, when doing this note the following: - Clean sealing surfaces on both sections of housing. - Renew gasket and O-ring. - Insert hammer-head bolt in drilling in coolant pump. - Install V-belt =>Page 13-9. - Fill up with coolant=> Page 19-7. Tightening torques Component Nm Bearing housing to pump housing 10 Pump housing to toothed belt guard 10 Vane pump bracket to cylinder block 25 Bracket for engine cover panel 25 Hose clamps 2
  • 179. 900058 Type 4A Type description MY Engine ID 1Z Gearbox ID CUT User MICLEF Workshop Manual - 1 - Removing and installing, checking coolant thermostat Removing - Drain cooling system=> Page 19-4 - Õ Slacken bolts 2 ... 6. - Slacken V-belt by turning tensioning nut -1-.
  • 180. 900058 Type 4A Type description MY Engine ID 1Z Gearbox ID CUT User MICLEF Workshop Manual - 2 - - Remove V-belt. - Õ Unbolt vane pump for power steering complete with rear bracket -arrows-. Do not disconnect hydraulic connections. - Secure vane pump to body with wire to reduce load on connections.
  • 181. 900058 Type 4A Type description MY Engine ID 1Z Gearbox ID CUT User MICLEF Workshop Manual - 3 - - Õ Unscrew bolts -4- and remove connection -3-, O-ring -2- and coolant thermostat -1-. Installing - Clean and smooth down sealing surface for O-ring as required. - Insert coolant thermostat. - Install V-belt =>Page 13-9. - Fill up with coolant=> Page 19-7. Tightening torques Component Nm Connection to pump housing 10 Hose clamps 2 Testing coolant thermostat - Heat thermostat in water bath. Starts to open Fully open Opening travel approx. 87 °C approx. 102 °C1) min. 8 mm 1)cannot be tested
  • 182. 900058 Type 4A Type description MY Engine ID 1Z Gearbox ID CUT User MICLEF Workshop Manual - 1 - Removing and installing radiator Removing - Remove front bumper. => General body repairs; Repair group 63; Front bumper=> - Drain coolant from drain plug on radiator=> Page 19-4 - Õ Disconnect both coolant hoses at bottom of radiator -arrows-. - Unplug connector -1- from radiator fan thermoswitch -F54. - Disconnect coolant hose at top left of radiator. Vehicles with automatic gearbox - Removing ATF pipes/hoses from radiator: => Automatic gearbox 01N; Repair group 37;=> => Dismantling and assembling gearbox; Removing and installing ATF pipes Vehicles with air conditioner: Warning! The air conditioner refrigerant circuit must not be opened. Note: To prevent damage to the condenser and refrigerant pipes/ hoses, ensure that the pipes and hoses are not stretched, kinked or bent. - Remove securing bolts for condenser. - Pull condenser out of its bracket, pivot towards the side and
  • 183. 900058 Type 4A Type description MY Engine ID 1Z Gearbox ID CUT User MICLEF Workshop Manual - 2 - secure with wire. All models - Õ Remove securing screw -arrow A- and pull out headlight trim in direction indicated by arrow.
  • 184. 900058 Type 4A Type description MY Engine ID 1Z Gearbox ID CUT User MICLEF Workshop Manual - 3 - - Õ Remove screw securing bracket -2- for headlight trim on housing. - Detach air cowls from radiator -1- and -3- (left and right).
  • 185. 900058 Type 4A Type description MY Engine ID 1Z Gearbox ID CUT User MICLEF Workshop Manual - 4 - - Õ Unscrew nuts -2- on bonded rubber mountings. - Pull radiator forwards out of bracket for bonded rubber mounting at the bottom ... - ... and pull downwards out of top bracket -arrow- (if necessary, unscrew bolt -1- on radiator support). Installing Installation is carried out in the reverse order, when doing this note the following: - Fill up with coolant=> Page 19-7. Tightening torque Component Nm Radiator to front end M6 10 M8 20 Condenser to radiator 10 Hose clamps 2
  • 186. 900058 Type 4A Type description MY Engine ID 1Z Gearbox ID CUT User MICLEF Workshop Manual - 1 - Checking cooling system for leaks Special tools and workshop equipment required ‹ V.A.G 1274 with V.A.G 1274/1 Test requirement: z Engine at operating temperature. Test sequence
  • 187. 900058 Type 4A Type description MY Engine ID 1Z Gearbox ID CUT User MICLEF Workshop Manual - 2 - Warning! Hot steam can escape when opening cap on expansion tank: Cover cap with a cloth and open carefully. - Open cap on coolant expansion tank. - Õ Attach tester V.A.G 1274 with adapter V.A.G 1274/1 to expansion tank. - Using hand pump on tester, build up a pressure of approx. 1.0 bar. - If pressure is not maintained, trace leak and rectify fault. Testing pressure relief valve in filler cap.
  • 188. 900058 Type 4A Type description MY Engine ID 1Z Gearbox ID CUT User MICLEF Workshop Manual - 3 - - Õ Fit tester V.A.G 1274 with adapter V.A.G 1274/1 onto filler cap. - Operate hand pump. - Pressure relief valve must open at 1.2 ... 1.5 bar.
  • 189. 900058 Type 4A Type description MY Engine ID 1Z Gearbox ID CUT User MICLEF Workshop Manual - 1 - Fuel supply system Safety precautions when working on the fuel supply system When removing and installing the fuel gauge sender from a full or partly full fuel tank, note the following points: ‹ The fuel tank must not be more than2/3full. ‹ If necessary, drain the tank according to instructions: => Page 20-6. ‹ Before commencing work, switch on exhaust extraction system and place an extraction hose close to the sender opening in the fuel tank to extract escapingfumes. If no exhaust extraction system is available, a radial fan (as long as motor is not in air flow) with a displacement greater than 15 m3/h can be used. ‹ Avoid skin contact with fuel. Wear fuel-resistant gloves. Drain the fuel tank before removal from the vehicle in order to reduce weight. ‹ If necessary, drain the tank according to instructions: => Page 20-6.
  • 190. 900058 Type 4A Type description MY Engine ID 1Z Gearbox ID CUT User MICLEF Workshop Manual - 1 - Safety precautions when working on the fuel supply system When removing and installing the fuel gauge sender from a full or partly full fuel tank, note the following points: ‹ The fuel tank must not be more than2/3full. ‹ If necessary, drain the tank according to instructions: => Page 20-6. ‹ Before commencing work, switch on exhaust extraction system and place an extraction hose close to the sender opening in the fuel tank to extract escapingfumes. If no exhaust extraction system is available, a radial fan (as long as motor is not in air flow) with a displacement greater than 15 m3/h can be used. ‹ Avoid skin contact with fuel. Wear fuel-resistant gloves. Drain the fuel tank before removal from the vehicle in order to reduce weight. ‹ If necessary, drain the tank according to instructions: => Page 20-6.
  • 191. 900058 Type 4A Type description MY Engine ID 1Z Gearbox ID CUT User MICLEF Workshop Manual - 1 - Rules for cleanliness When working on the fuel supply/injection system, pay careful attention to the following "basic rules": ‹ Thoroughly clean all unions and the adjacent areas before disconnecting. ‹ Place parts that have been removed on a clean surface and cover them over. Do not use fluffy cloths! ‹ Carefully cover over or seal opened components if the repair cannot be completed immediately. ‹ Only install clean components: Only unpack replacement parts immediately prior to installation. Do not use parts that have been stored loose (e.g. in tool boxes etc.). ‹ When the system is open: Do not work with compressed air. Do not move vehicle unless absolutely necessary. ‹ Also ensure that no Diesel fuel runs onto the coolant hoses. If necessary hoses must be cleaned immediately. Affected hoses must be replaced.
  • 192. 900058 Type 4A Type description MY Engine ID 1Z Gearbox ID CUT User MICLEF Workshop Manual - 1 - Overview of components: fuel tank with attachments Notes: ‹ All hose connections must be secured with hose clips (same as original parts). => Parts catalogue ‹ Always renew gaskets and seals when performing repairs. 1 - Securing strap ‹ For fuel tank 2 - Fuel tank ‹ Removing and installing => Page 20-7 3 - Vent pipe
  • 193. 900058 Type 4A Type description MY Engine ID 1Z Gearbox ID CUT User MICLEF Workshop Manual - 2 - 4 - Hose for filler pipe 5 - Filler pipe insert ‹ With non-return flap 6 - Filler pipe 7 - Overflow hose 8 - Oval head screw 9 - Clamp 10 - Union nut, 60 Nm ‹ Remove and install with spanner 3217 11 - Fuel gauge sender -G ‹ Testing => Page 20-10 ‹ Removing and installing => Page 20-13 ‹ Internal dia. of supply pipe: 8 mm ‹ Internal dia. of return pipe: 6 mm
  • 194. 900058 Type 4A Type description MY Engine ID 1Z Gearbox ID CUT User MICLEF Workshop Manual - 3 - 12 - Seal 13 - Clamping washer 14 - Heat shield ‹ For fuel tank ‹ Ensure proper seating on rubber plugs ‹ Engage on retaining pins on fuel tank and secure with clamping washer 15 - Collar nut - 20 Nm