1. ABAP Objects in Action: Screen Programming with the Control
Framework
by Horst Keller and Gisbert Loff,SAP
Thisarticle demonstrateshow to use controlswith ABAP Objectsto program single-screen user interfaces. It also takes you
step-by-step through the development processand providessample code thatservesas a starting point for creatingmore
invitinguser interfaces.
If you have attended a recent trainingclassor SAP demonstrationwhere SAP's"flight model"wasused as a database,
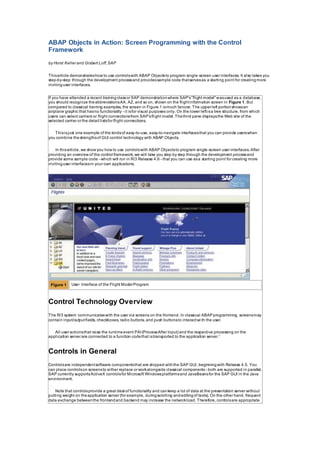
you should recognize theabbreviationsAA, AZ, and so on, shown on the flightinformation screen in Figure 1. But
compared to classical training examples, the screen in Figure 1 ismuch fancier. The upper left portionshowsan
airplane graphic that hasno functionality - it isfor visual purposes only. On the lower leftisa tree structure, from which
users can select carriers or flight connectionsfrom SAP'sflight model.Thethird pane displaysthe Web site of the
selected carrier or the detail listsfor flight connections.
Thisisjust one example of the kindsof easy-to-use, easy-to-navigate interfacesthat you can provide userswhen
you combine thestrengthsof GUI control technology with ABAP Objects.
In thisarticle, we show you how to use controlswith ABAP Objectsto program single-screen user interfaces. After
providing an overview of the control framework, we will take you step by step through the development processand
provide some sample code - which will run in R/3 Release 4.6 - that you can use asa starting point for creating more
invitinguser interfacesin your own applications.
Figure 1 User Interface of the Flight Model Program
Control Technology Overview
The R/3 system communicateswith the user via screens on the frontend. In classical ABAPprogramming, screensmay
contain input/outputfields, checkboxes, radio buttons, and push buttonsto interactwi th the user.
All user actionsthat raise the runtimeevent PAI(ProcessAfter Input) and the respective processing on the
application server are connected to a function codethat istransported to the application server.¹
Controls in General
Controlsare independentsoftware componentsthat are shipped withthe SAP GUI, beginningwith Release 4.5. You
can place controlson screensto either replace or workalongside classical components - both are supported in parallel.
SAP currently supportsActiveX controlsfor Microsoft Windowsplatformsand JavaBeansfor the SAP GUI in the Java
environment.
Note that controlsprovide a great deal of functionality and cankeep a lot of data at the presentation server without
putting weight on theapplication server (for example, duringscrolling andeditingof texts). On the other hand, frequent
data exchange betweenthe frontendand backend may increase the networkload. Therefore, controlsare appropriate
2. when most of the work can be done at the frontendand whenexchange withthe backenddoesnot occur too often.
Control Framework
In order to facilitateprogramming withcontrols, starting with Release 4.6, the SAP Basissystem providesa control
framework(CFW). The CFW encapsulatesall availablecontrols in global classesof ABAP Objects. To workwith
controlson your screen, simply create objectsof these global classes, call their methods, and react on their events.
Since the CFW classes are part of an inheritancehierarchy, these classesprovide a standardized interface for most of
the common functionality you will findin thecontrols.
The CFW distinguishesbetween container controls andapplication controls.Applicationcontrolsare the components
you want to use on the screen. Container controlsprovide a software layer that standardizesall layout-relatedissues
and the implementation of application controls. All application controlsmust be linked to a container control while the
container control islinked to an area of the screen (see Figure 2).
Figure 2 Container Controlsand Application Controlson Screens
Container Controls
Container controlsprovide areason the screen that can be used for application controls. Themost importantcontainer
controlsare encapsulated inthe following global classes²:
CL_GUI_CUSTOM_CONTAINER: When you create an object of thisclass, you must
linkit to a custom control on a screen via the IMPORTING parameter container_name of itsconstructor. You
can use the Screen Painter to create one or several custom controlswithin thearea of one screen, and you
can use custom controlstogether with classical screen elements. Any applicationcontrol thatyou linkto a
custom container will appear withinitsscreen area.
CL_GUI_DOCKING_CONTAINER: When you create an objectof thisclass, you must
linkit to one of the four edgesof a screen. By doing so, you create a new area docked to a screen without
using the Screen Painter. Any application control that you linkto a docking container will appear within that
screen area.
CL_GUI_SPLITTER_CONTAINER:When you create an object of thisclass, you must
linkit to an already existingcontainer control. By doingso, you split the area of the existing control either
vertically or horizontally into two new areas, aswas done to create the screen in Figure 1. You canthen link
application controlsto the new areas. You can also nest splitter controlsto create more areas.
Application Controls
After creating objectsof container controls, you can create objectsof applicationcontrols - the componentsyou want to
use onscreen. You must linkeach application control to an object of a container control. You can dothisby simply
passing the respective reference to the parameter parent of the applicationcontrol'sconstructor. Important application
3. controlsand their respective global classes are:
CL_GUI_ALV_GRID: Thiscontrol allowsyou to display interactivelists. (ALV standsfor ABAP
List Viewer, which replacesclassical list processing.)
CL_GUI_HTML_VIEWER: Thiscontrol allowsyou to display HTML documents. For
example, thenew helpviewer of the ABAP keyword documentation usesan HTML control.
CL_GUI_PICTURE: Thiscontrol allowsyou to display any given picture on an R/3 screen. For
example, theairplane inFigure 1 isdisplayed ina picturecontrol. SAP Easy Access is another exampleof a
picture control asbackground.
CL_GUI_SIMPLE_TREE: Thiscontrol allowsyou to display and workwith a tree structure. In
addition to the simple tree,there are also other kindsof treesavailable. For example,the Object Navigator of
the ABAP Workbench uses a tree control.
CL_GUI_TEXTEDIT: Thiscontrol implementsa full-fledged editor for viewingand maintaining
texts. For example, the ABAPEditor usesa textedit control.
Control Methods
You use the methodsdefinedin thecontrol'sclasses to work with the controlsdisplayedon the screen. In general, you
work with the methodsof the application controls. You would use these, for example, to fill text from an internal table
into the text editor of the texteditcontrol. But sometimesyou will also call methodsof the CFW. In order to minimizethe
network load betweenbackend andfrontend, method calls are bufferedin an automationqueue before beingsent to
the frontend at definedsynchronizationpoints, such as at the end of PBO (Process Before Output) processing. To force
a synchronization pointin your program, you can call thestatic method cl_gui_cfw=> flush.
Control Events and Event Handling
User actionson controlscan trigger events. However, the eventsof controlsare not classical screen events, which
trigger the PAI processing at the application server and send a functioncode.Instead, they are declared asABAP
Objectseventsin their global wrapper classes. For performance reasons, a user action on controlsisnot automatically
passed back to the application server. If you want an event to be passed backto the application server, you must
register it in your program using the special methodset_registered_events, which isavailablein all application controls.
You can specify two kinds of event handling:
System Events (default): The event ispassed to the applicationserver, but doesnot
trigger the PAI event (see Figure 3). In order to react on the event, you must register an event handler
method in your ABAP program withthe SET HANDLER statement. Thismethodisthen executed on the
application server.
Pros and cons: The benefitsof using thisdefault technique isthat the event handler methodisexecuted
automatically. There also are no conflictswith the classical automatic input checksassociated with the
screen. The disadvantageisthat the contentsof the classical screen fieldsthat might exist alongside
controlsare not automatically transported to theprogram.
TIP: If you work with classical
screen fieldsand you really
need to transport their contents
during control event handling,
you can call the static method
cl_gui_cfw=>set_new_ok_code
to set a function codeand
trigger the PAI event, including
a field transport. After PAI has
been processed, the PBO
event of the next screen is
triggered (see Figure 3).
4.
Figure 3 Handlingof System Events
Application Events: With thissecond type of event handling, theevent ispassed to the
application server and triggersthe PAI (see Figure 4). If you want to handle theevent,you must includea
method call for cl_gui_cfw=>dispatch in an appropriate PAI dialogmodule. The dispatch method callsall
event handler methodsthat are definedand registered withthe SET HANDLER statement for that event.
After the event handler hasbeen processed, control returnsto the PAI module andPAI processing
continues.
Pros and cons: The advantageof using thismethod isthat you can specify thepoint at whichthe eventis
handled.Thecontentsof the screen fieldsare also transported to the application server beforehand. The
disadvantage isthat thiskind of event handlingcan leadto conflictswith the automatic input checkson the
screen, which can cause eventsto be lost.
Why two types of event handling? Youhave these optionsbecause controlsmay be displayed on classical
ABAP screens, and there may be classical screen elementsalongsidecontrols. The flexibility of thetwo
types of event registration and the methodsof the CFW, mentioned above,allow you to steer the sequence
of data transports between frontend andbackend. If you do not use any classical screen componentsat all,
you can simply work with system events(the default mode).
5. Figure 4 Handlingof ApplicationEvents
Introduction to the Demonstration Program
Our demonstration program isdesignedto be assimple aspossible. It ismeant to demonstrate the basic conceptsof
programming with GUI controls. Because of this, we omitted all superfluouscode, and we did not exploit all the
possibilitiesthat control technology provides. With the information we provide inthisarticle, you can go on to modify the
program to learn more. Youcan findthe codein our example at DEMO_ABAP_OBJECTS_SPLIT_SCREEN in R/3
Release 4.6C or higher.
Program Structure
Figure 5 shows the processing blocks of the demonstration program. The program containstwo local classes,
screen_init and screen_handler, which are used to create and fill the controlsand to react on the user's input. Since
controlsare displayed on classical ABAPscreens, we need a small classical frameworkto call a carrier screen for our
controls. We use the event blockLOAD-OF-PROGRAM and two dialogmodulesfor that purpose.
Listing 1 shows the coding structure of the program. For our demonstrationprogram, we have chosen the program
type 1 (executable). Note that we could have taken one of the other program typesthat support screens, namely a
module pool or a functionpool. Choosing an executable just simplifiesthe program execution,because you can start
the program directly from the ABAPEditor.
The program doesnot containany global datadeclarations, and it doesnot make use of the classical reporting events
such as START-OF-SELECTION. It issimply a container for the three processing blocksof the classical screen
framework, shown in Figure 5, and our two local classes.
Figure 5 Structure of the DemonstrationProgram
PROGRAM demo_abap_objects_split_screen.
* Classes ***************************************************
CLASS screen_init DEFINITION CREATE PRIVATE.
...
ENDCLASS.
CLASS screen_handler DEFINITION.
...
ENDCLASS.
CLASS screen_init IMPLEMENTATION.
...
ENDCLASS.
CLASS screen_handler IMPLEMENTATION.
...
ENDCLASS.
* Classical processing blocks ********************************
LOAD-OF-PROGRAM.
...
MODULE status_0100 OUTPUT.
...
ENDMODULE.
MODULE cancel INPUT.
...
ENDMODULE.
6. Listing 1 Layout of the Demonstration Program
The Program at Runtime
Figure 6 shows which objectsthe program usesto create the screen display of the demonstration program,along
with the referencesbetween these objects.
During screen display, there isno instance of the local classscreen_init because there isno global reference
variable in theprogram that can point to such an instance. An objectof screen_init will be createdtemporarily
during each PBO processing of the screen, where it isused as a factory object to create theco ntrol objectsfrom
the global classescl_gui_splitter_container, cl_gui_picture, and cl_gui_simple_tree. After each PBO processing,
the object of screen_init will be deleted by the garbagecollector. Theobjectsof the global classesare kept alive by
pointersfrom the CFW because they are bound to screen areas. An instance of screen_handler isregistered asan
event handler for eventsof object cl_gui_simple_tree. Thisinstance itself holdsreferencesto objectsof the global
classes cl_gui_ html_viewer andcl_gui_alv_grid. The instancesof the global classesare linked to controlson the
screen via the CFW layer. The two objectsof cl_gui_ splitter_container split the screen in the threeareasshown in
Figure 1. The objectsof the applicationcontrolsare linked to these areas. The objectsof cl_gui_html_viewer and
cl_gui_alv_grid are bothlinked to the same area.
Figure 6 Runtime Objectsof the Demonstration Program
Demonstration Program in Detail
The following sectionsexplain the definitionsand the processing blocksof the demonstration program indetail.
(Again, the code shown here isavailable at DEMO_ABAP_OBJECTS_SPLIT_SCREEN in Release 4.6C or
higher.)
Classical Screen Framework
Listing 2 shows the completecoding of thethree classical processing blockslisted in Figure 5. The ABAPruntime
environment raisesthe event LOAD-OF-PROGRAM at the momentwhen the program isstarted. The respective
processing blockdoes nothing butcall Screen 100. Screen100 iscreated withthe Screen Painter. In itsscreen
flow logic, the two dialogmodulesstatus_0100 and cancel are called duringPBO and PAI respectively, the latter
with the additionAT EXIT-COMMAND. We did notuse the graphical Screen Painter for our example because we
have no classical elementson our screen, and we will use an implicit methodto create a custom control. The PBO
module setsa GUI status. Within that status, the three functioncodes BACK, EXIT, and CANCEL are definedwith
function type E (Exit Command) and are activated inthe symbol bar. Therefore,the PAI module iscalled only
when the user wants to leave the program. Themost important action duringPBO iscallingthe static method
init_screen of classscreen_handler. All actual screen handlingisencapsulated inthe two local classes.
LOAD-OF-PROGRAM.
CALL SCREEN 100.
MODULE status_0100 OUTPUT.
SET PF-STATUS 'SCREEN_100'.
SET TITLEBAR 'TIT_100'.
CALL METHOD screen_init=>init_screen.
ENDMODULE.
MODULE cancel INPUT.
7. LEAVE PROGRAM.
ENDMODULE.
Listing 2 Classical Processing Blocks of the Demonstration Program
Local Class Definitions
Listing 3 shows the declaration partsof the two local classesof the program: screen_init and screen_handler.
In each of the declarationparts, two visibility sectionsare definedby using the statementsPUBLIC SECTION
and PRIVATE SECTION. Only those classcomponentsthat must be used from the outside client are declared
in the public sections. All other componentsare encapsulated in theprivate sections. All attributesare
reference variablesthat refer to global classesof the CFW. Each local classhas an instance constructor and
private methodsthat are used to fill thecontrolswith data.
In addition to these general features, our two local classesalso have their own particular features:
Class screen_init hasa public static method,init_screen,that can be called without creatingan
object of that class.
Class screen_handler hasan event handler methodhandle_node_double_clickthat can handle
eventsof the global classcl_gui_ simple_tree.
Note the additionCREATE PRIVATEin the definitionof screen_init inListing 3. Objectsof cla ssscreen_
init can be created only withinclassscreen_init itself.
CLASS screen_init DEFINITION CREATE PRIVATE.
PUBLIC SECTION.
CLASS-METHODS init_screen.
METHODS constructor.
PRIVATE SECTION.
DATA: splitter_h TYPE REF TO cl_gui_splitter_container,
splitter_v TYPE REF TO cl_gui_splitter_container,
picture TYPE REF TO cl_gui_picture,
tree TYPE REF TO cl_gui_simple_tree.
METHODS: fill_tree, fill_picture.
ENDCLASS.
CLASS screen_handler DEFINITION. PUBLIC SECTION.
METHODS: constructor IMPORTING container
TYPE REF TO cl_gui_container,
handle_node_double_click
FOR EVENT node_double_click
OF cl_gui_simple_tree
IMPORTING node_key.
PRIVATE SECTION.
DATA: html_viewer TYPE REF TO cl_gui_html_viewer,
list_viewer TYPE REF TO cl_gui_alv_grid.
METHODS: fill_html IMPORTING carrid TYPE spfli-carrid,
fill_list IMPORTING carrid TYPE spfli-carrid
connid TYPE spfli-connid.
ENDCLASS.
Listing 3 Declaration Partsof the Two Local Classes
Static Method init_screen
Listing 4 shows the static method init_screen of classscreen_init. The single purpose of methodinit_screen is
to create a temporary object of classscreen_init. Thisisdone by using a local reference variable,screen.
During the CREATE OBJECT statement, the instance constructor of screen_init isexecuted. Note that after
leaving method init_screen, thereference variablescreen isdeleted. The object isnot referencedanymore and
will be deletedby the next turn of the garbagecollector.
METHOD init_screen.
DATA screen TYPE REF TO screen_init.
CREATE OBJECT screen.
ENDMETHOD.
Listing 4 The Static Methodinit_screen of Classscreen_init
Instance Constructor of screen_init
8. Listing 5 shows the instance constructor of class screen_init. The instance constructor isused to create all the
container controlson Screen 100 andtwo of the applicationcontrols(picture and tree). Furthermore, it creates
an event handler for eventsof the tree control. Most of the data objectsthat are needed for thispurpose are
declared locally withinthe constructor. Thereferencevariablesof type cl_gui_container can containreferences
that point to any container control at the screen.
METHOD constructor.
DATA: events TYPE cntl_simple_events,
event LIKE LINE OF events,
event_handler TYPE REF TO screen_handler,
container_left TYPE REF TO cl_gui_container,
container_right TYPE REF TO cl_gui_container,
container_top TYPE REF TO cl_gui_container,
container_bottom TYPE REF TO cl_gui_container.
CREATE OBJECT splitter_h
EXPORTING
parent = cl_gui_container=>screen0
rows = 1
columns = 2.
CALL METHOD splitter_h->set_border
EXPORTING border = cl_gui_cfw=>false.
CALL METHOD splitter_h->set_column_mode
EXPORTING mode = splitter_h->mode_absolute.
CALL METHOD splitter_h->set_column_width
EXPORTING id = 1
width = 110.
container_left = splitter_h->get_container( row = 1 column = 1 ).
container_right = splitter_h->get_container( row = 1 column = 2 ).
CREATE OBJECT splitter_v
EXPORTING
parent = container_left
rows = 2
columns = 1.
CALL METHOD splitter_v->set_border
EXPORTING border = cl_gui_cfw=>false.
CALL METHOD splitter_v->set_row_mode
EXPORTING mode = splitter_v->mode_absolute.
CALL METHOD splitter_v->set_row_height
EXPORTING id = 1
height = 160.
container_top = splitter_v->get_container( row = 1 column = 1 ).
container_bottom = splitter_v->get_container( row = 2 column = 1 ).
CREATE OBJECT picture
EXPORTING parent = container_top.
CREATE OBJECT tree
EXPORTING parent = container_bottom
node_selection_mode =
cl_gui_simple_tree=>node_sel_mode_single.
CREATE OBJECT event_handler
EXPORTING container = container_right.
event-eventid = cl_gui_simple_tree=>eventid_node_double_click.
event-appl_event = ' '.
APPEND event TO events.
CALL METHOD tree->set_registered_events
EXPORTING events = events.
SET HANDLER event_handler->handle_node_double_click FOR tree.
CALL METHOD: me->fill_picture,
me->fill_tree.
ENDMETHOD.
Listing 5 The Instance Constructor of Class screen_init
Creating the Container Controls
The code in Listing 5 demonstratesthe processinvolved increating thecontainer controlsin the demonstration
program:
1. Create the first splitter container (CREATE OBJECT splitter_h). The constructor createsan
object of the global classcl_gui_splitter_ container using thereferencevariablesplitter_h.In the
CREATE statement, actual parametersare passed to the IMPORTING parametersof the global
class's constructor.
2. Create a Custom Control at Screen 100 (parent = cl_gui_container =>screen0). By passing the
static attribute screen0 of classcl_gui_ container to the parameter parent, we use the entire area of
Screen 100 asa custom control implicitly. (Thisiswhy we didn't have to use the graphical Screen
Painter for Screen 100 to create a custom control.)
9. Alternatively, we could createa custom control on Screen 100with thegraphical ScreenPainter and
pass its name instead of screen0. Then,only thisarea would be used for displaying thecontrols.
TIP: When you write more complex programsthat workwith more than
one screen, you must create custom controlswith the graphical Screen
Painter in order to distinguish betweenthe screens.
3. Split the screen into two columns (columns= 2). We fill the remainingIMPORTING parameters
with appropriatevaluesto split Screen 100 intotwo columns. For each column, a new container
control iscreated. Referencesto each new container are stored in a system table of the CFW. You
cannot access thistable from the ABAP program. Nevertheless, the table linespointto container
control objectsof the program that are currently linked to a screen and prevent these objectsfrom
being deletedby the garbage collector, even if thecontainer control objectsare not referencedin
the program itself (see Figure 6).
TIP: To remove a control object from the program,you must use its
method free before initializing all respective reference variables. This
method deletesthe respective entry from the CFW system table.
4. Get references of the two columns into container_left andcontainer_right. After we set some
attributesof the columnsby callingmethodsof splitter_h, we read the referencesto our containers
from the CFW into the local referencevariablescontainer_left andcontainer_rightby functional calls
of method get_container.
5. Create two rows in the left column (CREATE OBJECT splitter_v). We follow the basic principles
of steps 1-4 in a similar procedure to splitthe left columnintotwo rows. Here, we pass the reference
in container_left to theconstructor of cl_gui_splitter_ container and getreferencesof the two new
container objectsinto thelocal reference variablescontainer_ top andcontainer_bottom.
Creating the Application Controls By going through the stepslisted above,we have createdall the container
controlsthat we need. Now we can go on to create our application controls. The processis shown in the code
in Listing 5, and involvesthese steps:
1. Create application controls for the left column (CREATE OBJECT picture andCREATE
OBJECT tree). With the instance constructor of classscreen_init, we create the two application
controlsfor the containersin the leftcolumn.In the upper container, we create an object of
cl_gui_picture. In thelower container, we create an object of cl_gui_simple_tree.We linkthe objects
to the respective container controlsby passing the referencesin container_topand container_
bottom to their constructor'sIMPORTING parameter parent.
2. Create an event handler (CREATE OBJECT event_handler). Sincewe want our program to react
on user actionsin the tree control, we must provideand register an event handler:
First, we create an object of our local classscreen_handler.
The constructor of thisclass demandsan IMPORTING parameter of type
cl_gui_container. We passthe reference to the right column'scontainer control.
In order to register our object of classscreen_handler asan event handler for the tree
control, we must call the special methodset_registered_eventsaswell asthe simple SET
HANDLER statement (see "Control Eventsand Event Handling"above).
The parametersare passed via an internal tableof type cntl_simple_events, which is
defined inthe ABAP Dictionary.
By moving a blankcharacter ' ' (default value) and not an 'X' to the component
appl_event, we definethat theevent ishandledasa system event (default) and not asan
application event.
3. Send initial datato the application controls(call method:me->fill picture,me->fill tree). Finally, the
constructor callsthe methodsfill_picture andfill_treeto initialize the contentsof our application
controlson the screen.
Method fill_picture
Listing 6 shows the instance methodfill_picture of classscreen_init. The method fill_picture importsa picture
in GIF format from an indx type database tableabtreeintoa local internal tablepict_tab. The function module
dp_create_url createsa URL for that internal table andpasses it to the local variable url.By passing that URL
to method load_picture_from_url of our picture control object, we send the picture to the picturecontrol at the
10. screen. The method set_display_modeallowsusto set the attributesof the picture displayed inthe control.
Instead of working with an internal table, you can also use a local picture filefrom your presentation server
and pass its name directly to theparameter url of method load_picture_from_url.Our program hasthe
advantage of working for all users.
METHOD fill_picture.
TYPES pict_line(256) TYPE c.
DATA pict_tab TYPE TABLE OF pict_line.
DATA url(255) TYPE c.
IMPORT pict_tab = pict_tab FROM DATABASE abtree(pi) ID 'FLIGHTS'.
CALL FUNCTION 'DP_CREATE_URL'
EXPORTING
type = 'IMAGE'
subtype = 'GIF'
TABLES
data = pict_tab
CHANGING
url = url.
CALL METHOD picture->load_picture_from_url EXPORTING url = url.
CALL METHOD picture->set_display_mode
EXPORTING display_mode = picture->display_mode_fit_center.
ENDMETHOD.
Listing 6 The Instance Method fill_picture of Classscreen_init
TIP:How can you save picturesin an indx type database table? Listing 7 shows a little helper routine that
fulfillsthat purpose. Provide your favorite picture ina folder (for example,C:TEMP of your presentation
server) and simply run thisprogram. Theprogram loadsthe picture in binary format into an internal table
and exportsit to an indx type database table. (We strongly recommend that you create your own indx type
table instead of using abtree or indx itself!)
REPORT picture_save.
PARAMETERS file TYPE rlgrap-filename DEFAULT 'C:TEMP.GIF'.
PARAMETERS id(20) TYPE c.
DATA pict_line(256) TYPE c.
DATA pict_tab LIKE TABLE OF pict_line.
CALL FUNCTION 'WS_UPLOAD'
EXPORTING
filename = file
filetype = 'BIN'
TABLES
data_tab = pict_tab.
EXPORT pict_tab = pict_tab TO DATABASE abtree(pi) ID id.
Listing 7 Helper Routine to SaveGIFsin a Database Table
Method fill_tree
Listing 8 shows the instance methodfill_treeof classscreen_init. Tocreate a tree-like structure within thetree
control, you must call methodadd_nodesand pass an internal table of special structure and contentsto that
method. Theaddition TYPE TABLEOF in the declaration of node_tablein Listing 8 showsthat the line typeof
that internal table isabdemonode, definedin the ABAP Dictionary. You can createsuch typesby copying the
global template structure mtreesnode.
The internal tablecontainsone linefor each nodeof the tree. Eachnodemust have a uniquekey node_key.
The columnsrelatkey and relatshipdescribe therelationsbetween thenodes. You can also add description
texts, change the standard icons, and so on. In our example, we create a node tablefrom the contentsof
database table spfli. The database tablespfli isthe well-known tableof flightconnectionsfrom SAP'straining
and demonstration flight model.
We select all data from spfli intothe sorted internal tablespfli_tab and processthistable in a loop. There,
we fill the internal table node_tablewith linesthat represent a tree structure of two hierarchy levels. The
attributesof the nodesare set by assigning flagsto some columnsof node_table.Note that we replace the
standard folder icon withan airplane icon for the subnodesby assigning the internal code"@AV@" to the
image columns.
METHOD fill_tree.
DATA: node_table TYPE TABLE OF abdemonode,
node TYPE abdemonode,
11. spfli_wa TYPE spfli,
spfli_tab TYPE SORTED TABLE OF spfli
WITH UNIQUE KEY carrid connid.
SELECT carrid connid
FROM spfli
INTO CORRESPONDING FIELDS OF TABLE spfli_tab.
node-hidden = ' '.
node-disabled = ' '.
node-isfolder = 'X'.
node-expander = ' '.
LOOP AT spfli_tab INTO spfli_wa.
AT NEW carrid.
node-node_key = spfli_wa-carrid.
CLEAR node-relatkey.
CLEAR node-relatship.
node-text = spfli_wa-carrid.
node-n_image = ' '.
node-exp_image = ' '.
APPEND node TO node_table.
ENDAT.
AT NEW connid.
CONCATENATE spfli_wa-carrid spfli_wa-connid
INTO node-node_key.
node-relatkey = spfli_wa-carrid.
node-relatship =
cl_gui_simple_tree=>relat_last_child.
node-text = spfli_wa-connid.
node-n_image = '@AV@'.
node-exp_image = '@AV@'.
ENDAT.
APPEND node TO node_table.
ENDLOOP.
CALL METHOD tree->add_nodes
EXPORTING table_structure_name = 'ABDEMONODE'
node_table = node_table.
ENDMETHOD.
Listing 8 The Instance Method fill_tree of Classscreen_init
TIP: To find the internal codesof all SAP icons, executethe report SHOWICON.
Instance Constructor of screen_handler
Listing 9 shows the instance constructor of class screen_handler. The instance constructor of class
screen_init createsan objectof classscreen_ handler. Thismeansthat the execution of theinstance
constructor of class screen_handler isembedded in theexecution of the instance constructor of class
screen_init. It createstwo application control objects, both of which are linked to the right columnof our vertical
splitter control. Remember that theinstance constructor of classscreen_init passes the reference to the right
column'scontainer control andto the constructor'sparameter container in the CREATEOBJECT statement.
The application controlscan display either HTMLpagesor lists, but they are not filledduringthe constructor's
execution yet. Filling these controlsdependson the user'saction in the tree control.
METHOD constructor.
CREATE OBJECT: html_viewer EXPORTING parent = container,
list_viewer EXPORTING i_parent = container.
ENDMETHOD.
Listing 9 The Instance Constructor of Class screen_handler
Method handle_node_double_click
Listing 10 shows the instance method handle_node_double_clickof classscreen_handler. Thismethod is
declared and registered asan event handler for the event node_double_clickof our tree control object.
Therefore, each timea user double-clickson a node of the tree, it triggersthat method. The method importsthe
event'sEXPORTING parameter node_key, which containsthe key of the selected node. Depending on the
key's contents, the event handler either callsmethod fill_html or fill_list. It also sets the visibility of the two
application controlsreferencedby html_viewer and list_viewer. Remember that bothcontrolsare linked to the
right columnof our vertical splitter control. Theeventhandler steerstheir alternative display inthat container.
As stated above, method callsto the frontend are bufferedin an automationqueue. Butsince there isno
automatic synchronization point after handling a system event on the backend, we must force the system to
process the precedingmethod calls. To do this, we must call the static methodcl_gui_cfw=>flush. Note that we
12. do not have any regular PAI processing in our program exceptwhen the user leavesthe screen. The
communicationbetween frontendand backendishandled by the CFW. The frontend-to-backend
communicationistriggered by events, and the backend-to-frontendcommunicationistriggered by flushes.
METHOD handle_node_double_click.
DATA: carrid TYPE spfli-carrid,
connid TYPE spfli-connid.
carrid = node_key(2).
connid = node_key+2(4).
IF connid IS INITIAL.
CALL METHOD: fill_html EXPORTING carrid = carrid,
html_viewer->set_visible EXPORTING visible = 'X',
list_viewer->set_visible EXPORTING visible = ' '.
ELSE.
CALL METHOD: fill_list EXPORTING carrid = carrid
connid = connid,
list_viewer->set_visible EXPORTING visible = 'X',
html_viewer->set_visible EXPORTING visible = ' '.
ENDIF.
CALL METHOD cl_gui_cfw=>flush.
ENDMETHOD.
Listing 10 The Instance Method handle_node_double_clickof Class screen_handler
Method fill_html
Listing 11 shows the instance method fill_html of classscreen_handler. When a user selectsa node, this
method readsthe value of column URL from the database tableSCARR accordingto the nodeselected. The
selected URL is simply passed to the method show_url of our HTMLcontrol, whichdisplaysit in itsarea on the
screen.
Beginningwith Release 4.6C, the new column URL of the carrier database tableSCARR will contain the
addresses of the carrier's Web sites. To add, change, or update theaddresses, you can provide your own data
and change the program accordingly.
METHOD fill_html.
DATA url TYPE scarr-url.
SELECT SINGLE url
FROM scarr
INTO url
WHERE carrid = carrid.
CALL METHOD html_viewer->show_url EXPORTING url = url.
ENDMETHOD.
Listing 11 The Instance Method fill_html of Classscreen_handler</tr>
Method fill_list
Listing 12 shows the instance method fill_list of classscreen_handler. Thismethod givesyou an impression of
how to work with the new SAP List Viewer, which will replace classical ABAP list processing. Aswith the tree
control, you have to prepare data inan internal tableand passthistable to a methodof the List Viewer object.
In our case, we read detail information from database table sflight into an internal table flight_tab when theuser
has double-clicked a flight connectionin the tree.In additionto the actual data, we prepareand passadditional
information - such as the list'stitle and some of itsattributes - to the method. Figure 7 shows the screen after
selecting a flight connection inthe tree.
METHOD fill_list.
DATA: flight_tab TYPE TABLE OF demofli,
BEGIN OF flight_title,
carrname TYPE scarr-carrname,
cityfrom TYPE spfli-cityfrom,
cityto TYPE spfli-cityto,
END OF flight_title,
list_layout TYPE lvc_s_layo.
SELECT SINGLE c~carrname p~cityfrom p~cityto
INTO CORRESPONDING FIELDS OF flight_title
FROM ( scarr AS c
INNER JOIN spfli AS p ON
13. c~carrid = p~carrid )
WHERE p~carrid = carrid AND
p~connid = connid.
SELECT fldate seatsmax seatsocc
INTO CORRESPONDING FIELDS OF TABLE
flight_tab
FROM sflight
WHERE carrid = carrid AND connid = connid
ORDER BY fldate.
CONCATENATE flight_title-carrname
connid
flight_title-cityfrom
flight_title-cityto
INTO list_layout-grid_title
SEPARATED BY space.
list_layout-smalltitle = 'X'.
list_layout-cwidth_opt = 'X'.
list_layout-no_toolbar = 'X'.
CALL METHOD list_viewer->set_table_for_first_display
EXPORTING i_structure_name = 'DEMOFLI'
is_layout = list_layout
CHANGING it_outtab = flight_tab.
ENDMETHOD.
Listing 12 The Instance Method fill_list of Class screen_handler
Figure 7 List Display with an ALV Control
Conclusion
In thisarticle, we showed you the principal conceptsof programmingscreenswith the control frameworkusing a
detailed demonstrationprogram. Thisprocedure canbe condensed into the followingsteps:
1. Create container control objectsand linkthem to areasat the screen.
2. Create application control objectsand linkthem to the container controls.
3. Provide data for the controlsin data objects, which, in most cases, are internal tablesof special global
14. types.
4. Send the data to the controlsby callingcontrol methods.
5. React on user actionson the controlsby definingand registeringevent handler methods.
In thisarticle, we did not explain thesinglecontrol classes - or their methodsand events- in great detail. We
simply wanted to providean overview for the ABAP Objectsprogrammer who wantsto use global classesof the
CFW and who defineshisor her own local classesto handle the control objectson the screen.
Using this article asa starting point, you can learn more about the featuresof the control frameworkby
referring to the documentationof the control classesor to their definitionin theclassbuilder of the ABAP
Workbench. With that information, you can then continueto explore the CFW on your own. For example, you
might create classesthat react when a user clicks on a picture. Or you could lookfurther intotree controls, so
that when a user selects a node in a tree control, you couldintroducecontextmenusfor those nodes. Users
would then findthese when they right-clickon a particular node. Finally,there ismuch to discover about the ALV,
which we covered only briefly. ALV isthe best choice for presenting tabular dataon the screen. It replaces
classical table controlsaswell as classical lists, and it providesa complete environment for interactivereporting.
If you wish to design and improveGUI featuresthat benefit your users, the opportunitiesare there, and the
developmentprocessfor these interfacesismore streamlined thanever before.Whichever featuresyou choose
to take advantage of,thisarticlecan be your springboard to creatingan interface that isan effective tool for your
end users.