EVANNEX Tesla Model S Accent-I Installation
•
1 like•22,298 views

Tesla Model S Interior Trim Installation

Recommended
Recommended
More Related Content
What's hot
What's hot (16)
Similar to EVANNEX Tesla Model S Accent-I Installation
Similar to EVANNEX Tesla Model S Accent-I Installation (20)
More from EVANNEX Aftermarket Tesla Accessories
More from EVANNEX Aftermarket Tesla Accessories (14)
Recently uploaded
Recently uploaded (20)
EVANNEX Tesla Model S Accent-I Installation
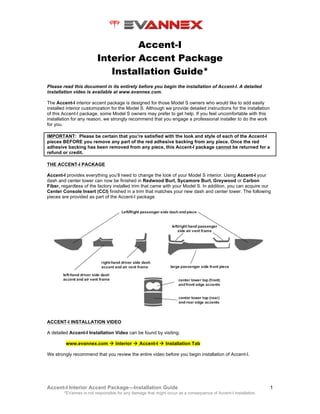
- 1. Accent-I Interior Accent Package—Installation Guide 1 *EVannex is not responsible for any damage that might occur as a consequence of Accent-I installation. Accent-I Interior Accent Package Installation Guide* Please read this document in its entirety before you begin the installation of Accent-I. A detailed installation video is available at www.evannex.com. The Accent-I interior accent package is designed for those Model S owners who would like to add easily installed interior customization for the Model S. Although we provide detailed instructions for the installation of this Accent-I package, some Model S owners may prefer to get help. If you feel uncomfortable with this installation for any reason, we strongly recommend that you engage a professional installer to do the work for you. IMPORTANT: Please be certain that you’re satisfied with the look and style of each of the Accent-I pieces BEFORE you remove any part of the red adhesive backing from any piece. Once the red adhesive backing has been removed from any piece, this Accent-I package cannot be returned for a refund or credit. THE ACCENT-I PACKAGE Accent-I provides everything you’ll need to change the look of your Model S interior. Using Accent-I your dash and center tower can now be finished in Redwood Burl, Sycamore Burl, Greywood or Carbon Fiber, regardless of the factory installed trim that came with your Model S. In addition, you can acquire our Center Console Insert (CCI) finished in a trim that matches your new dash and center tower. The following pieces are provided as part of the Accent-I package. ACCENT-I INSTALLATION VIDEO A detailed Accent-I Installation Video can be found by visiting: www.evannex.com Interior Accent-I Installation Tab We strongly recommend that you review the entire video before you begin installation of Accent-I.
- 2. Accent-I Interior Accent Package—Installation Guide 2 *EVannex is not responsible for any damage that might occur as a consequence of Accent-I installation. GENERIC INSTALLATION COMMENTS 1. There are two strategies for installing Accent-I: • Semi-permanent installation. Allows the removal of the Accent-I pieces without substantial effort. • Permanent installation. Provides exceptionally strong adhesion to the underlying surface but will also result in difficulty in removing Accent-I and the potential for minor damage to the underlying surface. We recommend “semi-permanent installation,” but the final decision is yours. Preparation for both types of installation is discussed in this document. 2. If you choose the “semi-permanent installation” approach, Accent-I can be removed relatively easily if you no longer want the look. 3. If you choose the “permanent installation” approach, a. It is very important to properly align each Accent-I piece before pressing it into place. The adhesive used for Accent-I is extremely strong, and it will be difficult to remove the accent piece once it adheres. First, fit each piece without removing its red adhesive backing to ensure you understand fit and orientation. You can use masking tape to provide temporary support for the piece as you work on alignment and installation, removing it as you install the piece. b. We advise installing each Accent-I piece “incrementally.” By this, we mean that you should remove only a small portion of the red adhesive backing material (exposing only a small part of the adhesive surface), then align an edge of each piece, again checking alignment of the edge and adjacent or perpendicular edges. Work slowly to affix the material in steps while pulling the red backing off. Then press the part into place. c. Removal is more difficult, but still possible (see instructions on page 9 of this document). It is important to note that removal can permanently stretch and/or damage the Accent-I pieces and might cause minor damage to your factory trim finish. WARNING: Because factory-installed Lacewood trim is soft and open grain, any attempt at removing Accent-I from factory Lacewood trim can damage the factory trim, regardless of whether you choose semi-permanent or permanent installation. Therefore, application of Accent-I onto Lacewood MUST be considered a permanent installation. PREPARATIONS FOR SEMI-PERMANENT INSTALLATION (RECOMMENDED APPROACH) IMPORTANT: Before you remove any part of the red adhesive backing, fit each piece into its appropriate location to: (1) ensure that you’ve chosen the correct piece and (2) to familiarize yourself with the installation approach. Semi-permanent installation is for those Model S owners who want to keep their options open. That is, they really like Accent-I and intend to customize their Model S with it. But they want to be able to remove Accent-I pieces at some later date, and either (1) try a different Accent-I trim finish, or (2) return to the factory trim. Within certain constraints, it is possible to accomplish this. In essence, you will follow all of the installation instructions contained in this document, but instead of removing the entire red backing for the adhesive on each Accent-I piece, do the following: Step A. Using a #1 Xacto knife (or similar sharp blade), cut a 3/8 inch to ½ inch border on the back of larger Accent-I pieces and a narrower border on smaller trim pieces. IMPORTANT: Cut just deep enough to cut through the red adhesive backing, no deeper! Step B. Pull off the backing for the border only. See photo below. This will allow you to adhere the edges of an Accent-I piece, but because the surface area for adhesion is relatively small, the Accent-I piece is much easier to remove. The remainder of the red adhesive backing stays where it is, as shown in the photo below
- 3. Accent-I Interior Accent Package—Installation Guide 3 *EVannex is not responsible for any damage that might occur as a consequence of Accent-I installation. Notes: 1) The wider the ‘border’ that exposes the adhesive, the stronger the bond for the entire Accent-I piece. If you’d like a stronger bond, cut slightly wider borders for larger pieces. However, as the border is widened and the bond becomes stronger, the pieces become increasingly more difficult to remove. 2) Accent-I pieces installed using the semi-permanent approach will not adhere as strongly and may have to be pressed back into place from time to time. 3) Accent-I pieces installed using the semi-permanent approach may still be damaged (e.g., stretched or broken) as you remove them, and some adhesive may have to be removed from the underlying surface. WARNING: Removal of Accent-I pieces using the semi-permanent approach can damage Lacewood open grain trim when it is removed. Proceed with caution when you have factory installed Lacewood trim. IMPORTANT: Please be sure to recognize that once the red adhesive backing is removed from any Accent-I piece (including the ‘borders’), the entire Accent-I package cannot be returned. See our "Returns" tab for further details.
- 4. Accent-I Interior Accent Package—Installation Guide 4 *EVannex is not responsible for any damage that might occur as a consequence of Accent-I installation. PREPARATIONS FOR PERMANENT INSTALLATION Permanent installation is for those Model S owners who want to provide the strongest possible bond between the underlying surface and the Accent-I piece. Removal of permanently installed Accent-I pieces is possible and is discussed at the end of this document. As each Accent-I piece is installed, the red adhesive backing is removed in it entirety. But this is done “incrementally” as you install each piece so that the underlying trim surface is exposed to only a small part of the Accent-I adhesive as the piece is aligned in its proper location and orientation. IMPORTANT: Even if you do decide to use the permanent installation approach, we strongly recommend that you do a test install using the semi-permanent method. This will allow you to get a feel for installation before you remove the full adhesive backing from each piece for a permanent install. INSTALLATION INSTRUCTIONS IMPORTANT: Before you remove the red adhesive backing, fit each piece into its appropriate location to: (1) ensure that you’ve chosen the correct piece for the location and (2) to familiarize yourself with the installation approach. Tools required: A #1 Xacto knife (or similar) is required for semi-permanent installation (recommended). Materials required: Masking tape, a spray bottle contained a mixture of alcohol and distilled water (available at any large pharmacy) in a 30% alcohol, 70% water mixture, and a clean, soft cloth. Step 1. Clean the entire dash and upper center tower surface using an alcohol-water mixture. Allow to dry. DASH—PASSENGER SIDE (see Figure 1 for overview of steps) Step 2. Install the large passenger side front piece beginning on its left side (areas A, B and C in Figure 1).* Be certain to butt the left edge of the accent piece against the brushed aluminum frame (near B) and against the bottom edge upholstery (along C and E) throughout the entire length. Keep the right portion of the piece raised above the surface and slowly lower (in areas D and E) as you move to the right. On the right side near the door, DO NOT adhere the narrow vertical strip in area G (leave the red adhesive backing in place!) until you install the right hand passenger side air vent frame accent piece (Step 3). Step 3a. Install the right hand passenger side air vent frame accent piece.* Be sure to butt the accent against the chrome frame of the air vent and against the corresponding outline curve cut into the large passenger side front piece. Be sure the edge between the pieces is tight and smooth. Step 3b. Install the left hand passenger side air vent frame accent.* See photo above. Be sure to butt the accent against the chrome frame of the air vent and against the corresponding outline curve cut into the larger dash piece. It may be necessary to bend the frame piece slightly and slide it under the aluminum frame on both the upper left and right edge to achieve proper fit.** Use your finger to ensure that the pieces properly butt the corresponding edge of the larger dash accent piece. Step 3c. Remove the red adhesive backing from the narrow vertical strip on the right end of the large passenger side front piece (in the area of G. Be sure it properly butts with the right hand passenger side air vent frame accent, then press it into place. ----------------------------------- * If you have chosen semi-permanent installation, you will first cut a border around this piece. If you have chosen permanent installation, you will remove the entire red adhesive backing incrementally as you install. ** If your Model S has a newer aluminum frame design (cars released in mid-2014 and after) it may be necessary to left the aluminum frame slightly put pulling toward you as you slide the Accent-I piece under the frame.
- 5. Accent-I Interior Accent Package—Installation Guide 5 *EVannex is not responsible for any damage that might occur as a consequence of Accent-I installation. Figure 1. Installing passenger side front piece Step 4. Install the passenger-side dash end piece (i.e., also called the “end cap,” this is the larger accent piece that fits on the side of the dashboard facing the passenger door (see Figure 2).* Be sure to butt the passenger-side dash end piece against the back of the doorframe (Figure 2, locations B and C), but at the same time, align it with the shape of the edge of the dash accent piece. Note: The factory installed side dash panel on your Model S may have some give, deflecting inward or outward by as much as a quarter of an inch. If this is the case for your Model S, it may be difficult to make the passenger-side dash end piece adhere to the edge of the front dash accent piece. This is a characteristic of the assembly of the Model S, and as a consequence, a small gap may be visible when the door is open. It will not be visible when the door is closed. Note: For steps 3 and 4, use your finger to smooth the edges and ensure that all pieces are properly seated and properly abut the corresponding shapes in the larger passenger side dash accent piece. There will be a visible seam between these two pieces but it should be smooth and tight. The seam cannot be avoided given the shape of the dash trim in this area and the fabrication characteristics of the Accent-I pieces. Figure 2. Installing passenger-side dash end piece DASH—LEFT DRIVER SIDE (see Figure 3 for overview of steps) Step 5. Install the left-hand driver side dash accent.* Be sure to butt the accent piece to the lower upholstery edge (Figure 3, area B). To achieve proper fit, it may be necessary to tuck the edges of the piece under the aluminum frame ** on the upper left and the far right (Figure 3, areas A and C). Step 6. Install the left-hand driver side air vent frame accent.* Be sure to butt the accent piece to the edge of the left-hand driver side dash accent. To achieve proper fit, it may be necessary to slide the air vent frame under the aluminum frame on the upper left and the far right. See Figure 3. ----------------------------------- * If you have chosen semi-permanent installation, you will first cut a border around this piece. If you have chosen permanent installation, you will remove the entire red adhesive backing incrementally as you install. ** If your Model S has a newer aluminum frame design (cars released in mid-2014 and after) it may be necessary to left the aluminum frame slightly put pulling toward you as you slide the Accent-I piece under the frame.
- 6. Accent-I Interior Accent Package—Installation Guide 6 *EVannex is not responsible for any damage that might occur as a consequence of Accent-I installation. Figure 3. Installing left-hand driver side dash accent Step 7. Install the driver-side dash end piece.* Using an approach analogous to the one used in Step 4, be sure to butt the side dash piece against the back of the door frame but at the same time, align it with the shape of the edge of the dash accent piece. Note: The factory installed side dash panel on your Model S may have some give, deflecting inward or outward by as much as a quarter of an inch. If this is the case for your Model S, it may be difficult to make the side accent piece adhere to the edge of the front dash accent piece. This is a characteristic of the assembly of the Model S and as a consequence, small gap may be visible when the door is open. ----------------------------------- * If you have chosen semi-permanent installation, you will first cut a border around this piece. If you have chosen permanent installation, you will remove the entire red adhesive backing incrementally as you install.
- 7. Accent-I Interior Accent Package—Installation Guide 7 *EVannex is not responsible for any damage that might occur as a consequence of Accent-I installation. DASH—RIGHT DRIVER SIDE (see Figure 4 for overview of steps) Step 8. Install the right-hand driver side dash accent.* Be sure to butt the accent piece to the lower upholstery edge beginning with the curve in the right lower corner. To achieve proper fit, it may be necessary to slide the accent piece under the aluminum frame on both the left and right of the right hand driver side dash area.** Step 9. Install the right-hand driver side air vent frame accent.* To achieve proper fit, it may be necessary to slide the frame accent under the brushed aluminum frame. CENTER TOWER FRONT (see Figure 5 for overview of steps) Step 10. Push the factory armrests to their rear position (i.e., the factory cup holders are uncovered fully). Step 11 Install the center tower top accent (front).* Begin by tipping the piece so that the front edge (nearest the dash) is raised and the rear edge is ready to slide under the armrests in their retracted position. Slide the piece under the armrest. and then position using the existing cup holder chrome frame as a guide, align the center tower top accent (front) so that it abuts the cup holder chrome frame around its entire perimeter beginning with the two flat areas along its front to back centerline, being sure that it also aligns to the right and left top edges of the center tower top surface. Step 15. Install the center tower front edge accent and press into place.* The center tower top accent (front) should adhere to the top edge of the front edge accent. Press the seam closed for a smooth fit. Figure 4. Installing right-hand driver side dash accent. Figure 5. Installing the center tower top accent (front)* and edge. ----------------------------------- * If you have chosen semi-permanent installation, you will first cut a border around this piece. If you have chosen permanent installation, you will remove the entire red adhesive backing incrementally as you install. ** If your Model S has a newer aluminum frame design (cars released in mid-2014 and after) it may be necessary to left the aluminum frame slightly put pulling toward you as you slide the Accent-I piece under the frame.
- 8. Accent-I Interior Accent Package—Installation Guide 8 *EVannex is not responsible for any damage that might occur as a consequence of Accent-I installation. CENTER TOWER REAR (see Figure 6 for overview of steps) Step 12. Push the factory arm rests to their front position (i.e., the factory cup holders are covered fully). [For owners who have installed PARZ (armest + rear seat cupholders) by EVannex, contact us for Installation options for the center tower top accent (rear).] Step 13. Install center tower rear edge accent.* Align the bottom of the accent with the bottom edge of the existing factory trim just above the rear air vent. Step 14. Tilt the rear of the center tower top accent (rear) upward and then carefully align the sides of the with the sides of the center tower. Carefully slide the center tower top accent (rear) under the arm rests about 2- 3 mm. Be sure that the sides are aligned and that the rear curve of the center tower top accent (rear) aligns with the curve of the center tower rear edge accent. Step 15. Press into place, being sure both sides align with the edges of the center tower. Figure 6. Installing center tower top accent and rear edge accent ----------------------------------- * If you have chosen semi-permanent installation, you will first cut a border around this piece. If you have chosen permanent installation, you will remove the entire red adhesive backing incrementally as you install.
- 9. Accent-I Interior Accent Package—Installation Guide 9 *EVannex is not responsible for any damage that might occur as a consequence of Accent-I installation. REMOVAL OF THE ACCENTS Removal instructions when the recommended semi-permanent installation has been used: If you used the recommended semi-permanent installation approach (i.e., you removed only the boundary of the adhesive backing for all pieces), Accent-I pieces are relatively easy to remove. It’s likely you can remove the pieces with your fingers, but you can using a plastic putty knife or professional auto panel removal tool (i.e., a sharp plastic edge) and pry up a corner and then peel off each piece beginning at its edge. DO NOT use a metal edge to pry up the piece! Removal instructions when permanent installation has been used: If you used the permanent installation approach (i.e., you removed the entire adhesive backing for all pieces), the product should be viewed as a permanent installation. Removal will permanently stretch and/or damage the Accent-I pieces and can cause damage to your factory trim finish. WARNING: Because Lacewood trim is a soft, open grain trim, any attempt at removing Accent-I from factory Lacewood trim using either the semi-permanent or permanent installation procedure is likely to damage the factory trim. Therefore, application of Accent-I to Lacewood MUST be considered a permanent installation. Starting at a corner of the Accent-I piece, use a plastic putty knife or professional auto panel removal tool (i.e., a sharp plastic edge) and pry up the corner. You can heat the surface of the Accent-I piece with a hair drier -- NOT a heat gun -- and this will help by making the material slightly more pliable. Then, working methodically, use the sharp plastic edge and work inward, pulling the material up as you go. DO NOT use a metal edge to pry up the piece! IMPORTANT NOTES FOR REMOVAL: 1) Some of the adhesive will be left on the surface. This can be removed by rolling it up with the sharp plastic edge or even your fingernail; the original surface can then be cleaned with acetone to remove any final adhesive smudges. 2) It's unlikely that you'll damage the automotive surface beneath the Accent-I piece, but it can happen if you scratch the surface while removing the adhesive. Be careful! Use only plastic if you need to pry up the Accent-I piece. Also, if you adhere the pieces to a porous or soft surface (i.e., Lacewood trim), damage will occur during removal. 3) An Accent-I piece that is removed may be stretched or damaged to some extent, so you should only remove it if you no longer want the look. Damage and stretching can occur regardless of the installation approach you have used, but is much more likely when the permanent installation approach is used.