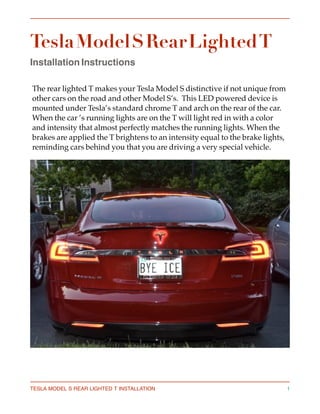
Rear Lighted T Installation Guide
•
1 like•225,976 views

Rear Lighted T Installation Guide

Recommended
Recommended
More Related Content
More from EVANNEX Aftermarket Tesla Accessories
More from EVANNEX Aftermarket Tesla Accessories (20)
Recently uploaded
Recently uploaded (20)
Rear Lighted T Installation Guide
- 2. Parts Provided TESLA MODEL S REAR LIGHTED T INSTALLATION 2 • Rear"Lighted"T"and"Arch"with"dual"brightness"drive" • 5 feet each of blue, yellow, and black 20 gauge stranded wire • Three 20-22 gauge Posi-taps • 5 Posi-Lok Connectors, 18-24 gauge • 2 feet Spectra nylon parachute thread • 5 spare blue/green plastic retainer clips • Small tube of clear silicone sealant"
- 3. A. Remove liftgate trim pieces There are four black plastic trim pieces on the interior side of the lift gate: top, right and left sides, and a large piece covering the lower side of the liftgate. Each is clipped into place with plastic retainers that snap into a hole on the lift gate metal frame. These must be removed to proceed with the installation. 1. Begin with the top horizontal piece. Using a plastic pry tool or your hands, snap the right or left side loose and remove the piece. Some of the clips may break or remain stuck in the mounting hole. In the latter case use a u-shaped pry tool to remove them. Save all the clips that have not been damaged — you’ll need them for the re-installation. Replace any broken clips with those in the parts list. 2. Do the same with the right and left pieces. 3. Removal of the large bottom trim piece requires several additional steps. First, the two indented handle openings at the bottom of the piece have to be removed using a pry tool. The passenger side piece has a wire connection for the lift gate release. Unplug it. The upper ends of the trim piece are attached to the lift gate frame with small black screws. Remove these screws. 4. At this stage there are two alternatives. You can prop up the large lower trim piece while you install the rear T or you can disconnect the trim piece’s electrical connections and set the piece aside. The former option is a bit easier but requires an assistant and material to hold the trim piece up while you install the rear T and make its electrical connections. Point 5 below describes the steps for the latter option. This piece also had two T-15 screws holding it in place a the top ends — be sure to remove them. 5. The lower trim piece has several electric connections on the back side: one each for the two rear speakers, and one TESLA MODEL S REAR LIGHTED T INSTALLATION 3
- 4. for the trunk light. Accessing these connectors is much easier if the speaker mount piece at the top is removed, which is clipped in place. Starting with the bottom edge work the trim piece loose but hold it loosely in place once all of the retaining clips have been released, taking care not to stress or break these electrical connectors. Reach up over the inside of the trim pieces to disconnect these. The top piece can be problematic as it has a small retaining tab on the upper side of the connector connections. 6. Once all of the trim pieces have been removed set them aside in a safe place and keep all of the retainers and screws in a place where they will be easy to find for reuse. 7. When the pieces have been removed you’ll see two black vinyl sheets on the back of the lift gate. These are glued on with a tar-like material and need to be removed to provide access to the electrical connections. Remove them and set aside B. Mount the rear lighted T 1. Raise the lift gate to a convenient working level for working on the T. 2. Using the painters tape outline the existing chrome T and arch to mark their exact placement. This is a very important step for correct placement of the lighted T and arch. 3. Using your fingers push the chrome T and arch from side to side to loosen them a bit from the double sided tape with which they are attached to the lift gate. 4. Take a 12” piece of parachute thread and use it to saw back and forth under the chrome T until it’s loose and you can remove it. Do the same for the chrome arch. Set them aside in a safe place. The residue of TESLA MODEL S REAR LIGHTED T INSTALLATION 4
- 5. the black double sided tape that attached the T and arch to the lift gate will remain when the chrome pieces have been removed. Leave this on the car as is and do not attempt to clean it off. It serves as a guide for drilling the holes for the electrical connections and mounting the lighted T and arch. 5. With a marker, place a spot on the residue double- sided black tape about 1/8” from the extreme right edge of the top of the T, centered in the space from top to bottom. Do the same on right edge of double-sided black residue tape for the arch. These are the guide marks for drilling the hole. Take the light T and arch pieces and match the wire placement on the backs to be sure the marks are accurate. 6. With the drill and bit and using light pressure on the drill very carefully drill a hole in these spots. The residue double-sided tape will keep the drill bit from drifting. As soon as the drill penetrates the sheet metal stop drilling and back out the drill. 7. Take the T and thread the red and black wire lead through the hole you just drilled. Find the lead on the underside of the lift gate and temporarily tape it to the lift gate back. Do the same with the arch. 8. Remove the protective covering from the 3M double side tape on the back of the T and carefully but lightly align it in place over the black residue double sided tape. painters tape also helps) then press it firmly into place. Do the same with the arch, being sure to maintain good, even spacing between the top edge of the T and the bottom edge of the arch. 9. Once you’re happy with the alignment of the T and arch remove the protective tape from the top of the lighted T and apply the original Tesla chrome T on top of it, taking care to align it perfectly. Once aligned press it firmly into place. Do the same with the arch. TESLA MODEL S REAR LIGHTED T INSTALLATION 5
- 6. C. Connect the running and brake light 12v power 1. Locate the black and red leads for the T and arch on the underside of the lift gate, Using the tube of silicone place a dab (for water proofing) on the back of each hole then separate the red and black wires.. Strip about 1/2 inch of the insulation off the ends. Twist together the 2 red wires and do the same with black wires. Then attach a Posi- Lock Connector on the ends of both the red and black wires. Then take the red and black leads on one end of the dual brightness driver and attach them to the open ends of the Posi-Lock Connector attached to the red and black leads from the T & Arch. Leave the yellow, blue, and white wires from the dual brightness driver alone — they will be connected in the steps below. If additional lengths of wire are needed to make these connections, use the wire provided in the kit and the Posi-Lock Connectors. . 2. Look at the very top of the underside of the lift gate. You’ll see a black cable with a reddish pink connector. This cable contains both the LED brake light and ground connections 3. Trace this cable down the underside of the lift gate. You want to access it in the passenger side opening that was revealed when you removed the black vinyl pieces in step A5. Find the cable in this opening then pull out so that it’s accessible. Then remove some of the electrical tape and open it up so you can access the individual wires in the cable. The blue wire is for the brake light connection and the black wire for ground. 4. Place a Positap connector on the blue wire and slip the yellow lead from the dual brightness driver into other side of the connector and screw both ends down as tight as possible. TESLA MODEL S REAR LIGHTED T INSTALLATION 6
- 7. 5. Place another Posi-tap connector on the black wire and slip the white lead from the dual brightness drive into the other side of the connector. Then screw down both ends as tight as possible. 6. Just behind the license plate lights on the interior side of liftgate you’ll find purple wires that provide power for each license plate light. Attach a Positap to one of the purple wires and connect the blue wire from dual brightness driver to the other end of the Positap. 7. You’re now ready for testing. D. Test Operation You will need an assistant for these steps. 1. Using the touchscreen turn all of the lights on. The rear lighted T should light match the intensity of the rear running lights. If it doesn’t light check all of your connections. 2. Have an assistant sit in the car and press the brake light. The rear lighted T should brighten to match the intensity of the brake lights. The video to the right shows proper operation TESLA MODEL S REAR LIGHTED T INSTALLATION 7