Lab #9 and 10: Web Server Programming
Create a New Folder: I suggest that youcreate a new folder named Lab 9 and 10 to store your 13 or more files for this lab.
PHP Functions dedicated to working with MySQL databases:
PHP Function
Description
mysql_connect()
Used to connect to a database including user ID and password for database user.
mysql_select_db()
Set the default database that is to be used.
mysql_query()
Used for general query (or database actions) such as performing CREATE TABLE, SELECT, INSERT, UPDATE, or DELETE actions.
mysql_fetch_assoc()
Allows an entire row (record) of data to be retrieved and converted to an associative array. This allows each field of a record to be retrieved using the field name itself as the array index.
mysql_close()
Closing access to an opened MySQL database.
Your Topic for this Lab: Decide on a topic for this lab based on your entrepreneurship (if feasible). In my example, I created an inventory program for a company called Kettel’s Auto Parts. (The idea was inspired by a business once owned by my great Uncle Joe back in the 1940’s – he may have kept records differently back then) You might consider an inventory for your company. The goal is to keep track of items in a database.
Dealing with Large Programs: This is the most ambitions PHP program we have tackled so far. If you attempt to consider this endeavor as a whole, it may be overwhelming to you. So, here is the trick for handling large programs. Break them into small pieces, and just consider one little piece at a time. This program is divided into 13 modules. If you can write a small program, then you can write a large program broken into many small pieces. I suggest you skim over this assignment so you get an idea of where you are headed. As in the past, this example is just a paradigm – your program may look completely different.
Lab #9 – Parts I to V: The first week, plan to submit a Word document with a link to your “Viewing Site” (Part V). Be sure to include a graphic banner and a least one “time” field using the PHP now() function.
Lab #10 – Finish the Program: The second week plan to submit a Word document with a link to the menu. Your Add records, Edit Records, Delete Records and View by Sorted and Filtered order should be functioning.
Program Files for this Lab: In my example I wrote the following 13 modules to make up the Kettel’s Auto Parts Inventory Program:
parts_form.html – Part I
parts_banner.php – Part I
parts_include.php – Part II
parts_reset.php – Part III
parts_save_rec.php – Part IV
parts_view_all.php – Part V
Parts_menu.html – Part VI
parts_view.php
parts_delete.php
parts_delete_entry.php
parts_edit.php
parts_edit_entry.php
parts_edit_save.php
Hierarchy Chart: Do you remember the hierarchy charts from Chapter 2 of CST 170? When a program has many modules calling other modules, programmers often use hierarchy carts to show a picture of how the modules relate to each other. Don’t confuse the hierarchy ...
Lab #9 and 10 Web Server ProgrammingCreate a New Folder I s.docx
1. Lab #9 and 10: Web Server Programming
Create a New Folder: I suggest that youcreate a new folder
named Lab 9 and 10 to store your 13 or more files for this lab.
PHP Functions dedicated to working with MySQL databases:
PHP Function
Description
mysql_connect()
Used to connect to a database including user ID and password
for database user.
mysql_select_db()
Set the default database that is to be used.
mysql_query()
Used for general query (or database actions) such as performing
CREATE TABLE, SELECT, INSERT, UPDATE, or DELETE
actions.
mysql_fetch_assoc()
Allows an entire row (record) of data to be retrieved and
converted to an associative array. This allows each field of a
record to be retrieved using the field name itself as the array
index.
mysql_close()
Closing access to an opened MySQL database.
Your Topic for this Lab: Decide on a topic for this lab based on
your entrepreneurship (if feasible). In my example, I created
an inventory program for a company called Kettel’s Auto Parts.
(The idea was inspired by a business once owned by my great
Uncle Joe back in the 1940’s – he may have kept records
differently back then) You might consider an inventory for
your company. The goal is to keep track of items in a database.
Dealing with Large Programs: This is the most ambitions PHP
2. program we have tackled so far. If you attempt to consider this
endeavor as a whole, it may be overwhelming to you. So, here
is the trick for handling large programs. Break them into small
pieces, and just consider one little piece at a time. This
program is divided into 13 modules. If you can write a small
program, then you can write a large program broken into many
small pieces. I suggest you skim over this assignment so you
get an idea of where you are headed. As in the past, this
example is just a paradigm – your program may look completely
different.
Lab #9 – Parts I to V: The first week, plan to submit a Word
document with a link to your “Viewing Site” (Part V). Be sure
to include a graphic banner and a least one “time” field using
the PHP now() function.
Lab #10 – Finish the Program: The second week plan to submit
a Word document with a link to the menu. Your Add records,
Edit Records, Delete Records and View by Sorted and Filtered
order should be functioning.
Program Files for this Lab: In my example I wrote the following
13 modules to make up the Kettel’s Auto Parts Inventory
Program:
parts_form.html – Part I
parts_banner.php – Part I
parts_include.php – Part II
parts_reset.php – Part III
parts_save_rec.php – Part IV
parts_view_all.php – Part V
Parts_menu.html – Part VI
parts_view.php
parts_delete.php
parts_delete_entry.php
parts_edit.php
parts_edit_entry.php
3. parts_edit_save.php
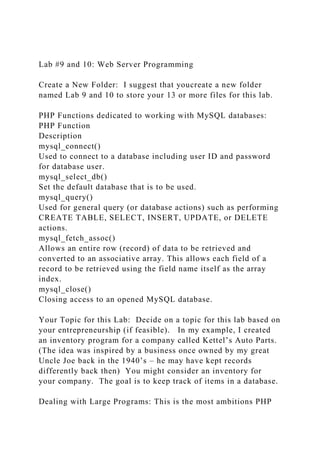
Hierarchy Chart: Do you remember the hierarchy charts from
Chapter 2 of CST 170? When a program has many modules
calling other modules, programmers often use hierarchy carts to
show a picture of how the modules relate to each other. Don’t
confuse the hierarchy chart with a flowchart. Flowcharts show
program details while this chart only tells us which modules
exist and where they are called from. You will be asked to
draw a hierarchy chart for lab #11.
Hierarchy Chart for Kettel’s Auto Parts Inventory Program:
(
Menu
)
(
Parts Edit
) (
Parts Form HTML File
)
(
Parts Delete
) (
Parts View
)
(
Parts Edit Entry
4. )
(
Parts Delete Entry
) (
Parts
Save
Record
)
(
Parts Edit Save
)
(
Parts Include
) (
Parts Reset
)
Part I - Create an HTML form to add records to a table you will
soon create for this lab. I used CoolText.com to create my
banner. Create your own image that you will use in the various
modules for this lab. My form passes the fields to a scripted
named part_save_rec.php – which we will write later.
5. HTML Color Names: Visit
http://www.w3schools.com/html/html_colornames.asp to see
your choices for HTML colors.
Form document:
Part II - Create an Include file for a common Function: Review
page 109 of the textbook. The purpose of an include file is to
make your code more concise, and to eliminate the need to
modify your script in more than one place. In this lab, we will
need to connect to the MySQL database many times. Therefore,
we will create an Include file with a function called “doDB()”
that we can call anytime we need to connect to our database.
First, this makes your program more concise and second, if you
change your password, you only need to change one line of
code, rather than many. Study my example code below. I
named the following script parts_include.php. However, it is
common to name an include file inc_something.php. Notice
that I declared $db_connect as a global variable so it can be
seen outside the function doDB(). You can create an include
file for another purpose (or not), but I created this one to
connect to the MySQL database – something I must do many
times in this project.
6. Part III - Create a Reset Table Module: Now that you know
what your fields are, we need to create a table in your MySQL
database to store this data. I would like you to add two more
fields: date_added and date_modified so we can monitor dates.
You can fill them with the function now(). I also added the
command mysql_query("DROP TABLE auto_parts"); so we can
use this module to delete an old table and start fresh with a new
one. I did not link it to my Menu because I did not want to
delete it by mistake – do as you please.
7. Part IV - Create a Document to save the data in the From: Now
that you have a form to gather information and a table to store
this data, it is time to write the document to save your field
information. I named my file: parts_save_rec.php. I added a
confirmation line and links back to add more parts or return to
the menu (that we have not written yet).
Part V - View the Table Data: After you add a few records,
write a document to view these records. This is what my
8. parts_view_all.php file produces.
Remember, whenever you use an HTML command line in php,
start with echo, place the line in quotes, and end with a
semicolon. If there are multiple commands on the same line,
separate them with a comma. (Quiz question) Example line:
echo "<center>","<table border=10 cellspacing=5 cellpadding=5
bgcolor=tan>";
If there are quotes in the HTML code, add a backslash before
each of them. Example:
"<td colspan=7><center><img src="parts_banner.png"
width="600" height="152"></center></td>";
I never used parts_view_all.php in my program. Instead, I
created it as a rough draft, and then used a modified version of
it named: parts_view.php.
This completes lab #9. Submit a Word document with a link to
9. your viewing site (Part V). Be sure to include a graphic banner
and a least one time field using the PHP now() function.
Code for displaying Parts:
Part VII: Create a Menu: Because this program has many
modules, a menu will provide a way to link to them. Feel free
to be more creative. If you’d like, use buttons or graphics for
your links.
· Create a link to your HTML form to add more records.
· Add a link to edit a record.
· Add a link to a delete a record.
· Using SQL commands, plan to view the data in a variety of
different sorted orders.
· Also provide a menu choice to filter the data in a variety of
ways as well.
10. HTML for Menu:
Part VIII - View Data in Sorted or Filtered Order:
To view your data by part number, use the ORDER BY
command:
To view only selected data, filter your records with the WHERE
command
Notice I added totals at the end of the table. To display the
number of records queried, include a line like this one:
To accumulate the total part quantity, I declared a variable at
the beginning of the program:
Then, I coded the following line in my while loop:
To show totals, I added the following lines after the table.
Start with the script you wrote in Part V and add a case/switch
statement to the top.
11. Part IX – Delete a Record: To delete records I wrote a two-part
script. The first part allows the user to choose the record they
wish to delete from a drop down menu, and the second part
deletes it. Write a two-part or all-in-one form to accomplish
this task.
I programmed a drop-down list of Record ID numbers to select
from. Once an ID is selected, clicking the Delete button
(submit) will take the user to a second script to delete the
record with this ID.
Script to allow user to select the record to Delete:
Once the user selects a record to delete, the submit button links
to the script that will delete the record from your table.
Part X: Delete the selected record: Write a script that will
delete the selected record. This is the command block that
focused on the record for deletion:
12. This is the command block to delete the record:
This is the command block to send a message to the user:
This is the messages posted when the record was deleted. Links
back to delete more records or return to the menu were
included:
PHP to delete the selected entry:
13. Part XI - Edit a Record: I created 3 different modules for this
routine:
1. Choose a record to edit. Start with the script you wrote to
choose a record to delete.
2. Create a form to edit the selected record. Start with the form
you wrote to add a record.
3. Save the changes. Start with the script you wrote to delete
the selected record.
You may want to use an all-in-one module.
The “choose a record to edit” script is exactly the same as the
one used to “choose a record to delete” (the exact same thing
only different?). Just change the form action file and the word
Delete to Edit.
14. The second module is a sticky form where the program displays
the form information and the user is able to edit the record:
Lab Assignment #9 Point Distribution: (25 points total)
1. Part I- 4 point
2. Part II and III- 5 points
3. Part IV - 5 points
4. Part V- 5points
5. Part VI - 5 points
6. You recorded and submitted a message for me providing
feedback - 1 points
15. Lab Assignment #10 Point Distribution: (25 points total)
1. Part VII- 4 point
2. Part VIII - 5 points
3. Part IX- 5 points
4. Part X- 5points
5. Part XI - 5 points
6. You recorded and submitted a message for me providing
feedback - 1 points
View the PHP script on the next page.
The last thing to do is save the changes you made in the edit
routine. I used the following command block to save the
changes to the record:
PHP Script:
Wow, we made it! When you completed this lab, submit a Word
document in the drop box for Lab 10 with a link to your menu.
1 | Page
16. PHP Project/PHPProj.docx
PHP!!!!!!!!!!!!!!!!!!!!!!!!!!!!!!!!!!!!!!!!!!
CST 217 Project: In this assignment you are asked to design
and develop an original PHP application that utilizes the many
concepts you were taught in this course. Use your
entrepreneurship theme if feasible.
USE THIS IDEA, IT’S THE EASIEST:
1. Tic-Tack-Toe Game: Interactive Internet Game (Like Yahoo
Games)
Draw a Hierarchy Chart: Planning is important! Because you
will be using many modules for this project, I would like you to
draw a hierarchy carts to show a picture of how the modules
relate to each other. To draw this chart in Word, click Insert,
Shapes, and then click the box shape to get started. Then, right-
click on the box and choose Format Shape and change the line
thickness (weight). Right-click on the box again and this time
chose Add text and type the title. Plan to submit this chart, as a
Word document, along with the link to your Login script in drop
box 11 when you finish the project.
Program a Login Form: This can be simple or complex – it’s up
to you. Here are some example videos of a simple login form.
To get started, you might want to watch these videos. You can
create your MySQL database the way we did in Lab 8 and 9
with name and password fields.
Password Login:
http://www.youtube.com/watch?v=4oSCuEtxRK8
Example 2: http://www.youtube.com/watch?v=5XpBzLVHkPY
Example 3: http://www.youtube.com/watch?v=YCduI1JAFWo
We want to keep the password a secret, even if a hacker reads
the HTML code. A good way to achieve this goal is to use the
md5() function. Refer to page 138 and 139. Decide what your
password will be and then write a 3 line script to encode it. The
password in this example is “cst217”
17. Example 3 line password script:
When I ran this 3 line script, and got this encoded message:
There is no way a “common hacker” can decode this password.
Here is the Example Login Program.
18. Project Point Distribution: (100 points total)
First Half of Project:
1. You submitted a hierarchy cart - 5 points
2. Your project was unique to your first 10 labs. - 10points
3. All your documents includes comment statements - 5 point
4. Your forms included professional looking images - 5 points
5. You programmed a login script - 10 points
6. You programmed a menu (see lab 9 and 10) - 10points
7. You wrote your data to a MySQL table- 10points
8. You programmed an “Add records module” - 10points
Second Half of Project:
9. You programmed a “Delete records module” - 10points
10. You allowed the user to view data in sorted order (Lab 10) -
10points
11. You allowed the user to view data in filtered order (Lab 10)
- 5points
12. You did some math – (calculated a total or added tax) -
5points
13. You wrote or recorded a significant comment describing the
difficulty of this project and your thoughts on this online class
as a whole. - 5 points