SlideShare a Scribd company logo
1 of 21
Pro-E INSTALLATION
• 1 go to ftp://144.16.106.78
• 2 use ftp clients like WS FTP or CUTE FTP
• 3 PTCPRO-EWIN2000-NT4 setup
• 4 search the file “hosts” in C:
• 5 open “hosts” in NOTEPAD/WORDPAD
• 6 at the bottom of the file “hosts” write
144.16.106.78 cc-001
1. What is Pro-E???
•It is one of the most widely used CAD/CAM
software in today’s world
•This tool is provided by PTC and the website is
www.ptc.com
•Pro-E runs on a Windows 95, Windows 2000,
Windows NT or UNIX platform.
2. Introduction to Pro-E
• Earlier, engineering designs were
constructed with 2D drawings.
• Now, engineering drawings are represented
by mathematical solid models instead of as
2D drawings.
Two main reasons for the move from 2D
models to solid 3D models
1. The solid model can be understood even by non-
technical members of the team, such as those
from marketing and sales department.
2. The capabilities of solid modellers have been
upgraded so that the model can represent not only
the geometry of the part being designed, but also
the intent of the designer.
Pro-E Interface
Application Manager
Menu Bar
Menu Manager
Main Graphics
Window
Top Toolbar
Right Toolbar
Model Tree
Message Area
Default Datum
Planes
Coordinate
System
3. Protrusions and Cuts
A protrusion( or extrusion) is a part feature that adds material.
Different geometries can be sketched by combining a variety
of form options and attributes during creation of protrusion
feature.
Cuts are used to remove material from existing solid features.
Protrusions.
A protrusion is always the first solid feature created. This can be the
base feature or the first feature created after a base feature of datum
planes.
To create an extruded protrusion:
1. Choose Feature from the PART menu, and the choose Create
from the FEAT menu.
2. Choose Protrusion from the SOLID menu.
3. Choose Extrude=>Solid=>Done=> from the SOLID options
menu.
4. Pro/E displays PROTRUSION : Extrude dialog box, which lists
The elements needed for creating this type of protrusion.
5. Pro/E displays ATTRIBUTES menu, which lists the following
Options:
(a) One Side Creates the feature of one side of the sketching plane.
(b) Both Sides Creates the feature on both sides of the sketching
Plane.
6. Choose One side or Both Sides=> Done from ATTRIBUTES menu.
7. Select the sketching plane.
8. Sketch the protrusion.
a circle
the circle when extruded forms the solid cylinder
a square
the square when extruded forms the solid cuboid
Cuts
To remove material from a part, we use the following features.
1. Choose Feature from the PART menu, and then choose Create
From the FEAT menu.
2. Choose Cut from the SOLID menu.
3. Choose Extrude=>Solid=>Done (SOLID OPTS menu).
4. The appropriate dialog box is displayed.
5. Choose One Side or Both Sides=> Done (ATTRIBUTES menu).
6. Select the sketching plane on the part and the parts orientation.
7. Accept the cut direction or flip the arrow.
8. Determine the depth of the cut
a rectangular parallelepiped
a rectangular parallelepiped with a cut
4. Holes
Another variety of geometric construction which is accomplished by
Pro/E are holes. This is a pick and place feature, because they are
created automatically from your input and placed according to prompts
by Pro/E. A hole can also be created using a Cut, but it must be
sketched.
To create a straight hole, the following steps are done
1. Choose Hole from SOLID menu.
2. Pro/E displays HOLE OPTS menu. Choose Straight=> Done.
3. Pro/E displays the Feature Creation dialog box and the
PLACEMENT menu, which lists the options Linear, Radial,
Coaxial etc. Choose one of the options, then Done.
4. Select the placement plane.
5. Select the first reference (edge, surface, axis or datum).
6. Enter the distance from the first reference in the message area.
7. Select the second reference.
8. Enter the distance from the second reference in the message area.
9. Pro/E displays SIDES menu. Choose One Side or Both Sides, then
Done.
10. Select the extent to which the hole will be created.
11. Select OK in the dialog box to create the hole.
(i)
(ii) (iii)
EXAMPLE
(i) A solid body
(ii) A solid body with a full length
coaxial hole.
(iii) A solid body with a variable
length coaxial hole.
5. Rounds
Round creates a fillet, or a round on a edge, that is smooth transition
with a circular profile between two adjacent surfaces.
Following are three simple types of rounds.
1. Edge-Surface rounds
2. Surface-Surface rounds
3. Edge Pair rounds

More Related Content

Similar to SM1.ppt

Mold project basic
Mold project basicMold project basic
Mold project basic
AlexDaStar
 
Understanding basic features
Understanding basic featuresUnderstanding basic features
Understanding basic features
Mr_Burns
 
Cnc tutorial mastercam
Cnc tutorial mastercamCnc tutorial mastercam
Cnc tutorial mastercam
Ricardo Bdn
 
Computer Aided Solid Modelling
Computer Aided Solid ModellingComputer Aided Solid Modelling
Computer Aided Solid Modelling
Dibyajyoti Laha
 
AUTOCAD Report
AUTOCAD ReportAUTOCAD Report
AUTOCAD Report
AMIT RAJ
 
LabReport-Autodesk Inventor 2008-MasterCam X4
LabReport-Autodesk Inventor 2008-MasterCam X4LabReport-Autodesk Inventor 2008-MasterCam X4
LabReport-Autodesk Inventor 2008-MasterCam X4
Kienho Chan
 

Similar to SM1.ppt (20)

Manual autocad 2010 english
Manual autocad 2010 englishManual autocad 2010 english
Manual autocad 2010 english
 
Unit III ARM Interface and ARM Programming
Unit III ARM Interface and ARM Programming Unit III ARM Interface and ARM Programming
Unit III ARM Interface and ARM Programming
 
Cad cam lab 2016 2017
Cad cam lab 2016 2017Cad cam lab 2016 2017
Cad cam lab 2016 2017
 
Civil project .ppt
Civil project .pptCivil project .ppt
Civil project .ppt
 
Lesson02
Lesson02Lesson02
Lesson02
 
Mold project basic
Mold project basicMold project basic
Mold project basic
 
Understanding basic features
Understanding basic featuresUnderstanding basic features
Understanding basic features
 
Robot Studio
Robot StudioRobot Studio
Robot Studio
 
Cnc tutorial mastercam
Cnc tutorial mastercamCnc tutorial mastercam
Cnc tutorial mastercam
 
Computer Aided Solid Modelling
Computer Aided Solid ModellingComputer Aided Solid Modelling
Computer Aided Solid Modelling
 
Creating a Schematic Design in OrCAD Capture CIS
Creating a Schematic Design in OrCAD Capture CISCreating a Schematic Design in OrCAD Capture CIS
Creating a Schematic Design in OrCAD Capture CIS
 
Practical work 4
Practical work 4Practical work 4
Practical work 4
 
AUTOCAD Report
AUTOCAD ReportAUTOCAD Report
AUTOCAD Report
 
Infotechnogen Solid works
Infotechnogen Solid worksInfotechnogen Solid works
Infotechnogen Solid works
 
solidworks
solidworkssolidworks
solidworks
 
solidworks
solidworkssolidworks
solidworks
 
AJAY SHARMA autocad-summer-training-report.pdf
AJAY SHARMA autocad-summer-training-report.pdfAJAY SHARMA autocad-summer-training-report.pdf
AJAY SHARMA autocad-summer-training-report.pdf
 
LabReport-Autodesk Inventor 2008-MasterCam X4
LabReport-Autodesk Inventor 2008-MasterCam X4LabReport-Autodesk Inventor 2008-MasterCam X4
LabReport-Autodesk Inventor 2008-MasterCam X4
 
Ig proe-wf-5.0
Ig proe-wf-5.0Ig proe-wf-5.0
Ig proe-wf-5.0
 
Ig proe-wf-5.0
Ig proe-wf-5.0Ig proe-wf-5.0
Ig proe-wf-5.0
 

Recently uploaded

Verification of thevenin's theorem for BEEE Lab (1).pptx
Verification of thevenin's theorem for BEEE Lab (1).pptxVerification of thevenin's theorem for BEEE Lab (1).pptx
Verification of thevenin's theorem for BEEE Lab (1).pptx
chumtiyababu
 

Recently uploaded (20)

Wadi Rum luxhotel lodge Analysis case study.pptx
Wadi Rum luxhotel lodge Analysis case study.pptxWadi Rum luxhotel lodge Analysis case study.pptx
Wadi Rum luxhotel lodge Analysis case study.pptx
 
data_management_and _data_science_cheat_sheet.pdf
data_management_and _data_science_cheat_sheet.pdfdata_management_and _data_science_cheat_sheet.pdf
data_management_and _data_science_cheat_sheet.pdf
 
DC MACHINE-Motoring and generation, Armature circuit equation
DC MACHINE-Motoring and generation, Armature circuit equationDC MACHINE-Motoring and generation, Armature circuit equation
DC MACHINE-Motoring and generation, Armature circuit equation
 
Navigating Complexity: The Role of Trusted Partners and VIAS3D in Dassault Sy...
Navigating Complexity: The Role of Trusted Partners and VIAS3D in Dassault Sy...Navigating Complexity: The Role of Trusted Partners and VIAS3D in Dassault Sy...
Navigating Complexity: The Role of Trusted Partners and VIAS3D in Dassault Sy...
 
Online electricity billing project report..pdf
Online electricity billing project report..pdfOnline electricity billing project report..pdf
Online electricity billing project report..pdf
 
Verification of thevenin's theorem for BEEE Lab (1).pptx
Verification of thevenin's theorem for BEEE Lab (1).pptxVerification of thevenin's theorem for BEEE Lab (1).pptx
Verification of thevenin's theorem for BEEE Lab (1).pptx
 
S1S2 B.Arch MGU - HOA1&2 Module 3 -Temple Architecture of Kerala.pptx
S1S2 B.Arch MGU - HOA1&2 Module 3 -Temple Architecture of Kerala.pptxS1S2 B.Arch MGU - HOA1&2 Module 3 -Temple Architecture of Kerala.pptx
S1S2 B.Arch MGU - HOA1&2 Module 3 -Temple Architecture of Kerala.pptx
 
Moment Distribution Method For Btech Civil
Moment Distribution Method For Btech CivilMoment Distribution Method For Btech Civil
Moment Distribution Method For Btech Civil
 
HOA1&2 - Module 3 - PREHISTORCI ARCHITECTURE OF KERALA.pptx
HOA1&2 - Module 3 - PREHISTORCI ARCHITECTURE OF KERALA.pptxHOA1&2 - Module 3 - PREHISTORCI ARCHITECTURE OF KERALA.pptx
HOA1&2 - Module 3 - PREHISTORCI ARCHITECTURE OF KERALA.pptx
 
A CASE STUDY ON CERAMIC INDUSTRY OF BANGLADESH.pptx
A CASE STUDY ON CERAMIC INDUSTRY OF BANGLADESH.pptxA CASE STUDY ON CERAMIC INDUSTRY OF BANGLADESH.pptx
A CASE STUDY ON CERAMIC INDUSTRY OF BANGLADESH.pptx
 
Work-Permit-Receiver-in-Saudi-Aramco.pptx
Work-Permit-Receiver-in-Saudi-Aramco.pptxWork-Permit-Receiver-in-Saudi-Aramco.pptx
Work-Permit-Receiver-in-Saudi-Aramco.pptx
 
FEA Based Level 3 Assessment of Deformed Tanks with Fluid Induced Loads
FEA Based Level 3 Assessment of Deformed Tanks with Fluid Induced LoadsFEA Based Level 3 Assessment of Deformed Tanks with Fluid Induced Loads
FEA Based Level 3 Assessment of Deformed Tanks with Fluid Induced Loads
 
Unit 4_Part 1 CSE2001 Exception Handling and Function Template and Class Temp...
Unit 4_Part 1 CSE2001 Exception Handling and Function Template and Class Temp...Unit 4_Part 1 CSE2001 Exception Handling and Function Template and Class Temp...
Unit 4_Part 1 CSE2001 Exception Handling and Function Template and Class Temp...
 
Bhubaneswar🌹Call Girls Bhubaneswar ❤Komal 9777949614 💟 Full Trusted CALL GIRL...
Bhubaneswar🌹Call Girls Bhubaneswar ❤Komal 9777949614 💟 Full Trusted CALL GIRL...Bhubaneswar🌹Call Girls Bhubaneswar ❤Komal 9777949614 💟 Full Trusted CALL GIRL...
Bhubaneswar🌹Call Girls Bhubaneswar ❤Komal 9777949614 💟 Full Trusted CALL GIRL...
 
GEAR TRAIN- BASIC CONCEPTS AND WORKING PRINCIPLE
GEAR TRAIN- BASIC CONCEPTS AND WORKING PRINCIPLEGEAR TRAIN- BASIC CONCEPTS AND WORKING PRINCIPLE
GEAR TRAIN- BASIC CONCEPTS AND WORKING PRINCIPLE
 
Thermal Engineering -unit - III & IV.ppt
Thermal Engineering -unit - III & IV.pptThermal Engineering -unit - III & IV.ppt
Thermal Engineering -unit - III & IV.ppt
 
Introduction to Serverless with AWS Lambda
Introduction to Serverless with AWS LambdaIntroduction to Serverless with AWS Lambda
Introduction to Serverless with AWS Lambda
 
NO1 Top No1 Amil Baba In Azad Kashmir, Kashmir Black Magic Specialist Expert ...
NO1 Top No1 Amil Baba In Azad Kashmir, Kashmir Black Magic Specialist Expert ...NO1 Top No1 Amil Baba In Azad Kashmir, Kashmir Black Magic Specialist Expert ...
NO1 Top No1 Amil Baba In Azad Kashmir, Kashmir Black Magic Specialist Expert ...
 
kiln thermal load.pptx kiln tgermal load
kiln thermal load.pptx kiln tgermal loadkiln thermal load.pptx kiln tgermal load
kiln thermal load.pptx kiln tgermal load
 
Hostel management system project report..pdf
Hostel management system project report..pdfHostel management system project report..pdf
Hostel management system project report..pdf
 

SM1.ppt

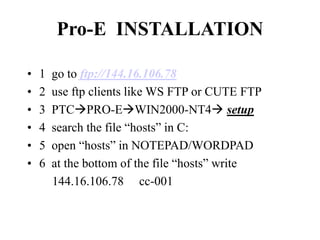
  • 1. Pro-E INSTALLATION • 1 go to ftp://144.16.106.78 • 2 use ftp clients like WS FTP or CUTE FTP • 3 PTCPRO-EWIN2000-NT4 setup • 4 search the file “hosts” in C: • 5 open “hosts” in NOTEPAD/WORDPAD • 6 at the bottom of the file “hosts” write 144.16.106.78 cc-001
  • 2. 1. What is Pro-E??? •It is one of the most widely used CAD/CAM software in today’s world •This tool is provided by PTC and the website is www.ptc.com •Pro-E runs on a Windows 95, Windows 2000, Windows NT or UNIX platform.
  • 3. 2. Introduction to Pro-E • Earlier, engineering designs were constructed with 2D drawings. • Now, engineering drawings are represented by mathematical solid models instead of as 2D drawings.
  • 4. Two main reasons for the move from 2D models to solid 3D models 1. The solid model can be understood even by non- technical members of the team, such as those from marketing and sales department. 2. The capabilities of solid modellers have been upgraded so that the model can represent not only the geometry of the part being designed, but also the intent of the designer.
  • 5. Pro-E Interface Application Manager Menu Bar Menu Manager Main Graphics Window Top Toolbar Right Toolbar Model Tree Message Area Default Datum Planes Coordinate System
  • 6. 3. Protrusions and Cuts A protrusion( or extrusion) is a part feature that adds material. Different geometries can be sketched by combining a variety of form options and attributes during creation of protrusion feature. Cuts are used to remove material from existing solid features.
  • 7. Protrusions. A protrusion is always the first solid feature created. This can be the base feature or the first feature created after a base feature of datum planes. To create an extruded protrusion: 1. Choose Feature from the PART menu, and the choose Create from the FEAT menu. 2. Choose Protrusion from the SOLID menu. 3. Choose Extrude=>Solid=>Done=> from the SOLID options menu. 4. Pro/E displays PROTRUSION : Extrude dialog box, which lists The elements needed for creating this type of protrusion. 5. Pro/E displays ATTRIBUTES menu, which lists the following Options:
  • 8. (a) One Side Creates the feature of one side of the sketching plane. (b) Both Sides Creates the feature on both sides of the sketching Plane. 6. Choose One side or Both Sides=> Done from ATTRIBUTES menu. 7. Select the sketching plane. 8. Sketch the protrusion.
  • 10. the circle when extruded forms the solid cylinder
  • 12. the square when extruded forms the solid cuboid
  • 13. Cuts To remove material from a part, we use the following features. 1. Choose Feature from the PART menu, and then choose Create From the FEAT menu. 2. Choose Cut from the SOLID menu. 3. Choose Extrude=>Solid=>Done (SOLID OPTS menu). 4. The appropriate dialog box is displayed. 5. Choose One Side or Both Sides=> Done (ATTRIBUTES menu). 6. Select the sketching plane on the part and the parts orientation. 7. Accept the cut direction or flip the arrow. 8. Determine the depth of the cut
  • 16. 4. Holes Another variety of geometric construction which is accomplished by Pro/E are holes. This is a pick and place feature, because they are created automatically from your input and placed according to prompts by Pro/E. A hole can also be created using a Cut, but it must be sketched. To create a straight hole, the following steps are done 1. Choose Hole from SOLID menu. 2. Pro/E displays HOLE OPTS menu. Choose Straight=> Done. 3. Pro/E displays the Feature Creation dialog box and the PLACEMENT menu, which lists the options Linear, Radial, Coaxial etc. Choose one of the options, then Done. 4. Select the placement plane.
  • 17. 5. Select the first reference (edge, surface, axis or datum). 6. Enter the distance from the first reference in the message area. 7. Select the second reference. 8. Enter the distance from the second reference in the message area. 9. Pro/E displays SIDES menu. Choose One Side or Both Sides, then Done. 10. Select the extent to which the hole will be created. 11. Select OK in the dialog box to create the hole.
  • 18. (i) (ii) (iii) EXAMPLE (i) A solid body (ii) A solid body with a full length coaxial hole. (iii) A solid body with a variable length coaxial hole.
  • 19. 5. Rounds Round creates a fillet, or a round on a edge, that is smooth transition with a circular profile between two adjacent surfaces. Following are three simple types of rounds. 1. Edge-Surface rounds
  • 21. 3. Edge Pair rounds