Saving Battery Power on the Go with Windows 10
•
3 likes•1,411 views

Losing battery power quickly on your Windows 10 device? Use these tips to conserve power with Windows 10 Battery Saver. Discover how to find out what's using the most power in order to better conserve your battery.
Recommended

Recommended
More Related Content
Viewers also liked
Viewers also liked (7)
More from Wiley
More from Wiley (20)
Recently uploaded
Recently uploaded (20)
Saving Battery Power on the Go with Windows 10
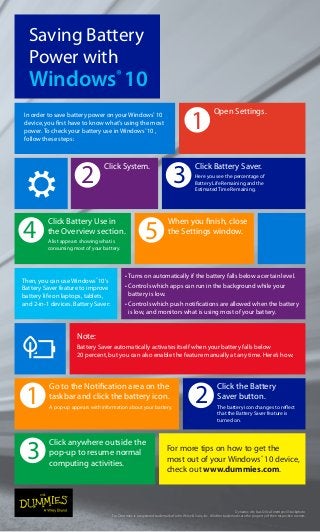
- 1. In order to save battery power on your Windows® 10 device, you first have to know what’s using the most power. To check your battery use in Windows® 10 , follow these steps: Then, you can use Windows® 10’s Battery Saver feature to improve battery life on laptops, tablets, and 2-in-1 devices. Battery Saver: Open Settings. 1 2 Click System. A list with system settings appears. 3 Click Battery Saver. Here you see the percentage of Battery Life Remaining and the Estimated Time Remaining. 4 Click Battery Use in the Overview section. A list appears showing what is consuming most of your battery. 5 When you finish, close the Settings window. • Turns on automatically if the battery falls below a certain level. • Controls which apps can run in the background while your battery is low. • Controls which push notifications are allowed when the battery is low, and monitors what is using most of your battery. Note: Battery Saver automatically activates itself when your battery falls below 20 percent, but you can also enable the feature manually at any time. Here’s how: Go to the Notification area on the taskbar and click the battery icon. 1 A pop-up appears with information about your battery. 2 Click the Battery Saver button. The battery icon changes to reflect that the Battery Saver feature is turned on. Click anywhere outside the pop-up to resume normal computing activities. 3 For more tips on how to get the most out of your Windows® 10 device, check out www.dummies.com. Saving Battery Power with Windows® 10 Dynamic city bus © Ilya Terentyev/iStockphoto For Dummies is a registered trademark of John Wiley Sons, Inc. All other trademarks are the property of their respective owners.