SorBose Flash Template Text Editing
•
0 likes•215 views

This document provides instructions for customizing a SorBose Flash template by opening the FLA file, changing text and images, adding links, and publishing the modified Flash file. Key steps include opening the FLA file in Flash, locating elements in the timeline or symbols panel to edit text, images, and buttons. Links can be added to buttons using action script code. The final customized Flash file is published and replaced in the template files.

Recommended
More Related Content
What's hot
What's hot (18)
Viewers also liked
Similar to SorBose Flash Template Text Editing
Similar to SorBose Flash Template Text Editing (20)
More from Adil Jafri
More from Adil Jafri (20)
Recently uploaded
Recently uploaded (20)
SorBose Flash Template Text Editing
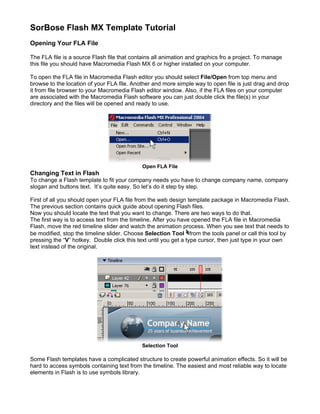
- 1. SorBose Flash MX Template Tutorial Opening Your FLA File The FLA file is a source Flash file that contains all animation and graphics fro a project. To manage this file you should have Macromedia Flash MX 6 or higher installed on your computer. To open the FLA file in Macromedia Flash editor you should select File/Open from top menu and browse to the location of your FLA file. Another and more simple way to open file is just drag and drop it from file browser to your Macromedia Flash editor window. Also, if the FLA files on your computer are associated with the Macromedia Flash software you can just double click the file(s) in your directory and the files will be opened and ready to use. Open FLA File Changing Text in Flash To change a Flash template to fit your company needs you have to change company name, company slogan and buttons text. It’s quite easy. So let’s do it step by step. First of all you should open your FLA file from the web design template package in Macromedia Flash. The previous section contains quick guide about opening Flash files. Now you should locate the text that you want to change. There are two ways to do that. The first way is to access text from the timeline. After you have opened the FLA file in Macromedia Flash, move the red timeline slider and watch the animation process. When you see text that needs to be modified, stop the timeline slider. Choose Selection Tool from the tools panel or call this tool by pressing the “V” hotkey. Double click this text until you get a type cursor, then just type in your own text instead of the original. Selection Tool Some Flash templates have a complicated structure to create powerful animation effects. So it will be hard to access symbols containing text from the timeline. The easiest and most reliable way to locate elements in Flash is to use symbols library.
- 2. To open the symbols library you can use “Ctrl + L” hotkey or “F11” or choose Window/Library from the top menu. Symbols Library Browse the symbols library to find symbol containing the text you want to modify. You can see symbols preview in the preview window at the top of symbols library panel. Usually most symbols that contain text have appropriate names such as “Company Name” or “About Us” in the library. If you are unable to see the text for some reason try to change the movie background to non-white. This is because white colored text on a white background is invisible. To change the background color choose Modify/Document from the top menu and change background color in popup window. When you have found a symbol containing the text you want to change double click the symbol icon to show the text symbol in main workspace window. Then just double click the text with the Selection Tool or single click it with the Text Tool (hotkey “T”) to edit text. While editing text in Macromedia Flash you have wide choice of attributes to modify the text’s look and feel. All those options are accessible from the properties panel at the bottom of the Macromedia Flash workspace. If you can’t see this panel you can open it by pressing the “Ctrl + F3” hotkey. Text Properties To modify text color or font size just select text using Text Tool and go to Properties Panel to change appropriate option. You can find font family and size dropdowns, color select box and align icons there. Modify any of that options and change will update to selected text.
- 3. When you have finished editing of the text block, press “Esc” key to quit editing mode. Now you can repeat operations described above to edit other text blocks of your Flash header. After you’ve made all appropriate changes you should publish your Flash movie to SWF file and update it to your web design template. You can find instructions about publishing in the Publishing your Flash movie section. Assigning Links in Flash To add some interactivity to the Flash animated portion of your web design template you should add links to Flash objects. For example you will need to link Flash buttons with pages of your website or redirect your Flash intro to the homepage after it finished. There are a few of kinds of links in Macromedia Flash: button symbol links, frame links and text links. To add links to the button symbols in your Flash movie do the following. First of all you should locate the button symbol you want your links be assigned to. There are two ways to do that. The first way is to access it from the timeline. After you’ve opened your FLA file in Macromedia Flash, move red timeline slider and watch the animation process. When you see a button symbol that needs to be linked, stop the timeline slider. Select it by single clicking it with Selection Tool . You can choose the Selection Tool from the tools panel or call this tool by pressing “V” hotkey. Go to the Properties Panel to check this symbols behavior. If you can’t see this panel for any reason you can open it by pressing “Ctrl + F3” hotkey. The symbols behavior dropdown is located in the top left corner. It must be a “Button”. If it is “Movie Clip”, “Graphics” or some other than a “Button” you can’t assign links to it. Do not change it to a “Button” because it will damage original rollover structure. Double click this symbol to the next level of this component, select its content and check symbols behavior again. Symbol Behavior If you are still unable to locate appropriate symbol, it could be that some symbols are hidden or locked. To unhide/unlock symbols do the following. Go to timeline panel, there is a layers list on the left. There are three icons at the top of this list: eye, lock and rectangle. Click eye and lock icons twice to unhide and unlock all layers in current symbol. Some of Flash headers have complicated structures to create powerful animation effects. So it will be hard to access button symbols from the timeline. The easiest and most reliable way to locate elements in Flash is to use symbols library. To open symbols library you can use “Ctrl + L” hotkey or choose Window/Library from the top menu. Browse the symbols library to find button symbol you want links be assigned to. You can see symbols preview in the preview window at the top of symbols library panel. All button symbols have appropriate names such as “About Us button” or “Search button”. Double click the symbols icon to edit the button in the main workspace window. Then do the operations described above to locate symbols with a “Button” behavior. After you have selected a button symbol press “F9” to open the Actions panel. If this button has a rollover effect, you will see following script code:
- 4. on (rollOver) { gotoAndPlay(2); } on (rollOut) { gotoAndPlay(10); } Add there following getURL action script code: on (release) { getURL("your_url_here"); } GetURL Action Script You should type URL button will be linked to as getURL function argument. For example if you want to link a button to your contacts page type following: on (release) { getURL("http://www.sorbose.com/contacts.html"); } The getURL function accepts three arguments: URL, window type and variables send method. Window type argument specifies were new URL will be opened. If this argument is blank a link will be opened in the same window. If you want to open it in a new window, use “_blank” argument. Variables send method should be used if you are parsing some variables through a URL string. Available options are “GET” and “POST”. Next the action script example calls the products page with “item” variable with a “9” value in the same window using the GET method. on (release) { getURL("http://www.sorbose.com/products.php?item=9", "_self", "GET"); } If you are using a Flash intro template, you will need to redirect visitors to your website after the intro is finished playing. To do this follow these instructions. Move the red timeline slider to the end of Flash intro movie. Select the last frame by single clicking it with mouse. Press “F6” to create keyframe in this frame. Press “F9” to open Actions panel. Type the following code there.
- 5. getURL("your_url_here"); Replace your_url_here text with appropriate URL of your website. If you want some portion of text to be linked to some location on web do the following. Locate the symbol containing text using instructions from the Changing text section. Select text you want to link with URL using Text Tool. Go to Properties Panel, press “Ctrl+F3” if you can’t see it for some reason. At the very bottom of that panel you will see a URL input box. It has a chain icon to the left of it. Just fill that field input box with appropriate URL. URL Input Box Changing Images in Flash In the process of your web design template customization you may need to insert your company logo or images in your Flash template. Here you’ll find quick guide on how to do that. Open your source FLA file in Macromedia Flash. Press “F11” to launch the symbols library. To make a filtered search of needed image symbols easier sort them by kind by pressing “kind” tab at the top of symbols list. You will see that all the bitmap symbols are grouped now at the top of the symbols library. Bitmap Symbols in Library Browse these symbols to find symbols you want to substitute. You can see the symbols preview at the top of symbols library. When you have found the correct bitmap symbol you want to substitute, double click the icon to see the symbol properties window.
- 6. Bitmap Properties You can see the image preview and options in this new window. Check the image size. In our example it is 193 x 214 pixels at 32 bits per pixel. To make your new image fit the original effects and animation, your image must be same size as the original image. You can resize or crop your image using Adobe Photoshop or Macromedia Fireworks. Open your image in it using File/Open… from the top menu. To resize or crop choose Image/Image Size… or Image/Canvas Size… accordingly. Then save image using File/Save As, for using in Flash chose one of the following image formats: JPEG, GIF or PNG. Press the Import button at the left and browse to location of your image file. At the bitmap symbols properties window you can change image quality. Make it lower to reduce published file size of your Flash movie. Now you should publish your Flash movie. The next section will provide you with detailed instructions and tips on publishing. Publishing Your Flash Movie After you have made all appropriate change to the Flash web design template, you should publish and update it. You may want to modify publish settings to reduce download time or increase image quality. To do this choose File/Publish Settings from the top menu. In the Publish Settings window choose the Flash tab. The main options that have significant influence on published SWF movie file sizes are jpeg quality, audio stream and audio event.
- 7. Publish Settings To change jpeg the image compression ratio move the jpeg quality slider or type in the input box to the right what percent of quality you want to retain. Low quality (high compression) extremely reduces download time but the movie looses some of its professional look. Try to experiment with quality to get optimal size/quality balance for your need. Another way to affect movie size is to change Audio Stream and Event options. Press Set button at the right to change music quality options. You can publish your movie directly from the Publish Settings window, see Publish button at the bottom. Or you can publish at any time by pressing the “Shift+F12” hotkey. Published SWF files will appear in the folder with the corresponding FLA. Replace the old SWF file in HTML/Flash folder with a new one. Now it’s time to check the modifications you have made. Go to the HTML folder where you have your web design template and launch the HTML file to see your changes. Readjust as needed. Thank you for purchasing a SorBose Product! SorBose, Inc. www.sorbose.com All Rights Reserved, 2005 May not be reproduced without written permission.