GeoVision :Video Management Solutions : How to : Upgrading GV-GIS System
•
0 likes•353 views

GeoVision :Video Management Solutions : How to : Upgrading GV-GIS System

Recommended
Recommended
More Related Content
More from TSOLUTIONS
More from TSOLUTIONS (20)
Recently uploaded
Recently uploaded (20)
GeoVision :Video Management Solutions : How to : Upgrading GV-GIS System
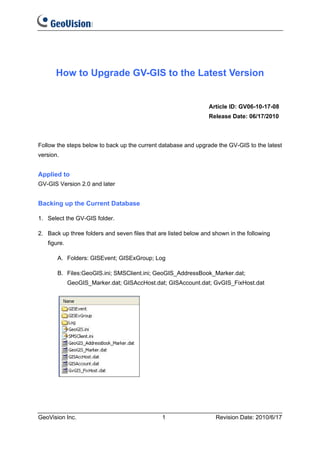
- 1. How to Upgrade GV-GIS to the Latest Version Article ID: GV06-10-17-08 Release Date: 06/17/2010 Follow the steps below to back up the current database and upgrade the GV-GIS to the latest version. Applied to GV-GIS Version 2.0 and later Backing up the Current Database 1. Select the GV-GIS folder. 2. Back up three folders and seven files that are listed below and shown in the following figure. A. Folders: GISEvent; GISExGroup; Log B. Files:GeoGIS.ini; SMSClient.ini; GeoGIS_AddressBook_Marker.dat; GeoGIS_Marker.dat; GISAccHost.dat; GISAccount.dat; GvGIS_FixHost.dat GeoVision Inc. 1 Revision Date: 2010/6/17
- 2. Installing the Latest Version and Restoring the Previous Database 1. Uninstall the current version of GV-GIS. 2. Uninstall the current version of the USB Device driver and install the latest version of it. A. Insert the Software DVD to the computer. This window appears. Select Install or Remove GeoVision GV-Series Driver. B. Select Install GeoVision USB Device Driver and select Remove. C. Select Install GeoVision USB Devices Driver and select Install. GeoVision Inc. 2 Revision Date: 2010/6/17
- 3. 3. To install the latest version of GV-GIS, select Install GeoVision Vxxxx GV-GIS System. By default the installation directory is C:Program FilesGV-GIS. 4. Copy the backup folders and files, and paste them to the new program folder. 5. Start the GV-GIS. The version upgrade is complete. Note: You may not upgrade the GV-GIS by using the Software CD, but by using the upgrade or patch download link provided by GeoVision. In this case, you should locate related executive programs from folders to start. 1. To uninstall the current version of the USB Device driver and install the new version, run GvUsb.exe. 2. To install the latest version of GV-GIS, run GV-GIS.exe. GeoVision Inc. 3 Revision Date: 2010/6/17