PhoneGap Push Notifications API (JavaScript)
•
0 likes•1,128 views

PushApps - offers a low cost and effective way for mobile developers to send and manage their push notifications http://www.pushapps.mobi Just use our SDK (check out our WIKI) and Start managing and sending complex notifications (scheduled, location based, etc...)
![Handle Incoming Notifications
PushApps will raise an HTML event, every time an incoming notification is received. In order to bind a function to this event, all you need is:
document.addEventListener('pushapps.message-received', function(event) {
var notification = event.notification;
// This is the entire object, just take the wanted
propertey
console.log(notification);
});
Tags
There will be a time when you will want to send a push notification to a group of users, with a common characteristics. In order to do that, the
PushApps PhoneGap plugin gives you the ability to mark users with a specific tag. For example: one's age. You can add as many tags as you
want per user. For each, you'll need to supply the tag's identifier and the tag's value.
A set of tags and conditions between them creates a Segment, to learn more about Segments please refer to our Segmentation guide
There are 4 types of tags:
Boolean ( by a String , "true" or "false")
String
Number
Date
Boolean
// Add boolean tag
var bool = document.getElementById('myCheckbox').value === "on" ? "true" : "false";
var iden = "Vegetarian";
PushNotification.setTags([{
identifier: iden,
value: bool
}], function () {
alert("Your tag was successfully added");
}, function (message) {
alert("ERROR: " + message);
});
Number](data:image/gif;base64,R0lGODlhAQABAIAAAAAAAP///yH5BAEAAAAALAAAAAABAAEAAAIBRAA7)
Recommended
More Related Content
Viewers also liked
Recently uploaded
Recently uploaded (20)
PhoneGap Push Notifications API (JavaScript)
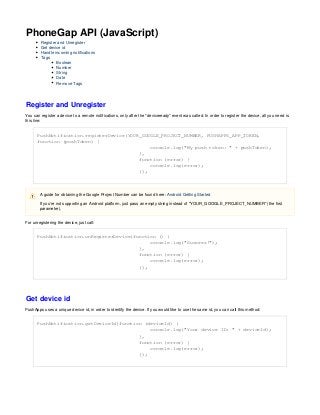
- 1. PhoneGap API (JavaScript) Register and Unregister Get device id Handle incoming notifications Tags Boolean Number String Date Remove Tags Register and Unregister You can register a device to a remote notifications, only after the "deviceready" event was called. In order to register the device, all you need is this line: PushNotification.registerDevice(YOUR_GOOGLE_PROJECT_NUMBER, PUSHAPPS_APP_TOKEN, function (pushToken) { console.log("My push token: " + pushToken); }, function (error) { console.log(error); }); For unregistering the device, just call: PushNotification.unRegisterDevice(function () { console.log("Success!"); }, function (error) { console.log(error); }); Get device id PushApps uses a unique device id, in order to identify the device. If you would like to use the same id, you can call this method: PushNotification.getDeviceId(function (deviceId) { console.log("Your device ID: " + deviceId); }, function (error) { console.log(error); }); A guide for obtaining the Google Project Number can be found here: Android Getting Started If you're not supporting an Android platform, just pass an empty string instead of "YOUR_GOOGLE_PROJECT_NUMBER" (the first parameter).
- 2. Handle Incoming Notifications PushApps will raise an HTML event, every time an incoming notification is received. In order to bind a function to this event, all you need is: document.addEventListener('pushapps.message-received', function(event) { var notification = event.notification; // This is the entire object, just take the wanted propertey console.log(notification); }); Tags There will be a time when you will want to send a push notification to a group of users, with a common characteristics. In order to do that, the PushApps PhoneGap plugin gives you the ability to mark users with a specific tag. For example: one's age. You can add as many tags as you want per user. For each, you'll need to supply the tag's identifier and the tag's value. A set of tags and conditions between them creates a Segment, to learn more about Segments please refer to our Segmentation guide There are 4 types of tags: Boolean ( by a String , "true" or "false") String Number Date Boolean // Add boolean tag var bool = document.getElementById('myCheckbox').value === "on" ? "true" : "false"; var iden = "Vegetarian"; PushNotification.setTags([{ identifier: iden, value: bool }], function () { alert("Your tag was successfully added"); }, function (message) { alert("ERROR: " + message); }); Number
- 3. // Add number tag var number = document.getElementById("myNumberInput").value; var iden = "Age"; PushNotification.setTags([{ identifier: iden, value: number }], function () { alert("Your tag was successfully added"); }, function (message) { alert("ERROR: " + message); }); String // Add string tag var str = document.getElementById("cityNameInput").value; var iden = "City"; PushNotification.setTags([{ identifier: iden, value: str }], function () { alert("Your tag was successfully added"); }, function (message) { alert("ERROR: " + message); }); Date // Add date tag var d = new Date(document.getElementById("birthdayInput").value); var date = d.toISOString(); var iden = "Birthday"; PushNotification.setTags([{ identifier: iden, value: date }], function () { alert("Your tag was successfully added"); }, function (message) { alert("ERROR: " + message); }); Remove Tags You can always remove tags from user, by calling the removeTags function:
- 4. // Remove tags var idens = [ "Age", "Birthday", "City" ]; PushNotification.removeTags(idens, function () { alert("Tags removed successfully"); }, function (message) { alert("ERROR: " + message); });