How to Convert iTunes Music to MP3 on Mac
•
1 like•3,726 views
This PDF shows you 4 different ways to convert iTunes music m4p to mp3, aac to mp3, m4a to mp3, iTunes Plus to mp3 on Mac OS X (including OS X Lion).
Report
Share
Report
Share
Download to read offline

Recommended
Recommended
Call Girls New Ashok Nagar Delhi WhatsApp Number 9711199171
Booking Contact Details
WhatsApp Chat: ☎️ +91-9873940964
Visit My Website: - https://www.thehotelsescorts.com/
27-APR-2024
Choose Immature Escorts Service in Delhi For An Erotic Play
Escorts are known for their friendliness and sense of humour, providing doorstep services at your convenience or meeting up in hotel rooms for intimate encounters. Furthermore, they also provide foreplay, anal sex; three- or four-person sex services as well as other erotic services such as foreplay or Escorts Service in Delhi are available 24 hours a day to provide you with an unforgettable nighttime’s experience. From catering to your every need and providing unforgettable service, they will ensure a night you won't soon forget.
Delhi Escort Service offer an array of services tailored to the specific needs and desires of their clients, from massage therapy to casual foreplay. Call girls can provide the ultimate sensual pleasure and fun. Available for both in-person and online services, and even making house calls, these beautiful call girls make for the ideal way to indulge your sexy desires and have some serious sensual fun. With friendly personalities that make them easy to talk with - not to mention stunning looks and physiques to delight - call girls are sure to please any individual looking for some sexy action.
Independent Escorts Delhi makes an ideal companion. Not only are these highly educated call girls well versed in the art of seduction but they are also available for dinner dates and public appearances, offering their seductive smiles and captivating conversations while being priced affordably so you will want to book them again and again.
★**OUR BEST SERVICES: – FOR BOOKING**
★ A-Level (5-star escort)
★ Strip-tease
★ BBBJ (Bareback Blowjob)
★ Spending time in my rooms
★ BJ (Blowjob Without a Condom)
★ COF (Come on Face)
★ Completion
★ (Oral to completion) noncovered
★ Special Massage
★ O-Level (Oral)
★ Blow Job;
★ Oral fun uncovered)
★ COB (Come on Body)
★**. Extra ball (Have ride many times)**
☛ ☛ ☛ secure** 100% safe**
WHATSAPP CALL ME** ** SERVICE ✅ ❣️
Y A Variety Of Clicks To Explore The Great Call Girls Near Delhi
Call Girls Near Delhi specialize in sexual encounters while others simply look forward to enjoying an entertaining date night with clients. If you're searching for classy escorts in Delhi, our stunning beauties offer all-out luxury Available for in call or outcall and to fulfill all of your sexual fantasies. Also great for dinner dates or full evenings of erotica fun - hire one to experience what life should be like? Or hire a celebrity escort and live out your fantasy of living the life you always imagined.
Call Girls New Ashok Nagar Delhi WhatsApp Number 9711199171
Call Girls New Ashok Nagar Delhi WhatsApp Number 9711199171Delhi Call Girls 📞9899900591 ✔️ High Profile Service 100% Safe
Call Girls Nashik Gayatri 7001305949 Independent Escort Service Nashik
Booking Contact Details
WhatsApp Chat: +91-7001035870
Nashik Escort Service includes providing maximum physical satisfaction to their clients as well as engaging conversation that keeps your time enjoyable and entertaining. Plus they look fabulously elegant; making an impressionable.
Independent Escorts Nashik understands the value of confidentiality and discretion - they will go the extra mile to meet your needs. Simply contact them via text messaging or through their online profiles; they'd be more than delighted to accommodate any request or arrange a romantic date or fun-filled night together.
We provide -
27-april-2024(v.n)
Call Girls Nashik Gayatri 7001305949 Independent Escort Service Nashik
Call Girls Nashik Gayatri 7001305949 Independent Escort Service NashikCall Girls in Nagpur High Profile
Hello, Guys welcome to Manalifun Goa Escort service. Are you want Top call girls in Goa at just ₹10000 then no further anywhere because we have a large number of local beautiful girls. We are a genuine platform to provide unlimited classification escort ads service without any commission. 9316020077
Here many Goa Independent call girls and ladies, publish their ads. Our call girl in Goa is well-known for real sexual fun in Goa. We are not allow any prostitute to work here without checking the details, Firstly all ads check by our team then we publish them here. So don’t hesitate to book Low rate call girls in Goa. 9316020077
Goa call girls: A real wonder in Goa
Who are the best Goa Escort Service provider for Goa call girls
High-Class call girls in Goa escort service for 100% Satisfaction
Choose a trusted call girl service in Goa with Us +91-9316020077
Goa Escorts Provide 100% Client Satisfaction
How Our Goa Call Girls Are Perfect For Instant Satisfaction
100% Guaranteed Goa call girls will make you excited
How to Find Cheap Call Girls in Goa
Our Reliable Escort Service in Goa Local Areas
Goa Escorts (cheap escort service in Goa)
Rate Chart of Goa call girls, (call girl Rate in Goa)
5-star hotel For Goa call girls service
Call girls in Goa are the ideal sex partner for you
BOOK YOUR FAVORITE Goa CALL GIRLS SERVICE WITH US CALL! US NOW~ 9316020077
Best way to Hire call girls in Goa
What’s the cost of escort service in Goa
North Goa Call Girls
Location :-
Baga , Caclangute , Candolim , Anjuna , Panaji Arpora , Vagator , Morjim , Siolim , Mandrem , Arambol , etc.
Vasco , Bambolim , Madgaon, Colva , EtcGoa Call Girls 9316020077 Call Girls In Goa By Russian Call Girl in goa
Goa Call Girls 9316020077 Call Girls In Goa By Russian Call Girl in goarussian goa call girl and escorts service
Call Girls South Avenue Delhi WhatsApp Number 9711199171
Booking Contact Details
WhatsApp Chat: ☎️ +91-9873940964
Visit My Website: - https://www.thehotelsescorts.com/
27-APR-2024
Choose Immature Escorts Service in Delhi For An Erotic Play
Escorts are known for their friendliness and sense of humour, providing doorstep services at your convenience or meeting up in hotel rooms for intimate encounters. Furthermore, they also provide foreplay, anal sex; three- or four-person sex services as well as other erotic services such as foreplay or Escorts Service in Delhi are available 24 hours a day to provide you with an unforgettable nighttime’s experience. From catering to your every need and providing unforgettable service, they will ensure a night you won't soon forget.
Delhi Escort Service offer an array of services tailored to the specific needs and desires of their clients, from massage therapy to casual foreplay. Call girls can provide the ultimate sensual pleasure and fun. Available for both in-person and online services, and even making house calls, these beautiful call girls make for the ideal way to indulge your sexy desires and have some serious sensual fun. With friendly personalities that make them easy to talk with - not to mention stunning looks and physiques to delight - call girls are sure to please any individual looking for some sexy action.
Independent Escorts Delhi makes an ideal companion. Not only are these highly educated call girls well versed in the art of seduction but they are also available for dinner dates and public appearances, offering their seductive smiles and captivating conversations while being priced affordably so you will want to book them again and again.
★**OUR BEST SERVICES: – FOR BOOKING**
★ A-Level (5-star escort)
★ Strip-tease
★ BBBJ (Bareback Blowjob)
★ Spending time in my rooms
★ BJ (Blowjob Without a Condom)
★ COF (Come on Face)
★ Completion
★ (Oral to completion) noncovered
★ Special Massage
★ O-Level (Oral)
★ Blow Job;
★ Oral fun uncovered)
★ COB (Come on Body)
★**. Extra ball (Have ride many times)**
☛ ☛ ☛ secure** 100% safe**
WHATSAPP CALL ME** ** SERVICE ✅ ❣️
Y A Variety Of Clicks To Explore The Great Call Girls Near Delhi
Call Girls Near Delhi specialize in sexual encounters while others simply look forward to enjoying an entertaining date night with clients. If you're searching for classy escorts in Delhi, our stunning beauties offer all-out luxury Available for in call or outcall and to fulfill all of your sexual fantasies. Also great for dinner dates or full evenings of erotica fun - hire one to experience what life should be like? Or hire a celebrity escort and live out your fantasy of living the life you always imagined.
Call Girls South Avenue Delhi WhatsApp Number 9711199171
Call Girls South Avenue Delhi WhatsApp Number 9711199171Delhi Call Girls 📞9899900591 ✔️ High Profile Service 100% Safe
Model Call Girl Services in Delhi reach out to us at 🔝 9953056974 🔝✔️✔️
Our agency presents a selection of young, charming call girls available for bookings at Oyo Hotels. Experience high-class escort services at pocket-friendly rates, with our female escorts exuding both beauty and a delightful personality, ready to meet your desires. Whether it's Housewives, College girls, Russian girls, Muslim girls, or any other preference, we offer a diverse range of options to cater to your tastes.
We provide both in-call and out-call services for your convenience. Our in-call location in Delhi ensures cleanliness, hygiene, and 100% safety, while our out-call services offer doorstep delivery for added ease.
We value your time and money, hence we kindly request pic collectors, time-passers, and bargain hunters to refrain from contacting us.
Our services feature various packages at competitive rates:
One shot: ₹2000/in-call, ₹5000/out-call
Two shots with one girl: ₹3500/in-call, ₹6000/out-call
Body to body massage with sex: ₹3000/in-call
Full night for one person: ₹7000/in-call, ₹10000/out-call
Full night for more than 1 person: Contact us at 🔝 9953056974 🔝. for details
Operating 24/7, we serve various locations in Delhi, including Green Park, Lajpat Nagar, Saket, and Hauz Khas near metro stations.
For premium call girl services in Delhi 🔝 9953056974 🔝. Thank you for considering us!CHEAP Call Girls in Malviya Nagar, (-DELHI )🔝 9953056974🔝(=)/CALL GIRLS SERVICE
CHEAP Call Girls in Malviya Nagar, (-DELHI )🔝 9953056974🔝(=)/CALL GIRLS SERVICE9953056974 Low Rate Call Girls In Saket, Delhi NCR
Call Girl Nashik Saloni 7001305949 Independent Escort Service Nashik
Booking Contact Details
WhatsApp Chat: +91-7001035870
Nashik Escort Service includes providing maximum physical satisfaction to their clients as well as engaging conversation that keeps your time enjoyable and entertaining. Plus they look fabulously elegant; making an impressionable.
Independent Escorts Nashik understands the value of confidentiality and discretion - they will go the extra mile to meet your needs. Simply contact them via text messaging or through their online profiles; they'd be more than delighted to accommodate any request or arrange a romantic date or fun-filled night together.
We provide -
27-april-2024(v.n)
Call Girl Nashik Saloni 7001305949 Independent Escort Service Nashik
Call Girl Nashik Saloni 7001305949 Independent Escort Service NashikCall Girls in Nagpur High Profile
More Related Content
Recently uploaded
Call Girls New Ashok Nagar Delhi WhatsApp Number 9711199171
Booking Contact Details
WhatsApp Chat: ☎️ +91-9873940964
Visit My Website: - https://www.thehotelsescorts.com/
27-APR-2024
Choose Immature Escorts Service in Delhi For An Erotic Play
Escorts are known for their friendliness and sense of humour, providing doorstep services at your convenience or meeting up in hotel rooms for intimate encounters. Furthermore, they also provide foreplay, anal sex; three- or four-person sex services as well as other erotic services such as foreplay or Escorts Service in Delhi are available 24 hours a day to provide you with an unforgettable nighttime’s experience. From catering to your every need and providing unforgettable service, they will ensure a night you won't soon forget.
Delhi Escort Service offer an array of services tailored to the specific needs and desires of their clients, from massage therapy to casual foreplay. Call girls can provide the ultimate sensual pleasure and fun. Available for both in-person and online services, and even making house calls, these beautiful call girls make for the ideal way to indulge your sexy desires and have some serious sensual fun. With friendly personalities that make them easy to talk with - not to mention stunning looks and physiques to delight - call girls are sure to please any individual looking for some sexy action.
Independent Escorts Delhi makes an ideal companion. Not only are these highly educated call girls well versed in the art of seduction but they are also available for dinner dates and public appearances, offering their seductive smiles and captivating conversations while being priced affordably so you will want to book them again and again.
★**OUR BEST SERVICES: – FOR BOOKING**
★ A-Level (5-star escort)
★ Strip-tease
★ BBBJ (Bareback Blowjob)
★ Spending time in my rooms
★ BJ (Blowjob Without a Condom)
★ COF (Come on Face)
★ Completion
★ (Oral to completion) noncovered
★ Special Massage
★ O-Level (Oral)
★ Blow Job;
★ Oral fun uncovered)
★ COB (Come on Body)
★**. Extra ball (Have ride many times)**
☛ ☛ ☛ secure** 100% safe**
WHATSAPP CALL ME** ** SERVICE ✅ ❣️
Y A Variety Of Clicks To Explore The Great Call Girls Near Delhi
Call Girls Near Delhi specialize in sexual encounters while others simply look forward to enjoying an entertaining date night with clients. If you're searching for classy escorts in Delhi, our stunning beauties offer all-out luxury Available for in call or outcall and to fulfill all of your sexual fantasies. Also great for dinner dates or full evenings of erotica fun - hire one to experience what life should be like? Or hire a celebrity escort and live out your fantasy of living the life you always imagined.
Call Girls New Ashok Nagar Delhi WhatsApp Number 9711199171
Call Girls New Ashok Nagar Delhi WhatsApp Number 9711199171Delhi Call Girls 📞9899900591 ✔️ High Profile Service 100% Safe
Call Girls Nashik Gayatri 7001305949 Independent Escort Service Nashik
Booking Contact Details
WhatsApp Chat: +91-7001035870
Nashik Escort Service includes providing maximum physical satisfaction to their clients as well as engaging conversation that keeps your time enjoyable and entertaining. Plus they look fabulously elegant; making an impressionable.
Independent Escorts Nashik understands the value of confidentiality and discretion - they will go the extra mile to meet your needs. Simply contact them via text messaging or through their online profiles; they'd be more than delighted to accommodate any request or arrange a romantic date or fun-filled night together.
We provide -
27-april-2024(v.n)
Call Girls Nashik Gayatri 7001305949 Independent Escort Service Nashik
Call Girls Nashik Gayatri 7001305949 Independent Escort Service NashikCall Girls in Nagpur High Profile
Hello, Guys welcome to Manalifun Goa Escort service. Are you want Top call girls in Goa at just ₹10000 then no further anywhere because we have a large number of local beautiful girls. We are a genuine platform to provide unlimited classification escort ads service without any commission. 9316020077
Here many Goa Independent call girls and ladies, publish their ads. Our call girl in Goa is well-known for real sexual fun in Goa. We are not allow any prostitute to work here without checking the details, Firstly all ads check by our team then we publish them here. So don’t hesitate to book Low rate call girls in Goa. 9316020077
Goa call girls: A real wonder in Goa
Who are the best Goa Escort Service provider for Goa call girls
High-Class call girls in Goa escort service for 100% Satisfaction
Choose a trusted call girl service in Goa with Us +91-9316020077
Goa Escorts Provide 100% Client Satisfaction
How Our Goa Call Girls Are Perfect For Instant Satisfaction
100% Guaranteed Goa call girls will make you excited
How to Find Cheap Call Girls in Goa
Our Reliable Escort Service in Goa Local Areas
Goa Escorts (cheap escort service in Goa)
Rate Chart of Goa call girls, (call girl Rate in Goa)
5-star hotel For Goa call girls service
Call girls in Goa are the ideal sex partner for you
BOOK YOUR FAVORITE Goa CALL GIRLS SERVICE WITH US CALL! US NOW~ 9316020077
Best way to Hire call girls in Goa
What’s the cost of escort service in Goa
North Goa Call Girls
Location :-
Baga , Caclangute , Candolim , Anjuna , Panaji Arpora , Vagator , Morjim , Siolim , Mandrem , Arambol , etc.
Vasco , Bambolim , Madgaon, Colva , EtcGoa Call Girls 9316020077 Call Girls In Goa By Russian Call Girl in goa
Goa Call Girls 9316020077 Call Girls In Goa By Russian Call Girl in goarussian goa call girl and escorts service
Call Girls South Avenue Delhi WhatsApp Number 9711199171
Booking Contact Details
WhatsApp Chat: ☎️ +91-9873940964
Visit My Website: - https://www.thehotelsescorts.com/
27-APR-2024
Choose Immature Escorts Service in Delhi For An Erotic Play
Escorts are known for their friendliness and sense of humour, providing doorstep services at your convenience or meeting up in hotel rooms for intimate encounters. Furthermore, they also provide foreplay, anal sex; three- or four-person sex services as well as other erotic services such as foreplay or Escorts Service in Delhi are available 24 hours a day to provide you with an unforgettable nighttime’s experience. From catering to your every need and providing unforgettable service, they will ensure a night you won't soon forget.
Delhi Escort Service offer an array of services tailored to the specific needs and desires of their clients, from massage therapy to casual foreplay. Call girls can provide the ultimate sensual pleasure and fun. Available for both in-person and online services, and even making house calls, these beautiful call girls make for the ideal way to indulge your sexy desires and have some serious sensual fun. With friendly personalities that make them easy to talk with - not to mention stunning looks and physiques to delight - call girls are sure to please any individual looking for some sexy action.
Independent Escorts Delhi makes an ideal companion. Not only are these highly educated call girls well versed in the art of seduction but they are also available for dinner dates and public appearances, offering their seductive smiles and captivating conversations while being priced affordably so you will want to book them again and again.
★**OUR BEST SERVICES: – FOR BOOKING**
★ A-Level (5-star escort)
★ Strip-tease
★ BBBJ (Bareback Blowjob)
★ Spending time in my rooms
★ BJ (Blowjob Without a Condom)
★ COF (Come on Face)
★ Completion
★ (Oral to completion) noncovered
★ Special Massage
★ O-Level (Oral)
★ Blow Job;
★ Oral fun uncovered)
★ COB (Come on Body)
★**. Extra ball (Have ride many times)**
☛ ☛ ☛ secure** 100% safe**
WHATSAPP CALL ME** ** SERVICE ✅ ❣️
Y A Variety Of Clicks To Explore The Great Call Girls Near Delhi
Call Girls Near Delhi specialize in sexual encounters while others simply look forward to enjoying an entertaining date night with clients. If you're searching for classy escorts in Delhi, our stunning beauties offer all-out luxury Available for in call or outcall and to fulfill all of your sexual fantasies. Also great for dinner dates or full evenings of erotica fun - hire one to experience what life should be like? Or hire a celebrity escort and live out your fantasy of living the life you always imagined.
Call Girls South Avenue Delhi WhatsApp Number 9711199171
Call Girls South Avenue Delhi WhatsApp Number 9711199171Delhi Call Girls 📞9899900591 ✔️ High Profile Service 100% Safe
Model Call Girl Services in Delhi reach out to us at 🔝 9953056974 🔝✔️✔️
Our agency presents a selection of young, charming call girls available for bookings at Oyo Hotels. Experience high-class escort services at pocket-friendly rates, with our female escorts exuding both beauty and a delightful personality, ready to meet your desires. Whether it's Housewives, College girls, Russian girls, Muslim girls, or any other preference, we offer a diverse range of options to cater to your tastes.
We provide both in-call and out-call services for your convenience. Our in-call location in Delhi ensures cleanliness, hygiene, and 100% safety, while our out-call services offer doorstep delivery for added ease.
We value your time and money, hence we kindly request pic collectors, time-passers, and bargain hunters to refrain from contacting us.
Our services feature various packages at competitive rates:
One shot: ₹2000/in-call, ₹5000/out-call
Two shots with one girl: ₹3500/in-call, ₹6000/out-call
Body to body massage with sex: ₹3000/in-call
Full night for one person: ₹7000/in-call, ₹10000/out-call
Full night for more than 1 person: Contact us at 🔝 9953056974 🔝. for details
Operating 24/7, we serve various locations in Delhi, including Green Park, Lajpat Nagar, Saket, and Hauz Khas near metro stations.
For premium call girl services in Delhi 🔝 9953056974 🔝. Thank you for considering us!CHEAP Call Girls in Malviya Nagar, (-DELHI )🔝 9953056974🔝(=)/CALL GIRLS SERVICE
CHEAP Call Girls in Malviya Nagar, (-DELHI )🔝 9953056974🔝(=)/CALL GIRLS SERVICE9953056974 Low Rate Call Girls In Saket, Delhi NCR
Call Girl Nashik Saloni 7001305949 Independent Escort Service Nashik
Booking Contact Details
WhatsApp Chat: +91-7001035870
Nashik Escort Service includes providing maximum physical satisfaction to their clients as well as engaging conversation that keeps your time enjoyable and entertaining. Plus they look fabulously elegant; making an impressionable.
Independent Escorts Nashik understands the value of confidentiality and discretion - they will go the extra mile to meet your needs. Simply contact them via text messaging or through their online profiles; they'd be more than delighted to accommodate any request or arrange a romantic date or fun-filled night together.
We provide -
27-april-2024(v.n)
Call Girl Nashik Saloni 7001305949 Independent Escort Service Nashik
Call Girl Nashik Saloni 7001305949 Independent Escort Service NashikCall Girls in Nagpur High Profile
Recently uploaded (20)
Call Girls New Ashok Nagar Delhi WhatsApp Number 9711199171
Call Girls New Ashok Nagar Delhi WhatsApp Number 9711199171
Goa Call "Girls Service 9316020077 Call "Girls in Goa
Goa Call "Girls Service 9316020077 Call "Girls in Goa
Call Girls Nashik Gayatri 7001305949 Independent Escort Service Nashik
Call Girls Nashik Gayatri 7001305949 Independent Escort Service Nashik
↑Top Model (Kolkata) Call Girls Salt Lake ⟟ 8250192130 ⟟ High Class Call Girl...
↑Top Model (Kolkata) Call Girls Salt Lake ⟟ 8250192130 ⟟ High Class Call Girl...
Goa Call Girls 9316020077 Call Girls In Goa By Russian Call Girl in goa
Goa Call Girls 9316020077 Call Girls In Goa By Russian Call Girl in goa
Call Girls Manjri Call Me 7737669865 Budget Friendly No Advance Booking
Call Girls Manjri Call Me 7737669865 Budget Friendly No Advance Booking
👙 Kolkata Call Girls Sonagachi 💫💫7001035870 Model escorts Service
👙 Kolkata Call Girls Sonagachi 💫💫7001035870 Model escorts Service
5* Hotels Call Girls In Goa {{07028418221}} Call Girls In North Goa Escort Se...
5* Hotels Call Girls In Goa {{07028418221}} Call Girls In North Goa Escort Se...
VIP Call Girls Nagpur Megha Call 7001035870 Meet With Nagpur Escorts
VIP Call Girls Nagpur Megha Call 7001035870 Meet With Nagpur Escorts
Call Girl Nagpur Roshni Call 7001035870 Meet With Nagpur Escorts
Call Girl Nagpur Roshni Call 7001035870 Meet With Nagpur Escorts
Behala ( Call Girls ) Kolkata ✔ 6297143586 ✔ Hot Model With Sexy Bhabi Ready ...
Behala ( Call Girls ) Kolkata ✔ 6297143586 ✔ Hot Model With Sexy Bhabi Ready ...
👙 Kolkata Call Girls Park Circus 💫💫7001035870 Model escorts Service
👙 Kolkata Call Girls Park Circus 💫💫7001035870 Model escorts Service
↑Top Model (Kolkata) Call Girls Behala ⟟ 8250192130 ⟟ High Class Call Girl In...
↑Top Model (Kolkata) Call Girls Behala ⟟ 8250192130 ⟟ High Class Call Girl In...
Call Girls South Avenue Delhi WhatsApp Number 9711199171
Call Girls South Avenue Delhi WhatsApp Number 9711199171
Call Girls in Barasat | 7001035870 At Low Cost Cash Payment Booking
Call Girls in Barasat | 7001035870 At Low Cost Cash Payment Booking
CHEAP Call Girls in Malviya Nagar, (-DELHI )🔝 9953056974🔝(=)/CALL GIRLS SERVICE
CHEAP Call Girls in Malviya Nagar, (-DELHI )🔝 9953056974🔝(=)/CALL GIRLS SERVICE
Call Girl Nashik Saloni 7001305949 Independent Escort Service Nashik
Call Girl Nashik Saloni 7001305949 Independent Escort Service Nashik
Karnal Call Girls 8860008073 Dyal Singh Colony Call Girls Service in Karnal E...
Karnal Call Girls 8860008073 Dyal Singh Colony Call Girls Service in Karnal E...
Low Rate Young Call Girls in Surajpur Greater Noida ✔️☆9289244007✔️☆ Female E...
Low Rate Young Call Girls in Surajpur Greater Noida ✔️☆9289244007✔️☆ Female E...
Featured
More than Just Lines on a Map: Best Practices for U.S Bike Routes
This session highlights best practices and lessons learned for U.S. Bike Route System designation, as well as how and why these routes should be integrated into bicycle planning at the local and regional level.
Presenters:
Presenter: Kevin Luecke Toole Design Group
Co-Presenter: Virginia Sullivan Adventure Cycling AssociationMore than Just Lines on a Map: Best Practices for U.S Bike Routes
More than Just Lines on a Map: Best Practices for U.S Bike RoutesProject for Public Spaces & National Center for Biking and Walking
Featured (20)
Content Methodology: A Best Practices Report (Webinar)
Content Methodology: A Best Practices Report (Webinar)
How to Prepare For a Successful Job Search for 2024
How to Prepare For a Successful Job Search for 2024
Social Media Marketing Trends 2024 // The Global Indie Insights
Social Media Marketing Trends 2024 // The Global Indie Insights
Trends In Paid Search: Navigating The Digital Landscape In 2024
Trends In Paid Search: Navigating The Digital Landscape In 2024
5 Public speaking tips from TED - Visualized summary
5 Public speaking tips from TED - Visualized summary
Google's Just Not That Into You: Understanding Core Updates & Search Intent
Google's Just Not That Into You: Understanding Core Updates & Search Intent
The six step guide to practical project management
The six step guide to practical project management
Beginners Guide to TikTok for Search - Rachel Pearson - We are Tilt __ Bright...
Beginners Guide to TikTok for Search - Rachel Pearson - We are Tilt __ Bright...
Unlocking the Power of ChatGPT and AI in Testing - A Real-World Look, present...
Unlocking the Power of ChatGPT and AI in Testing - A Real-World Look, present...
More than Just Lines on a Map: Best Practices for U.S Bike Routes
More than Just Lines on a Map: Best Practices for U.S Bike Routes
Ride the Storm: Navigating Through Unstable Periods / Katerina Rudko (Belka G...
Ride the Storm: Navigating Through Unstable Periods / Katerina Rudko (Belka G...
How to Convert iTunes Music to MP3 on Mac
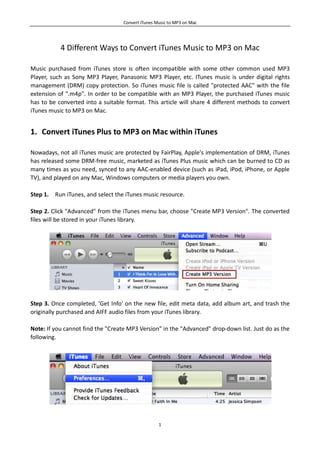
- 1. Convert iTunes Music to MP3 on Mac 4 Different Ways to Convert iTunes Music to MP3 on Mac Music purchased from iTunes store is often incompatible with some other common used MP3 Player, such as Sony MP3 Player, Panasonic MP3 Player, etc. ITunes music is under digital rights management (DRM) copy protection. So iTunes music file is called "protected AAC" with the file extension of ".m4p". In order to be compatible with an MP3 Player, the purchased iTunes music has to be converted into a suitable format. This article will share 4 different methods to convert iTunes music to MP3 on Mac. 1. Convert iTunes Plus to MP3 on Mac within iTunes Nowadays, not all iTunes music are protected by FairPlay, Apple's implementation of DRM, iTunes has released some DRM-free music, marketed as iTunes Plus music which can be burned to CD as many times as you need, synced to any AAC-enabled device (such as iPad, iPod, iPhone, or Apple TV), and played on any Mac, Windows computers or media players you own. Step 1. Run iTunes, and select the iTunes music resource. Step 2. Click "Advanced" from the iTunes menu bar, choose "Create MP3 Version". The converted files will be stored in your iTunes library. Step 3. Once completed, 'Get Info' on the new file, edit meta data, add album art, and trash the originally purchased and AIFF audio files from your iTunes library. Note: If you cannot find the "Create MP3 Version" in the "Advanced" drop-down list. Just do as the following. 1
- 2. Convert iTunes Music to MP3 on Mac Click the top-left "iTunes-> Preferences..." In the pop-up "General Preferences" dialogue, click the "Import Settings..." 2
- 3. Convert iTunes Music to MP3 on Mac Choose the "MP3 Encoder" in the "Import Using" drop-down list. Then you can find the "Create MP3 Version" in the "Advanced" drop-down list. 2. Convert iTunes music to MP3 by burning a CD and ripping it back Step 1. Insert a CD-R or CD-RW disc into the CD-ROM drive Step 2. Launch iTunes, create a new playlist, add iTunes music resource to the newly created playlist, and burn it to make an "Audio CD". Step 3. After the Audio CD is successfully burned, insert the disc into CD-ROM drive again. Then import the music tracks on the burned disc to iTunes. The following step is similar to the process of converting iTunes Plus music to MP3. Note: A CD disc can hold about 79 minutes files, so such method is a long and painful journey if you have hundreds of music files ready to be converted to MP3. 3. Convert iTunes music to MP3 on Mac with TuneClone Step 1. Install and run TuneClone (http://m4ptomp3.tuneclone.com) which is an iTunes music DRM removal tool. It has a built-in virtual CD burner, so there is no need to buy CD-R or CD-RW disc. Step 2. Run iTunes, create a new playlist and add the DRM protected iTunes music to the playlist. 3
- 4. Convert iTunes Music to MP3 on Mac Step 3. Right click the playlist, and select "Burn Playlist to Disc". Step 4. Pop up dialogue titled "Burn Settings", select "CDWriter TuneClone" as default CD Burner, choose "Audio CD" as Disc Format and tick "Include CD Text" (preserving the music metadata, such as name, artist, album names, etc.). Step 5. Click "Burn" button to start the burning. Nearly at the same time, TuneClone will convert the iTunes music to MP3 files automatically. You can open the TuneClone manager screen to check out the burning status. The output MP3 files can be found easily by clicking the "Reveal in Finder" button on the manager screen. There is a detailed step-by-step demonstration of how to convert m4p to mp3 on Mac with TuneClone: http://m4ptomp3.tuneclone.com/tuneclone-m4p-to-mp3-converter.html 4. Convert iTunes music to MP3 on Mac with iMovie Step 1. Run the iMovie and create a New Project. Step 2. Choose the 'Music' tab. Notice that the top right portion of the interface now offers a media browser. Then import the playlist containing purchased music. 4
- 5. Convert iTunes Music to MP3 on Mac Step 3. Select the DRM protected music and drag the file the iMovie timeline. Step 4. In order to export the music, iMovie needs a visual image associated with the audio track - iMovie thinks that it is going to be exporting a movie. Simply drag a image (whatever image is OK.) to the track above the imported audio file. Once iMovie has processed the image, select the "Export using QuickTime..." submenu item from the "Share" drop-down list. Step 5. In the pop-up "Save exported file as..."dialogue, select "Sound to AIFF" in the drop-down list. Choose an appropriate directory for iMovie to export files to, title the file, and tick 'Save' button. 5
- 6. Convert iTunes Music to MP3 on Mac Step 6. Find the exported AIFF audio file and import it to the iTunes Library. The following steps is much similar to the process of converting iTunes Plus music to MP3. At last, drag and drop converted MP3 files to your MP3 player via USB. Just enjoy yourself. For more, please visit http://m4ptomp3.tuneclone.com 6