SlideShare a Scribd company logo
1 of 49
Download to read offline
AUGUST 2015 (Revised)
A PRINCIPLED TECHNOLOGIES REPORT
Commissioned by Intel Corp.
IMPROVE DATACENTER ENERGY EFFICIENCY WITH INTEL NODE MANAGER
The server virtualization wave has helped to reduce the number of servers and power consumption
datacenters need to keep business moving, but most of the time, those servers are not optimized to efficiently
balance energy consumption and performance. They’re just burning power by running inefficiently 24 hours a
day, 7 days a week. Intel Node Manager, a server firmware feature that works with Intel Xeon processors, is a
power management tool that can help you optimize the balance between compute resources and energy
consumption to make your infrastructure more efficient and save you money in operating expenses.
In the Principled Technologies datacenter, we found that compared to running a server without power
management, managing power with Intel Node Manager enabled:
 42.8 percent more performance/watt for a mixed workload when limiting server power
consumption to 70%
 19.7 percent more performance/watt on a storage-intensive workload when limiting server power
consumption to 65%
 13.2 percent more performance/watt on a memory-intensive workload when limiting server power
consumption to 70%
 11.1 percent more VDI sessions/watt on a CPU-intensive workload when limiting server power
consumption to 70%
These results show the value of managing power with Intel Node Manager: When you get more
efficient, you make the most of every watt your datacenter consumes and spend less on wearying energy costs
while maximizing performance within your power budget.
A Principled Technologies report 2Improve datacenter energy efficiency with Intel Node Manager
MANAGING DATACENTER POWER WITH INTEL NODE MANAGER
Intel Node Manager is a server firmware feature available Intel Xeon processor
E3, E5, and E7 family servers that lets IT administrators balance processor resources
with power and cooling. With Intel Node Manager, administrators use a management
console to set power policies that help make the most of each rack in the datacenter.
By managing energy to increase efficiency, Intel Node Manager has the
potential to help businesses:
 reduce ongoing operating costs datacenter wide
 balance resources dynamically by moving power and cooling resources
to the workloads that need them
 improve continuity by limiting hardware’s ability to overheat and fail
By dynamically limiting power with Intel Node Manager, administrators can find
the optimal power limit that maximizes efficiency without hurting performance. Power
capping works to increase performance per watt because there is a point at which each
additional watt of power used no longer has a similar corresponding increase in
performance. Not all users in all situations want to optimize for performance/watt. If
you want to optimize for absolute performance, you should leave the servers
unconstrained.
For details about the workloads we used in our tests, see Appendix A. For
detailed test results, see Appendix B. Start at Appendix C for our step-by-step test
methodology.
Increase energy efficiency for all kinds of workloads
Using Intel Node Manager increased energy efficiency for the four types of
workloads we tested, increasing performance per watt by as much as 42.8 percent (see
Figure 1). Maximizing the amount of performance a server can do per watt of power
used is important because ultimately the cost of powering and cooling hardware is a
large part of a datacenter’s budget, so it’s more cost efficient to consider a
performance/watt metric.
Power capping lets admins
plan power and cooling
capacity for the whole
datacenter. With caps in
place, admins need not
worry that an unexpected
performance peak will
overload a system or rack,
trip a circuit, and bring
down important
workloads. This strategy
eliminates the
unnecessary power and
cooling overhead that
admins traditionally leave
to handle these
unexpected spikes.
A Principled Technologies report 3Improve datacenter energy efficiency with Intel Node Manager
Figure 1: Intel Node Manager
let us set power capping
policies that increased
performance/watt for various
common workloads.
Mixed workload
As Figure 2 shows, capping power with Intel Node Manager increased
performance/watt for our Exchange/LoadGen mixed workload by 42.8 percent at the 70
percent power level compared to running the workload with no power cap. Cutting
power lower than 70 percent caused the mixed workload test to fail due to CPU
constrictions.
Figure 2: Using Intel Node
Manager to set a power cap
increased performance/watt
up to an optimized 70% cap.
Storage-intensive workload
As Figure 3 shows, capping power with Intel Node Manager increased
performance/watt for our database storage-intensive workload by 19.7 percent at the
65 percent power level compared to running the workload with no power cap. Because
further capping decreased performance/watt, we know that 65 percent is the optimal
power level for this IO-intensive test.
A Principled Technologies report 4Improve datacenter energy efficiency with Intel Node Manager
Figure 3: Using Intel Node
Manager to set a power cap
increased performance/watt
up to an optimized 65% cap.
Memory-intensive workload
As Figure 4 shows, capping power with Intel Node Manager increased
performance/watt for our SPECjbb memory-intensive workload by 13.2 percent at the
70 percent power level compared to running the workload with no power cap. Because
further capping decreased performance/watt, we know that 70 percent is the optimal
power level for this memory-intensive test.
Figure 4: Using Intel Node
Manager to set a power cap
increased performance/watt
up to an optimized 70% cap.
CPU-intensive workload
As Figure 5 shows, capping power with Intel Node Manager increased
performance/watt for our CPU-intensive VDI workload by 11.1 percent at the 70 percent
power level compared to running the workload with no power cap. Because further
capping decreased performance/watt due to slow application response, we know that
70 percent is the optimal power level for this VDI workload.
A Principled Technologies report 5Improve datacenter energy efficiency with Intel Node Manager
Figure 5: Using Intel Node
Manager to set a power cap
increased VDI sessions/watt
up to an optimized 70% cap.
CONCLUSION
Managing power in the datacenter can be a good strategy to reduce power and
cooling overheard while allowing servers operate at the most efficient power levels and
do as much work as possible within your specific power policies.
We found that using Intel Node Manager to set power limits on servers running
various workloads increased performance per watt by up to 42.8 percent compared to
running the same workloads with no power management solution.
A Principled Technologies report 6Improve datacenter energy efficiency with Intel Node Manager
APPENDIX A – ABOUT THE BENCHMARKS
Benchmarking a mixed workload using LoadGen 2013
To test the solutions’ mail server performance, we used the Microsoft Load Generator 2013 (LoadGen)
benchmark, performing tasks to simulate an Average user generating mail activity. For our workloads, we used the
following settings:
 Number of users: 2,000
 Mailbox Profile: 250MB mailboxes
 Action Profile: 300 - Outlook 2007 cached
For more details about LoadGen, see www.microsoft.com/downloads/details.aspx?FamilyId=DDEC1642-F6E3-
4D66-A82F- 8D3062C6FA98&displaylang=en.
Benchmarking a storage-intensive workload using DVD Store Version 2.1
To create our real-world OLTP workload, we used the DVD Store Version 2.1 benchmarking tool. DS2 models an
online DVD store, where customers log in, search for movies, and make purchases. DS2 reports these actions in orders
per minute that the system could handle, to show what kind of performance you could expect for your customers. The
DS2 workload also performs other actions, such as adding new customers, to exercise the wide range of database
functions you would need to run your ecommerce environment.
Learn more at www.delltechcenter.com/page/DVD+Store.
Benchmarking a memory-intensive workload using SPECjbb2005
SPECjbb2005 is an industry-standard benchmark created by the Standard Performance Evaluation Corp. (SPEC)
to measure a server’s Java performance. (Note: SPEC and the SPECjbb2005 are trademarks of the Standard Performance
Evaluation Corporation.) SPEC modeled SPECjbb2005 on the three-tier client/server architecture, with the middle layer
as the primary focus. According to SPEC, “Random input selection represents the first (user) tier. SPECjbb2005 fully
implements the middle tier business logic. The third tier is represented by tables of objects, implemented by Java
Collections, rather than a separate database.” (www.spec.org/jbb2005/docs/UserGuide.html).
SPECjbb2005 utilizes multiple special data groups and multiple threads as it runs. Each data unit is a
“warehouse,” a roughly 25MB collection of data objects. Each thread represents an active user posting transaction
requests within a warehouse. The benchmark run begins with one warehouse and then increases the number of
warehouses; its goal is to saturate the server’s processor capacity. As the number of warehouses increases, so does the
number of threads. The benchmark’s results portray the server’s throughput in business operations per second or
SPECjbb2005 bops. A higher number of SPECjbb2005 bops is better. For more information on SPECjbb2005, go to
www.spec.org.
Benchmarking a CPU-intensive workload using Login VSI 4.1
Login Virtual Session Indexer (Login VSI) is a tool that helps assess the virtual desktop performance, capacity,
and scalability of servers.
Login VSI 4.1 reports the following metrics:
 Minimum Response: The minimum application response time
 Average Response: The average application response time
A Principled Technologies report 7Improve datacenter energy efficiency with Intel Node Manager
 Maximum Response: The maximum application response time
 VSI Baseline: Average application response time of the first 15 sessions
 VSI Index Average: The VSI index average is the average response time dropping the highest and lowest
2 percent
For more information about Login VSI 4.1, see www.loginvsi.com/product-overview.
A Principled Technologies report 8Improve datacenter energy efficiency with Intel Node Manager
APPENDIX B – DETAILED TEST RESULTS
Mixed workload
Figure 6 shows the power consumption profile over the course of the test, and Figure 7 shows CPU utilization.
Figure 6: Power consumption profile over the course of our mixed workload test.
Figure 7: CPU utilization over the course of our mixed workload test.
A Principled Technologies report 9Improve datacenter energy efficiency with Intel Node Manager
Storage-intensive workload
Figure 8 shows the power consumption profile over the course of the test, and Figure 9 shows CPU utilization.
Figure 8: Power consumption profile over the course of our storage-intensive workload test.
Figure 9: CPU utilization over the course of our storage-intensive workload test.
A Principled Technologies report 10Improve datacenter energy efficiency with Intel Node Manager
Memory-intensive workload
Figure 10 shows the power consumption profile over the course of the test, and Figure 11 shows CPU utilization.
Note that in this memory-intensive test, high CPU is a results of high memory utilization.
Figure 10: Power consumption profile over the course of our memory-intensive workload test.
Figure 11: CPU utilization over the course of our memory-intensive workload test.
A Principled Technologies report 11Improve datacenter energy efficiency with Intel Node Manager
CPU-intensive workload
Figure 12 shows the power consumption profile over the course of the test, and Figure 13 shows CPU utilization.
Figure 12: Power consumption profile over the course of our CPU-intensive workload test.
Figure 13: CPU utilization over the course of our CPU-intensive workload test.
A Principled Technologies report 12Improve datacenter energy efficiency with Intel Node Manager
APPENDIX C – SYSTEM CONFIGURATION INFORMATION
Figure 14 provides detailed configuration information for the test system.
System Intel S2600WT2
Power supplies
Total number 2
Vendor and model number DPS-750XB A
Wattage of each (W) 750
Cooling fans
Total number 6
Vendor and model number Nidec UltraFlo V60E12BS1B5
Dimensions (h × w) of each 2.5” X 2.5”
Volts (V) 12
Amps (A) 1.50
General
Number of processor packages 2
Number of cores per processor 12
Number of hardware threads per core 2
System power management policy Performance
CPU
Vendor Intel
Name Xeon
Model number E5-2680 v3
Socket type LGA2011-3
Core frequency (GHz) 2.5
Bus frequency 9.6 GT/s DMI
L1 cache 32 KB (per core)
L2 cache 256 KB (per core)
L3 cache 30 MB
Platform
Vendor and model number Intel S2600WT2
Motherboard model number Intel S2600WT2
BIOS name and version SE5C610.86B.01.01.1008 (03/19/2015)
BIOS settings Default
Memory module(s)
Total RAM in system (GB) 256
Vendor and model number SK Hynix HMA42GR7MFR4N-TF
Type PC4-2133P
Speed (MHz) 2,133
Speed running in the system (MHz) 2,133
Timing/Latency (tCL-tRCD-tRP-tRASmin) 15-15-15-33
Size (GB) 16
Number of RAM module(s) 16
Chip organization Dual sided
Rank Dual
A Principled Technologies report 13Improve datacenter energy efficiency with Intel Node Manager
System Intel S2600WT2
Operating system
Name VMware ESXi 6.0.0
Build number 2494585
File system VMFS
Language English
Graphics
Vendor and Model Number Matrox® G200
Graphics memory (MB) 256
RAID controller
Vendor and model number Intel Onboard SAS Controller
Firmware version SE5C610.86B.01.01.1008 (03/19/2015)
Hard drives
Vendor and model number Western Digital WD1003FZEX
Number of drives 1
Size (TB) 1
RPM 7.2K
Type SATA 6.0
Ethernet adapters
Vendor and Model Number Intel Ethernet Controller X540-AT2
Type Integrated
Ethernet adapter 2
Vendor and Model Number QLogic® QLE2562
Type PCIe
Figure 14: System configuration information for our test server.
A Principled Technologies report 14Improve datacenter energy efficiency with Intel Node Manager
APPENDIX D – HOW WE TESTED
Equipment
Server name
# of
servers
Model Processors
Memory
(GB)
Functional role
Intel server 1 S2600WT 2 X Intel Xeon E5-2680 v3 256
Server Under Test
(SUT)
Infrastructure
servers
4
Intel-based
server
2 X Intel Xeon E5-2650 v3 192 Infrastructure
Figure 15: Detailed server specifications.
For our virtualized test, we installed and configured the latest available version of VMware vSphere 6.0 on the
infrastructure servers and on the Intel server under test. For our bare metal configuration, we installed a copy of
Windows Server 2012 R2 on the Intel server under test.
We used two 10GbE switches to provide connectivity between infrastructure servers, server under test, and
storage, and we used two 10GbE ports for networking per server. We used one port for server management and to carry
private test traffic, and we used the second port to connect to the storage.
For storage, we used an industry-leading SSD-based storage array and provisioned a 10TB datastore for the
server under test to use.
Configuring the server under test for Intel Node Manager
1. Connect network cable to mgmt NIC.
2. Power on the server and press F2 to enter Server Setup.
3. Select Server Management – BMC LAN Configuration.
4. Select User Configuration.
5. Select User ID root.
6. If necessary, change User Status to enabled.
7. Select User Password and enter a secure password.
8. Hit ESC to return to previous menu.
9. Under IPv6, select Disabled.
10. Under DHCP hostname, enter dcmintelhost1.
11. Under User Configuration, select User ID and select root.
12. Under User Status, select Enabled.
13. Under User Password, enter a secure password.
14. Press F10 to save configuration.
15. Hit ESC three times to exit menu and select Reset to reboot the server.
Installing Intel Data Center Manager software
1. Double-click the installation program.
2. At the welcome screen, click Next.
3. In the license agreement, choose I accept the terms. Click Next.
A Principled Technologies report 15Improve datacenter energy efficiency with Intel Node Manager
4. Enter customer information, and click Next.
5. Select a destination folder, and click Next.
6. Choose the default SNMP and RMI settings, and click Next.
7. Choose the default HTTPS port, and click Next.
8. Change the sample frequency and data granularity to 30 seconds, and click Next.
9. Configure the datacenter manager username and password.
10. Enter keystore password and certificate information, and click Next.
11. Select the Default embedded database, enter user credentials, and click Next.
12. Click Install.
Discovering and adding systems to Intel Data Center Manager
1. Open the browser and enter https://localhost:8643/DcmConsole/ to launch the DCM Console.
2. To login, enter the user name and password configured during installation.
3. Click Discovery and Import.
4. Click Add Discover Task.
5. Select IPMI as the protocol, and input the appropriate IP range and Subnet Mask of the server under test.
6. Enter root as the IPMI User Name, enter the previously selected password, and click OK to initiate the discovery
process.
7. Click Data Center Management and click the + sign to add a Data Center, Room, Row, Rack, and Device. The
Device should be the system recently discovered.
Applying a power cap using Intel Data Center Manager
1. Click the Devices and Racks tab.
2. Under Devices, select the server.
3. Click the Policies tab.
4. Click Add.
5. Enter a Policy name, select Custom Power Limit as the policy type, and enter a power cap in Watts.
6. Select Permanent Policy, and make sure that the Policy Enabled option is selected. Click OK.
A Principled Technologies report 16Improve datacenter energy efficiency with Intel Node Manager
MIXED WORKLOAD: LOADGEN 2013 METHODOLOGY
VM name vCPUs Memory Host OS OS drive Additional drive
ExchangeCAS 8 16 GB Intel SUT
Windows Server
2012 R2
Standard
100 GB None
ExchangeMB 8 16 GB Intel SUT
Windows Server
2012 R2
Standard
100 GB 750 GB for Mailboxes
Exchange
AD/DNS
2 8 GB Infra
Windows Server
2012 R2
Standard
100 GB None
LoadGen client 4 8 GB Infra
Windows Server
2008 R2
Enterprise
100 GB None
Figure 16: The virtual machines in our test environment.
Setting up Microsoft Windows Active Directory® server
1. In your Web browser, connect to the vSphere server.
2. Right-click the ESXi host, and choose New Virtual Machine.
3. On the Create New Virtual Machine screen, select custom, and click Next.
4. Assign a name to the virtual machine, and click Next.
5. Select the LUN for the storage, and click Next.
6. Select Virtual Machine Version 11, and click Next.
7. Choose Windows, select Microsoft Windows Server 2012, and click Next.
8. Choose the VM’s virtual hardware options, and click Next.
9. Select two virtual processor socket, and select one core per virtual socket.
10. Select 4GB RAM.
11. Select the NIC interface with access to the private test network.
12. Leave the default option for SCSI controller.
13. Choose to create a new virtual disk, and click Next.
14. Make the OS virtual disk size 100 GB, choose thin provisioned, specify external storage, and click Next.
15. Keep the default virtual device node (0:0), and click Next.
16. Click Finish.
17. Right-click the VM, and select Edit Settings.
18. Click the Resources tab, and click Memory.
19. Select Reserve all guest memory, and click OK.
20. Connect the VM virtual CD-ROM to the Microsoft Windows Server 2012 R2 installation disk.
21. Start the VM.
Installing Microsoft Windows Server 2012 R2 Standard Edition
1. Connect the installation media, and power on the VM.
2. When the option appears, to enter the Boot Manager, press F11.
3. Select the connected boot media, and press Enter.
4. When prompted to boot from DVD, press any key.
A Principled Technologies report 17Improve datacenter energy efficiency with Intel Node Manager
5. When the installation screen appears, click My language is English.
6. Leave language, time/currency format, and input method as default, and click Next.
7. Click Install now.
8. When the Windows Setup screen appears, when prompted to go online to install updates, click No thanks.
9. Select Windows Server 2012 R2 Standard (Server with a GUI), and click Next.
10. Check the I accept the license terms checkbox, and click Next.
11. Click Custom: Install Windows only (advanced).
12. Press Alt+A to open advanced partition options. Delete any partitions until there is only Drive 0 Unallocated
Space.
13. Select Drive 0 Unallocated Space, and click Next. At this point, Windows will begin installing, and will restart
automatically after completing.
14. When the Settings page appears, fill in the Password and Reenter Password fields with the same password.
15. Log in with the previously set up password.
Configuring Windows Update
1. In the left pane of the Server Manager screen, click Local Server.
2. In the main frame, next to Windows Update, click Not configured.
3. In the Windows Update screen, in the main pane, click Let me choose my settings.
4. Under Important updates, select Never check for updates (not recommended), and click OK.
5. In the left pane, click Check for updates, and install all available updates.
6. Close the Windows Update screen.
Configuring Windows Firewall
1. In Server Manager, click ToolsWindows Firewall with Advanced Security.
2. In the Overview section, click Windows Firewall Properties.
3. In the Domain Profile tab, for Firewall state, click Off.
4. In the Private Profile tab, for Firewall state, click Off.
5. In the Public Profile tab, for Firewall state, click Off.
6. Click OK.
7. Close the Windows Firewall Properties screen.
Setting up Remote Desktop
1. In the Local Server tab of the Server Manager screen, next to Remote Desktop, click Disabled.
2. In the System Properties screen, in the Remote Desktop section, select the Allow remote connections to this
computer radio button. When the warning message appears, click OK.
3. Uncheck Allow connections only from computers running Remote Desktop with Network Level
Authentication (recommended), and click OK.
Disabling IE Enhanced Security Configuration
1. In the Local Server tab of the Server Manager screen, next to IE Enhanced Security Configuration, click On.
2. In the Internet Explorer Enhanced Security Configuration screen, select the Off radio buttons for both
Administrators and Users, and click OK.
Installing VMware Tools
1. Install VMware Tools. For more information, see
kb.vmware.com/selfservice/microsites/search.do?language=en_US&cmd=displayKC&externalId=340.
A Principled Technologies report 18Improve datacenter energy efficiency with Intel Node Manager
Installing Active Directory and DNS services
1. Power on the Active Directory VM.
2. On the Active Directory server, open Windows PowerShell.
3. Run the following command: Install-WindowsFeature RSAT-ADDS
4. When the installation is finished, close PowerShell.
5. On the VM, open Server Manager.
6. On the Welcome screen, click 2, and click Add roles and features.
7. At the initial Before you begin screen, click Next three times.
8. At the Server Roles screen, select Active Directory Domain Services.
9. On the pop-up screen, click Add Features.
10. Click Next three times.
11. Verify the desired role is being installed, and click Install.
12. Once installation has finished, close the Add roles and features wizard.
13. In Server Manager, click the flag at the top, and select the Promote this server to a domain controller link.
14. Select Add a new forest, enter a root domain name of test.local and click Next.
15. On the Domain Controller Options screen, enter a password, and click Next.
16. On the DNS Options screen, click Next.
17. On the Additional Options screen, click Next.
18. On the Paths screen, click Next.
19. On the Review Options screen, click Next.
20. On the Prerequisites screen, verify all prerequisites have passed, and click Install.
21. Once Active Directory Domain Services finishes installing, click Finish, and restart the system.
Creating the first VM
1. Using the vSphere client, connect to the vCenter Server.
2. Right-click the cluster, and choose New Virtual Machine.
3. On the Configuration screen, choose Custom, and click Next.
4. On the Name and Location screen, add a name, select the datacenter, and click Next.
5. On the specific Host screen, choose the server under test, and click Next.
6. On the Storage screen, select the OS datastore on the external storage, and click Next.
7. On the Virtual Machine Version screen, choose Virtual Machine Version 11, and click Next.
8. On the Guest Operating System screen, choose Windows, select Microsoft Windows Server 2012 R2 (64-bit), and
click Next.
9. On the CPUs screen, choose 1 virtual socket, choose 4 virtual processors per core, and click Next.
10. On the Memory screen, choose 8 GB RAM, and click Next.
11. On the Network screen, click 1 for the number of NICs, select the NIC connected to the isolated testing network,
and click Next.
12. On the SCSI Controller screen, leave the default virtual storage controller, and click Next.
13. On the Select a Disk screen, choose to create a new virtual disk, and click Next.
14. On the Create a Disk screen, make the OS virtual disk size 100 GB, and choose thin provisioned.
15. On the Advanced Options screen, leave the default virtual device node (0:0), and click Next.
16. On the Ready to Complete screen, click Finish.
A Principled Technologies report 19Improve datacenter energy efficiency with Intel Node Manager
17. Right click the VM, select Upgrade Virtual Hardware, and click Yes.
18. Start the VM.
19. Attach the Windows Server 2012 R2 ISO image to the VM, and install Windows Server 2012 R2 on your VM.
Installing the operating system on the VMs
Repeat the sections above regarding the initial creation of the virtual machines and installation of Windows
Server 2012 R2 Standard.
Creating a VM template
1. Using the vSphere Client, right click the first VM, select Template, and select Clone to Template.
2. On the Name and Location screen, enter a Template Name.
3. On the Host / Cluster screen, select the management server.
4. On the Datastore screen, select a datastore, and click Next.
5. On the Ready to Complete screen, click Finish.
The template created will be used to clone out the rest of the VMs.
Configuring the Active Directory server
Preparing AD for Exchange
1. Create a reverse lookup zone:
a. Click Start, and type DNS in the search field.
b. Open the DNS manager by clicking in the results field.
c. Expand your active directory domain, and click Reverse Lookup Zones.
d. Click ActionNew Zone.
e. On the Welcome screen, click Next.
f. Chose Primary Zone, and click Next.
g. Leave default replication scope, and click Next.
h. Choose IPv4, and click Next.
i. Enter the IP address of your domain (192.168.3) for our example.
j. Choose Allow both nonsecure and secure dynamic updates, and click Next.
k. Click Finish.
2. Insert the Exchange 2012 SP1 Installation ISO in the AD VM DVD drive.
3. In Windows Explorer, double-click the Exchange DVD icon.
4. In the Exchange installation folder, hold down shift, and right-click.
5. Choose Open a command window.
6. Run the following command: Setup.exe /PrepareSchema
/IAcceptExchangeServerLicenseTerms
7. When the previous command completes, run the following command: Setup.exe /PrepareAD
/OrganizationName:”organization name” /IAcceptExchangeServerLicenseTerms
8. Close the command window when the setup finishes.
Installing Active Directory Certificate Services
1. Launch Server Manager, and select Add roles and features.
2. At the Add Roles and Features Wizard, click Next.
A Principled Technologies report 20Improve datacenter energy efficiency with Intel Node Manager
3. Select Role-based or feature-based installation, and click Next.
4. Choose Active Directory Certificate Services.
5. If prompted, to install any required features, click Add Features.
6. Click Next three times.
7. Choose Certificate Authority and Certification Authority Web Enrollment.
8. If prompted, to install any required features, click Add Features.
9. Click Next.
10. Leave defaults, and click Next.
11. Click Install.
12. When the install finishes, click Close.
13. In the Server Manager, click the yellow warning symbol, and click Configure Active Directory Certificate
Services.
14. Leave defaults, and click Next.
15. Check both Certification Authority and Certification Authority Web Enrollment, and click Next.
16. Choose Enterprise CA, and click Next.
17. Choose Root CA, and click Next.
18. Choose Create a new private key, and click Next.
19. Leave defaults, and click Next.
20. Leave defaults, and click Next.
21. Leave 5 years, and click Next.
22. Leave default locations, and click Next.
23. Click Configure.
24. Close when the configuration finishes.
25. Open Internet Explorer and navigate to localhost/certsrv/Default.asp to verify that the installation
succeeded.
Installing Exchange Server 2013 SP1 Mailbox and Client Access Server roles
Using the template, clone two VMs, one for the Exchange Client Access Server, or CAS, and the other for the
Exchange Mailbox Server. Edit the hardware settings in each. The Mailbox server should have eight vCPUs (eight virtual
sockets each with one core) and 16 GBs of memory. Using the Exchange datastore, add a 750 GB disk and a 100 GB disk
to the Mailbox server for the Exchange mailbox and Exchange logs respectively. Set static IPs on both VMs and join the
domain.
1. On the Exchange Mailbox Server, log into the server using domain administrator credentials.
2. Open Windows PowerShell and run the following command:
Install-WindowsFeature AS-HTTP-Activation, Desktop-Experience, NET-
Framework-45-Features, RPC-over-HTTP-proxy, RSAT-Clustering, RSAT-
Clustering-CmdInterface, RSAT-Clustering-Mgmt, RSAT-Clustering-
PowerShell, Web-Mgmt-Console, WAS-Process-Model, Web-Asp-Net45, Web-
Basic-Auth, Web-Client-Auth, Web-Digest-Auth, Web-Dir-Browsing, Web-Dyn-
Compression, Web-Http-Errors, Web-Http-Logging, Web-Http-Redirect, Web-
Http-Tracing, Web-ISAPI-Ext, Web-ISAPI-Filter, Web-Lgcy-Mgmt-Console,
A Principled Technologies report 21Improve datacenter energy efficiency with Intel Node Manager
Web-Metabase, Web-Mgmt-Console, Web-Mgmt-Service, Web-Net-Ext45, Web-
Request-Monitor, Web-Server, Web-Stat-Compression, Web-Static-Content,
Web-Windows-Auth, Web-WMI, Windows-Identity-Foundation
3. Restart the server.
4. Download the Microsoft Unified Communications Managed API 4.0, Core Runtime 64-bit.
(go.microsoft.com/fwlink/p/?linkId=258269)
5. Run UcmaRuntimeSetup.exe.
6. When the installation completes, click Finish.
7. Navigate to the location of the Exchange installation media, and double-click Setup.exe.
8. At the Check for Updates? screen, check the Connect to the Internet and check for updates checkbox, and
click Next.
9. When the updates complete, click Next.
10. At the Introduction screen, click Next.
11. At the License Agreement screen, check the box to accept the terms, and click Next.
12. At the Recommended Settings screen, check the Don’t use recommended settings checkbox, and click Next.
13. At the Server Role Selection, select Mailbox or Client Access role, and click Next.
14. At the Installation Space and Location screen, leave the default location for the installation, and click Next.
15. At the Malware Protection Settings, select yes to disable, and click Next.
16. At the Readiness Checks screen, allow the verification to complete. If there are no failures, click Install.
17. When the installation completes, click Finish, and restart the server.
18. Repeat steps 1-17 for the Exchange CAS server.
Configuring Exchange
1. On the CAS server, open the Exchange Admin Center by using a browser and navigating to
https://localhost/ecp
2. Enter the domain administrator credentials, and click Sign in.
3. If prompted, select the language and time zone, and click Save.
4. In the left pane, click Mail flow, and click Send connectors.
5. On the Send connectors page, click the New icon.
6. In the New send connector wizard, specify SMTP as the name, and select Internet as the type. Click Next.
7. In the Network settings screen, choose MX record associated with recipient domain, and click Next.
8. In the Address space screen, click the Add icon.
9. In the Add domain screen, in the Fully Qualified Domain Name (FQDN) field, enter *, and click Save.
10. Click Next.
11. In Source server screen, click the Add icon.
12. In the Select a Server screen, select the mailbox server, click Add, and click OK.
13. Click Finish.
14. In the left pane of the EAC, click servers, select the name of the CAS server, and click Edit.
15. Click Outlook Anywhere, and for the external and internal hostname field, enter the appropriate FQDN of
the Client Access Server. (For example, exchangeserver.test.local.)
A Principled Technologies report 22Improve datacenter energy efficiency with Intel Node Manager
16. Choose NTLM as the authentication method, and click Save.
17. Click Virtual Directories, and click the Configure external access domain icon.
18. In the Select the Client Access servers to use with the external URL screen, click the Add icon.
19. Select the CAS server, and click Add. Click OK.
20. Type the FQDN of the CAS server in the Enter the domain field, and click Save.
21. Log into the Active Directory server using administrator credentials, and complete the following steps:
a. Open Server Manager, and click ToolsDNS
b. In the left pane of DNS Manager, expand the Active Directory server nameForward Lookup
Zonestest.local.
c. In the right pane of DNS Manager, verify or create the DNS records as presented in Figure 17.
Type
Host or child
domain/alias name
FQDN
FQDN of mail
server
Mail Exchanger (MX) Leave blank domain.com casserver.domain.com
Alias (CNAME) Autodiscover Autodiscover.domain.com casserver.domain.com
Alias (CNAME) Owa Owa.domain.com casserver.domain.com
Figure 17: DNS records.
22. Log into your CAS server.
23. In the Exchange Power Shell, run the following commands, replacing “$HostName” with the host name (not
FQDN) of your CAS server.
Set-EcpVirtualDirectory "$HostNameECP (Default Web Site)" -InternalUrl
((Get-EcpVirtualDirectory "$HostNameECP (Default Web
Site)").ExternalUrl)
Set-WebServicesVirtualDirectory "$HostNameEWS (Default Web Site)" -
InternalUrl ((get-WebServicesVirtualDirectory "$HostNameEWS (Default Web
Site)").ExternalUrl)
Set-ActiveSyncVirtualDirectory "$HostNameMicrosoft-Server-ActiveSync
(Default Web Site)" -InternalUrl ((Get-ActiveSyncVirtualDirectory
"$HostNameMicrosoft-Server-ActiveSync (Default Web Site)").ExternalUrl)
Set-OabVirtualDirectory "$HostNameOAB (Default Web Site)" -InternalUrl
((Get-OabVirtualDirectory "$HostNameOAB (Default Web
Site)").ExternalUrl)
Set-OwaVirtualDirectory "$HostNameOWA (Default Web Site)" -InternalUrl
((Get-OwaVirtualDirectory "$HostNameOWA (Default Web
Site)").ExternalUrl)
Set-PowerShellVirtualDirectory "$HostNamePowerShell (Default Web Site)"
-InternalUrl ((Get-PowerShellVirtualDirectory "$HostNamePowerShell
(Default Web Site)").ExternalUrl)
Get-OfflineAddressBook | Set-OfflineAddressBook -
A Principled Technologies report 23Improve datacenter energy efficiency with Intel Node Manager
GlobalWebDistributionEnabled $True -VirtualDirectories $Null
24. Create a folder at the root of C: on the CAS server, and share it to Everyone with read/write permissions.
25. Log into the Exchange admin center, and navigate to ServersCertificates.
26. Choose the CAS server in the drop-down menu, and to create a new certificate, click the plus sign.
27. Choose Create a request for a certificate from a certification authority, and click Next.
28. Name the certificate, and click Next.
29. Do not request a wildcard certificate, and click Next.
30. Click Browse, choose the CAS server, and click Ok. Click Next.
31. Leave defaults, and click Next.
32. Leave defaults, and click Next.
33. Enter your organization information, and click Next.
34. Enter the path to the share you created on the CAS server, and click Finish. Example:
cassharemyrequest.REQ
35. Log into the AD server, and open Internet Explorer.
36. Browse to localhost/CertSrv
37. Click Request a certificate.
38. Choose Advanced certificate request.
39. Choose Submit a certificate request by using a base-64-endcoded CMC.
40. Open Windows Explorer, and navigate to the share folder on the CAS server where the certificate request is
stored.
41. Open the certificate with notepad, and copy the content between BEGIN NEW CERTIFICATE REQUEST and
END NEW CERTIFICATE REQUEST.
42. Paste the copied content into the Saved Request screen.
43. In the Certificate Template drop-down menu, choose Web Server, and click Submit.
44. Choose Base 64 encoded, and download the certificate.
45. Copy the new certificate into the share folder on the CAS server.
46. Log back into the CAS server and open the Exchange Admin Center.
47. Go to ServersCertificates, and highlight the certificate you began before. (In the status column, it should
say Pending request.)
48. Click Complete on the right side.
49. Type the path to the certificate, including the certificate name, and click Ok. Example:
cassharecertnew.CER
50. Verify that the status has changed to Valid.
51. Edit the new entry, and click Edit.
52. Go to Services and check SMTP and IIS, and click Save.
53. On the warning message, click Yes.
54. Run the following steps on the CAS and AD servers.
a. Click Start, and type MMC
A Principled Technologies report 24Improve datacenter energy efficiency with Intel Node Manager
b. Click FileAdd/Remove Snap-in.
c. Choose Certificates, and click Add.
d. Choose Computer account, and click Next.
e. Choose Local computer, and click Finish.
f. Click OK.
g. Expand CertificatesTrusted Root Certificate AuthoritiesCertificates.
h. Click ActionAll TasksImport.
i. Click Next.
j. Browse to the share folder on the CAS server, and choose the new certificate you created. Click
Next.
k. Leave defaults, and click Next.
l. Click Finish.
m. Click OK on the Import was successful message.
55. Log into the CAS server, and open the Exchange admin center.
56. Navigate to ServersDatabases.
57. Restart the Microsoft Exchange Information Store service on the MB server.
58. Using the Edit button, disable the maintenance schedule, and enable circular logging for each mailbox
database.
59. Dismount and remount the databases.
60. Open Exchange Management shell, and enter the following to move the paths of the default mailbox:
Move-Databasepath “DatabaseName” –EdbFilepath “E:NewlocationDBname.edb”
–LogFolderpath “F:Newlocation”
61. When prompted, type A and press enter.
62. Open Exchange Management Shell, and enter the following:
Get-OutlookAnywhere |Set-OutlookAnywhere -ExternalHostname cas.domain.com
-DefaultAuthenticationMethod NTLM -ExternalClientsRequireSsl $true
Installing and configuring the Exchange 2013 mail test clients and completing LoadGen
configuration on Exchange 2013
For our testing, we used one virtual client machine to run Loadgen2013. To create the mail clients, we installed
several software components. We followed this process for each installation:
Installing Windows Server 2008 R2 SP1 Enterprise Edition
1. Insert the installation DVD for Windows Server 2008 R2 SP1 Enterprise into the DVD drive.
2. At the Language Selection Screen, click Next.
3. Click Install Now.
4. Select Windows Server 2008 R2 Enterprise (Full Installation), and click Next.
5. Click the I accept the license terms checkbox, and click Next.
6. Click Custom.
7. Click Next.
8. At the User’s password must be changed before logging on warning screen, click OK.
9. Enter the desired password for the administrator in both fields, and click the arrow to continue.
A Principled Technologies report 25Improve datacenter energy efficiency with Intel Node Manager
10. At the Your password has been changed screen, click OK.
11. Click Start, type change power-saving settings and press Enter.
12. Click Change plan settings.
13. Change the Turn off the display drop-down menu to Never.
14. Click Save changes, and close the Power Options, Screen Saver Settings, and Personalization screens.
To set up this server, we had to install several additional software components. The following subsections detail
the necessary installation processes.
Joining the domain
1. Set a static IP.
2. Select StartControl PanelNetwork ConnectionsLocal Area Connection.
3. Click Properties.
4. Highlight Internet Protocol (TCP/IP), and click Properties.
5. Select the Use the following DNS server addresses radio button, and in the Preferred DNS server field, enter
the IP of the DNS server. Click OK.
6. Right-click My Computer, and select Properties.
7. Under the Computer Name tab, click Change.
8. In the Computer Name Changes screen, under the Member of section, select the Domain radial box, and
type test.local
9. Select OK to start joining the domain.
10. When the screen appears asking for a person qualified on the domain, type Administrator as the
username and Password1 as the password.
11. At the Welcome pop-up and the screen warning that you must restart the computer for the changes to take
effect, click OK.
12. At the System Properties screen, click OK.
13. When a pop-up appears asking if you want to restart now, click Yes to restart your computer.
Installing Internet Information Services
1. Click StartAdministrative ToolsServer Manager.
2. On the left pane, click Roles.
3. Click Add Roles.
4. Click the Application Server checkbox.
5. When the Add features required for Application Server? screen appears, click Add Required Features.
6. Click Next.
7. Click Next.
8. At the Select Role Services page for Application Server, click the Web Server (IIS) Support checkbox.
9. Click Add Required Support Role Services.
10. Click Next.
11. Click Next.
12. At the Select Role Services page for Web Server (IIS), click IIS 6 Management Compatibility, ASP, and CGI
checkboxes, and click Next.
13. Click Install.
14. Click Close.
A Principled Technologies report 26Improve datacenter energy efficiency with Intel Node Manager
Installing Load Generator
Download and install Load Generator 2013 using all defaults.
Importing the certificate and editing the hosts file
1. Click Start, and type MMC
2. Click FileAdd/Remove Snap-in.
3. Choose Certificates, and click Add.
4. Choose Computer account, and click Next.
5. Choose Local computer, and click Finish.
6. Click OK.
7. Expand CertificatesTrusted Root Certificate AuthoritiesCertificates.
8. Click ActionAll TasksImport.
9. Click Next.
10. Browse to the share folder on the CAS server, and choose the new certificate you created. Click Next.
11. Leave defaults, and click Next.
12. Click Finish.
13. Click OK on the Import was successful message.
14. Open the Notepad program, and use FileOpen to open the hosts file stored at
C:WindowsSystem32driversetc.
15. Add the IP and FQDN of the CAS server.
16. Save and close Notepad.
Preparing Load Generator
1. Log into the mail client.
2. Select StartAll ProgramsMicrosoft ExchangeExchange Load Generator 2013.
3. When the Load Generator screen appears, select Start a new test.
4. Select Create a new test configuration, and click Continue.
5. Change the total length of simulation to 12 hours.
6. In the Specify test settings screen, type Password1 as the Directory Access Password and Mailbox Account
Master Password, and click Continue with recipient management.
7. Create 2,000 users in the Mailbox Database, and click Continue.
8. To accept defaults for Advanced recipient settings, click Continue.
9. In the Specify test user groups screen, select the plus sign to add a user group.
10. Change the Client Type to Outlook 2007 Cached, the action profile to Outlook_300, and the Mailbox size to
250 MB, and click Continue.
11. In Remote configurations, check the checkbox to enable distributing the workload, enter the computer
names of all of the test clients, and click Continue.
12. Click Save the configuration file as, and name it testcfg.xml
13. Click Start the initialization phase (recommended before running the test).
14. Once you have initialized the database, create a backup copy of the Exchange mailbox databases.
A Principled Technologies report 27Improve datacenter energy efficiency with Intel Node Manager
Running the LoadGen test
To run the test, we installed the LoadGen client and server components and simulated 2,000 Exchange users
targeting the Exchange VM using LoadGen’s Exchange_300 Workload profile. We ran the LoadGen benchmark for 30
minutes.
For more details about LoadGen, see www.microsoft.com/download/en/details.aspx?displaylang=en&id=14060.
STORAGE-INTENSIVE WORKLOAD: DVD STORE METHODOLOGY
For DVD store testing, we installed a fresh copy of Windows Server 2012 R2 on the server under test. We also
installed SQL Server 2014 and deployed four SQL instances, each with a 100GB database. We ran the test for 45 minutes
using a .05 millisecond think time.
Installing Microsoft Windows Server 2012 R2 Datacenter Edition
1. Insert the installation media into the CD/DVD drive, and restart the server.
2. When the option appears, to enter the Boot Manager, press F11.
3. Select BIOS Boot Menu.
4. Select SATA Optical Drive, and press Enter.
5. When prompted to boot from DVD, press any key.
6. When the installation screen appears, click My language is English (United States).
7. Leave language, time/currency format, and input method as default, and click Next.
8. Click Install now.
9. When the installation prompts you, enter the product key.
10. Select Windows Server 2012 R2 Datacenter (Server with a GUI), and click Next.
11. Check I accept the license terms, and click Next.
12. Click Custom: Install Windows only (advanced).
13. Select Drive 0 Unallocated Space, and click Next. At this point, Windows begins automatically and restarts
automatically after completing.
14. When the Settings page appears, fill in the Password and Reenter Password fields with the same password.
15. Log in with the password you set up previously.
Configuring Windows Update
1. In the left pane of the Server Manager screen, click Local Server.
2. In the main frame, next to Windows Update, click Not configured.
3. In the Windows Update screen, in the main pane, click Let me choose my settings.
4. Under Important updates, select Never check for updates (not recommended), and click OK.
5. In the left pane, click Check for updates, and install all available updates.
6. Close the Windows Update screen.
Installing SQL Server 2014
1. Insert the installation DVD for SQL Server 2012 into the DVD drive.
A Principled Technologies report 28Improve datacenter energy efficiency with Intel Node Manager
2. Click Run SETUP.EXE. If Autoplay does not begin the installation, navigate to the SQL Server 2014 DVD, and
double-click it.
3. In the left pane, click Installation.
4. Click New SQL Server stand-alone installation or add features to an existing installation.
5. Select the Enter the product key radio button, and enter the product key. Click Next.
6. Click the checkbox to accept the license terms, and click Next.
7. Click Use Microsoft Update to check for updates, and click Next.
8. Click Install to install the setup support files.
9. If no failures are displayed, click Next.
10. At the Setup Role screen, choose SQL Server Feature Installation, and click Next.
11. At the Feature Selection screen, select Database Engine Services, Full-Text and Semantic Extractions for
Search, Client Tools Connectivity, Client Tools Backwards Compatibility, Management Tools – Basic, and
Management Tools – Complete. Click Next.
12. At the Installation Rules screen, after the check completes, click Next.
13. At the Instance configuration screen, leave the default selection of default instance, and click Next.
14. At the Server Configuration screen, choose NT ServiceSQLSERVERAGENT for SQL Server Agent, and choose
NT ServiceMSSQLSERVER for SQL Server Database Engine. Change the Startup Type to Automatic. Click
Next.
15. At the Database Engine Configuration screen, select the authentication method you prefer. (For our testing
purposes, we selected Mixed Mode.)
16. Enter and confirm a password for the system administrator account.
17. Click Add Current user. This may take several seconds.
18. Click Next.
19. At the Error and usage reporting screen, click Next.
20. At the Installation Configuration Rules screen, check that there are no failures or relevant warnings, and click
Next.
21. At the Ready to Install screen, click Install.
22. After installation completes, click Close.
23. Close the installation screen.
24. Navigate to the SQL Server 2014 DVD, and double-click it.
25. In the left pane, click Installation.
26. Click New SQL Server stand-alone installation or add features to an existing installation.
27. At the Installation Type screen, select Perform a new Installation of SQL Server 2014. Click Next.
28. Select the Enter the product key radio button, and enter the product key. Click Next.
29. Click the checkbox to accept the license terms, and click Next.
30. At the Setup Role screen, select SQL Feature Installation. Click Next.
31. At the Feature Selection screen, select Database Engine Services and Full-Text and Semantic Extractions for
Search. Click Next.
A Principled Technologies report 29Improve datacenter energy efficiency with Intel Node Manager
32. At the Instance Configuration screen, select named instance, and enter a name. Click Next.
33. At the Server Configuration screen, choose NT ServiceSQLSERVERAGENT for SQL Server Agent, and choose
NT ServiceMSSQLSERVER for SQL Server Database Engine. Change the Startup Type to Automatic. Click
Next.
34. At the Database Engine Configuration screen, select the authentication method you prefer. For our testing
purposes, we selected Mixed Mode.
35. Enter and confirm a password for the system administrator account.
36. Click Add Current user.
37. Click Next.
38. At the Installation Configuration Rules screen, check that there are no failures or relevant warnings, and click
Next.
39. At the Ready to Install screen, click Install.
40. After installation completes, click Close.
41. Repeat steps 4 - 40 to install three more SQL instances.
Configuring the database
We generated the database data using the Install.pl script included with DVD Store version 2.1 (DS2), providing
the parameters for our 100GB database size and the database platform on which we ran Microsoft SQL Server. We ran
the Install.pl script on a utility system running Linux. The Install.pl script generated the database schema.
After processing the data generation, we transferred the data files and schema creation files to a Windows-
based system running SQL Server. We built the 100GB database in SQL Server, and we performed a full backup, storing
the backup file remotely for quick access. We used that backup file to restore the server between test runs.
The only modifications we made to the schema creation scripts were the specified file sizes for our database. We
explicitly set the file sizes higher than necessary to ensure that no file-growth activity would affect the outputs of the
test. Other than this file size modification, we created and loaded the database in accordance with the DVD Store
documentation. Specifically, we followed these steps:
1. We generated the data, and created the database and file structure using database creation scripts in the
DS2 download. We made size modifications specific to our 100GB database, and made the appropriate
changes to drive letters.
2. We transferred the files from our Linux data generation system to a Windows system running SQL Server.
3. We created database tables, stored procedures, and objects using the provided DVD Store scripts.
4. We set the database recovery model to bulk-logged to prevent excess logging.
5. We loaded the data we generated into the database. For data loading, we used the import wizard in SQL
Server Management Studio. Where necessary, we retained options from the original scripts, such as Enable
Identity Insert.
6. We created indices, full-text catalogs, primary keys, and foreign keys using the database-creation scripts.
7. We updated statistics on each table according to database-creation scripts, which sample 18 percent of the
table data.
A Principled Technologies report 30Improve datacenter energy efficiency with Intel Node Manager
8. On the SQL Server instance, we created a ds2user SQL Server login using the following Transact SQL (TSQL)
script:
USE [master]
GO
CREATE LOGIN [ds2user] WITH PASSWORD=N’’,
DEFAULT_DATABASE=[master],
DEFAULT_LANGUAGE=[us_english],
CHECK_EXPIRATION=OFF,
CHECK_POLICY=OFF
GO
9. We set the database recovery model back to full.
10. We created the necessary full text index using SQL Server Management Studio.
11. We created a database user, and mapped this user to the SQL Server login.
12. We performed a full backup of the database. This backup allowed us to restore the databases to a pristine
state relatively quickly between tests.
Running the DVD Store tests
We created a series of batch files, SQL scripts, and shell scripts to automate the complete test cycle. DVD Store
outputs an orders-per-minute metric, which is a running average calculated through the test. In this report, we report
the last OPM reported by each client/target pair.
Each complete test cycle consisted of the following general steps:
1. Clean up prior outputs from the target system and the client driver system.
2. Drop the database from the target.
3. Restore the database on the target.
4. Shut down the target.
5. Reboot the host and client system.
6. Wait for a ping response from the server under test (the hypervisor system), the client system, and the target.
7. Let the test server idle for 20 minutes.
8. Start the DVD Store driver on the client.
We used the following DVD Store parameters for testing:
ds2sqlserverdriver.exe --target=<target_IP> --ramp_rate=10 --run_time=60 --
n_threads=32 --db_size=100GB --think_time=0.05 --detailed_view=Y --warmup_time=5
--csv_output=<drive path>
MEMORY-INTENSIVE WORKLOAD: SPECJJB METHODOLOGY
SPECjbb2005 requires Java Runtime Environment to run. We used Oracle HotSpot 64-bit server with Java version
1.7.0_65 for testing. We used the following steps to install Java.
A Principled Technologies report 31Improve datacenter energy efficiency with Intel Node Manager
Installing Java
1. Download Java installation file from https://java.com/en/download/.
2. Double click the installation file.
3. At the Welcome screen, select Change destination folder and click Install.
4. At destination folder, click Change.
5. Navigate to C: and click Make folder. Name the folder Java, and click Ok.
6. Click Next.
7. When the installation finishes, click Close.
Installing SPECjbb2005
The SPECjbb2005 benchmark has a main folder that must be copied over to the server under test. We copied
this folder to the test server and put in C:SPECjbb2005. We used SPECjbb2005 version 1.07 for testing.
For testing, we used four Java instances. We started the test with the default runit_multi. bat file in the
SPECjbb2005 directory. However, we used the following Java Options:
-Xmx64g -Xms64g -Xmn50g -XX:+UseParallelOldGC
-XX:-UseAdaptiveSizePolicy -XX:-UseBiasedLocking
CPU-INTENSIVE WORKLOAD: VDI TESTING METHODOLOGY
On the infrastructure servers, we installed and configured VMware View Horizon 6.0 to use a VMware vCenter
and VMware Composer Server. We created one automated, floating, linked clone pool, and configured the pool to use 1
GB of host cache. We configured the linked clones with two vCPUs and 1.5 GB of memory.
Configuring the VMs and storage
VM name Qty. OS Role Host(s) vCPUs Mem (GB) vDisk (GB)
DC1 1
Windows 2008
R2
Active Directory, DNS,
DHCP
Infrastructure 2 4 100
VSI_Share 1
Windows 2008
R2
Login VSI share Infrastructure 2 4 100
vCenter 1
Windows 2008
R2
VMware vCenter Infrastructure 4 8 100
Composer 1
Windows 2008
R2
VMware Composer Infrastructure 2 8 100
View 1
Windows 2008
R2
VMware View server Infrastructure 2 4 100
SQL 1
Windows 2008
R2
vCenter, and Composer DB
server
Infrastructure 2 4 100
L01-l06 6 Windows 7 (x64) Login VSI Launcher Infrastructure 2 8 40
View VMs 150 Windows 7 (x86) VMware Virtual Desktops Intel SUT 2 1.5 24
Figure 18: Detailed VM configuration.
We used the Login VSI 4.1 Knowledge Worker workload to generate a reproducible, real-world test case against
the virtual desktops pool. This workload simulated the execution of various applications, including Microsoft® Internet
A Principled Technologies report 32Improve datacenter energy efficiency with Intel Node Manager
Explorer®, Microsoft Office applications, and high definition videos. Using Login VSI, we could determine how many
virtual desktop users each solution could support.
We configured Login VSI to run in benchmark mode to create a default test environment in which we could
compare test results with each other. Login VSI measures the total response time of multiple operations from each
session, and at the beginning of each test, it samples a small set of virtual desktops to generate a VSImax Baseline. As
more sessions begin to consume system resources, response time degrades, and the VSI response time increases until it
reaches VSImax. VSImax is reached when the average VSI response time result reaches VSIbase + a 1000 ms latency
threshold. When this condition is met, the benchmark records a Login VSImax, which is the maximum number of
sessions that platform could support. Not reaching VSImax is an indication of good end user response time. For more
information about VSImax, see www.loginvsi.com/documentation/index.php?title=VSImax
Installing VMware ESXi 6.0 on the infrastructure servers and server under test
1. Attach the installation media.
2. Boot the server.
3. At the VMware Installer screen, press Enter.
4. To Accept and Continue at the EULA screen, press F11.
5. Under Storage Devices, select the appropriate virtual disk, and press Enter.
6. Select US as the keyboard layout, and press Enter.
7. Enter the root password twice, and press Enter.
8. Press F11 to start installation.
9. After the server reboots, press F2 and enter root credentials.
10. Select Configure Management Network, and press Enter.
11. Select the appropriate network adapter, and select OK.
12. Log into the server using the VMware vSphere client.
13. Select the Configuration tab, and click Networking.
14. Click Add Networking.
15. Create the management network.
16. To configure server time, click the Configuration tab, and select Time Configuration.
17. Click DNS and Routing, and confirm the settings.
Setting up a VM to host the Microsoft Windows Active Directory® server (DC1)
1. Connect to the infra1 server via the VMware vSphere client.
2. Log in as root
3. In the VMware vSphere client, under Basic Tasks, select Create a new virtual machine.
4. Choose Custom, and click Next.
5. Assign the name DC1 to the virtual machine, and click Next.
6. Select infra1 as the host, and click Next.
7. Select the appropriate storage, and click Next.
8. Choose Virtual Machine Version 11, and click Next.
9. Choose Windows, choose Microsoft Windows Server® 2008 R2 (64-bit), and click Next.
A Principled Technologies report 33Improve datacenter energy efficiency with Intel Node Manager
10. For CPUs, select one virtual processor socket and two cores per virtual socket, and click Next.
11. Choose 4 GB RAM, and click Next.
12. Click 1 for the number of NICs, select VMXNET3, connect to the PRIV-NET network, and click Next.
13. Leave the default virtual storage controller, and click Next.
14. Choose to create a new virtual disk, and click Next.
15. Make the OS virtual disk size 100 GB, choose thin-provisioned lazy zeroed, specify external storage, and click
Next.
16. Keep the default virtual device node (0:0), and click Next.
17. Click Finish.
18. Right-click the VM, and choose Edit Settings.
19. Click the Resources tab, and click Memory.
20. Select Reserve all guest memory, and click OK.
21. Connect the VM virtual CD-ROM to the Microsoft Windows Server 2008 R2 installation disk.
22. Start the VM.
Installing the Microsoft Windows Server 2008 R2 operating system on the VM
1. Open a virtual machine console on DC1.
2. Choose the language, time and currency, and keyboard input. Click Next.
3. Click Install Now.
4. Choose Windows Server 2008 R2 Enterprise (Full Installation), and click Next.
5. Accept the license terms, and click Next.
6. Click Custom.
7. Click the Disk, and click Drive options (advanced).
8. Click NewApplyFormat, and click Next.
9. After the installation completes, to set the Administrator password, click OK.
10. Enter the administrator password twice, and click OK.
11. Install VMware Tools. For more information, see
kb.vmware.com/selfservice/microsites/search.do?language=en_US&cmd=displayKC&externalId=340.
12. Reboot the server.
13. Connect the machine to the Internet, and install all available Windows updates. Restart as necessary.
14. Enable remote desktop access.
15. Change the hostname to DC1, and reboot when the installation prompts you.
16. Set up networking for the data network:
a. Click StartControl Panel, right-click Network Connections, and choose Open.
b. Right-click the VM traffic NIC, and choose Properties.
c. Uncheck TCP/IP (v6).
d. Select TCP/IP (v4), and choose Properties.
e. Set the IP address as 172.16.0.10/255.255.0.0
A Principled Technologies report 34Improve datacenter energy efficiency with Intel Node Manager
Installing Active Directory and DNS services on DC1
1. Click StartRun, type dcpromo, and click OK.
2. At the Active Directory Domain Services Installation Wizard welcome screen, check the Use advanced mode
installation option, and click Next.
3. In the Choose a Deployment Configuration dialog box, select Create a new domain in a new forest, and click
Next.
4. At the FQDN page, type domain.local, and click Next.
5. At the NetBIOS name prompt, leave the name domain, and click Next.
6. At the Forest Functionality level, select Windows Server 2008 R2, and click Next.
7. At the additional Domain Controller Options, leave DNS server selected, and click Next.
8. Assign a Directory Services Restore Mode Administrator account password, and click Next.
9. At the Summary screen, review your selections, and click Next.
10. Once Active Directory Domain Services finishes installing, click Finish, and restart the system.
11. Click StartRun, and type dnsmgmt.msc
12. Create a reverse lookup zone for DC1.
13. Create static entries for the three infrastructure servers and the five servers under test.
Configuring the Windows time service on DC1
To ensure reliable time, we pointed our Active Directory server to a physical NTP server.
1. Open a command prompt.
2. Type the following:
W32tm /config /syncfromflags:manual /manualpeerlist:"<ip address of a NTP
server>"
W32tm /config /reliable:yes
W32tm /config /update
W32tm /resync
Net stop w32time
Net start w32time
Setting up DHCP services on DC1
1. Click StartAdministrative ToolsServer ManagerAdd Roles.
2. Select DHCP Server, and click Next.
3. At the Introduction to DHCP Server screen, click Next.
4. At the Specify IPv4 DNS Settings screen, type domain.local for the parent domain.
5. Enter the preferred DNS server IPv4 address, and click Next.
6. At the Specify IPv4 WINS Server Settings screen, select WINS is not required for applications on the network, and
click Next.
7. At the Add or Edit DHCP Scopes screen, click Add.
8. At the Add Scope screen, enter the Name DHCP Scope name.
A Principled Technologies report 35Improve datacenter energy efficiency with Intel Node Manager
9. In the next box, set the following values, and click OK.
 Start IP address=172.16.2.1
 End IP address=172.16.100.200
 Subnet mask=255.255.0.0
10. Check Activate This Scope.
11. At the Add or Edit DHCP Scopes screen, click Next.
12. Click Enable DHCP v6 Stateless Mode, and click Next.
13. Leave the default IPv6 DNS Settings, and click Next.
14. At the Authorize DHCP server dialog box, select Use current credentials.
15. At the Confirm Installation Selections screen, click Next. If the installation is set up correctly, a screen displays
saying the DHCP server install succeeded.
16. Click Close.
Setting up a VM to host the vCenter server (vCenter)
1. Log into the infra1 server with the VMware vSphere client.
2. In the VMware vSphere client, under Basic Tasks, select Create a new virtual machine.
3. Choose Custom, and click Next.
4. Assign the name vCenter to the virtual machine, and click Next.
5. Select infra1 as the host, and click Next.
6. Select the appropriate storage, and click Next.
7. Choose Virtual Machine Version 8, and click Next.
8. Choose Windows, choose Microsoft Windows Server 2008 R2 (64-bit), and click Next.
9. For CPUs, select one virtual processor socket, and four cores per virtual socket, and click Next.
10. Choose 8GB RAM, and click Next.
11. For the number of NICs, click 1; select VMXNET3; connect to the PRIV-NET port group; and click Next.
12. Leave the default virtual storage controller, and click Next.
13. Keep the default virtual device node (0:0), and click Next.
14. Connect the VM virtual CD-ROM to the Microsoft Windows 2008 R2 installation disk.
15. Click Finish.
16. Right-click the vCenter VM, and click Edit settings.
17. Click the Resources tab, click Memory, check the Reserve all guest memory checkbox, and click OK.
18. Start the VM.
Installing the Microsoft Windows Server 2008 R2 operating system on the VM
1. Open a virtual machine console on vCenter.
2. Choose the language, time and currency, and keyboard input. Click Next.
3. Click Install Now.
4. Choose Windows Server 2008 R2 Enterprise (Full Installation), and click Next.
5. Accept the license terms, and click Next.
6. Click Custom.
A Principled Technologies report 36Improve datacenter energy efficiency with Intel Node Manager
7. Click the Disk, and click Drive options (advanced).
8. Click NewApplyFormat, and click Next.
9. After the installation completes, to set the Administrator password, click OK.
10. Enter the administrator password twice, and click OK.
11. Install VMware Tools. For more information, see
kb.vmware.com/selfservice/microsites/search.do?language=en_US&cmd=displayKC&externalId=340.
12. Reboot.
13. Connect the machine to the Internet, and install all available Windows updates. Restart as necessary.
14. Enable remote desktop access.
15. Change the hostname to vCenter, and reboot when the installation prompts you.
16. Set up networking for the data network:
a. Click Start, click Control Panel, right-click Network Connections, and choose Open.
b. Right-click the VM traffic NIC, and choose Properties.
c. Uncheck the TCP/IP (v6) checkbox.
d. Select TCP/IP (v4), and choose Properties.
e. Set the IP address, subnet, gateway, and DNS server.
17. Join the domain.local domain.
18. Reboot the system.
Setting up a VM to host Microsoft SQL Server (SQL) for infrastructure
1. Connect to the infra1 server via the VMware vSphere client.
2. Log in as root
3. In the VMware vSphere client, under Basic Tasks, select Create a new virtual machine.
4. Choose Custom, and click Next.
5. Assign the name SQL to the virtual machine, and click Next.
6. Select infra1 as the host, and click Next.
7. Select the appropriate storage, and click Next.
8. Choose Virtual Machine Version 11, and click Next.
9. Choose Windows, choose Microsoft Windows Server 2008 R2 (64-bit), and click Next.
10. For CPUs, select one virtual processor socket, select two cores per virtual socket, and click Next.
11. Choose 4 GB RAM, and click Next.
12. Click 1 for the number of NICs, select VMXNET3, connect to the PRIV-NET network, and click Next.
13. Leave the default virtual storage controller, and click Next.
14. Choose to create a new virtual disk, and click Next.
15. Make the OS virtual disk size 100 GB, choose thin-provisioned lazy zeroed, specify external storage, and click
Next.
16. Keep the default virtual device node (0:0), and click Next.
17. Click Finish.
18. Right-click the VM, and choose Edit Settings.
A Principled Technologies report 37Improve datacenter energy efficiency with Intel Node Manager
19. Click the Resources tab, and click Memory.
20. Select Reserve all guest memory, and click OK.
21. Connect the VM virtual CD-ROM to the Microsoft Windows Server 2008 R2 installation disk.
22. Start the VM.
Installing the Microsoft Windows Server 2008 R2 operating system on the VM
1. Open a virtual machine console on SQL.
2. Choose the language, time and currency, and keyboard input. Click Next.
3. Click Install Now.
4. Choose Windows Server 2008 R2 Enterprise (Full Installation), and click Next.
5. Accept the license terms, and click Next.
6. Click Custom.
7. Click the Disk, and click Drive options (advanced).
8. Click NewApplyFormat, and click Next.
9. After the installation completes, to set the Administrator password, click OK.
10. Enter the administrator password twice, and click OK.
11. Install VMware Tools. For more information, see
kb.vmware.com/selfservice/microsites/search.do?language=en_US&cmd=displayKC&externalId=340.
12. Reboot the server.
13. Connect the machine to the Internet, and install all available Windows updates. Restart as necessary.
14. Enable remote desktop access.
15. Change the hostname to SQL, and reboot when the installation prompts you.
16. Set up networking for the data network:
a. Click StartControl Panel, right-click Network Connections, and choose Open.
b. Right-click the VM traffic NIC, and choose Properties.
c. Uncheck the TCP/IP (v6) checkbox.
d. Select TCP/IP (v4), and choose Properties.
e. Set the IP address, subnet, gateway, and DNS server.
Installing Microsoft SQL Server 2008 R2
1. Insert the installation media, and to install .NET framework, click OK.
2. Wait for the SQL Installer to launch. On the left menu, click Installation.
3. Click New installation or add features to an existing installation. Click OK.
4. Enter the Product Key, and click Next.
5. Check the I accept the license terms checkbox, and click Next.
6. To install the Setup Support Files (required), click Install.
7. Resolve any issues displayed in the setup wizard, and click Next.
8. At the Setup Role screen, select SQL Server Feature Installation, and click Next.
9. Select Database Engine Services, Full-Text Search, Client Tools Backwards Compatibility, and Management Tools
Basic and Complete, and click Next twice.
A Principled Technologies report 38Improve datacenter energy efficiency with Intel Node Manager
10. Accept instance configuration defaults, and click Next.
11. Accept defaults for disk space requirements, and click Next.
12. Click Use the same account for all SQL Server services, select NT AuthoritySystem, and click OK. Click Next.
13. Select Mixed Mode, and enter a password for the SA account. Click Add Current User, and click Next.
14. Accept defaults for error reporting, and click Next.
15. Review installation configuration rules check, and click Next.
16. To begin the installation, click Install.
17. At the completion screen, click Close.
18. Run Windows Update to receive all updates and security patches.
Setting up databases for vCenter and VMware View™ Composer
1. Log on to SQL as DOMAINadministrator
2. From the server desktop, open StartAll ProgramsMicrosoft SQL Server 2008 R2Configuration ToolsSQL
Server Configuration Manager.
3. Click SQL Server Network ConfigurationProtocols for MSSQLSERVER.
4. Right-click TCP/IP, and select Enabled.
5. Click SQL Services, right-click SQL Server Browser, and select Properties.
6. In the SQL Server Browser Properties, select the Services tab, change the Start mode to Automatic, and click OK.
Repeat this step for the SQL Server Agent service.
7. Start the SQL Server Browser service and the SQL Server Agent service.
8. From the SQL Server desktop, open StartAll ProgramsMicrosoft SQL Server 2008 R2Configuration
ToolsSQL Server Management Studio.
9. Click Connect.
10. Select the Databases folder, right-click, and select New Database.
11. Provide the name vCenter for the new database.
12. Select the Databases folder, right-click, and select New Database.
13. Provide the name composer for the new database.
14. Click Options, change the recovery model from full to simple, and click OK.
Setting up an ODBC DSN on vCenter
1. Log into vCenter as DOMAINadministrator
2. Click Options, change the recovery model from full to simple, and click OK.
3. From the desktop of the vCenter server, select Start, Run, and type odbcad32.exe. Press Enter.
4. Click the system DSN tab.
5. Click Add.
6. Click SQL Server Native Client 10.0, and click Finish.
7. In the Create a New Data Source to SQL Server text box, type the connection name vcenter
8. For Server, select SQL, and click Next.
9. Change authentication to With SQL Server authentication using a login ID and password entered by the user,
type sa as the Login ID, use the password you defined in SQL Server setup for the SA account, and click Next.
A Principled Technologies report 39Improve datacenter energy efficiency with Intel Node Manager
10. From the pull-down menu, select Change the default database to choose vCenter, and click Next.
11. Click Finish.
12. To confirm correct configuration, click Test Data Source…
13. To create the vCenter ODBC connection, click OK.
Installing VMware vCenter 6.0
1. Log into vCenter as DOMAINadministrator
2. From the VMware vCenter 6 install media, click Autorun.
3. To start the install wizard, click Run.
4. Select vCenter Server for Windows, and click Install.
5. At the Install wizard welcome screen, click Next.
6. Accept the End User License Agreement, and click Next.
7. Select embedded deployment and the deployment type, and click Next.
8. Verify the system name, and click Next.
9. Enter and confirm the password you wish to use with the Administrator account for vCenter Single Sign On, and
click Next.
10. Select Use Windows Local System Account and the service account, and click Next.
11. Select Use an external database, and enter database credentials. Click Next.
12. At the Configure Ports screen, click Next.
13. Accept the default installation path, and click Next.
14. Click Install.
15. Using the vSphere web client, log into the vCenter server as DOMAINadministrator
16. Right-click the root of vCenter, and click New Data center.
17. Name the new datacenter datacenter
18. Add the servers under test and infrastructure servers to the datacenter.
Setting up a VM to host VMWare View Composer
1. Log into vCenter via the VMware Web client.
2. Click the Virtual Machines tab.
3. Right-click, and choose New Virtual Machine.
4. Select Create a new virtual machine.
5. Choose Custom, and click Next.
6. Assign the name composer to the virtual machine, and click Next.
7. Select infra1 as the host, and click Next.
8. Select the appropriate storage, and click Next.
9. Choose Virtual Machine Version 11, and click Next.
10. Choose Windows, choose Microsoft Windows Server 2008 R2 (64-bit), and click Next.
11. For CPUs, select one virtual processor socket, select four cores per virtual socket, and click Next.
12. Choose 8GB RAM, and click Next.
13. For the number of NICs, click 1; select VMXNET3; connect to the PRIV-NET port group; and click Next.
A Principled Technologies report 40Improve datacenter energy efficiency with Intel Node Manager
14. Leave the default virtual storage controller, and click Next.
15. Keep the default virtual device node (0:0), and click Next.
16. Connect the VM virtual CD-ROM to the Microsoft Windows 2008 R2 installation disk.
17. Click Finish.
18. Right-click the composer VM, and click Edit settings.
19. Click the Resources tab, click Memory, check the Reserve all guest memory checkbox, and click OK.
20. Start the VM.
Installing the Microsoft Windows Server 2008 R2 operating system on the VM
1. Open a virtual machine console on the composer VM.
2. Choose the language, time and currency, and keyboard input. Click Next.
3. Click Install Now.
4. Choose Windows Server 2008 R2 Enterprise (Full Installation), and click Next.
5. Accept the license terms, and click Next.
6. Click Custom.
7. Click the Disk, and click Drive options (advanced).
8. Click NewApplyFormat, and click Next.
9. After the installation completes, to set the Administrator password, click OK.
10. Enter the administrator password twice, and click OK.
11. Install VMware Tools. For more information, see
kb.vmware.com/selfservice/microsites/search.do?language=en_US&cmd=displayKC&externalId=340.
12. Reboot.
13. Connect the machine to the Internet, and install all available Windows updates. Restart as necessary.
14. Enable remote desktop access.
15. Change the hostname to composer, and reboot when the installation prompts you.
16. Set up networking for the data network:
a. Click Start, click Control Panel, right-click Network Connections, and choose Open.
b. Right-click the VM traffic NIC, and choose Properties.
c. Uncheck the TCP/IP (v6) checkbox.
d. Select TCP/IP (v4), and choose Properties.
e. Set the IP address, subnet, gateway, and DNS server.
17. Join the domain.local domain.
18. Reboot the system.
Setting up a database and ODBC DSN for VMware View Composer
1. Log on to the composer VM as DOMAINadministrator
2. From the desktop of the vCenter server, select Start, select Run, type odbcad32.exe and press Enter.
3. Click the system DSN tab.
4. Click Add.
5. Click SQL Server Native Client 10.0, and click Finish.
A Principled Technologies report 41Improve datacenter energy efficiency with Intel Node Manager
6. In the text box named Create a New Data Source to SQL Server, type the connection name composer
7. For Server, select SQL, and click Next.
8. Change authentication to With SQL Server authentication using a login ID and password entered by the user,
type sa as the Login ID, use the password you defined in SQL Server setup for the SA account, and click Next.
9. Select Change the default database to:, choose composer from the pull-down menu, and click Next.
10. Click Finish.
11. To confirm correct configuration, click Test Data Source…
12. To create the Composer ODBC connection, Click OK.
Setting up VMware Horizon View Composer 6
1. Open the View 5 media folder, and run the file named VMware-viewcomposer-6.0.1
2. At the Welcome screen and the Patents screen, click Next.
3. Accept the VMware end user license agreement, and click Next.
4. Leave the Destination folder as default, and click Next.
5. In the Database information box, type composer as the source name and sa as the user name. Enter the
password, and click Next.
6. Leave the default SOAP port, and click Next.
7. Click Install, and click Finish.
8. Restart the server.
Setting up a VM to host the VMware View connection server
1. Log into vCenter via the VMware Web client.
2. Click the Virtual Machines tab.
3. Right-click, and choose New Virtual Machine.
4. Select Create a new virtual machine.
5. Choose Custom, and click Next.
6. Assign the name View to the virtual machine, and click Next.
7. Select infrastructure for the host, and click Next.
8. Select the appropriate storage, and click Next.
9. Choose Virtual Machine Version 11, and click Next.
10. Choose Windows, choose Microsoft Windows Server 2008 R2 (64-bit), and click Next.
11. For CPUs, select one virtual processor socket, select two cores per virtual socket, and click Next.
12. Choose 4GB RAM, and click Next.
13. For the number of NICs, click 1; select VMXNET 3; connect to the PRIV-NET port group; and click Next.
14. Leave the default virtual storage controller, and click Next.
15. Choose to create a new virtual disk, and click Next.
16. Make the OS virtual disk size 100 GB, choose thick-provisioned lazy zeroed, specify the OS datastore on the
external storage, and click Next.
17. Keep the default virtual device node (0:0), and click Next.
18. Connect the VM virtual CD-ROM to the Microsoft Windows Server 2008 R2 installation disk.
A Principled Technologies report 42Improve datacenter energy efficiency with Intel Node Manager
19. Right-click the View Connection VM, and click Edit settings.
20. Click the Resources tab, click Memory, check the Reserve all guest memory checkbox, and click OK.
21. Click Finish.
22. Start the VM.
Installing the Microsoft Windows Server 2008 R2 operating system on the VM
1. Open a virtual machine console on the View VM.
2. Choose the language, time and currency, and keyboard input. Click Next.
3. Click Install Now.
4. Choose Windows Server 2008 R2 Enterprise (Full Installation), and click Next.
5. Accept the license terms, and click Next.
6. Click Custom.
7. Click the Disk, and click Drive options (advanced).
8. Click NewApplyFormat, and click Next.
9. After the installation completes, to set the Administrator password, click OK.
10. Enter the administrator password twice, and click OK.
11. Install VMware Tools. For more information, see
kb.vmware.com/selfservice/microsites/search.do?language=en_US&cmd=displayKC&externalId=340.
12. Reboot.
13. Connect the machine to the Internet, and install all available Windows updates. Restart as necessary.
14. Enable remote desktop access.
15. Change the hostname to View, and reboot when the installation prompts you.
16. Set up networking for the data network:
a. Click Start, click Control Panel, right-click Network Connections, and choose Open.
b. Right-click the VM traffic NIC, and choose Properties.
c. Uncheck the TCP/IP (v6) checkbox.
d. Select TCP/IP (v4), and choose Properties.
e. Set the IP address, subnet, gateway, and DNS server.
17. Join the VDI domain.
18. Reboot the system.
Installing the VMware View Connection Server 6
1. Log into the server named View Connection.
2. Browse to VMware View installation media, and click VMware-viewconnectionserver-x86_64-6.0.1.
3. Click Run.
4. At the Welcome screen, click Next.
5. Agree to the End User License Agreement, and click Next.
6. Keep the default installation directory, and click Next.
7. Select View Standard Server, and click Next.
8. At the Data Recovery screen, enter a backup password, and click Next.
9. Allow View Server to configure the Windows firewall automatically, and click Next.
A Principled Technologies report 43Improve datacenter energy efficiency with Intel Node Manager
10. Authorize the local administrator to administer View, and click Next.
11. Choose whether to participate in the customer experience improvement program, and click Next.
12. To finish installing View Connection Server, complete the installation wizard.
13. Click Finish.
14. Reboot server.
Configuring the VMware Horizon View Connection Server
1. Open a Web browser to <view connection server FQDN>/admin
2. Log in as administrator
3. Under Licensing, click Edit License...
4. Enter a valid license serial number, and click OK.
5. Open View ConfigurationServers.
6. In the vCenter Servers tab, click Add.
7. Enter vCenter Server credentials, and click Next.
8. At the View composer screen, select View Composer co-installed with vCenter Server, and click Next.
9. At the View composer domains screen, click Add.
10. Enter full domain name and user credentials.
11. At the storage screen, select Reclaim VM disk space, and select Enable View Storage Accelerator.
12. Change the Default host cache size to 1.5GB, and click Next.
13. At the ready to complete screen, click Finish.
Setting up a Windows 7 Enterprise (x86) ESXi base image VM
1. Log into vCenter via the VMware Web client.
2. Click the Virtual Machines tab.
3. Right-click, and choose New Virtual Machine.
4. Select Create a new virtual machine.
5. Choose Custom, and click Next.
6. Assign the name View-gold, and click Next.
7. Select the appropriate host, and click Next.
8. Select the appropriate storage.
9. Choose Virtual Machine Version 11, and click Next.
10. Choose Windows, choose Microsoft Windows 7 (32-bit), and click Next.
11. For CPUs, select one virtual processor socket, select two cores per virtual socket, and click Next.
12. Choose 1.5 GB RAM, and click Next.
13. For the number of NICs, click 1; select VMXNET 3; and click Next.
14. Leave the default virtual storage controller, and click Next.
15. Choose to create a new virtual disk, and click Next.
16. Make the OS virtual disk size 24 GB, choose Thin Provision, specify the OS datastore on the external storage, and
click Next.
17. Keep the default virtual device node (0:0), and click Next.
A Principled Technologies report 44Improve datacenter energy efficiency with Intel Node Manager
18. Click Finish.
19. Click the Hardware tab, CD/DVD Drive, and connect the VM virtual CD-ROM to the Microsoft Windows 7 x86
installation disk.
20. Click OK.
Installing Windows 7 Enterprise (x86) on ESXi base image VM
1. When the installation prompts you, press any key to begin setup.
2. Enter your language preferences, and click Next.
3. Click Install.
4. Accept the license terms, and click Next.
5. Select Custom, and select the drive that will contain the OS.
6. Click Install.
7. Type user for the username, and click Next.
8. Enter no password, and click Next.
9. At the system protection screen, select Use recommended settings, and click Next.
10. Enter your time zone, and click Next.
11. Select the Work Network setting, and click Next.
12. Install VMware Tools, and select Complete Installation. For more information, see
kb.vmware.com/selfservice/microsites/search.do?language=en_US&cmd=displayKC&externalId=340.
13. Reboot.
14. Connect the machine to the Internet, and install all available Windows updates. Restart as necessary.
15. Join the domain and restart the VM.
16. Install Microsoft Office Professional Plus 2010.
Installing the VMware Horizon View 6 agent
1. Browse to the VMware Horizon View 6 media, and run the VMware-viewagent file.
2. Click Run.
3. At the Welcome screen, click Next.
4. Accept the VMware end user license agreement, and click Next.
5. Select defaults, and click Next.
6. Click Install.
Configuring Regedit for QuickPrep
1. Click StartRun, and type regedit
2. Browse to HKEY_LOCAL_MACHINESYSTEMCurrentControlSetServicesvmware-viewcomposer-ga.
3. Right-click SkipLicenseActivation, and click Modify.
4. Change the value from 0 to 1.
5. Shut down the machine, and take a snapshot of the final disk image.
Deploying Virtual Desktops using VMware Horizon View
1. Open the View Administrator.
2. Log in as administrator
3. Under Inventory, click Pools, and click Add.
A Principled Technologies report 45Improve datacenter energy efficiency with Intel Node Manager
4. Select Automatic Pool, and click Next.
5. Select Dedicated, and click Next.
6. Select View Composer linked clones, and click Next.
7. For the pool ID and display name, type pool, and click Next.
8. Leave the pool settings as defaults, and click Next.
9. Under Naming Pattern, enter an appropriate name pattern for the pool.
10. Under Pool Sizing, type 150 for Max number of desktops and the number of spare (power on) desktops.
11. Select Provision all desktops up-front, and click Next.
12. Select the defaults under View Composer Disks, and click Next.
13. Under Storage Optimization, select Do not use VMware Virtual SAN.
14. Under vCenter Settings, select one of the following, depending on where you are deploying virtual machines:
 Parent VM
 Snapshot
 VM folder location
 Host or cluster
 Resource pool
 Datastores
15. Under Advanced Storage Options, select Use View Storage Accelerator (OS disk, 7 days).
16. Under Guest customization, select the following:
 Domain: domain.local
 AD container: OU=Computers,OU=LoginVSI
17. Select Use Quick Prep, and click Next.
18. Click Finish.
19. After this wizard finishes, select Entitle users.
20. Select the LoginVSI group and click OK.
Installing the Login VSI 4 benchmark
Setting up a VM to host the Login VSI share
1. Connect to an infrastructure server via the VMware web client.
2. In the VMware vSphere client, under Basic Tasks, select Create a new virtual machine.
3. Choose Custom, and click Next.
4. Assign the name VSI_share to the virtual machine, and click Next.
5. Select infra1 as the host, and click Next.
6. Select the appropriate storage, and click Next.
7. Choose Virtual Machine Version 11, and click Next.
8. Choose Windows, choose Microsoft Windows Server 2008 R2 (64-bit), and click Next.
9. For CPUs, select one virtual processor socket, select two cores per virtual socket, and click Next.
10. Choose 4 GB RAM, and click Next.
11. For the number of NICs, click 1; select VMXNET3; connect to the PRIV-NET network; and click Next.
A Principled Technologies report 46Improve datacenter energy efficiency with Intel Node Manager
12. Leave the default virtual storage controller, and click Next.
13. Choose to create a new virtual disk, and click Next.
14. Make the OS virtual disk size 100 GB, choose thin-provisioned lazy zeroed, specify external storage, and click
Next.
15. Keep the default virtual device node (0:0), and click Next.
16. Click Finish.
17. Right-click the VM, and choose Edit Settings.
18. Click the Resources tab, and click Memory.
19. Select Reserve all guest memory, and click OK.
20. Connect the VM virtual CD-ROM to the Microsoft Windows Server 2008 R2 installation disk.
21. Start the VM.
Installing the Microsoft Windows Server 2008 R2 operating system on the VM
1. Open a virtual machine console on VSIshare.
2. Choose the language, time and currency, and keyboard input. Click Next.
3. Click Install Now.
4. Choose Windows Server 2008 R2 Enterprise (Full Installation), and click Next.
5. Accept the license terms, and click Next.
6. Click Custom.
7. Click the Disk, and click Drive options (advanced).
8. Click NewApplyFormat, and click Next.
9. After the installation completes, click OK to set the Administrator password.
10. Enter the administrator password twice, and click OK.
11. Install VMware Tools. For more information, see
kb.vmware.com/selfservice/microsites/search.do?language=en_US&cmd=displayKC&externalId=340.
12. Reboot the server.
13. Connect the machine to the Internet, and install all available Windows updates. Restart as necessary.
14. Enable remote desktop access.
15. Change the hostname to VSIShare, and reboot when the installation prompts you.
16. Set up networking for the data network:
a. Click StartControl Panel, right-click Network Connections, and choose Open.
b. Right-click the VM traffic NIC, and choose Properties.
c. Uncheck the TCP/IP (v6) checkbox.
d. Select TCP/IP (v4), and choose Properties.
e. Set the IP address, subnet, gateway, and DNS server.
Installing the Login VSI benchmark on VSI_share
1. Log into VSI_Share.
2. Create a folder named c:share
3. Right-click the c:share folder, and click Properties.
A Principled Technologies report 47Improve datacenter energy efficiency with Intel Node Manager
4. Click the Sharing tab, and click Share.
5. Add everyone, system, and administrators to the Read/Write group, and click Share.
6. Unpack the Login VSI install media.
7. Open Datacenter setupsetup.exe.
8. At the welcome screen, click Next.
9. Select the share named vsishareshare, and click Next.
10. To start the Management Console when the setup is completed, check the Start Login VSI Management Console
checkbox, and click Finish.
11. At the management console, enter the path to your login VSI license file, and click save.
Configuring Login VSI: AD setup
1. Open the VSI management console and click 1. AD setup.
2. Enter the following:
Base OU DC=domain,DC=local
Username LoginVSI
Password (enter password here)
Domain (auto detect checked)
Number of users 150
Formatting length 1
Launcher user Launcher-v4
Launcher password (enter password here)
Click save to .ps1
3. Copy the VSIADSetup.ps1 file to DC1c$
4. Log into DC1, and execute the VSIADSetup.ps1 in Windows PowerShell™.
Creating Windows 7 Enterprise x64 image VSI Launchers
Using the vSphere client, we created a Windows 7 Enterprise x64 VM with 2 vCPUs and 8 GB of memory.
Installing VMware View Client on the launcher
1. Accept the VMware license terms.
2. Select default options.
3. Accept or change the destination folder.
4. Click Install.
Installing Virtual Audio Cable
By default, the virtual launchers cannot render audio, so we installed Virtual Audio Cable version 4.10 from
software.muzychenko.net/eng/vac.htm.
1. Download and extract the media.
2. Click Setup.
3. To begin the install, click Yes.
4. To accept the software license agreement, click I accept.
5. Click Install.
A Principled Technologies report 48Improve datacenter energy efficiency with Intel Node Manager
Converting the launcher VM to a template
1. In vSphere Client, right-click the launcher VM, and select TemplateConvert to Template.
Deploying the launchers VM from the launcher template
1. In vSphere Client, browse to HomeVMs and Templates.
2. To deploy a virtual machine from the template, right-click the launcher template.
3. As the new VM name, type launcher_1, and click Next.
4. Click Datacenter, and click Next.
5. Click the launcher server, and click Next.
6. Select the appropriate storage, and click Next.
7. Select customization using existing customization specifications, select the appropriate file, and click Next.
8. To deploy the new VM, click Finish.
9. Repeat steps 1 through 8 to deploy more launchers.
Configuring VSI Launchers for testing
After all 6 launchers are configured and in an idle state, configure the Login VSI test harness to add them to
available launcher capacity.
1. Log on to VSI_Share as DOMAINadministrator.
2. Open the Login VSI management console.
3. Click 2. Add Launchers.
4. At the Add launchers wizard, click Next.
5. Click batch entry and enter the following:
Name=launcher
Start number=1
Increment=1
Count=6
Maximum capacity=30
Formatting length=2
6. Click Next.
7. Click Finish.
Running the Login VSI benchmark
Before we ran our test, we executed assign_user.ps1 on the VMware View server and statically assigned
login_VSI users to virtual desktops, so persona data would not be created randomly in testing. Next, we ran a profile
create job in Login VSI to fully initialize each user’s profile. Finally, we used six launchers to run a Knowledge Worker
workload. For more information on how to run a Login VSI test, see
www.loginvsi.com/documentation/index.php?title=Main_Page.
A Principled Technologies report 49Improve datacenter energy efficiency with Intel Node Manager
ABOUT PRINCIPLED TECHNOLOGIES
Principled Technologies, Inc.
1007 Slater Road, Suite 300
Durham, NC, 27703
www.principledtechnologies.com
We provide industry-leading technology assessment and fact-based
marketing services. We bring to every assignment extensive experience
with and expertise in all aspects of technology testing and analysis, from
researching new technologies, to developing new methodologies, to
testing with existing and new tools.
When the assessment is complete, we know how to present the results to
a broad range of target audiences. We provide our clients with the
materials they need, from market-focused data to use in their own
collateral to custom sales aids, such as test reports, performance
assessments, and white papers. Every document reflects the results of
our trusted independent analysis.
We provide customized services that focus on our clients’ individual
requirements. Whether the technology involves hardware, software, Web
sites, or services, we offer the experience, expertise, and tools to help our
clients assess how it will fare against its competition, its performance, its
market readiness, and its quality and reliability.
Our founders, Mark L. Van Name and Bill Catchings, have worked
together in technology assessment for over 20 years. As journalists, they
published over a thousand articles on a wide array of technology subjects.
They created and led the Ziff-Davis Benchmark Operation, which
developed such industry-standard benchmarks as Ziff Davis Media’s
Winstone and WebBench. They founded and led eTesting Labs, and after
the acquisition of that company by Lionbridge Technologies were the
head and CTO of VeriTest.
Principled Technologies is a registered trademark of Principled Technologies, Inc.
All other product names are the trademarks of their respective owners.
Disclaimer of Warranties; Limitation of Liability:
PRINCIPLED TECHNOLOGIES, INC. HAS MADE REASONABLE EFFORTS TO ENSURE THE ACCURACY AND VALIDITY OF ITS TESTING, HOWEVER,
PRINCIPLED TECHNOLOGIES, INC. SPECIFICALLY DISCLAIMS ANY WARRANTY, EXPRESSED OR IMPLIED, RELATING TO THE TEST RESULTS AND
ANALYSIS, THEIR ACCURACY, COMPLETENESS OR QUALITY, INCLUDING ANY IMPLIED WARRANTY OF FITNESS FOR ANY PARTICULAR PURPOSE.
ALL PERSONS OR ENTITIES RELYING ON THE RESULTS OF ANY TESTING DO SO AT THEIR OWN RISK, AND AGREE THAT PRINCIPLED
TECHNOLOGIES, INC., ITS EMPLOYEES AND ITS SUBCONTRACTORS SHALL HAVE NO LIABILITY WHATSOEVER FROM ANY CLAIM OF LOSS OR
DAMAGE ON ACCOUNT OF ANY ALLEGED ERROR OR DEFECT IN ANY TESTING PROCEDURE OR RESULT.
IN NO EVENT SHALL PRINCIPLED TECHNOLOGIES, INC. BE LIABLE FOR INDIRECT, SPECIAL, INCIDENTAL, OR CONSEQUENTIAL DAMAGES IN
CONNECTION WITH ITS TESTING, EVEN IF ADVISED OF THE POSSIBILITY OF SUCH DAMAGES. IN NO EVENT SHALL PRINCIPLED TECHNOLOGIES,
INC.’S LIABILITY, INCLUDING FOR DIRECT DAMAGES, EXCEED THE AMOUNTS PAID IN CONNECTION WITH PRINCIPLED TECHNOLOGIES, INC.’S
TESTING. CUSTOMER’S SOLE AND EXCLUSIVE REMEDIES ARE AS SET FORTH HEREIN.

More Related Content

What's hot

Increase density and performance with upgrades from Intel and Microsoft
Increase density and performance with upgrades from Intel and MicrosoftIncrease density and performance with upgrades from Intel and Microsoft
Increase density and performance with upgrades from Intel and Microsoft
Principled Technologies
 
Dell PowerEdge C4130 & NVIDIA Tesla K80 GPU accelerators
Dell PowerEdge C4130 & NVIDIA Tesla K80 GPU acceleratorsDell PowerEdge C4130 & NVIDIA Tesla K80 GPU accelerators
Dell PowerEdge C4130 & NVIDIA Tesla K80 GPU accelerators
Principled Technologies
 
Alinean whitepaper: Server Consolidation for Oracle E-Business Suite with IBM...
Alinean whitepaper: Server Consolidation for Oracle E-Business Suite with IBM...Alinean whitepaper: Server Consolidation for Oracle E-Business Suite with IBM...
Alinean whitepaper: Server Consolidation for Oracle E-Business Suite with IBM...
IBM India Smarter Computing
 
VMware Report Draft v2.1
VMware Report Draft v2.1VMware Report Draft v2.1
VMware Report Draft v2.1
John White
 

What's hot (20)

Media and entertainment workload comparison: HP Z8 vs. Apple Mac Pro
Media and entertainment workload comparison: HP Z8 vs. Apple Mac ProMedia and entertainment workload comparison: HP Z8 vs. Apple Mac Pro
Media and entertainment workload comparison: HP Z8 vs. Apple Mac Pro
 
Increase density and performance with upgrades from Intel and Microsoft
Increase density and performance with upgrades from Intel and MicrosoftIncrease density and performance with upgrades from Intel and Microsoft
Increase density and performance with upgrades from Intel and Microsoft
 
Back up deduplicated data in less time with the Dell DR6000 Disk Backup Appli...
Back up deduplicated data in less time with the Dell DR6000 Disk Backup Appli...Back up deduplicated data in less time with the Dell DR6000 Disk Backup Appli...
Back up deduplicated data in less time with the Dell DR6000 Disk Backup Appli...
 
Accelerate your growth potential
Accelerate your growth potentialAccelerate your growth potential
Accelerate your growth potential
 
Database Performance of Intel Cache Acceleration Software
Database Performance of Intel Cache Acceleration SoftwareDatabase Performance of Intel Cache Acceleration Software
Database Performance of Intel Cache Acceleration Software
 
9. intel prez sesiune hw
9. intel prez sesiune hw9. intel prez sesiune hw
9. intel prez sesiune hw
 
Efficient Data Center Virtualization with QLogic 10GbE Solutions from HP
Efficient Data Center Virtualization with QLogic 10GbE Solutions from HPEfficient Data Center Virtualization with QLogic 10GbE Solutions from HP
Efficient Data Center Virtualization with QLogic 10GbE Solutions from HP
 
Enable greater data reduction and storage performance with Dell EMC PowerStor...
Enable greater data reduction and storage performance with Dell EMC PowerStor...Enable greater data reduction and storage performance with Dell EMC PowerStor...
Enable greater data reduction and storage performance with Dell EMC PowerStor...
 
Improving your PUE while consolidating into an existing live data center
Improving your PUE while consolidating into an existing live data centerImproving your PUE while consolidating into an existing live data center
Improving your PUE while consolidating into an existing live data center
 
White Paper: MoreVRP for EMC Greenplum
White Paper: MoreVRP for EMC Greenplum  White Paper: MoreVRP for EMC Greenplum
White Paper: MoreVRP for EMC Greenplum
 
A Dell Latitude 5420 laptop powered by a four-core Intel Core i5-1145G7 vPro ...
A Dell Latitude 5420 laptop powered by a four-core Intel Core i5-1145G7 vPro ...A Dell Latitude 5420 laptop powered by a four-core Intel Core i5-1145G7 vPro ...
A Dell Latitude 5420 laptop powered by a four-core Intel Core i5-1145G7 vPro ...
 
Dell PowerEdge C4130 & NVIDIA Tesla K80 GPU accelerators
Dell PowerEdge C4130 & NVIDIA Tesla K80 GPU acceleratorsDell PowerEdge C4130 & NVIDIA Tesla K80 GPU accelerators
Dell PowerEdge C4130 & NVIDIA Tesla K80 GPU accelerators
 
Alinean whitepaper: Server Consolidation for Oracle E-Business Suite with IBM...
Alinean whitepaper: Server Consolidation for Oracle E-Business Suite with IBM...Alinean whitepaper: Server Consolidation for Oracle E-Business Suite with IBM...
Alinean whitepaper: Server Consolidation for Oracle E-Business Suite with IBM...
 
VMware Report Draft v2.1
VMware Report Draft v2.1VMware Report Draft v2.1
VMware Report Draft v2.1
 
Offer faster access to critical data and achieve greater inline data reductio...
Offer faster access to critical data and achieve greater inline data reductio...Offer faster access to critical data and achieve greater inline data reductio...
Offer faster access to critical data and achieve greater inline data reductio...
 
Inside story on Intel Data Center @ IDF 2013
Inside story on Intel Data Center @ IDF 2013Inside story on Intel Data Center @ IDF 2013
Inside story on Intel Data Center @ IDF 2013
 
Database Performance Tuning Introduction
Database  Performance Tuning IntroductionDatabase  Performance Tuning Introduction
Database Performance Tuning Introduction
 
Dell PowerEdge M820 blades: Balancing performance, density, and high availabi...
Dell PowerEdge M820 blades: Balancing performance, density, and high availabi...Dell PowerEdge M820 blades: Balancing performance, density, and high availabi...
Dell PowerEdge M820 blades: Balancing performance, density, and high availabi...
 
A Dell Latitude 7420 laptop powered by a four-core Intel Core i7-1185G7 vPro ...
A Dell Latitude 7420 laptop powered by a four-core Intel Core i7-1185G7 vPro ...A Dell Latitude 7420 laptop powered by a four-core Intel Core i7-1185G7 vPro ...
A Dell Latitude 7420 laptop powered by a four-core Intel Core i7-1185G7 vPro ...
 
Speed up deep learning tasks with Amazon Web Services instances featuring 2nd...
Speed up deep learning tasks with Amazon Web Services instances featuring 2nd...Speed up deep learning tasks with Amazon Web Services instances featuring 2nd...
Speed up deep learning tasks with Amazon Web Services instances featuring 2nd...
 

Similar to Improve datacenter energy efficiency with Intel Node Manager

Aumentare le prestazioni dei server in un'azienda vincente
Aumentare le prestazioni dei server in un'azienda vincenteAumentare le prestazioni dei server in un'azienda vincente
Aumentare le prestazioni dei server in un'azienda vincente
Nuova Periodici
 

Similar to Improve datacenter energy efficiency with Intel Node Manager (20)

Intel Node Manager Intro
Intel Node Manager IntroIntel Node Manager Intro
Intel Node Manager Intro
 
Rein in power consumption faster and more easily
Rein in power consumption faster and more easilyRein in power consumption faster and more easily
Rein in power consumption faster and more easily
 
Power management: Lenovo ThinkServer Smart Grid Technology
Power management: Lenovo ThinkServer Smart Grid TechnologyPower management: Lenovo ThinkServer Smart Grid Technology
Power management: Lenovo ThinkServer Smart Grid Technology
 
Reducing tco white paper rev5
Reducing tco white paper rev5Reducing tco white paper rev5
Reducing tco white paper rev5
 
Server consolidation with the NEC Express5800/A2040b: Power and performance a...
Server consolidation with the NEC Express5800/A2040b: Power and performance a...Server consolidation with the NEC Express5800/A2040b: Power and performance a...
Server consolidation with the NEC Express5800/A2040b: Power and performance a...
 
Intel Node Manager Technology Brief
Intel Node Manager Technology BriefIntel Node Manager Technology Brief
Intel Node Manager Technology Brief
 
Robust Free Power management: Dell OpenManage Power Center
Robust Free Power management: Dell OpenManage Power CenterRobust Free Power management: Dell OpenManage Power Center
Robust Free Power management: Dell OpenManage Power Center
 
Increase density and performance with upgrades from Intel and Dell
Increase density and performance with upgrades from Intel and DellIncrease density and performance with upgrades from Intel and Dell
Increase density and performance with upgrades from Intel and Dell
 
Component upgrades from Intel and Dell can increase VM density and boost perf...
Component upgrades from Intel and Dell can increase VM density and boost perf...Component upgrades from Intel and Dell can increase VM density and boost perf...
Component upgrades from Intel and Dell can increase VM density and boost perf...
 
Aumentare le prestazioni dei server in un'azienda vincente
Aumentare le prestazioni dei server in un'azienda vincenteAumentare le prestazioni dei server in un'azienda vincente
Aumentare le prestazioni dei server in un'azienda vincente
 
Po3660 Krogstad Vm World 2008
Po3660 Krogstad Vm World 2008Po3660 Krogstad Vm World 2008
Po3660 Krogstad Vm World 2008
 
Data centerefficiency
Data centerefficiencyData centerefficiency
Data centerefficiency
 
Improve sustainability through energy insights
Improve sustainability through energy insights Improve sustainability through energy insights
Improve sustainability through energy insights
 
Windows server power_efficiency___robben_and_worthington__final
Windows server power_efficiency___robben_and_worthington__finalWindows server power_efficiency___robben_and_worthington__final
Windows server power_efficiency___robben_and_worthington__final
 
Improve sustainability through energy insights - Infographic
Improve sustainability through energy insights - InfographicImprove sustainability through energy insights - Infographic
Improve sustainability through energy insights - Infographic
 
Achieve up to 80% better throughput and increase storage efficiency with the ...
Achieve up to 80% better throughput and increase storage efficiency with the ...Achieve up to 80% better throughput and increase storage efficiency with the ...
Achieve up to 80% better throughput and increase storage efficiency with the ...
 
Single core design space exploration
Single core design space explorationSingle core design space exploration
Single core design space exploration
 
Dell OME advanced features deliver faster power monitoring capabilities plus ...
Dell OME advanced features deliver faster power monitoring capabilities plus ...Dell OME advanced features deliver faster power monitoring capabilities plus ...
Dell OME advanced features deliver faster power monitoring capabilities plus ...
 
Systems management savings with Dell OpenManage on 13G Dell PowerEdge servers
Systems management savings with Dell OpenManage on 13G Dell PowerEdge servers Systems management savings with Dell OpenManage on 13G Dell PowerEdge servers
Systems management savings with Dell OpenManage on 13G Dell PowerEdge servers
 
OLTP with Dell hybrid arrays: Comparing the EqualLogic PS6210XS with the Equa...
OLTP with Dell hybrid arrays: Comparing the EqualLogic PS6210XS with the Equa...OLTP with Dell hybrid arrays: Comparing the EqualLogic PS6210XS with the Equa...
OLTP with Dell hybrid arrays: Comparing the EqualLogic PS6210XS with the Equa...
 

More from Principled Technologies

Improve performance and gain room to grow by easily migrating to a modern Ope...
Improve performance and gain room to grow by easily migrating to a modern Ope...Improve performance and gain room to grow by easily migrating to a modern Ope...
Improve performance and gain room to grow by easily migrating to a modern Ope...
Principled Technologies
 
Increase security, sustainability, and efficiency with robust Dell server man...
Increase security, sustainability, and efficiency with robust Dell server man...Increase security, sustainability, and efficiency with robust Dell server man...
Increase security, sustainability, and efficiency with robust Dell server man...
Principled Technologies
 

More from Principled Technologies (20)

Dell APEX Cloud Platform for Red Hat OpenShift: An easily deployable and powe...
Dell APEX Cloud Platform for Red Hat OpenShift: An easily deployable and powe...Dell APEX Cloud Platform for Red Hat OpenShift: An easily deployable and powe...
Dell APEX Cloud Platform for Red Hat OpenShift: An easily deployable and powe...
 
Upgrade your cloud infrastructure with Dell PowerEdge R760 servers and VMware...
Upgrade your cloud infrastructure with Dell PowerEdge R760 servers and VMware...Upgrade your cloud infrastructure with Dell PowerEdge R760 servers and VMware...
Upgrade your cloud infrastructure with Dell PowerEdge R760 servers and VMware...
 
Upgrade your cloud infrastructure with Dell PowerEdge R760 servers and VMware...
Upgrade your cloud infrastructure with Dell PowerEdge R760 servers and VMware...Upgrade your cloud infrastructure with Dell PowerEdge R760 servers and VMware...
Upgrade your cloud infrastructure with Dell PowerEdge R760 servers and VMware...
 
Realize 2.1X the performance with 20% less power with AMD EPYC processor-back...
Realize 2.1X the performance with 20% less power with AMD EPYC processor-back...Realize 2.1X the performance with 20% less power with AMD EPYC processor-back...
Realize 2.1X the performance with 20% less power with AMD EPYC processor-back...
 
Improve performance and gain room to grow by easily migrating to a modern Ope...
Improve performance and gain room to grow by easily migrating to a modern Ope...Improve performance and gain room to grow by easily migrating to a modern Ope...
Improve performance and gain room to grow by easily migrating to a modern Ope...
 
Boost PC performance: How more available memory can improve productivity
Boost PC performance: How more available memory can improve productivityBoost PC performance: How more available memory can improve productivity
Boost PC performance: How more available memory can improve productivity
 
Deploy with confidence: VMware Cloud Foundation 5.1 on next gen Dell PowerEdg...
Deploy with confidence: VMware Cloud Foundation 5.1 on next gen Dell PowerEdg...Deploy with confidence: VMware Cloud Foundation 5.1 on next gen Dell PowerEdg...
Deploy with confidence: VMware Cloud Foundation 5.1 on next gen Dell PowerEdg...
 
Upgrade your cloud infrastructure with Dell PowerEdge R760 servers and VMware...
Upgrade your cloud infrastructure with Dell PowerEdge R760 servers and VMware...Upgrade your cloud infrastructure with Dell PowerEdge R760 servers and VMware...
Upgrade your cloud infrastructure with Dell PowerEdge R760 servers and VMware...
 
A comparison of security features in Dell, HP, and Lenovo PC systems
A comparison of security features in Dell, HP, and Lenovo PC systemsA comparison of security features in Dell, HP, and Lenovo PC systems
A comparison of security features in Dell, HP, and Lenovo PC systems
 
Increase security, sustainability, and efficiency with robust Dell server man...
Increase security, sustainability, and efficiency with robust Dell server man...Increase security, sustainability, and efficiency with robust Dell server man...
Increase security, sustainability, and efficiency with robust Dell server man...
 
Increase security, sustainability, and efficiency with robust Dell server man...
Increase security, sustainability, and efficiency with robust Dell server man...Increase security, sustainability, and efficiency with robust Dell server man...
Increase security, sustainability, and efficiency with robust Dell server man...
 
Scale up your storage with higher-performing Dell APEX Block Storage for AWS ...
Scale up your storage with higher-performing Dell APEX Block Storage for AWS ...Scale up your storage with higher-performing Dell APEX Block Storage for AWS ...
Scale up your storage with higher-performing Dell APEX Block Storage for AWS ...
 
Scale up your storage with higher-performing Dell APEX Block Storage for AWS
Scale up your storage with higher-performing Dell APEX Block Storage for AWSScale up your storage with higher-performing Dell APEX Block Storage for AWS
Scale up your storage with higher-performing Dell APEX Block Storage for AWS
 
Get in and stay in the productivity zone with the HP Z2 G9 Tower Workstation
Get in and stay in the productivity zone with the HP Z2 G9 Tower WorkstationGet in and stay in the productivity zone with the HP Z2 G9 Tower Workstation
Get in and stay in the productivity zone with the HP Z2 G9 Tower Workstation
 
Open up new possibilities with higher transactional database performance from...
Open up new possibilities with higher transactional database performance from...Open up new possibilities with higher transactional database performance from...
Open up new possibilities with higher transactional database performance from...
 
Improving database performance and value with an easy migration to Azure Data...
Improving database performance and value with an easy migration to Azure Data...Improving database performance and value with an easy migration to Azure Data...
Improving database performance and value with an easy migration to Azure Data...
 
Realize better value and performance migrating from Azure Database for Postgr...
Realize better value and performance migrating from Azure Database for Postgr...Realize better value and performance migrating from Azure Database for Postgr...
Realize better value and performance migrating from Azure Database for Postgr...
 
Realize better value and performance migrating from Azure Database for Postgr...
Realize better value and performance migrating from Azure Database for Postgr...Realize better value and performance migrating from Azure Database for Postgr...
Realize better value and performance migrating from Azure Database for Postgr...
 
Set up students and teachers to excel now and in the future with Intel proces...
Set up students and teachers to excel now and in the future with Intel proces...Set up students and teachers to excel now and in the future with Intel proces...
Set up students and teachers to excel now and in the future with Intel proces...
 
Finding the path to AI success with the Dell AI portfolio - Summary
Finding the path to AI success with the Dell AI portfolio - SummaryFinding the path to AI success with the Dell AI portfolio - Summary
Finding the path to AI success with the Dell AI portfolio - Summary
 

Recently uploaded

Histor y of HAM Radio presentation slide
Histor y of HAM Radio presentation slideHistor y of HAM Radio presentation slide
Histor y of HAM Radio presentation slide
vu2urc
 
Artificial Intelligence: Facts and Myths
Artificial Intelligence: Facts and MythsArtificial Intelligence: Facts and Myths
Artificial Intelligence: Facts and Myths
Joaquim Jorge
 

Recently uploaded (20)

Powerful Google developer tools for immediate impact! (2023-24 C)
Powerful Google developer tools for immediate impact! (2023-24 C)Powerful Google developer tools for immediate impact! (2023-24 C)
Powerful Google developer tools for immediate impact! (2023-24 C)
 
2024: Domino Containers - The Next Step. News from the Domino Container commu...
2024: Domino Containers - The Next Step. News from the Domino Container commu...2024: Domino Containers - The Next Step. News from the Domino Container commu...
2024: Domino Containers - The Next Step. News from the Domino Container commu...
 
Connector Corner: Accelerate revenue generation using UiPath API-centric busi...
Connector Corner: Accelerate revenue generation using UiPath API-centric busi...Connector Corner: Accelerate revenue generation using UiPath API-centric busi...
Connector Corner: Accelerate revenue generation using UiPath API-centric busi...
 
Histor y of HAM Radio presentation slide
Histor y of HAM Radio presentation slideHistor y of HAM Radio presentation slide
Histor y of HAM Radio presentation slide
 
presentation ICT roal in 21st century education
presentation ICT roal in 21st century educationpresentation ICT roal in 21st century education
presentation ICT roal in 21st century education
 
Apidays New York 2024 - The value of a flexible API Management solution for O...
Apidays New York 2024 - The value of a flexible API Management solution for O...Apidays New York 2024 - The value of a flexible API Management solution for O...
Apidays New York 2024 - The value of a flexible API Management solution for O...
 
HTML Injection Attacks: Impact and Mitigation Strategies
HTML Injection Attacks: Impact and Mitigation StrategiesHTML Injection Attacks: Impact and Mitigation Strategies
HTML Injection Attacks: Impact and Mitigation Strategies
 
GenAI Risks & Security Meetup 01052024.pdf
GenAI Risks & Security Meetup 01052024.pdfGenAI Risks & Security Meetup 01052024.pdf
GenAI Risks & Security Meetup 01052024.pdf
 
Artificial Intelligence: Facts and Myths
Artificial Intelligence: Facts and MythsArtificial Intelligence: Facts and Myths
Artificial Intelligence: Facts and Myths
 
Strategize a Smooth Tenant-to-tenant Migration and Copilot Takeoff
Strategize a Smooth Tenant-to-tenant Migration and Copilot TakeoffStrategize a Smooth Tenant-to-tenant Migration and Copilot Takeoff
Strategize a Smooth Tenant-to-tenant Migration and Copilot Takeoff
 
🐬 The future of MySQL is Postgres 🐘
🐬  The future of MySQL is Postgres   🐘🐬  The future of MySQL is Postgres   🐘
🐬 The future of MySQL is Postgres 🐘
 
Tata AIG General Insurance Company - Insurer Innovation Award 2024
Tata AIG General Insurance Company - Insurer Innovation Award 2024Tata AIG General Insurance Company - Insurer Innovation Award 2024
Tata AIG General Insurance Company - Insurer Innovation Award 2024
 
The 7 Things I Know About Cyber Security After 25 Years | April 2024
The 7 Things I Know About Cyber Security After 25 Years | April 2024The 7 Things I Know About Cyber Security After 25 Years | April 2024
The 7 Things I Know About Cyber Security After 25 Years | April 2024
 
Handwritten Text Recognition for manuscripts and early printed texts
Handwritten Text Recognition for manuscripts and early printed textsHandwritten Text Recognition for manuscripts and early printed texts
Handwritten Text Recognition for manuscripts and early printed texts
 
Strategies for Unlocking Knowledge Management in Microsoft 365 in the Copilot...
Strategies for Unlocking Knowledge Management in Microsoft 365 in the Copilot...Strategies for Unlocking Knowledge Management in Microsoft 365 in the Copilot...
Strategies for Unlocking Knowledge Management in Microsoft 365 in the Copilot...
 
ProductAnonymous-April2024-WinProductDiscovery-MelissaKlemke
ProductAnonymous-April2024-WinProductDiscovery-MelissaKlemkeProductAnonymous-April2024-WinProductDiscovery-MelissaKlemke
ProductAnonymous-April2024-WinProductDiscovery-MelissaKlemke
 
Advantages of Hiring UIUX Design Service Providers for Your Business
Advantages of Hiring UIUX Design Service Providers for Your BusinessAdvantages of Hiring UIUX Design Service Providers for Your Business
Advantages of Hiring UIUX Design Service Providers for Your Business
 
A Year of the Servo Reboot: Where Are We Now?
A Year of the Servo Reboot: Where Are We Now?A Year of the Servo Reboot: Where Are We Now?
A Year of the Servo Reboot: Where Are We Now?
 
Real Time Object Detection Using Open CV
Real Time Object Detection Using Open CVReal Time Object Detection Using Open CV
Real Time Object Detection Using Open CV
 
Tech Trends Report 2024 Future Today Institute.pdf
Tech Trends Report 2024 Future Today Institute.pdfTech Trends Report 2024 Future Today Institute.pdf
Tech Trends Report 2024 Future Today Institute.pdf
 

Improve datacenter energy efficiency with Intel Node Manager

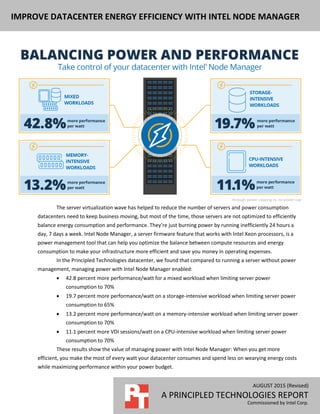
  • 1. AUGUST 2015 (Revised) A PRINCIPLED TECHNOLOGIES REPORT Commissioned by Intel Corp. IMPROVE DATACENTER ENERGY EFFICIENCY WITH INTEL NODE MANAGER The server virtualization wave has helped to reduce the number of servers and power consumption datacenters need to keep business moving, but most of the time, those servers are not optimized to efficiently balance energy consumption and performance. They’re just burning power by running inefficiently 24 hours a day, 7 days a week. Intel Node Manager, a server firmware feature that works with Intel Xeon processors, is a power management tool that can help you optimize the balance between compute resources and energy consumption to make your infrastructure more efficient and save you money in operating expenses. In the Principled Technologies datacenter, we found that compared to running a server without power management, managing power with Intel Node Manager enabled:  42.8 percent more performance/watt for a mixed workload when limiting server power consumption to 70%  19.7 percent more performance/watt on a storage-intensive workload when limiting server power consumption to 65%  13.2 percent more performance/watt on a memory-intensive workload when limiting server power consumption to 70%  11.1 percent more VDI sessions/watt on a CPU-intensive workload when limiting server power consumption to 70% These results show the value of managing power with Intel Node Manager: When you get more efficient, you make the most of every watt your datacenter consumes and spend less on wearying energy costs while maximizing performance within your power budget.
  • 2. A Principled Technologies report 2Improve datacenter energy efficiency with Intel Node Manager MANAGING DATACENTER POWER WITH INTEL NODE MANAGER Intel Node Manager is a server firmware feature available Intel Xeon processor E3, E5, and E7 family servers that lets IT administrators balance processor resources with power and cooling. With Intel Node Manager, administrators use a management console to set power policies that help make the most of each rack in the datacenter. By managing energy to increase efficiency, Intel Node Manager has the potential to help businesses:  reduce ongoing operating costs datacenter wide  balance resources dynamically by moving power and cooling resources to the workloads that need them  improve continuity by limiting hardware’s ability to overheat and fail By dynamically limiting power with Intel Node Manager, administrators can find the optimal power limit that maximizes efficiency without hurting performance. Power capping works to increase performance per watt because there is a point at which each additional watt of power used no longer has a similar corresponding increase in performance. Not all users in all situations want to optimize for performance/watt. If you want to optimize for absolute performance, you should leave the servers unconstrained. For details about the workloads we used in our tests, see Appendix A. For detailed test results, see Appendix B. Start at Appendix C for our step-by-step test methodology. Increase energy efficiency for all kinds of workloads Using Intel Node Manager increased energy efficiency for the four types of workloads we tested, increasing performance per watt by as much as 42.8 percent (see Figure 1). Maximizing the amount of performance a server can do per watt of power used is important because ultimately the cost of powering and cooling hardware is a large part of a datacenter’s budget, so it’s more cost efficient to consider a performance/watt metric. Power capping lets admins plan power and cooling capacity for the whole datacenter. With caps in place, admins need not worry that an unexpected performance peak will overload a system or rack, trip a circuit, and bring down important workloads. This strategy eliminates the unnecessary power and cooling overhead that admins traditionally leave to handle these unexpected spikes.
  • 3. A Principled Technologies report 3Improve datacenter energy efficiency with Intel Node Manager Figure 1: Intel Node Manager let us set power capping policies that increased performance/watt for various common workloads. Mixed workload As Figure 2 shows, capping power with Intel Node Manager increased performance/watt for our Exchange/LoadGen mixed workload by 42.8 percent at the 70 percent power level compared to running the workload with no power cap. Cutting power lower than 70 percent caused the mixed workload test to fail due to CPU constrictions. Figure 2: Using Intel Node Manager to set a power cap increased performance/watt up to an optimized 70% cap. Storage-intensive workload As Figure 3 shows, capping power with Intel Node Manager increased performance/watt for our database storage-intensive workload by 19.7 percent at the 65 percent power level compared to running the workload with no power cap. Because further capping decreased performance/watt, we know that 65 percent is the optimal power level for this IO-intensive test.
  • 4. A Principled Technologies report 4Improve datacenter energy efficiency with Intel Node Manager Figure 3: Using Intel Node Manager to set a power cap increased performance/watt up to an optimized 65% cap. Memory-intensive workload As Figure 4 shows, capping power with Intel Node Manager increased performance/watt for our SPECjbb memory-intensive workload by 13.2 percent at the 70 percent power level compared to running the workload with no power cap. Because further capping decreased performance/watt, we know that 70 percent is the optimal power level for this memory-intensive test. Figure 4: Using Intel Node Manager to set a power cap increased performance/watt up to an optimized 70% cap. CPU-intensive workload As Figure 5 shows, capping power with Intel Node Manager increased performance/watt for our CPU-intensive VDI workload by 11.1 percent at the 70 percent power level compared to running the workload with no power cap. Because further capping decreased performance/watt due to slow application response, we know that 70 percent is the optimal power level for this VDI workload.
  • 5. A Principled Technologies report 5Improve datacenter energy efficiency with Intel Node Manager Figure 5: Using Intel Node Manager to set a power cap increased VDI sessions/watt up to an optimized 70% cap. CONCLUSION Managing power in the datacenter can be a good strategy to reduce power and cooling overheard while allowing servers operate at the most efficient power levels and do as much work as possible within your specific power policies. We found that using Intel Node Manager to set power limits on servers running various workloads increased performance per watt by up to 42.8 percent compared to running the same workloads with no power management solution.
  • 6. A Principled Technologies report 6Improve datacenter energy efficiency with Intel Node Manager APPENDIX A – ABOUT THE BENCHMARKS Benchmarking a mixed workload using LoadGen 2013 To test the solutions’ mail server performance, we used the Microsoft Load Generator 2013 (LoadGen) benchmark, performing tasks to simulate an Average user generating mail activity. For our workloads, we used the following settings:  Number of users: 2,000  Mailbox Profile: 250MB mailboxes  Action Profile: 300 - Outlook 2007 cached For more details about LoadGen, see www.microsoft.com/downloads/details.aspx?FamilyId=DDEC1642-F6E3- 4D66-A82F- 8D3062C6FA98&displaylang=en. Benchmarking a storage-intensive workload using DVD Store Version 2.1 To create our real-world OLTP workload, we used the DVD Store Version 2.1 benchmarking tool. DS2 models an online DVD store, where customers log in, search for movies, and make purchases. DS2 reports these actions in orders per minute that the system could handle, to show what kind of performance you could expect for your customers. The DS2 workload also performs other actions, such as adding new customers, to exercise the wide range of database functions you would need to run your ecommerce environment. Learn more at www.delltechcenter.com/page/DVD+Store. Benchmarking a memory-intensive workload using SPECjbb2005 SPECjbb2005 is an industry-standard benchmark created by the Standard Performance Evaluation Corp. (SPEC) to measure a server’s Java performance. (Note: SPEC and the SPECjbb2005 are trademarks of the Standard Performance Evaluation Corporation.) SPEC modeled SPECjbb2005 on the three-tier client/server architecture, with the middle layer as the primary focus. According to SPEC, “Random input selection represents the first (user) tier. SPECjbb2005 fully implements the middle tier business logic. The third tier is represented by tables of objects, implemented by Java Collections, rather than a separate database.” (www.spec.org/jbb2005/docs/UserGuide.html). SPECjbb2005 utilizes multiple special data groups and multiple threads as it runs. Each data unit is a “warehouse,” a roughly 25MB collection of data objects. Each thread represents an active user posting transaction requests within a warehouse. The benchmark run begins with one warehouse and then increases the number of warehouses; its goal is to saturate the server’s processor capacity. As the number of warehouses increases, so does the number of threads. The benchmark’s results portray the server’s throughput in business operations per second or SPECjbb2005 bops. A higher number of SPECjbb2005 bops is better. For more information on SPECjbb2005, go to www.spec.org. Benchmarking a CPU-intensive workload using Login VSI 4.1 Login Virtual Session Indexer (Login VSI) is a tool that helps assess the virtual desktop performance, capacity, and scalability of servers. Login VSI 4.1 reports the following metrics:  Minimum Response: The minimum application response time  Average Response: The average application response time
  • 7. A Principled Technologies report 7Improve datacenter energy efficiency with Intel Node Manager  Maximum Response: The maximum application response time  VSI Baseline: Average application response time of the first 15 sessions  VSI Index Average: The VSI index average is the average response time dropping the highest and lowest 2 percent For more information about Login VSI 4.1, see www.loginvsi.com/product-overview.
  • 8. A Principled Technologies report 8Improve datacenter energy efficiency with Intel Node Manager APPENDIX B – DETAILED TEST RESULTS Mixed workload Figure 6 shows the power consumption profile over the course of the test, and Figure 7 shows CPU utilization. Figure 6: Power consumption profile over the course of our mixed workload test. Figure 7: CPU utilization over the course of our mixed workload test.
  • 9. A Principled Technologies report 9Improve datacenter energy efficiency with Intel Node Manager Storage-intensive workload Figure 8 shows the power consumption profile over the course of the test, and Figure 9 shows CPU utilization. Figure 8: Power consumption profile over the course of our storage-intensive workload test. Figure 9: CPU utilization over the course of our storage-intensive workload test.
  • 10. A Principled Technologies report 10Improve datacenter energy efficiency with Intel Node Manager Memory-intensive workload Figure 10 shows the power consumption profile over the course of the test, and Figure 11 shows CPU utilization. Note that in this memory-intensive test, high CPU is a results of high memory utilization. Figure 10: Power consumption profile over the course of our memory-intensive workload test. Figure 11: CPU utilization over the course of our memory-intensive workload test.
  • 11. A Principled Technologies report 11Improve datacenter energy efficiency with Intel Node Manager CPU-intensive workload Figure 12 shows the power consumption profile over the course of the test, and Figure 13 shows CPU utilization. Figure 12: Power consumption profile over the course of our CPU-intensive workload test. Figure 13: CPU utilization over the course of our CPU-intensive workload test.
  • 12. A Principled Technologies report 12Improve datacenter energy efficiency with Intel Node Manager APPENDIX C – SYSTEM CONFIGURATION INFORMATION Figure 14 provides detailed configuration information for the test system. System Intel S2600WT2 Power supplies Total number 2 Vendor and model number DPS-750XB A Wattage of each (W) 750 Cooling fans Total number 6 Vendor and model number Nidec UltraFlo V60E12BS1B5 Dimensions (h × w) of each 2.5” X 2.5” Volts (V) 12 Amps (A) 1.50 General Number of processor packages 2 Number of cores per processor 12 Number of hardware threads per core 2 System power management policy Performance CPU Vendor Intel Name Xeon Model number E5-2680 v3 Socket type LGA2011-3 Core frequency (GHz) 2.5 Bus frequency 9.6 GT/s DMI L1 cache 32 KB (per core) L2 cache 256 KB (per core) L3 cache 30 MB Platform Vendor and model number Intel S2600WT2 Motherboard model number Intel S2600WT2 BIOS name and version SE5C610.86B.01.01.1008 (03/19/2015) BIOS settings Default Memory module(s) Total RAM in system (GB) 256 Vendor and model number SK Hynix HMA42GR7MFR4N-TF Type PC4-2133P Speed (MHz) 2,133 Speed running in the system (MHz) 2,133 Timing/Latency (tCL-tRCD-tRP-tRASmin) 15-15-15-33 Size (GB) 16 Number of RAM module(s) 16 Chip organization Dual sided Rank Dual
  • 13. A Principled Technologies report 13Improve datacenter energy efficiency with Intel Node Manager System Intel S2600WT2 Operating system Name VMware ESXi 6.0.0 Build number 2494585 File system VMFS Language English Graphics Vendor and Model Number Matrox® G200 Graphics memory (MB) 256 RAID controller Vendor and model number Intel Onboard SAS Controller Firmware version SE5C610.86B.01.01.1008 (03/19/2015) Hard drives Vendor and model number Western Digital WD1003FZEX Number of drives 1 Size (TB) 1 RPM 7.2K Type SATA 6.0 Ethernet adapters Vendor and Model Number Intel Ethernet Controller X540-AT2 Type Integrated Ethernet adapter 2 Vendor and Model Number QLogic® QLE2562 Type PCIe Figure 14: System configuration information for our test server.
  • 14. A Principled Technologies report 14Improve datacenter energy efficiency with Intel Node Manager APPENDIX D – HOW WE TESTED Equipment Server name # of servers Model Processors Memory (GB) Functional role Intel server 1 S2600WT 2 X Intel Xeon E5-2680 v3 256 Server Under Test (SUT) Infrastructure servers 4 Intel-based server 2 X Intel Xeon E5-2650 v3 192 Infrastructure Figure 15: Detailed server specifications. For our virtualized test, we installed and configured the latest available version of VMware vSphere 6.0 on the infrastructure servers and on the Intel server under test. For our bare metal configuration, we installed a copy of Windows Server 2012 R2 on the Intel server under test. We used two 10GbE switches to provide connectivity between infrastructure servers, server under test, and storage, and we used two 10GbE ports for networking per server. We used one port for server management and to carry private test traffic, and we used the second port to connect to the storage. For storage, we used an industry-leading SSD-based storage array and provisioned a 10TB datastore for the server under test to use. Configuring the server under test for Intel Node Manager 1. Connect network cable to mgmt NIC. 2. Power on the server and press F2 to enter Server Setup. 3. Select Server Management – BMC LAN Configuration. 4. Select User Configuration. 5. Select User ID root. 6. If necessary, change User Status to enabled. 7. Select User Password and enter a secure password. 8. Hit ESC to return to previous menu. 9. Under IPv6, select Disabled. 10. Under DHCP hostname, enter dcmintelhost1. 11. Under User Configuration, select User ID and select root. 12. Under User Status, select Enabled. 13. Under User Password, enter a secure password. 14. Press F10 to save configuration. 15. Hit ESC three times to exit menu and select Reset to reboot the server. Installing Intel Data Center Manager software 1. Double-click the installation program. 2. At the welcome screen, click Next. 3. In the license agreement, choose I accept the terms. Click Next.
  • 15. A Principled Technologies report 15Improve datacenter energy efficiency with Intel Node Manager 4. Enter customer information, and click Next. 5. Select a destination folder, and click Next. 6. Choose the default SNMP and RMI settings, and click Next. 7. Choose the default HTTPS port, and click Next. 8. Change the sample frequency and data granularity to 30 seconds, and click Next. 9. Configure the datacenter manager username and password. 10. Enter keystore password and certificate information, and click Next. 11. Select the Default embedded database, enter user credentials, and click Next. 12. Click Install. Discovering and adding systems to Intel Data Center Manager 1. Open the browser and enter https://localhost:8643/DcmConsole/ to launch the DCM Console. 2. To login, enter the user name and password configured during installation. 3. Click Discovery and Import. 4. Click Add Discover Task. 5. Select IPMI as the protocol, and input the appropriate IP range and Subnet Mask of the server under test. 6. Enter root as the IPMI User Name, enter the previously selected password, and click OK to initiate the discovery process. 7. Click Data Center Management and click the + sign to add a Data Center, Room, Row, Rack, and Device. The Device should be the system recently discovered. Applying a power cap using Intel Data Center Manager 1. Click the Devices and Racks tab. 2. Under Devices, select the server. 3. Click the Policies tab. 4. Click Add. 5. Enter a Policy name, select Custom Power Limit as the policy type, and enter a power cap in Watts. 6. Select Permanent Policy, and make sure that the Policy Enabled option is selected. Click OK.
  • 16. A Principled Technologies report 16Improve datacenter energy efficiency with Intel Node Manager MIXED WORKLOAD: LOADGEN 2013 METHODOLOGY VM name vCPUs Memory Host OS OS drive Additional drive ExchangeCAS 8 16 GB Intel SUT Windows Server 2012 R2 Standard 100 GB None ExchangeMB 8 16 GB Intel SUT Windows Server 2012 R2 Standard 100 GB 750 GB for Mailboxes Exchange AD/DNS 2 8 GB Infra Windows Server 2012 R2 Standard 100 GB None LoadGen client 4 8 GB Infra Windows Server 2008 R2 Enterprise 100 GB None Figure 16: The virtual machines in our test environment. Setting up Microsoft Windows Active Directory® server 1. In your Web browser, connect to the vSphere server. 2. Right-click the ESXi host, and choose New Virtual Machine. 3. On the Create New Virtual Machine screen, select custom, and click Next. 4. Assign a name to the virtual machine, and click Next. 5. Select the LUN for the storage, and click Next. 6. Select Virtual Machine Version 11, and click Next. 7. Choose Windows, select Microsoft Windows Server 2012, and click Next. 8. Choose the VM’s virtual hardware options, and click Next. 9. Select two virtual processor socket, and select one core per virtual socket. 10. Select 4GB RAM. 11. Select the NIC interface with access to the private test network. 12. Leave the default option for SCSI controller. 13. Choose to create a new virtual disk, and click Next. 14. Make the OS virtual disk size 100 GB, choose thin provisioned, specify external storage, and click Next. 15. Keep the default virtual device node (0:0), and click Next. 16. Click Finish. 17. Right-click the VM, and select Edit Settings. 18. Click the Resources tab, and click Memory. 19. Select Reserve all guest memory, and click OK. 20. Connect the VM virtual CD-ROM to the Microsoft Windows Server 2012 R2 installation disk. 21. Start the VM. Installing Microsoft Windows Server 2012 R2 Standard Edition 1. Connect the installation media, and power on the VM. 2. When the option appears, to enter the Boot Manager, press F11. 3. Select the connected boot media, and press Enter. 4. When prompted to boot from DVD, press any key.
  • 17. A Principled Technologies report 17Improve datacenter energy efficiency with Intel Node Manager 5. When the installation screen appears, click My language is English. 6. Leave language, time/currency format, and input method as default, and click Next. 7. Click Install now. 8. When the Windows Setup screen appears, when prompted to go online to install updates, click No thanks. 9. Select Windows Server 2012 R2 Standard (Server with a GUI), and click Next. 10. Check the I accept the license terms checkbox, and click Next. 11. Click Custom: Install Windows only (advanced). 12. Press Alt+A to open advanced partition options. Delete any partitions until there is only Drive 0 Unallocated Space. 13. Select Drive 0 Unallocated Space, and click Next. At this point, Windows will begin installing, and will restart automatically after completing. 14. When the Settings page appears, fill in the Password and Reenter Password fields with the same password. 15. Log in with the previously set up password. Configuring Windows Update 1. In the left pane of the Server Manager screen, click Local Server. 2. In the main frame, next to Windows Update, click Not configured. 3. In the Windows Update screen, in the main pane, click Let me choose my settings. 4. Under Important updates, select Never check for updates (not recommended), and click OK. 5. In the left pane, click Check for updates, and install all available updates. 6. Close the Windows Update screen. Configuring Windows Firewall 1. In Server Manager, click ToolsWindows Firewall with Advanced Security. 2. In the Overview section, click Windows Firewall Properties. 3. In the Domain Profile tab, for Firewall state, click Off. 4. In the Private Profile tab, for Firewall state, click Off. 5. In the Public Profile tab, for Firewall state, click Off. 6. Click OK. 7. Close the Windows Firewall Properties screen. Setting up Remote Desktop 1. In the Local Server tab of the Server Manager screen, next to Remote Desktop, click Disabled. 2. In the System Properties screen, in the Remote Desktop section, select the Allow remote connections to this computer radio button. When the warning message appears, click OK. 3. Uncheck Allow connections only from computers running Remote Desktop with Network Level Authentication (recommended), and click OK. Disabling IE Enhanced Security Configuration 1. In the Local Server tab of the Server Manager screen, next to IE Enhanced Security Configuration, click On. 2. In the Internet Explorer Enhanced Security Configuration screen, select the Off radio buttons for both Administrators and Users, and click OK. Installing VMware Tools 1. Install VMware Tools. For more information, see kb.vmware.com/selfservice/microsites/search.do?language=en_US&cmd=displayKC&externalId=340.
  • 18. A Principled Technologies report 18Improve datacenter energy efficiency with Intel Node Manager Installing Active Directory and DNS services 1. Power on the Active Directory VM. 2. On the Active Directory server, open Windows PowerShell. 3. Run the following command: Install-WindowsFeature RSAT-ADDS 4. When the installation is finished, close PowerShell. 5. On the VM, open Server Manager. 6. On the Welcome screen, click 2, and click Add roles and features. 7. At the initial Before you begin screen, click Next three times. 8. At the Server Roles screen, select Active Directory Domain Services. 9. On the pop-up screen, click Add Features. 10. Click Next three times. 11. Verify the desired role is being installed, and click Install. 12. Once installation has finished, close the Add roles and features wizard. 13. In Server Manager, click the flag at the top, and select the Promote this server to a domain controller link. 14. Select Add a new forest, enter a root domain name of test.local and click Next. 15. On the Domain Controller Options screen, enter a password, and click Next. 16. On the DNS Options screen, click Next. 17. On the Additional Options screen, click Next. 18. On the Paths screen, click Next. 19. On the Review Options screen, click Next. 20. On the Prerequisites screen, verify all prerequisites have passed, and click Install. 21. Once Active Directory Domain Services finishes installing, click Finish, and restart the system. Creating the first VM 1. Using the vSphere client, connect to the vCenter Server. 2. Right-click the cluster, and choose New Virtual Machine. 3. On the Configuration screen, choose Custom, and click Next. 4. On the Name and Location screen, add a name, select the datacenter, and click Next. 5. On the specific Host screen, choose the server under test, and click Next. 6. On the Storage screen, select the OS datastore on the external storage, and click Next. 7. On the Virtual Machine Version screen, choose Virtual Machine Version 11, and click Next. 8. On the Guest Operating System screen, choose Windows, select Microsoft Windows Server 2012 R2 (64-bit), and click Next. 9. On the CPUs screen, choose 1 virtual socket, choose 4 virtual processors per core, and click Next. 10. On the Memory screen, choose 8 GB RAM, and click Next. 11. On the Network screen, click 1 for the number of NICs, select the NIC connected to the isolated testing network, and click Next. 12. On the SCSI Controller screen, leave the default virtual storage controller, and click Next. 13. On the Select a Disk screen, choose to create a new virtual disk, and click Next. 14. On the Create a Disk screen, make the OS virtual disk size 100 GB, and choose thin provisioned. 15. On the Advanced Options screen, leave the default virtual device node (0:0), and click Next. 16. On the Ready to Complete screen, click Finish.
  • 19. A Principled Technologies report 19Improve datacenter energy efficiency with Intel Node Manager 17. Right click the VM, select Upgrade Virtual Hardware, and click Yes. 18. Start the VM. 19. Attach the Windows Server 2012 R2 ISO image to the VM, and install Windows Server 2012 R2 on your VM. Installing the operating system on the VMs Repeat the sections above regarding the initial creation of the virtual machines and installation of Windows Server 2012 R2 Standard. Creating a VM template 1. Using the vSphere Client, right click the first VM, select Template, and select Clone to Template. 2. On the Name and Location screen, enter a Template Name. 3. On the Host / Cluster screen, select the management server. 4. On the Datastore screen, select a datastore, and click Next. 5. On the Ready to Complete screen, click Finish. The template created will be used to clone out the rest of the VMs. Configuring the Active Directory server Preparing AD for Exchange 1. Create a reverse lookup zone: a. Click Start, and type DNS in the search field. b. Open the DNS manager by clicking in the results field. c. Expand your active directory domain, and click Reverse Lookup Zones. d. Click ActionNew Zone. e. On the Welcome screen, click Next. f. Chose Primary Zone, and click Next. g. Leave default replication scope, and click Next. h. Choose IPv4, and click Next. i. Enter the IP address of your domain (192.168.3) for our example. j. Choose Allow both nonsecure and secure dynamic updates, and click Next. k. Click Finish. 2. Insert the Exchange 2012 SP1 Installation ISO in the AD VM DVD drive. 3. In Windows Explorer, double-click the Exchange DVD icon. 4. In the Exchange installation folder, hold down shift, and right-click. 5. Choose Open a command window. 6. Run the following command: Setup.exe /PrepareSchema /IAcceptExchangeServerLicenseTerms 7. When the previous command completes, run the following command: Setup.exe /PrepareAD /OrganizationName:”organization name” /IAcceptExchangeServerLicenseTerms 8. Close the command window when the setup finishes. Installing Active Directory Certificate Services 1. Launch Server Manager, and select Add roles and features. 2. At the Add Roles and Features Wizard, click Next.
  • 20. A Principled Technologies report 20Improve datacenter energy efficiency with Intel Node Manager 3. Select Role-based or feature-based installation, and click Next. 4. Choose Active Directory Certificate Services. 5. If prompted, to install any required features, click Add Features. 6. Click Next three times. 7. Choose Certificate Authority and Certification Authority Web Enrollment. 8. If prompted, to install any required features, click Add Features. 9. Click Next. 10. Leave defaults, and click Next. 11. Click Install. 12. When the install finishes, click Close. 13. In the Server Manager, click the yellow warning symbol, and click Configure Active Directory Certificate Services. 14. Leave defaults, and click Next. 15. Check both Certification Authority and Certification Authority Web Enrollment, and click Next. 16. Choose Enterprise CA, and click Next. 17. Choose Root CA, and click Next. 18. Choose Create a new private key, and click Next. 19. Leave defaults, and click Next. 20. Leave defaults, and click Next. 21. Leave 5 years, and click Next. 22. Leave default locations, and click Next. 23. Click Configure. 24. Close when the configuration finishes. 25. Open Internet Explorer and navigate to localhost/certsrv/Default.asp to verify that the installation succeeded. Installing Exchange Server 2013 SP1 Mailbox and Client Access Server roles Using the template, clone two VMs, one for the Exchange Client Access Server, or CAS, and the other for the Exchange Mailbox Server. Edit the hardware settings in each. The Mailbox server should have eight vCPUs (eight virtual sockets each with one core) and 16 GBs of memory. Using the Exchange datastore, add a 750 GB disk and a 100 GB disk to the Mailbox server for the Exchange mailbox and Exchange logs respectively. Set static IPs on both VMs and join the domain. 1. On the Exchange Mailbox Server, log into the server using domain administrator credentials. 2. Open Windows PowerShell and run the following command: Install-WindowsFeature AS-HTTP-Activation, Desktop-Experience, NET- Framework-45-Features, RPC-over-HTTP-proxy, RSAT-Clustering, RSAT- Clustering-CmdInterface, RSAT-Clustering-Mgmt, RSAT-Clustering- PowerShell, Web-Mgmt-Console, WAS-Process-Model, Web-Asp-Net45, Web- Basic-Auth, Web-Client-Auth, Web-Digest-Auth, Web-Dir-Browsing, Web-Dyn- Compression, Web-Http-Errors, Web-Http-Logging, Web-Http-Redirect, Web- Http-Tracing, Web-ISAPI-Ext, Web-ISAPI-Filter, Web-Lgcy-Mgmt-Console,
  • 21. A Principled Technologies report 21Improve datacenter energy efficiency with Intel Node Manager Web-Metabase, Web-Mgmt-Console, Web-Mgmt-Service, Web-Net-Ext45, Web- Request-Monitor, Web-Server, Web-Stat-Compression, Web-Static-Content, Web-Windows-Auth, Web-WMI, Windows-Identity-Foundation 3. Restart the server. 4. Download the Microsoft Unified Communications Managed API 4.0, Core Runtime 64-bit. (go.microsoft.com/fwlink/p/?linkId=258269) 5. Run UcmaRuntimeSetup.exe. 6. When the installation completes, click Finish. 7. Navigate to the location of the Exchange installation media, and double-click Setup.exe. 8. At the Check for Updates? screen, check the Connect to the Internet and check for updates checkbox, and click Next. 9. When the updates complete, click Next. 10. At the Introduction screen, click Next. 11. At the License Agreement screen, check the box to accept the terms, and click Next. 12. At the Recommended Settings screen, check the Don’t use recommended settings checkbox, and click Next. 13. At the Server Role Selection, select Mailbox or Client Access role, and click Next. 14. At the Installation Space and Location screen, leave the default location for the installation, and click Next. 15. At the Malware Protection Settings, select yes to disable, and click Next. 16. At the Readiness Checks screen, allow the verification to complete. If there are no failures, click Install. 17. When the installation completes, click Finish, and restart the server. 18. Repeat steps 1-17 for the Exchange CAS server. Configuring Exchange 1. On the CAS server, open the Exchange Admin Center by using a browser and navigating to https://localhost/ecp 2. Enter the domain administrator credentials, and click Sign in. 3. If prompted, select the language and time zone, and click Save. 4. In the left pane, click Mail flow, and click Send connectors. 5. On the Send connectors page, click the New icon. 6. In the New send connector wizard, specify SMTP as the name, and select Internet as the type. Click Next. 7. In the Network settings screen, choose MX record associated with recipient domain, and click Next. 8. In the Address space screen, click the Add icon. 9. In the Add domain screen, in the Fully Qualified Domain Name (FQDN) field, enter *, and click Save. 10. Click Next. 11. In Source server screen, click the Add icon. 12. In the Select a Server screen, select the mailbox server, click Add, and click OK. 13. Click Finish. 14. In the left pane of the EAC, click servers, select the name of the CAS server, and click Edit. 15. Click Outlook Anywhere, and for the external and internal hostname field, enter the appropriate FQDN of the Client Access Server. (For example, exchangeserver.test.local.)
  • 22. A Principled Technologies report 22Improve datacenter energy efficiency with Intel Node Manager 16. Choose NTLM as the authentication method, and click Save. 17. Click Virtual Directories, and click the Configure external access domain icon. 18. In the Select the Client Access servers to use with the external URL screen, click the Add icon. 19. Select the CAS server, and click Add. Click OK. 20. Type the FQDN of the CAS server in the Enter the domain field, and click Save. 21. Log into the Active Directory server using administrator credentials, and complete the following steps: a. Open Server Manager, and click ToolsDNS b. In the left pane of DNS Manager, expand the Active Directory server nameForward Lookup Zonestest.local. c. In the right pane of DNS Manager, verify or create the DNS records as presented in Figure 17. Type Host or child domain/alias name FQDN FQDN of mail server Mail Exchanger (MX) Leave blank domain.com casserver.domain.com Alias (CNAME) Autodiscover Autodiscover.domain.com casserver.domain.com Alias (CNAME) Owa Owa.domain.com casserver.domain.com Figure 17: DNS records. 22. Log into your CAS server. 23. In the Exchange Power Shell, run the following commands, replacing “$HostName” with the host name (not FQDN) of your CAS server. Set-EcpVirtualDirectory "$HostNameECP (Default Web Site)" -InternalUrl ((Get-EcpVirtualDirectory "$HostNameECP (Default Web Site)").ExternalUrl) Set-WebServicesVirtualDirectory "$HostNameEWS (Default Web Site)" - InternalUrl ((get-WebServicesVirtualDirectory "$HostNameEWS (Default Web Site)").ExternalUrl) Set-ActiveSyncVirtualDirectory "$HostNameMicrosoft-Server-ActiveSync (Default Web Site)" -InternalUrl ((Get-ActiveSyncVirtualDirectory "$HostNameMicrosoft-Server-ActiveSync (Default Web Site)").ExternalUrl) Set-OabVirtualDirectory "$HostNameOAB (Default Web Site)" -InternalUrl ((Get-OabVirtualDirectory "$HostNameOAB (Default Web Site)").ExternalUrl) Set-OwaVirtualDirectory "$HostNameOWA (Default Web Site)" -InternalUrl ((Get-OwaVirtualDirectory "$HostNameOWA (Default Web Site)").ExternalUrl) Set-PowerShellVirtualDirectory "$HostNamePowerShell (Default Web Site)" -InternalUrl ((Get-PowerShellVirtualDirectory "$HostNamePowerShell (Default Web Site)").ExternalUrl) Get-OfflineAddressBook | Set-OfflineAddressBook -
  • 23. A Principled Technologies report 23Improve datacenter energy efficiency with Intel Node Manager GlobalWebDistributionEnabled $True -VirtualDirectories $Null 24. Create a folder at the root of C: on the CAS server, and share it to Everyone with read/write permissions. 25. Log into the Exchange admin center, and navigate to ServersCertificates. 26. Choose the CAS server in the drop-down menu, and to create a new certificate, click the plus sign. 27. Choose Create a request for a certificate from a certification authority, and click Next. 28. Name the certificate, and click Next. 29. Do not request a wildcard certificate, and click Next. 30. Click Browse, choose the CAS server, and click Ok. Click Next. 31. Leave defaults, and click Next. 32. Leave defaults, and click Next. 33. Enter your organization information, and click Next. 34. Enter the path to the share you created on the CAS server, and click Finish. Example: cassharemyrequest.REQ 35. Log into the AD server, and open Internet Explorer. 36. Browse to localhost/CertSrv 37. Click Request a certificate. 38. Choose Advanced certificate request. 39. Choose Submit a certificate request by using a base-64-endcoded CMC. 40. Open Windows Explorer, and navigate to the share folder on the CAS server where the certificate request is stored. 41. Open the certificate with notepad, and copy the content between BEGIN NEW CERTIFICATE REQUEST and END NEW CERTIFICATE REQUEST. 42. Paste the copied content into the Saved Request screen. 43. In the Certificate Template drop-down menu, choose Web Server, and click Submit. 44. Choose Base 64 encoded, and download the certificate. 45. Copy the new certificate into the share folder on the CAS server. 46. Log back into the CAS server and open the Exchange Admin Center. 47. Go to ServersCertificates, and highlight the certificate you began before. (In the status column, it should say Pending request.) 48. Click Complete on the right side. 49. Type the path to the certificate, including the certificate name, and click Ok. Example: cassharecertnew.CER 50. Verify that the status has changed to Valid. 51. Edit the new entry, and click Edit. 52. Go to Services and check SMTP and IIS, and click Save. 53. On the warning message, click Yes. 54. Run the following steps on the CAS and AD servers. a. Click Start, and type MMC
  • 24. A Principled Technologies report 24Improve datacenter energy efficiency with Intel Node Manager b. Click FileAdd/Remove Snap-in. c. Choose Certificates, and click Add. d. Choose Computer account, and click Next. e. Choose Local computer, and click Finish. f. Click OK. g. Expand CertificatesTrusted Root Certificate AuthoritiesCertificates. h. Click ActionAll TasksImport. i. Click Next. j. Browse to the share folder on the CAS server, and choose the new certificate you created. Click Next. k. Leave defaults, and click Next. l. Click Finish. m. Click OK on the Import was successful message. 55. Log into the CAS server, and open the Exchange admin center. 56. Navigate to ServersDatabases. 57. Restart the Microsoft Exchange Information Store service on the MB server. 58. Using the Edit button, disable the maintenance schedule, and enable circular logging for each mailbox database. 59. Dismount and remount the databases. 60. Open Exchange Management shell, and enter the following to move the paths of the default mailbox: Move-Databasepath “DatabaseName” –EdbFilepath “E:NewlocationDBname.edb” –LogFolderpath “F:Newlocation” 61. When prompted, type A and press enter. 62. Open Exchange Management Shell, and enter the following: Get-OutlookAnywhere |Set-OutlookAnywhere -ExternalHostname cas.domain.com -DefaultAuthenticationMethod NTLM -ExternalClientsRequireSsl $true Installing and configuring the Exchange 2013 mail test clients and completing LoadGen configuration on Exchange 2013 For our testing, we used one virtual client machine to run Loadgen2013. To create the mail clients, we installed several software components. We followed this process for each installation: Installing Windows Server 2008 R2 SP1 Enterprise Edition 1. Insert the installation DVD for Windows Server 2008 R2 SP1 Enterprise into the DVD drive. 2. At the Language Selection Screen, click Next. 3. Click Install Now. 4. Select Windows Server 2008 R2 Enterprise (Full Installation), and click Next. 5. Click the I accept the license terms checkbox, and click Next. 6. Click Custom. 7. Click Next. 8. At the User’s password must be changed before logging on warning screen, click OK. 9. Enter the desired password for the administrator in both fields, and click the arrow to continue.
  • 25. A Principled Technologies report 25Improve datacenter energy efficiency with Intel Node Manager 10. At the Your password has been changed screen, click OK. 11. Click Start, type change power-saving settings and press Enter. 12. Click Change plan settings. 13. Change the Turn off the display drop-down menu to Never. 14. Click Save changes, and close the Power Options, Screen Saver Settings, and Personalization screens. To set up this server, we had to install several additional software components. The following subsections detail the necessary installation processes. Joining the domain 1. Set a static IP. 2. Select StartControl PanelNetwork ConnectionsLocal Area Connection. 3. Click Properties. 4. Highlight Internet Protocol (TCP/IP), and click Properties. 5. Select the Use the following DNS server addresses radio button, and in the Preferred DNS server field, enter the IP of the DNS server. Click OK. 6. Right-click My Computer, and select Properties. 7. Under the Computer Name tab, click Change. 8. In the Computer Name Changes screen, under the Member of section, select the Domain radial box, and type test.local 9. Select OK to start joining the domain. 10. When the screen appears asking for a person qualified on the domain, type Administrator as the username and Password1 as the password. 11. At the Welcome pop-up and the screen warning that you must restart the computer for the changes to take effect, click OK. 12. At the System Properties screen, click OK. 13. When a pop-up appears asking if you want to restart now, click Yes to restart your computer. Installing Internet Information Services 1. Click StartAdministrative ToolsServer Manager. 2. On the left pane, click Roles. 3. Click Add Roles. 4. Click the Application Server checkbox. 5. When the Add features required for Application Server? screen appears, click Add Required Features. 6. Click Next. 7. Click Next. 8. At the Select Role Services page for Application Server, click the Web Server (IIS) Support checkbox. 9. Click Add Required Support Role Services. 10. Click Next. 11. Click Next. 12. At the Select Role Services page for Web Server (IIS), click IIS 6 Management Compatibility, ASP, and CGI checkboxes, and click Next. 13. Click Install. 14. Click Close.
  • 26. A Principled Technologies report 26Improve datacenter energy efficiency with Intel Node Manager Installing Load Generator Download and install Load Generator 2013 using all defaults. Importing the certificate and editing the hosts file 1. Click Start, and type MMC 2. Click FileAdd/Remove Snap-in. 3. Choose Certificates, and click Add. 4. Choose Computer account, and click Next. 5. Choose Local computer, and click Finish. 6. Click OK. 7. Expand CertificatesTrusted Root Certificate AuthoritiesCertificates. 8. Click ActionAll TasksImport. 9. Click Next. 10. Browse to the share folder on the CAS server, and choose the new certificate you created. Click Next. 11. Leave defaults, and click Next. 12. Click Finish. 13. Click OK on the Import was successful message. 14. Open the Notepad program, and use FileOpen to open the hosts file stored at C:WindowsSystem32driversetc. 15. Add the IP and FQDN of the CAS server. 16. Save and close Notepad. Preparing Load Generator 1. Log into the mail client. 2. Select StartAll ProgramsMicrosoft ExchangeExchange Load Generator 2013. 3. When the Load Generator screen appears, select Start a new test. 4. Select Create a new test configuration, and click Continue. 5. Change the total length of simulation to 12 hours. 6. In the Specify test settings screen, type Password1 as the Directory Access Password and Mailbox Account Master Password, and click Continue with recipient management. 7. Create 2,000 users in the Mailbox Database, and click Continue. 8. To accept defaults for Advanced recipient settings, click Continue. 9. In the Specify test user groups screen, select the plus sign to add a user group. 10. Change the Client Type to Outlook 2007 Cached, the action profile to Outlook_300, and the Mailbox size to 250 MB, and click Continue. 11. In Remote configurations, check the checkbox to enable distributing the workload, enter the computer names of all of the test clients, and click Continue. 12. Click Save the configuration file as, and name it testcfg.xml 13. Click Start the initialization phase (recommended before running the test). 14. Once you have initialized the database, create a backup copy of the Exchange mailbox databases.
  • 27. A Principled Technologies report 27Improve datacenter energy efficiency with Intel Node Manager Running the LoadGen test To run the test, we installed the LoadGen client and server components and simulated 2,000 Exchange users targeting the Exchange VM using LoadGen’s Exchange_300 Workload profile. We ran the LoadGen benchmark for 30 minutes. For more details about LoadGen, see www.microsoft.com/download/en/details.aspx?displaylang=en&id=14060. STORAGE-INTENSIVE WORKLOAD: DVD STORE METHODOLOGY For DVD store testing, we installed a fresh copy of Windows Server 2012 R2 on the server under test. We also installed SQL Server 2014 and deployed four SQL instances, each with a 100GB database. We ran the test for 45 minutes using a .05 millisecond think time. Installing Microsoft Windows Server 2012 R2 Datacenter Edition 1. Insert the installation media into the CD/DVD drive, and restart the server. 2. When the option appears, to enter the Boot Manager, press F11. 3. Select BIOS Boot Menu. 4. Select SATA Optical Drive, and press Enter. 5. When prompted to boot from DVD, press any key. 6. When the installation screen appears, click My language is English (United States). 7. Leave language, time/currency format, and input method as default, and click Next. 8. Click Install now. 9. When the installation prompts you, enter the product key. 10. Select Windows Server 2012 R2 Datacenter (Server with a GUI), and click Next. 11. Check I accept the license terms, and click Next. 12. Click Custom: Install Windows only (advanced). 13. Select Drive 0 Unallocated Space, and click Next. At this point, Windows begins automatically and restarts automatically after completing. 14. When the Settings page appears, fill in the Password and Reenter Password fields with the same password. 15. Log in with the password you set up previously. Configuring Windows Update 1. In the left pane of the Server Manager screen, click Local Server. 2. In the main frame, next to Windows Update, click Not configured. 3. In the Windows Update screen, in the main pane, click Let me choose my settings. 4. Under Important updates, select Never check for updates (not recommended), and click OK. 5. In the left pane, click Check for updates, and install all available updates. 6. Close the Windows Update screen. Installing SQL Server 2014 1. Insert the installation DVD for SQL Server 2012 into the DVD drive.
  • 28. A Principled Technologies report 28Improve datacenter energy efficiency with Intel Node Manager 2. Click Run SETUP.EXE. If Autoplay does not begin the installation, navigate to the SQL Server 2014 DVD, and double-click it. 3. In the left pane, click Installation. 4. Click New SQL Server stand-alone installation or add features to an existing installation. 5. Select the Enter the product key radio button, and enter the product key. Click Next. 6. Click the checkbox to accept the license terms, and click Next. 7. Click Use Microsoft Update to check for updates, and click Next. 8. Click Install to install the setup support files. 9. If no failures are displayed, click Next. 10. At the Setup Role screen, choose SQL Server Feature Installation, and click Next. 11. At the Feature Selection screen, select Database Engine Services, Full-Text and Semantic Extractions for Search, Client Tools Connectivity, Client Tools Backwards Compatibility, Management Tools – Basic, and Management Tools – Complete. Click Next. 12. At the Installation Rules screen, after the check completes, click Next. 13. At the Instance configuration screen, leave the default selection of default instance, and click Next. 14. At the Server Configuration screen, choose NT ServiceSQLSERVERAGENT for SQL Server Agent, and choose NT ServiceMSSQLSERVER for SQL Server Database Engine. Change the Startup Type to Automatic. Click Next. 15. At the Database Engine Configuration screen, select the authentication method you prefer. (For our testing purposes, we selected Mixed Mode.) 16. Enter and confirm a password for the system administrator account. 17. Click Add Current user. This may take several seconds. 18. Click Next. 19. At the Error and usage reporting screen, click Next. 20. At the Installation Configuration Rules screen, check that there are no failures or relevant warnings, and click Next. 21. At the Ready to Install screen, click Install. 22. After installation completes, click Close. 23. Close the installation screen. 24. Navigate to the SQL Server 2014 DVD, and double-click it. 25. In the left pane, click Installation. 26. Click New SQL Server stand-alone installation or add features to an existing installation. 27. At the Installation Type screen, select Perform a new Installation of SQL Server 2014. Click Next. 28. Select the Enter the product key radio button, and enter the product key. Click Next. 29. Click the checkbox to accept the license terms, and click Next. 30. At the Setup Role screen, select SQL Feature Installation. Click Next. 31. At the Feature Selection screen, select Database Engine Services and Full-Text and Semantic Extractions for Search. Click Next.
  • 29. A Principled Technologies report 29Improve datacenter energy efficiency with Intel Node Manager 32. At the Instance Configuration screen, select named instance, and enter a name. Click Next. 33. At the Server Configuration screen, choose NT ServiceSQLSERVERAGENT for SQL Server Agent, and choose NT ServiceMSSQLSERVER for SQL Server Database Engine. Change the Startup Type to Automatic. Click Next. 34. At the Database Engine Configuration screen, select the authentication method you prefer. For our testing purposes, we selected Mixed Mode. 35. Enter and confirm a password for the system administrator account. 36. Click Add Current user. 37. Click Next. 38. At the Installation Configuration Rules screen, check that there are no failures or relevant warnings, and click Next. 39. At the Ready to Install screen, click Install. 40. After installation completes, click Close. 41. Repeat steps 4 - 40 to install three more SQL instances. Configuring the database We generated the database data using the Install.pl script included with DVD Store version 2.1 (DS2), providing the parameters for our 100GB database size and the database platform on which we ran Microsoft SQL Server. We ran the Install.pl script on a utility system running Linux. The Install.pl script generated the database schema. After processing the data generation, we transferred the data files and schema creation files to a Windows- based system running SQL Server. We built the 100GB database in SQL Server, and we performed a full backup, storing the backup file remotely for quick access. We used that backup file to restore the server between test runs. The only modifications we made to the schema creation scripts were the specified file sizes for our database. We explicitly set the file sizes higher than necessary to ensure that no file-growth activity would affect the outputs of the test. Other than this file size modification, we created and loaded the database in accordance with the DVD Store documentation. Specifically, we followed these steps: 1. We generated the data, and created the database and file structure using database creation scripts in the DS2 download. We made size modifications specific to our 100GB database, and made the appropriate changes to drive letters. 2. We transferred the files from our Linux data generation system to a Windows system running SQL Server. 3. We created database tables, stored procedures, and objects using the provided DVD Store scripts. 4. We set the database recovery model to bulk-logged to prevent excess logging. 5. We loaded the data we generated into the database. For data loading, we used the import wizard in SQL Server Management Studio. Where necessary, we retained options from the original scripts, such as Enable Identity Insert. 6. We created indices, full-text catalogs, primary keys, and foreign keys using the database-creation scripts. 7. We updated statistics on each table according to database-creation scripts, which sample 18 percent of the table data.
  • 30. A Principled Technologies report 30Improve datacenter energy efficiency with Intel Node Manager 8. On the SQL Server instance, we created a ds2user SQL Server login using the following Transact SQL (TSQL) script: USE [master] GO CREATE LOGIN [ds2user] WITH PASSWORD=N’’, DEFAULT_DATABASE=[master], DEFAULT_LANGUAGE=[us_english], CHECK_EXPIRATION=OFF, CHECK_POLICY=OFF GO 9. We set the database recovery model back to full. 10. We created the necessary full text index using SQL Server Management Studio. 11. We created a database user, and mapped this user to the SQL Server login. 12. We performed a full backup of the database. This backup allowed us to restore the databases to a pristine state relatively quickly between tests. Running the DVD Store tests We created a series of batch files, SQL scripts, and shell scripts to automate the complete test cycle. DVD Store outputs an orders-per-minute metric, which is a running average calculated through the test. In this report, we report the last OPM reported by each client/target pair. Each complete test cycle consisted of the following general steps: 1. Clean up prior outputs from the target system and the client driver system. 2. Drop the database from the target. 3. Restore the database on the target. 4. Shut down the target. 5. Reboot the host and client system. 6. Wait for a ping response from the server under test (the hypervisor system), the client system, and the target. 7. Let the test server idle for 20 minutes. 8. Start the DVD Store driver on the client. We used the following DVD Store parameters for testing: ds2sqlserverdriver.exe --target=<target_IP> --ramp_rate=10 --run_time=60 -- n_threads=32 --db_size=100GB --think_time=0.05 --detailed_view=Y --warmup_time=5 --csv_output=<drive path> MEMORY-INTENSIVE WORKLOAD: SPECJJB METHODOLOGY SPECjbb2005 requires Java Runtime Environment to run. We used Oracle HotSpot 64-bit server with Java version 1.7.0_65 for testing. We used the following steps to install Java.
  • 31. A Principled Technologies report 31Improve datacenter energy efficiency with Intel Node Manager Installing Java 1. Download Java installation file from https://java.com/en/download/. 2. Double click the installation file. 3. At the Welcome screen, select Change destination folder and click Install. 4. At destination folder, click Change. 5. Navigate to C: and click Make folder. Name the folder Java, and click Ok. 6. Click Next. 7. When the installation finishes, click Close. Installing SPECjbb2005 The SPECjbb2005 benchmark has a main folder that must be copied over to the server under test. We copied this folder to the test server and put in C:SPECjbb2005. We used SPECjbb2005 version 1.07 for testing. For testing, we used four Java instances. We started the test with the default runit_multi. bat file in the SPECjbb2005 directory. However, we used the following Java Options: -Xmx64g -Xms64g -Xmn50g -XX:+UseParallelOldGC -XX:-UseAdaptiveSizePolicy -XX:-UseBiasedLocking CPU-INTENSIVE WORKLOAD: VDI TESTING METHODOLOGY On the infrastructure servers, we installed and configured VMware View Horizon 6.0 to use a VMware vCenter and VMware Composer Server. We created one automated, floating, linked clone pool, and configured the pool to use 1 GB of host cache. We configured the linked clones with two vCPUs and 1.5 GB of memory. Configuring the VMs and storage VM name Qty. OS Role Host(s) vCPUs Mem (GB) vDisk (GB) DC1 1 Windows 2008 R2 Active Directory, DNS, DHCP Infrastructure 2 4 100 VSI_Share 1 Windows 2008 R2 Login VSI share Infrastructure 2 4 100 vCenter 1 Windows 2008 R2 VMware vCenter Infrastructure 4 8 100 Composer 1 Windows 2008 R2 VMware Composer Infrastructure 2 8 100 View 1 Windows 2008 R2 VMware View server Infrastructure 2 4 100 SQL 1 Windows 2008 R2 vCenter, and Composer DB server Infrastructure 2 4 100 L01-l06 6 Windows 7 (x64) Login VSI Launcher Infrastructure 2 8 40 View VMs 150 Windows 7 (x86) VMware Virtual Desktops Intel SUT 2 1.5 24 Figure 18: Detailed VM configuration. We used the Login VSI 4.1 Knowledge Worker workload to generate a reproducible, real-world test case against the virtual desktops pool. This workload simulated the execution of various applications, including Microsoft® Internet
  • 32. A Principled Technologies report 32Improve datacenter energy efficiency with Intel Node Manager Explorer®, Microsoft Office applications, and high definition videos. Using Login VSI, we could determine how many virtual desktop users each solution could support. We configured Login VSI to run in benchmark mode to create a default test environment in which we could compare test results with each other. Login VSI measures the total response time of multiple operations from each session, and at the beginning of each test, it samples a small set of virtual desktops to generate a VSImax Baseline. As more sessions begin to consume system resources, response time degrades, and the VSI response time increases until it reaches VSImax. VSImax is reached when the average VSI response time result reaches VSIbase + a 1000 ms latency threshold. When this condition is met, the benchmark records a Login VSImax, which is the maximum number of sessions that platform could support. Not reaching VSImax is an indication of good end user response time. For more information about VSImax, see www.loginvsi.com/documentation/index.php?title=VSImax Installing VMware ESXi 6.0 on the infrastructure servers and server under test 1. Attach the installation media. 2. Boot the server. 3. At the VMware Installer screen, press Enter. 4. To Accept and Continue at the EULA screen, press F11. 5. Under Storage Devices, select the appropriate virtual disk, and press Enter. 6. Select US as the keyboard layout, and press Enter. 7. Enter the root password twice, and press Enter. 8. Press F11 to start installation. 9. After the server reboots, press F2 and enter root credentials. 10. Select Configure Management Network, and press Enter. 11. Select the appropriate network adapter, and select OK. 12. Log into the server using the VMware vSphere client. 13. Select the Configuration tab, and click Networking. 14. Click Add Networking. 15. Create the management network. 16. To configure server time, click the Configuration tab, and select Time Configuration. 17. Click DNS and Routing, and confirm the settings. Setting up a VM to host the Microsoft Windows Active Directory® server (DC1) 1. Connect to the infra1 server via the VMware vSphere client. 2. Log in as root 3. In the VMware vSphere client, under Basic Tasks, select Create a new virtual machine. 4. Choose Custom, and click Next. 5. Assign the name DC1 to the virtual machine, and click Next. 6. Select infra1 as the host, and click Next. 7. Select the appropriate storage, and click Next. 8. Choose Virtual Machine Version 11, and click Next. 9. Choose Windows, choose Microsoft Windows Server® 2008 R2 (64-bit), and click Next.
  • 33. A Principled Technologies report 33Improve datacenter energy efficiency with Intel Node Manager 10. For CPUs, select one virtual processor socket and two cores per virtual socket, and click Next. 11. Choose 4 GB RAM, and click Next. 12. Click 1 for the number of NICs, select VMXNET3, connect to the PRIV-NET network, and click Next. 13. Leave the default virtual storage controller, and click Next. 14. Choose to create a new virtual disk, and click Next. 15. Make the OS virtual disk size 100 GB, choose thin-provisioned lazy zeroed, specify external storage, and click Next. 16. Keep the default virtual device node (0:0), and click Next. 17. Click Finish. 18. Right-click the VM, and choose Edit Settings. 19. Click the Resources tab, and click Memory. 20. Select Reserve all guest memory, and click OK. 21. Connect the VM virtual CD-ROM to the Microsoft Windows Server 2008 R2 installation disk. 22. Start the VM. Installing the Microsoft Windows Server 2008 R2 operating system on the VM 1. Open a virtual machine console on DC1. 2. Choose the language, time and currency, and keyboard input. Click Next. 3. Click Install Now. 4. Choose Windows Server 2008 R2 Enterprise (Full Installation), and click Next. 5. Accept the license terms, and click Next. 6. Click Custom. 7. Click the Disk, and click Drive options (advanced). 8. Click NewApplyFormat, and click Next. 9. After the installation completes, to set the Administrator password, click OK. 10. Enter the administrator password twice, and click OK. 11. Install VMware Tools. For more information, see kb.vmware.com/selfservice/microsites/search.do?language=en_US&cmd=displayKC&externalId=340. 12. Reboot the server. 13. Connect the machine to the Internet, and install all available Windows updates. Restart as necessary. 14. Enable remote desktop access. 15. Change the hostname to DC1, and reboot when the installation prompts you. 16. Set up networking for the data network: a. Click StartControl Panel, right-click Network Connections, and choose Open. b. Right-click the VM traffic NIC, and choose Properties. c. Uncheck TCP/IP (v6). d. Select TCP/IP (v4), and choose Properties. e. Set the IP address as 172.16.0.10/255.255.0.0
  • 34. A Principled Technologies report 34Improve datacenter energy efficiency with Intel Node Manager Installing Active Directory and DNS services on DC1 1. Click StartRun, type dcpromo, and click OK. 2. At the Active Directory Domain Services Installation Wizard welcome screen, check the Use advanced mode installation option, and click Next. 3. In the Choose a Deployment Configuration dialog box, select Create a new domain in a new forest, and click Next. 4. At the FQDN page, type domain.local, and click Next. 5. At the NetBIOS name prompt, leave the name domain, and click Next. 6. At the Forest Functionality level, select Windows Server 2008 R2, and click Next. 7. At the additional Domain Controller Options, leave DNS server selected, and click Next. 8. Assign a Directory Services Restore Mode Administrator account password, and click Next. 9. At the Summary screen, review your selections, and click Next. 10. Once Active Directory Domain Services finishes installing, click Finish, and restart the system. 11. Click StartRun, and type dnsmgmt.msc 12. Create a reverse lookup zone for DC1. 13. Create static entries for the three infrastructure servers and the five servers under test. Configuring the Windows time service on DC1 To ensure reliable time, we pointed our Active Directory server to a physical NTP server. 1. Open a command prompt. 2. Type the following: W32tm /config /syncfromflags:manual /manualpeerlist:"<ip address of a NTP server>" W32tm /config /reliable:yes W32tm /config /update W32tm /resync Net stop w32time Net start w32time Setting up DHCP services on DC1 1. Click StartAdministrative ToolsServer ManagerAdd Roles. 2. Select DHCP Server, and click Next. 3. At the Introduction to DHCP Server screen, click Next. 4. At the Specify IPv4 DNS Settings screen, type domain.local for the parent domain. 5. Enter the preferred DNS server IPv4 address, and click Next. 6. At the Specify IPv4 WINS Server Settings screen, select WINS is not required for applications on the network, and click Next. 7. At the Add or Edit DHCP Scopes screen, click Add. 8. At the Add Scope screen, enter the Name DHCP Scope name.
  • 35. A Principled Technologies report 35Improve datacenter energy efficiency with Intel Node Manager 9. In the next box, set the following values, and click OK.  Start IP address=172.16.2.1  End IP address=172.16.100.200  Subnet mask=255.255.0.0 10. Check Activate This Scope. 11. At the Add or Edit DHCP Scopes screen, click Next. 12. Click Enable DHCP v6 Stateless Mode, and click Next. 13. Leave the default IPv6 DNS Settings, and click Next. 14. At the Authorize DHCP server dialog box, select Use current credentials. 15. At the Confirm Installation Selections screen, click Next. If the installation is set up correctly, a screen displays saying the DHCP server install succeeded. 16. Click Close. Setting up a VM to host the vCenter server (vCenter) 1. Log into the infra1 server with the VMware vSphere client. 2. In the VMware vSphere client, under Basic Tasks, select Create a new virtual machine. 3. Choose Custom, and click Next. 4. Assign the name vCenter to the virtual machine, and click Next. 5. Select infra1 as the host, and click Next. 6. Select the appropriate storage, and click Next. 7. Choose Virtual Machine Version 8, and click Next. 8. Choose Windows, choose Microsoft Windows Server 2008 R2 (64-bit), and click Next. 9. For CPUs, select one virtual processor socket, and four cores per virtual socket, and click Next. 10. Choose 8GB RAM, and click Next. 11. For the number of NICs, click 1; select VMXNET3; connect to the PRIV-NET port group; and click Next. 12. Leave the default virtual storage controller, and click Next. 13. Keep the default virtual device node (0:0), and click Next. 14. Connect the VM virtual CD-ROM to the Microsoft Windows 2008 R2 installation disk. 15. Click Finish. 16. Right-click the vCenter VM, and click Edit settings. 17. Click the Resources tab, click Memory, check the Reserve all guest memory checkbox, and click OK. 18. Start the VM. Installing the Microsoft Windows Server 2008 R2 operating system on the VM 1. Open a virtual machine console on vCenter. 2. Choose the language, time and currency, and keyboard input. Click Next. 3. Click Install Now. 4. Choose Windows Server 2008 R2 Enterprise (Full Installation), and click Next. 5. Accept the license terms, and click Next. 6. Click Custom.
  • 36. A Principled Technologies report 36Improve datacenter energy efficiency with Intel Node Manager 7. Click the Disk, and click Drive options (advanced). 8. Click NewApplyFormat, and click Next. 9. After the installation completes, to set the Administrator password, click OK. 10. Enter the administrator password twice, and click OK. 11. Install VMware Tools. For more information, see kb.vmware.com/selfservice/microsites/search.do?language=en_US&cmd=displayKC&externalId=340. 12. Reboot. 13. Connect the machine to the Internet, and install all available Windows updates. Restart as necessary. 14. Enable remote desktop access. 15. Change the hostname to vCenter, and reboot when the installation prompts you. 16. Set up networking for the data network: a. Click Start, click Control Panel, right-click Network Connections, and choose Open. b. Right-click the VM traffic NIC, and choose Properties. c. Uncheck the TCP/IP (v6) checkbox. d. Select TCP/IP (v4), and choose Properties. e. Set the IP address, subnet, gateway, and DNS server. 17. Join the domain.local domain. 18. Reboot the system. Setting up a VM to host Microsoft SQL Server (SQL) for infrastructure 1. Connect to the infra1 server via the VMware vSphere client. 2. Log in as root 3. In the VMware vSphere client, under Basic Tasks, select Create a new virtual machine. 4. Choose Custom, and click Next. 5. Assign the name SQL to the virtual machine, and click Next. 6. Select infra1 as the host, and click Next. 7. Select the appropriate storage, and click Next. 8. Choose Virtual Machine Version 11, and click Next. 9. Choose Windows, choose Microsoft Windows Server 2008 R2 (64-bit), and click Next. 10. For CPUs, select one virtual processor socket, select two cores per virtual socket, and click Next. 11. Choose 4 GB RAM, and click Next. 12. Click 1 for the number of NICs, select VMXNET3, connect to the PRIV-NET network, and click Next. 13. Leave the default virtual storage controller, and click Next. 14. Choose to create a new virtual disk, and click Next. 15. Make the OS virtual disk size 100 GB, choose thin-provisioned lazy zeroed, specify external storage, and click Next. 16. Keep the default virtual device node (0:0), and click Next. 17. Click Finish. 18. Right-click the VM, and choose Edit Settings.
  • 37. A Principled Technologies report 37Improve datacenter energy efficiency with Intel Node Manager 19. Click the Resources tab, and click Memory. 20. Select Reserve all guest memory, and click OK. 21. Connect the VM virtual CD-ROM to the Microsoft Windows Server 2008 R2 installation disk. 22. Start the VM. Installing the Microsoft Windows Server 2008 R2 operating system on the VM 1. Open a virtual machine console on SQL. 2. Choose the language, time and currency, and keyboard input. Click Next. 3. Click Install Now. 4. Choose Windows Server 2008 R2 Enterprise (Full Installation), and click Next. 5. Accept the license terms, and click Next. 6. Click Custom. 7. Click the Disk, and click Drive options (advanced). 8. Click NewApplyFormat, and click Next. 9. After the installation completes, to set the Administrator password, click OK. 10. Enter the administrator password twice, and click OK. 11. Install VMware Tools. For more information, see kb.vmware.com/selfservice/microsites/search.do?language=en_US&cmd=displayKC&externalId=340. 12. Reboot the server. 13. Connect the machine to the Internet, and install all available Windows updates. Restart as necessary. 14. Enable remote desktop access. 15. Change the hostname to SQL, and reboot when the installation prompts you. 16. Set up networking for the data network: a. Click StartControl Panel, right-click Network Connections, and choose Open. b. Right-click the VM traffic NIC, and choose Properties. c. Uncheck the TCP/IP (v6) checkbox. d. Select TCP/IP (v4), and choose Properties. e. Set the IP address, subnet, gateway, and DNS server. Installing Microsoft SQL Server 2008 R2 1. Insert the installation media, and to install .NET framework, click OK. 2. Wait for the SQL Installer to launch. On the left menu, click Installation. 3. Click New installation or add features to an existing installation. Click OK. 4. Enter the Product Key, and click Next. 5. Check the I accept the license terms checkbox, and click Next. 6. To install the Setup Support Files (required), click Install. 7. Resolve any issues displayed in the setup wizard, and click Next. 8. At the Setup Role screen, select SQL Server Feature Installation, and click Next. 9. Select Database Engine Services, Full-Text Search, Client Tools Backwards Compatibility, and Management Tools Basic and Complete, and click Next twice.
  • 38. A Principled Technologies report 38Improve datacenter energy efficiency with Intel Node Manager 10. Accept instance configuration defaults, and click Next. 11. Accept defaults for disk space requirements, and click Next. 12. Click Use the same account for all SQL Server services, select NT AuthoritySystem, and click OK. Click Next. 13. Select Mixed Mode, and enter a password for the SA account. Click Add Current User, and click Next. 14. Accept defaults for error reporting, and click Next. 15. Review installation configuration rules check, and click Next. 16. To begin the installation, click Install. 17. At the completion screen, click Close. 18. Run Windows Update to receive all updates and security patches. Setting up databases for vCenter and VMware View™ Composer 1. Log on to SQL as DOMAINadministrator 2. From the server desktop, open StartAll ProgramsMicrosoft SQL Server 2008 R2Configuration ToolsSQL Server Configuration Manager. 3. Click SQL Server Network ConfigurationProtocols for MSSQLSERVER. 4. Right-click TCP/IP, and select Enabled. 5. Click SQL Services, right-click SQL Server Browser, and select Properties. 6. In the SQL Server Browser Properties, select the Services tab, change the Start mode to Automatic, and click OK. Repeat this step for the SQL Server Agent service. 7. Start the SQL Server Browser service and the SQL Server Agent service. 8. From the SQL Server desktop, open StartAll ProgramsMicrosoft SQL Server 2008 R2Configuration ToolsSQL Server Management Studio. 9. Click Connect. 10. Select the Databases folder, right-click, and select New Database. 11. Provide the name vCenter for the new database. 12. Select the Databases folder, right-click, and select New Database. 13. Provide the name composer for the new database. 14. Click Options, change the recovery model from full to simple, and click OK. Setting up an ODBC DSN on vCenter 1. Log into vCenter as DOMAINadministrator 2. Click Options, change the recovery model from full to simple, and click OK. 3. From the desktop of the vCenter server, select Start, Run, and type odbcad32.exe. Press Enter. 4. Click the system DSN tab. 5. Click Add. 6. Click SQL Server Native Client 10.0, and click Finish. 7. In the Create a New Data Source to SQL Server text box, type the connection name vcenter 8. For Server, select SQL, and click Next. 9. Change authentication to With SQL Server authentication using a login ID and password entered by the user, type sa as the Login ID, use the password you defined in SQL Server setup for the SA account, and click Next.
  • 39. A Principled Technologies report 39Improve datacenter energy efficiency with Intel Node Manager 10. From the pull-down menu, select Change the default database to choose vCenter, and click Next. 11. Click Finish. 12. To confirm correct configuration, click Test Data Source… 13. To create the vCenter ODBC connection, click OK. Installing VMware vCenter 6.0 1. Log into vCenter as DOMAINadministrator 2. From the VMware vCenter 6 install media, click Autorun. 3. To start the install wizard, click Run. 4. Select vCenter Server for Windows, and click Install. 5. At the Install wizard welcome screen, click Next. 6. Accept the End User License Agreement, and click Next. 7. Select embedded deployment and the deployment type, and click Next. 8. Verify the system name, and click Next. 9. Enter and confirm the password you wish to use with the Administrator account for vCenter Single Sign On, and click Next. 10. Select Use Windows Local System Account and the service account, and click Next. 11. Select Use an external database, and enter database credentials. Click Next. 12. At the Configure Ports screen, click Next. 13. Accept the default installation path, and click Next. 14. Click Install. 15. Using the vSphere web client, log into the vCenter server as DOMAINadministrator 16. Right-click the root of vCenter, and click New Data center. 17. Name the new datacenter datacenter 18. Add the servers under test and infrastructure servers to the datacenter. Setting up a VM to host VMWare View Composer 1. Log into vCenter via the VMware Web client. 2. Click the Virtual Machines tab. 3. Right-click, and choose New Virtual Machine. 4. Select Create a new virtual machine. 5. Choose Custom, and click Next. 6. Assign the name composer to the virtual machine, and click Next. 7. Select infra1 as the host, and click Next. 8. Select the appropriate storage, and click Next. 9. Choose Virtual Machine Version 11, and click Next. 10. Choose Windows, choose Microsoft Windows Server 2008 R2 (64-bit), and click Next. 11. For CPUs, select one virtual processor socket, select four cores per virtual socket, and click Next. 12. Choose 8GB RAM, and click Next. 13. For the number of NICs, click 1; select VMXNET3; connect to the PRIV-NET port group; and click Next.
  • 40. A Principled Technologies report 40Improve datacenter energy efficiency with Intel Node Manager 14. Leave the default virtual storage controller, and click Next. 15. Keep the default virtual device node (0:0), and click Next. 16. Connect the VM virtual CD-ROM to the Microsoft Windows 2008 R2 installation disk. 17. Click Finish. 18. Right-click the composer VM, and click Edit settings. 19. Click the Resources tab, click Memory, check the Reserve all guest memory checkbox, and click OK. 20. Start the VM. Installing the Microsoft Windows Server 2008 R2 operating system on the VM 1. Open a virtual machine console on the composer VM. 2. Choose the language, time and currency, and keyboard input. Click Next. 3. Click Install Now. 4. Choose Windows Server 2008 R2 Enterprise (Full Installation), and click Next. 5. Accept the license terms, and click Next. 6. Click Custom. 7. Click the Disk, and click Drive options (advanced). 8. Click NewApplyFormat, and click Next. 9. After the installation completes, to set the Administrator password, click OK. 10. Enter the administrator password twice, and click OK. 11. Install VMware Tools. For more information, see kb.vmware.com/selfservice/microsites/search.do?language=en_US&cmd=displayKC&externalId=340. 12. Reboot. 13. Connect the machine to the Internet, and install all available Windows updates. Restart as necessary. 14. Enable remote desktop access. 15. Change the hostname to composer, and reboot when the installation prompts you. 16. Set up networking for the data network: a. Click Start, click Control Panel, right-click Network Connections, and choose Open. b. Right-click the VM traffic NIC, and choose Properties. c. Uncheck the TCP/IP (v6) checkbox. d. Select TCP/IP (v4), and choose Properties. e. Set the IP address, subnet, gateway, and DNS server. 17. Join the domain.local domain. 18. Reboot the system. Setting up a database and ODBC DSN for VMware View Composer 1. Log on to the composer VM as DOMAINadministrator 2. From the desktop of the vCenter server, select Start, select Run, type odbcad32.exe and press Enter. 3. Click the system DSN tab. 4. Click Add. 5. Click SQL Server Native Client 10.0, and click Finish.
  • 41. A Principled Technologies report 41Improve datacenter energy efficiency with Intel Node Manager 6. In the text box named Create a New Data Source to SQL Server, type the connection name composer 7. For Server, select SQL, and click Next. 8. Change authentication to With SQL Server authentication using a login ID and password entered by the user, type sa as the Login ID, use the password you defined in SQL Server setup for the SA account, and click Next. 9. Select Change the default database to:, choose composer from the pull-down menu, and click Next. 10. Click Finish. 11. To confirm correct configuration, click Test Data Source… 12. To create the Composer ODBC connection, Click OK. Setting up VMware Horizon View Composer 6 1. Open the View 5 media folder, and run the file named VMware-viewcomposer-6.0.1 2. At the Welcome screen and the Patents screen, click Next. 3. Accept the VMware end user license agreement, and click Next. 4. Leave the Destination folder as default, and click Next. 5. In the Database information box, type composer as the source name and sa as the user name. Enter the password, and click Next. 6. Leave the default SOAP port, and click Next. 7. Click Install, and click Finish. 8. Restart the server. Setting up a VM to host the VMware View connection server 1. Log into vCenter via the VMware Web client. 2. Click the Virtual Machines tab. 3. Right-click, and choose New Virtual Machine. 4. Select Create a new virtual machine. 5. Choose Custom, and click Next. 6. Assign the name View to the virtual machine, and click Next. 7. Select infrastructure for the host, and click Next. 8. Select the appropriate storage, and click Next. 9. Choose Virtual Machine Version 11, and click Next. 10. Choose Windows, choose Microsoft Windows Server 2008 R2 (64-bit), and click Next. 11. For CPUs, select one virtual processor socket, select two cores per virtual socket, and click Next. 12. Choose 4GB RAM, and click Next. 13. For the number of NICs, click 1; select VMXNET 3; connect to the PRIV-NET port group; and click Next. 14. Leave the default virtual storage controller, and click Next. 15. Choose to create a new virtual disk, and click Next. 16. Make the OS virtual disk size 100 GB, choose thick-provisioned lazy zeroed, specify the OS datastore on the external storage, and click Next. 17. Keep the default virtual device node (0:0), and click Next. 18. Connect the VM virtual CD-ROM to the Microsoft Windows Server 2008 R2 installation disk.
  • 42. A Principled Technologies report 42Improve datacenter energy efficiency with Intel Node Manager 19. Right-click the View Connection VM, and click Edit settings. 20. Click the Resources tab, click Memory, check the Reserve all guest memory checkbox, and click OK. 21. Click Finish. 22. Start the VM. Installing the Microsoft Windows Server 2008 R2 operating system on the VM 1. Open a virtual machine console on the View VM. 2. Choose the language, time and currency, and keyboard input. Click Next. 3. Click Install Now. 4. Choose Windows Server 2008 R2 Enterprise (Full Installation), and click Next. 5. Accept the license terms, and click Next. 6. Click Custom. 7. Click the Disk, and click Drive options (advanced). 8. Click NewApplyFormat, and click Next. 9. After the installation completes, to set the Administrator password, click OK. 10. Enter the administrator password twice, and click OK. 11. Install VMware Tools. For more information, see kb.vmware.com/selfservice/microsites/search.do?language=en_US&cmd=displayKC&externalId=340. 12. Reboot. 13. Connect the machine to the Internet, and install all available Windows updates. Restart as necessary. 14. Enable remote desktop access. 15. Change the hostname to View, and reboot when the installation prompts you. 16. Set up networking for the data network: a. Click Start, click Control Panel, right-click Network Connections, and choose Open. b. Right-click the VM traffic NIC, and choose Properties. c. Uncheck the TCP/IP (v6) checkbox. d. Select TCP/IP (v4), and choose Properties. e. Set the IP address, subnet, gateway, and DNS server. 17. Join the VDI domain. 18. Reboot the system. Installing the VMware View Connection Server 6 1. Log into the server named View Connection. 2. Browse to VMware View installation media, and click VMware-viewconnectionserver-x86_64-6.0.1. 3. Click Run. 4. At the Welcome screen, click Next. 5. Agree to the End User License Agreement, and click Next. 6. Keep the default installation directory, and click Next. 7. Select View Standard Server, and click Next. 8. At the Data Recovery screen, enter a backup password, and click Next. 9. Allow View Server to configure the Windows firewall automatically, and click Next.
  • 43. A Principled Technologies report 43Improve datacenter energy efficiency with Intel Node Manager 10. Authorize the local administrator to administer View, and click Next. 11. Choose whether to participate in the customer experience improvement program, and click Next. 12. To finish installing View Connection Server, complete the installation wizard. 13. Click Finish. 14. Reboot server. Configuring the VMware Horizon View Connection Server 1. Open a Web browser to <view connection server FQDN>/admin 2. Log in as administrator 3. Under Licensing, click Edit License... 4. Enter a valid license serial number, and click OK. 5. Open View ConfigurationServers. 6. In the vCenter Servers tab, click Add. 7. Enter vCenter Server credentials, and click Next. 8. At the View composer screen, select View Composer co-installed with vCenter Server, and click Next. 9. At the View composer domains screen, click Add. 10. Enter full domain name and user credentials. 11. At the storage screen, select Reclaim VM disk space, and select Enable View Storage Accelerator. 12. Change the Default host cache size to 1.5GB, and click Next. 13. At the ready to complete screen, click Finish. Setting up a Windows 7 Enterprise (x86) ESXi base image VM 1. Log into vCenter via the VMware Web client. 2. Click the Virtual Machines tab. 3. Right-click, and choose New Virtual Machine. 4. Select Create a new virtual machine. 5. Choose Custom, and click Next. 6. Assign the name View-gold, and click Next. 7. Select the appropriate host, and click Next. 8. Select the appropriate storage. 9. Choose Virtual Machine Version 11, and click Next. 10. Choose Windows, choose Microsoft Windows 7 (32-bit), and click Next. 11. For CPUs, select one virtual processor socket, select two cores per virtual socket, and click Next. 12. Choose 1.5 GB RAM, and click Next. 13. For the number of NICs, click 1; select VMXNET 3; and click Next. 14. Leave the default virtual storage controller, and click Next. 15. Choose to create a new virtual disk, and click Next. 16. Make the OS virtual disk size 24 GB, choose Thin Provision, specify the OS datastore on the external storage, and click Next. 17. Keep the default virtual device node (0:0), and click Next.
  • 44. A Principled Technologies report 44Improve datacenter energy efficiency with Intel Node Manager 18. Click Finish. 19. Click the Hardware tab, CD/DVD Drive, and connect the VM virtual CD-ROM to the Microsoft Windows 7 x86 installation disk. 20. Click OK. Installing Windows 7 Enterprise (x86) on ESXi base image VM 1. When the installation prompts you, press any key to begin setup. 2. Enter your language preferences, and click Next. 3. Click Install. 4. Accept the license terms, and click Next. 5. Select Custom, and select the drive that will contain the OS. 6. Click Install. 7. Type user for the username, and click Next. 8. Enter no password, and click Next. 9. At the system protection screen, select Use recommended settings, and click Next. 10. Enter your time zone, and click Next. 11. Select the Work Network setting, and click Next. 12. Install VMware Tools, and select Complete Installation. For more information, see kb.vmware.com/selfservice/microsites/search.do?language=en_US&cmd=displayKC&externalId=340. 13. Reboot. 14. Connect the machine to the Internet, and install all available Windows updates. Restart as necessary. 15. Join the domain and restart the VM. 16. Install Microsoft Office Professional Plus 2010. Installing the VMware Horizon View 6 agent 1. Browse to the VMware Horizon View 6 media, and run the VMware-viewagent file. 2. Click Run. 3. At the Welcome screen, click Next. 4. Accept the VMware end user license agreement, and click Next. 5. Select defaults, and click Next. 6. Click Install. Configuring Regedit for QuickPrep 1. Click StartRun, and type regedit 2. Browse to HKEY_LOCAL_MACHINESYSTEMCurrentControlSetServicesvmware-viewcomposer-ga. 3. Right-click SkipLicenseActivation, and click Modify. 4. Change the value from 0 to 1. 5. Shut down the machine, and take a snapshot of the final disk image. Deploying Virtual Desktops using VMware Horizon View 1. Open the View Administrator. 2. Log in as administrator 3. Under Inventory, click Pools, and click Add.
  • 45. A Principled Technologies report 45Improve datacenter energy efficiency with Intel Node Manager 4. Select Automatic Pool, and click Next. 5. Select Dedicated, and click Next. 6. Select View Composer linked clones, and click Next. 7. For the pool ID and display name, type pool, and click Next. 8. Leave the pool settings as defaults, and click Next. 9. Under Naming Pattern, enter an appropriate name pattern for the pool. 10. Under Pool Sizing, type 150 for Max number of desktops and the number of spare (power on) desktops. 11. Select Provision all desktops up-front, and click Next. 12. Select the defaults under View Composer Disks, and click Next. 13. Under Storage Optimization, select Do not use VMware Virtual SAN. 14. Under vCenter Settings, select one of the following, depending on where you are deploying virtual machines:  Parent VM  Snapshot  VM folder location  Host or cluster  Resource pool  Datastores 15. Under Advanced Storage Options, select Use View Storage Accelerator (OS disk, 7 days). 16. Under Guest customization, select the following:  Domain: domain.local  AD container: OU=Computers,OU=LoginVSI 17. Select Use Quick Prep, and click Next. 18. Click Finish. 19. After this wizard finishes, select Entitle users. 20. Select the LoginVSI group and click OK. Installing the Login VSI 4 benchmark Setting up a VM to host the Login VSI share 1. Connect to an infrastructure server via the VMware web client. 2. In the VMware vSphere client, under Basic Tasks, select Create a new virtual machine. 3. Choose Custom, and click Next. 4. Assign the name VSI_share to the virtual machine, and click Next. 5. Select infra1 as the host, and click Next. 6. Select the appropriate storage, and click Next. 7. Choose Virtual Machine Version 11, and click Next. 8. Choose Windows, choose Microsoft Windows Server 2008 R2 (64-bit), and click Next. 9. For CPUs, select one virtual processor socket, select two cores per virtual socket, and click Next. 10. Choose 4 GB RAM, and click Next. 11. For the number of NICs, click 1; select VMXNET3; connect to the PRIV-NET network; and click Next.
  • 46. A Principled Technologies report 46Improve datacenter energy efficiency with Intel Node Manager 12. Leave the default virtual storage controller, and click Next. 13. Choose to create a new virtual disk, and click Next. 14. Make the OS virtual disk size 100 GB, choose thin-provisioned lazy zeroed, specify external storage, and click Next. 15. Keep the default virtual device node (0:0), and click Next. 16. Click Finish. 17. Right-click the VM, and choose Edit Settings. 18. Click the Resources tab, and click Memory. 19. Select Reserve all guest memory, and click OK. 20. Connect the VM virtual CD-ROM to the Microsoft Windows Server 2008 R2 installation disk. 21. Start the VM. Installing the Microsoft Windows Server 2008 R2 operating system on the VM 1. Open a virtual machine console on VSIshare. 2. Choose the language, time and currency, and keyboard input. Click Next. 3. Click Install Now. 4. Choose Windows Server 2008 R2 Enterprise (Full Installation), and click Next. 5. Accept the license terms, and click Next. 6. Click Custom. 7. Click the Disk, and click Drive options (advanced). 8. Click NewApplyFormat, and click Next. 9. After the installation completes, click OK to set the Administrator password. 10. Enter the administrator password twice, and click OK. 11. Install VMware Tools. For more information, see kb.vmware.com/selfservice/microsites/search.do?language=en_US&cmd=displayKC&externalId=340. 12. Reboot the server. 13. Connect the machine to the Internet, and install all available Windows updates. Restart as necessary. 14. Enable remote desktop access. 15. Change the hostname to VSIShare, and reboot when the installation prompts you. 16. Set up networking for the data network: a. Click StartControl Panel, right-click Network Connections, and choose Open. b. Right-click the VM traffic NIC, and choose Properties. c. Uncheck the TCP/IP (v6) checkbox. d. Select TCP/IP (v4), and choose Properties. e. Set the IP address, subnet, gateway, and DNS server. Installing the Login VSI benchmark on VSI_share 1. Log into VSI_Share. 2. Create a folder named c:share 3. Right-click the c:share folder, and click Properties.
  • 47. A Principled Technologies report 47Improve datacenter energy efficiency with Intel Node Manager 4. Click the Sharing tab, and click Share. 5. Add everyone, system, and administrators to the Read/Write group, and click Share. 6. Unpack the Login VSI install media. 7. Open Datacenter setupsetup.exe. 8. At the welcome screen, click Next. 9. Select the share named vsishareshare, and click Next. 10. To start the Management Console when the setup is completed, check the Start Login VSI Management Console checkbox, and click Finish. 11. At the management console, enter the path to your login VSI license file, and click save. Configuring Login VSI: AD setup 1. Open the VSI management console and click 1. AD setup. 2. Enter the following: Base OU DC=domain,DC=local Username LoginVSI Password (enter password here) Domain (auto detect checked) Number of users 150 Formatting length 1 Launcher user Launcher-v4 Launcher password (enter password here) Click save to .ps1 3. Copy the VSIADSetup.ps1 file to DC1c$ 4. Log into DC1, and execute the VSIADSetup.ps1 in Windows PowerShell™. Creating Windows 7 Enterprise x64 image VSI Launchers Using the vSphere client, we created a Windows 7 Enterprise x64 VM with 2 vCPUs and 8 GB of memory. Installing VMware View Client on the launcher 1. Accept the VMware license terms. 2. Select default options. 3. Accept or change the destination folder. 4. Click Install. Installing Virtual Audio Cable By default, the virtual launchers cannot render audio, so we installed Virtual Audio Cable version 4.10 from software.muzychenko.net/eng/vac.htm. 1. Download and extract the media. 2. Click Setup. 3. To begin the install, click Yes. 4. To accept the software license agreement, click I accept. 5. Click Install.
  • 48. A Principled Technologies report 48Improve datacenter energy efficiency with Intel Node Manager Converting the launcher VM to a template 1. In vSphere Client, right-click the launcher VM, and select TemplateConvert to Template. Deploying the launchers VM from the launcher template 1. In vSphere Client, browse to HomeVMs and Templates. 2. To deploy a virtual machine from the template, right-click the launcher template. 3. As the new VM name, type launcher_1, and click Next. 4. Click Datacenter, and click Next. 5. Click the launcher server, and click Next. 6. Select the appropriate storage, and click Next. 7. Select customization using existing customization specifications, select the appropriate file, and click Next. 8. To deploy the new VM, click Finish. 9. Repeat steps 1 through 8 to deploy more launchers. Configuring VSI Launchers for testing After all 6 launchers are configured and in an idle state, configure the Login VSI test harness to add them to available launcher capacity. 1. Log on to VSI_Share as DOMAINadministrator. 2. Open the Login VSI management console. 3. Click 2. Add Launchers. 4. At the Add launchers wizard, click Next. 5. Click batch entry and enter the following: Name=launcher Start number=1 Increment=1 Count=6 Maximum capacity=30 Formatting length=2 6. Click Next. 7. Click Finish. Running the Login VSI benchmark Before we ran our test, we executed assign_user.ps1 on the VMware View server and statically assigned login_VSI users to virtual desktops, so persona data would not be created randomly in testing. Next, we ran a profile create job in Login VSI to fully initialize each user’s profile. Finally, we used six launchers to run a Knowledge Worker workload. For more information on how to run a Login VSI test, see www.loginvsi.com/documentation/index.php?title=Main_Page.
  • 49. A Principled Technologies report 49Improve datacenter energy efficiency with Intel Node Manager ABOUT PRINCIPLED TECHNOLOGIES Principled Technologies, Inc. 1007 Slater Road, Suite 300 Durham, NC, 27703 www.principledtechnologies.com We provide industry-leading technology assessment and fact-based marketing services. We bring to every assignment extensive experience with and expertise in all aspects of technology testing and analysis, from researching new technologies, to developing new methodologies, to testing with existing and new tools. When the assessment is complete, we know how to present the results to a broad range of target audiences. We provide our clients with the materials they need, from market-focused data to use in their own collateral to custom sales aids, such as test reports, performance assessments, and white papers. Every document reflects the results of our trusted independent analysis. We provide customized services that focus on our clients’ individual requirements. Whether the technology involves hardware, software, Web sites, or services, we offer the experience, expertise, and tools to help our clients assess how it will fare against its competition, its performance, its market readiness, and its quality and reliability. Our founders, Mark L. Van Name and Bill Catchings, have worked together in technology assessment for over 20 years. As journalists, they published over a thousand articles on a wide array of technology subjects. They created and led the Ziff-Davis Benchmark Operation, which developed such industry-standard benchmarks as Ziff Davis Media’s Winstone and WebBench. They founded and led eTesting Labs, and after the acquisition of that company by Lionbridge Technologies were the head and CTO of VeriTest. Principled Technologies is a registered trademark of Principled Technologies, Inc. All other product names are the trademarks of their respective owners. Disclaimer of Warranties; Limitation of Liability: PRINCIPLED TECHNOLOGIES, INC. HAS MADE REASONABLE EFFORTS TO ENSURE THE ACCURACY AND VALIDITY OF ITS TESTING, HOWEVER, PRINCIPLED TECHNOLOGIES, INC. SPECIFICALLY DISCLAIMS ANY WARRANTY, EXPRESSED OR IMPLIED, RELATING TO THE TEST RESULTS AND ANALYSIS, THEIR ACCURACY, COMPLETENESS OR QUALITY, INCLUDING ANY IMPLIED WARRANTY OF FITNESS FOR ANY PARTICULAR PURPOSE. ALL PERSONS OR ENTITIES RELYING ON THE RESULTS OF ANY TESTING DO SO AT THEIR OWN RISK, AND AGREE THAT PRINCIPLED TECHNOLOGIES, INC., ITS EMPLOYEES AND ITS SUBCONTRACTORS SHALL HAVE NO LIABILITY WHATSOEVER FROM ANY CLAIM OF LOSS OR DAMAGE ON ACCOUNT OF ANY ALLEGED ERROR OR DEFECT IN ANY TESTING PROCEDURE OR RESULT. IN NO EVENT SHALL PRINCIPLED TECHNOLOGIES, INC. BE LIABLE FOR INDIRECT, SPECIAL, INCIDENTAL, OR CONSEQUENTIAL DAMAGES IN CONNECTION WITH ITS TESTING, EVEN IF ADVISED OF THE POSSIBILITY OF SUCH DAMAGES. IN NO EVENT SHALL PRINCIPLED TECHNOLOGIES, INC.’S LIABILITY, INCLUDING FOR DIRECT DAMAGES, EXCEED THE AMOUNTS PAID IN CONNECTION WITH PRINCIPLED TECHNOLOGIES, INC.’S TESTING. CUSTOMER’S SOLE AND EXCLUSIVE REMEDIES ARE AS SET FORTH HEREIN.