1. AGROFORESTRY IN ACTION
University of Missouri Center for Agroforestry AF1003 - 2010
Propagating Pecan and Black
Walnut in Missouri*
by William Reid, Ph.D., Research and Extension Horticulturist,
Kansas State University
Pecan and Black Walnut
in Agroforestry Practices
Agroforestry is an integrated set of land management
practices that help land and forest owners to diversify
products, markets and farm income, while simultaneously
improving soil and water quality, enhancing wildlife habitat
and sustaining land resources for long-term use. The five
practices of agroforestry — alley cropping, silvopasture,
riparian forest buffers, forest farming and windbreaks — offer
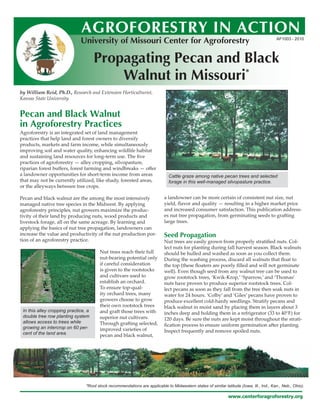
a landowner opportunities for short-term income from areas Cattle graze among native pecan trees and selected
that may not be currently utilized, like shady, forested areas, forage in this well-managed silvopasture practice.
or the alleyways between tree crops.
Pecan and black walnut are the among the most intensively a landowner can be more certain of consistent nut size, nut
managed native tree species in the Midwest. By applying yield, flavor and quality — resulting in a higher market price
agroforestry principles, nut growers maximize the produc- and increased consumer satisfaction. This publication address-
tivity of their land by producing nuts, wood products and es nut tree propagation, from germinating seeds to gra�ing
livestock forage, all on the same acreage. By learning and large trees.
applying the basics of nut tree propagation, landowners can
increase the value and productivity of the nut production por- Seed Propagation
tion of an agroforestry practice. Nut trees are easily grown from properly stratified nuts. Col-
lect nuts for planting during fall harvest season. Black walnuts
Nut trees reach their full should be hulled and washed as soon as you collect them.
nut-bearing potential only During the washing process, discard all walnuts that float to
if careful consideration the top (these floaters are poorly filled and will not germinate
is given to the rootstocks well). Even though seed from any walnut tree can be used to
and cultivars used to grow rootstock trees, ‘Kwik-Krop,’ ‘Sparrow,’ and ‘Thomas’
establish an orchard. nuts have proven to produce superior rootstock trees. Col-
To ensure top-qual- lect pecans as soon as they fall from the tree then soak nuts in
ity orchard trees, many water for 24 hours. ‘Colby’ and ‘Giles’ pecans have proven to
growers choose to grow produce excellent cold-hardy seedlings. Stratify pecans and
their own rootstock trees black walnut in moist sand by placing them in layers about 3
In this alley cropping practice, a and gra� those trees with inches deep and holding them in a refrigerator (33 to 40°F) for
double tree row planting system superior nut cultivars. 120 days. Be sure the nuts are kept moist throughout the strati-
allows access to trees while Through gra�ing selected, fication process to ensure uniform germination a�er planting.
growing an intercrop on 60 per- improved varieties of
cent of the land area. Inspect frequently and remove spoiled nuts.
pecan and black walnut,
*Root stock recommendations are applicable to Midwestern states of similar latitude (Iowa, Ill., Ind., Kan., Neb., Ohio).
www.centerforagroforestry.org
2. Three methods can be used for growing seedlings for its characteristics from both male and female parents. Since
later use in establishing orchard of nut trees: walnut and pecan trees are wind pollinated, the source of
1. Growing trees in place male pollen is usually unknown. The pollen that fertilized the
2. Establishing a nursery flower and resulted in the nut you plant may have come from
3. Growing trees in containers a small, hard-shelled “wild” tree. As a consequence, a seedling
tree o�en produces nuts that are intermediate between that
Growing trees in place Prepare a fine seedbed in the area you small, hard nut and the big, thin-shelled nut that was planted.
intend to plant nut tree seed. During early spring, plant three
to five stratified nuts, 2 inches deep, at each tree location. Be Gra�ing is an age-old horticultural technique that can be de-
certain to mark the area where nuts are planted and to keep fined as a�aching a twig from one tree to the stem of another
the area weed-free. During the first year, select the strongest- in such a way that the twig continues to grow and become a
growing tree and remove the others by cu�ing them off below permanent part of the tree. All of the branches that grow from
the root collar. Fertilize the seedlings in mid-June with 1/4-cup that twig will have the identical characteristics of the tree from
of a slow release fertilizer per tree location. Water trees when which the twig was taken. Gra�ing a twig (the scionwood)
conditions become dry. from a tree that produces high-quality nuts onto a seedling
tree (the stock) is the only way to ensure that your tree will
Establishing a nursery Choose a deep, sandy loam soil for produce desirable nuts.
a nut tree nursery to facilitate digging and transplanting.
Prepare a fine seedbed for the nursery area in early spring. Collecting scionwood
Plant stratified seed 2 inches deep, 2 feet apart, in rows at least The first step in the gra�ing process is to obtain scionwood
4 feet apart. Keep the nursery weed-free and well watered. from trees of known nut production performance. There
Sidedress by applying a slow-release fertilizer along the are several pecan and black walnut cultivars recommended
nursery row in mid-June. Nursery-grown trees should be for commercial nut production in Missouri (Table 1, page
dug for transplanting in March of the following year. When 3). Scionwood should be collected during the late dormant
digging 1-year-old seedlings, be sure to dig at least 16 to 18 season (late February to early March). Cut scions from the
inches deep and preserve as many fibrous roots as possible. previous season’s new growth making sure there is an ample
supply of large plump buds on the twig. Store scionwood in
Growing trees in containers There are several sizes and plastic bags under refrigeration (35°F) until the spring gra�-
shapes of containers that can be used for growing pecan and ing season. Make sure the scionwood does not dry out during
walnut seedlings. Choose a container with an open bo�om. storage by wrapping the wood with moistened paper towels.
When placed on a screen wire bench, tree roots will grow Check stored scions frequently and rewet the paper towel if it
to the bo�om of the pot and then become “air-pruned.” The becomes dry.
air-pruning process prevents taproot circling — a common
problem in container-grown trees. Tools for gra�ing trees
Before the gra�ing season begins, you should collect all the
Use a po�ing soil mixture that allows free movement of tools and equipment you will need to gra� trees that are from
water through the pot. Mix in a slow-release fertilizer that 1/2” to 4” in diameter.
can provide both macronutrients (primary elements essential
for plant growth: nitrogen, phosphorus and potassium) and
micronutrients (trace elements essential for plant growth: Necessary gra�ing supplies include:
boron, chlorine, copper, iron, manganese, molybdenum and
• Sharp grafting knife (sheep’s foot blade)
zinc) for seven to nine months. Plant a single, stratified nut
in each pot. Nut tree seedlings grown in containers need
• Pair of pruning shears (with by-pass blade)
daily watering and the careful a�ention demanded by all • Pruning saw (turbo style)
containerized nursery plants. Container-grown stock can be • Light-duty staple gun (Arrow model JT 21)
transplanted into the field in the early fall. The fall planting • 5/16” staples for staple gun
season starts three to four weeks before the first killing frost • Plastic sandwich bags
and continues until mid-November. Containerized stock can • Aluminum foil
also be planted during the traditional spring planting season. • Bottle of white glue
However, if you are holding container trees over the winter, • 4 mil plastic grafting tape
you must protect tree roots from sub-freezing temperatures • Black plastic electrical tape
during the winter. A�er trees become dormant in the fall,
cover the trees with an insulating cover or hay mulch.
Season for gra�ing
Grafting Trees During the spring, rapid wood and bark growth allows the
The only way to ensure each tree in your orchard produces bark to be easily removed from the wood. We use this natural
quality nuts is to gra� superior cultivars onto your rootstock phenomenon to our advantage during the gra�ing process.
trees. Trees grown from seed will, in most cases, bear nuts that But because the bark of the stock tree must ‘slip,’ gra�ing sea-
are inferior to the nut planted. The seed-grown tree exhib- son is largely confined to a six-week period during the spring.
University of Missouri Center for Agroforestry 2
3. and into the wood approximately 2 inches long at the bo�om
Pecan Black Walnut* end of the scion (Fig. 3). This cut should expose a long “U”-
Hirschi Brown Nugget shaped area of cambial tissue with woody tissue inside the
“U” (Fig. 4). Repeat this step twice more so that the scion has
Kanza Emma K three evenly spaced cuts around its diameter. Leaving a strip
Major Hay of bark between each cut ensures maximum cambial exposure
(Fig. 5).
Pawnee Kwik Krop
Peruque Sparrow Sometimes, a bud and leaf scar are found in a position where
cuts are to be made. If so, make the first shallow cut so that
Posey Sparks 127 it removes the bud. Before moving back to working on the
Shepherd Thomas stock, hold the cut end of the scion in your mouth (away from
tongue and teeth) to keep the scion from drying and to free
Table 1: Popular pecan and black walnut cultivars your hands. Using the tip of your knife, separate the bark
currently propagated in Missouri. from the wood at the top of the stock. With your fingertips,
carefully peel the bark away from the wood in three flaps,
each 2.5 to 3 inches long. Use shears, blade side down, to hold
Gra� small trees as soon as the emerging buds are 1-inch long.
the three flaps down while clipping out the wood on the in-
Start gra�ing larger trees when the leaves begin to unfurl.
side of the flaps (Fig. 6). Avoid excessive fingering of the flaps
You can continue to gra� until the leaves of the stock trees are
— oily fingers can impair gra� callus formation.
completely expanded. During certain periods of the gra�ing
season you will note excessive sap flow when stock trees are
Next, a�ach scion to stock. Place the scion inside the three
cut. This ‘bleeding’ inhibits callous formation and can cause
flaps, lining up each cut surface with a flap. Hold the three
gra� failure. To avoid ‘bleeding’ problems, cut stock trees off
flaps up over the cut surfaces with one hand and begin wrap-
just above the location you intend to gra�. Wait a couple of
ping the gra� union with gra�ing tape (already in place) (Fig.
days, and then make a fresh cut one inch below your previous
7). Wrap the gra� tape spirally up the stem, making certain
cut before making your gra�.
the flaps and scion do not twist (Fig. 8). Tie the tape above
the three flaps. Push straight down on the scion to ensure the
When you are ready to start gra�ing, take your scionwood
scion is firmly seated against the wood of the stock.
out to the field in a small cooler. Ice down your scionwood to
keep it fresh. Avoid leaving bags of scionwood out in the sun,
Protect the gra� from sunburn by wrapping with a small piece
where the wood can become very hot.
of aluminum foil (Fig. 9). Foil also acts as a splint, protecting
the gra� from wind injury. Next, tear the corner out of a plas-
The Three-Flap Graft (Images, pages 4-5) tic sandwich bag and place the bag over the gra� (Fig. 10). Tie
The three-flap gra� is the best method for propagating pecan the bag above and below the gra� union with gra�ing tape.
and walnut cultivars onto stock trees 3-5 feet in height. The The plastic bag helps prevent moisture loss and speeds gra�
three-flap gra� works best when both scion and stock are ap- callusing. Cover the cut surface at the top of the scion with
proximately the same diameter. Take a piece of scionwood out a drop of white glue (Fig. 11), which prevents moisture loss.
of your cooler and hold it up to the stock tree and choose the Pound a steel fence post into the ground next to your gra�.
proper height for gra�ing (Fig. 1, page 4). Cut off the top of This post will prevent birds from breaking out your gra� and
the stock tree at that point with hand shears. As a general rule, provide a stake for training the young tree.
the scionwood should be large enough to allow you to cut off
at least one third of the stock tree. Three to four weeks a�er gra�ing, scion buds should start to
break (Fig. 12). A�er the scion has made 3-5 inches of new
A�er choosing the site for gra�ing, set your scion back in the growth, carefully remove the plastic bag, aluminum foil and
cooler while working on stock. Begin preparing the stock by gra�ing tape to prevent gra� girdling. A strong gra� should
making three vertical incisions, 3 inches long, through the have callous tissue growing between each flap.
bark at the top of the stock. Space these evenly around the
diameter of the stock. If a bud and leaf scar are present, rub Wrap up the gra� again in reverse order, first with the plastic
off the bud and make the first vertical cut directly through the bag, then aluminum foil, and finally gra�ing tape. This wrap-
bud (Fig. 2). To facilitate tying the gra� union during a later ping will not girdle the gra� but it provides wind and sun
step, tie an 18-inch piece of plastic gra�ing tape on the stock protection. Force the scion to grow by pruning back any new
just below the three vertical cuts. shoots growing from below the gra� (on the root stock) and
by fertilizing with nitrogen. To prevent wind damage, train
Now turn your a�ention to preparing the scion. First, trim shoots growing from the scion to the steel fence post by tying
1/2 inch off the bo�om of the scion to fresh, green wood. With with gra�ing tape or plastic flagging tape.
a sharp gra�ing knife, make a shallow cut through the bark
*Black walnut recommendations reflect current understanding of cultivar performance based on 13-year-old trees grown in central Missouri. With time,
we expect this list to change as our trees grow older and additional nut yield data is obtained from plantings established in other parts of the state.
3 www.centerforagroforestry.org
4. The Three-Flap Graft
Figure 1. The
three-flap
graft is ap-
plied where
the scion and
stock are the Figure 4. Cut deep enough to expose a long “U” shaped
same area of cambium.
diameter.
Figure 5.
Leave a
strip of
bark
between
each cut
Figure 2. Slice on the
through the scion.
bark of the
stock.
Figure
Figure 3. 6. Clip
Start your out the
first cut on wood
the scion inside
two inches the flaps
from the on the
base. stock.
University of Missouri Center for Agroforestry 4
5. The Three-Flap Graft (cont.)
Figure 7.
Insert the
scion into
the stock Figure 10.
so that Attach a
each flap sandwich
covers bag over
each cut the graft
surface of to prevent
the scion. moisture
loss.
Figure 8.
Wrap the
graft with Figure 11.
plastic Seal the
grafting top of the
tape. scion with
white glue.
Figure 12.
Figure 9. Buds should
Protect begin to
the graft break three
with alu- to four
minum weeks after
foil. grafting.
5 www.centerforagroforestry.org
6. The Bark Graft (Images, pages 6-9) pendicular cut should fit snugly against the bark slit. Secure
The bark gra� is an effective way to propagate walnut and the gra� union with staples (Fig. 24) or brad nails (Fig. 25). It
pecan cultivars onto trees 2” to 4” in diameter. Select a point is important to staple down the bark firmly against the scion
on the stock above the first whorl of branches and at a com- and be sure all air pockets are removed. Use as many staples
fortable working height (Fig. 13, bo�om right). Retain lower as needed but be careful not to split the bark.
branches to help maintain tree vigor until the new gra�
becomes established. Leaves on these branches also will shade Like the three-flap gra�, cover the gra� union with aluminum
the trunk to prevent sunscalding. Remove the top of the stock foil. Place the foil over the cut surface of the stock and around
tree with your turbo saw. Check for excessive sap flow, and be the base of the scion. Next, cut the corner out of a sandwich
prepared to gra� another day if necessary. bag and place over the scion. Tie the plastic bag with gra�ing
tape at the base of the scion and below the aluminum foil on
Inspect the cut surface of the stock. You’ll notice that the stem the stock (Fig. 26). Place a drop of white glue on the cut sur-
is not perfectly round. Choose the flat side of the tree to make face at the top of the scion to prevent moisture loss. To prevent
your gra�. At this point, remove some of the rough bark with bird damage, use black electrical tape to fasten a 3’ long stick
your knife or small wood wrasp. Pare down the bark until it (bird perch) to the stock so it extends well above the scion.
becomes about 3/16” thick in an area 1.5” wide and 3” long. You can also tie the scion’s new growth to this stick during the
Reducing bark thickness will make the bark more pliable and early part of the summer to prevent wind damage.
more able to conform to the scion. Use your gra�ing knife to
make a 2.5” long vertical slit through the bark (Fig. 14, p. 7). The bark gra� can grow very rapidly. In mid-summer, cut
The stock is now ready to accept the scionwood. off the gra�ing tape that was used to tie the plastic bag to the
scion to prevent girdling. Remove the bird perch and a�ach
Scionwood approximately 3/8” in diameter works best for a 2 x 2”-diameter stake to the trunk of the stock tree, making
the bark gra�ing. Trim 1/2” off the bo�om of the scion with sure the stake extends at least 3’ above the gra� union. Tie
your pruning shears to expose fresh, green wood. If a bud is new growth from the scion to the stake to prevent the wind
found near the base of the scion, your first cut should remove from blowing out the gra�. The young gra� will need support
the bud (Fig. 15). Draw your knife through the scion starting until new wood grows over the cut surface on the stock (2 or
about 2.5” from the base. Carve the scion down through the more years).
pith to less than half its original thickness using several passes
of your knife (Fig. 16). This deep cut should be parallel to the
scion and feature a right angle shoulder. Be certain that two
buds remain above the cut. The Bark Graft
Turning the scionwood piece over, make a shallow cut into the
wood of the back side from your first cut (this cut is similar to
preparing a scion for three-flap gra�ing). This cut is not made
parallel to the deep cut but angled to one side (Fig. 17). When
finished, you should have a thin piece of bark adjacent to the
deep cut on one side and a much thicker strip on the other.
The cut on the back side of the scion should start just below
the shoulder of the deep cut and should give the scionwood
a wedge shape when completed (Fig. 18). A third cut is made
perpendicular to the deep cut along the thick bark strip
edge. This cut should be made just deep enough to expose
the cambium (thin layer of cells between the inner bark and
wood). Be certain to leave a strip of bark between the backside
cut and the perpendicular cut. At this point, your scionwood
should have a triangular shape (Fig. 19). Complete scionwood
preparation by making a chisel point on the end of the bud Figure 13.
stick (Fig. 20). This final cut should be made on back side of The bark
the scion. graft should
be applied
Use your gra�ing knife to gently pull the stock’s bark away above the
from the wood on the right side of the bark slit (Fig. 21). Insert first whorl of
the scion between the bark and the wood of the stock (Fig. 22). branches.
Tap the scion down into the stock until the shoulder of the
deep cut fits snugly against the upper side of the stock (Fig.
23). The deep cut should be facing the wood, while the shal-
low cut should be covered by the raised bark flap and per-
University of Missouri Center for Agroforestry 6
7. The Bark Graft (cont.)
Figure 14.
Cut a slit
through Figure 17. Make a shallow cut on the back of the
the bark scion angled to one side.
of the
stock.
Figure 18. After making your second cut, the scion
Figure 15. If a bud is found near the base of the should have a wedge shape in cross section.
scion, your first cut should remove the bud.
Figure 19. After making your third cut, the scion should
Figure 16. Carve the scion down to less than
have a triangular shape.
half its original thickness.
7 www.centerforagroforestry.org
8. The Bark Graft (cont.)
Figure 23.
Tap the scion
down until
the shoulder
of the deep
Figure 20. Complete scion preparation by making a chisel cut touches
point at the end of the bud stick. the wood of
the stock.
Figure 24. A staple gun can be used to secure the graft
Figure 21. Use your knife to lift the bark of the stock away
union on smaller trees.
from the wood.
Figure 25.
Brad nails
can be used
Figure 22. to secure a
Insert the sci- bark graft on
on between larger trees
the bark and (note the po-
wood of the sition of the
stock. nail heads.
University of Missouri Center for Agroforestry 8
9. To insert the scion into the stock, pull back the corners of the
bark on both sides of the incision made in the stock and insert
the arrowhead under the bark (Fig. 33). Slide the scion down
into the bark until the shoulder of the sloping cut touches the
top of the stock. When the scion is properly placed, the bark
flaps should cover the cambium you exposed when carv-
ing the arrowhead and the strip of bark you le� on the scion
should be seen between bark flaps (Fig. 34). For this gra� to
take, the bark of the stock tree must be forced to fit tightly
over the cut surfaces of the scion. Starting near the base of the
gra�, use a light-duty staple gun to bend the bark inwards
Figure 26. so it conforms to the scion (Fig. 35, p. 11). Repeat this step on
The graft the opposite side of the scion. Add additional staples up both
union should sides of the scion, switching sides as you go. Make sure the
be wrapped in scion stays in the center of the bark slit while stapling. A total
aluminum foil of six staples are usually adequate to conform the bark to the
and a plastic
scion (Fig. 36).
bag much like
the three-flap
To further stabilize the arrowhead gra�, wrap the gra� union
graft.
firmly with gra�ing tape (Fig. 37). Like the other gra�ing
techniques described in this bulletin, cover the gra� with alu-
minum foil and a sandwich bag (Fig. 38). Seal the top of the
The Arrowhead Graft (Images, pages 10-11) scion with some white glue. Be sure to a�ach a stick to the tree
The first decision you make when gra�ing nut trees is how
with electrician’s tape to provide bird protection and for train-
best to a�ach the scion to the stock with a gra�ing method
ing the new growth once the gra� starts growing (Fig. 39).
that will be successful. When scion and stock are roughly
The arrowhead gra� is very prone to wind damage and every
the same size, use the three-flap gra�. When the stock is 2-4
precaution needs to be taken to prevent gra� blowout.
inches in diameter, use the bark gra�. But when the stock is
too large for a three-flap yet too small for a bark gra�, the
Gra� a�ercare for the arrowhead gra� is similar to all gra�ing
arrowhead gra� provides the best option for propagating
methods. In mid-summer, loosen the tape used to a�ach the
pecans and walnuts (Fig. 27, p. 10).
sandwich bag to the gra� to prevent girdling. Trim off com-
peting sucker growth. Remove the bird perch and drive a steel
The arrowhead gra� takes its name from the arrowhead-like
fence post into the soil adjacent to the tree. Train the gra�’s
point you carve on the scion to make the gra�. This form of
new growth to the fence post by tying the tree to the post with
gra�ing should be used on stock trees with smooth bark, ¾ to
flagging tape (Fig. 40). The fence post should remain in place
2 inches in diameter. Use scionwood that is on the small side,
for several years to discourage deer from rubbing the bark off
about 3/8” in diameter. The timing is late April through May,
your tree.
like our other gra�ing methods.
Start the gra�ing process by choosing a spot on the stock tree Graft After Care the Following Spring
that has smooth bark and is free of buds and leaf scars. You and Beyond
should remove at least 1/3 of the stock tree’s top when decid- During the following spring, remove all wraps from the
ing where to place your gra�. A�er removing the top, prepare gra� union. On bark and arrowhead gra�s, trim the stock to
the stock by making an incision through the bark straight remove dead wood in the area opposite of the scion. This can
down the stem, about 3 inches long (Fig. 28). be accomplished by making a sloping cut at about 30 degrees
down and away from the scion. Prune the growth on the gra�
Select a small diameter (about 3/8”) piece of scionwood from to a central leader. If more than one bud grows from the bud
your cooler for this gra�. Make a sloping cut (2 ½” long or stick, leave only the growth coming from the strongest bud
longer) through the scion, making sure you remove the lowest to form the new top of the tree. On three-flap and arrowhead
bud on the scion (Fig. 29). Take a few additional slices off the gra�s, prune off all shoots below the gra�. Prune off about
scion to create a shoulder at the top of the cut and a smooth, one-third of lower limbs on bark-gra�ed trees to force more
tapered ‘tongue’ towards the base of the stick (Fig. 30). Next of the tree’s energy to the gra�. In subsequent years, continue
turn the scion over to carve the arrowhead point. Starting pruning the top of the tree to a central leader and remove
at a point near the base of the scion’s shoulder, shave a thin limbs below the gra�.
strip of bark off one side of the scion to expose the cambium
along the edge of the stick (Fig. 31). This cut should be made
like you were trying to sharpen the edge of the scion. Repeat
the process on the other side of the scion and you have just
finished sharpening your arrowhead. A strip of bark should
remain down the center of the arrowhead (Fig. 32).
9 www.centerforagroforestry.org
10. The Arrowhead Graft
Figure 27.
Use the ar-
rowhead graft
when the scion
is too small for
a three-flap
graft and the
stock too small Figure 31.
for a bark graft. Turn the
(Scion on left, scion over
stock on right) and slice off
enough bark
along one
edge to re-
veal cambial
tissue.
Figure 28.
Prepare the
stock by
cutting a slit
through the
bark.
Figure 32. Slice off some bark on the other
side of the scion. The finished scion should
have an arrowhead appearance with a
sharp point and a strip of bark down the
center of the stick.
Figure 33.
Insert
the scion
under the
bark of the
stock, right
down the
Figure 29. Carving the scion starts with the
middle of
removal of the lowest bud.
the inci-
sion.
Figure 34.
Push the sci-
on down until
the scion’s
shoulder
reaches the
top of the
stock. The
stock’s bark
should cover
the cambium
Figure 30. Make a sloping cut through scion exposed on
leaving a prominent shoulder on the upper the arrow-
portion of the cut. head.
University of Missouri Center for Agroforestry 10
11. The Arrowhead Graft (cont.)
Figure 38.
Wrap alu-
minum foil
around
the graft to
prevent sun
scald. Attach
a plastic bag
over the graft
to preserve
Figure 35. Use your staple gun to press and hold moisture.
the stock’s bark firmly against the scion.
Figure 39.
Attach a stick
to the side
of the graft
with electri-
cal tape to
prevent birds
from break-
Figure 36. ing over the
Six staples new graft.
are used
to form
the bark
around the
scion.
Figure 37.
Wrap the
graft with
tape to
strength-
en the
union. Figure 40. Once the graft starts grow-
ing, use a steel fence post to train the
new growth and prevent graft blowout.
11 www.centerforagroforestry.org
12. Author: William Reid, Ph.D., is the Research and Extension Horticulturist specializing in nut tree crops and
the Director of the Pecan Experiment Field at Kansas State University, Chetopa, Kan., 67336-0247. Dr.
Reid holds adjunct faculty status with the University of Missouri Center for Agroforestry.
Revised/Reprinted: January 2010
Additional suggested reading
UMCA publications: The following University of Missouri Center for Agroforestry publications are available
from www.centerforagroforestry.org or University of Missouri Extension at http://extension.missouri.
edu/explore/agguides/agroforestry/
Agroforestry in Action: Growing Pecans in Missouri
Agroforestry in Action: Growing Black Walnut for Nut Production
In the library: The Grafter’s Handbook, R.J Garner
Plant Propagation: Principles and Practices, H.T Hartmann, D.E. Kester, F. T. Davies and R.L. Geneve
On the Web: Northern Nut Growers Association: http://www.icserv.com/nnga/
Produced by the
University of Missouri Center for Agroforestry
Shibu Jose, Ph.D., Director
203 ABNR Columbia, MO 65211
Technology Transfer and Outreach Unit
Michael Gold, Ph.D., Associate Director
Larry D. Godsey, Economist
Dusty Walter, Technical Training Specialist
Julie Rhoads, Events Coordinator
Michelle Hall, Sr. Information Specialist
For more information, visit www.centerforagroforestry.org
(573) 884-2874; umca@missouri.edu
This work was funded through the University of Missouri Center for Agroforestry under cooperative agreements
58-6227-5-029, 58-6227-2-008 and 58-6227-5-028 with the United States Dept. of Agriculture (USDA) Agricul-
tural Research Service. Special recognition is given to the USDA, ARS, Dale Bumpers Small Farm Research
Center, Booneville, Ark. Any opinions, findings, conclusions, or recommendations expressed in this publication
are those of the author(s) and do not necessarily reflect the view of the USDA.
University of Missouri Center for Agroforestry