SlideShare a Scribd company logo
1 of 16
Download to read offline
2001-03 SUSPENSION
Front - 3.2CL
DESCRIPTION
Fig. 1: Locating Components
Courtesy of AMERICAN HONDA MOTOR CO., INC.
NOTE: For system description and component location see, Fig. 1 .
2003 Acura 3.2CL Type S
2001-03 SUSPENSION Front - 3.2CL
2003 Acura 3.2CL Type S
2001-03 SUSPENSION Front - 3.2CL
me
Sunday, May 10, 2009 8:17:13 AM Page 1 © 2005 Mitchell Repair Information Company, LLC.
me
Sunday, May 10, 2009 8:17:17 AM Page 1 © 2005 Mitchell Repair Information Company, LLC.
ADJUSTMENTS
WHEEL ALIGNMENT
WHEEL BEARING END PLAY
1. Raise vehicle, and make sure it is securely supported. Remove wheels, then reinstall wheel nuts.
2. Place dial gauge against hub flange. Measure bearing end play by moving disc inward or outward.
3. If bearing end play measurement is more than 0-.002" (.05 mm), replace wheel bearing.
REMOVAL & INSTALLATION
BALL JOINT
Removal
1. Install a hex nut onto threads of ball joint. Make sure nut is flush with ball joint pin end to prevent
damage to threads. Apply grease (A) to 28 mm Ball Joint Remover (07MAC-SL00200) on areas shown.
See Fig. 2 . This will ease installation of the tool and prevent damage to the pressure bolt (B) threads.
2. Install ball joint remover as shown. Insert the jaws carefully, making sure you do not damage the ball
joint boot. Adjust the jaw spacing by turning the pressure bolt. See Fig. 3 .
3. Once the ball joint remover is in place, turn the adjusting bolt (A) as necessary to make the jaws parallel.
Then hand-tighten the pressure bolt (B), and recheck the jaws to make sure they are still parallel. See Fig.
4 .
4. After making adjustment to adjusting bolt, make sure head of adjusting bolt is in position (A) to allow
jaw (C) to pivot. See Fig. 4 .
5. With a wrench, tighten pressure bolt (B) until ball joint shaft pops loose from steering suspension arm. If
necessary, apply penetrating type lubricant to loosen ball joint. Remove tool, then remove nut from end of
the ball joint and pull ball joint out of steering/suspension arm. Inspect ball joint boot, and replace it if
damaged.
NOTE: See appropriate SPECIFICATIONS & PROCEDURES article.
2003 Acura 3.2CL Type S
2001-03 SUSPENSION Front - 3.2CL
me
Sunday, May 10, 2009 8:17:13 AM Page 2 © 2005 Mitchell Repair Information Company, LLC.
Fig. 2: Applying Grease To Special Tool
Courtesy of AMERICAN HONDA MOTOR CO., INC.
2003 Acura 3.2CL Type S
2001-03 SUSPENSION Front - 3.2CL
me
Sunday, May 10, 2009 8:17:13 AM Page 3 © 2005 Mitchell Repair Information Company, LLC.
Fig. 3: Removing Ball Joint
Courtesy of AMERICAN HONDA MOTOR CO., INC.
2003 Acura 3.2CL Type S
2001-03 SUSPENSION Front - 3.2CL
me
Sunday, May 10, 2009 8:17:13 AM Page 4 © 2005 Mitchell Repair Information Company, LLC.
Fig. 4: Adjusting Ball Joint Bolt
Courtesy of AMERICAN HONDA MOTOR CO., INC.
BALL JOINT BOOT
Removal
1. Remove boot clip and boot. Pack interior of boot and lip (A) with grease. Do not contaminate lower
CAUTION: DO NOT contaminate lower collar of the boot with grease.
CAUTION: Keep dirt, or other foreign materials from getting into boot.
2003 Acura 3.2CL Type S
2001-03 SUSPENSION Front - 3.2CL
me
Sunday, May 10, 2009 8:17:13 AM Page 5 © 2005 Mitchell Repair Information Company, LLC.
collar of the boot (B) with grease. See Fig. 5 .
2. Wipe grease off tapered portion of shaft and pack fresh grease into base. Do not let dirt, or other foreign
materials get into the boot.
Fig. 5: Greasing Ball Joint Boot
Courtesy of AMERICAN HONDA MOTOR CO., INC.
Installation
1. Install boot on ball joint, then squeeze it gently to force out any air. For lower ball joint, adjust Ball Joint
Boot Clip (07GAG-SD40700) with adjusting bolt (B) until its base is just above groove around the
bottom of boot. Then slide clip over ball joint boot clip and into position on boot. See Fig. 6 .
2. For upper ball joint, just hold tool over joint, then slide clip over ball joint boot clip and into position on
boot. After installing boot, wipe any grease off exposed portion of ball joint shaft.
2003 Acura 3.2CL Type S
2001-03 SUSPENSION Front - 3.2CL
me
Sunday, May 10, 2009 8:17:13 AM Page 6 © 2005 Mitchell Repair Information Company, LLC.
Fig. 6: Installing Ball Joint Boot
Courtesy of AMERICAN HONDA MOTOR CO., INC.
KNUCKLE & HUB
NOTE: See Fig. 1 andFig. 7 for component locations and exploded view of knuckle &
hub.
2003 Acura 3.2CL Type S
2001-03 SUSPENSION Front - 3.2CL
me
Sunday, May 10, 2009 8:17:13 AM Page 7 © 2005 Mitchell Repair Information Company, LLC.
Fig. 7: Exploded View Of Knuckle & Hub
Courtesy of AMERICAN HONDA MOTOR CO., INC.
Removal
1. Remove front wheel. Raise locking tab on the spindle nut, then remove nut. Remove brake hose mounting
bolts. Remove caliper mounting bolts (B), and hang caliper assembly (C) to one side. See Fig. 8 . To
prevent damage to caliper assembly or brake hose, use a short piece of wire to hang caliper from
undercarriage.
2003 Acura 3.2CL Type S
2001-03 SUSPENSION Front - 3.2CL
me
Sunday, May 10, 2009 8:17:13 AM Page 8 © 2005 Mitchell Repair Information Company, LLC.
2. Remove wheel sensor from knuckle. Do not disconnect wheel sensor connector. Raise stake of spindle
nut, then remove nut. Remove the 6 mm brake disc retaining screws.
3. Screw two 8 x 1.25 mm bolts (B) into disc to push it away from the hub. Turn each bolt 2 turns at a time
to prevent cocking disc excessively. Remove brake disc from knuckle. Check front hub for damage and
cracks. Remove cotter pin (A) from the tie-rod end ball joint, then loosen nut (B). See Fig. 9 .
4. Remove tie-rod ball joint from knuckle using Ball Joint Remover (07MAC-SL00200). See Fig. 7 .
Remove cotter pin (A) from lower arm ball joint castle nut (B), and remove nut. See Fig. 10 .
5. Remove lower ball joint from knuckle using ball joint remover. Remove cotter pin (A) from upper ball
joint castle nut (B) and remove nut. See Fig. 7 . Remove upper ball joint from knuckle using ball joint
remover.
6. Pull knuckle outward, and remove driveshaft outboard joint (B) from knuckle (A) by tapping driveshaft
end (C) with a plastic hammer, then remove knuckle. See Fig. 11 .
7. Separate hub (A) from knuckle (B) using Hub Dis/assembly Tool (07GAF-SE00100) and a hydraulic
press. Take care not to distort splash guard. Hold onto hub to keep it from falling when pressed clear. See
Fig. 12 .
8. Remove snap ring and splash guard from knuckle. Press wheel bearing out of knuckle using a Driver
(07749-0010000), 58 x 72 mm Attachment (07947-6340201) and a press. Press wheel bearing inner race
from hub using Hub Dis/assembly Tool, a commercially available bearing separator, and a press.
9. Wash knuckle and hub thoroughly in high flash point solvent before reassembly.
2003 Acura 3.2CL Type S
2001-03 SUSPENSION Front - 3.2CL
me
Sunday, May 10, 2009 8:17:13 AM Page 9 © 2005 Mitchell Repair Information Company, LLC.
Fig. 8: Removing Caliper
Courtesy of AMERICAN HONDA MOTOR CO., INC.
Fig. 9: Removing Cotter Pin From Tie-Rod End Ball Joint
Courtesy of AMERICAN HONDA MOTOR CO., INC.
2003 Acura 3.2CL Type S
2001-03 SUSPENSION Front - 3.2CL
me
Sunday, May 10, 2009 8:17:13 AM Page 10 © 2005 Mitchell Repair Information Company, LLC.
Fig. 10: Removing Lower Arm Ball Joint Castle Nut
Courtesy of AMERICAN HONDA MOTOR CO., INC.
2003 Acura 3.2CL Type S
2001-03 SUSPENSION Front - 3.2CL
me
Sunday, May 10, 2009 8:17:13 AM Page 11 © 2005 Mitchell Repair Information Company, LLC.
Fig. 11: Removing Knuckle
Courtesy of AMERICAN HONDA MOTOR CO., INC.
2003 Acura 3.2CL Type S
2001-03 SUSPENSION Front - 3.2CL
me
Sunday, May 10, 2009 8:17:13 AM Page 12 © 2005 Mitchell Repair Information Company, LLC.
Fig. 12: Separating Hub From Knuckle
Courtesy of AMERICAN HONDA MOTOR CO., INC.
Installation
1. Press a new wheel bearing (A) into knuckle (B) using old bearing (C), a steel plate (D), Bearing Driver
Attachment (07965-SD90100), and a press. Place wheel bearing on knuckle with pack seal side facing
(metal color) toward inside. Be careful not to damage sleeve of pack seal. See Fig. 13 .
2. Install snap ring securely in knuckle. Install splash guard, and tighten screws to specifications. See
TORQUE SPECIFICATIONS .
3. Install hub (A) on knuckle (B) using Bearing Driver Attachment, Driver and a hydraulic press. Be careful
not to distort splash guard (C). See Fig. 14 .
4. Install knuckle in the reverse order of removal, and pay particular attention to the following items:
 Be careful not to damage ball joint boots when installing knuckle. Torque all mounting hardware to
2003 Acura 3.2CL Type S
2001-03 SUSPENSION Front - 3.2CL
me
Sunday, May 10, 2009 8:17:13 AM Page 13 © 2005 Mitchell Repair Information Company, LLC.
Thank you very much for
your reading. Please Click
Here. Then Get COMPLETE
MANUAL. NO WAITING
NOTE:
If there is no response to
click on the link above,
please download the PDF
document first and then
click on it.
specified torque values. See TORQUE SPECIFICATIONS . Torque castle nuts to lower torque
specifications, then tighten only far enough to align slot with pin hole. Do not align castle nut by
loosening. Before installing brake disc, clean mating surface of front hub and inside of brake disc.
 Install new cotter pins on castle nuts after torquing. Raise locking tab on spindle nut (C), then
remove nut. Before installing spindle nut, apply a small amount of engine oil to seating surface of
nut. After tightening, use a drift to stake spindle nut shoulder against driveshaft.
 Before installing wheel, clean mating surface of brake disc and inside of wheel. Check front wheel
alignment, and adjust it if necessary. See WHEEL ALIGNMENT under ADJUSTMENTS.
Fig. 13: Pressing New Wheel Bearing Into Knuckle
Courtesy of AMERICAN HONDA MOTOR CO., INC.
2003 Acura 3.2CL Type S
2001-03 SUSPENSION Front - 3.2CL
me
Sunday, May 10, 2009 8:17:13 AM Page 14 © 2005 Mitchell Repair Information Company, LLC.
Fig. 14: Installing Hub  Knuckle
Courtesy of AMERICAN HONDA MOTOR CO., INC.
LOWER ARM
Removal  Installation
1. Remove front wheels. Remove strut fork by doing the following. See Fig. 15 .
 Remove strut pinch bolt (A).
 Remove lower bolt and self-locking nut from strut fork.
 Remove strut fork (C) from strut.
2. Remove cotter pin from lower ball joint castle nut, and remove nut. Remove lower ball joint from
2003 Acura 3.2CL Type S
2001-03 SUSPENSION Front - 3.2CL
me
Sunday, May 10, 2009 8:17:13 AM Page 15 © 2005 Mitchell Repair Information Company, LLC.

More Related Content

More from fjskemdzaqmme

Massey ferguson mf 425 tractor 4 wd (0000000001 425-237827) parts catalogue...
Massey ferguson mf 425 tractor 4 wd (0000000001   425-237827) parts catalogue...Massey ferguson mf 425 tractor 4 wd (0000000001   425-237827) parts catalogue...
Massey ferguson mf 425 tractor 4 wd (0000000001 425-237827) parts catalogue...fjskemdzaqmme
 
Massey ferguson mf 425 tractor 2 wd (0000000001 425-238493) parts catalogue...
Massey ferguson mf 425 tractor 2 wd (0000000001   425-238493) parts catalogue...Massey ferguson mf 425 tractor 2 wd (0000000001   425-238493) parts catalogue...
Massey ferguson mf 425 tractor 2 wd (0000000001 425-238493) parts catalogue...fjskemdzaqmme
 
Massey ferguson mf 240 combine parts catalogue manual
Massey ferguson mf 240 combine parts catalogue manualMassey ferguson mf 240 combine parts catalogue manual
Massey ferguson mf 240 combine parts catalogue manualfjskemdzaqmme
 
Massey ferguson mf 168 mkiii 168 s tractors (fr) parts catalogue manual
Massey ferguson mf 168 mkiii  168 s tractors (fr) parts catalogue manualMassey ferguson mf 168 mkiii  168 s tractors (fr) parts catalogue manual
Massey ferguson mf 168 mkiii 168 s tractors (fr) parts catalogue manualfjskemdzaqmme
 
Massey ferguson mf 168 mkiii 168 f tractors (fr) parts catalogue manual
Massey ferguson mf 168 mkiii  168 f tractors (fr) parts catalogue manualMassey ferguson mf 168 mkiii  168 f tractors (fr) parts catalogue manual
Massey ferguson mf 168 mkiii 168 f tractors (fr) parts catalogue manualfjskemdzaqmme
 
Massey ferguson mf 158 mkiii 158 v tractors parts catalogue manual
Massey ferguson mf 158 mkiii  158 v tractors parts catalogue manualMassey ferguson mf 158 mkiii  158 v tractors parts catalogue manual
Massey ferguson mf 158 mkiii 158 v tractors parts catalogue manualfjskemdzaqmme
 
Massey ferguson mf 158 mkiii 158 f tractors parts catalogue manual
Massey ferguson mf 158 mkiii  158 f tractors parts catalogue manualMassey ferguson mf 158 mkiii  158 f tractors parts catalogue manual
Massey ferguson mf 158 mkiii 158 f tractors parts catalogue manualfjskemdzaqmme
 
Massey ferguson mf 152 mkiii 152 f tractors parts catalogue manual
Massey ferguson mf 152 mkiii  152 f tractors parts catalogue manualMassey ferguson mf 152 mkiii  152 f tractors parts catalogue manual
Massey ferguson mf 152 mkiii 152 f tractors parts catalogue manualfjskemdzaqmme
 
Massey ferguson mf 145 mkiii 145 v tractors parts catalogue manual
Massey ferguson mf 145 mkiii  145 v tractors parts catalogue manualMassey ferguson mf 145 mkiii  145 v tractors parts catalogue manual
Massey ferguson mf 145 mkiii 145 v tractors parts catalogue manualfjskemdzaqmme
 
Massey ferguson mf 99 combine parts catalogue manual
Massey ferguson mf 99 combine parts catalogue manualMassey ferguson mf 99 combine parts catalogue manual
Massey ferguson mf 99 combine parts catalogue manualfjskemdzaqmme
 
Massey ferguson mf 19 combine parts catalogue manual
Massey ferguson mf 19 combine parts catalogue manualMassey ferguson mf 19 combine parts catalogue manual
Massey ferguson mf 19 combine parts catalogue manualfjskemdzaqmme
 
Massey ferguson mf 17 combine parts catalogue manual
Massey ferguson mf 17 combine parts catalogue manualMassey ferguson mf 17 combine parts catalogue manual
Massey ferguson mf 17 combine parts catalogue manualfjskemdzaqmme
 
Massey ferguson 398 tractor, b18009 parts catalogue manual
Massey ferguson 398 tractor,   b18009 parts catalogue manualMassey ferguson 398 tractor,   b18009 parts catalogue manual
Massey ferguson 398 tractor, b18009 parts catalogue manualfjskemdzaqmme
 
Massey ferguson 375 tractor, b18009 parts catalogue manual
Massey ferguson 375 tractor,   b18009 parts catalogue manualMassey ferguson 375 tractor,   b18009 parts catalogue manual
Massey ferguson 375 tractor, b18009 parts catalogue manualfjskemdzaqmme
 
Massey ferguson 365 tractor, b18009 parts catalogue manual
Massey ferguson 365 tractor,   b18009 parts catalogue manualMassey ferguson 365 tractor,   b18009 parts catalogue manual
Massey ferguson 365 tractor, b18009 parts catalogue manualfjskemdzaqmme
 
Husqvarna rider pro flex 18 mower service repair manual
Husqvarna rider pro flex 18 mower service repair manualHusqvarna rider pro flex 18 mower service repair manual
Husqvarna rider pro flex 18 mower service repair manualfjskemdzaqmme
 
Husqvarna rider pro 15 service repair manual
Husqvarna rider pro 15 service repair manualHusqvarna rider pro 15 service repair manual
Husqvarna rider pro 15 service repair manualfjskemdzaqmme
 
Husqvarna rider 16 service repair manual
Husqvarna rider 16 service repair manualHusqvarna rider 16 service repair manual
Husqvarna rider 16 service repair manualfjskemdzaqmme
 
Husqvarna rider 13 service repair manual
Husqvarna rider 13 service repair manualHusqvarna rider 13 service repair manual
Husqvarna rider 13 service repair manualfjskemdzaqmme
 
Husqvarna rider 13 bio service repair manual
Husqvarna rider 13 bio service repair manualHusqvarna rider 13 bio service repair manual
Husqvarna rider 13 bio service repair manualfjskemdzaqmme
 

More from fjskemdzaqmme (20)

Massey ferguson mf 425 tractor 4 wd (0000000001 425-237827) parts catalogue...
Massey ferguson mf 425 tractor 4 wd (0000000001   425-237827) parts catalogue...Massey ferguson mf 425 tractor 4 wd (0000000001   425-237827) parts catalogue...
Massey ferguson mf 425 tractor 4 wd (0000000001 425-237827) parts catalogue...
 
Massey ferguson mf 425 tractor 2 wd (0000000001 425-238493) parts catalogue...
Massey ferguson mf 425 tractor 2 wd (0000000001   425-238493) parts catalogue...Massey ferguson mf 425 tractor 2 wd (0000000001   425-238493) parts catalogue...
Massey ferguson mf 425 tractor 2 wd (0000000001 425-238493) parts catalogue...
 
Massey ferguson mf 240 combine parts catalogue manual
Massey ferguson mf 240 combine parts catalogue manualMassey ferguson mf 240 combine parts catalogue manual
Massey ferguson mf 240 combine parts catalogue manual
 
Massey ferguson mf 168 mkiii 168 s tractors (fr) parts catalogue manual
Massey ferguson mf 168 mkiii  168 s tractors (fr) parts catalogue manualMassey ferguson mf 168 mkiii  168 s tractors (fr) parts catalogue manual
Massey ferguson mf 168 mkiii 168 s tractors (fr) parts catalogue manual
 
Massey ferguson mf 168 mkiii 168 f tractors (fr) parts catalogue manual
Massey ferguson mf 168 mkiii  168 f tractors (fr) parts catalogue manualMassey ferguson mf 168 mkiii  168 f tractors (fr) parts catalogue manual
Massey ferguson mf 168 mkiii 168 f tractors (fr) parts catalogue manual
 
Massey ferguson mf 158 mkiii 158 v tractors parts catalogue manual
Massey ferguson mf 158 mkiii  158 v tractors parts catalogue manualMassey ferguson mf 158 mkiii  158 v tractors parts catalogue manual
Massey ferguson mf 158 mkiii 158 v tractors parts catalogue manual
 
Massey ferguson mf 158 mkiii 158 f tractors parts catalogue manual
Massey ferguson mf 158 mkiii  158 f tractors parts catalogue manualMassey ferguson mf 158 mkiii  158 f tractors parts catalogue manual
Massey ferguson mf 158 mkiii 158 f tractors parts catalogue manual
 
Massey ferguson mf 152 mkiii 152 f tractors parts catalogue manual
Massey ferguson mf 152 mkiii  152 f tractors parts catalogue manualMassey ferguson mf 152 mkiii  152 f tractors parts catalogue manual
Massey ferguson mf 152 mkiii 152 f tractors parts catalogue manual
 
Massey ferguson mf 145 mkiii 145 v tractors parts catalogue manual
Massey ferguson mf 145 mkiii  145 v tractors parts catalogue manualMassey ferguson mf 145 mkiii  145 v tractors parts catalogue manual
Massey ferguson mf 145 mkiii 145 v tractors parts catalogue manual
 
Massey ferguson mf 99 combine parts catalogue manual
Massey ferguson mf 99 combine parts catalogue manualMassey ferguson mf 99 combine parts catalogue manual
Massey ferguson mf 99 combine parts catalogue manual
 
Massey ferguson mf 19 combine parts catalogue manual
Massey ferguson mf 19 combine parts catalogue manualMassey ferguson mf 19 combine parts catalogue manual
Massey ferguson mf 19 combine parts catalogue manual
 
Massey ferguson mf 17 combine parts catalogue manual
Massey ferguson mf 17 combine parts catalogue manualMassey ferguson mf 17 combine parts catalogue manual
Massey ferguson mf 17 combine parts catalogue manual
 
Massey ferguson 398 tractor, b18009 parts catalogue manual
Massey ferguson 398 tractor,   b18009 parts catalogue manualMassey ferguson 398 tractor,   b18009 parts catalogue manual
Massey ferguson 398 tractor, b18009 parts catalogue manual
 
Massey ferguson 375 tractor, b18009 parts catalogue manual
Massey ferguson 375 tractor,   b18009 parts catalogue manualMassey ferguson 375 tractor,   b18009 parts catalogue manual
Massey ferguson 375 tractor, b18009 parts catalogue manual
 
Massey ferguson 365 tractor, b18009 parts catalogue manual
Massey ferguson 365 tractor,   b18009 parts catalogue manualMassey ferguson 365 tractor,   b18009 parts catalogue manual
Massey ferguson 365 tractor, b18009 parts catalogue manual
 
Husqvarna rider pro flex 18 mower service repair manual
Husqvarna rider pro flex 18 mower service repair manualHusqvarna rider pro flex 18 mower service repair manual
Husqvarna rider pro flex 18 mower service repair manual
 
Husqvarna rider pro 15 service repair manual
Husqvarna rider pro 15 service repair manualHusqvarna rider pro 15 service repair manual
Husqvarna rider pro 15 service repair manual
 
Husqvarna rider 16 service repair manual
Husqvarna rider 16 service repair manualHusqvarna rider 16 service repair manual
Husqvarna rider 16 service repair manual
 
Husqvarna rider 13 service repair manual
Husqvarna rider 13 service repair manualHusqvarna rider 13 service repair manual
Husqvarna rider 13 service repair manual
 
Husqvarna rider 13 bio service repair manual
Husqvarna rider 13 bio service repair manualHusqvarna rider 13 bio service repair manual
Husqvarna rider 13 bio service repair manual
 

Recently uploaded

在线定制(UBC毕业证书)英属哥伦比亚大学毕业证成绩单留信学历认证原版一比一
在线定制(UBC毕业证书)英属哥伦比亚大学毕业证成绩单留信学历认证原版一比一在线定制(UBC毕业证书)英属哥伦比亚大学毕业证成绩单留信学历认证原版一比一
在线定制(UBC毕业证书)英属哥伦比亚大学毕业证成绩单留信学历认证原版一比一qh1ao5mm
 
industry 4.0-Revolution-PowerPoint-Templates (1).pptx
industry 4.0-Revolution-PowerPoint-Templates (1).pptxindustry 4.0-Revolution-PowerPoint-Templates (1).pptx
industry 4.0-Revolution-PowerPoint-Templates (1).pptxlongswitchmeeting
 
Mercedes Check Engine Light Solutions Precision Service for Peak Performance
Mercedes Check Engine Light Solutions Precision Service for Peak PerformanceMercedes Check Engine Light Solutions Precision Service for Peak Performance
Mercedes Check Engine Light Solutions Precision Service for Peak PerformanceMotronix
 
Why Is The Glow Plug Light Flashing In My VW & What Does It Indicate
Why Is The Glow Plug Light Flashing In My VW & What Does It IndicateWhy Is The Glow Plug Light Flashing In My VW & What Does It Indicate
Why Is The Glow Plug Light Flashing In My VW & What Does It IndicateWoodinville Sports Cars
 
How Do I Know If My Volvo Has Throttle Position Sensor Problems
How Do I Know If My Volvo Has Throttle Position Sensor ProblemsHow Do I Know If My Volvo Has Throttle Position Sensor Problems
How Do I Know If My Volvo Has Throttle Position Sensor ProblemsHeynneman European
 
powerpoint presentation on Vehicle crash Analysis
powerpoint presentation on Vehicle crash Analysispowerpoint presentation on Vehicle crash Analysis
powerpoint presentation on Vehicle crash AnalysisRajeshM436962
 
原版定做(ncl学位证书)英国纽卡斯尔大学毕业证文凭学历证书-国外学历学位认证
原版定做(ncl学位证书)英国纽卡斯尔大学毕业证文凭学历证书-国外学历学位认证原版定做(ncl学位证书)英国纽卡斯尔大学毕业证文凭学历证书-国外学历学位认证
原版定做(ncl学位证书)英国纽卡斯尔大学毕业证文凭学历证书-国外学历学位认证eehzz
 
如何办理(爱大毕业证书)爱丁堡大学毕业证成绩单留信学历认证真实可查
如何办理(爱大毕业证书)爱丁堡大学毕业证成绩单留信学历认证真实可查如何办理(爱大毕业证书)爱丁堡大学毕业证成绩单留信学历认证真实可查
如何办理(爱大毕业证书)爱丁堡大学毕业证成绩单留信学历认证真实可查huxs9sacp
 
如何办理(NCL毕业证书)纽卡斯尔大学毕业证毕业证成绩单原版一比一
如何办理(NCL毕业证书)纽卡斯尔大学毕业证毕业证成绩单原版一比一如何办理(NCL毕业证书)纽卡斯尔大学毕业证毕业证成绩单原版一比一
如何办理(NCL毕业证书)纽卡斯尔大学毕业证毕业证成绩单原版一比一avy6anjnd
 
快速办理澳洲昆士兰科技大学毕业证教育部学历认证书一模一样
快速办理澳洲昆士兰科技大学毕业证教育部学历认证书一模一样快速办理澳洲昆士兰科技大学毕业证教育部学历认证书一模一样
快速办理澳洲昆士兰科技大学毕业证教育部学历认证书一模一样kthcah
 
Exploring the Heart of Alberta: A Journey from Calgary to Edmonton
Exploring the Heart of Alberta: A Journey from Calgary to EdmontonExploring the Heart of Alberta: A Journey from Calgary to Edmonton
Exploring the Heart of Alberta: A Journey from Calgary to EdmontonTheCanada BUS
 
如何办理英国埃塞克斯大学毕业证(Essex毕业证书)毕业证成绩单原版一比一
如何办理英国埃塞克斯大学毕业证(Essex毕业证书)毕业证成绩单原版一比一如何办理英国埃塞克斯大学毕业证(Essex毕业证书)毕业证成绩单原版一比一
如何办理英国埃塞克斯大学毕业证(Essex毕业证书)毕业证成绩单原版一比一avy6anjnd
 
mechanical vibrations pebbles.pptbbbbbbbbx
mechanical vibrations pebbles.pptbbbbbbbbxmechanical vibrations pebbles.pptbbbbbbbbx
mechanical vibrations pebbles.pptbbbbbbbbxjoshuaclack73
 
Charging Forward: Bringing Electric Vehicle Charging Infrastructure to Rural ...
Charging Forward: Bringing Electric Vehicle Charging Infrastructure to Rural ...Charging Forward: Bringing Electric Vehicle Charging Infrastructure to Rural ...
Charging Forward: Bringing Electric Vehicle Charging Infrastructure to Rural ...Forth
 
一比一原版(Auburn毕业证书)奥本大学毕业证原件一模一样
一比一原版(Auburn毕业证书)奥本大学毕业证原件一模一样一比一原版(Auburn毕业证书)奥本大学毕业证原件一模一样
一比一原版(Auburn毕业证书)奥本大学毕业证原件一模一样AS
 
uipath-interview-questions.pdf it was productive
uipath-interview-questions.pdf it was productiveuipath-interview-questions.pdf it was productive
uipath-interview-questions.pdf it was productivesfvfmbgpq2
 
Auto Glass Repair in Redwood City What to Do When Disaster Strikes.pdf
Auto Glass Repair in Redwood City What to Do When Disaster Strikes.pdfAuto Glass Repair in Redwood City What to Do When Disaster Strikes.pdf
Auto Glass Repair in Redwood City What to Do When Disaster Strikes.pdfDuran's Auto Glass
 
Access to Rural Charging by David Skakel
Access to Rural Charging by David SkakelAccess to Rural Charging by David Skakel
Access to Rural Charging by David SkakelForth
 
Seamless Driving Experience Premier Mini Cooper Clutch Solutions
Seamless Driving Experience Premier Mini Cooper Clutch SolutionsSeamless Driving Experience Premier Mini Cooper Clutch Solutions
Seamless Driving Experience Premier Mini Cooper Clutch SolutionsAbsolute Auto Care Inc
 

Recently uploaded (20)

在线定制(UBC毕业证书)英属哥伦比亚大学毕业证成绩单留信学历认证原版一比一
在线定制(UBC毕业证书)英属哥伦比亚大学毕业证成绩单留信学历认证原版一比一在线定制(UBC毕业证书)英属哥伦比亚大学毕业证成绩单留信学历认证原版一比一
在线定制(UBC毕业证书)英属哥伦比亚大学毕业证成绩单留信学历认证原版一比一
 
industry 4.0-Revolution-PowerPoint-Templates (1).pptx
industry 4.0-Revolution-PowerPoint-Templates (1).pptxindustry 4.0-Revolution-PowerPoint-Templates (1).pptx
industry 4.0-Revolution-PowerPoint-Templates (1).pptx
 
Mercedes Check Engine Light Solutions Precision Service for Peak Performance
Mercedes Check Engine Light Solutions Precision Service for Peak PerformanceMercedes Check Engine Light Solutions Precision Service for Peak Performance
Mercedes Check Engine Light Solutions Precision Service for Peak Performance
 
Why Is The Glow Plug Light Flashing In My VW & What Does It Indicate
Why Is The Glow Plug Light Flashing In My VW & What Does It IndicateWhy Is The Glow Plug Light Flashing In My VW & What Does It Indicate
Why Is The Glow Plug Light Flashing In My VW & What Does It Indicate
 
How Do I Know If My Volvo Has Throttle Position Sensor Problems
How Do I Know If My Volvo Has Throttle Position Sensor ProblemsHow Do I Know If My Volvo Has Throttle Position Sensor Problems
How Do I Know If My Volvo Has Throttle Position Sensor Problems
 
powerpoint presentation on Vehicle crash Analysis
powerpoint presentation on Vehicle crash Analysispowerpoint presentation on Vehicle crash Analysis
powerpoint presentation on Vehicle crash Analysis
 
原版定做(ncl学位证书)英国纽卡斯尔大学毕业证文凭学历证书-国外学历学位认证
原版定做(ncl学位证书)英国纽卡斯尔大学毕业证文凭学历证书-国外学历学位认证原版定做(ncl学位证书)英国纽卡斯尔大学毕业证文凭学历证书-国外学历学位认证
原版定做(ncl学位证书)英国纽卡斯尔大学毕业证文凭学历证书-国外学历学位认证
 
如何办理(爱大毕业证书)爱丁堡大学毕业证成绩单留信学历认证真实可查
如何办理(爱大毕业证书)爱丁堡大学毕业证成绩单留信学历认证真实可查如何办理(爱大毕业证书)爱丁堡大学毕业证成绩单留信学历认证真实可查
如何办理(爱大毕业证书)爱丁堡大学毕业证成绩单留信学历认证真实可查
 
如何办理(NCL毕业证书)纽卡斯尔大学毕业证毕业证成绩单原版一比一
如何办理(NCL毕业证书)纽卡斯尔大学毕业证毕业证成绩单原版一比一如何办理(NCL毕业证书)纽卡斯尔大学毕业证毕业证成绩单原版一比一
如何办理(NCL毕业证书)纽卡斯尔大学毕业证毕业证成绩单原版一比一
 
快速办理澳洲昆士兰科技大学毕业证教育部学历认证书一模一样
快速办理澳洲昆士兰科技大学毕业证教育部学历认证书一模一样快速办理澳洲昆士兰科技大学毕业证教育部学历认证书一模一样
快速办理澳洲昆士兰科技大学毕业证教育部学历认证书一模一样
 
Exploring the Heart of Alberta: A Journey from Calgary to Edmonton
Exploring the Heart of Alberta: A Journey from Calgary to EdmontonExploring the Heart of Alberta: A Journey from Calgary to Edmonton
Exploring the Heart of Alberta: A Journey from Calgary to Edmonton
 
如何办理英国埃塞克斯大学毕业证(Essex毕业证书)毕业证成绩单原版一比一
如何办理英国埃塞克斯大学毕业证(Essex毕业证书)毕业证成绩单原版一比一如何办理英国埃塞克斯大学毕业证(Essex毕业证书)毕业证成绩单原版一比一
如何办理英国埃塞克斯大学毕业证(Essex毕业证书)毕业证成绩单原版一比一
 
mechanical vibrations pebbles.pptbbbbbbbbx
mechanical vibrations pebbles.pptbbbbbbbbxmechanical vibrations pebbles.pptbbbbbbbbx
mechanical vibrations pebbles.pptbbbbbbbbx
 
Charging Forward: Bringing Electric Vehicle Charging Infrastructure to Rural ...
Charging Forward: Bringing Electric Vehicle Charging Infrastructure to Rural ...Charging Forward: Bringing Electric Vehicle Charging Infrastructure to Rural ...
Charging Forward: Bringing Electric Vehicle Charging Infrastructure to Rural ...
 
一比一原版(Auburn毕业证书)奥本大学毕业证原件一模一样
一比一原版(Auburn毕业证书)奥本大学毕业证原件一模一样一比一原版(Auburn毕业证书)奥本大学毕业证原件一模一样
一比一原版(Auburn毕业证书)奥本大学毕业证原件一模一样
 
uipath-interview-questions.pdf it was productive
uipath-interview-questions.pdf it was productiveuipath-interview-questions.pdf it was productive
uipath-interview-questions.pdf it was productive
 
Obat Penggugur Kandungan Di Apotek Klinik Banyuwangi +6287776558899
Obat Penggugur Kandungan Di Apotek Klinik Banyuwangi +6287776558899Obat Penggugur Kandungan Di Apotek Klinik Banyuwangi +6287776558899
Obat Penggugur Kandungan Di Apotek Klinik Banyuwangi +6287776558899
 
Auto Glass Repair in Redwood City What to Do When Disaster Strikes.pdf
Auto Glass Repair in Redwood City What to Do When Disaster Strikes.pdfAuto Glass Repair in Redwood City What to Do When Disaster Strikes.pdf
Auto Glass Repair in Redwood City What to Do When Disaster Strikes.pdf
 
Access to Rural Charging by David Skakel
Access to Rural Charging by David SkakelAccess to Rural Charging by David Skakel
Access to Rural Charging by David Skakel
 
Seamless Driving Experience Premier Mini Cooper Clutch Solutions
Seamless Driving Experience Premier Mini Cooper Clutch SolutionsSeamless Driving Experience Premier Mini Cooper Clutch Solutions
Seamless Driving Experience Premier Mini Cooper Clutch Solutions
 

2003 acura cl service repair manual

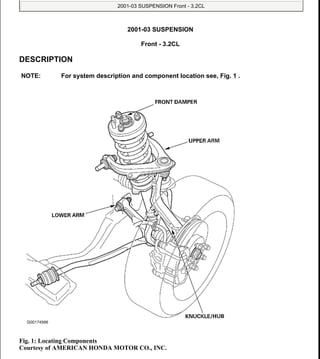
  • 1. 2001-03 SUSPENSION Front - 3.2CL DESCRIPTION Fig. 1: Locating Components Courtesy of AMERICAN HONDA MOTOR CO., INC. NOTE: For system description and component location see, Fig. 1 . 2003 Acura 3.2CL Type S 2001-03 SUSPENSION Front - 3.2CL 2003 Acura 3.2CL Type S 2001-03 SUSPENSION Front - 3.2CL me Sunday, May 10, 2009 8:17:13 AM Page 1 © 2005 Mitchell Repair Information Company, LLC. me Sunday, May 10, 2009 8:17:17 AM Page 1 © 2005 Mitchell Repair Information Company, LLC.
  • 2. ADJUSTMENTS WHEEL ALIGNMENT WHEEL BEARING END PLAY 1. Raise vehicle, and make sure it is securely supported. Remove wheels, then reinstall wheel nuts. 2. Place dial gauge against hub flange. Measure bearing end play by moving disc inward or outward. 3. If bearing end play measurement is more than 0-.002" (.05 mm), replace wheel bearing. REMOVAL & INSTALLATION BALL JOINT Removal 1. Install a hex nut onto threads of ball joint. Make sure nut is flush with ball joint pin end to prevent damage to threads. Apply grease (A) to 28 mm Ball Joint Remover (07MAC-SL00200) on areas shown. See Fig. 2 . This will ease installation of the tool and prevent damage to the pressure bolt (B) threads. 2. Install ball joint remover as shown. Insert the jaws carefully, making sure you do not damage the ball joint boot. Adjust the jaw spacing by turning the pressure bolt. See Fig. 3 . 3. Once the ball joint remover is in place, turn the adjusting bolt (A) as necessary to make the jaws parallel. Then hand-tighten the pressure bolt (B), and recheck the jaws to make sure they are still parallel. See Fig. 4 . 4. After making adjustment to adjusting bolt, make sure head of adjusting bolt is in position (A) to allow jaw (C) to pivot. See Fig. 4 . 5. With a wrench, tighten pressure bolt (B) until ball joint shaft pops loose from steering suspension arm. If necessary, apply penetrating type lubricant to loosen ball joint. Remove tool, then remove nut from end of the ball joint and pull ball joint out of steering/suspension arm. Inspect ball joint boot, and replace it if damaged. NOTE: See appropriate SPECIFICATIONS & PROCEDURES article. 2003 Acura 3.2CL Type S 2001-03 SUSPENSION Front - 3.2CL me Sunday, May 10, 2009 8:17:13 AM Page 2 © 2005 Mitchell Repair Information Company, LLC.
  • 3. Fig. 2: Applying Grease To Special Tool Courtesy of AMERICAN HONDA MOTOR CO., INC. 2003 Acura 3.2CL Type S 2001-03 SUSPENSION Front - 3.2CL me Sunday, May 10, 2009 8:17:13 AM Page 3 © 2005 Mitchell Repair Information Company, LLC.
  • 4. Fig. 3: Removing Ball Joint Courtesy of AMERICAN HONDA MOTOR CO., INC. 2003 Acura 3.2CL Type S 2001-03 SUSPENSION Front - 3.2CL me Sunday, May 10, 2009 8:17:13 AM Page 4 © 2005 Mitchell Repair Information Company, LLC.
  • 5. Fig. 4: Adjusting Ball Joint Bolt Courtesy of AMERICAN HONDA MOTOR CO., INC. BALL JOINT BOOT Removal 1. Remove boot clip and boot. Pack interior of boot and lip (A) with grease. Do not contaminate lower CAUTION: DO NOT contaminate lower collar of the boot with grease. CAUTION: Keep dirt, or other foreign materials from getting into boot. 2003 Acura 3.2CL Type S 2001-03 SUSPENSION Front - 3.2CL me Sunday, May 10, 2009 8:17:13 AM Page 5 © 2005 Mitchell Repair Information Company, LLC.
  • 6. collar of the boot (B) with grease. See Fig. 5 . 2. Wipe grease off tapered portion of shaft and pack fresh grease into base. Do not let dirt, or other foreign materials get into the boot. Fig. 5: Greasing Ball Joint Boot Courtesy of AMERICAN HONDA MOTOR CO., INC. Installation 1. Install boot on ball joint, then squeeze it gently to force out any air. For lower ball joint, adjust Ball Joint Boot Clip (07GAG-SD40700) with adjusting bolt (B) until its base is just above groove around the bottom of boot. Then slide clip over ball joint boot clip and into position on boot. See Fig. 6 . 2. For upper ball joint, just hold tool over joint, then slide clip over ball joint boot clip and into position on boot. After installing boot, wipe any grease off exposed portion of ball joint shaft. 2003 Acura 3.2CL Type S 2001-03 SUSPENSION Front - 3.2CL me Sunday, May 10, 2009 8:17:13 AM Page 6 © 2005 Mitchell Repair Information Company, LLC.
  • 7. Fig. 6: Installing Ball Joint Boot Courtesy of AMERICAN HONDA MOTOR CO., INC. KNUCKLE & HUB NOTE: See Fig. 1 andFig. 7 for component locations and exploded view of knuckle & hub. 2003 Acura 3.2CL Type S 2001-03 SUSPENSION Front - 3.2CL me Sunday, May 10, 2009 8:17:13 AM Page 7 © 2005 Mitchell Repair Information Company, LLC.
  • 8. Fig. 7: Exploded View Of Knuckle & Hub Courtesy of AMERICAN HONDA MOTOR CO., INC. Removal 1. Remove front wheel. Raise locking tab on the spindle nut, then remove nut. Remove brake hose mounting bolts. Remove caliper mounting bolts (B), and hang caliper assembly (C) to one side. See Fig. 8 . To prevent damage to caliper assembly or brake hose, use a short piece of wire to hang caliper from undercarriage. 2003 Acura 3.2CL Type S 2001-03 SUSPENSION Front - 3.2CL me Sunday, May 10, 2009 8:17:13 AM Page 8 © 2005 Mitchell Repair Information Company, LLC.
  • 9. 2. Remove wheel sensor from knuckle. Do not disconnect wheel sensor connector. Raise stake of spindle nut, then remove nut. Remove the 6 mm brake disc retaining screws. 3. Screw two 8 x 1.25 mm bolts (B) into disc to push it away from the hub. Turn each bolt 2 turns at a time to prevent cocking disc excessively. Remove brake disc from knuckle. Check front hub for damage and cracks. Remove cotter pin (A) from the tie-rod end ball joint, then loosen nut (B). See Fig. 9 . 4. Remove tie-rod ball joint from knuckle using Ball Joint Remover (07MAC-SL00200). See Fig. 7 . Remove cotter pin (A) from lower arm ball joint castle nut (B), and remove nut. See Fig. 10 . 5. Remove lower ball joint from knuckle using ball joint remover. Remove cotter pin (A) from upper ball joint castle nut (B) and remove nut. See Fig. 7 . Remove upper ball joint from knuckle using ball joint remover. 6. Pull knuckle outward, and remove driveshaft outboard joint (B) from knuckle (A) by tapping driveshaft end (C) with a plastic hammer, then remove knuckle. See Fig. 11 . 7. Separate hub (A) from knuckle (B) using Hub Dis/assembly Tool (07GAF-SE00100) and a hydraulic press. Take care not to distort splash guard. Hold onto hub to keep it from falling when pressed clear. See Fig. 12 . 8. Remove snap ring and splash guard from knuckle. Press wheel bearing out of knuckle using a Driver (07749-0010000), 58 x 72 mm Attachment (07947-6340201) and a press. Press wheel bearing inner race from hub using Hub Dis/assembly Tool, a commercially available bearing separator, and a press. 9. Wash knuckle and hub thoroughly in high flash point solvent before reassembly. 2003 Acura 3.2CL Type S 2001-03 SUSPENSION Front - 3.2CL me Sunday, May 10, 2009 8:17:13 AM Page 9 © 2005 Mitchell Repair Information Company, LLC.
  • 10. Fig. 8: Removing Caliper Courtesy of AMERICAN HONDA MOTOR CO., INC. Fig. 9: Removing Cotter Pin From Tie-Rod End Ball Joint Courtesy of AMERICAN HONDA MOTOR CO., INC. 2003 Acura 3.2CL Type S 2001-03 SUSPENSION Front - 3.2CL me Sunday, May 10, 2009 8:17:13 AM Page 10 © 2005 Mitchell Repair Information Company, LLC.
  • 11. Fig. 10: Removing Lower Arm Ball Joint Castle Nut Courtesy of AMERICAN HONDA MOTOR CO., INC. 2003 Acura 3.2CL Type S 2001-03 SUSPENSION Front - 3.2CL me Sunday, May 10, 2009 8:17:13 AM Page 11 © 2005 Mitchell Repair Information Company, LLC.
  • 12. Fig. 11: Removing Knuckle Courtesy of AMERICAN HONDA MOTOR CO., INC. 2003 Acura 3.2CL Type S 2001-03 SUSPENSION Front - 3.2CL me Sunday, May 10, 2009 8:17:13 AM Page 12 © 2005 Mitchell Repair Information Company, LLC.
  • 13. Fig. 12: Separating Hub From Knuckle Courtesy of AMERICAN HONDA MOTOR CO., INC. Installation 1. Press a new wheel bearing (A) into knuckle (B) using old bearing (C), a steel plate (D), Bearing Driver Attachment (07965-SD90100), and a press. Place wheel bearing on knuckle with pack seal side facing (metal color) toward inside. Be careful not to damage sleeve of pack seal. See Fig. 13 . 2. Install snap ring securely in knuckle. Install splash guard, and tighten screws to specifications. See TORQUE SPECIFICATIONS . 3. Install hub (A) on knuckle (B) using Bearing Driver Attachment, Driver and a hydraulic press. Be careful not to distort splash guard (C). See Fig. 14 . 4. Install knuckle in the reverse order of removal, and pay particular attention to the following items: Be careful not to damage ball joint boots when installing knuckle. Torque all mounting hardware to 2003 Acura 3.2CL Type S 2001-03 SUSPENSION Front - 3.2CL me Sunday, May 10, 2009 8:17:13 AM Page 13 © 2005 Mitchell Repair Information Company, LLC.
  • 14. Thank you very much for your reading. Please Click Here. Then Get COMPLETE MANUAL. NO WAITING NOTE: If there is no response to click on the link above, please download the PDF document first and then click on it.
  • 15. specified torque values. See TORQUE SPECIFICATIONS . Torque castle nuts to lower torque specifications, then tighten only far enough to align slot with pin hole. Do not align castle nut by loosening. Before installing brake disc, clean mating surface of front hub and inside of brake disc. Install new cotter pins on castle nuts after torquing. Raise locking tab on spindle nut (C), then remove nut. Before installing spindle nut, apply a small amount of engine oil to seating surface of nut. After tightening, use a drift to stake spindle nut shoulder against driveshaft. Before installing wheel, clean mating surface of brake disc and inside of wheel. Check front wheel alignment, and adjust it if necessary. See WHEEL ALIGNMENT under ADJUSTMENTS. Fig. 13: Pressing New Wheel Bearing Into Knuckle Courtesy of AMERICAN HONDA MOTOR CO., INC. 2003 Acura 3.2CL Type S 2001-03 SUSPENSION Front - 3.2CL me Sunday, May 10, 2009 8:17:13 AM Page 14 © 2005 Mitchell Repair Information Company, LLC.
  • 16. Fig. 14: Installing Hub Knuckle Courtesy of AMERICAN HONDA MOTOR CO., INC. LOWER ARM Removal Installation 1. Remove front wheels. Remove strut fork by doing the following. See Fig. 15 . Remove strut pinch bolt (A). Remove lower bolt and self-locking nut from strut fork. Remove strut fork (C) from strut. 2. Remove cotter pin from lower ball joint castle nut, and remove nut. Remove lower ball joint from 2003 Acura 3.2CL Type S 2001-03 SUSPENSION Front - 3.2CL me Sunday, May 10, 2009 8:17:13 AM Page 15 © 2005 Mitchell Repair Information Company, LLC.