
Recommended
Recommended
More Related Content
Similar to YALE F876 GDP120DC LIFT TRUCK (EUROPE) Service Repair Manual
Similar to YALE F876 GDP120DC LIFT TRUCK (EUROPE) Service Repair Manual (15)
Recently uploaded
Recently uploaded (20)
YALE F876 GDP120DC LIFT TRUCK (EUROPE) Service Repair Manual
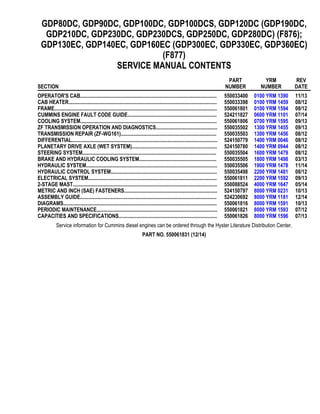
- 1. GDP80DC, GDP90DC, GDP100DC, GDP100DCS, GDP120DC (GDP190DC, GDP210DC, GDP230DC, GDP230DCS, GDP250DC, GDP280DC) (F876); GDP130EC, GDP140EC, GDP160EC (GDP300EC, GDP330EC, GDP360EC) (F877) SERVICE MANUAL CONTENTS SECTION PART NUMBER YRM NUMBER REV DATE OPERATOR'S CAB........................................................................................................ 550033400 0100 YRM 1390 11/13 CAB HEATER................................................................................................................. 550033398 0100 YRM 1459 08/12 FRAME............................................................................................................................ 550061801 0100 YRM 1594 08/12 CUMMINS ENGINE FAULT CODE GUIDE.................................................................... 524211827 0600 YRM 1101 07/14 COOLING SYSTEM........................................................................................................ 550061806 0700 YRM 1595 09/13 ZF TRANSMISSION OPERATION AND DIAGNOSTICS............................................... 550035502 1300 YRM 1455 09/13 TRANSMISSION REPAIR (ZF-WG161)......................................................................... 550035503 1300 YRM 1456 08/12 DIFFERENTIAL............................................................................................................... 524150779 1400 YRM 0046 08/12 PLANETARY DRIVE AXLE (WET SYSTEM)................................................................. 524150780 1400 YRM 0944 08/12 STEERING SYSTEM...................................................................................................... 550035504 1600 YRM 1479 08/12 BRAKE AND HYDRAULIC COOLING SYSTEM........................................................... 550035505 1800 YRM 1498 03/13 HYDRAULIC SYSTEM.................................................................................................... 550035506 1900 YRM 1478 11/14 HYDRAULIC CONTROL SYSTEM................................................................................. 550035498 2200 YRM 1481 08/12 ELECTRICAL SYSTEM.................................................................................................. 550061811 2200 YRM 1592 09/13 2-STAGE MAST.............................................................................................................. 550088524 4000 YRM 1647 05/14 METRIC AND INCH (SAE) FASTENERS....................................................................... 524150797 8000 YRM 0231 10/13 ASSEMBLY GUIDE........................................................................................................ 524230692 8000 YRM 1181 12/14 DIAGRAMS..................................................................................................................... 550061816 8000 YRM 1591 10/13 PERIODIC MAINTENANCE............................................................................................ 550061821 8000 YRM 1593 07/12 CAPACITIES AND SPECIFICATIONS........................................................................... 550061826 8000 YRM 1596 07/13 Service information for Cummins diesel engines can be ordered through the Hyster Literature Distribution Center. PART NO. 550061831 (12/14)
- 2. SAFETY PRECAUTIONS MAINTENANCE AND REPAIR • The Service Manuals are updated on a regular basis, but may not reflect recent design changes to the product. Updated technical service information may be available from your local authorized Yale® dealer. Service Manuals provide general guidelines for maintenance and service and are intended for use by trained and experienced technicians. Failure to properly maintain equipment or to follow instructions con- tained in the Service Manual could result in damage to the products, personal injury, property damage or death. • When lifting parts or assemblies, make sure all slings, chains, or cables are correctly fastened, and that the load being lifted is balanced. Make sure the crane, cables, and chains have the capacity to support the weight of the load. • Do not lift heavy parts by hand, use a lifting mechanism. • Wear safety glasses. • DISCONNECT THE BATTERY CONNECTOR before doing any maintenance or repair on electric lift trucks. Disconnect the battery ground cable on internal combustion lift trucks. • Always use correct blocks to prevent the unit from rolling or falling. See HOW TO PUT THE LIFT TRUCK ON BLOCKS in the Operating Manual or the Periodic Maintenance section. • Keep the unit clean and the working area clean and orderly. • Use the correct tools for the job. • Keep the tools clean and in good condition. • Always use YALE APPROVED parts when making repairs. Replacement parts must meet or exceed the specifications of the original equipment manufacturer. • Make sure all nuts, bolts, snap rings, and other fastening devices are removed before using force to re- move parts. • Always fasten a DO NOT OPERATE tag to the controls of the unit when making repairs, or if the unit needs repairs. • Be sure to follow the WARNING and CAUTION notes in the instructions. • Gasoline, Liquid Petroleum Gas (LPG), Compressed Natural Gas (CNG), and Diesel fuel are flammable. Be sure to follow the necessary safety precautions when handling these fuels and when working on these fuel systems. • Batteries generate flammable gas when they are being charged. Keep fire and sparks away from the area. Make sure the area is well ventilated. NOTE: The following symbols and words indicate safety information in this man- ual: WARNING Indicates a hazardous situation which, if not avoided, could result in death or serious injury. CAUTION Indicates a hazardous situation which, if not avoided, could result in minor or moderate injury and property damage. On the lift truck, the WARNING symbol and word are on orange back- ground. The CAUTION symbol and word are on yellow background.
- 3. ©2014 Yale Materials Handling Corp. TABLE OF CONTENTS General .....................................................................................................................................................................1 Description of Operation ...........................................................................................................................................3 Cab Structure ....................................................................................................................................................... 3 Cab Tilt System .................................................................................................................................................... 3 Cab Tilt System, Raise .....................................................................................................................................4 Cab Tilt System, Lower ....................................................................................................................................4 Oil Filling for Cab Tilt System ....................................................................................................................................6 Raising and Lowering Cab ........................................................................................................................................7 Raise Cab .............................................................................................................................................................7 Lower Cab ............................................................................................................................................................ 8 Cab Door Assembly ..................................................................................................................................................8 Cab Door .............................................................................................................................................................. 8 Remove ............................................................................................................................................................8 Install ................................................................................................................................................................8 Door Hinge ........................................................................................................................................................... 9 Remove ............................................................................................................................................................9 Install ................................................................................................................................................................9 Door Striker Pin .................................................................................................................................................. 10 Door Striker Pin Adjustment ...........................................................................................................................10 Door Latch ..........................................................................................................................................................10 Remove ..........................................................................................................................................................10 Install ..............................................................................................................................................................10 Door Handle ....................................................................................................................................................... 11 Remove ..........................................................................................................................................................11 Install ..............................................................................................................................................................11 Door Release ......................................................................................................................................................11 Remove ..........................................................................................................................................................11 Install ..............................................................................................................................................................12 Door Push Button ............................................................................................................................................... 12 Remove ..........................................................................................................................................................12 Install ..............................................................................................................................................................12 Cab Tilt System .......................................................................................................................................................12 Electric Tilt Pump ................................................................................................................................................12 Remove ..........................................................................................................................................................12 Install ..............................................................................................................................................................13 Hand Pump .........................................................................................................................................................13 Remove ..........................................................................................................................................................13 Install ..............................................................................................................................................................13 Cab Tilt Cylinder .................................................................................................................................................15 Remove ..........................................................................................................................................................15 Disassemble ...................................................................................................................................................15 Clean ..............................................................................................................................................................16 Inspect ............................................................................................................................................................16 Assemble ....................................................................................................................................................... 17 Install ..............................................................................................................................................................17 Latch ...................................................................................................................................................................17 Remove ..........................................................................................................................................................17 Install ..............................................................................................................................................................18 Brake and Inching Pedals .......................................................................................................................................19 Remove .............................................................................................................................................................. 19 Table of Contents i
- 4. TABLE OF CONTENTS (Continued) Install .................................................................................................................................................................. 19 Brake Pedal Adjustment .....................................................................................................................................19 Dry Brake ....................................................................................................................................................... 19 Wet Brake ...................................................................................................................................................... 19 Inching Pedal Adjustment ...................................................................................................................................20 Inching Pedal Sensor Adjustment Using Dana Dashboard Software .................................................................20 Inching Pedal Sensor Calibration Procedure Using Dana Dashboard Software ................................................21 Inching Pedal Sensor Adjustment Using the APC200 Display ...........................................................................21 Inching Pedal Sensor Calibration Procedure Using the APC200 Display .......................................................... 22 Inching Sensor Adjustment for trucks with ZF Transmission ..............................................................................22 Inching Pedal Calibration for trucks with ZF Transmission .................................................................................23 Accelerator Pedal and Sensor ................................................................................................................................23 Accelerator Pedal ............................................................................................................................................... 23 Remove ..........................................................................................................................................................23 Install ..............................................................................................................................................................23 Accelerator Pedal Sensor ...................................................................................................................................23 Adjust ............................................................................................................................................................. 23 Seat Assembly ........................................................................................................................................................24 Seat .................................................................................................................................................................... 24 Remove ..........................................................................................................................................................24 Install ..............................................................................................................................................................24 Seat Cushion ......................................................................................................................................................25 Remove ..........................................................................................................................................................25 Install ..............................................................................................................................................................25 Back Cushion ..................................................................................................................................................... 26 Remove ..........................................................................................................................................................26 Install ..............................................................................................................................................................26 Seat Suspension Replacement .......................................................................................................................... 26 Boot Replacement ..............................................................................................................................................26 Suspension Scissor and Shock Absorber .......................................................................................................... 27 Remove ..........................................................................................................................................................27 Install ..............................................................................................................................................................32 Compressor ........................................................................................................................................................39 Remove ..........................................................................................................................................................39 Install ..............................................................................................................................................................43 Power Assist Armrest ..............................................................................................................................................49 Release Cable ....................................................................................................................................................49 Remove ..........................................................................................................................................................49 Install ..............................................................................................................................................................49 Gas Spring ..........................................................................................................................................................50 Remove ..........................................................................................................................................................50 Install ..............................................................................................................................................................50 Joystick ...............................................................................................................................................................50 Remove ..........................................................................................................................................................50 Install ..............................................................................................................................................................50 Electrical Levers ................................................................................................................................................. 51 Remove ..........................................................................................................................................................51 Install ..............................................................................................................................................................51 Armrest Rocker Switches ................................................................................................................................... 51 Remove ..........................................................................................................................................................51 Table of Contents ii
- 5. TABLE OF CONTENTS (Continued) Install ..............................................................................................................................................................51 Armrest Top Cover ............................................................................................................................................. 52 Remove ..........................................................................................................................................................52 Install ..............................................................................................................................................................52 Instrument Panel .....................................................................................................................................................52 Key Switch ..........................................................................................................................................................52 Remove ..........................................................................................................................................................52 Install ..............................................................................................................................................................52 12V Power Socket ..............................................................................................................................................52 Remove ..........................................................................................................................................................52 Install ..............................................................................................................................................................53 Electric-Operated Heat Control and Air Recirculation Control (Airco Only) ........................................................53 Remove ..........................................................................................................................................................53 Install ..............................................................................................................................................................53 Cable-Operated Heater Control (Heater Only) ...................................................................................................53 Remove ..........................................................................................................................................................53 Install ..............................................................................................................................................................54 Air Conditioning Switch Replacement ................................................................................................................ 54 Instrument Panel Rocker Switches Replacement .............................................................................................. 55 Parking Brake Switch ......................................................................................................................................... 55 Remove ..........................................................................................................................................................55 Install ..............................................................................................................................................................55 Indicator Display Replacement ...........................................................................................................................55 Instrument Panel Top Console ...........................................................................................................................56 Remove ..........................................................................................................................................................56 Install ..............................................................................................................................................................56 Steering Wheel and Column Assembly .................................................................................................................. 57 Steering Wheel and Horn ................................................................................................................................... 57 Remove ..........................................................................................................................................................57 Install ..............................................................................................................................................................57 Steering Column Assembly ................................................................................................................................ 57 Remove ..........................................................................................................................................................57 Install ..............................................................................................................................................................57 Adjustment Handle ............................................................................................................................................. 60 Remove ..........................................................................................................................................................60 Install ..............................................................................................................................................................60 Main Warning Lights ...........................................................................................................................................60 Remove ..........................................................................................................................................................60 Install ..............................................................................................................................................................60 Shift Lever .......................................................................................................................................................... 60 Remove ..........................................................................................................................................................60 Install ..............................................................................................................................................................61 Turn Signal Lever ............................................................................................................................................... 61 Remove ..........................................................................................................................................................61 Install ..............................................................................................................................................................61 Window Wipers Replacement .................................................................................................................................61 Window Wiper Assembly, Replace .....................................................................................................................61 Remove ..........................................................................................................................................................61 Install ..............................................................................................................................................................62 Window Wiper Motor Replacement ........................................................................................................................ 62 Table of Contents iii
- 6. TABLE OF CONTENTS (Continued) Front Window Wiper Motor Assembly ................................................................................................................ 62 Remove ..........................................................................................................................................................62 Install ..............................................................................................................................................................62 Rear Window Wiper Motor Assembly .................................................................................................................63 Remove ..........................................................................................................................................................63 Install ..............................................................................................................................................................63 Top Window Wiper Motor Assembly .................................................................................................................. 63 Remove ..........................................................................................................................................................63 Install ..............................................................................................................................................................63 Window Washer System .........................................................................................................................................64 Window Washer Reservoir and Pumps ..............................................................................................................64 Remove ..........................................................................................................................................................64 Install ..............................................................................................................................................................64 Window Washer Hoses ...................................................................................................................................... 65 Hoses for Top and Rear Window ...................................................................................................................65 Remove ......................................................................................................................................................65 Install ..........................................................................................................................................................65 Hoses for Front Window .................................................................................................................................66 Remove ......................................................................................................................................................66 Install ..........................................................................................................................................................66 Window Washer Spray Nozzles ......................................................................................................................... 67 Front ...............................................................................................................................................................67 Remove ......................................................................................................................................................67 Install ..........................................................................................................................................................67 Rear ............................................................................................................................................................... 67 Remove ......................................................................................................................................................67 Install ..........................................................................................................................................................67 Top .................................................................................................................................................................67 Remove ......................................................................................................................................................67 Install ..........................................................................................................................................................67 Window Replacement .............................................................................................................................................68 Front Window ..................................................................................................................................................... 69 Remove ..........................................................................................................................................................69 Install ..............................................................................................................................................................69 Rear Window ......................................................................................................................................................69 Remove ..........................................................................................................................................................69 Install ..............................................................................................................................................................69 Top Window ........................................................................................................................................................70 Remove ..........................................................................................................................................................70 Install ..............................................................................................................................................................70 Door Window ......................................................................................................................................................71 Upper/Lower Window .....................................................................................................................................71 Remove ......................................................................................................................................................71 Install ..........................................................................................................................................................71 Sliding Window and Sliding Tracks .................................................................................................................... 71 Remove ..........................................................................................................................................................71 Install ..............................................................................................................................................................73 Weather Strip Replacement ...........................................................................................................................73 Window Stopper Replacement .......................................................................................................................73 Window Seal Replacement ............................................................................................................................73 Table of Contents iv
- 7. TABLE OF CONTENTS (Continued) Sliding Window Frame ................................................................................................................................... 73 Remove ......................................................................................................................................................73 Install ..........................................................................................................................................................74 Floor Mat .................................................................................................................................................................74 Front Floor Mat ...................................................................................................................................................74 Remove ..........................................................................................................................................................74 Install ..............................................................................................................................................................75 Rear Floor Mat ....................................................................................................................................................75 Remove ..........................................................................................................................................................75 Install ..............................................................................................................................................................75 Radio Console ........................................................................................................................................................ 76 Remove .............................................................................................................................................................. 76 Install .................................................................................................................................................................. 76 Air Duct Replacement .............................................................................................................................................77 Front ................................................................................................................................................................... 77 Rear ....................................................................................................................................................................77 Remove ..........................................................................................................................................................77 Install ..............................................................................................................................................................77 Accessories ............................................................................................................................................................ 78 Mirror Replacement ............................................................................................................................................78 Sunshade Replacement ..................................................................................................................................... 78 Top .................................................................................................................................................................78 Rear ............................................................................................................................................................... 79 Map Light Replacement ......................................................................................................................................79 Interior Fan Replacement ...................................................................................................................................79 Remove ..........................................................................................................................................................79 Training Seat ...................................................................................................................................................... 79 Field Installation ............................................................................................................................................. 79 Remove ..........................................................................................................................................................79 Label Replacement .................................................................................................................................................80 This section is for the following models: GDP/GLP80-120DB (GDP170-280DB) [D876]; GDP/GLP130-160EB (GDP/GLP300-360EB) [D877]; GDP80DC, GDP90DC, GDP100DC, GDP100DCS, GDP120DC (GDP190DC, GDP210DC, GDP230DC, GDP230DCS, GDP250DC, GDP280DC) [E876]; GDP130EC, GDP140EC, GDP160EC (GDP300EC, GDP330EC, GDP360EC) [E877]; GDP80-120DC, GDP100DCS (GDP190-280DC, GDP230DCS) [F876]; GDP130-160EC (GDP360-360EC) [F877] Table of Contents v
- 8. General This YRM describes the functions of the cab and the replacement instructions for the cab components. See Figure 1. Some of the described components are options that may not be present on each cab. The operation of the various switches and controls can be found in the Operating Manual. The description and repair instructions for the heater assembly are in Cab Heater (Prior to Oct. 2008) 0100YRM1458 for lift trucks built prior to October, 2008, and in Cab Heater 0100YRM1459 for lift trucks built after October, 2008. The remove and replace instructions for the cab as an assembly are in the frame YRM specific to each model lift truck. Information on systems that are related to the cab are in YRM for the Electrical System, Hydraulic System, Brake System, Steering System and Diagrams specific to each model lift truck. Before making any repairs to the lift truck, complete the following procedures: 1. Place the lift truck on a solid, level surface. 2. Lower the mast completely and tilt forward. 3. Place the shift lever in NEUTRAL. 4. Apply the parking brake. 5. Shut down the engine. 0100 YRM 1390 General 1
- 9. Thank you very much for your reading. Please Click Here. Then Get COMPLETE MANUAL. NO WAITING NOTE: If there is no response to click on the link above, please download the PDF document first and then click on it.
- 10. 1. HEATER SECTION 2. INCHING PEDAL 3. BRAKE PEDAL 4. ACCELERATOR PEDAL 5. STEERING COLUMN 6. FRONT, REAR, AND TOP WINDOWS 7. FRONT, REAR, AND TOP WIPER ASSEMBLIES 8. INTEGRATED OVERHEAD GUARD 9. OPERATOR'S CONSOLE, CONTROLS, AND ARMREST 10. AIR CONDITIONING CONDENSER, DRYER, AND FAN ASSEMBLY (OPTIONAL) 11. SEAT Figure 1. Operator's Cab Description of Operation 0100 YRM 1390 2
- 11. Description of Operation CAB STRUCTURE The cab frame is a welded structure. The overhead guard is an integral part of the cab frame. See Fig- ure 1. In order to maintain maximum overhead protec- tion, changes to the cab frame and integrated over- head guard are not allowed. There are two cab op- tions: an open cab and a closed cab. The closed cab features windows and wipers, doors, a heater, and optional air conditioning. Both cab types feature inte- rior components. CAB TILT SYSTEM On lift trucks with a cab tilt system, the cab can tilt to the right-hand side, providing service access to the engine compartment and components under the cab. The cab tilt system consists of a cab support frame, cab tilt cylinder, cab tilt hand pump assembly, cab latches, and an optional electrical cab tilt pump. See Figure 2. The cab is attached to the lift truck in the lowered po- sition by the cab support pivots on the right-hand frame channel, the two cab latches on the left-hand frame channel, and the cab tilt cylinder. Hydraulic pressure is required to unlock the cab latches and extend the cab tilt cylinder. The cab can be raised by rotating the cab tilt hand pump direc- tional valve clockwise and operating the cab tilt hand pump. See Figure 3. To lower the cab from the raised position, rotate the cab tilt hand pump directional valve counterclockwise and operating the cab tilt hand pump. The cab tilt cylinder retracts to lower the cab. The optional electrical cab tilt pump is push-button op- erated. See Raising and Lowering Cab, Raise Cab, Figure 8. NOTE: If the optional electrical cab tilt pump is inop- erable, the cab can be raised or lowered by using the manually operated cab tilt hand pump. A. PULL DIRECTION OF THE TILT LATCH RE- LEASE 1. CAB SUPPORT FRAME 2. CAB TILT HAND PUMP 3. CAB LATCH 4. CAB TILT CYLINDER Figure 2. Cab Tilt System A. LOWER B. RAISE 1. PUMP LEVER CONNECTION 2. PUMP DIRECTIONAL VALVE Figure 3. Cab Tilt Hand Pump 0100 YRM 1390 Description of Operation 3
- 12. When the cab has been raised to the partially open position, the safety latch will engage with a retainer plate that is welded to the frame. To raise or lower the cab after the safety latch has engaged, pull and hold the tilt latch release and raise or lower the cab until the safety latch has passed the retainer plate. Just before the fully open position is reached, move- ment becomes gravity-controlled by the weight of the cab. The cab is in the fully open position when the cab tilt cylinder is fully extended. Cab Tilt System, Raise When the directional valve is in the raise position, the pump push port and pump pull port are connected to each other. See Figure 4. Hydraulic pressure is transferred to the cab latches and both the piston and rod side of the cab tilt cylin- der. Hydraulic oil extruded at the rod side enters the piston side of the cylinder through the directional valve in the hand pump. The end of stroke is deter- mined by a retaining ring in the cab tilt cylinder. Cab Tilt System, Lower When the directional valve is in the lower position, the pump push port is connected to the pump reservoir through a reservoir check valve. The reservoir check valve retains enough pressure to keep the cab locks open. The pump pull port is connected to the hand pump. While the hand pump provides sufficient pres- sure, the cylinder check valve will raise to allow the oil at the piston side of the cylinder to return to the reser- voir. The cylinder cannot lower when there is insuffi- cient pressure at the pull connection. When the piston has reached the free fall area, the oil at the piston side will escape to the rod side and the cab will drop under the influence of its own weight. When the cab drops, the oil in the cab lock cylinders is pushed out through the reservoir check valve. After the cab has dropped, the cab is locked into position by the cab latches. Description of Operation 0100 YRM 1390 4