
Recommended
Recommended
More Related Content
More from ufjjksekmdmmd2w
More from ufjjksekmdmmd2w (20)
Recently uploaded
Recently uploaded (20)
2005 Chrysler Dodge LX Service Repair Manual.pdf
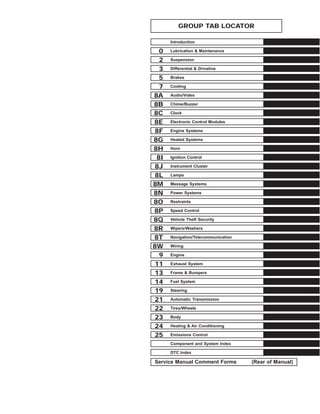
- 1. GROUP TAB LOCATOR Introduction 0 Lubrication & Maintenance 2 Suspension 3 Differential & Driveline 5 Brakes 7 Cooling 8A Audio/Video 8B Chime/Buzzer 8C Clock 8E Electronic Control Modules 8F Engine Systems 8G Heated Systems 8H Horn 8I Ignition Control 8J Instrument Cluster 8L Lamps 8M Message Systems 8N Power Systems 8O Restraints 8P Speed Control 8Q Vehicle Theft Security 8R Wipers/Washers 8T Navigation/Telecommunication 8W Wiring 9 Engine 11 Exhaust System 13 Frame & Bumpers 14 Fuel System 19 Steering 21 Automatic Transmission 22 Tires/Wheels 23 Body 24 Heating & Air Conditioning 25 Emissions Control Component and System Index DTC Index Service Manual Comment Forms (Rear of Manual)
- 2. INTRODUCTION TABLE OF CONTENTS page page BODY CODE PLATE DESCRIPTION . . . . . . . . . . . . . . . . . . . . . . . . . . 1 FASTENER IDENTIFICATION DESCRIPTION . . . . . . . . . . . . . . . . . . . . . . . . . . 5 FASTENER USAGE DESCRIPTION FASTENER USAGE . . . . . . . . . . . . . . . . . . . . . 8 THREADED HOLE REPAIR . . . . . . . . . . . . . . . 8 INTERNATIONAL SYMBOLS DESCRIPTION . . . . . . . . . . . . . . . . . . . . . . . . . . 8 MANUFACTURE PLATE DESCRIPTION . . . . . . . . . . . . . . . . . . . . . . . . . . 9 METRIC SYSTEM DESCRIPTION . . . . . . . . . . . . . . . . . . . . . . . . . 10 TORQUE REFERENCES DESCRIPTION . . . . . . . . . . . . . . . . . . . . . . . . . 12 VECI LABEL DESCRIPTION . . . . . . . . . . . . . . . . . . . . . . . . . 13 VEHICLE IDENTIFICATION NUMBER DESCRIPTION . . . . . . . . . . . . . . . . . . . . . . . . . 13 VEHICLE CERTIFICATION LABEL DESCRIPTION . . . . . . . . . . . . . . . . . . . . . . . . . 15 BODY CODE PLATE DESCRIPTION LOCATION AND DECODING The Body Code Plate is located in the engine compartment on the front right side shock tower mounting front panel. LX INTRODUCTION 1
- 3. BODY CODE PLATE LINE 3 There are seven lines of information on the body code plate. Lines 4, 5, 6, and 7 are not used to define ser- vice information. Information reads from left to right, starting with line 3 in the center of the plate to line 1 at the bottom of the plate. DIGITS 1, 2, AND 3 Paint procedure DIGIT 4 Open Space DIGITS 5 THROUGH 7 Primary Paint DIGIT 8 AND 9 Open Space DIGITS 10 THROUGH 12 Secondary Paint DIGIT 13 AND 14 Open Space DIGITS 15 THROUGH 18 Interior Trim Code DIGIT 19 Open Space DIGITS 20, 21, AND 22 Engine Code • EER = 2.7 L, Six Cylinder, 24 Valve, DOHC, Gasoline, Aluminum Block (MPI) • EGG = 3.5 L, Six Cylinder, 24 Valve, SOHC, High Output, Gasoline, Aluminum Block (MPI) • EZB = 5.7 L, V-8 Cylinder, HEMI, Multi-Displacement, Gasoline, DIGIT 23 Open Space 2 INTRODUCTION LX
- 4. BODY CODE PLATE – LINE 2 DIGITS 1 THROUGH 12 Vehicle Order Number DIGITS 13, THROUGH 15 Vinyl Roof Code DIGITS 16 AND 17 Open space DIGITS 18 AND 19 Vehicle Shell Line • LX DIGITS 20 Carline • C = Chrysler • D = Dodge DIGIT 21 Price Class • E = Economy • H = High Line • L = Low Line • M = Medium • P = Premium • S = Sport • X = Special DIGITS 22 AND 23 Body Type • 48 = Four Door Sedan Tall • 49 =Hatchback Tall LX INTRODUCTION 3
- 5. BODY CODE PLATE LINE 1 DIGITS 1, 2, AND 3 Transaxle Codes • DG6 = 4-Speed Electronic Automatic Transaxle • DGJ = 5-Speed Automatic Transaxle DIGIT 4 Open Space DIGIT 5 Market Code • C = Canada • B = International • M = Mexico • U = United States DIGIT 6 Open Space DIGITS 7 THROUGH 23 Vehicle Identification Number • (Refer to VEHICLE DATA/VEHICLE INFORMATION/VEHICLE IDENTIFICATION NUMBER - DESCRIPTION) for proper breakdown of VIN code. IF TWO BODY CODE PLATES ARE REQUIRED The last code shown on either plate will be followed by END. When two plates are required, the last code space on the first plate will indicate (CTD) When a second plate is required, the first four spaces of each line will not be used due to overlap of the plates. 4 INTRODUCTION LX
- 7. The SAE bolt strength grades range from grade 2 to grade 8. The higher the grade number, the greater the bolt strength. Identification is determined by the line marks on the top of each bolt head. The actual bolt strength grade corresponds to the number of line marks plus 2. The most commonly used metric bolt strength classes are 9.8 and 10.9. The metric strength class identification number is imprinted on the head of the bolt. The higher the class number, the greater the bolt strength. Some metric nuts are imprinted with a single-digit strength class on the nut face. Refer to the Fastener Identification and Fastener Strength Charts. 6 INTRODUCTION LX
- 9. FASTENER USAGE DESCRIPTION FASTENER USAGE WARNING: USE OF AN INCORRECT FASTENER MAY RESULT IN COMPONENT DAMAGE OR PERSONAL INJURY. Fasteners and torque specifications references in this Service Manual are identified in metric and SAE format. During any maintenance or repair procedures, it is important to salvage all fasteners (nuts, bolts, etc.) for reassem- bly. If the fastener is not salvageable, a fastener of equivalent specification must be used. THREADED HOLE REPAIR Most stripped threaded holes can be repaired using a HelicoilT. Follow the vehicle or HelicoilT recommendations for application and repair procedures. INTERNATIONAL SYMBOLS DESCRIPTION The graphic symbols illustrated in the following International Control and Display Symbols Chart are used to identify various instrument controls. The symbols correspond to the controls and displays that are located on the instrument panel. 8 INTRODUCTION LX
- 10. MANUFACTURE PLATE DESCRIPTION The Manufacturer Plate is located in the engine com- partment on the passenger side rear corner of the hood. The plate contains five lines of information: 1. Vehicle Identification Number (VIN) 2. Gross Vehicle Mass (GVM) 3. Gross Train Mass (GTM) 4. Gross Front Axle Rating (GFAR) 5. Gross Rear Axle Rating (GRAR) LX INTRODUCTION 9
- 12. The metric system is based on quantities of one, ten, one hundred, one thousand and one million. The following chart will assist in converting metric units to equivalent English and SAE units, or vise versa. CONVERSION FORMULAS AND EQUIVALENT VALUES MULTIPLY BY TO GET MULTIPLY BY TO GET in-lbs x 0.11298 = Newton Meters (N·m) N·m x 8.851 = in-lbs ft-lbs x 1.3558 = Newton Meters (N·m) N·m x 0.7376 = ft-lbs Inches Hg (60° F) x 3.377 = Kilopascals (kPa) kPa x 0.2961 = Inches Hg psi x 6.895 = Kilopascals (kPa) kPa x 0.145 = psi Inches x 25.4 = Millimeters (mm) mm x 0.03937 = Inches Feet x 0.3048 = Meters (M) M x 3.281 = Feet Yards x 0.9144 = Meters M x 1.0936 = Yards mph x 1.6093 = Kilometers/Hr. (Km/h) Km/h x 0.6214 = mph Feet/Sec x 0.3048 = Meters/Sec (M/S) M/S x 3.281 = Feet/Sec mph x 0.4470 = Meters/Sec (M/S) M/S x 2.237 = mph Kilometers/Hr. (Km/h) x 0.27778 = Meters/Sec (M/S) M/S x 3.600 Kilometers/Hr. (Km/h) COMMON METRIC EQUIVALENTS 1 inch = 25 Millimeters 1 Cubic Inch = 16 Cubic Centimeters 1 Foot = 0.3 Meter 1 Cubic Foot = 0.03 Cubic Meter 1 Yard = 0.9 Meter 1 Cubic Yard = 0.8 Cubic Meter 1 Mile = 1.6 Kilometers Refer to the Metric Conversion Chart to convert torque values listed in metric Newton- meters (N·m). Also, use the chart to convert between millimeters (mm) and inches (in.). LX INTRODUCTION 11
- 13. TORQUE REFERENCES DESCRIPTION Individual Torque Charts appear within many or the Groups. Refer to the Standard Torque Specifications Chart for torque references not listed in the individual torque charts. 12 INTRODUCTION LX
- 14. VECI LABEL DESCRIPTION All vehicles are equipped with a combined VECI label. This label is located in the engine compartment. The VECI label contains the following: • Engine family and displacement • Evaporative family • Emission control system schematic • Certification application • Engine timing specifications (if adjustable) • Idle speeds (if adjustable) • Spark plug and gap The label also contains an engine vacuum schematic. There are unique labels for vehicles built for sale in the state of California and the country of Canada. Canadian labels are written in both the English and French languages. These labels are permanently attached and cannot be removed without defacing information and destroying label. VEHICLE IDENTIFICATION NUMBER DESCRIPTION The Vehicle Identification Number (VIN) plate is attached to the top left side of the instrument panel. The VIN contains 17 characters that provide data con- cerning the vehicle. Refer to the decoding chart to determine the identification of a vehicle. To protect the consumer from theft and possible fraud the manufacturer is required to include a Check Digit at the ninth position of the Vehicle Identification Num- ber. The check digit is used by the manufacturer and government agencies to verify the authenticity of the vehicle and official documentation. The formula to use the check digit is not released to the general public. LX INTRODUCTION 13
- 15. VIN DECODING INFORMATION POSITION INTERPRETATION CODE = DESCRIPTION 1 Country of Origin 1 = Manufactured by DaimlerChrysler Canada Inc. 2 Make C = Chrysler D = Dodge 3 Vehicle Type 3 = Passenger Car 4 = Multipurpose Passenger Vehicle With Side Airbags 8 = Multipurpose Passenger Vehicle with Side Airbags 4 Restraint System J = Restraint System Air bags Front Next Generation Multi-Stage Sales Code (CG1) Without Side Air Bags Sales Code (CGS) Gross Vehicle Weight Rating H = 6001-7000 lbs. 5 Vehicle Line A = 300 / 300C / SRT-8 (RWD) K = 300 (AWD) V = TBD (RWD) Z = TBD (AWD) 6 Series 2 = L Low Line 3 = M Medium 4 - H High Line 5 = P Premium 6 = S Sport 7 = S Special 7 Body Style 3 = LX - 48 8 = LX - 49 8 Engine R = 2.7L V-6 cyl. DOHC 24 Valve MPI Gasoline G = 3.5L V-6 cyl. High Output 24 Valve MPI Gasoline H = 5.7L V-8 cyl. Gasoline T = 2.7L V-6 cyl. DOHC 24 Valve MPI Gasoline V = 3.5L V-6 cyl. High Output 24 Valve MPI Gasoline 2 = 5.7L V-8 cyl. HEMI Multiple Displacement Gasoline 9 Check Digit 0 through 9 or X 10 Model Year 5 = 2005 11 Assembly Plant H = Brampton Assembly 12 Through 17 Vehicle Build Sequence Six Digit Number Assigned By Assembly Plant 14 INTRODUCTION LX
- 16. VEHICLE CERTIFICATION LABEL DESCRIPTION A vehicle certification label is attached to every DaimlerChrysler Corporation vehicle. The label certi- fies that the vehicle conforms to all applicable Federal Motor Vehicle Standards. The label also lists: • Month and year of vehicle manufacture. • Gross Vehicle Weight Rating (GVWR). The gross front and rear axle weight ratings (GAWR’s) are based on a minimum rim size and maximum cold tire inflation pressure. • Vehicle Identification Number (VIN). • Type of vehicle. • Type of rear wheels. • Bar code. • Month, Day and Hour (MDH) of final assembly. • Paint and Trim codes. • Country of origin. The label is located on the driver-side door shut-face. LX INTRODUCTION 15
- 18. LUBRICATION & MAINTENANCE TABLE OF CONTENTS page page FLUID TYPES DESCRIPTION ENGINE OIL AND LUBRICANTS . . . . . . . . . . . 1 DESCRIPTION - AXLE . . . . . . . . . . . . . . . . . . . 3 AUTOMATIC TRANSMISSION FLUID . . . . . . . . 3 OPERATION AUTOMATIC TRANSMISSION FLUID . . . . . . . . 4 FLUID CAPACITIES SPECIFICATIONS - FLUID CAPACITIES . . . . . . . 4 FLUID FILL/CHECK LOCATIONS DESCRIPTION . . . . . . . . . . . . . . . . . . . . . . . . . . 5 HOISTING STANDARD PROCEDURE - HOISTING . . . . . . . . 5 INTERNATIONAL SYMBOLS DESCRIPTION . . . . . . . . . . . . . . . . . . . . . . . . . . 6 JUMP STARTING STANDARD PROCEDURE JUMP STARTING . . . . . . . . . . . . . . . . . . . . . . . 6 LUBRICATION POINTS DESCRIPTION . . . . . . . . . . . . . . . . . . . . . . . . . . 7 MAINTENANCE SCHEDULES DESCRIPTION DESCRIPTION - SEDAN . . . . . . . . . . . . . . . . . 7 DESCRIPTION - WAGON . . . . . . . . . . . . . . . . 13 DESCRIPTION - EXPORT . . . . . . . . . . . . . . . 19 PARTS & LUBRICANT RECOMMENDATION DESCRIPTION DESCRIPTION - FLUID TYPES . . . . . . . . . . . 24 LUBRICANT RECOMMENDATIONS . . . . . . . . 25 TOWING STANDARD PROCEDURE - TOWING . . . . . . . . 26 FLUID TYPES DESCRIPTION ENGINE OIL AND LUBRICANTS WARNING: NEW OR USED ENGINE OIL CAN BE IRRITATING TO THE SKIN. AVOID PROLONGED OR REPEATED SKIN CONTACT WITH ENGINE OIL. CONTAMINANTS IN USED ENGINE OIL, CAUSED BY INTER- NAL COMBUSTION, CAN BE HAZARDOUS TO YOUR HEALTH. THOROUGHLY WASH EXPOSED SKIN WITH SOAP AND WATER. DO NOT WASH SKIN WITH GASOLINE, DIESEL FUEL, THINNER, OR SOLVENTS, HEALTH PROBLEMS CAN RESULT. DO NOT POLLUTE, DISPOSE OF USED ENGINE OIL PROPERLY. CON- TACT YOUR DEALER OR GOVERNMENT AGENCY FOR LOCATION OF COLLECTION CENTER IN YOUR AREA. When service is required, DaimlerChrysler Corporation recommends that only MoparT brand parts, lubricants and chemicals be used. MoparT provides the best engineered products for servicing DaimlerChrysler Corporation vehi- cles. Only lubricants bearing designations defined by the following organization should be used. • Society of Automotive Engineers (SAE) • American Petroleum Institute (API) • National Lubricating Grease Institute (NLGI) LX LUBRICATION & MAINTENANCE 0 - 1
- 19. API SERVICE GRADE CERTIFIED Use an engine oil that is API Certified. MoparT pro- vides engine oils, meeting Material Standard MS-6395, that meet or exceed this requirement. SAE VISCOSITY SAE 5W-20 and SAE 5W-30 enigne oils are recomendedfor all operating temperatures. These engine oils improve low temperature starting and vehicle fuel economy. Refer to the engine oil filler cap for the recommened engine oil viscosity for each vehicle. An SAE viscosity grade is used to specify the viscosity of engine oil. Use only engine oils with multiple viscosities such as 5W-20 or 5W-30. These are specified with a dual SAE viscosity grade which indicates the cold-to-hot temperature viscosity range. Select an engine oil that is best suited to your particular temperature range and variation. ENERGY CONSERVING OIL An Energy Conserving type oil is recommended for gasoline engines. The designation of ENERGY CONSERVING is located on the label of an engine oil container. CONTAINER IDENTIFICATION Standard engine oil identification notations have been adopted to aid in the proper selection of engine oil. The iden- tifying notations are located on the front label of engine oil plastic bottles and the top of engine oil cans. This symbol means that the oil has been certified by the American Petroleum Institute (API). DiamlerChrysler only recommend API Certified engine oils that meet the requirements of Material Standard MS-6395. Use MoparT or an equivalent oil meeting the specification MS-6395. SYNTHETIC ENGINE OILS There are a number of engine oils being promoted as either synthetic or semi-synthetic. If you chose to use such a product, use only those oils that meet the American Petroleum Institute (API) and SAE viscosity standard. Follow the service schedule that describes your driving type. 0 - 2 LUBRICATION & MAINTENANCE LX
- 20. ENGINE OIL ADDITIVES/SUPPLEMENTS The manufacturer does not recommend the addition of any engine oil additives/supplements to the specified engine oil. Engine oil additives/supplements should not be used to enhance engine oil performance. Engine oil addi- tives/supplements should not be used to extend engine oil change intervals. No additive is known to be safe for engine durability and can degrade emission components. Additives can contain undesirable materials that harm the long term durability of engines by: • Doubling the level of Phosphorus in the engine oil. The ILSAC (International Lubricant Standard Approval Committee) GF-2 and GF-3 standards require that engine oil contain no more than 0.10% Phosphorus to pro- tect the vehicles emissions performance. Addition of engine oil additives/supplements can poison, from the added sulfur and phosphorus, catalysts and hinder efforts to guarantee emissions performance to 80,000 miles. • Altering the viscosity characteristics of the engine oil so that it no longer meets the requirements of the spec- ified viscosity grade. • Creating potential for an undesirable additive compatibility interaction in the engine crankcase. Generally it is not desirable to mix additive packages from different suppliers in the crankcase; there have been reports of low temperature engine failures caused by additive package incompatibility with such mixtures. GEAR LUBRICANTS SAE ratings also apply to multigrade gear lubricants. In addition, API classification defines the lubricants usage. Such as API GL-5 and SAE 75W-90. LUBRICANTS AND GREASES Lubricating grease is rated for quality and usage by the NLGI. All approved products have the NLGI sym- bol on the label. At the bottom NLGI symbol is the usage and quality identification letters. Wheel bearing lubricant is identified by the letter “G”. Chassis lubri- cant is identified by the latter “L”. The letter following the usage letter indicates the quality of the lubricant. The following symbols indicate the highest quality. SPECIALIZED LUBRICANTS AND OILS Some maintenance or repair procedures may require the use of specialized lubricants or oils. Consult the appro- priate sections in this manual for the correct application of these lubricants. DESCRIPTION - AXLE Note: DaimlerChrysler recommends the use of MoparT lubricants. Fluid additives are not required for these axles. REAR AXLE • 198 RII - MoparT Synthetic Gear & Axle Lubricant 75W-140 • 210 RII - MoparT Synthetic Gear & Axle Lubricant 75W-140 AUTOMATIC TRANSMISSION FLUID Note: Refer to Service Procedures in this group for fluid level checking procedures. MoparT ATF +4, Automatic Transmission Fluid is the recommended fluid for DaimlerChrysler automatic transmis- sions. Dexron II fluid IS NOT recommended. Clutch chatter can result from the use of improper fluid. LX LUBRICATION & MAINTENANCE 0 - 3
- 21. MoparT ATF +4, Automatic Transmission Fluid when new is red in color. The ATF is dyed red so it can be identified from other fluids used in the vehicle such as engine oil or antifreeze. The red color is not permanent and is not an indicator of fluid condition. As the vehicle is driven, the ATF will begin to look darker in color and may eventually become brown. This is normal. ATF+4 also has a unique odor that may change with age. Consequently, odor and color cannot be used to indicate the fluid condition or the need for a fluid change. FLUID ADDITIVES DaimlerChrysler strongly recommends against the addition of any fluids to the transmission, other than those auto- matic transmission fluids listed above. Exceptions to this policy are the use of special dyes to aid in detecting fluid leaks. Various “special” additives and supplements exist that claim to improve shift feel and/or quality. These additives and others also claim to improve converter clutch operation and inhibit overheating, oxidation, varnish, and sludge. These claims have not been supported to the satisfaction of DaimlerChrysler and these additives must not be used. The use of transmission “sealers” should also be avoided, since they may adversely affect the integrity of transmission seals. OPERATION AUTOMATIC TRANSMISSION FLUID The automatic transmission fluid is selected based upon several qualities. The fluid must provide a high level of protection for the internal components by providing a lubricating film between adjacent metal components. The fluid must also be thermally stable so that it can maintain a consistent viscosity through a large temperature range. If the viscosity stays constant through the temperature range of operation, transmission operation and shift feel will remain consistent. Transmission fluid must also be a good conductor of heat. The fluid must absorb heat from the internal transmission components and transfer that heat to the transmission case. FLUID CAPACITIES SPECIFICATIONS - FLUID CAPACITIES DESCRIPTION SPECIFICATION Fuel Tank - V6 Engine 68 L (18 gal.) Fuel Tank - V8 Engine 72 L (19 gal.) Engine Oil* 5.7 L (6.0 qts.) Engine Oil* - 5.7L 6.6 L (7.0 qts.) Cooling System - 2.7L** 10.0 L (10.5 qts.) Cooling System - 3.5L** 10.5 L (11.0 qts.) *(includes filter) **(includes heater and coolant recovery bottle filled to MAX level) AUTOMATIC TRANSMISSION Service Fill - NAG1 5.0 L (10.6 pts.) O-haul Fill - NAG1 7.7 L (16.3 pts.) Service Fill - 42RLE 3.8L (4.0 qts) O-haul Fill - 42RLE 8.3L (17.6 pts) Dry fill capacity Depending on type and size of internal cooler, length and inside diameter of cooler lines, or use of an auxiliary cooler, these figures may vary. (Refer to 21 - TRANSMISSION/AUTOMATIC/FLUID - STANDARD PROCEDURE) AXLE - REAR 198 MM RII Axle 1.4L (1.5 qts.) 210 MM RII Axle 1.6L (1.7 qts.) 0 - 4 LUBRICATION & MAINTENANCE LX
- 22. FLUID FILL/CHECK LOCATIONS DESCRIPTION The fluid check/fill points and lubrication locations are located in each applicable Sections. HOISTING STANDARD PROCEDURE - HOISTING Refer to Owner’s Manual provided with vehicle for proper emergency jacking procedures. WARNING: THE HOISTING AND JACK LIFTING POINTS PROVIDED ARE FOR A COMPLETE VEHI- CLE. WHEN THE ENGINE OR REAR SUSPENSION IS REMOVED FROM A VEHICLE, THE CENTER OF GRAVITY IS ALTERED MAKING SOME HOISTING CONDITIONS UNSTABLE. PROPERLY SUPPORT OR SECURE VEHICLE TO HOISTING DEVICE WHEN THESE CONDITIONS EXIST. CAUTION: Do not position hoisting device on any suspension component, including the front or rear suspension crossmembers. Do not hoist on the front and rear bumpers, the lower liftgate cross- member, the lower radiator crossmember, or the front engine mount. 1 - DRIVE ON LIFT 2 - SAE HOISTING SYMBOLS 2 - FRAME CONTACT LIFT (SINGLE POST) 2 - CHASSIS LIFT (DUAL LIFT) 2 - OUTBOARD LIFT (DUEL LIFT) 2 - FLOOR JACK 3 - HOISTING PADS 3 - FRAME CONTACT LIFT (SINGLE POST) 3 - CHASSIS LIFT (DUAL LIFT) 3 - OUTBOARD LIFT (DUEL LIFT) 3 - FLOOR JACK LX LUBRICATION & MAINTENANCE 0 - 5
- 23. INTERNATIONAL SYMBOLS DESCRIPTION DaimlerChrysler Corporation uses international sym- bols to identify engine compartment lubricant and fluid inspection and fill locations. JUMP STARTING STANDARD PROCEDURE JUMP STARTING WARNING: REVIEW ALL SAFETY PRECAUTIONS AND WARNINGS IN THE BATTERY SYSTEM SECTION OF THE SERVICE MANUAL. (Refer to 8 - ELECTRICAL/BATTERY SYSTEM/BATTERY - STANDARD PROCEDURE) Take care to avoid the radiator cooling fan whenever the hood is raised. It can start anytime the ignition switch is on. You can be hurt by the fan. • DO NOT JUMP START A FROZEN BATTERY, PERSONAL INJURY CAN RESULT. • IF EQUIPPED, DO NOT JUMP START WHEN MAINTENANCE FREE BATTERY INDICATOR DOT IS YELLOW OR BRIGHT COLOR. • DO NOT JUMP START A VEHICLE WHEN THE BATTERY FLUID IS BELOW THE TOP OF LEAD PLATES. • DO NOT ALLOW JUMPER CABLE CLAMPS TO TOUCH EACH OTHER WHEN CONNECTED TO A BOOSTER SOURCE. • DO NOT USE OPEN FLAME NEAR BATTERY. • REMOVE METALLIC JEWELRY WORN ON HANDS OR WRISTS TO AVOID INJURY BY ACCIDENTAL ARC- ING OF BATTERY CURRENT. • WHEN USING A HIGH OUTPUT BOOSTING DEVICE, DO NOT ALLOW BATTERY VOLTAGE TO EXCEED 16 VOLTS. REFER TO INSTRUCTIONS PROVIDED WITH DEVICE BEING USED. • Do not attempt to push or tow your vehicle to get it started. Vehicles equipped with an automatic trans- mission cannot be started this way. Unburned fuel could enter the catalytic converter and once the engine has started, ignite and damage the converter and vehicle. If the vehicle has a discharged battery, booster cables may be used to obtain a start from another vehicle. This type of start can be dangerous if done improperly, so follow this procedure carefully. • Battery fluid is a corrosive acid solution; do not allow battery fluid to contact eyes, skin or clothing. Don’t lean over battery when attaching clamps or allow the clamps to touch each other. If acid splashes in eyes or on skin, flush contaminated area immediately with large quantities of water. • A battery generates hydrogen gas which is flammable and explosive. Keep flame or spark away from the vent holes. Do not use a booster battery or any other booster source with an output that exceeds 12 volts. FAILURE TO FOLLOW THESE INSTRUCTIONS MAY RESULT IN PERSONAL INJURY. CAUTION: When using another vehicle as a booster, do not allow vehicles to touch. Electrical systems can be damaged on either vehicle. 0 - 6 LUBRICATION & MAINTENANCE LX
- 24. Note: The battery is stored under an access cover in the trunk. Remote battery terminals are located in the engine compartment for jump starting. Note: The battery in this vehicle has a vent hose that should not be disconnected and should only be replaced with a battery of the same type (vented). TO JUMP START A DISABLED VEHICLE: • Wear eye protection and remove any metal jew- elry such as watch bands or bracelets that might make an inadvertent electrical contact. • When boost is provided by a battery in another vehicle, park that vehicle within booster cable reach and without letting the vehicles touch. Set the parking brake, place the automatic transmis- sion in PARK and turn the ignition switch to the OFF (or LOCK) position for both vehicles. • Turn off the heater, radio and all unnecessary electrical loads. • Connect one end of the jumper cable RED clamp to the remote jump start positive battery post in the engine compartment of the disabled vehicle. Connect the other end of the jumper cable RED clamp to the positive terminal of the booster bat- tery. • Connect the jumper cable BLACK clamp, first to the negative terminal of the booster battery and then connect the other end of the jumper cable BLACK clamp to a suitable engine ground on the disabled vehicle battery. Make sure you have a good contact on the engine ground. DISCONNECT CABLE CLAMPS AS FOLLOWS: • Disconnect BLACK cable clamp from engine ground on disabled vehicle. • When using a booster vehicle, disconnect BLACK cable clamp from battery negative terminal. Disconnect RED cable clamp from battery positive terminal. • Disconnect RED cable clamp from battery positive terminal on disabled vehicle. LUBRICATION POINTS DESCRIPTION Lubrication point locations are located in each applicable Sections. MAINTENANCE SCHEDULES DESCRIPTION DESCRIPTION - SEDAN There are two maintenance schedules that show the required service for your vehicle. First is Schedule B. It is for vehicles that are operated under the conditions that are listed below and at the begin- ning of the schedule. Change the automatic transmission fluid and filter every 60,000 miles (96 000 km) if the vehi- cle is usually operated under one or more of the conditions marked with an L. • Day or night temperatures are below 32° F (0° C). • Stop and go driving. • Extensive engine idling. LX LUBRICATION & MAINTENANCE 0 - 7
- 25. • Driving in dusty conditions. • Short trips of less than 10 miles (16 km). • More than 50% of your driving is at sustained high speeds during hot weather, above 90° F (32° C). • Trailer towing.L • Taxi, police, or delivery service (commercial service).L • Off-road or desert operation. Note: If ANY of these apply to you then change your engine oil every 3,000 miles (5 000 km) or 3 months, whichever comes first and follow schedule B of the (Maintenance Schedules( section of this manual. Note: Most vehicles are operated under the conditions listed for Schedule B. Second is Schedule A. It is for vehicles that are not operated under any of the conditions listed under Schedule B. Use the schedule that best describes your driving conditions. Where time and mileage are listed, follow the interval that occurs first. Note: Under no circumstances should oil change intervals exceed 6000 miles (10 000 km) or 6 months whichever comes first. CAUTION: Failure to perform the required maintenance items may result in damage to the vehicle. At Each Stop for Fuel • Check the engine oil level about 5 minutes after a fully warmed engine is shut off. Checking the oil level while the vehicle is on level ground will improve the accuracy of the oil level reading. Add oil only when the level is at or below the ADD or MIN mark. • Check the windshield washer solvent and add if required. Once a Month • Check tire pressure and look for unusual wear or damage. • Inspect the battery and clean and tighten the terminals as required. • Check the fluid levels of coolant reservoir, brake master cylinder, and transmission and add as needed. • Check all lights and all other electrical items for correct operation. • Check rubber seals on each side of the radiator for proper fit. At Each Oil Change • Change the engine oil filter. • Inspect the exhaust system. • Inspect the brake hoses. • Inspect the CV joints and front and rear suspension components. • Check the automatic transmission fluid level. • Check the coolant level, hoses, and clamps. SCHEDULE B Follow schedule B if you usually operate your vehicle under one or more of the following conditions. Change the automatic transmission fluid and filter every 60,000 miles (96 000 km) if the vehicle is usually operated under one or more of the conditions marked with an L. • Day or night temperatures are below 32° F (0° C). • Stop and go driving. • Extensive engine idling. • Driving in dusty conditions. • Short trips of less than 10 miles (16.2 km). • More than 50% of your driving is at sustained high speeds during hot weather, above 90° F (32° C). • Trailer towing.L 0 - 8 LUBRICATION & MAINTENANCE LX
- 26. Thank you very much for your reading. Please Click Here Then Get More Information.