Sanjay Nagar Call Girls: 🍓 7737669865 🍓 High Profile Model Escorts | Bangalor...
Manual_1.pdf
1. Read This Manual First.
Thank you for purchasing the Canon LASER SHOT LBP2900.
Please read this manual thoroughly before operating the printer.
After reading this manual, keep it in a safe place for future reference.
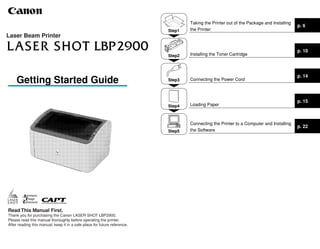
p. 6
p. 10
p. 14
p. 15
p. 22
Getting Started Guide
Step1
Step2
Step3
Step4
Step5
Taking the Printer out of the Package and Installing
the Printer
Installing the Toner Cartridge
Connecting the Power Cord
Loading Paper
Connecting the Printer to a Computer and Installing
the Software
Laser Beam Printer
2. 2
Introduction
Manuals
The electronic version (PDF) of the manuals is included on the CD-ROM that
comes with this printer.
: Guides with this symbol are PDF manuals included on the
accompanying CD-ROM.
* The PDF manuals are available from "CD-ROM Setup". (See "About the CD-ROM," on p. 32)
IMPORTANT
Adobe Reader/Adobe Acrobat Reader is required to view the manuals in
PDF format. If Adobe Reader/Adobe Acrobat Reader is not installed on
your system, please download it from the Adobe Systems Incorporated
website.
Conventions
The following symbols are used in this manual to explain procedures,
restrictions, handling precautions, and instructions that should be observed
for safety.
WARNING
Indicates warnings that, if followed incorrectly, may lead to death or
serious personal injury.To use the product safely, be sure to adhere
to these warnings.
CAUTION
Indicates cautions that, if followed incorrectly, may lead to personal
injuries or damage to property.To use the product safely, be sure to
adhere to these cautions.
IMPORTANT
Indicates important points and limitations that need to be observed.
Be sure to read these carefully to avoid running into problems
operating the printer.
NOTE
Indicates additional information related to the operation of the
printer. It is recommended that you read these points.
Copyright 2009 by Canon Inc. All rights reserved.
No part of this publication may be reproduced or transmitted in any form or by
any means, electronic or mechanical, including photocopying and recording,
or by any information storage or retrieval system without the prior written
permission of Canon Inc.
Notice
Canon makes no guarantees of any kind with regard to this manual. Canon
shall not be held liable for errors contained herein or for consequential or
incidental damages incurred as a result of acting on information contained in
the manual.
Abbreviations Used in this Manual
In this manual, product names and model names are abbreviated as follows:
Microsoft Windows 2000 operating system: Windows 2000
Microsoft Windows XP operating system: Windows XP
Microsoft Windows Server 2003 operating system: Windows Server 2003
Microsoft Windows Vista operating system: Windows Vista
Microsoft Windows Server 2008 operating system: Windows Server 2008
Microsoft Windows 7 operating system: Windows 7
Microsoft Windows operating system: Windows
LASER SHOT LBP2900: LBP2900
Instruction
Manual Name
Contents Format
File Name of the
PDF Manual
Getting Started
Guide (this
manual)
Describes the procedure for
installing this printer and the
preparations needed before
you can print with this printer.
Manual_1.pdf*
User's Guide
Describes the printing
procedures, routine
maintenance, and
troubleshooting.
Manual_2.pdf*
CD-ROM
CD-ROM
CD-ROM
3. 3
Trademarks
Canon, the Canon logo, LASER SHOT, and LBP are trademarks of Canon
Inc.
Adobe, Adobe Acrobat, and Adobe Reader are trademarks of Adobe
Systems Incorporated.
IBM and PowerPC are trademarks of International Business Machines
Corporation in the United States.
Microsoft and Windows are registered trademarks of Microsoft Corporation in
the United States and/or other countries.
Windows Server and Windows Vista are trademarks of Microsoft Corporation.
Other product and company names herein may be the trademarks of their
respective owners.
Installation Site
Installation Environment
To use this printer safely and comfortably, install the printer in a location that
meets the following requirements.
IMPORTANT
Before installing the printer, be sure to read "Important Safety Instructions"
in the User's Guide.
● Use power supplies rated for voltages in the following ranges.
220 to 240 V (±10%) 50/60 Hz (±2 Hz)
● The maximum power consumption for the printer is 726W or below. Electrical
noise or a dramatic drop in power voltage may result in a faulty operation or
loss of data in the printer and computer.
● Use the printer where the temperature and humidity are in the following
ranges.
Ambient temperature: 10 to 32.5°C (50 to 90.5°F)
Humidity: 20 to 80% RH (no condensation)
IMPORTANT
Water droplets (condensation) may form inside the printer in the following
situations: To allow the printer to adjust to the surrounding temperature
and humidity, leave the printer in the installation area for at least one hour
before use. If water droplets form inside the printer, problems may arise in
the paper transport path, resulting in paper jams, printer malfunctions, and
other operating problems.
- When the room where the printer is installed is heated suddenly
- When the printer is moved from a cool and dry area to a hot and humid
area
NOTE
To customers using an ultrasonic humidifier
If you use tap water or well water when you are using an ultrasonic
humidifier, impurities in the water may be dispersed through the air and
become trapped inside the printer, causing poor image quality. When you
are using these humidifiers, it is therefore recommended that you use
purified water or other water that is free of impurities.
● Install the printer in the following environment
• A place where sufficient space can be secured
• A well-ventilated room
• A flat surface
• A sturdy platform that can easily tolerate the weight of the printer and optional
equipment
WARNING
Do not install the printer in a location near alcohol, thinners, or other
flammable substances. If an inflammable substance comes into
contact with the electrical unit inside the printer it may ignite or
cause an electrical shock.
CD-ROM
4. 4
CAUTION
• Do not install the printer in any of the following locations. Doing so
may cause fire or electrical shock.
- A damp or dusty location
- A location exposed to smoke and steam, such as next to a stove or
humidifier.
- A location exposed to rain or snow
- A location near water faucets or water
- A location exposed to direct sunlight
- A location subject to high temperatures
- A location near open flames
• Do not install the printer on an unsteady platform, an uneven surface,
or any other unstable location, or any location subject to vibrations.
If the printer falls down or the platform tips over, someone may be
injured.
IMPORTANT
Do not install the printer in any of the following locations. Doing so may
damage the printer.
- An environment where the temperature and/or humidity changes rapidly,
or where condensation occurs
- A poorly ventilated room
- Near devices that generate magnetic or electromagnetic waves
- In rooms such as laboratories where chemical reactions occur
- In a room where corrosive or poisonous chemicals such as salt or
ammonia are present in the air
- A platform that may warp from the weight of the printer and optional
equipment, or where the printer is liable to sink (such as on a carpet or
mat)
Installation Space
Choose an installation location where you can secure the following amount of free
space around the printer, and on a surface that can support the weight of the
printer. The dimensions of each of the printer components, the dimensions of the
space needed around the components, and the positions of the feet are as follows.
Front View
Front View
•Printer Dimensions
•Peripheral Space
•Feet Positions
(mm)
382.5
369.8
281.1
(mm)
585
75
520
450
75
75
150
75
(mm)
171.3
32.8 46.5
171.3
32.8 46.5
285.8
47.9
36.1
261.5
52.6
55.7
5. 5
System Requirements
Operating System
• Windows 2000 Server or Professional
• Windows XP Professional or Home Edition
• Windows XP Professional x64 Edition
• Windows Server 2003
• Windows Server 2003 x64 Editions
• Windows Vista (32-bit or 64-bit version)
• Windows Server 2008 (32-bit or 64-bit version)
• Windows 7 (32-bit or 64-bit version)
* For details on the procedures, instructions, and so on for Windows 7 and Server 2008, refer to
those for Windows Vista.
* For details on the latest status of the supported operating systems and Service Pack, see the
Canon website (http://www.canon.com/).
- System Requirements (minimum required)
- System Requirements (recommended)
Interface
USB 2.0 Hi-Speed/USB Full-Speed (USB1.1 equivalent)
NOTE
• If you want to use the sounds from the printer driver, a PC synthesizer
(and the PCM synthesizer driver) needs to be installed in your computer.
Do not use the PC speaker driver (speaker.drv).
• This printer uses bidirectional communication. Operation of the printer when
connected via unidirectional communication equipment has not been tested.
As a result, Canon cannot guarantee printer operation when the printer is
connected using unidirectional print servers, USB hubs and switching
devices.
Windows 2000/XP/Server 2003 Windows Vista
CPU
Pentium II
300 MHz or more
Conforms to the minimum
system requirements for
Windows Vista
Memory (RAM)*1
128 MB or more
Hard Disk*2
120 MB or more 120 MB or more
(PC/AT compatibles)
*1 As the amount of available memory varies depending on the system configuration of the
computer or application you are using, the above environment does not guarantee
printing in all cases.
*2
This indicates free hard disk space required for installing the printer driver and manuals
using Easy Installation. Required free hard disk space varies depending on the system
environment or installation method.
Windows 2000/XP/Server 2003 Windows Vista
CPU
Pentium III
600 MHz or more
Conforms to the
recommended system
requirements for Windows
Vista
Memory (RAM) 256 MB or more
6. 6
Step
1 Taking the Printer out of
the Package and
Installing the Printer
Confirming the Package Contents
Before installing the printer, check that all of the following components are
included in the package. In the rare event that any components are missing or
damaged, contact the store where you purchased the printer.
NOTE
• Illustrations of the power cord used in this manual may not represent exact
appearance and configuration of the actual power cord.
• The toner cartridge supplied with the printer is different from the
replacement toner cartridge. Refer to Chapter 5 "Routine Maintenance" in
the User's Guide when you purchase a replacement toner cartridge.
• A USB cable is supplied with this printer only within countries and regions
of Asia. In other countries and regions, prepare according to the
specifications of your computer.
Carrying the Printer to the Installation Site
Once you have chosen an installation site, take the printer out of the package
and carry it to the chosen location.
IMPORTANT
• Install the printer on a platform such as a desk that can tolerate the weight
of the printer sufficiently.
• Do not install the printer on a platform that could warp under the weight of
the printer and optional equipment, or where the printer is liable to sink
(such as on a carpet or mat)
1 Take the printer out of the package.
IMPORTANT
Use a large area with plenty of space for taking the printer out of the
package.
Step1
Toner Cartridge
Printer
Power Cord
CD-ROM
[LBP2900 User Software]
CAPT (Canon Advanced
Printing Technology) software
Getting Started Guide (This Manual)
User's Guide
CAPT Windows Firewall Utility
USB cable
(Only countries and
regions of Asia)
CD-ROM
7. 7
Step
1
2 Carry the printer to the installation site.
Hold both sides of the printer in your hands as shown in the diagram, making sure
that you hold the printer firmly with both hands.
CAUTION
• The printer weighs approximately 5.6 kg when the toner cartridge is
not installed.Take care to carry the printer without hurting your back.
• Do not lift the printer by the multi-purpose tray, manual feed tray,
paper output tray or any other part of the printer except as directed.
Doing so may cause the printer to fall, resulting in personal injury.
3 Put the printer down carefully at the installation site.
CAUTION
Put the printer down slowly and carefully.You may be injured if your
hands, etc. are pinched by the printer.
IMPORTANT
Make sure there is enough space set aside at the installation site for
attaching cables, etc.
8. 8
Step
1
Removing the Packing Materials
Cellophane tape and packing materials are attached to the printer to protect it
from vibrations and shocks during transport. Remove these pieces of tape and
packing material after you carry the printer to the installation site.
1 Remove the tape that is attached to the printer at four
locations at the front and back of the printer a, then
remove the protective sheet b.
2 Remove the following pieces of tape that are attached to the
printer (6 locations).
3 Open the output tray.
4 Remove the following pieces of tape that are attached to the
printer (2 locations).
a
b
9. 9
Step
1
5 Open the multi-purpose tray. Grasp the groove in the center
of the printer to open the multi-purpose tray.
6 Remove the tape that is securing the rear paper guide.
7 Close the multi-purpose tray.
10. 10
Step
2
Installing the Toner
Cartridge
For details on handling the toner cartridges, refer to Chapter 5 "Routine
Maintenance" in the User's Guide.
WARNING
The toner cartridge produces a weak magnetic field. If someone who
is using a pacemaker feels any unusual sensations, they should stay
clear of the toner cartridge and seek medical attention immediately.
CAUTION
Be careful to avoid staining your clothes or hands with toner. If you
do get any toner on your clothes or hands, wash it off immediately
with cold water. If you rinse using hot water the toner may become
fixed, creating a stain that cannot be removed.
IMPORTANT
Never touch any of the high voltage parts inside the top cover. Doing so
may damage the printer.
1 Open the output tray.
2 Open the top cover.
Grasp the groove on the right side of the top cover and open the cover until it
stops.
Step2
CD-ROM
High Voltage Electrical
Contacts
11. 11
Step
2
3 Take the toner cartridge out of the protective bag.
Use scissors to open the protective bag so as not to damage the toner cartridge.
IMPORTANT
• Do not throw away the toner cartridge protective bag.You will need this
cover when you remove the toner cartridge for printer maintenance, etc.
• If you touch the inner drum with your hand or scratch it, the printing quality
will be degraded. Do not touch or open the drum protective shutter under
any circumstances. Be careful not to hold or touch any parts other than as
directed. Doing so may damage the toner cartridge.
• Do not expose the toner cartridge to direct sunlight or strong light.
4 Hold the toner cartridge as shown in the figure, and roll it
gently from side to side 5 or 6 times to evenly distribute the
toner inside.
IMPORTANT
• If the toner is not distributed evenly, you may get poor printing quality.
Make sure you perform this step.
• Rotate the toner cartridge gently. If you do not rotate the cartridge gently,
toner may spill out.
Drum Protective Shutter
12. 12
Step
2
• Be careful not to hold or touch sensitive areas such as the sensor or
electrical contacts. Doing so may damage the toner cartridge.
5 Place the toner cartridge on a flat surface, then slowly pull
out the sealing tape (approx. 50 cm in length) while
supporting the toner cartridge.
Pull the sealing tape out directly in the direction of the arrow.
CAUTION
If you pull on the sealing tape with excessive force or stop pulling
midway, toner may spray from the tape. If toner gets into your eyes or
mouth, wash it out immediately with cold water and consult a doctor.
IMPORTANT
• Do not bend the tape or pull it up or down. If you do, the sealing tape may
break in the middle, and you won't be able to fully remove it.
• Keep pulling on the tape until it is fully removed from the cartridge. If any
sealing tape is left inside the toner cartridge, you may experience printing
problems.
• When pulling out the sealing tape, be careful not to hold the drum
protective shutter with your hands.
• After removing the packing materials, install the toner cartridge in the
printer as soon as possible.
• Dispose of the sealing tape according to local regulations.
Electrical
Contacts
Electrical
Contacts
Drum Protective Shutter
13. 13
Step
2
6 Align the protrusions on the left and right ends of the toner
cartridge with the toner cartridge guides in the main printer,
and push the cartridge all the way to the back a
a
a
a, then pull it
down towards you b
b
b
b.
7 Close the top cover.
IMPORTANT
• If you cannot close the top cover, check that the toner cartridge is installed
properly in the printer. If you close the top cover forcefully, the printer may
be damaged.
• Do not leave the top cover open for a long time after installing the toner
cartridge.
a
b
14. 14
Step
3
Connecting the Power
Cord
IMPORTANT
• One AC power outlet should be used exclusively for the printer.
• Do not plug the power cord into the auxiliary outlet on a computer.
• Do not connect this printer to an uninterruptible power supply. The printer
may malfunction when a power outage occurs, and there is a risk of
damaging the printer.
1 Make sure that the power switch of the printer is turned
OFF.
The printer is off when the " " side of the power switch is pressed in.
2 Plug the supplied power cord firmly into the power socket.
3 Plug the power plug into the AC power outlet.
Step3
15. 15
Step
4
Loading Paper
This printer can feed paper from the multi-purpose tray and the manual
feed tray.This manual only describes the method for loading standard size
plain paper. Refer to Chapter 2 "Loading and Delivering Paper" in the
User's Guide for information on loading heavy paper, transparencies, label
paper, envelopes, Index Card, or custom paper sizes.
IMPORTANT
• When you are printing from the multi-purpose tray, make sure that there is
no paper in the manual feed tray. If there is any paper in the manual feed
tray, paper will feed from the manual feed tray because manual feed tray
has priority over the multi-purpose tray.
• Do not load paper into the manual feed tray while the printer is printing
from the multi-purpose tray. The paper loaded in the manual feed tray will
feed into the printer, causing overlapping paper feeds and paper jams.
• Do not load paper that has jagged edges, wrinkles, or that is extremely
curly. Doing so can cause paper jams and printer faults.
• For more details on printable paper, refer to Chapter 2 "Loading and
Delivering Paper" in the User's Guide.
Loading Paper into the Multi-Purpose Tray
The multi-purpose tray can hold up to approximately 150 sheets of A4, B5, A5,
Legal, Letter, or Executive plain paper (64 g/m2
).You can also load heavy
paper, transparencies, label paper, envelopes (Envelope C5, Envelope
COM10, Envelope DL, Envelope Monarch) or custom paper of width 76.2 to
215.9 mm and length 127.0 to 355.6 mm.
Always load paper lengthways into the multi-purpose tray.
IMPORTANT
• If you are refilling the multi-purpose tray when there is still paper in the tray,
take out the remaining paper and align it properly with the new paper
before loading it into the tray.
• Use the paper capacity for each type of paper as a guide to the number of
sheets of paper that can be printed continuously.
Step4
CD-ROM
Manual Feed
Tray
Multi-Purpose
Tray
CD-ROM
16. 16
Step
4
1 Open the multi-purpose tray.
Grasp the groove in the center of the printer to open the multi-purpose tray.
2 Pull out the rear paper guide.
IMPORTANT
Before you close the multi-purpose tray, make sure that you return the rear
paper guide to the position shown in the diagram. If you close the multi-
purpose tray without returning the paper guide to the position shown, the
printer may be damaged.
17. 17
Step
4
3 Push the side paper guides out a little wider than the actual
width of the paper.
4 Gently load the stack of paper with the printing side facing
up until it touches the back of the tray.
Make sure that the paper stack is loaded under the paper limit guides.
CAUTION
When loading paper, take care not to cut your hands with the edges
of the paper.
IMPORTANT
• The number of sheets of plain paper that can be loaded in the multi-
purpose tray is approximately 150 (for 64 g/m2
paper). Check that there is
sufficient clear space between the paper limit guides and the paper. If
there is no free space, slightly reduce the amount of paper.
• If you use paper that has been poorly cut, the paper may have a tendency
to double-feed. In this case, thoroughly line up the edges of the paper on a
flat surface before loading it.
• Load the paper so that it is straight.
• If the rear edge of the paper stack is not properly aligned, it may result in
misfeeds or paper jams.
• If the paper is curled or folded at the corners, flatten it out before loading.
Paper Limit Guide
18. 18
Step
4
NOTE
To print on letterhead paper or paper with a logo already printed on it, load
the paper so that the printed side is facing up and the top of the paper is at
the far end.
5 Slide the paper guides to fit both sides of the stack.
IMPORTANT
Always make sure the paper guides match the width of the paper. If the
paper guides are too loose or too tight, the paper will not feed properly and
this will cause paper jams.
19. 19
Step
4
6 Adjust the rear paper guide to match the paper.
IMPORTANT
Do not touch or pull paper out of the multi-purpose tray during printing.
Doing so may cause the printer to malfunction.
Loading Paper in the Manual Feed Tray
The manual feed tray can hold A4, B5, A5, Legal, Letter or Executive size plain
paper.You can also load heavy paper, transparencies, label paper, envelopes
(Envelope C5, Envelope COM10, Envelope DL, Envelope Monarch) or custom
paper of width 76.2 to 215.9 mm and length 127.0 to 355.6 mm.
Always load paper lengthways into the manual feed tray.
IMPORTANT
• You can only load a single sheet of paper in the manual feed tray.
• You cannot print from the manual feed tray if the printer settings are set to
multiple copies or multiple pages. If you start a print job set for multiple
copies or multiple pages, the second and subsequent sheets will feed from
the multi-purpose tray regardless of the paper size and paper type.
• Do not touch or pull paper out of the manual feed tray during printing.
Doing so may cause the printer to malfunction.
1 If the multi-purpose tray is not open, open the multi-
purpose tray.
(See "Loading Paper into the Multi-Purpose Tray," on p. 15.)
2 Push the side paper guides out a little wider than the actual
width of the paper.
20. 20
Step
4
3 Gently load the sheet of paper with the print side facing up
until it touches the back of the tray.
Make sure that the paper passes under the paper limit guides.
CAUTION
When loading paper, take care not to cut your hands with the edges
of the paper.
IMPORTANT
• You can only load a single sheet of paper in the manual feed tray.
• Load the paper so that it is straight.
• If the paper is curled or folded at the corners, flatten it out before loading.
NOTE
To print on letterhead paper or paper with a logo already printed on it, load
the paper so that the printed side is facing up and the top of the paper is at
the far end.
4 Slide the paper guides to fit both sides of the paper.
Paper Limit Guide
21. 21
Step
4
IMPORTANT
• Always make sure the paper guides match the width of the paper. If the
paper guides are too loose or too tight, the paper will not feed properly and
this will cause paper jams.
• Do not touch or pull paper out of the manual feed tray during printing.
Doing so may cause the printer to malfunction.
Paper Output
Pages are output to the output tray on the top of the printer with the printed side
facing down. Open the output tray when you are printing to the output tray.
Close the output tray when you are not using the printer.
CAUTION
Keep your hands or clothing away from the roller in the output area.
Even if the printer is not printing, sudden rotation of the roller may
catch your hands or clothing,resulting in personal injury.
IMPORTANT
The area around the output tray becomes very hot during printing and
directly after printing. When you are collecting paper from the output tray
or clearing a paper jam, be careful not to touch the area around the output
tray.
NOTE
The output tray can hold up to approximately 100 sheets of plain paper
(64 g/m2
).
22. 22
Step
5
Connecting the Printer
to a Computer and
Installing the Software
In this section, connect the printer to a computer with a USB cable, and
then install the printer driver.
WARNING
• If you are connecting or disconnecting the USB cable while the
printer power plug is connected to a power outlet, make sure that
you do not touch the metal parts of the connector. Doing so may
cause an electrical shock.
• Do not pull out the USB cable while the computer or printer are
turned on. Doing so may damage the printer.
IMPORTANT
• Do not connect or disconnect the USB cable under the following
circumstances. Doing so may cause malfunctions on the computer or
printer.
- While the operating system is starting up right after the computer is
turned on
- While printing
• If you are connecting or disconnecting the USB cable while the computer
and printer are turned on, make sure you wait at least 5 seconds after
unplugging the cable before reconnecting. Reconnecting the cable
immediately after disconnecting it may cause the computer or printer to
malfunction.
• This printer performs bidirectional communications while printing.
Connecting to print servers, USB hubs and switching devices that require
unidirectional communication may cause faulty operation.
• When starting Windows, be sure to log on as a member of Administrators.
• When you turn the printer on for the first time after installing it, a single
sheet of white paper may be ejected from the printer. This is not a
malfunction.
NOTE
• The screen shots shown in this section are taken from Windows XP Home
Edition.
• A USB cable is supplied with this printer only within countries and regions
of Asia. In other countries and regions, prepare according to the
specifications of your computer.
1 Make sure that the computer and printer are turned off at
the power.
2 Open the USB cover.
Step5
23. 23
Step
5
3 Connect the B-type (square) end of the USB cable to the
USB connector on the rear side of the printer, and close the
USB cover.
4 Connect the A-type (flat) end of the USB cable to the USB
port on the computer.
5 Turn the computer on and start up Windows.
IMPORTANT
If a Wizard or dialog box appears by the Plug and Play automatic setup,
click [Cancel], and then install the CAPT software using this procedure.
6 Insert the supplied "LBP2900 User Software" CD-ROM into
the CD-ROM drive.
If the CD-ROM is already in the drive, eject the disk and re-insert it into the drive.
IMPORTANT
• If you are using Windows Vista and the [AutoPlay] dialog box appears,
click [Run AUTORUN.EXE].
• If CD-ROM Setup does not appear, display it using the following
procedures. (The CD-ROM drive name is indicated as "D:" in this manual.
The CD-ROM drive name may differ depending on the computer you are
using.)
- If you are using an operating system other than Windows Vista, select
[Run] from the [Start] menu, enter "D:EnglishMInst.exe", and then click
[OK].
- If you are using Windows Vista, enter "D:EnglishMInst.exe" in [Start
Search] under the [Start] menu, and then press the [ENTER] key on your
keyboard.
24. 24
Step
5
NOTE
If you are using Windows Vista and the [User Account Control] dialog box
appears, click [Allow].
7 Click [Easy Installation] or [Custom Installation].
[Easy Installation] allows you to install the printer driver and the instruction
manuals simultaneously. If you do not install the manuals, select [Custom
Installation].
8 Click [Install].
If you selected [Custom Installation] in Step 7, clear the [Online Manuals] check
box, and then click [Install].
9 Confirm the contents, then click [Yes].
25. 25
Step
5
10 Click [Next].
11 Select [Install with USB Connection], then click [Next].
Depending on the system environment, a message that prompts you to restart the
computer may appear. In this case, restart the computer and continue the
installation.
If you are using Windows XP Service Pack 2 or another operating system
equipped with Windows Firewall, the following screen is displayed. Specify
whether to configure Windows Firewall to unblock communication with the client
computers when sharing the printer on a network.
Click [Yes] when you share the printer on a network. After completing the
installation, see "Chapter 3 Setting Up the Printing Environment" in User's
Guide and specify the settings for sharing the printer on the network.
Click [No] when you do not share the printer on a network.
NOTE
Even after the installation, you can change the Firewall settings using
"CAPT Windows Firewall Utility" in the supplied CD-ROM. For more
details, see "Chapter 7 Appendix" in User's Guide.
12 The message <Installation cannot be stopped once it starts.
Do you want to continue?> appears. Click [Yes].
NOTE
• If you are using Windows 2000 and the [Digital Signature Not Found]
dialog box appears, click [Yes].
• If you are using Windows XP/Server 2003 and the [Hardware Installation]
dialog box appears, click [Continue Anyway].
• If you are using Windows Vista and the [Windows Security] dialog box
appears, click [Install this driver software anyway].
CD-ROM
CD-ROM
26. 26
Step
5
13 When the following screen is displayed, turn the printer ON.
Press "I" of the power switch to turn the printer ON.
Installation of the USB class driver and the printer driver starts automatically.
NOTE
• If the printer is not recognized automatically even after the USB cable is
connected, see "Chapter 6 Troubleshooting" in User's Guide.
• If you are using Windows XP/Server 2003 and the [Hardware Installation]
dialog box appears, click [Continue Anyway].
• If you are using Windows Vista and the [Windows Security] dialog box
appears, click [Install this driver software anyway].
14 If [Easy Installation] is selected in Step 7, the manuals are
installed.
15 Confirm the installation results, then click [Next].
NOTE
If the driver installation did not finish successfully, see "Chapter 6
Troubleshooting" in User's Guide, then reinstall the CAPT software.
CD-ROM
CD-ROM
27. 27
Step
5
16 Select the [Restart Computer Now (Recommended)] check
box, then click [Restart].
Windows restarts.
The installation of the USB class driver and the printer driver is
completed.
After Completing the Installation
When the CAPT software is finished installing, the following icons and folders
will be created.
■ For Windows 2000
• A [Canon LBP2900] printer icon is displayed in the [Printers]
folder.
• [Canon Printer Uninstaller] is added to [Programs] under the
[Start] menu.
28. 28
Step
5
• If the manuals are installed, [LBP2900 Online Manuals] is
created on the desktop, and [LBP2900 Online Manuals] under
[Canon LBP2900] is added to [Programs] under the [Start]
menu.
■ For Windows XP/Server 2003
• A [Canon LBP2900] printer icon is displayed in the [Printers
and Faxes] folder.
• [Canon Printer Uninstaller] is added to [All Programs] under
the [Start] menu.
• If the manuals are installed, [LBP2900 Online Manuals] is
created on the desktop, and [LBP2900 Online Manuals] under
[Canon LBP2900] is added to [All Programs] under the [Start]
menu.
■ For Windows Vista
• The [Canon LBP2900] printer icon is displayed in the [Printers]
folder.
• [Canon Printer Uninstaller] is added to [All Programs] under
the [Start] menu.
29. 29
Step
5
• If the manuals are installed, [LBP2900 Online Manuals] is
created on the desktop, and [LBP2900 Online Manuals] under
[Canon LBP2900] is added to [All Programs] under the [Start]
menu.
Printing a Test Page
Before using the printer for the first time, be sure to print a test page using the
following procedure.
NOTE
The screen shots shown in this section are taken from Windows XP Home
Edition.
1 Open the [Printers and Faxes] or [Printers] folder.
For Windows 2000: Select [Settings] ➞ [Printers] from the [Start] menu.
For Windows XP Professional/Server 2003: Select [Printers and Faxes] from the
[Start] menu.
For Windows XP Home Edition: Select [Control Panel] from the [Start] menu, then
click [Printers and Other Hardware] ➞ [Printers and Faxes].
For Windows Vista: From the [Start] menu, select [Control Panel], and then click
[Printer].
The [Printers and Faxes] or [Printers] folder is displayed.
30. 30
Step
5
2 Right-click the [Canon LBP2900] icon, then select
[Properties] from the pop-up menu.
The [Properties] dialog box for the printer is displayed.
3 Click [Print Test Page] on the [General] sheet.
The printer will begin printing a test page.
4 If the page is printed correctly, click [OK] or [Close].
NOTE
If the test page does not print correctly, refer to Chapter 6
"Troubleshooting" in the User's Guide for details on re-installing the
CAPT driver.
The printer is now ready to print.
Make sure you read the User's Guide thoroughly in order to get
the most out of your printer's features.
Displaying the Manuals
This section describes the procedures for displaying the following manuals in
PDF format.
IMPORTANT
To display the manuals in PDF format, Adobe Reader/Adobe Acrobat
Reader is required. If Adobe Reader/Adobe Acrobat Reader is not
installed on your system, download it from the Adobe Systems
Incorporated website.
Instruction Manual Name Contents
Getting Started Guide
(this manual)
Describes the procedure for installing this printer and
the preparations needed before you can print with
this printer.
User's Guide Describes the printing procedures, routine
maintenance, and troubleshooting.
CD-ROM
CD-ROM
31. 31
Step
5
When Displaying a Manual Installed on a Computer
[LBP2900 Online Manuals] is displayed by double-clicking the shortcut icon
created on the desktop when the manuals were installed or selecting [Canon
LBP2900] - [LBP2900 Online Manuals] added to [All Programs] ([Programs]
for Windows 2000) under the [Start] menu. Clicking either of [Getting Started
Guide] or [User's Guide] displays the respective manuals.
Displaying the Manuals from CD-ROM Setup
Display the manuals from the CD-ROM supplied with the printer.
1 Insert the supplied "LBP2900 User Software" CD-ROM into
the CD-ROM drive.
NOTE
• If you are using Windows Vista and the [AutoPlay] dialog box appears,
click [Run AUTORUN.EXE].
• If CD-ROM Setup does not appear, display it using the following
procedures. (The CD-ROM drive name is indicated as "D:" in this manual.
The CD-ROM drive name may differ depending on the computer you are
using.)
- If you are using an operating system other than Windows Vista, select
[Run] from the [Start] menu, enter "D:EnglishMInst.exe", and then click
[OK].
- If you are using Windows Vista, enter "D:EnglishMInst.exe" in [Start
Search] under the [Start] menu, and then press the [ENTER] key on your
keyboard.
• If you are using Windows Vista and the [User Account Control] dialog box
appears, click [Allow].
2 Click [Display Manuals].
3 Click [ ] next to the name of the desired guide.
32. 32
Appendix
About the CD-ROM
■ CAPT (Canon Advanced Printing Technology) software
The CAPT (Canon Advanced Printing Technology) software that is supplied on
the included CD-ROM must be installed before you can print using your
printer. Make sure that this software is installed on the computer that you are
using.
NOTE
Be sure to read the README file by clicking [ ] on the installation
window before installing.
About CD-ROM Setup
When the CD-ROM is inserted into the CD-ROM drive, the following CD-ROM
Setup starts automatically.
You can begin the installation of different pieces of software from the CD-ROM
Setup.
● Easy Installation
Clicking this button allows you to install the printer driver and the instruction
manuals simultaneously.
● Custom Installation
Clicking this button allows you to select whether to install the printer driver only
or install the manuals only.
● Display Manuals
Clicking this button displays the manuals for LBP2900 ([Getting Started Guide]
and [User's Guide]).
Clicking [ ] next to each guide displays the respective PDF manuals. To
display the manuals in PDF format, Adobe Reader/Adobe Acrobat Reader is
required. If Adobe Reader/Adobe Acrobat Reader is not installed on the
system you are using, download it from the Adobe Systems Incorporated
website.
* The following PDF manuals are included in the "Manuals" folder in the
supplied CD-ROM.
Getting Started Guide: Manual_1.pdf
User's Guide: Manual_2.pdf
33. 33
● Exit
Clicking this button closes the CD-ROM Setup.
NOTE
• If you are using Windows Vista and the [AutoPlay] dialog box appears,
click [Run AUTORUN.EXE].
• If CD-ROM Setup does not appear, display it using the following
procedures. (The CD-ROM drive name is indicated as "D:" in this manual.
The CD-ROM drive name may differ depending on the computer you are
using.)
- If you are using an operating system other than Windows Vista, select
[Run] from the [Start] menu, enter "D:EnglishMInst.exe", and then click
[OK].
- If you are using Windows Vista, enter "D:EnglishMInst.exe" in [Start
Search] under the [Start] menu, and then press the [ENTER] key on your
keyboard.
• If you are using Windows Vista and the [User Account Control] dialog box
appears, click [Allow].