This document provides instructions for installing and configuring the Apache Tomcat web server on a Windows system. It outlines downloading and extracting the Tomcat zip file to a project directory. Important Tomcat subdirectories like bin, conf, and webapps are described. It also explains setting the environment variable JAVA_HOME to the Java Development Kit installation directory, which Tomcat requires. Detailed steps are provided for setting JAVA_HOME as a system variable in Windows 10.


![15
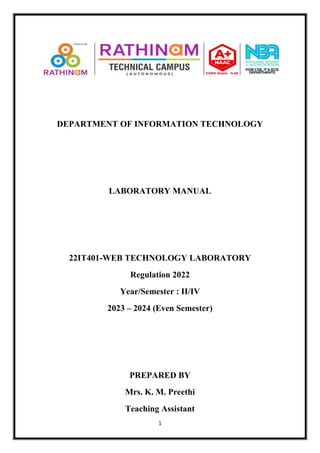
You might like to open the source code for this form in a separate window
The page consists of a JavaScript function called validate_form() that performs
the form validation, followed by the form itself.
CODE
<!DOCTYPEhtml>
<html>
<head>
<script>functionvalidate Form(){
var x =
document.forms["myFo rm"]["fname"].value; if(x==null||x=="")
{
alert("Name must be filled out");returnfalse;
}
}
</script>
</head>
<body>
<formname="myForm" action="usrwlcm.html"o nsubmit="returnvalidate
Form()"m ethod="post"> Name:<inputtype="text" name="fname">
<inputtype="submit"val ue="Submit">
</form>
</body>
</html>](https://image.slidesharecdn.com/webtechnologylabmanualpdf-240131072014-3b5b7428/85/Web-technology-Lab-manual-pdf-pdf-15-320.jpg)


![29
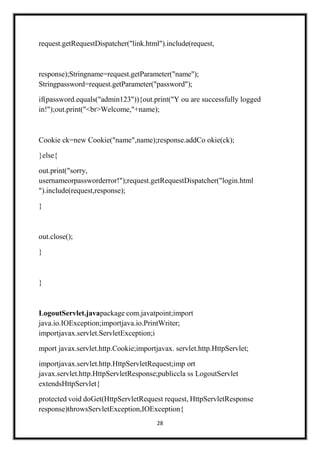
response.setContentType("text/html"); PrintWriterout=response.getWriter();
request.getRequestDispatcher("link.html").include(request,
response);Cookieck=newCookie("name",""); ck.setMaxAge(0);respon
se.addCookie(ck); out.print("youaresuccessfullylogged out!");
}
}
File:ProfileServlet.java
packagecom.javatpoint;
importjava.io.IOException;i mportjava.io.PrintWriter;
importjavax.servlet.ServletException;i mport
javax.servlet.http.Cookie;importjavax. servlet.http.HttpServlet;
importjavax.servlet.http.HttpServletRequest;im port
javax.servlet.http.HttpServletResponse;publiccl
assProfileServletextendsHttpServlet{
protected void doGet(HttpServletRequest request, HttpServletResponse
response)throwsServletException,IOException{
response.setContentType("text/html"); PrintWriterout=response.getWriter();
request.getRequestDispatcher("link.html").include(request,
response);Cookieck[]=request.getCookies();
if(ck!=null){
String name=ck[0].getValue();if(!name.eq uals("")||name!=null){
out.print("<b>Welcome to Profile</b>");out.print("<br>Welcome,"
+name);
}
}else{](https://image.slidesharecdn.com/webtechnologylabmanualpdf-240131072014-3b5b7428/85/Web-technology-Lab-manual-pdf-pdf-29-320.jpg)


![[PHP SW] Software vs Web: What sets them apart?](https://cdn.slidesharecdn.com/ss_thumbnails/softwarevsweb-240913091818-fb77c3bd-thumbnail.jpg?width=640&height=640&fit=bounds)


