Beginners Guide to TikTok for Search - Rachel Pearson - We are Tilt __ Bright...
Visit instructions
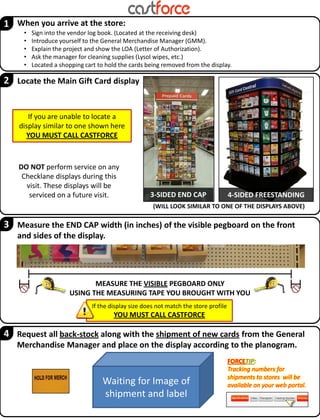
1. 1 When you arrive at the store:
• Sign into the vendor log book. (Located at the receiving desk)
• Introduce yourself to the General Merchandise Manager (GMM).
• Explain the project and show the LOA (Letter of Authorization).
• Ask the manager for cleaning supplies (Lysol wipes, etc.)
• Located a shopping cart to hold the cards being removed from the display.
2 Locate the Main Gift Card display
If you are unable to locate a
display similar to one shown here
YOU MUST CALL CASTFORCE
DO NOT perform service on any
Checklane displays during this
visit. These displays will be
serviced on a future visit. 3-SIDED END CAP 4-SIDED FREESTANDING
(WILL LOOK SIMILAR TO ONE OF THE DISPLAYS ABOVE)
3 Measure the END CAP width (in inches) of the visible pegboard on the front
and sides of the display.
MEASURE THE VISIBLE PEGBOARD ONLY
USING THE MEASURING TAPE YOU BROUGHT WITH YOU
If the display size does not match the store profile
YOU MUST CALL CASTFORCE
4 Request all back-stock along with the shipment of new cards from the General
Merchandise Manager and place on the display according to the planogram.
FORCETIP:
Tracking numbers for
shipments to stores will be
Waiting for Image of available on your web portal.
shipment and label
2. 5 Remove all discontinued cards from the display and give to the manager to discard
CVS
6 Remove all cards, pegs, and signs: FORCETIP:
Removing one section at a
• Do one section of the display at a time and place in cart time will make this process
• Keep like cards together (by category) much easier for you.
• Keep cart(s), removed product, boxes and other items out of customers way
• Discard any other fixtures/signs found on the display that are not part of the new planogram.
DO NOT remove the Hallmark Use a cart to create
Display on top of the fixture your working area
7 Clean the pegboard and all ledges using cleaning supplies provided by the store.
8 Place the new sign, per the planogram, at the top edge of the peg board on the
display.
3. 9 Place the top row of pegs on the display DIRECTLY under the sign.
Use the first open
peg hole DIRECTLY
under the sign.
Leave 2 open peg Leave 5 open peg
holes on the left holes between
side. each peg.
10 Place pegs going down the left side of the display with the correct spacing adding
signs as needed per the planogram.
Use an iTunes card for the spacing
(iTunes cards are taller than all other card)
Insert the peg in the open hole
DIRECTLY under the iTunes card
11 Continue placing pegs down and across with the proper spacing adding signs as needed per
the planogram.
4-Sided FreeStanding & 3 Foot End Cap – A FULL SET OF PLASTIC PEGS WERE
SHIPPED TO THE STORE. Use new pegs first.
All other displays – 15 METAL PEGS WERE SHIPPED TO YOU. Use existing pegs
where needed
Use an iTunes card for the spacing
(iTunes cards are taller than all other card)
4. 12 Place the cards back on the display per the new planogram.
START FROM THE BOTTOM AND WORK UP
STEP 1
Locate the specified card per the planogram. (For Regional cards see additional document)
STEP 2
Remove the empty peg from the display.
STEP 3
Exchange the empty peg with the cards ensuring the backer tag is correct
(The backer tag must be placed from the back of the peg)
If the correct backer tag is not found, use the labels and backer tags shipped to you.
IF THEY DO NOT HAVE THE CARD IN
STOCK, DO NOT FILL WITH OTHER
CARDS. LEAVE THE PEG EMPTY WITH
THE CORRECT BACKER TAG.
13 Repeat # 5 – 11 for all remaining sides of the display substituting for the correct signs per the
planogram.
14 Perform a full inventory count on all cards and record the results on the provided Inventory
Sheet.
Be sure to include all back-
stock in your inventory counts.
SEE THE DOCUMENT LABELED “INVENTORY ANALYSIS” for instruction on how to perform this step.
15 Meet with the manager and provide them with:
The discontinued cards to be discarded (Any cards that are no longer on the planogram)
The overstock cards - work with the manager to secure a place to store them for future visits (Any cards
that are on the planogram but will not fit)
16 Ensure all areas you were working in are clean.
Discard any trash you may have.
Return all carts to their designated location.
5. 17 Take a picture of each side of the display (3-4 pictures) after performing all services. PIC CODE
PICTURE MUST INCLUDE:
Full display from top to bottom and left to right showing space around the display.
xxxx
Pic Code visible. (Found in the blue box to the right)
Store # visible.
EXAMPLE PICTURES:
LEFT SIDE FRONT RIGHT SIDE
SPACE SHOWN AROUND Store # AND Pic Code
THE ENTIRE DISPLAY Visible
18 Take a picture of the full display from a distance showing the section of the store it is in. PIC CODE
MUST BE OF THE FULL DISPLAY FROM TOP TO BOTTOM WITH THE STORE
# AND PIC CODE VISIBLE.
xxxx
PICTURE
19 Sign out of the vendor log book.