Download to read offline


![Resolving the Network Issues on Some
Linux Distributions
In some Linux distributions, for example in Fedora 20, you may encounter an
issue when the NetworkManager service interfering with the VirtualBox host-only
network adapters. The NetworkManager service may interfere with the VirtualBox
IP addresses assigned for host-only adapters and remove the IP addresses after
the DHCP timeout. This may result in issues with an HA environment
deployment.
Procedure:
1. Verify the Fuel installation is completed.
2. Open the VirtualBox network configuration file for editing.
3. In the beginning of the configuration file, add the following line:
4. NM_CONTROLLED=no
5. Save the file.
6. Repeat Step 2 to Step 5 for all network interface configuration files.
Depending on how you configure your environment and your Linux
distribution, the network configuration files may have different names.
Example:
[user@system]$ ls -l /etc/sysconfig/network-scripts/ifcfg-*
-rw-r--r--. 1 root root 254 Jan 14 2014 /etc/sysconfig/network-
scripts/
ifcfg-lo
-rw-r--r--. 1 root root 178 Feb 13 12:01 /etc/sysconfig/network-
scripts/
ifcfg-p2p1
-rw-r--r--. 1 root root 242 Feb 16 12:14 /etc/sysconfig/network-
scripts/
ifcfg-Wired_connection_1
-rw-r--r--. 1 root root 242 Feb 16 12:14 /etc/sysconfig/network-
scripts/
ifcfg-Wired_connection_2
-rw-r--r--. 1 root root 242 Feb 16 12:14 /etc/sysconfig/network-
scripts/](https://image.slidesharecdn.com/virtualboxinstallation-170213115317/85/Virtual-box-installation-16-320.jpg)

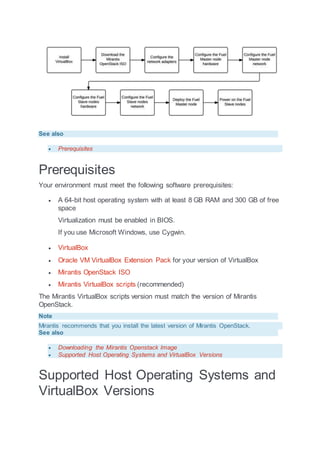
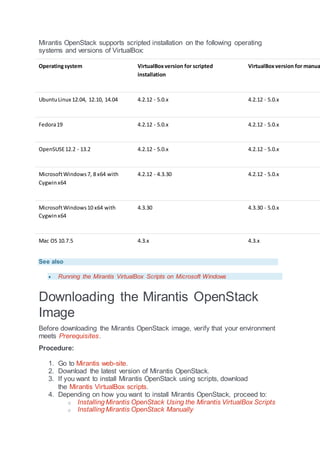
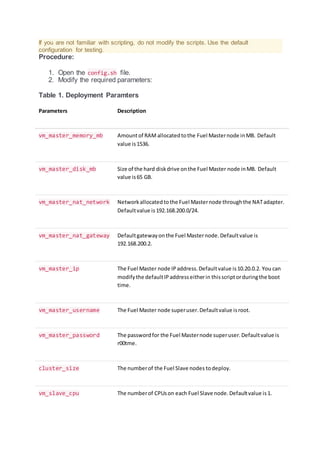
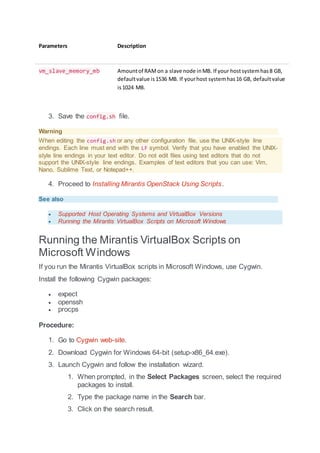
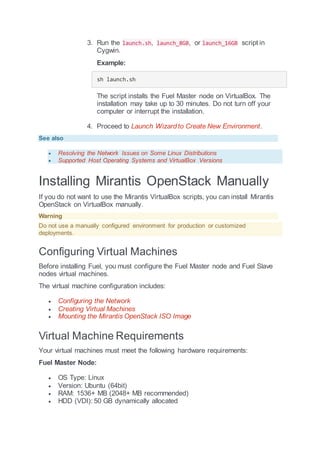
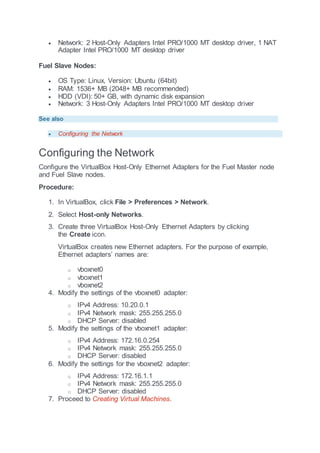
The document provides instructions for installing Mirantis OpenStack on VirtualBox using automated scripts or manually. It describes: 1. Installing Mirantis OpenStack using automated Mirantis VirtualBox scripts that provision virtual machines with required settings. This is the recommended method. 2. Installing Mirantis OpenStack manually by configuring virtual machines, networks, and mounting the OpenStack ISO image, which requires more steps but can be used if the scripts cannot be run. 3. Hardware and software prerequisites for running the scripts or manual installation, such as supported host operating systems, VirtualBox versions, and software requirements.


