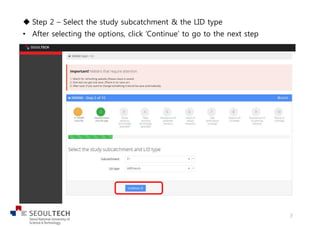
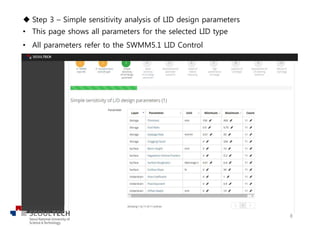
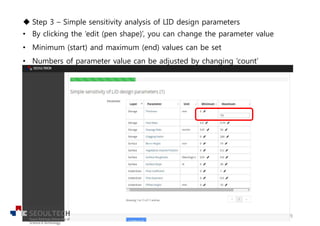
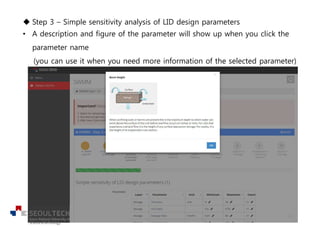
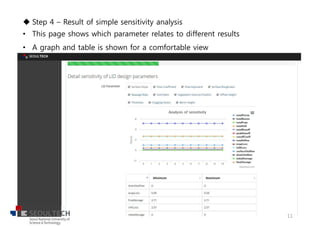
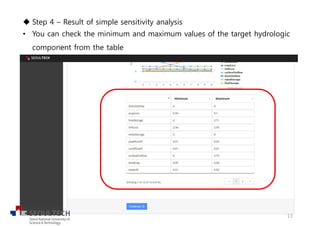
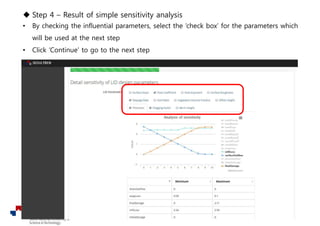
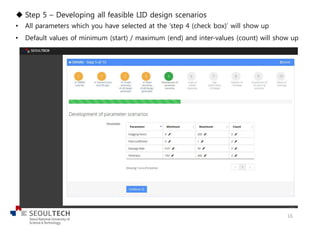
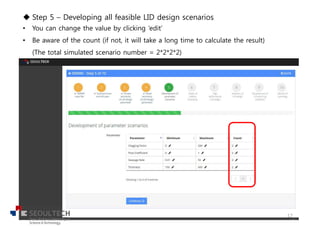
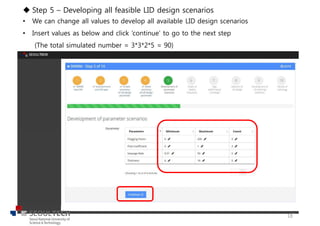
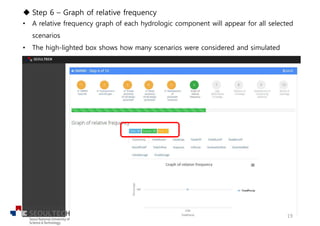
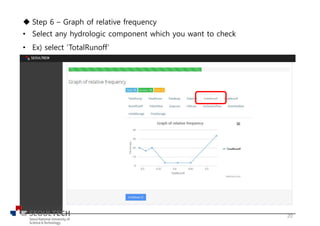
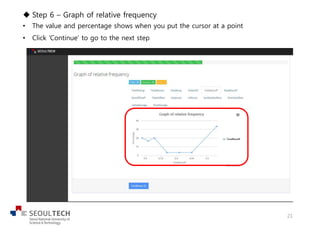
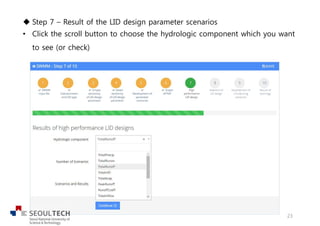
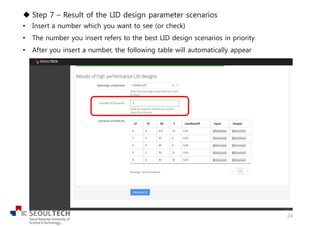
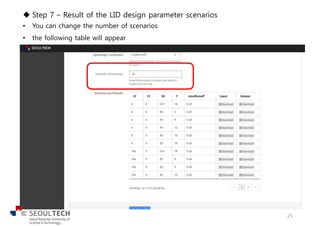
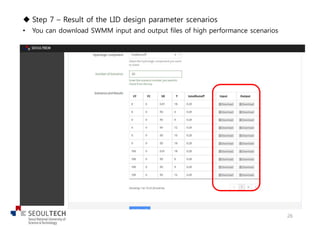
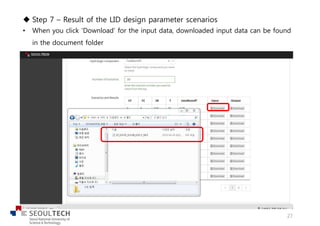
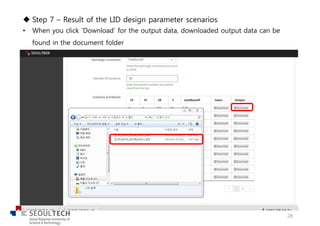
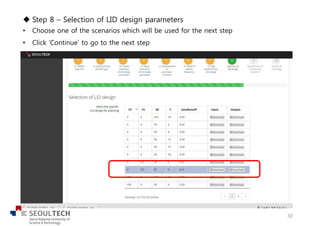
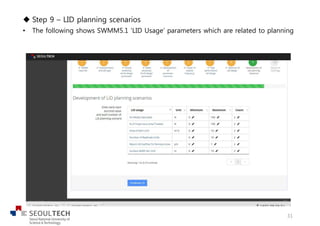
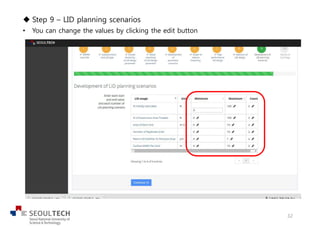
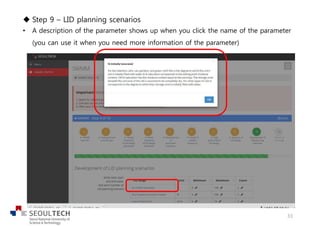
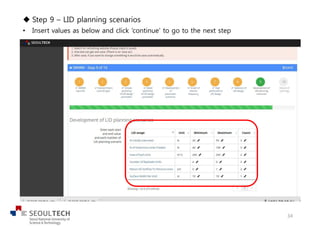
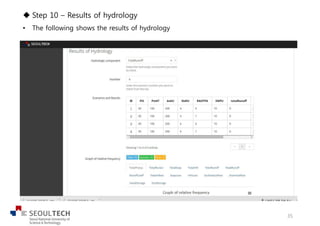
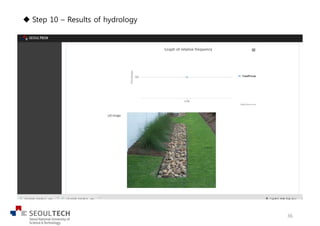
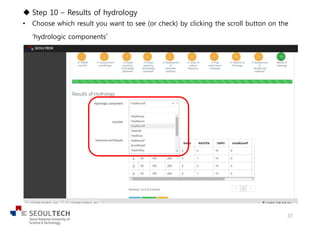
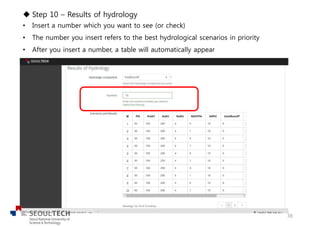
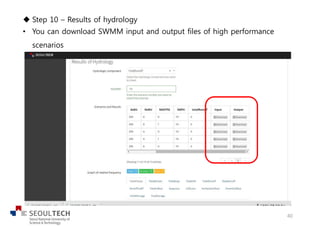
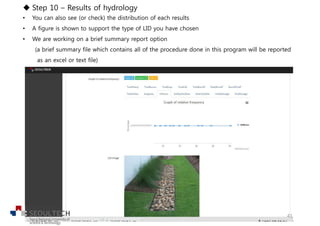
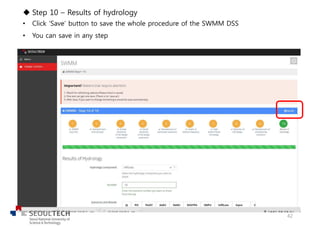
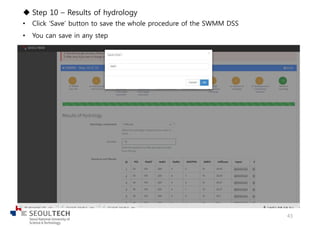
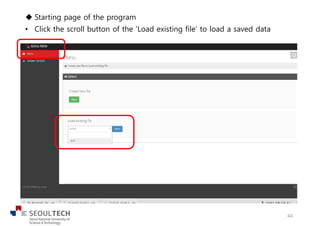
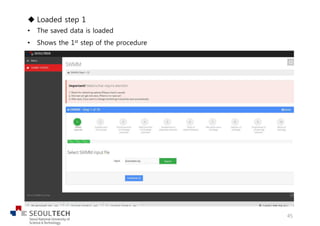
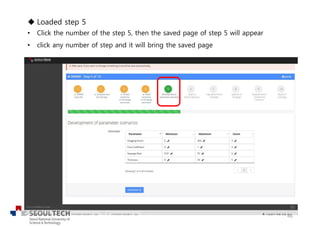
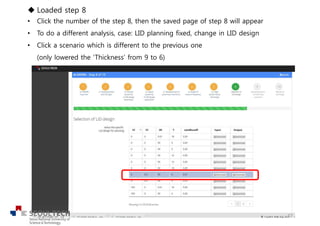
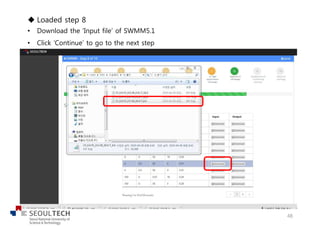
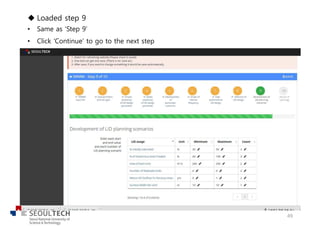
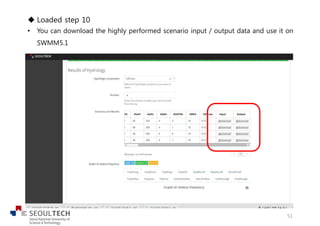
u Starting page of the program
• Enter the allocated web adress from a chrome website
• Click ‘Start’ to create a new file
2
u Step 1 – Select SWMM input file
• Click ‘Search’ to load SWMM input file
3
u Step 1 – Select SWMM input file
• Select an input file (Example4.inp) and click open
4
u Step 1 – Select SWMM input file
• Click ‘Continue’ on the bottom to go to the next step
5
u Step 2 – Select the study subcatchment & the LID type
• Click the scroll button on the right to select the study subcatchment &
LID type
6
u Step 2 – Select the study subcatchment & the LID type
• After selecting the options, click ‘Continue’ to go to the next step
7
u Step 3 – Simple sensitivity analysis of LID design parameters
• This page shows all parameters for the selected LID type
• All parameters refer to the SWMM5.1 LID Control
8
u Step 3 – Simple sensitivity analysis of LID design parameters
• By clicking the ‘edit (pen shape)’, you can change the parameter value
• Minimum (start) and maximum (end) values can be set
• Numbers of parameter value can be adjusted by changing ‘count’
9
u Step 3 – Simple sensitivity analysis of LID design parameters
• A description and figure of the parameter will show up when you click the
parameter name
(you can use it when you need more information of the selected parameter)
10
u Step 4 – Result of simple sensitivity analysis
• This page shows which parameter relates to different results
• A graph and table is shown for a comfortable view
11
u Step 4 – Result of simple sensitivity analysis
• Click ‘Thickness (or another parameter)’ to see the related analysis result
• You can see the changed graph and table
12
u Step 4 – Result of simple sensitivity analysis
• You can check the minimum and maximum values of the target hydrologic
component from the table
13
u Step 4 – Result of simple sensitivity analysis
• You can check the minimum/maximum values and the change of the hydrologic
component from the graph
• You can also delete unchanging graphs by clicking the ‘result options’ on the right
14
u Step 4 – Result of simple sensitivity analysis
• By checking the influential parameters, select the ‘check box’ for the parameters which
will be used at the next step
• Click ‘Continue’ to go to the next step
15
u Step 5 – Developing all feasible LID design scenarios
• All parameters which you have selected at the ‘step 4 (check box)’ will show up
• Default values of minimum (start) / maximum (end) and inter-values (count) will show up
16
u Step 5 – Developing all feasible LID design scenarios
• You can change the value by clicking ‘edit’
• Be aware of the count (if not, it will take a long time to calculate the result)
(The total simulated scenario number = 2*2*2*2)
17
u Step 5 – Developing all feasible LID design scenarios
• We can change all values to develop all available LID design scenarios
• Insert values as below and click ‘continue’ to go to the next step
(The total simulated number = 3*3*2*5 = 90)
18
u Step 6 – Graph of relative frequency
• A relative frequency graph of each hydrologic component will appear for all selected
scenarios
• The high-lighted box shows how many scenarios were considered and simulated
19
u Step 6 – Graph of relative frequency
• Select any hydrologic component which you want to check
• Ex) select ‘TotalRunoff’
20
u Step 6 – Graph of relative frequency
• The value and percentage shows when you put the cursor at a point
• Click ‘Continue’ to go to the next step
21
u Step 7 – Result of the LID design parameter scenarios
• The following will show up to select a hydrologic component
22
u Step 7 – Result of the LID design parameter scenarios
• Click the scroll button to choose the hydrologic component which you want
to see (or check)
23
u Step 7 – Result of the LID design parameter scenarios
• Insert a number which you want to see (or check)
• The number you insert refers to the best LID design scenarios in priority
• After you insert a number, the following table will automatically appear
24
u Step 7 – Result of the LID design parameter scenarios
• You can change the number of scenarios
• the following table will appear
25
u Step 7 – Result of the LID design parameter scenarios
• You can download SWMM input and output files of high performance scenarios
26
u Step 7 – Result of the LID design parameter scenarios
• When you click ‘Download’ for the input data, downloaded input data can be found
in the document folder
27
u Step 7 – Result of the LID design parameter scenarios
• When you click ‘Download’ for the output data, downloaded output data can be
found in the document folder
28
u Step 8 – Selection of LID design parameters
• The following shows the selected scenario results of the previous step
29
u Step 8 – Selection of LID design parameters
• Choose one of the scenarios which will be used for the next step
• Click ‘Continue’ to go to the next step
30
u Step 9 – LID planning scenarios
• The following shows SWMM5.1 ‘LID Usage’ parameters which are related to planning
31
u Step 9 – LID planning scenarios
• You can change the values by clicking the edit button
32
u Step 9 – LID planning scenarios
• A description of the parameter shows up when you click the name of the parameter
(you can use it when you need more information of the parameter)
33
u Step 9 – LID planning scenarios
• Insert values as below and click ‘continue’ to go to the next step
34
u Step 10 – Results of hydrology
• The following shows the results of hydrology
35
u Step 10 – Results of hydrology
36
u Step 10 – Results of hydrology
• Choose which result you want to see (or check) by clicking the scroll button on the
‘hydrologic components’
37
u Step 10 – Results of hydrology
• Insert a number which you want to see (or check)
• The number you insert refers to the best hydrological scenarios in priority
• After you insert a number, a table will automatically appear
38
u Step 10 – Results of hydrology
• The table shows 10 scenarios each on the page
• If the number you selected is high, other results can be seen by clicking the page
number below the table
39
u Step 10 – Results of hydrology
• You can download SWMM input and output files of high performance
scenarios
40
u Step 10 – Results of hydrology
• You can also see (or check) the distribution of each results
• A figure is shown to support the type of LID you have chosen
• We are working on a brief summary report option
(a brief summary file which contains all of the procedure done in this program will be reported
as an excel or text file)
41
u Step 10 – Results of hydrology
• Click ‘Save’ button to save the whole procedure of the SWMM DSS
• You can save in any step
42
u Step 10 – Results of hydrology
• Click ‘Save’ button to save the whole procedure of the SWMM DSS
• You can save in any step
43
u Starting page of the program
• Click the scroll button of the ‘Load existing file’ to load a saved data
44
u Loaded step 1
• The saved data is loaded
• Shows the 1st step of the procedure
45
u Loaded step 5
• Click the number of the step 5, then the saved page of step 5 will appear
• click any number of step and it will bring the saved page
46
u Loaded step 8
• Click the number of the step 8, then the saved page of step 8 will appear
• To do a different analysis, case: LID planning fixed, change in LID design
• Click a scenario which is different to the previous one
(only lowered the ‘Thickness’ from 9 to 6)
47
u Loaded step 8
• Download the ‘Input file’ of SWMM5.1
• Click ‘Continue’ to go to the next step
48
u Loaded step 9
• Same as ‘Step 9’
• Click ‘Continue’ to go to the next step
49
u Loaded step 10
• Results of hydrology is shown
50
u Loaded step 10
• You can download the highly performed scenario input / output data and use it on
SWMM5.1
51

Tutorial guide for WMAM

  • 2.
    u Starting pageof the program • Enter the allocated web adress from a chrome website • Click ‘Start’ to create a new file 2
  • 3.
    u Step 1– Select SWMM input file • Click ‘Search’ to load SWMM input file 3
  • 4.
    u Step 1– Select SWMM input file • Select an input file (Example4.inp) and click open 4
  • 5.
    u Step 1– Select SWMM input file • Click ‘Continue’ on the bottom to go to the next step 5
  • 6.
    u Step 2– Select the study subcatchment & the LID type • Click the scroll button on the right to select the study subcatchment & LID type 6
  • 7.
    u Step 2– Select the study subcatchment & the LID type • After selecting the options, click ‘Continue’ to go to the next step 7
  • 8.
    u Step 3– Simple sensitivity analysis of LID design parameters • This page shows all parameters for the selected LID type • All parameters refer to the SWMM5.1 LID Control 8
  • 9.
    u Step 3– Simple sensitivity analysis of LID design parameters • By clicking the ‘edit (pen shape)’, you can change the parameter value • Minimum (start) and maximum (end) values can be set • Numbers of parameter value can be adjusted by changing ‘count’ 9
  • 10.
    u Step 3– Simple sensitivity analysis of LID design parameters • A description and figure of the parameter will show up when you click the parameter name (you can use it when you need more information of the selected parameter) 10
  • 11.
    u Step 4– Result of simple sensitivity analysis • This page shows which parameter relates to different results • A graph and table is shown for a comfortable view 11
  • 12.
    u Step 4– Result of simple sensitivity analysis • Click ‘Thickness (or another parameter)’ to see the related analysis result • You can see the changed graph and table 12
  • 13.
    u Step 4– Result of simple sensitivity analysis • You can check the minimum and maximum values of the target hydrologic component from the table 13
  • 14.
    u Step 4– Result of simple sensitivity analysis • You can check the minimum/maximum values and the change of the hydrologic component from the graph • You can also delete unchanging graphs by clicking the ‘result options’ on the right 14
  • 15.
    u Step 4– Result of simple sensitivity analysis • By checking the influential parameters, select the ‘check box’ for the parameters which will be used at the next step • Click ‘Continue’ to go to the next step 15
  • 16.
    u Step 5– Developing all feasible LID design scenarios • All parameters which you have selected at the ‘step 4 (check box)’ will show up • Default values of minimum (start) / maximum (end) and inter-values (count) will show up 16
  • 17.
    u Step 5– Developing all feasible LID design scenarios • You can change the value by clicking ‘edit’ • Be aware of the count (if not, it will take a long time to calculate the result) (The total simulated scenario number = 2*2*2*2) 17
  • 18.
    u Step 5– Developing all feasible LID design scenarios • We can change all values to develop all available LID design scenarios • Insert values as below and click ‘continue’ to go to the next step (The total simulated number = 3*3*2*5 = 90) 18
  • 19.
    u Step 6– Graph of relative frequency • A relative frequency graph of each hydrologic component will appear for all selected scenarios • The high-lighted box shows how many scenarios were considered and simulated 19
  • 20.
    u Step 6– Graph of relative frequency • Select any hydrologic component which you want to check • Ex) select ‘TotalRunoff’ 20
  • 21.
    u Step 6– Graph of relative frequency • The value and percentage shows when you put the cursor at a point • Click ‘Continue’ to go to the next step 21
  • 22.
    u Step 7– Result of the LID design parameter scenarios • The following will show up to select a hydrologic component 22
  • 23.
    u Step 7– Result of the LID design parameter scenarios • Click the scroll button to choose the hydrologic component which you want to see (or check) 23
  • 24.
    u Step 7– Result of the LID design parameter scenarios • Insert a number which you want to see (or check) • The number you insert refers to the best LID design scenarios in priority • After you insert a number, the following table will automatically appear 24
  • 25.
    u Step 7– Result of the LID design parameter scenarios • You can change the number of scenarios • the following table will appear 25
  • 26.
    u Step 7– Result of the LID design parameter scenarios • You can download SWMM input and output files of high performance scenarios 26
  • 27.
    u Step 7– Result of the LID design parameter scenarios • When you click ‘Download’ for the input data, downloaded input data can be found in the document folder 27
  • 28.
    u Step 7– Result of the LID design parameter scenarios • When you click ‘Download’ for the output data, downloaded output data can be found in the document folder 28
  • 29.
    u Step 8– Selection of LID design parameters • The following shows the selected scenario results of the previous step 29
  • 30.
    u Step 8– Selection of LID design parameters • Choose one of the scenarios which will be used for the next step • Click ‘Continue’ to go to the next step 30
  • 31.
    u Step 9– LID planning scenarios • The following shows SWMM5.1 ‘LID Usage’ parameters which are related to planning 31
  • 32.
    u Step 9– LID planning scenarios • You can change the values by clicking the edit button 32
  • 33.
    u Step 9– LID planning scenarios • A description of the parameter shows up when you click the name of the parameter (you can use it when you need more information of the parameter) 33
  • 34.
    u Step 9– LID planning scenarios • Insert values as below and click ‘continue’ to go to the next step 34
  • 35.
    u Step 10– Results of hydrology • The following shows the results of hydrology 35
  • 36.
    u Step 10– Results of hydrology 36
  • 37.
    u Step 10– Results of hydrology • Choose which result you want to see (or check) by clicking the scroll button on the ‘hydrologic components’ 37
  • 38.
    u Step 10– Results of hydrology • Insert a number which you want to see (or check) • The number you insert refers to the best hydrological scenarios in priority • After you insert a number, a table will automatically appear 38
  • 39.
    u Step 10– Results of hydrology • The table shows 10 scenarios each on the page • If the number you selected is high, other results can be seen by clicking the page number below the table 39
  • 40.
    u Step 10– Results of hydrology • You can download SWMM input and output files of high performance scenarios 40
  • 41.
    u Step 10– Results of hydrology • You can also see (or check) the distribution of each results • A figure is shown to support the type of LID you have chosen • We are working on a brief summary report option (a brief summary file which contains all of the procedure done in this program will be reported as an excel or text file) 41
  • 42.
    u Step 10– Results of hydrology • Click ‘Save’ button to save the whole procedure of the SWMM DSS • You can save in any step 42
  • 43.
    u Step 10– Results of hydrology • Click ‘Save’ button to save the whole procedure of the SWMM DSS • You can save in any step 43
  • 44.
    u Starting pageof the program • Click the scroll button of the ‘Load existing file’ to load a saved data 44
  • 45.
    u Loaded step1 • The saved data is loaded • Shows the 1st step of the procedure 45
  • 46.
    u Loaded step5 • Click the number of the step 5, then the saved page of step 5 will appear • click any number of step and it will bring the saved page 46
  • 47.
    u Loaded step8 • Click the number of the step 8, then the saved page of step 8 will appear • To do a different analysis, case: LID planning fixed, change in LID design • Click a scenario which is different to the previous one (only lowered the ‘Thickness’ from 9 to 6) 47
  • 48.
    u Loaded step8 • Download the ‘Input file’ of SWMM5.1 • Click ‘Continue’ to go to the next step 48
  • 49.
    u Loaded step9 • Same as ‘Step 9’ • Click ‘Continue’ to go to the next step 49
  • 50.
    u Loaded step10 • Results of hydrology is shown 50
  • 51.
    u Loaded step10 • You can download the highly performed scenario input / output data and use it on SWMM5.1 51