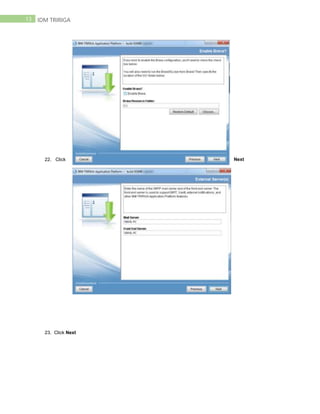
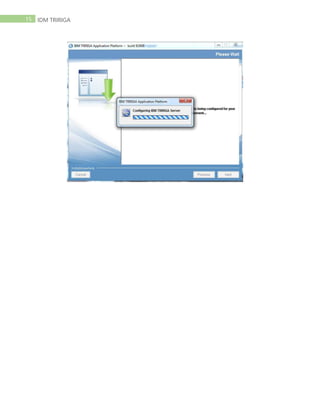
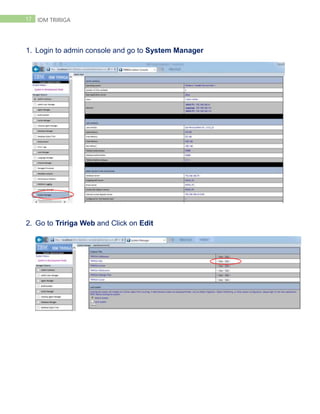
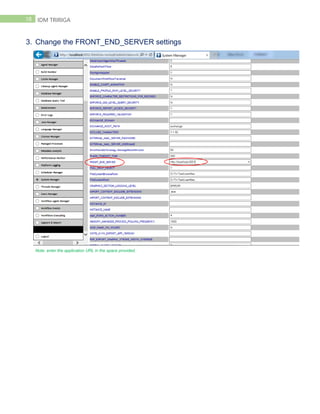
IBM TRRIGASimpler way to work
By Nikhil Rohilla
1 IDM TRIRIGA
1. Tririga Pre-Requisites
2. Tririga Installation
3. Changing Port Configuration.
4. DNS Setup & Configuration.
5. Assigning Domain name and SSL on URLs
6. Change Logo of new applications.
7. Log monitoring
8. Data Connect Jobs Schedule In Production Applications
9. Configuration & Checking Tririga Agents
10. Setting Up IIS on Server
11. BIRT Report
Tririga Pre-Requisites
2 IDM TRIRIGA
Software Requirement
 Tririga Installer
 Jboss
 Jtds-1.2.8.jar
Client workstations
 2 gigahertz (GHz) or faster 32-bit (x86) or 64-bit (x64) processor
 1 gigabyte (GB) RAM (32-bit) or 2 GB RAM (64-bit) minimum, 4 GB RAM or greater
recommended
 75 GB or greater disk space
 100 Mbps NIC
 1024 x 768 minimum display resolution, 1280 x 1024 or greater recommended display resolution
Application server (Minimum Recommended)
 Two to four dedicated 64-bit processors
 2 – 4 GB RAM per processor
 50 GB or greater disk space for IBM TRIRIGA, Java™, Web Server components and run-time temporary
space
Database Server
 Two to four dedicated 64-bit processors minimum, four to eight recommended
 2 – 4 GB RAM per processor
 100 GB or greater disk space for database and data
SYSTEM ENVIRONMENT:
 Windows Server 2008
 MS SQL Server 2008 R2
 Oracle Java 6
 IBM Tririga Application Platform 3.3.2
Installation
The installation of IBM Tririga for Service Providers involves installing the product, deploying the Enterprise
Application files, and configuring the software. You start the installation programs from the Tririga installer.
This guide will show you the steps to install IBM Tririga Application Platform 3.3.2 with MS SQL Server 2008 R2
and IBM WebSphere 8.0 on standalone Windows Server 2008 environment.
Procedure
3 IDM TRIRIGA
1. Run the installer file as Administrator.
2. Follow the installation instructions and click Next on each screen to move to the next
screen.
4 IDM TRIRIGA
3. Accept the licenses for both the application and the application platform.
4. For the installation set, select Java VM. Java 6 is currently supported.
5. Set installation folder (recommend to keep default). Click Next.
5 IDM TRIRIGA
6. Select Server and Database and click Next.
Note:
 Select Server & Database when we
require to install blank installation.
 Select Process Server Only when we require to install only Application on existing database
 Select Database Only when we require to install Database only according to our installation.
7. Select New Installation and click Next.
6 IDM TRIRIGA
8. Locate data.zip file then
click Next.
9. Select Jboss 5.1.0 (Community) and click Next.
7 IDM TRIRIGA
10. Locate JBOSS
5.1.0 File and Click Next
11. Leave it as it is and click Next
8 IDM TRIRIGA
12. Assign the memory you need to
give.
13. Provide the host name/machine name and click Next.
9 IDM TRIRIGA
14. Select the type of database
you want to connect.
In this scenario we are select
the Microsoft SQL Server.
15. Locate jtds-1.2.8.jar file then click Next.
10 IDM TRIRIGA
16. Tick all the options and click Next.
17. Enter the SQL server’s IP or Host name, port and Database name.
11 IDM TRIRIGA
18. Click Next
19. Provide the Username and Password of the database.
12 IDM TRIRIGA
20. Click Next
21. Provide the Brava Configurations ( If Required ) and click on Next
13 IDM TRIRIGA
22. Click Next
23. Click Next
14 IDM TRIRIGA
24. Click Install
25. Click on Finish after completing the setup.
15 IDM TRIRIGA
16 IDM TRIRIGA
BIRT
Report
17 IDM TRIRIGA
1. Login to admin console and go to System Manager
2. Go to Tririga Web and Click on Edit
18 IDM TRIRIGA
3. Change the FRONT_END_SERVER settings
Note: enter the application URL in the space provided.
19 IDM TRIRIGA
Verify the Configurations
Login at admin console and go to My Report > System Report > Display Type > Select External > Open any Title
It should display the screen as below:
20 IDM TRIRIGA

Tririga Deployment / Installation Step by Step Guide

  • 1.
    IBM TRRIGASimpler wayto work By Nikhil Rohilla
  • 2.
    1 IDM TRIRIGA 1.Tririga Pre-Requisites 2. Tririga Installation 3. Changing Port Configuration. 4. DNS Setup & Configuration. 5. Assigning Domain name and SSL on URLs 6. Change Logo of new applications. 7. Log monitoring 8. Data Connect Jobs Schedule In Production Applications 9. Configuration & Checking Tririga Agents 10. Setting Up IIS on Server 11. BIRT Report Tririga Pre-Requisites
  • 3.
    2 IDM TRIRIGA SoftwareRequirement  Tririga Installer  Jboss  Jtds-1.2.8.jar Client workstations  2 gigahertz (GHz) or faster 32-bit (x86) or 64-bit (x64) processor  1 gigabyte (GB) RAM (32-bit) or 2 GB RAM (64-bit) minimum, 4 GB RAM or greater recommended  75 GB or greater disk space  100 Mbps NIC  1024 x 768 minimum display resolution, 1280 x 1024 or greater recommended display resolution Application server (Minimum Recommended)  Two to four dedicated 64-bit processors  2 – 4 GB RAM per processor  50 GB or greater disk space for IBM TRIRIGA, Java™, Web Server components and run-time temporary space Database Server  Two to four dedicated 64-bit processors minimum, four to eight recommended  2 – 4 GB RAM per processor  100 GB or greater disk space for database and data SYSTEM ENVIRONMENT:  Windows Server 2008  MS SQL Server 2008 R2  Oracle Java 6  IBM Tririga Application Platform 3.3.2 Installation The installation of IBM Tririga for Service Providers involves installing the product, deploying the Enterprise Application files, and configuring the software. You start the installation programs from the Tririga installer. This guide will show you the steps to install IBM Tririga Application Platform 3.3.2 with MS SQL Server 2008 R2 and IBM WebSphere 8.0 on standalone Windows Server 2008 environment. Procedure
  • 4.
    3 IDM TRIRIGA 1.Run the installer file as Administrator. 2. Follow the installation instructions and click Next on each screen to move to the next screen.
  • 5.
    4 IDM TRIRIGA 3.Accept the licenses for both the application and the application platform. 4. For the installation set, select Java VM. Java 6 is currently supported. 5. Set installation folder (recommend to keep default). Click Next.
  • 6.
    5 IDM TRIRIGA 6.Select Server and Database and click Next. Note:  Select Server & Database when we require to install blank installation.  Select Process Server Only when we require to install only Application on existing database  Select Database Only when we require to install Database only according to our installation. 7. Select New Installation and click Next.
  • 7.
    6 IDM TRIRIGA 8.Locate data.zip file then click Next. 9. Select Jboss 5.1.0 (Community) and click Next.
  • 8.
    7 IDM TRIRIGA 10.Locate JBOSS 5.1.0 File and Click Next 11. Leave it as it is and click Next
  • 9.
    8 IDM TRIRIGA 12.Assign the memory you need to give. 13. Provide the host name/machine name and click Next.
  • 10.
    9 IDM TRIRIGA 14.Select the type of database you want to connect. In this scenario we are select the Microsoft SQL Server. 15. Locate jtds-1.2.8.jar file then click Next.
  • 11.
    10 IDM TRIRIGA 16.Tick all the options and click Next. 17. Enter the SQL server’s IP or Host name, port and Database name.
  • 12.
    11 IDM TRIRIGA 18.Click Next 19. Provide the Username and Password of the database.
  • 13.
    12 IDM TRIRIGA 20.Click Next 21. Provide the Brava Configurations ( If Required ) and click on Next
  • 14.
    13 IDM TRIRIGA 22.Click Next 23. Click Next
  • 15.
    14 IDM TRIRIGA 24.Click Install 25. Click on Finish after completing the setup.
  • 16.
  • 17.
  • 18.
    17 IDM TRIRIGA 1.Login to admin console and go to System Manager 2. Go to Tririga Web and Click on Edit
  • 19.
    18 IDM TRIRIGA 3.Change the FRONT_END_SERVER settings Note: enter the application URL in the space provided.
  • 20.
    19 IDM TRIRIGA Verifythe Configurations Login at admin console and go to My Report > System Report > Display Type > Select External > Open any Title It should display the screen as below:
  • 21.