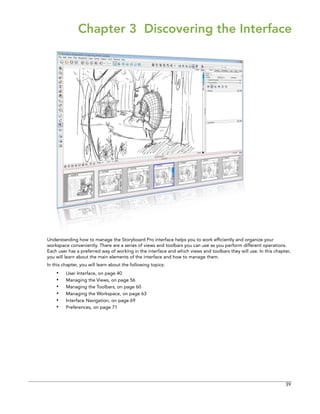
This document provides an overview of the Storyboard Pro user interface and basic functions. It begins with instructions for launching the software, creating and opening projects, and setting project properties. It then describes each area of the interface in detail, such as the different views and toolbars, and how to manage them. The document also covers importing scripts, adding scenes and panels, and working with captions. It provides guidance for basic drawing, colouring, layers, and libraries. The user guide serves as a reference for new Storyboard Pro users to learn the essential tools and workflows.


![20
Storyboard Pro 2 User Guide
Using the File Menu
If a project is already open and you want to create a new one, you can use the File menu.
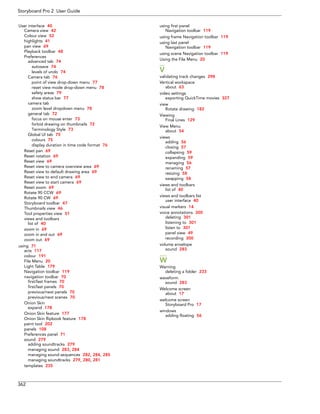
To create a project from the File menu:
1.Select File > New. You can also click on the New button in the File toolbar or use the default keyboard shortcut [Ctrl]+[N] (Windows) or []+[N] (Mac OS X).
The New Project dialog box opens.
2.Select a project directory by clicking on the Choose button.
3.In the Project Name field, type the name of the project. This name will appear as the file name.
4.In the Project Title field, type the name of the project title. It can be a good idea to use the Project Name for the Project Title. You can also type in the name of the Project Subtitle, but it is not mandatory. These titles will appear on the appropriate pages of PDF renders.
5.In the Resolution section, choose the project’s resolution, or click on the Add button to add a new resolution to the list.](https://image.slidesharecdn.com/storyboardpro2sp1userguide-141107045119-conversion-gate01/85/Storyboard-pro-2_sp1_user_guide-22-320.jpg)
![Chapter 2: Getting Started Creating and Opening a Project
21
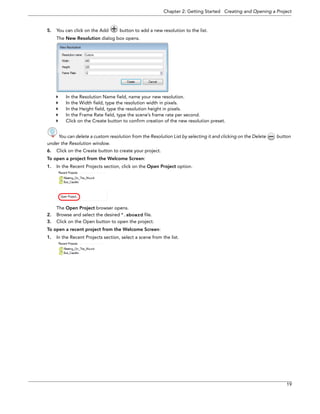
6.You can click on the Add button to add a new resolution to the list.
The New Resolution dialog box opens.
In the Resolution Name field, name your new resolution.
In the Width field, type the resolution width in pixels.
In the Height field, type the resolution height in pixels.
In the Frame Rate field, type the scene’s frame rate per second.
Click on the Create button to confirm creation of the new resolution preset.
You can delete a custom resolution from the Resolution List by selecting it and clicking on the Delete button
under the Resolution window.
7.Click on the Create button to create your project.
To open a project from the File menu:
1.Select File > Open. You can also click on the Open button in the File toolbar or use the default keyboard shortcut [Ctrl]+[O] (Windows) or []+[O] (Mac OS X).
The Open Scene browser opens.
2.Browse and select the desired *.sboard file.
3.Click on the Open button to open the scene.](https://image.slidesharecdn.com/storyboardpro2sp1userguide-141107045119-conversion-gate01/85/Storyboard-pro-2_sp1_user_guide-23-320.jpg)


![24
Storyboard Pro 2 User Guide
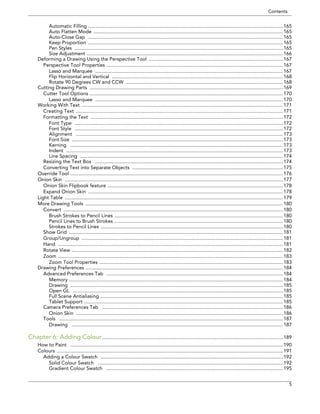
Creating a New Project from a Final Draft 7 Script
If you’re still working with version 7 of Final Draft, you will have to use the Final Draft Tagger to generate the *.xml file needed to use this feature. After you have produced your export, follow the steps detailed in the section above: Creating a New Project From a Final Draft Script., and proceed with the import.
Note: Final Draft 8 uses a new file format, an *.fdx, which can be imported directly into the software, as opposed
to the older *.fdr, which needs to be exported from Final Draft Tagger to generate an *.xml file.
To export your script as an XML:
1.Launch the Final Draft Tagger software.
2.Select File > Import Script, the keyboard shortcut is [Ctrl]+[I]. The Import dialog box opens.
3.In the browser, select your script file and click on the Open button. Your script will appear in Final Draft Tagger.
4.Select File > Export to XML.
5.Close the Final Draft Tagger application and proceed to import the *.xml file as in the previous section.](https://image.slidesharecdn.com/storyboardpro2sp1userguide-141107045119-conversion-gate01/85/Storyboard-pro-2_sp1_user_guide-26-320.jpg)


![Chapter 2: Getting Started Project Optimization
33
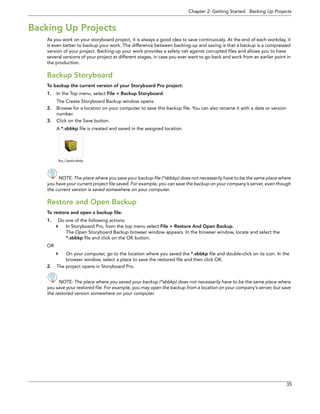
Other Optimization Suggestions
•Texture vs. Plain Vector Brush
•Flattening Your Drawings
•Bitmap Integration
Texture vs. Plain Vector Brush
In Toon Boom Storyboard Pro, all the strokes that you create with the Brush tool are vector elements. There are basically two kinds of brushes:
•Plain Brushes: By default, the brush tool creates vector strokes filled with either a colour or a gradient. Vector strokes use a very small amount of memory and can be used rapidly because they don’t contain any pixel information, only mathematical functions.
•Texture Brushes: This type of brush also produces a vector contour for its strokes, but is filled with a bitmap texture. These textures allows you to produce drawings that have natural looking brush strokes that resemble lines drawn using a crayon or airbrush.
Because they are using a bitmap image mapped inside vector strokes, texture brushes use much more memory and processing time than brush strokes filled with colour. Therefore it you wish to make your file size lighter and your drawing speed faster, use only regular brushes to draw your scenes. If you do choose to use texture brushes, is it important to use a reasonable size bitmap for your texture brush.
Flattening Your Drawings
In Storyboard Pro, strokes inside a layer are independent. You are able to select a specific stroke and edit its position, scale, rotation, skew, colour and so on, whenever you want. However, this flexibility increases the amount of memory and resources used by the software, especially when you have a lot of strokes in your drawing (which frequently happens when you sketch).
In the Project Optimization introduction, you learned that you could flatten all your drawings in one go. However, you can retain partial flexibility and still minimize file size and resources needed by consciously flattening certain drawings as you draw, or even by selecting them after they have been drawn. The Flatten option takes all strokes of the same colour with overlapping areas on the same layer and flattens them to create a single drawing with a vector contour.
To flatten strokes as you draw:
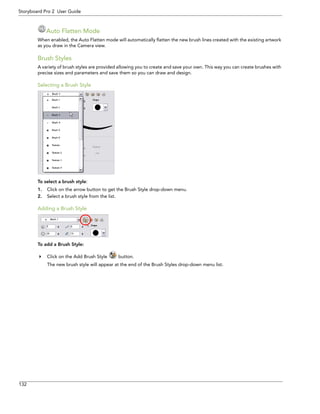
1.In the Tools toolbar, select the Brush tool .
2.In the Tool Properties panel, enable the Auto-Flatten button .
3.In the Camera view, sketch your first drawing. The drawing strokes will automatically be flattened.
To flatten an existing drawing:
1.In the Camera view, use the Select tool to select a group of strokes.
If you do not select a group of strokes, the whole layer will be flattened.
You can also select multiple layers so that they are flattened individually.
2.From the top menu, select Tools > Flatten, or use the keyboard shortcut [Alt]+[Shift]+[L] (Windows) or [Alt]+[Shift]+[F] (Mac).
Crop Texture on Flatten
When you use the Flatten option in the Tools menu, Storyboard Pro automatically crops all textures, this reduces the drawing size by removing the texture area which is not visible.
Bitmap Integration
Toon Boom Storyboard Pro allows you to create storyboards by importing scanned images or bitmaps drawn in another software. During the import process, images are vectorized and placed in a new scene in a vector bounding box as a bitmap fill. The bitmap image’s resolution can affect your project’s file size and the speed at which the software functions while handling your project. When importing bitmaps into storyboard there is rarely need to use a high resolution. This will not increase the quality of your PDF or animatic. You should import bitmaps with a resolution close to the project resolution. For example, in an NTSC project, using a bitmap with a 720x480 resolution or a 72dpi quality will be fine.](https://image.slidesharecdn.com/storyboardpro2sp1userguide-141107045119-conversion-gate01/85/Storyboard-pro-2_sp1_user_guide-35-320.jpg)

![36
Storyboard Pro 2 User Guide
Basic Commands
This table lists the most common commands used in Storyboard Pro
Command
Action
Access Methods
New
Starts a new scene while closing any scene already open. The New Scene dialog box appears, asking for directory, name and resolution information.
File > New
[Ctrl]+[N] (Windows)
[]+[N] (Mac OS X)
Open
Use the Open command to bring up the Open Scene file dialog. Browse your file system for a scene file.
The Open command is not disabled when a scene is opened. You can open a new scene from the current one and the previous scene will be closed.
File > Open
[Ctrl]+[O] (Windows)
[]+[O] (Mac OS X)
Open Recent
Displays a quick access list to view and open recently used Storyboard Pro files.
File > Open Recent
Close
Use the Close command to close the scene that is currently opened, but does not close the Storyboard Pro application.
File > Close
Save
Use the Save command to save all changes made to the opened scene, drawings, palettes, and palette lists.
File > Save
[Ctrl]+[S] (Windows)
[]+[S] (Mac OS X)
Save As
Use the Save As command to save the current state of a scene as another scene. The Save As window prompts you to give a new name and choose a different location to this scene before saving it. This will create a complete scene directory for the new scene.
File > Save As
Quit
Use the Quit command to close Storyboard Pro. If the current scene has changes, it asks if you want to save them before closing.
Windows: File > Quit
Mac OS X: Animate > Quit Toon Boom Animate
Cut
Use the Cut command to remove selected objects. You can then paste the object or its properties to another object.
Edit > Cut
[Ctrl]+[X] (Windows)
[]+[X] (Mac OS X)
Copy
Use the Copy command to copy selected objects and properties.
Edit > Copy
[Ctrl]+[C] (Windows)
[]+[C] (Mac OS X)
Paste
Use the Paste command to place an object you cut or copied into the location you select in the Camera and Timeline View.
Edit > Paste
[Ctrl]+[V] (Windows)
[]+[V] (Mac OS X)
Delete
Use the Delete command to remove selected objects.
Edit > Delete
[Delete]](https://image.slidesharecdn.com/storyboardpro2sp1userguide-141107045119-conversion-gate01/85/Storyboard-pro-2_sp1_user_guide-38-320.jpg)
![Chapter 2: Getting Started Basic Commands
37
Select All
Use the Select All command to select all drawing objects in the current drawing window in the Timeline and Camera View. This helps you manage the objects as one body when moving them.
Edit > Select All
[Ctrl]+[A] (Windows)
[]+[A] (Mac OS X)
Deselect All
Use the Deselect All command to remove the selection from the selected objects in the Drawing and Camera View.
Edit > Deselect All
[Esc]
Select Panels in Current Act
Use the Select Panels in Current Act command to select all the panels in the current act.
Edit > Select Panels in Current Act
Select Panels in Current Scene
Use the Select Panels in Current Scene command to select all the panels in the currently selected scene.
Edit > Select Panels in Current Scene
Undo
Use the Undo command to remove the last change made to your animation project. Storyboard Pro supports multiple undo, so you can revert changes you have made in the order you made them.
Edit > Undo
[Ctrl]+[Z] (Windows)
[]+[Z] (Mac OS X)
Redo
Use the Redo command when you have undone an operation that you decide to keep. The Redo command becomes active only after you use the Undo command.
Edit > Redo
[Ctrl]+[Y] (Windows)
[]+[Y] (Mac OS X)
Help
Launches the Storyboard Pro Help System PDF, complete with instructions on how to use the system.
Help > Help
[F1]
Toon Boom Storyboard Pro on the Web
Launches the Storyboard Pro web site, which features a Support and Community > Forum section.
Help > Toon Boom Storyboard Pro on the Web
Show End User License Agreement
This command opens the License dialog box which displays the End User License Agreement.
Help > Show End User License Agreement
About
Use the About command to access general information about the software.
Windows: Help > About
Mac OS X: Storyboard Pro > About Toon Boom Storyboard Pro
Command Action Access Methods](https://image.slidesharecdn.com/storyboardpro2sp1userguide-141107045119-conversion-gate01/85/Storyboard-pro-2_sp1_user_guide-39-320.jpg)


![42
Storyboard Pro 2 User Guide
Camera View
The Camera view is the centre of operations in Storyboard Pro. It is in this view that you will build, draw, paint, animate the camera, create layer paths and see your results.
The Camera view has an optional status bar at the bottom. This toolbar is not displayed by default, you can display it through the preferences panel.
To display the Status Bar:
1.Open the Preferences Panel:
Select File > Preferences (Windows) or Storyboard Pro > Preferences (Mac OS X).
You can also use the default keyboard shortcut [Ctrl]+[U] (Windows) or []+[U] (Mac OS X).
2.In the Preferences Panel, click on the Camera tab, to display the camera options.
3.In the Options section, enable the Show Status Bar option.
123456781791011141513181612
1.Thumbnail Mode2.Grid3.Safety4.4:3 Safety5.4:3 Area6.Camera Mask7.Camera Label8.Complete Camera Path9.Reset View10.Reset Rotation11.Point of View Drop-down Menu12.Zoom13.Zoom Slider14.Layer Name15.Tool Name16.Color Picker17.Camera Space18.Layer Tabs](https://image.slidesharecdn.com/storyboardpro2sp1userguide-141107045119-conversion-gate01/85/Storyboard-pro-2_sp1_user_guide-44-320.jpg)
![Chapter 3: Discovering the Interface User Interface
43
Thumbnail Mode
The Thumbnail mode switches the Camera view display to the same view mode as in the Thumbnails view. When the Camera view display is set to Thumbnail mode, it is not possible to draw or edit the drawing in any way.
Grid
You can choose to display a grid that appears in the Camera view. The default grid will be a standard 12 field animation grid, but you can choose another.
You can also access this feature from the top menu by selecting View > Grid > Show Grid, the default keyboard shortcut is [Ctrl]+[G] (Windows) or []+[G] (Mac OS X).
Refer to the Drawing chapter to learn more about the grid options.
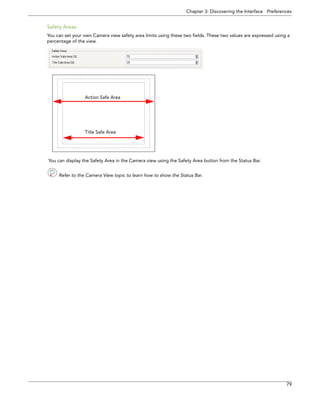
Safety
The Safe Area button shows or hides the TV safety zone and the centre of the camera frame. The Safe Area will adapt to the scene resolution as well as the safety zone and frame’s centre.
You can also access this feature from the top menu by selecting View > Grid > Show Safe Area.
You can define your own safety limits in the Preferences Panel.
Refer to the User Interface Preferences - Camera Tab section to learn how.
4:3 Safety
The 4:3 Safety button shows or hides the TV safety zone and the centre of the camera frame for a regular 4:3 resolution. This way, if you are working on a widescreen project, for example, you can easily plan in advance the conversion of your project to a tv format. This way, you can create your project so that it fits both resolutions.
You can also access this feature from the top menu by selecting View > Grid > Show 4:3 Safety.
4:3 Area
The 4:3 Area button shows or hides the 4:3 resolution zone without the centre of the camera frame and TV safety zone.
You can also access this feature from the top menu by selecting View > Grid > Show 4:3 Area.
Camera Mask
The Camera Mask button shows or hides a black mask around the scene’s frame to avoid seeing anything outside the Camera frame. This option is handy when you are setting up the scene. It allows you to see your scene’s composition better. You can also access this feature from the top menu by selecting Play > Camera Mask.](https://image.slidesharecdn.com/storyboardpro2sp1userguide-141107045119-conversion-gate01/85/Storyboard-pro-2_sp1_user_guide-45-320.jpg)
![44
Storyboard Pro 2 User Guide
Camera Label
The Camera Label button shows or hides the IN and OUT indications in the top left corner of the camera frames, on the start and end position of a camera move for the current panel. When the camera tool is selected, the labels switch to alphabetical labels, that clearly show the different camera keyframes.
Refer to the Animatic chapter to learn more about camera moves.
Complete Camera Path
The Complete Camera Path button displays all of the related camera keyframes and paths in a scene. When this button is deactivated, the Camera view only displays keyframes that are contained in a panel.
This option is not available in Camera by Panel Compatibility mode.
Reset View
The Reset View button will reset any panning, zooming or rotation done in the Camera view and return the display to the initial settings. This option is also available from the top menu, select View > Reset View or use the default keyboard shortcut [Shift]+[M].
This option works in conjunction with the Point of View Drop-down Menu. Refer to this section to learn more.
Reset Rotation
The Reset Rotation button will reset any rotation done in the Camera view and return the display to the initial rotation settings. This option is also available from the top menu, select View > Reset Rotation or use the default keyboard shortcut [Shift]+[X].
This option works in conjunction with the Point of View Drop-down Menu. Refer to this section to learn more.](https://image.slidesharecdn.com/storyboardpro2sp1userguide-141107045119-conversion-gate01/85/Storyboard-pro-2_sp1_user_guide-46-320.jpg)
![Chapter 3: Discovering the Interface User Interface
45
Point of View Drop-down Menu
The Point of View Drop-down menu is used to change the Point of View behaviour. This determines at which level the current position of the Camera view (zoom, pan and rotation) is remembered when you are flipping through your panels.
•Project: When this option is selected, the same zoom, pan and rotation value of the Camera view is kept for all the panels of the project.
•Scene: When this option is selected, the same zoom, pan and rotation value of the Camera view is kept only for the panels that are part of the current scene.
•Panel: When this option is selected, every panel of the project has its own zoom, pan and rotation value.
These options are also available from the top menu. Select View > Point of View Mode > Project Level, Scene Level or Panel Level.
The current Point of View mode will also affect the different Reset View commands’ behaviour as they will reset
following the Point of View mode.
Zoom Drop-down Menu
The Zoom Drop-down menu is used to enlarge or reduce the Camera view display. If you want the camera frame size to always match the size of your Camera view, select the Fit to View option. Click on the drop-down arrow and select a zoom level.
You can also use the default keyboard shortcuts [1] to zoom out and [2] to zoom in.
Zoom Slider
The Zoom Slider enlarges or reduces the Camera view display. Drag the slider to the left to zoom out or to the right to zoom in the Camera view.
Drawing Name
The Layer Name field displays the name of the selected layer of the current panel.
Tool Name
The Tool Name field displays the name of the selected tool. If you override a tool using an overriding keyboard shortcut, the tool’s name will be highlighted in red letters.
Refer to the Drawing chapter to learn how to temporarily override a tool.
Coordinates
The Coordinates field shows the coordinates of the cursor while in the Camera view.
Colour Picker
The Colour Picker square displays the name of the current selected colour in the colour view as well as the colour itself. You can double-click in the colour to open the Colour Picker window and select a new colour for this colour pot.
Refer to the Adding Colour chapter to learn more about colours and colour pots.](https://image.slidesharecdn.com/storyboardpro2sp1userguide-141107045119-conversion-gate01/85/Storyboard-pro-2_sp1_user_guide-47-320.jpg)
![46
Storyboard Pro 2 User Guide
Camera Space
This is where you will draw, animate layers and camera moves, as well as preview your storyboard. It is the main space of the default Drawing workspace.
Refer to the following chapters to learn more about the camera space:
•Drawing, on page 125
•Adding Colour, on page 189
•Animatic, on page 243
Thumbnails View
In the default workspace, the Thumbnails view is situated in the bottom part of the user interface. The Thumbnails View displays all the panels of your project in chronological order. You can use this view to navigate through your storyboard, rearrange panels and scenes, and select the panel of your choice as the current panel to be displayed in the Camera view.
By default, as to avoid unwanted changes that could occur with the panel manipulation, it is not possible to draw in the Thumbnails view. You can change this behaviour in the Preferences panel.
To enable drawing in the Thumbnails view:
1.Select Edit > Preferences (Windows) or Storyboard Pro > Preferences (Mac OS X) to open the Preferences panel. You can also use the default keyboard shortcut [Ctrl]+[U] (Windows) or []+[U] (Mac OS X).
2.In the Preferences panel, select the General tab.
3.Under General, disable the Forbid drawing on panel thumbnails option.
By default, the Thumbnail view doesn’t have browsing buttons. But you can change this setting in the Preferences panel.
To display next and previous buttons in the Thumbnail view:
1.Select Edit > Preferences (Windows) or Storyboard Pro > Preferences (Mac OS X) to open the Preferences panel. You can also use the default keyboard shortcut [Ctrl]+[U] (Windows) or []+[U] (Mac OS X).
2.In the Preferences panel, select the Global UI tab.](https://image.slidesharecdn.com/storyboardpro2sp1userguide-141107045119-conversion-gate01/85/Storyboard-pro-2_sp1_user_guide-48-320.jpg)
![Chapter 3: Discovering the Interface User Interface
47
3.Under the Global UI, enable the Display Next and Previous Buttons.
Once this option is activated, your Thumbnails view will have two new buttons on each side.
A second browsing option available is the Keep Current Panel Centred, which centres the current panel in the thumbnail view when it is selected.
To activate the Keep Current Panel Centred option:
1.Select Edit > Preferences (Windows) or Storyboard Pro > Preferences (Mac OS X) to open the Preferences panel. You can also use the default keyboard shortcut [Ctrl]+[U] (Windows) or []+[U] (Mac OS X).
2.In the Preferences panel, select the Global UI tab.
3.Under the Global UI, enable the Keep Current Panel Centred option.
Refer to the Drawing chapter to learn more about drawing your storyboard panels.
Tools Toolbar
The Tools toolbar contains all of the main tools you will use while working in Storyboard Pro. In the default workspace, you will find this toolbar on the left-most side of the interface.
Each tool is explained in detail in the following chapters:
•Drawing, on page 125
•Adding Colour, on page 189
•Animatic, on page 243
Storyboard Toolbar
The Storyboard toolbar contains all of the basic commands related to adding and deleting panels, scenes and transitions.
Each commands is explained in detail in the following chapters:
•Getting Started, on page 15
•Script and Panels, on page 83
•Animatic, on page 243](https://image.slidesharecdn.com/storyboardpro2sp1userguide-141107045119-conversion-gate01/85/Storyboard-pro-2_sp1_user_guide-49-320.jpg)
![48
Storyboard Pro 2 User Guide
Playback Toolbar
Use it to play back your storyboard. When you create an animatic with transitions and sound, you can play it back in real-time in the Camera view to check the timing.
•Click on the Go to First Frame of Selection button to automatically place the playback marker to the beginning of the panel selection. This selection can be one or many panels. In the Timeline view, you can see the red marker positioning itself at the first frame of the first panel of the selection.
•Click on the Play Selection button to play back only a selection of panels. You can also do this from the top menu by selecting Play > Play Selection, or use the default keyboard shortcut [Shift]+[Enter].
•Click on the Play button to start and stop the playback of the storyboard. You can also do this from the top menu by selecting Play > Play.
•Click on the Loop button to repeat your playback. You can also do this from the top menu by selecting Play > Loop.
•Click on the Sound button to enable sound in the playback. You can also do this from the top menu by selecting Play > Play Sound.
•Click on the Camera Preview button to enable dynamic camera movements during playback. You can also do this from the top menu by selecting Play > Camera Preview.
Refer to the Animatic chapter to learn more about timing, camera movements and creating an animatic.
Play Menu 41
Select any of the following from the top menu Play heading:
•First Panel
Use this to select the first storyboard panel and place the playback marker at the beginning of this panel.
•Previous Scene
Use this to select the scene preceding the current one and place the playback marker at the beginning of that scene.
•Previous Panel
Use this to select the panel preceding the current one and place the playback marker at the beginning of this panel. You can also use the keyboard shortcut [A]
•First Frame
Use this to place to playback marker at the first frame and select the first panel of the storyboard. You can also use the keyboard shortcut [Home]
•Previous Frame
Use this to go to the previous frame of the storyboard. You can also use the keyboard shortcut [,]
•Next Frame
Use this to go to the next frame of the storyboard. You can also use the keyboard shortcut [.]
•Last Frame
Use this to place the playback marker at the last frame and select the last panel of the storyboard. You can also use the keyboard shortcut [End]
•Next Panel
Use this to select the panel next to the current one and place the playback marker at the beginning of that panel. You can also use the keyboard shortcut [F]
•Next Scene
Use this to select the scene next to the current one and place the playback marker at the beginning of that scene.
•Last Panel
Use this to select the last panel of the storyboard and place the playback marker at the last frame.](https://image.slidesharecdn.com/storyboardpro2sp1userguide-141107045119-conversion-gate01/85/Storyboard-pro-2_sp1_user_guide-50-320.jpg)


![Chapter 3: Discovering the Interface User Interface
55
Quick Access Menu
Each view has a Quick Access Menu containing recurring actions. This menu is accessed by right-clicking (Windows) or [Ctrl]+click (Mac OS X) anywhere in the view.](https://image.slidesharecdn.com/storyboardpro2sp1userguide-141107045119-conversion-gate01/85/Storyboard-pro-2_sp1_user_guide-57-320.jpg)

![Chapter 3: Discovering the Interface Managing the Views
57
Renaming a View
You can rename a view’s tab temporarily. The new name will remain as long as the views stays open. Once closed and reopened, the tab will display the default name of the selected view.
To rename a view:
1.In the view to rename, click on the Drop-Down View Menu button.
2.Select Rename Tab from the list.
The Rename View Tab dialog box opens.
3.Type a new name for the tab you want to rename in the active text field.
4.Click on OK.
The view tab is renamed.
Closing a View
To close a view:
1.In the view to close, click on the Close View button.
2.If you have several tabs in the same window, hold [Shift] down and click on the Close View button to close all tabs together.](https://image.slidesharecdn.com/storyboardpro2sp1userguide-141107045119-conversion-gate01/85/Storyboard-pro-2_sp1_user_guide-59-320.jpg)


![Chapter 3: Discovering the Interface Managing the Toolbars
61
Toolbar Manager
Some of the toolbars can be customized to contain your favourite tools and options. Use the Toolbar Manager window to organize your different toolbars to suit your working preferences.
These are the toolbars that can be customized:
•Layer toolbar
•Storyboard toolbar
•Navigation toolbar
•Sound toolbar
•Tools toolbar
To customize your toolbars:
1.Right-click (Windows) or [Ctrl]+click (Mac OS X) on any button in the toolbar where you wish to add or subtract a button.
2.From the pop-up menu select Customize.
The Toolbar Manager window opens
3.To add a new icon to your toolbar, select the tool or command from the Available Tools list and click on the Right Arrow button to move it to the Toolbar list.
4.To remove an icon from your toolbar, select the tool or command in the Toolbar list and click on the Left Arrow button to move it to the Available Tools list.](https://image.slidesharecdn.com/storyboardpro2sp1userguide-141107045119-conversion-gate01/85/Storyboard-pro-2_sp1_user_guide-63-320.jpg)
![62
Storyboard Pro 2 User Guide
5.To reorder your icons in your Toolbar, select the command to be moved in the Toolbar list and click on the Up or Down Arrow buttons to move it to the correct location.
6.Click on the OK button when you are finished.
The Tools toolbar can only be customized by changing particular settings in the Preferences.
To enable customizing of the tools toolbar:
1.Open the Preferences Panel:
Select File > Preferences (Windows) or Storyboard Pro > Preferences (Mac OS X).
You can also use the default keyboard shortcut [Ctrl]+[U] (Windows) or []+[U] (Mac OS X).
2.In the Preferences Panel, click the Global UI tab.
3.In the Toolbars section, enable the Flat Tool Toolbar.
4.Click the OK button.
5.To be functional, this option requires a relaunch of Storyboard Pro. Make sure to do so. Once the software is relaunched, you will be able to customize the tools toolbar. You can then follow the previous instructions about customizing toolbars to do the same with the tools toolbar.](https://image.slidesharecdn.com/storyboardpro2sp1userguide-141107045119-conversion-gate01/85/Storyboard-pro-2_sp1_user_guide-64-320.jpg)
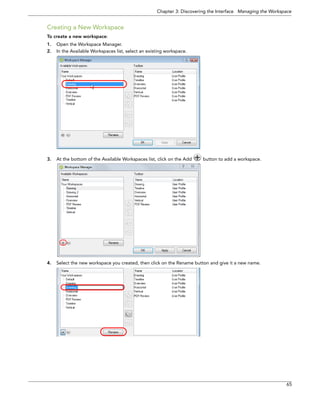
![64
Storyboard Pro 2 User Guide
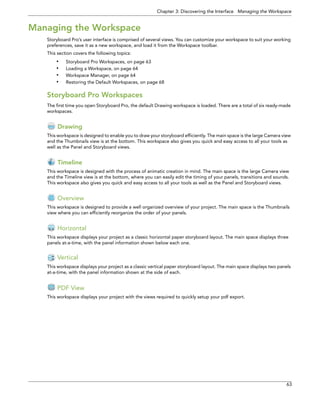
Loading a Workspace
There are four ways to load a workspace in Storyboard Pro
To load a workspace:
•From the View toolbar, click on the button representing the workspace of your choice.
In the View toolbar, you also have a quick access to Zoom In and Zoom Out buttons.
OR
•From the top menu, select Windows > Workspace > Workspace > The desired workspace.
OR
•From the Workspace toolbar, click on the drop-down button and select a workspace from the list.
OR
•Using the keyboard shortcuts [3] to [8] will open the corresponding workspaces, the only exception being PDF Review (there is no shortcut for this option, you must click directly on the menu item).
Workspace Manager
The Workspace Manager allows you to modify, create, delete, rename and reorder you workspaces.
To open the Workspace Manager:
1.In the Workspace toolbar, click on the Workspace Manager button.
2.In the top menu select Windows > Workspace > Workspace Manager.
The Workspace toolbar is not displayed in the default workspace. Before using it, you need to display it.
To display the Workspace toolbar:
Select Windows > Toolbars > Workspace from the top menu.](https://image.slidesharecdn.com/storyboardpro2sp1userguide-141107045119-conversion-gate01/85/Storyboard-pro-2_sp1_user_guide-66-320.jpg)
![66
Storyboard Pro 2 User Guide
5.Select the new workspace and click on the Right Arrow button to send it to the Workspace toolbar.
6.Click on the OK button.
Renaming a Workspace
To rename a workspace:
1.Open the Workspace Manager.
2.Choose the workspace to be renamed from the list.
3.Click on the Rename button. This allows you to edit the name.
4.Type in the new name of the workspace.
5.Press the [Return] key to validate the name.
6.Click on the OK button.
Saving a Workspace
Storyboard Pro automatically saves the changes made to a workspace. This means that when you resize, move around, add or delete views, your workspace will be automatically saved at its current state.
You may also save a workspace manually.
To save a workspace manually:
Select Windows > Workspace > Save Workspace from the top menu.
Save your workspace as a new version to avoid over-writing the current one.
To save your workspace as a new version:
1.Select Windows > Workspace > Save Workspace As.
The Save Workspace As dialog box opens.
2.In the text field, enter the new workspace name.
3.Click on the OK button to validate.](https://image.slidesharecdn.com/storyboardpro2sp1userguide-141107045119-conversion-gate01/85/Storyboard-pro-2_sp1_user_guide-68-320.jpg)


![Chapter 3: Discovering the Interface Interface Navigation
69
Interface Navigation
Storyboard Pro supports Zoom In, Zoom Out, Rotate, Pan and Reset View Position for easy interface navigation.
•Zoom In: Zooms into the view. Use the keyboard shortcut [2] or from the top menu,
select View > Zoom In.
•Zoom Out: Zooms out of the view. Use the keyboard shortcut [1] or from the top menu,
select View > Zoom Out.
•To Zoom In and Zoom Out: Hold down [Spacebar] and your middle mouse button while moving the mouse up or down.
•To Pan the view: Hold down the keyboard shortcut [Spacebar] and drag your mouse in the direction you want to pan the view.
•Reset View: Resets the view to its default position. Use the keyboard shortcut [Shift]+[M] or from the top menu, select View > Reset View.
•Reset View to Default Drawing Area: Resets the Camera view to show the default drawing area, which is the space situated inside the default camera frame (before the camera is modified).
Select View > Reset > Reset View to Default Drawing Area.
•Reset View to Camera Overview: Resets the Camera view to show an overview of the Camera frames. If a Camera movement was created in the selected panel, it will show the entire space within the camera movement.
Select View > Reset > Reset View to Camera Overview.
This option is only available when the Point of View Mode is set to the Scene or Panel level. Refer to the Point of
View Drop-down Menu to learn how to set the Point of View Mode.
•Reset View to Start Camera: Resets the Camera view to focus on the starting camera position of the camera movement on the current panel.
Select View > Reset > Reset View to Start Camera. This option is only available when the Point of View Mode is set to the Scene or Panel level. Refer to the Point of
View Drop-down Menu to learn how to set the Point of View Mode.
•Reset View to End Camera: Resets the Camera view to focus on the ending camera position of the camera movement on the current panel.
Select View > Reset > Reset View to End Camera.
This option is only available when the Point of View Mode is set to the Scene or Panel level. Refer to the Point of
View Drop-down Menu to learn how to set the Point of View Mode.
•Reset Rotation: Resets the view’s rotation to its default position. Use the keyboard shortcut [Shift]+[X] or from the top menu, select View > Reset Rotation.
•Reset Pan: Resets the view’s pan to its default position. Use the keyboard shortcut [Shift]+[N] or from the top menu, select View > Reset Pan.
•Reset Zoom: Resets the view’s zoom to its default position. Use the keyboard shortcut [Shift]+[Z] or from the top menu, select View > Reset Zoom.
•Rotate CW: Rotates the Camera View clockwise, like an animation table. Use the keyboard shortcut [V] or from the top menu, select View > Rotate View CW.
•Rotate CCW: Rotates the Camera View counter-clockwise, like an animation table. Use the keyboard shortcut [C] or from the top menu, select View > Rotate View CCW.
•Toggle Full Screen: Maximizes the application on your screen space. Use the keyboard shortcut [Ctrl]+[F] (Windows) or []+[F] (Mac OS X) once to make the application go full screen, click again to resolve to normal view. You can also use View > Toggle Full Screen from the top menu.](https://image.slidesharecdn.com/storyboardpro2sp1userguide-141107045119-conversion-gate01/85/Storyboard-pro-2_sp1_user_guide-71-320.jpg)
![Chapter 3: Discovering the Interface Preferences
71
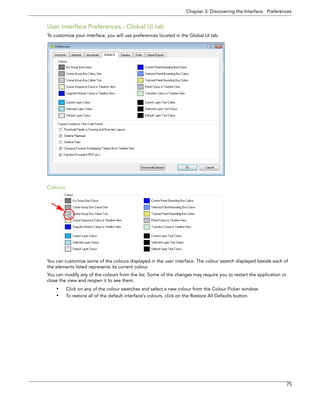
Preferences
An important feature of Toon Boom Storyboard Pro is the Preferences panel. From here you can customize your interface, tools behaviour and shortcuts. Throughout this guide, you are often required to go to the Preferences panel to set parameters and options.
In this section you will learn how to access the Preferences panel and also find a general description of its functionality.
To learn about the different preferences available, refer to the next chapters:
This section covers the following topics:
•Preference Highlights, on page 71
•Keyboard Shortcuts, on page 80
Preference Highlights
You can set up your preferences in the Preferences panel. You will learn about them as you read through this guide.
The Preferences panel is divided into the following tabbed sections:
•Shortcuts
•General
•Advanced
•Global UI
•Camera
•Tools
•Import/Export
Some preferences require you to exit and restart the application or to close a view and reopen it before changes
are applied.
Accessing the Preferences Panel
To access the Preferences panel:
1.In the top menu, select Edit > Preferences (Windows) or Storyboard Pro > Preferences (Mac OS X). You can also use the default keyboard shortcut [Ctrl]+[U] (Windows) or []+[U] (Mac OS X).](https://image.slidesharecdn.com/storyboardpro2sp1userguide-141107045119-conversion-gate01/85/Storyboard-pro-2_sp1_user_guide-73-320.jpg)

![Chapter 3: Discovering the Interface Preferences
73
Focus On Mouse Enter
The Focus On Mouse Enter preference is disabled by default.
In Storyboard Pro, for the operations or keyboard shortcuts to work in the view in which you are working, the focus must be in that view. When the focus is on a particular view, a red rectangle appears around its frame. You must click in the view or on the view’s header for the focus to be done.
If you enable the Focus on Mouse Enter preference, you will not need to click in the view to get the focus. It will be done as soon as your mouse enters the view.
This preference does not require you to restart the application.
NOTE:
If you enable the Focus On Mouse Enter preference, certain operations from the top menu may not be available since the view focus may change as you make your way to the top menu. In this case use keyboard shortcuts and quick access menus (right-click menus (Windows) or [Ctrl]+click menus (Mac OS X)).
Terminology Style
By default, Storyboard Pro is set on Animation terminology style. This means it will use the word Scene as opposed to Shot which is more commonly used in Live-Action projects. You can change this preference so that the project and interface uses Live-Action terminology.
To switch between terminology styles:
Enable Live-Action to use Shot.
Enable Animation to use Scene.
This guide is written using the Animation terminology style. Some command names will differ when using Live
Action terminology, as the user interface will use the concept of Shots rather than Scenes.](https://image.slidesharecdn.com/storyboardpro2sp1userguide-141107045119-conversion-gate01/85/Storyboard-pro-2_sp1_user_guide-75-320.jpg)


![80
Storyboard Pro 2 User Guide
Keyboard Shortcuts
To speed up your work, all of Toon Boom Storyboard Pro’s keyboard shortcuts can be customized and you can even choose other software keyboard shortcut sets.
This section covers the following topics:
•Selecting a Keyboard Shortcut Set, on page 80
•Customizing a Keyboard Shortcut, on page 80
Selecting a Keyboard Shortcut Set
In Storyboard Pro, you can choose a set of default keyboard shortcuts you are familiar with. You can choose between the following:
•Toon Boom Storyboard Pro (Default)
•Toon Boom Harmony
To switch keyboard shortcut sets:
1.Open the Preferences panel.
Use the default keyboard shortcut [Ctrl]+[U] (Windows) or []+[U] (Mac OS X).
2.In the Preferences panel, go to the Shortcuts tab.
3.In the Shortcut Set drop-down menu, select the desired set.
Customizing a Keyboard Shortcut
You can also customize most of the shortcuts by opening the Preferences panel and going to the Shortcuts tab.
To set a shortcut:
1.Open the Preferences panel.
Use the default keyboard shortcut [Ctrl]+[U] (Windows) or []+[U] (Mac OS X).
2.In the Preferences panel, go to the Shortcuts tab.
3.In the left window, select the command to modify.
4.Click on the shortcut rectangle (above the right window).
5.On your keyboard, click on the desired shortcut.
To reset a command’s default keyboard shortcut, click on the Default button.
To remove any keyboard shortcut associated to a command, click on the Clear button.
Clears the current keyboard shortcut. Current keyboard shortcut. Resets the keyboard shortcut to its default value.](https://image.slidesharecdn.com/storyboardpro2sp1userguide-141107045119-conversion-gate01/85/Storyboard-pro-2_sp1_user_guide-82-320.jpg)


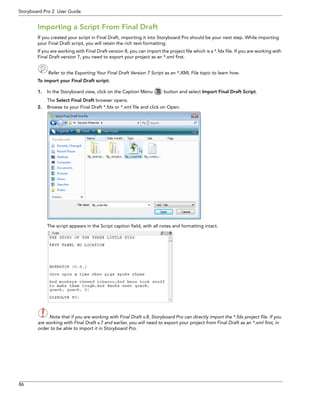
![Chapter 4: Script and Panels Importing a Script
87
Exporting Your Final Draft Version 7 Script as an *.XML File
Here is a simple step by step to help you export your Final Draft *.fdr project to an *.xml file using Final Draft Tagger in version 7.
To export a Final Draft version 7 script as an *.xml file:
1.Start the Final Draft Tagger software.
2.Select File > Import Script, the keyboard shortcut is [Ctrl]+[I].
The Import dialog box opens.
3.In the browser, select your script file and click on the Open button.
Your script will appear in Final Draft Tagger.
4.Select File > Export to XML.
5.Close the Final Draft Tagger application.](https://image.slidesharecdn.com/storyboardpro2sp1userguide-141107045119-conversion-gate01/85/Storyboard-pro-2_sp1_user_guide-89-320.jpg)

![Chapter 4: Script and Panels Captions
89
Panel Captions
There are several fields which are collectively known as Panel Captions, these are the default names:
•Dialogue
Type or copy/paste dialogue character dialogue into this field.
•Action Notes
Type or copy/paste notes related to the action occurring in the scene into this field.
•Slugging
Add notes referring to the timing of the storyboard. Slugging is the timing of the individual recorded lines of dialogue against the board.
•Notes
Add general notes about the panel here.
The caption fields are named by default, you can easily change the name of these fields by clicking on the Caption Menu button and selecting the Rename Caption option. Once you have changed the names of the captions and you are certain that you want to keep these names throughout the project you can set the new names as default by clicking on the Caption menu in the main menu bar and choosing Save Captions Layout as Default.
You can use the Caption Menu button to access the commands related to your caption fields, and the Text
Formatting button to display a toolbar to format your text.
NOTE: When you are editing in the Panel View, pressing the keyboard shortcut [ESC] will bring the focus back on the last view used in the Drawing Workspace. This shortcut might work in other views also.
Refer to the Adding Text to the Panel Captions to learn more.
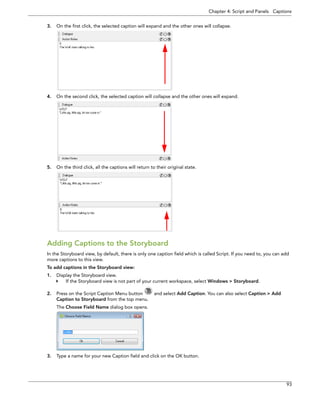
Adding Text to the Panel Captions
There are several ways to add text to a Caption field, and editing it is very easy.
•Drag and Drop Text
•Typing Text
•Formatting Text
•Find Text in Captions
Drag and Drop Text
The quickest and easiest way to add text to your caption fields is to drag and drop it from another one. For example, if you imported your script into the Storyboard view’s Script caption field, you can select the text you need and drop it in the desired panel’s caption field.
To drag and drop text from your imported script:
1.Switch to the Vertical Workspace, click on the Vertical Workspace button or select Windows > Workspace > Workspace > Vertical. This is not mandatary but it provides a good layout for the next steps.
2.In the Thumbnails view, select the panel to which you want to add text to a caption.
3.Display the Storyboard view:
In the Vertical Workspace, the Storyboard view is situated on the right of the screen under the Panel view. Simply click on the Storyboard tab to switch to this view.
If the Storyboard view is not displayed in your workspace, select Windows > Storyboard.](https://image.slidesharecdn.com/storyboardpro2sp1userguide-141107045119-conversion-gate01/85/Storyboard-pro-2_sp1_user_guide-91-320.jpg)

![Chapter 4: Script and Panels Captions
91
2.In the caption of your choice, select the text you want to format.
3.Use the Text Formatting toolbar buttons and options to edit the text.
Font Type:
Choose the font type of your choice from this drop-down menu.
Font Size:
Change the size of the text using this drop-down menu.
Bold:
Click on this button to change the text to bold.
Italic:
Click on this button to change your text to italic.
Underline:
Click on this button to underline your text.
Align Left:
Click on this button to align your text to the left.
Center:
Click on this button to center your text.
Align Right:
Click on this button to align your text to the right.
Justify:
Click on this button to justify your text.
Colour:
Click on this button to open the Select Colour dialog box and choose a new colour for your text.
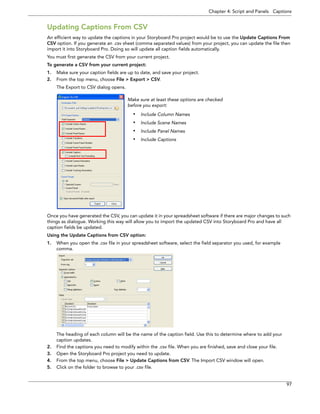
Find Text in Captions
You can search captions to find a specific part of your text. This can become very handy when you have a large amount of captions and text in your project.
To find text in captions:
1.In the Panel or Storyboard view, select any caption field.
2.Click on the Caption Menu button and select Find Text in Captions. You can also select Caption > Find Text in Captions from the top menu or use the default keyboard shortcut [Ctrl]+[Shift]+[F] (Windows) or []+[Shift]+[F] (Mac OS X).
The Find Text in Captions dialog box opens.](https://image.slidesharecdn.com/storyboardpro2sp1userguide-141107045119-conversion-gate01/85/Storyboard-pro-2_sp1_user_guide-93-320.jpg)


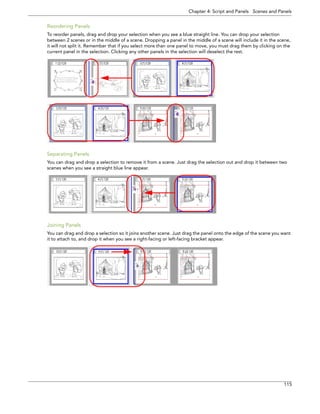
![Chapter 4: Script and Panels Scenes and Panels
103
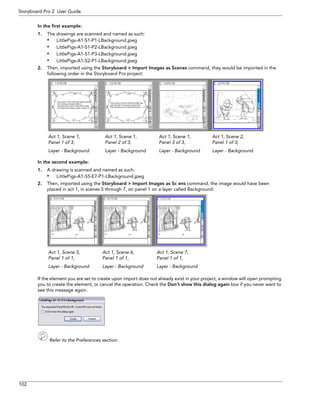
If the element you are set to create upon import does already exist in your project, a window will open prompting you to remove the original element, or keep it. Check off the Don’t show this dialog again box if you never want to see this message again.
Refer to the Preferences section for more information regarding this.
Deleting Scenes
If you have one or more scenes that you need to remove, you can easily do so.
To delete one scene:
1.In the Thumbnails view, select the scene you need to delete.
2.Select Storyboard > Delete Scene from the top menu or use the default keyboard shortcut [Delete].
The selected scene is deleted from your storyboard.
The Delete Scene command will only delete one scene at a time.
Note: When a scene is deleted, or a new scene is inserted between two pre-existing scenes, you will notice the
numbering of the scenes will be out of order. By default, there is no automatic renaming of scenes. You can change
this behaviour in the Preferences Panel.
Refer to the Preferences section to learn more. You can also simply rename the scenes you need to, refer to the
Renaming Scenes section to learn how.
To delete more than one scene at once, you can use the Delete Panel command, or the [Delete] key.
To delete many scenes:
1.In the Thumbnails view, [Shift]+click to select the scenes you need to delete.](https://image.slidesharecdn.com/storyboardpro2sp1userguide-141107045119-conversion-gate01/85/Storyboard-pro-2_sp1_user_guide-105-320.jpg)
![104
Storyboard Pro 2 User Guide
2.In the Storyboard toolbar, click on the Delete Panel button. You can also select Storyboard > Delete Panel from the top menu or use the default keyboard shortcut [Delete].
Renaming Scenes
When you start moving scenes and panels around, you will notice the Rename Scene dialog box automatically opens and prompts you to rename every time. You can also rename selected scenes as needed, using the Rename Scene command or the Panel view.
Renaming Scenes Using the Rename Scene Command
This command will let you rename a selected scene, as well as all the other scenes following it to make sure they are in order.
To rename scenes with the Rename Scene command:
1.In the Thumbnails view, select the scene you want to rename.
2.Select Storyboard > Rename Scene from the top menu.
The Rename Scene dialog box opens.
3.In the New name field, type the new name for the selected scene. You can type either a number or a name. If you type a name or a number that is already used by another scene, a warning message will appear.
1234](https://image.slidesharecdn.com/storyboardpro2sp1userguide-141107045119-conversion-gate01/85/Storyboard-pro-2_sp1_user_guide-106-320.jpg)
![Chapter 4: Script and Panels Scenes and Panels
105
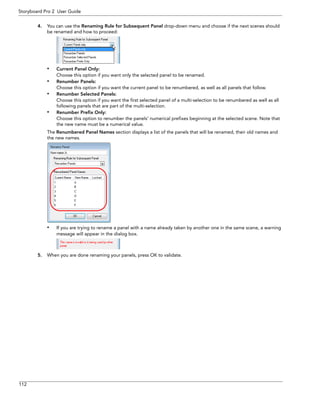
4.You can use the Renaming Rule for Subsequent Scene drop-down menu and choose if the next scenes should be renamed and how to proceed. The Renumbered Scene Names section will display the current and new names for all the scenes that will be affected by the renaming process.
•Current Scene Only:
Choose this option if you want only the selected scene to be renamed.
•Renumber Scenes:
Choose this option if you want the current scene to be renumbered, as well as all the scenes that follow.
•Renumber Selected Scenes:
Choose this option if you want the first selected scene of a multi selection to be renumbered as well as all the following scenes that are part of the multi selection.
•Renumber Prefix Only:
Choose this option to renumber the scenes numerical prefixes beginning at the selected scene. Note that the new name must be a numerical value.
5.Enable the Reset Panel Name option to reset all panel names according to the current panel time automatic increment rule.
Refer to the Preferences section to learn how to define the auto-increment rule.
6.Enable the Do not show this dialog automatically to prevent it from automatically opening every time you move scenes around.
Refer to Show Rename Dialog Automatically in the Preferences section to learn more.
7.Click on the OK button when you are done.
Rename a Scene Using the Panel view
You can rename scenes one at a time using the Panel view.
To rename a scene using the Panel view:
1.In the Thumbnails view, select the scene you want to rename.
2.Display the Panel view. If the Panel view is not part of your current workspace, select Windows > Panel.
3.In the Scene field, type the new name or number for your scene.
4.Press [Enter] to validate.
A warning message appears if the name is invalid or already used by another scene. If this happens, it is recommended to use the rename command and rename all subsequent scenes.
Refer to the Panel Information section to learn more about the Panel view.](https://image.slidesharecdn.com/storyboardpro2sp1userguide-141107045119-conversion-gate01/85/Storyboard-pro-2_sp1_user_guide-107-320.jpg)

![108
Storyboard Pro 2 User Guide
Panels
Your scenes should comprise as many panels as needed to show the actions taking place. With Storyboard Pro, you can easily create different panels for your project.
By default, you can find this information on the top of each panel:
This section contains the following information:
•Creating Panels
•Create Panel Before
•Smart Add Panel
•Renaming Panels
•Deleting Panels
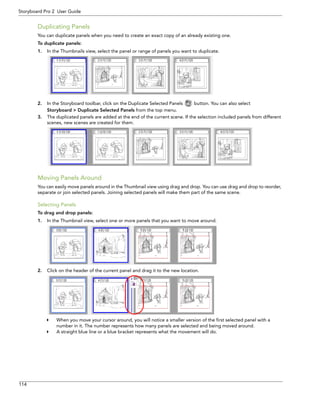
•Duplicating Panels
•Moving Panels Around
Creating Panels
When you are creating a panel, the new panel is added after the current panel.
To create panels:
1.In the Thumbnail view, select a panel of the scene you want to add a panel to.
2.In the Storyboard toolbar, click on the Create Panel button. You can also select Storyboard > Create Panel or use the default keyboard shortcut [P].
A new panel is added to the storyboard, and will be part of the same scene as the current panel.
ABC•A. Scene number. •B. Panel number/Total number of panels in the scene. •C. Duration of the panel in frames. You can also access all of this information in the Panel view.](https://image.slidesharecdn.com/storyboardpro2sp1userguide-141107045119-conversion-gate01/85/Storyboard-pro-2_sp1_user_guide-110-320.jpg)

![110
Storyboard Pro 2 User Guide
4.Click on the OK button.
A new panel will be created next to the selected panel. All layers are copied into the new panel, but only the layers you chose will contain artwork.
Renaming Panels
By default, the rename panels option is locked. You can unlock this option in the preferences panel and allow custom panel name.
Note, unless you enable this preference, you cannot rename panels.
To enable the Allow Custom Panel Name preferences:
1.Open the Preferences Panel:
Select File > Preferences (Windows) or Storyboard Pro > Preferences (Mac OS X).
You can also use the default keyboard shortcut [Ctrl]+[U] (Windows) or []+[U] (Mac OS X).
2.In the Preferences Panel, click on the General tab.
3.In the Naming section, enable the Allow Custom Panel Name option.
4.Click on the OK button.
Once you enable this preference, the Panel name field in the Panel view can be edited.](https://image.slidesharecdn.com/storyboardpro2sp1userguide-141107045119-conversion-gate01/85/Storyboard-pro-2_sp1_user_guide-112-320.jpg)
![Chapter 4: Script and Panels Scenes and Panels
111
Renaming Panels Using the Panel View
You can rename one panel at a time using the Panel view.
Refer to the Panel Information section to learn more about the Panel view.
To rename a panel from the Panel view:
1.In the Thumbnails view, select the panel you want to rename.
2.Display the Panel view.
If the Panel view is not part of your current workspace, select Windows > Panel.
3.In the Panel view, type a new name in the Panel field and press [Enter] to validate.
The panel will be renamed.
You can rename one or more panels simultaneously using the Rename Panel command.
Renaming Panels Using the Rename Panels Command
To rename panels using the Rename Panels command:
1.In the Thumbnails view, select the panel you want to rename.
2.Select Storyboard > Rename Panel from the top menu.
The Rename Panel dialog box opens.
3.Type a new name in the New name field.](https://image.slidesharecdn.com/storyboardpro2sp1userguide-141107045119-conversion-gate01/85/Storyboard-pro-2_sp1_user_guide-113-320.jpg)
![Chapter 4: Script and Panels Scenes and Panels
113
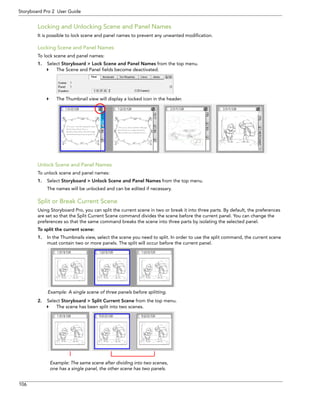
Locking and Unlocking Scene and Panel Names
It is possible to lock scene and panel names to prevent any unwanted modification.
Locking Scene and Panel Names
To lock scene and panel names:
1.Select Storyboard > Lock Scene and Panel Names from the top menu.
The Scene and Panel fields become deactivated.
The Thumbnail view will display a Locked icon in the header.
Unlock Scene and Panel Names
To unlock scene and panel names:
1.Select Storyboard > Unlock Scene and Panel Names from the top menu.
The names will be unlocked and can be edited if necessary.
Deleting Panels
Once you started adding panels, you can also delete some. Note that it is impossible to have an empty project, there is a minimum of one panel.
To delete panels:
1.In the Thumbnails view, select one or more panels you want to delete.
2.In the Storyboard toolbar, click on the Delete Selected Panels button. You can also select
Storyboard > Delete Selected Panels from the top menu or use the default keyboard shortcut [Delete].
The selected panels are deleted from your storyboard.](https://image.slidesharecdn.com/storyboardpro2sp1userguide-141107045119-conversion-gate01/85/Storyboard-pro-2_sp1_user_guide-115-320.jpg)

![Chapter 4: Script and Panels Scenes and Panels
117
Acts
An act is a particular section of the story delimited by a particular event or mood.
For example, a story could be constructed in three acts:
•Act 1: The initial situation, character introduction.
•Act 2: The journey.
•Act 3: The resolution.
Like scenes and panels, you can manipulate acts when building your storyboard. In order to be able to add acts to your storyboard, you must first enable the option.
•Enabling Acts
•Starting New Acts
•Joining Selected Acts
Enabling Acts
By default, the acts are disabled, you need to enable them in the Preferences Panel.
To enable acts:
1.Open the Preferences Panel:
Select File > Preferences (Windows) or Storyboard Pro > Preferences (Mac OS X).
You can also use the default keyboard shortcut [Ctrl]+[U] (Windows) or []+[U] (Mac OS X).
2.In the Preferences Panel, click on the General tab.
3.In the Naming section, enable the Enable Acts check box.
4.Click on the OK button.
Once you enabled the preference, you may notice that there is a dark grey rectangle behind all of your panels. An act has been created, encompassing all scenes and panels.
Starting New Acts
Once you have enabled acts in your storyboard project, it indicates that your storyboard is made of a single long act. You need to break it in several smaller acts. To split your project into acts, you need to define the starting panel for each act in your story.
To start new acts:
1.In the Thumbnails view, click on the panel where you want to create a new act.](https://image.slidesharecdn.com/storyboardpro2sp1userguide-141107045119-conversion-gate01/85/Storyboard-pro-2_sp1_user_guide-119-320.jpg)


![120
Storyboard Pro 2 User Guide
Preferences
In Toon Boom Storyboard Pro, there are a series of preferences that are available to customize behaviour and help you set up an efficient workflow.
To open the Preferences Panel:
Windows: Select File > Preferences. You can also use the default keyboard shortcut [Ctrl]+[U].
Mac OS X: Select Storyboard Pro > Preferences. You can also use the default keyboard shortcut []+[U].
General Tab
The preferences related to script and panels editing are principally grouped under the General tab, in the General and Naming sections.
Show Rename Dialog Automatically
This preference is enabled by default. Every time you move scenes around, the Rename Scene dialog box opens prompting you to rename the scenes. To disable this preference and change the behaviour so that existing scenes keep their original name and new scenes will automatically be named, without the Rename Scene dialog box opening.
Refer to the Renaming Scenes topic to learn more about the settings and options of this dialog box.](https://image.slidesharecdn.com/storyboardpro2sp1userguide-141107045119-conversion-gate01/85/Storyboard-pro-2_sp1_user_guide-122-320.jpg)


![126
Storyboard Pro 2 User Guide
How to Draw
As soon as Storyboard Pro is launched, you can start to draw straight away using the default panel.
How to draw:
1.In the Tools toolbar, select the Brush tool, you can also use the default keyboard shortcut [Alt]+[B].
2.In the Timeline or Thumbnails view, click in the first panel.
3.In the Camera view, start drawing.
4.You can change the colour of the Brush in the Colour view, using the default colour palette swatches. Click on the desired colour.
Refer to Adding Colour > Adding a Colour Swatch, on page 192 if you want to use more colours.](https://image.slidesharecdn.com/storyboardpro2sp1userguide-141107045119-conversion-gate01/85/Storyboard-pro-2_sp1_user_guide-128-320.jpg)


![Chapter 5: Drawing Viewing the Final Lines as you Draw
129
Viewing the Final Lines as you Draw
Everything you draw in Storyboard Pro is vector-based. Although, when you draw in the Camera view, you will notice that your lines may be jagged. This is the fast, real-time display called OpenGL. If you prefer to see smooth lines as you draw, you can enable the antialiasing.
Full Scene Antialiasing
The Full Scene antialiasing is generated by your computer’s graphic card. Full Scene Antialiasing is a preference you can turn on and off. By default, the Full Scene Antialiasing preference is disabled.
NOTE: Full Scene Antialiasing parameters are only valid while you work in your scene. The scene will be rendered out to 100% of its resolution regardless of your settings in the Preferences or graphic card panel.
To customize the Full Scene Antialiasing parameters:
NOTE: This procedure requires that if you have a Mac OS you must restart Toon Boom Storyboard Pro AFTER YOU HAVE CHANGED THE PARAMETERS.
1.If you are using Windows, you must enable your graphic card’s antialiasing parameter. Refer to your graphic card manufacturer’s user guide to learn how to do so.
For example, the parameters for an NVIDIA GeForce card may look like this:
2.In Storyboard Pro, select Edit > Preferences (Windows) or Storyboard Pro > Preferences (Mac OS X).
You can also use the default keyboard shortcut [Ctrl]+[U] (Windows) or []+[U] (Mac OS X).
The Preferences dialog box opens.
3.In the Advanced tab, go to the Full Scene Antialiasing section.
Enable check box: Click on the Enable check box to enable or disable the Full Scene Antialiasing.
Number or samples (For Mac OS): If you are using a Mac computer;
You must enter the number of samples you want to be used for the antialiasing process.
The number of samples is basically equivalent to the number of times a pixel will be enlarged to calculate the antialiasing. This technique is called supersampling.
The higher the number of samples, the better the antialiasing quality will be, but the longer it will take to calculate.
Once done, you must restart Toon Boom Storyboard Pro.](https://image.slidesharecdn.com/storyboardpro2sp1userguide-141107045119-conversion-gate01/85/Storyboard-pro-2_sp1_user_guide-131-320.jpg)
![130
Storyboard Pro 2 User Guide
Drawing with the Brush Tool
The Brush tool is pressure sensitive and can create a contour shape which gives a thick and thin line effect, as if the drawing was made with a brush.
To draw with the Brush tool:
1.In the Thumbnails or Timeline view, select the panel where you want to draw.
2.In the Thumbnails or the Camera view, click to select the layer you wish to draw on.
3.In the Tools toolbar, select the Brush tool. You can also use the default keyboard shortcut [Alt]+[B].
4.In the Colour View, click on a colour swatch to select a colour.](https://image.slidesharecdn.com/storyboardpro2sp1userguide-141107045119-conversion-gate01/85/Storyboard-pro-2_sp1_user_guide-132-320.jpg)
![Chapter 5: Drawing Drawing with the Brush Tool
131
5.In the Camera view, start drawing.
Hold [Ctrl] (Windows) or [] (Mac OS X) to force a line to join the end and start of your shape while drawing.
Hold [Shift] to force the brush to draw a straight line at any angle.
Hold [Shift]+[Alt] to force the brush to draw a straight line in 15 degree increments.
NOTE: The last colour you select while using the Brush tool is recalled the next time you select the Brush tool.
Brush Tool Options
When you select the Brush tool, its properties and options appear in the Tool Properties view.
Regular Brush Mode
The Regular Brush tool creates contour lines as you draw, adding each brush lines on top of the last ones.
Draw Behind Mode
The Draw Behind mode is used to paint behind the existing art. By default, when you use this mode, the brush stroke will appear over your work until you release the brush. But if you want to have live preview of your brush stroke in draw behind mode, you need to activate the Realistic Preview option.
The name of the mode will be highlighted in the status bar and the cursor will change, indicating that you are in Draw Behind Mode.
You can create a keyboard shortcut for this feature in the Edit > Preferences > Shortcuts
To activate Realistic Preview:
In the Top Menu, go to View, then selection Realistic Preview.
[Ctrl] (Windows)
[] (Mac OS X)](https://image.slidesharecdn.com/storyboardpro2sp1userguide-141107045119-conversion-gate01/85/Storyboard-pro-2_sp1_user_guide-133-320.jpg)

![134
Storyboard Pro 2 User Guide
To create a Dynamic Brush with multiple drawings:
1.Create drawings on the same layer of multiple panels or multiple layers of the same panel.
2.In the Thumbnails, Timeline or Camera view, [Shift]+click to create a multiple selection of all the layers you want to use to create the Dynamic Brush. If you are creating your brush with panels, [Ctrl]+[Shift]+click (Windows) or [Command]+[Shift]+click (Mac OS) the panels to use to create the Dynamic brush.
3.Click the Add Dynamic Brush button.
4.In the Tool Properties view, move the slider left or right to see the properties of the Dynamic Brush.
Now your new Dynamic Brush will contain all the selected drawings. When you use this brush, you will cycle through the drawings.](https://image.slidesharecdn.com/storyboardpro2sp1userguide-141107045119-conversion-gate01/85/Storyboard-pro-2_sp1_user_guide-136-320.jpg)


![140
Storyboard Pro 2 User Guide
Layer Selection Lock Setting
When using brush presets, it is possible to lock layers so that a brush only works in a specifically assigned layer. For example, if you are using the Rough brush, the brush will only work if a rough layer is included in the panel.
To activate the Enable Brush Preset Layer Selection Lock option:
1.Open the Preferences Panel:
Select File > Preferences (Windows) or Storyboard Pro > Preferences (Mac OS X).
You can also use the default keyboard shortcut [Ctrl]+[U] (Windows) or []+[U] (Mac OS X).
2.In the Preferences Panel, click on the General tab.
3.In the Layers section, enable the Enable Brush Preset Layer Selection Lock option.
4.Click on OK.](https://image.slidesharecdn.com/storyboardpro2sp1userguide-141107045119-conversion-gate01/85/Storyboard-pro-2_sp1_user_guide-142-320.jpg)
![142
Storyboard Pro 2 User Guide
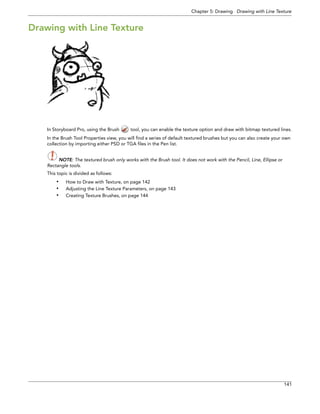
How to Draw with Texture
To draw with textured lines, use the Brush tool and the correct pen in the list.
To draw with textured lines:
1.In the Tools toolbar, select the Brush tool. The default keyboard shortcut is [Alt]+[B].
2.In the Tool Properties view, select a textured brush from the Pen drop-down list.
3.Select the panel and layer you wish to draw in.
4.In the Camera view, start drawing
Refer to the Drawing with the Brush Tool section to learn more about drawing with the Brush tool.](https://image.slidesharecdn.com/storyboardpro2sp1userguide-141107045119-conversion-gate01/85/Storyboard-pro-2_sp1_user_guide-144-320.jpg)

![144
Storyboard Pro 2 User Guide
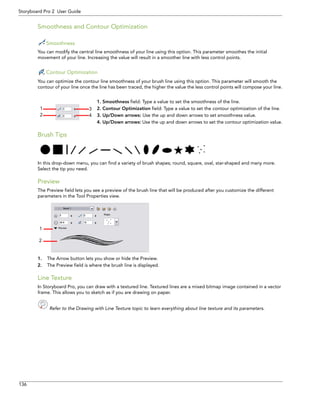
•6. Texture Scale:
The Texture Scale value changes the size of the texture file in the line. If you are using a plaid texture, the squares will be larger if you increase the value and smaller if you decrease it.
Creating Texture Brushes
To create your own texture brush, you must prepare your texture file in a third-party software such as Adobe® Photoshop®. If your image has transparency in it, it will be supported. The texture file must be either a PSD or TGA file.
It is recommended that you maintain your texture resolution between 100 x 100 pixels and 400 x 400 pixels.
To create your own texture brush:
1.In the Tools toolbar, select the Brush tool. The default keyboard shortcut is [Alt]+[B].
2.In the Tool Properties view, click on the New Brush button to add a new brush to your list.
3.In the Texture section, check the Enable Texture option.
4.Click on the Texture File button and browse for your bitmap texture file.
Note: the image colour will not be used, only the pattern in it.
5.In the Camera view, draw some lines and adjust the parameters to fit the style you are looking for.
Note: your pen list will be automatically saved.](https://image.slidesharecdn.com/storyboardpro2sp1userguide-141107045119-conversion-gate01/85/Storyboard-pro-2_sp1_user_guide-146-320.jpg)
![Chapter 5: Drawing Drawing using the Pencil Tool
145
Drawing using the Pencil Tool
The Pencil tool creates a centreline shape of constant width, making a clean line.
To draw with the Pencil tool:
1.In the Thumbnails or Timeline view, select the panel where you want to draw.
2.In the Thumbnails or Camera view, click to select the layer you wish to draw on.
3.In the Tools toolbar, select the Pencil tool, you can also use the default keyboard shortcut [Alt]+[9].
4.In the Colour View, click on a colour swatch to select a colour.](https://image.slidesharecdn.com/storyboardpro2sp1userguide-141107045119-conversion-gate01/85/Storyboard-pro-2_sp1_user_guide-147-320.jpg)
![146
Storyboard Pro 2 User Guide
5.In the Camera view, start drawing.
Hold [Alt] to draw a straight line.
Hold [Ctrl] (Windows) or [] (Mac OS X) to keep a line joining the end and start of your shape while drawing.
NOTE: The last colour which you selected while using the Pencil tool will be remembered the next time you select it.
Pencil Tool Options
When you select the Pencil tool, its properties and options appear in the Tool Properties view.
Draw Behind
The Draw Behind mode is used to paint behind the existing art. By default, when you use this mode, the pencil stroke will appear over your work until you release the brush. But if you want to have live preview of your pencil stroke in draw behind mode, you need to activate the Realistic Preview option.
You can create a keyboard shortcut for this feature in the Edit > Preferences > Shortcuts
To activate Realistic Preview:
In the Top Menu, go to View, then selection Realistic Preview.
Auto-Close Gap
When enabled, the Auto-Close Gap mode will automatically connect with an invisible stroke, the pencil lines you draw close to each other in the Camera view.
[Ctrl] (Windows)
[] (Mac OS X)](https://image.slidesharecdn.com/storyboardpro2sp1userguide-141107045119-conversion-gate01/85/Storyboard-pro-2_sp1_user_guide-148-320.jpg)


![Chapter 5: Drawing Drawing using Invisible Lines
149
Drawing using Invisible Lines
Pencil Tool
Using the Pencil tool, you can draw invisible lines. This can be useful to draw tones and highlights directly on the character.
To draw invisible lines with the Pencil tool:
1.Select the panel and layer where you want to draw.
2.In the Tools toolbar, select the Pencil tool; you can also use the default keyboard shortcut [Alt]+[9].
3.In the Top menu, select View > Show Strokes. The default keyboard shortcut is [K].
4.In the Tool Properties view, set the Pen Style size to “0”. You can also adjust the smoothness.
5.In the Camera view, start drawing.
If you forgot to enable the Show Strokes option before drawing, as soon as you draw a first stroke, a Message dialog box opens.
Enable the Don’t Show This Message Again check box if you don’t want the dialog box to pop up and notify you about the Show Strokes option.
Click on the OK button to close the dialog box.
6.You can modify the stroke shape with the Contour Editor tool.](https://image.slidesharecdn.com/storyboardpro2sp1userguide-141107045119-conversion-gate01/85/Storyboard-pro-2_sp1_user_guide-151-320.jpg)
![150
Storyboard Pro 2 User Guide
Erasing Parts of a Drawing
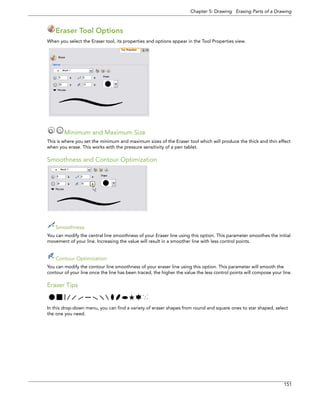
The Eraser tool is pressure sensitive, like the Brush tool, giving you more precision when erasing parts of a drawing.
To erase with the Eraser tool:
1.In the Thumbnails or Timeline view, select the panel where you want to erase.
2.In the Thumbnails or Camera view, click to select the layer you wish to draw on.
3.In the Tools toolbar, select the Eraser tool, you can also use the default keyboard shortcut [Alt]+[E].
4.In the Camera view, start erasing.
You can also use the select tool to select drawing objects and delete them instead of erasing.](https://image.slidesharecdn.com/storyboardpro2sp1userguide-141107045119-conversion-gate01/85/Storyboard-pro-2_sp1_user_guide-152-320.jpg)


![Chapter 5: Drawing Reshaping a Drawing Using the Contour Editor Tool
155
8.To modify the shape, you can:
Pull on the Bezier handle. Both point’s handles will move as one.
Hold [Alt] down and pull on one of the Bezier handles. The point’s handle will move independently from the other one.
Move the selected points to a new area.
Pull directly on the line in-between two points. No selection is necessary. Holding down the [Shift] key will limit the contour modification to the curve between the two first points.
If an anchor point has no visible bezier, hold down the [Alt] key to get them.](https://image.slidesharecdn.com/storyboardpro2sp1userguide-141107045119-conversion-gate01/85/Storyboard-pro-2_sp1_user_guide-157-320.jpg)
![156
Storyboard Pro 2 User Guide
Contour Editor Tool Properties
When you select the Contour Editor tool, its properties and options appear in the Tool Properties view.
Lasso and Marquee
Choose between the Lasso and the Marquee, to change the style of the Select tool.
•Click and hold [Alt] to temporarily switch from the current mode to the other.
Snap to Contour
The Snap to Contour option will snap the selected anchor point to any line you position it on.
The Snap to Contour option will snap the selected anchor point to any line you position it on.
To snap two shapes together:
1.In the Tools toolbar, select the Contour Editor tool.
2.In the Contour Editor Tool Properties view, click on the Snap to Contour button.
3.In the Camera view, click on an anchor point you want to snap to the other shape, drag it on top of the contour line area and release it.
Smooth Selection
The Smooth Selection operation is used to smooth out selected drawing strokes and remove extra points. Smoothing is applied to the entire stroke.](https://image.slidesharecdn.com/storyboardpro2sp1userguide-141107045119-conversion-gate01/85/Storyboard-pro-2_sp1_user_guide-158-320.jpg)
![Chapter 5: Drawing Selecting Drawing Objects
157
Selecting Drawing Objects
The Select tool is used to select drawing strokes in the Camera view, and apply basic transformations such as repositioning, rotating, scaling or skewing, using the different handles of the bounding box.
To select with the Select tool:
1.In the Timeline or Thumbnails view, select the panel and layer where you want to select drawing objects.
2.In the Tools toolbar, select the Select tool, you can also use the default keyboard shortcut [Alt]+[S].
3.In the Camera view, select the drawing objects.
You can select all the drawing objects in a drawing by using the default keyboard shortcut [Ctrl]+[A] on (Windows) or []+[A] on (Mac OS X).
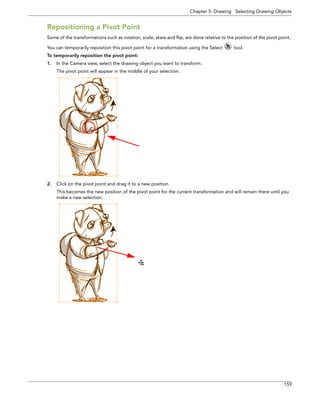
4.To deform or reposition a selection:
To reposition, click on the selected drawing object and drag the selection to a new area.
Holding the [Shift] key while moving the selected drawing object will force the bounding box to move in 15 degree increments.
SkewScaleRotateSkewScalePivot Point](https://image.slidesharecdn.com/storyboardpro2sp1userguide-141107045119-conversion-gate01/85/Storyboard-pro-2_sp1_user_guide-159-320.jpg)
![158
Storyboard Pro 2 User Guide
To rotate the bounding box, rotate the box handle.
To scale, pull or push either on the top, side, bottom or corner control point. Hold down the [Shift] key to lock the selection’s ratio.
To skew, drag sideway or up and down the sides or top and bottom segments, between the control points.](https://image.slidesharecdn.com/storyboardpro2sp1userguide-141107045119-conversion-gate01/85/Storyboard-pro-2_sp1_user_guide-160-320.jpg)
![160
Storyboard Pro 2 User Guide
Select Tool Properties
When you choose the Select tool, its properties and options appear in the Tool Properties view.
Lasso and Marquee
Choose between the Lasso and the Marquee, to change the style of the Select tool.
•Click and hold [Alt] to temporarily switch from the current mode to the other.
Snap Options
You can enable different snapping modes to help you when repositioning your drawings using the Select tool.
Snap to Contour
The Snap to Contour option will snap your selection to any line you position it on.
Snap and Align
The Snap and Align option lets you snap the selected anchor point to any existing line while displaying temporary rulers as a guide that you can also snap your anchor point to.
Refer to the Reshaping a Drawing Using the Contour Editor Tool topic to learn more about the Snap Options
utility.
Select by Colour
Use this option to turn on Select By Colour, which will allow you to rapidly select all drawing parts painted or drawn with the colour you have selected in the Colour view.
Flip Horizontal and Vertical
The Flip Horizontal and Flip Vertical operations flip the current selection Horizontally or Vertically. If no strokes are selected, the layer will be flipped. If you select more than one layer, they will all be flipped individually. You can also](https://image.slidesharecdn.com/storyboardpro2sp1userguide-141107045119-conversion-gate01/85/Storyboard-pro-2_sp1_user_guide-162-320.jpg)
![Chapter 5: Drawing Selecting Drawing Objects
161
use the top menu to flip a selection, select Tools > Flip Selection Horizontally or Flip Selection Vertically or use the default keyboard shortcuts [Alt]+[H] and [Alt]+[V].
Rotate 90 Degrees CW and CCW
Rotate 90 Degrees CW and Rotate 90 Degrees CCW operations rotate the current selection 90 degrees clockwise or counter-clockwise.
Smooth
The Smooth operation is used to smooth out selected drawing strokes and remove extra points.
Flatten
The Flatten operation is used to merge drawing objects and brush strokes into a single layer. If you draw new lines to fix a drawing or a line with many brush strokes, it can be useful to flatten them all into a single shape. By default, lines are drawn one on top of each other, if you intend repainting the lines or modifying their shape, it will be easier if they are flattened.
You can also access this feature through the top menu, by selecting Tools > Flatten or by using the default keyboard shortcut [Alt]+[Shift]+[F].
If you have selected strokes while using the flatten command, only these strokes will be flattened. If no strokes are selected, the entire current layer will be flattened. If you have selected multiple layers, they will all be flattened individually.
Crop Texture on Flatten
When you use the Flatten option in the Tools menu, Storyboard Pro automatically crops all textures, this reduces the drawing size by removing the texture area which is not visible.](https://image.slidesharecdn.com/storyboardpro2sp1userguide-141107045119-conversion-gate01/85/Storyboard-pro-2_sp1_user_guide-163-320.jpg)
![162
Storyboard Pro 2 User Guide
Pencil Selection
Use the Pencil Selection field to resize the selected centreline strokes. This operation is not permitted on contour line shapes such as brush strokes or shape fills.
1.Thickness: Type a value in this field to increase or decrease the thickness of the selected centreline stroke.
2.Up/Down arrows: Use the up and down arrows to modify the value contained in the Thickness value field.
Note that when you select text with the Select tool, the Select Tool Properties will display the Text tool options
on the bottom of the view. You can also use the Text tool keyboard shortcut [Ctrl]+[Shift]+[T] (Windows) or
[]+[Shift]+[T] (Mac OS X).
Refer to Working With Text > Formatting the Text to learn more about the Text Tool Properties.
12](https://image.slidesharecdn.com/storyboardpro2sp1userguide-141107045119-conversion-gate01/85/Storyboard-pro-2_sp1_user_guide-164-320.jpg)
![Chapter 5: Drawing Drawing With Shapes
163
Drawing With Shapes
In Storyboard Pro, you can use the Shape tool to draw with circles, lines and squares. You can also easily reshape a square or circle into a much more complex drawing such as these butterfly wings.
Refer to Reshaping a Drawing Using the Contour Editor Tool topic to learn more about the Contour Editor tool.
To draw with a Shape tool:
1.In the Timeline or Thumbnails view, select the panel and layer where you want to draw.
2.In the Tools toolbar, select a Shape tool.
3.In the Shape Tool Properties view, you can switch between the different shapes mode. Select either the Ellipse or Square tool.
4.In the Camera view, click and drag your mouse to draw the shape.
Hold down [Shift] to lock the rectangle or the ellipse ratio to 1:1.
Hold down [Alt] to draw the rectangle or ellipse from its centre.
Hold down [Shift] to snap the line every 15 degrees.
Hold down [Alt] to snap the starting or end point of the line to a close by stroke.
5.Use the Contour Editor tool to deform your shape and create your drawing.
Refer to the Reshaping a Drawing Using the Contour Editor Tool topic to learn more about using the Contour
Editor to deform a shape.](https://image.slidesharecdn.com/storyboardpro2sp1userguide-141107045119-conversion-gate01/85/Storyboard-pro-2_sp1_user_guide-165-320.jpg)
![164
Storyboard Pro 2 User Guide
Shape Tool Options
When you select the Shape tool, its properties and options appear in the Tool Properties view.
Line, Rectangle and Ellipse
Click on the button corresponding to the shape you want. Click and drag your mouse to draw the selected shape. The Shape tool creates centre lines.
Using the Ellipse or Rectangle option, press [Shift] to create a perfect round or a perfect square and press [Alt] to create the shape from its centre.
Using the Line option, press [Shift] to create a line which snaps-to every 15 degrees and then press [Alt] to connect the start or end point of that line to another nearby line.
Draw Behind
The Draw Behind mode is used to paint behind the existing art. By default, when you use this mode, the shapes will appear over your work until you release the brush. But if you want to have live preview of your shape in draw behind mode, you need to activate the Realistic Preview option.
You can create a keyboard shortcut for this feature in the Edit > Preferences > Shortcuts
To activate Realistic Preview:
In the Top Menu, go to View, then selection Realistic Preview.
Snap options
When drawing a shape, you can enable different snap modes to help you create your shape.
Snap to Contour
The Snap to Contour option snaps your shape to any line you position it on.
Snap and Align
The Snap and Align option snaps the selected anchor point to any existing line, while displaying temporary rulers as a guide that you can also snap your anchor point to.
Refer to the Show Grid topic to learn more about the Grid feature.
Refer to the Reshaping a Drawing Using the Contour Editor Tool topic to learn more about the Snapping options utilities.](https://image.slidesharecdn.com/storyboardpro2sp1userguide-141107045119-conversion-gate01/85/Storyboard-pro-2_sp1_user_guide-166-320.jpg)
![Chapter 5: Drawing Drawing With Shapes
165
Automatic Filling
Use the Automatic Filling option to automatically fill your shape with the selected colour as you draw it. By default the Shape tool creates the contour of an empty shape that you can later fill using the Paint tool.
Refer to Adding Colour > Selecting the Current Colour of a Tool, on page 200 to learn more about selecting a
fill colour.
Auto Flatten Mode
When enabled, the Auto Flatten mode automatically flattens the created shape with the existing artwork in the Drawing or Camera view.
Auto-Close Gap
When enabled, the Auto-Close Gap mode will automatically connect with an invisible stroke, the lines you draw close to each other in the Camera or Drawing view.
Refer to Selecting Drawing Objects to learn how to use the Store Colour Gradient option.
Keep Proportion
When the Ellipse or Square mode is enabled in the Shape tool’s Tool Properties view, the Draw Circle or Draw Square check box appears. When enabling these check boxes, the shape produced will either be a circle or a square. Holding down the [Shift] key as you create your shape will maintain proportion.
Pen Styles
Storyboard Pro provides a variety of pencil styles and allows you to create and save your own. This way, you can create and save pencils with precise sizes and parameters to draw and design. The Pen Styles of the Pen and Shape tools are interconnected.
Selecting a Pen Style
To select a pen style:
1.Click on the arrow button of the Pen Style drop-down menu.
2.Select a pen style from the list.](https://image.slidesharecdn.com/storyboardpro2sp1userguide-141107045119-conversion-gate01/85/Storyboard-pro-2_sp1_user_guide-167-320.jpg)

![Chapter 5: Drawing Deforming a Drawing Using the Perspective Tool
167
Deforming a Drawing Using the Perspective Tool
The Perspective tool is used to deform a drawing selection and alter its perspective.
To deform a drawing with the Perspective tool:
1.In the Tools toolbar, select the Perspective tool.
2.In the Camera view, select the drawing you want to deform.
3.Click and drag the different anchor points to deform the shape.
Perspective Tool Properties
Selecting the Perspective tool, displays its properties and options in the Tool Properties view.
Lasso and Marquee
Select the desired mode between the Lasso and the Marquee, to change the selection style of the Perspective tool.
•Click and hold [Alt] to temporarily switch from the current selected mode to the other.](https://image.slidesharecdn.com/storyboardpro2sp1userguide-141107045119-conversion-gate01/85/Storyboard-pro-2_sp1_user_guide-169-320.jpg)
![168
Storyboard Pro 2 User Guide
Flip Horizontal and Vertical
The Flip Horizontal and Flip Vertical operations flips the current selection Horizontally or Vertically. If no strokes are selected, the layer will be flipped. If you select more than one layer, they will all be flipped individually. You can also use the top menu to flip a selection, select Tools > Flip Selection Horizontally or Flip Selection Vertically or use the default keyboard shortcuts [Alt]+[H] and [Alt]+[V].
Rotate 90 Degrees CW and CCW
The Rotate 90 Degrees CW and Rotate 90 Degrees CCW operations rotate the current selection 90 degrees clockwise or counter-clockwise.](https://image.slidesharecdn.com/storyboardpro2sp1userguide-141107045119-conversion-gate01/85/Storyboard-pro-2_sp1_user_guide-170-320.jpg)
![Chapter 5: Drawing Cutting Drawing Parts
169
Cutting Drawing Parts
The Cutter tool is used to cut a drawing area to move, copy, cut or delete it.
To cut with the Cutter tool:
1.In the Tools toolbar, select the Cutter tool.
2.In the Camera view, trace a selection around the part to cut away.
To delete the selected zone, press [Delete].
To move the selection, click on the selection and drag it to a new area.
Use the bounding box controls to scale, skew or rotate the cut piece.
Resize
Rotate
Skew](https://image.slidesharecdn.com/storyboardpro2sp1userguide-141107045119-conversion-gate01/85/Storyboard-pro-2_sp1_user_guide-171-320.jpg)
![170
Storyboard Pro 2 User Guide
Cutter Tool Options
When you select the Cutter tool, its properties and options appear in the Tool Properties view.
Lasso and Marquee
Select Lasso or Marquee mode to change the selection style of the Cutter tool.
•Click and hold [Alt] to temporarily switch from the selected mode to the other.](https://image.slidesharecdn.com/storyboardpro2sp1userguide-141107045119-conversion-gate01/85/Storyboard-pro-2_sp1_user_guide-172-320.jpg)
![Chapter 5: Drawing Working With Text
171
Working With Text
With the Text tool, you can type text in your project, using various fonts and texts attributes. Text objects are part of a drawing, so you can manipulate them the same way.
This topic is divided as follows:
•Creating Text, on page 171
•Formatting the Text, on page 172
•Resizing the Text Box, on page 174
•Converting Text into Separate Objects, on page 175
Creating Text
To add text to your drawings:
1.In the Tools toolbar, select the Text tool or use the keyboard shortcut [Ctrl]+[Shift]+[T] (Windows) or
[]+[Shift]+[T] (Mac OS X). You can also select it in the top menu under Tools > Text.
2.In the Timeline or Thumbnails view, select the panel and layer containing the drawing you want to add text to.
3.In the Camera view, click on the location you want your text to begin.
4.You can use the Text view to select the font, font size and format the text you will type. To learn more see the next topic Formatting the Text, on page 172.
5.Type in the desired text.
6.Click outside the text box to exit the typing mode.
If you want to create another text object, click outside the currently active text box. You can always return to edit the text by selecting the Text tool and clicking in the text.](https://image.slidesharecdn.com/storyboardpro2sp1userguide-141107045119-conversion-gate01/85/Storyboard-pro-2_sp1_user_guide-173-320.jpg)
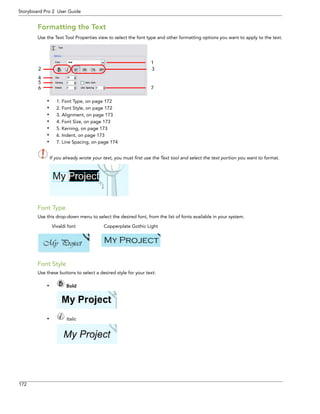


![Chapter 5: Drawing Working With Text
175
Converting Text into Separate Objects
Text contained in a text field is treated as a single drawing object. You can easily separate the text so that each character becomes an individual drawing object that you can select and modify independently.
To break a text object:
1.In the Tools toolbar, click on the Select tool. You can also use the default keyboard shortcut [Alt]+[S].
2.In the Camera view, select the text object you want to break.
3.Right-click on the text and choose Convert > Break Apart Text Layers.
Each character is now surrounded by its own bounding box that you can modify, they remain text objects that you can edit.
4.If you want to convert your independent letter to a complete vector object that you can deform, using the Select tool, select the letters to convert.
5.Right-click on the text and choose Convert > Break Apart Text Layers to break the selection into a regular drawing object, with no more text attributes.](https://image.slidesharecdn.com/storyboardpro2sp1userguide-141107045119-conversion-gate01/85/Storyboard-pro-2_sp1_user_guide-177-320.jpg)
![176
Storyboard Pro 2 User Guide
Override Tool
The Override Tool feature allows you to increase productivity by rapidly switching between tools used for short tasks and your previous tool.
Most drawing tool shortcuts are accessed using the [Alt] key followed by another key, such as the Eraser tool which is accessed by pressing [Alt]+[E]. If you are drawing with the Brush tool and need to briefly switch to the Eraser before continuing, hold down the [E] key while you are erasing. Once done, release [E] to return to the previous tool, in this case, the Brush.
You can do the same for most drawing tools that have a shortcut comprised of [Alt] followed by another key.
Selected tool
Override tool](https://image.slidesharecdn.com/storyboardpro2sp1userguide-141107045119-conversion-gate01/85/Storyboard-pro-2_sp1_user_guide-178-320.jpg)
![Chapter 5: Drawing Onion Skin
177
Onion Skin
With onion skinning in Storyboard Pro, you can display the drawings from previous panels in the current panel so you can see where to place the drawings for the next panel. You can also display drawings from next panels in the current panel so you can see where to place the drawings for the previous panel. You can use these drawings as a reference to determine the size, angle or position of the drawing in the current panel.
By default, the previous drawings will appear with a shade of red and the next drawings will be displayed with a shade of green but you can change the display options in the Preferences panel.
Refer to the Drawing Preferences topic to learn about the Onion Skin preferences.
To use the Onion Skin feature:
1.Enable the Onion Skin feature:
In the Onion Skin toolbar, click on the Show Onion Skin button.
In the Camera view, right-click and choose Onion Skin > Show Onion Skin
You can also use the default keyboard shortcut [Alt]+[O] (Windows) or []+[Alt]+[O] (Mac OS X) or from the top menu, select View > Onion Skin > Show Onion Skin.
2.By default, the Onion Skin settings are set to 1 previous and 1 next drawing, but it is possible to select the number of previous and next drawings you want to show:
Select View > Onion Skin > No Previous Drawing
Select View > Onion Skin > Previous Drawing
Select View > Onion Skin > Previous Two Drawings
Select View > Onion Skin > Previous Three Drawings
Select View > Onion Skin > No Next Drawing
Select View > Onion Skin > Next Drawing
Select View > Onion Skin > Next Two Drawings
Select View > Onion Skin > Next Three Drawings
3.The previous and next drawings will appear in the Camera view.](https://image.slidesharecdn.com/storyboardpro2sp1userguide-141107045119-conversion-gate01/85/Storyboard-pro-2_sp1_user_guide-179-320.jpg)


![Chapter 5: Drawing More Drawing Tools
181
Show Grid
Use the Show Grid option to display a grid in the Camera view.
• Select View > Grid > Show Grid. You can also press the keyboard shortcut [Ctrl]+[G] (Windows) or []+[G] (Mac OS X).
• Select View > Grid > Square to display a standard square grid.
• Select View > Grid > 12 Field Grid to display a 12 field size grid.
• Select View > Grid > 16 Field Grid to display a 16 field size grid.
• Select View > Grid > Underlay to display the grid behind the drawing elements.
• Select View > Grid > Overlay to display the grid over the drawing elements.
•Select View > Grid > Grid Outline Only to display only the contour of the grid.
You can also turn on the Grid via the Camera view Status Bar.
Group/Ungroup
Use the Group option to group selected drawing objects. This can help in the selection, repositioning, re-scaling and other transformations to be applied to multiple objects of a drawing.
•With your drawing elements selected, in the Camera view choose Right-click > Group > Group
or Right-click > Group > Ungroup.
Hand
Use the Hand tool to pan through the Camera view.
•In the Tools toolbar, select the Hand tool, click in the Camera view and drag your cursor. You can also select the Hand tool from the top menu, select Tools > Pan.
•You can also Hold down the keyboard shortcut [Spacebar], click in the Camera view and move your mouse in the direction you want to pan the view.](https://image.slidesharecdn.com/storyboardpro2sp1userguide-141107045119-conversion-gate01/85/Storyboard-pro-2_sp1_user_guide-183-320.jpg)
![182
Storyboard Pro 2 User Guide
Rotate View
Use the Rotate View tool to rotate the Camera view, the same way as you would do with a real animation disc.
•From the Tools toolbar select Rotate View.
•You can also hold down the keyboard shortcut [Ctrl]+[Alt] (Windows)
or []+[Alt] (Mac OS X).
You can also use the menu options to rotate the Camera view in 90 degree increments.
1.From the top menu choose View > Rotate view CW for Clockwise or View > Rotate view CCW for counterclockwise.](https://image.slidesharecdn.com/storyboardpro2sp1userguide-141107045119-conversion-gate01/85/Storyboard-pro-2_sp1_user_guide-184-320.jpg)
![Chapter 5: Drawing More Drawing Tools
183
Zoom
Use the Zoom tool to zoom in and zoom out in the Camera view.
•The default keyboard shortcut is [1] for zoom in and [2] for zoom out.
•When the Zoom In mode is selected, hold [Alt] as you click to zoom out.
Zoom Tool Properties
When you select the Zoom tool, its properties are displayed in the Tool Properties view.
Zoom In
Enable the Zoom In mode in the Options field to zoom in when using the Zoom tool.
Zoom Out
Enable the Zoom Out mode in the Options field to zoom out when using the Zoom tool.
Perform Zoom In
Use the Zoom In operation to perform a Zoom in the Camera.
•The default keyboard shortcut is [1].
Perform Zoom Out
Use the Zoom Out operation to perform a Zoom out in the Camera or Drawing view.
•The default keyboard shortcut is [2].
Reset Zoom
Use the Reset Zoom operation to restore the current zoom level to 100%.
•You can also use the default keyboard shortcut [Shift]+[Z].
Reset View
The Reset View restores the original display by resetting pan, rotation or zoom actions.](https://image.slidesharecdn.com/storyboardpro2sp1userguide-141107045119-conversion-gate01/85/Storyboard-pro-2_sp1_user_guide-185-320.jpg)
![184
Storyboard Pro 2 User Guide
Drawing Preferences
When drawing or animating traditionally in Storyboard Pro, there are preferences you can set to help you work more efficiently.
To open the Preferences panel:
Windows: Select Edit > Preferences.
Mac OS X: Select Storyboard Pro > Preferences.
You can also use the default keyboard shortcut [Ctrl]+[U] (Windows) or []+[U] (Mac OS X).
This topic is divided as follows:
•Advanced Preferences Tab, on page 184
•Camera Preferences Tab, on page 186
•Tools, on page 187
Advanced Preferences Tab
These are the preferences you will find in the Advanced tab:
Memory
•Loaded Drawing Limit: When you work with Toon Boom Storyboard Pro, the OpenGL drawing are loaded in the cache to optimize the display and playback. If you want to reduce or increase the amount of drawings loaded in your cache, you can change the value in the field. The default value is 50.](https://image.slidesharecdn.com/storyboardpro2sp1userguide-141107045119-conversion-gate01/85/Storyboard-pro-2_sp1_user_guide-186-320.jpg)

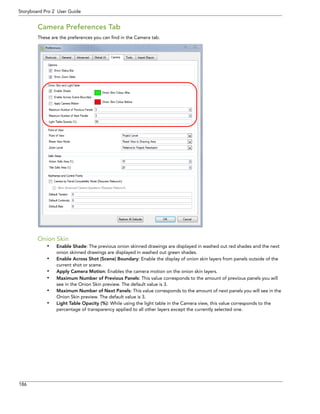
![Chapter 5: Drawing Drawing Preferences
187
Tools
These are the preferences you can find in the Tools tab.
Drawing
•Stroke Texture Quality: Specify a texture quality value between very low and very high for the brush stroke, or accept the default value of low.
•Use Lasso Selection as Default: When turned on, the selection tool is a lasso and a rectangular marquee when [Alt] is pressed. When turned off, the selection tool is a rectangular marquee and a lasso when [Alt] is pressed.
•Synchronize Eraser and Brush Selection: When turned on, this option syncs the brush and eraser so they are the same size. This option is set to on by default.
•Auto-Gap Closing: Specify the initial default setting for automatically closing gaps as you paint. Select from the following tolerance levels:
0 - disabled
1 - small gap
2 - medium gap
3 - large gap](https://image.slidesharecdn.com/storyboardpro2sp1userguide-141107045119-conversion-gate01/85/Storyboard-pro-2_sp1_user_guide-189-320.jpg)


![190
Storyboard Pro 2 User Guide
How to Paint
Learn how to paint your drawings by following these instructions.
To paint your drawings:
1.In the Tools toolbar, select the Paint tool. The default keyboard shortcut is [Alt]+[I]. You can also select the Paint tool using Tools > Paint in the top menu.
2.In the Colour view, select a colour from the palette.
3.In the Camera view, start painting the colours on your drawing by clicking in the area to be painted.](https://image.slidesharecdn.com/storyboardpro2sp1userguide-141107045119-conversion-gate01/85/Storyboard-pro-2_sp1_user_guide-192-320.jpg)


![198
Storyboard Pro 2 User Guide
Deleting a Colour Swatch
To delete a colour swatch:
1.In the Colour view, select the colour swatches to delete.
2.In the Colour View menu, select Delete. You can also click on the Delete Colour button. The default keyboard shortcut is [Delete].
Copying and Pasting Colours
When you are painting your storyboards, you may want to copy colour swatches to save time.
To copy and paste colours:
1.In the Colour view, click to select the colour to copy.
2.In the Colour View menu, select Copy. The default keyboard shortcut is [Ctrl]+[C] (Windows) or []+[C] (Mac OS X).
3.In the Colour View menu, select Paste as New Colours. The default keyboard shortcut is
[Ctrl]+[V] (Windows) or []+[V] (Mac OS X).
If you want to paste the colour values of the copied swatch over an existing colour swatch,
select Paste Colour Values.](https://image.slidesharecdn.com/storyboardpro2sp1userguide-141107045119-conversion-gate01/85/Storyboard-pro-2_sp1_user_guide-200-320.jpg)


![202
Storyboard Pro 2 User Guide
Painting Using the Paint Tool
The main tool you will use to paint your drawings is the Paint tool. The Paint tool can be used in several different modes, these can be customized in the Tool Properties view.
The Paint tool only paints closed zones. If you have gaps in your lines, you will have to close them using either the Brush, Pencil, or Close Gap tools.
To paint with the Paint tool:
1.In the Timeline or Thumbnails view, select the panel and layer where you want to paint.
2.In the Tools toolbar, click on the Paint tool. The default keyboard shortcut is [Alt]+[I]. You can also select the Paint tool in the top menu under Tools > Paint.
3.In the Colour view, select a colour.
4.In the Camera view, start painting. You can either point and click to paint a zone or trace a lasso or marquee selection to paint several zones at once.
NOTE:
The last colour you select while using the Paint tool will be remembered the next time you select the Paint tool.](https://image.slidesharecdn.com/storyboardpro2sp1userguide-141107045119-conversion-gate01/85/Storyboard-pro-2_sp1_user_guide-204-320.jpg)
![Chapter 6: Adding Colour Painting Using the Paint Tool
203
Paint Tool Properties
When you select the Paint tool, its properties and options appear in the Tools Properties view.
Lasso and Marquee
The Lasso and Marquee options let you choose what type of selection the Paint tool will do when you will click and drag your cursor to paint your drawings. The default selection mode is Lasso.
The Marquee option makes a rectangle selection box. Everything inside the selection will be painted according to the painting mode you selected.
The Lasso option lets you draw a custom selection box around the zones to be painted. Everything inside the selection will be painted according to the painting mode you selected.
Hold down the [Alt] key to switch to the opposite mode of your selection.
Painting Mode
The Paint tool has three different modes available:
Paint Mode
Paint Unpainted Mode
Unpaint Mode
You can also find these tools directly in the Tools toolbar and in the Tools menu.
Paint Mode
The Paint mode paints everything it touches, including empty and filled zones.](https://image.slidesharecdn.com/storyboardpro2sp1userguide-141107045119-conversion-gate01/85/Storyboard-pro-2_sp1_user_guide-205-320.jpg)

![Chapter 6: Adding Colour Painting Using the Paint Tool
205
The Automatic Close Gap option is used while painting drawings with small gaps. Instead of having to close them manually either with the Brush tool or Close Gap tool, Storyboard Pro will analyse the drawing and close the gaps while you paint according to the selected mode.
The automated gap closing should be done using the zoom function setting of your Camera view. If your eye does not see the gap, Storyboard Pro won’t either.
Selecting a Colour in a Drawing
While working in your Camera view, you can use the Dropper tool to pick a colour from your drawing without going to the Colour view.
To use the Dropper tool:
1.In the Tools toolbar, select the Dropper tool. The default keyboard shortcut is [Alt]+[D]. You can also select the Dropper tool from Tools > Dropper in the top menu.
2.In the Camera view, click on the desired colour.
If you are using another drawing tool such as the Paint tool, you can temporarily hold down the [D] key and click in your drawing before releasing the key to pick your colour. Once you let go of the hot key, Storyboard Pro will go back to your previous tool.
If the colour you pick is not already in your Colour view, you may get the following warning, prompting you to either add the new colour or not.](https://image.slidesharecdn.com/storyboardpro2sp1userguide-141107045119-conversion-gate01/85/Storyboard-pro-2_sp1_user_guide-207-320.jpg)

![Chapter 6: Adding Colour Editing Gradients and Textures
207
Editing Gradients and Textures
If you paint a zone with a gradient or texture colour you can use the Edit Gradient/Texture tool to modify its position in the zone. You can move, scale, rotate and skew your texture.
To use Edit Gradient/Texture tool:
1.In the Tools toolbar, select the Edit Gradient/Texture tool. You can also select this tool from the top menu under Tools > Edit Gradient/Texture.
2.Click on the Gradient or Texture zone to be modified.
If you want to modify several areas at once, hold down the [Shift] key and click in the zones to be modified.
3.Move the edit texture’s anchor points to the desired result.
If the same modification needs to be applied to another gradient in another drawing or texture zone, you can select the modified zone and select Edit > Copy. Select the zone to be modified in the other drawing and select Edit > Paste.
Linear GradientRadial Gradient
1
2](https://image.slidesharecdn.com/storyboardpro2sp1userguide-141107045119-conversion-gate01/85/Storyboard-pro-2_sp1_user_guide-209-320.jpg)
![208
Storyboard Pro 2 User Guide
Closing Gaps Manually
When painting, you will notice that some of your drawing areas are not closed. To close the zone you can either draw the missing line with the Brush or Pencil tool, but you can also close the gap with an invisible line. To do so, you will use the Close Gap tool.
The Close Gap tool is used to close small gaps in a drawing. The Paint tool only paints closed areas. The Close Gap tool will create a small, invisible stroke between the two closest points to close the colour zone. You do not need to trace directly over the gap. You can draw it a few millimetres away and the Close Gap will automatically choose the two closest points and close the gap.
To use the Close Gap tool:
1.In the Tools toolbar, select the Close Gap tool. You can also select the Close Gap tool from the top menu under Tools > Close Gap.
Enable the Auto Flatten option in the Tool Properties view if you want the stroke you will draw to be flattened in your drawing instead of being on top.
You can display the invisible lines with the Show Strokes option under View > Show Strokes. The default shortcut is [K].
If you do not display the strokes, a Message dialog box will appear.
Enabling the Don’t Show This Message Again option prevents this Message from appearing.
2.In the Camera view, trace an invisible line near to the gap to be closed. The gap will automatically close.](https://image.slidesharecdn.com/storyboardpro2sp1userguide-141107045119-conversion-gate01/85/Storyboard-pro-2_sp1_user_guide-210-320.jpg)
![Chapter 6: Adding Colour Preferences
209
Preferences
Adjusting preferences to suit your techniques allows you to paint your drawings more efficiently.
To open the Preferences panel:
Windows: Select Edit > Preferences.
Mac OS X: Select Storyboard Pro > Preferences.
You can also use the default keyboard shortcut
[Ctrl]+[U] (Windows) or []+[U] (Mac OS X).
In the Preferences panel, you will find the following preferences that are related to adding colours to your project.
Tools
Auto Gap Closing
The values for automatic gap closing while painting drawings are:
•0 = Disabled
•1 = Small
•2 = Medium
•3 = Big](https://image.slidesharecdn.com/storyboardpro2sp1userguide-141107045119-conversion-gate01/85/Storyboard-pro-2_sp1_user_guide-211-320.jpg)


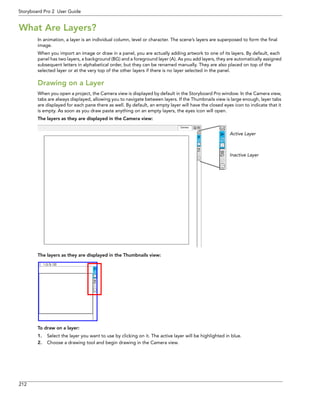
![Chapter 7: Layers Managing Layers
213
Managing Layers
This section will cover all the different ways you can work with layers within your storyboard project.
Adding Layers to a Panel
You can add an unlimited amount of layers to a panel.
To add a drawing layer to a panel:
1.Select the panel to which you want to add a new layer.
2.Do one of the following:
From the top menu, select Layer > Add Layer.
In the Camera or Thumbnails view, right-click in the layer section and select Add Layer.
In the Layer Toolbar, click the Add Layer button.
In the bottom right of the Layers view, click the Add Layer button.
Copying Layers
You can reuse drawings from other panels throughout your storyboard. You can also modify drawing objects and transformations after they’ve been copied to a new layer, rather than redrawing objects that are similar.
To copy a layer to another panel by dragging:
1.Click the tab(s) of the layer(s) you want to copy. You can copy multiple layers simultaneously by holding the [Ctrl] key while you make your selection.
2.Drag the tab you want to copy to the layer section of the destination panel. Drop it on the tabs at a specific position to place it in a specific layer order.
When you copy a layer it retains its original layer name in the new panel. If a layer with the same name already exists, then you will be prompted to give it a new name, or overwrite the existing layer.
For example, if layer A is copied to a panel, where a layer A already exists, the copied layer will be named A_1 by default. If it is copied into the panel a second time, the new layer will be named A_2.](https://image.slidesharecdn.com/storyboardpro2sp1userguide-141107045119-conversion-gate01/85/Storyboard-pro-2_sp1_user_guide-215-320.jpg)
![214
Storyboard Pro 2 User Guide
To copy a layer to another panel by using copy and paste:
1.Click the tab(s) of the layer(s) you want to copy. You can copy multiple layers at one time by holding the [Ctrl] key while you make your selection.
2.Do one of the following:
From the top menu choose Layer > Copy Layers. Then, with the destination panel selected, from the top menu choose Layer > Paste Layers.
Right-click your selection and choose Copy Selected Layers. Then, with the destination panel selected, right click the layers section and choose Paste Layer.
Renaming Layers
Relevant naming can help you to work faster and better keep track of layers.
To bring up the rename layer dialog box:
1.Select the panel with the layer you want to rename.
2.Do one of the following:
Select Layer > Rename Layers.
Right-click the layer’s tab and select Rename Layer.
Double-click on the layer.
Deleting Layers
You can delete the currently selected layer using the Delete Layer command.
To delete a layer from a panel:
1.Select the layer you wish to delete.
2.Do one of the following:
From the top menu select Layer > Delete Layer.
Right-click the layer’s tab and select Delete Layers.
In the Layer Toolbar, click the Delete Layer button.
From the Layers view, select the Delete Layer button.](https://image.slidesharecdn.com/storyboardpro2sp1userguide-141107045119-conversion-gate01/85/Storyboard-pro-2_sp1_user_guide-216-320.jpg)
![Chapter 7: Layers Managing Layers
215
Locking and Unlocking Layers
You can lock the currently selected layer to protect any objects on it from being changed. Once locked, you can unlock the layer to make changes to any objects on it.
To lock or unlock a layer:
1.Select the tab of the layer you want to lock or unlock.
2.Click the lock icon, located directly under the layer name.
Layers that are locked will display a lock icon to show that they’re locked.
Other ways to lock or unlock a layer:
Select Layer > Lock/Unlock Layers.
In the Layer Toolbar, click the Lock/Unlock Layers button.
Use the [Alt]+[L] shortcut.
Showing and Hiding Layers
Working with layers, it may be useful at times to hide certain layers.
To show or hide a layer:
1.Select the tab of the layer you wish to show or hide.
2.Click the show/hide layer icon.
Other ways to show or hide a layer:
Select Layer > Show/Hide Layers.
Right-click the layer tab and choose Show/Hide Layers.
This icon is prominent when a layer has been locked.
When a layer is not visible, the layer visibility icon will be greyed out.](https://image.slidesharecdn.com/storyboardpro2sp1userguide-141107045119-conversion-gate01/85/Storyboard-pro-2_sp1_user_guide-217-320.jpg)

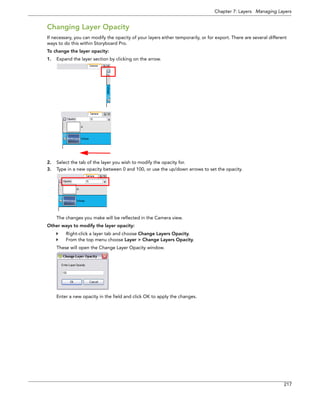


![220
Storyboard Pro 2 User Guide
Importing Images as Layers
As you build your scene, you may want to use bitmap images for backgrounds and overlays. You may also want to import an image as a reference for a vector drawing you want to create. With Toon Boom Storyboard Pro, you can import a variety of bitmap formats (TVG, OPT, PAL, SCAN, SGI, TGA, YUV, OMF, PSD, PNG, JPG, JPE or JPEG) which you can combine with your vector-animated content to create rich and unique graphic styles. You can import a single image (or multiple images located in the same folder) into a new layer.
Toon Boom Storyboard Pro DOES NOT SUPPORT IMPORT OF 8-BIT CMYK OR 16-BIT RGB OR CMYK FORMAT PSD FILES. YOU CAN CURRENTLY IMPORT ONLY 8-BIT RGBA FORMAT PSD FILES.
To import images into the current panel:
1.Select the panel where you want to import the image(s).
2.Select Layer > Import Images as Layers.
The Choose Images Files dialog box opens.
3.Select the image(s) you want to import and press Open to confirm your selection.
To select multiple images, hold down the [Ctrl] key (Windows) or the [Command] key (Mac OSX) as you click.
A layer will be created in your panel, containing the imported image. If you selected more than one image, each image will be imported in alphanumerical order on its own layer.
If you selected a PSD image with multiple layers, a message will appear giving you an option to import each layer separately.
If you click Yes, each layer is imported on its own layer in the panel.
If you click No, a layer will be created behind the existing layers, containing the selected PSD image.](https://image.slidesharecdn.com/storyboardpro2sp1userguide-141107045119-conversion-gate01/85/Storyboard-pro-2_sp1_user_guide-222-320.jpg)

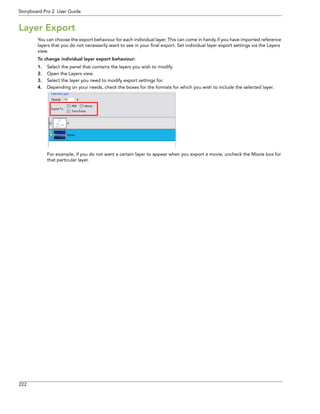
![Chapter 7: Layers Preferences
223
Preferences
You can change the way layers are displayed in Storyboard Pro via the Global UI tab of the Preferences.
To open the Preferences panel:
Windows: Select Edit > Preferences.
Mac OS X: Select Storyboard Pro > Preferences.
You can also use the default keyboard shortcut [Ctrl]+[U] (Windows) or []+[U] (Mac OS X).
Below is the Global UI tab of the Preferences, where you will find the settings to change the way layers look in the software.
•Current Layer Colour: Change the colour of the active layer.
•Selected Layer Colour: Changes the colour of selected layers which are not active.
•Default Layer Colour: Changes the default colour of a layer
•Current Layer Text Colour: Changes the colour of the layer text when the layer is active
•Selected Layer Text Colour: Changes the colour of the layer text when the layer is selected, but not active.
•Default Layer Text Colour: Changes the default colour of the layer text.](https://image.slidesharecdn.com/storyboardpro2sp1userguide-141107045119-conversion-gate01/85/Storyboard-pro-2_sp1_user_guide-225-320.jpg)


![228
Storyboard Pro 2 User Guide
Preview
The Preview window, allows you to preview the contents of a template.
To preview a template:
1.Click on the down arrow button above the Quick Search section to expand the preview section.
2.Double-click on the template you want to preview from the template list. You can also right-click (Windows) or [Ctrl]+click (Mac OS X) on the selected template and select Preview Template.
You can also double-click on a template from the template list while the preview section is collapsed to expand the preview section and preview the selected template at once.
3.When you created a template out of a panel containing a layer motion, click on the Play button or drag the slider to scrub through the panel.](https://image.slidesharecdn.com/storyboardpro2sp1userguide-141107045119-conversion-gate01/85/Storyboard-pro-2_sp1_user_guide-230-320.jpg)
![Chapter 8: Libraries Library View
229
Quick Search
You can use the Quick Search field to rapidly locate a particular template using a keyword contained in the template’s name.
To search for a template:
1.In the Quick Search field, type a word or part of a word contained in the template’s name. You can select a folder in the Library’s List to limit the search to this specific library.
2.Press on the [Enter] key to validate.
The first template found with the keyword you used is being selected and displayed in the right side of the Library view along with the other templates contained in the same folder.
3.Click on the Right Arrow button to find the next template containing the keyword, or on the Left Arrow button to see the previous result.](https://image.slidesharecdn.com/storyboardpro2sp1userguide-141107045119-conversion-gate01/85/Storyboard-pro-2_sp1_user_guide-231-320.jpg)
![230
Storyboard Pro 2 User Guide
Library List
The Library List is used to navigate through the different libraries and subfolders. You can also open, close and create new libraries from here.
The Library has two default Library folders:
•Global
This folder is empty, you can use it to organize your own templates. This Library is automatically shared between different projects. You can organize this library folder using subfolders.
•Templates
This folder contains default templates provided with Storyboard Pro and is stored on your hard drive. The content of this Library is automatically shared between the different projects.
Templates List
The templates contained in the selected Library list can be displayed on the right side of the Library view as thumbnails, in a list or as details.
To access the Template display options:
In the Library view’s right side, right-click (Windows) or [Ctrl]+click (Mac OS X) and select
View > List, Thumbnails or Details.](https://image.slidesharecdn.com/storyboardpro2sp1userguide-141107045119-conversion-gate01/85/Storyboard-pro-2_sp1_user_guide-232-320.jpg)
![Chapter 8: Libraries Structuring the Library
231
Structuring the Library
As you will probably create a large number of templates you will soon realize that they need to be organized. You can create different libraries and subfolders so that you can gain easy access to your assets. For example, create a different library for each project and divide it into several categories, such as:
•Characters
•Props
•Backgrounds
•Panels
•Sound Clips
This topic is divided as follows:
•Creating a Library, on page 231
•Opening a Library, on page 232
•Closing a Library, on page 232
•Creating a Folder, on page 232
•Refreshing the Library, on page 234
Creating a Library
There are two ways to create Library folders.
•Using Storyboard Pro’s interface
•Directly through your operating system
To create a library using your operating system, create a new folder with a relevant name in the location where you want the library to be stored. This can be opened in Storyboard Pro when you require it, see Opening a Library, on page 232 to find out how.
To create a library from Storyboard Pro:
1.In the Library view, right-click (Windows) or [Ctrl]+Click (Mac OS X) in the Library List section and select Open Library from the pop-up menu.
The Browser window opens.
2.Browse for the location where you want to store your new library in your computer.
3.Click on the Make New Folder button.
The new folder appears.
4.Name the new library with a relevant name.](https://image.slidesharecdn.com/storyboardpro2sp1userguide-141107045119-conversion-gate01/85/Storyboard-pro-2_sp1_user_guide-233-320.jpg)
![232
Storyboard Pro 2 User Guide
5.Click on the OK button.
The new library appears in the Library List section.
Opening a Library
You can open any folder on your hard drive or network as a library. Opening a library means linking the folder to your Library view. You only need to open the library once. The library folder is available every time you open the application until you decide to close the library and unlink it.
To open a library:
1.In the Library view, right-click (Windows) or [Ctrl]+Click (Mac OS X) in the Library List section and select Open Library from the pop-up menu.
The Browser window opens.
2.Browse to the location of the library folder.
3.Select the folder.
4.Click on the OK button.
The new library appears in the Library List section.
Closing a Library
You may not always require all of the library folders in the Library List, if this is the case you can close the ones you do not need. Closing it does not delete the folder, it only unlinks it from the Library view. If you want to reopen it later, you only need to locate it on your hard drive or network and open it in the Library view.
To close a library:
1.In the Library view’s right side, select the library folder to close.
2.In the Library View menu, select Folders > Close Library.
The library closes.
Creating a Folder
Template libraries need to be organized. You can create different subfolders on your hard drive or directly in the Library view so that you can gain easy access to your assets.
To create a folder:
1.In the Library view’s left side, select a library folder that you would like to make subfolders for.
2.Right-click (Windows) or [Ctrl]+click (Mac OS X) on the selected library and select New Folder.
The new subfolder is added to the Library (although not immediately visible as it is collapsed in its parent folder). Click on the root library folder containing the new folder and click on the [+] sign to expand it. The new subfolder appears.](https://image.slidesharecdn.com/storyboardpro2sp1userguide-141107045119-conversion-gate01/85/Storyboard-pro-2_sp1_user_guide-234-320.jpg)
![Chapter 8: Libraries Structuring the Library
233
Renaming a Folder
Once you add a folder, you can rename it, this also renames the folder on your hard drive.
To rename a folder:
1.In the Library view’s left side, select the folder to rename.
2.Right-click (Windows) or [Ctrl]+click (Mac OS X) on the selected library and select Rename Folder.
3.Rename the selected folder.
4.Press [Return] to validate the operation.
Deleting a Folder
You can delete a folder from the library if its contents are no longer needed.
WARNING: ALL THE TEMPLATES CONTAINED IN THE FOLDER WILL BE DELETED FROM YOUR HARD DRIVE.
ONCE DELETED THE DATA CAN NOT BE RETRIEVED.
To delete a folder:
1.In the Library view’s left side, select the folder to delete.
2.Right-click (Windows) or [Ctrl]+click (Mac OS X) on the selected library and select Delete Folder. You can also use the default keyboard shortcut [Delete].
A warning dialog box opens.
Click on Yes to delete the folder.
Click on No to cancel.](https://image.slidesharecdn.com/storyboardpro2sp1userguide-141107045119-conversion-gate01/85/Storyboard-pro-2_sp1_user_guide-235-320.jpg)
![234
Storyboard Pro 2 User Guide
Refreshing the Library
If you update the content of your libraries through your operating system, you will need to refresh your library folders in the Library view.
To refresh a library:
1.In the Library view’s left side, right-click (Windows) or [Ctrl]+click (Mac OS X) and select Refresh. You can also use the default keyboard shortcut [F5].
Generating Thumbnails
When you display thumbnails in the Library view, the system generates a series of small images (thumbnails) for you. It is possible to change this behaviour through the General tab in the Preferences panel by un-checking the Automatically Generate Thumbnails in Library option. You can then generate template thumbnails manually.
To generate thumbnails:
1.In the Library view’s right side, select the template you want to generate thumbnails for.
2.Right-click (Windows) or [Ctrl]+click (Mac OS X) and select Generate Thumbnails.
Refer to the Preferences section to learn more about this topic.
Deleting Thumbnails
You can delete the thumbnails files from the Library view.
To delete thumbnails:
In the Library view, right-click (Windows) or [Ctrl]+click (Mac OS X) in the left section and choose Delete
Thumbnails.](https://image.slidesharecdn.com/storyboardpro2sp1userguide-141107045119-conversion-gate01/85/Storyboard-pro-2_sp1_user_guide-236-320.jpg)
![Chapter 8: Libraries Templates
235
Templates
If you want to reuse artwork and layer or camera motions from your project into the same or other projects, you need to create a template out of it. A template can be seen as a portable scene or package that you can drag inside your project.
This topic is divided as follows:
•Creating a Template, on page 235
•Deleting a Template, on page 237
Creating a Template
You can create a template out of many assets of your project. You can create templates from the Camera, Thumbnails or the Timeline view.
Creating a Template from the Camera view
From the Camera view, you can create a template out of a panel’s layer or a selection of layers. Note that if a motion was created on the selected layer, it will be included in the template.
To create a template from the Camera view:
1.In the Library view, select the folder in which you want to store your template.
2.In the Camera view, select one or more layers’ tabs and drag them to the library view’s right section.
3.In the Rename dialog box, rename the new template.
•If you want to rename a template once it is created, right-click (Windows) or [Ctrl]+click (Mac OS X) on it and select Rename.
4.Click on the OK button.](https://image.slidesharecdn.com/storyboardpro2sp1userguide-141107045119-conversion-gate01/85/Storyboard-pro-2_sp1_user_guide-237-320.jpg)
![236
Storyboard Pro 2 User Guide
Creating a Template from the Thumbnails view
From the Thumbnails view, you can create a template from an entire panel. Note that if there is a layer or camera motion in the selected panel, it will be included in the template.
To create a template from the Thumbnail view:
1.In the Library view, select the folder in which you want to store your template.
2.In the Thumbnails view, select a panel and drag it to the library view’s right section.
3.In the Rename dialog box, rename the new template.
•If you want to rename a template once it is created, right-click (Windows) or [Ctrl]+click (Mac OS X) on it and select Rename.
4.Click on the OK button.](https://image.slidesharecdn.com/storyboardpro2sp1userguide-141107045119-conversion-gate01/85/Storyboard-pro-2_sp1_user_guide-238-320.jpg)
![Chapter 8: Libraries Templates
237
Creating a Template from the Timeline view
From the Timeline view, you can create a template out of an entire panel or a sound clip. Note that if there is a layer or camera motion in the selected panel, it will be included in the template.
To create a template from the Timeline view:
1.In the Library view, select the folder in which you want to store your template.
2.In the Timeline view, select a panel or a sound clip and drag it to the library view’s right section.
3.In the Rename dialog box, rename the new template.
•If you want to rename a template once it is created, right-click (Windows) or [Ctrl]+click (Mac OS X) on it and select Rename.
4.Click on the OK button.
Deleting a Template
To delete templates from your library, use the Library view. Storyboard Pro lets you undo the delete action if necessary.
WARNING: DO NOT DELETE THEM USING THE OPERATING SYSTEM BECAUSE YOU WILL NOT BE ABLE TO UNDO YOUR ACTION.
To delete a template:
1.In the Library view, select the templates to delete.
2.Right-click (Windows) or [Ctrl]+click (Mac OS X) on the selection and select Delete. The default keyboard shortcut is [Delete].](https://image.slidesharecdn.com/storyboardpro2sp1userguide-141107045119-conversion-gate01/85/Storyboard-pro-2_sp1_user_guide-239-320.jpg)
![238
Storyboard Pro 2 User Guide
Importing Files as Templates Using the Library View
Using the Library view, you can import several types of file and store them in a library folder as a template. Once you have these new templates, you can use them throughout your storyboard projects just as regular ones.
•Importing Image Files , on page 238
•Importing Audio Files, on page 238
•Importing Flash Movie Files
Importing Image Files
You can import all sort of image files using the Library view, to be able to re-use them throughout your projects as templates. You can import bitmap but also vector based images which can be really handy. The supported image formats are *.ai, *.pdf, *.tvg, *.pal, *.scan, *.sgi, *. tga, *.yuv, *omf, *.psd, *.png, *.jpg, *.jpeg, *.bmp and *.tif.
To import an AI or PDF file:
1.Go to the Library view and right-click (Windows) or [Ctrl]+click (Mac OS X) on the Library folder of your choice and select Import Files.
The browser window opens.
2.Find and select your image file and click on Open.
3.The selected file will appear in the Library view as a *.tpl inside the selected library folder.
Importing Audio Files
You can import three types of audio files, which you can drag in the Timeline view when creating your animatic project. The supported audio file formats are: *.wav, *.aif and *.mp3.
To import an audio file:
1.Go to the Library view and right-click (Windows) or [Ctrl]+click (Mac OS X) on the Library folder of your choice and select Import Files.
The browser window opens.
2.Find and select your image file and click on Open.
3.The selected audio will appear in the Library view as a *.tpl inside the selected library folder.
Importing Adobe Flash Movie Files
You can import an Adobe Flash movie file, *.swf, into the Library view. The movie file will become a single layer template which will containing the animation.
To import an Adobe Flash movie file:
1.Go to the Library view and right-click (Windows) or [Ctrl]+click (Mac OS X) on the Library folder of your choice and select Import Files.
The browser window opens.
2.Find and select your *.swf file and click on Open.
3.The selected *.swf will appear in the Library view as a *.tpl inside the selected library folder.
You can preview the animation contained in the new template by using the preview section of the Library view.
Refer to the Preview section to learn how.
Note that only the first 20 first frames of the animation will be imported in the template.](https://image.slidesharecdn.com/storyboardpro2sp1userguide-141107045119-conversion-gate01/85/Storyboard-pro-2_sp1_user_guide-240-320.jpg)

![240
Storyboard Pro 2 User Guide
Importing a Template in the Timeline View
You can import layers, panel and sound clip templates into the Timeline view.
To import a template in the Timeline view:
1.In the Timeline view, select the panel in which you want to import the template.
1.In the Library view, select the template you want to import.
2.Drag the selected template to the selected panel in the Timeline view.
If you are importing a sound clip template, drag the template into a sound layer in the Timeline view.
Opening a Template as a Folder
Since a template is like a scene, you can open the template’s folder and select elements inside it such as specific drawings.
You may only want to import a few drawing layers instead of importing the entire contents of a template. In this case, use the Open As Folder command to import the items you want.
To open a template as a folder:
1.In the Library view, select the template to open.
2.Right-click (Windows) or [Ctrl]+click (Mac OS X) on the selection and select Open As Folder.
3.In the Library list, explore the template’s folder to display its content.](https://image.slidesharecdn.com/storyboardpro2sp1userguide-141107045119-conversion-gate01/85/Storyboard-pro-2_sp1_user_guide-242-320.jpg)
![Chapter 8: Libraries Preferences
241
Preferences
In Toon Boom Storyboard Pro, there are a series of preferences that are available to customize behaviour and help you set up an efficient workflow.
To open the Preferences Panel:
Windows: Select File > Preferences. You can also use the default keyboard shortcut [Ctrl]+[U].
Mac OS X: Select Storyboard Pro > Preferences. You can also use the default keyboard shortcut []+[U].
General Tab
You can find the preference related to the Library under the General tab.
Automatically Generate Thumbnails in Library
By default this option is enabled, this means that the thumbnails in the Library view will be automatically generated. You can disable this option as to prevent the thumbnails from being automatically generated. When you disable the Automatically Generate Thumbnails in Library, you can manually generate them when
desired. Refer to Generating Thumbnails to know how.](https://image.slidesharecdn.com/storyboardpro2sp1userguide-141107045119-conversion-gate01/85/Storyboard-pro-2_sp1_user_guide-243-320.jpg)

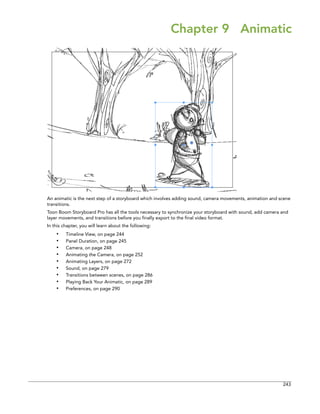
![244
Storyboard Pro 2 User Guide
Timeline View
The Timeline view can be used to assemble the timing of your scene’s visuals and sounds. You can add sound track layers to this timeline, as well as edit audio files imported into the sound tracks. You can also add transitions and control the playback of a selected panel or the entire storyboard from this view.
When setting up your animatic in Storyboard Pro, you will want to be in the Timeline view. This will enable you to easily change the duration of your panels, add sound and transitions, and playback your animation with a display of the time or frames.
Enable the Timeline view in one of the following ways:
•In the top menu, select Windows > Timeline.
•In Workspace toolbar, select Timeline.
•Use the default keyboard shortcut [4].
Refer to Discovering the Interface > Adding a New View, on page 56 to learn how to add a view and manage it.](https://image.slidesharecdn.com/storyboardpro2sp1userguide-141107045119-conversion-gate01/85/Storyboard-pro-2_sp1_user_guide-246-320.jpg)
![Chapter 9: Animatic Panel Duration
245
Panel Duration
When panels are initially created, they will be a default length. When it comes to your animatic, you will want to be more accurate. Modifying the duration of a particular panel is key when working out timing. There are a few different ways to accomplish this.
This section is divided as follows:
•Setting the Panel Duration Visually, on page 245
•Setting the Panel Duration in the Panel View, on page 246
•Setting the Panel Duration from the Top Menu, on page 246
•Split Panel at Current Frame, on page 247
Setting the Panel Duration Visually
In the Timeline view, it’s very easy to change the duration of a panel just by dragging to resize it. This way you can easily see the length of your panels in relation to one another.
There are two ways to resize a panel this way, depending on how you want the change to affect subsequent panels.
•Resizing a Panel in the Timeline and Shifting all Other Panels Down
•Resizing a Panel While Only Affecting the Next Panel
Resizing a Panel in the Timeline and Shifting all Other Panels Down
To resize a panel in the Timeline and shift all other panels down:
Use this method when you are not concerned about modifying the position of all subsequent panels.
1.Place your mouse cursor over the end (right side) of your panel to display the resize icon.
2.Click and drag the edge of the panel to the left or right to set the desired length. Using this method, all subsequent panels will be shifted along with the selected one.
While you drag, the length of your panel will be displayed in this black box so that you can be more accurate.
Resizing a Panel While Only Affecting the Next Panel
To resize a panel while only affecting the next panel:
Use this method if you need to keep subsequent panels exactly where they are.
1.Place your mouse cursor over the end (right side) of your panel to display the resize icon.
2.Hold the [Alt] key then click and drag the edge of the panel to the left or right to set the desired length. Only the panel directly after the selected panel will be changed.](https://image.slidesharecdn.com/storyboardpro2sp1userguide-141107045119-conversion-gate01/85/Storyboard-pro-2_sp1_user_guide-247-320.jpg)

![Chapter 9: Animatic Panel Duration
247
Split Panel at Current Frame
You can split your current panel into two pieces. Following this operation, you will have two identical panels generated from the original. All elements, including layers, will be in both panels. Each panel’s length will be determined by where you have the red current time slider when you perform the operation.
To split panel at current frame:
1.In the Timeline view, drag the red current time slider to where you want your panel to be split.
2.Do one of the following to split the panel:
From the top menu, select Storyboard > Split Panel At Current Frame.
In the Timeline view, right-click (Windows) or [Ctrl]+click (Mac OS X) in your selected panel and select
Split Panel At Current Frame.
Your panel has now been split into two pieces, precisely where the red current time slider is.
You may have to make adjustments to any layer transformations you may have created before you split the
panels.
1 2](https://image.slidesharecdn.com/storyboardpro2sp1userguide-141107045119-conversion-gate01/85/Storyboard-pro-2_sp1_user_guide-249-320.jpg)
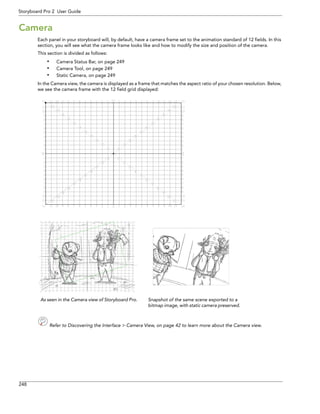
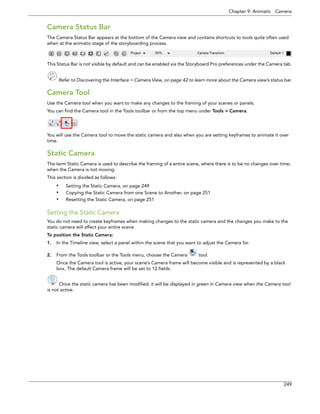
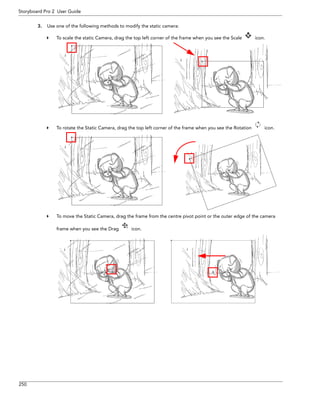


![Chapter 9: Animatic Animating the Camera
257
Using Copy and Paste to add keyframes:
1.In the Timeline view, click to select a camera keyframe. It will become blue when selected.
In the Camera view, click the camera keyframe. It will become bolder when selected.
2.From the top menu choose Edit > Copy Camera Keyframes.
The default keyboard shortcut [Ctrl]+[C] (Windows) or []+[C] (Mac OS X).
Select the Camera tool, and in the Tool Properties view, click on the Copy Camera from Selected Panels button.
3.Move the red Current Frame Slider to the position within the same scene where you want to paste the keyframe.
4.From the top menu choose Edit > Paste Camera Keyframes. The default keyboard shortcut [Ctrl]+[V] (Windows) or []+[V] (Mac OS X).
Select the Camera tool, and in the Tool Properties view, click on the Paste and Fit Camera in Selected Panels button.
You can copy/paste several keyframes simultaneously if you have several keyframes selected before you perform
the operation.](https://image.slidesharecdn.com/storyboardpro2sp1userguide-141107045119-conversion-gate01/85/Storyboard-pro-2_sp1_user_guide-259-320.jpg)
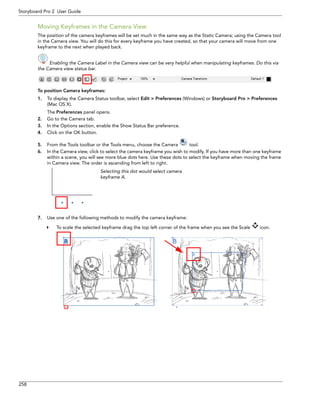
![Chapter 9: Animatic Animating the Camera
259
Once you let go of the mouse, your keyframe is set, and some blue arrows appear to indicate the direction of the camera movement. In this case, it would be zooming out from position A to position B.
To rotate the selected keyframe, drag the top left corner of the frame when you see the Rotate icon.
To move the selected keyframe, drag the frame from the centre pivot point or the outer edge of the camera frame when you see the Drag icon.
You can also nudge the selected keyframe with the [Up], [Down], [Left] and [Right] keyboard shortcuts.
At this point, if you wanted to, you could select the B position keyframe and move it to a new location. The scene, when played back, will contain a camera that moves from position A to position B.
In this case keyframe B was dragged to the right of
keyframe A. When the Camera pans, it will pan left
to right.](https://image.slidesharecdn.com/storyboardpro2sp1userguide-141107045119-conversion-gate01/85/Storyboard-pro-2_sp1_user_guide-261-320.jpg)

![Chapter 9: Animatic Animating the Camera
261
Deleting a Control Point
Control Points will be visible in the Timeline, but you can only move them in the Camera view. You will have to go to the Timeline, however, to delete a control point.
To delete a control point:
1.In the Timeline view, click the control point, represented by a small dot between your keyframes. Once selected, it will be blue.
2.Use the default shortcut [Delete] to remove the selected point.
Your trajectory will revert to it’s original shape after you delete the control point.
Moving Keyframes in the Timeline
If you need to change the position of a keyframe in the Timeline view, there are a couple different ways to do this. Note that camera keyframes can only be moved to a new location within the same scene. The two methods below are useful when you want to move a keyframe to a new location, or cut and paste a keyframe.
Dragging camera keyframes to a new location in the Timeline view:
1.In the Timeline view, click to select a camera keyframe. It will become blue when selected.
2.Drag the selected keyframe left or right to choose a new position in time. You will only be able to drag it to a new location within your current scene.
While you drag the keyframe, it’s position relative to the scene will be displayed in a black box. Also displayed is the number of frames off the original position the new keyframe will be located.
You can drag more than one keyframe at a time if you have several selected before you drag them.
Using Cut and Paste to move keyframes:
1.In the Timeline view, click to select a camera keyframe. It will become blue when selected.
On the left the current time, relative to the scene is displayed. On the right are the number of frames you are moving this keyframe.](https://image.slidesharecdn.com/storyboardpro2sp1userguide-141107045119-conversion-gate01/85/Storyboard-pro-2_sp1_user_guide-263-320.jpg)
![262
Storyboard Pro 2 User Guide
2.From the top menu choose Edit > Cut Camera Keyframes. The default keyboard shortcut [Ctrl]+[X] (Windows) or []+[X] (Mac OS X). Your keyframe will be removed from the Timeline view, but will be copied to the clipboard.
3.Move the red current frame slider to the position within the same scene where you want to paste the keyframe.
4.From the top menu choose Edit > Paste Camera Keyframes. The default keyboard shortcut [Ctrl]+[V] (Windows) or []+[V] (Mac OS X).
This will work to cut/paste several keyframes at one time if you have several keyframes selected before you
perform the operation.](https://image.slidesharecdn.com/storyboardpro2sp1userguide-141107045119-conversion-gate01/85/Storyboard-pro-2_sp1_user_guide-264-320.jpg)

![264
Storyboard Pro 2 User Guide
To adjust the Continuity, Tension and Bias parameters:
1.In the Tools toolbar, select the Camera tool.
2.In the Timeline view, select the Keyframe or Control Point you want to adjust.
3.In the Keyframes and Control Points toolbar, adjust the Continuity, Tension and Bias parameters.
If the Keyframes and Control Points toolbar is not visible, from the top menu choose Windows > Toolbars > Keyframes and Control Points.
If you find that you are using the same Continuity, Tension and Bias settings, you can set a preference to remember your settings.
To adjust the Keyframes and Control Points default preferences:
1.From the top menu, select Edit > Preferences (Windows) or Storyboard Pro > Preferences (Mac OS X).
The Preferences window opens.
2.From the top of the Preferences window, select the Camera tab and navigate to the bottom.
3.Type in the defaults for Tension, Continuity and Bias, based on your preferred settings.
4.Click on the OK button.
Snapping
If you turn on snapping, camera keyframes, panels and sound tracks will snap to the beginning and end of each panel, each sound track or the red slider when dragging.
To turn on/off Snapping:
1.In the Timeline view, right-click (Windows) [Ctrl]+click (Mac OS X) the area where the camera keyframes are.
2.From the quick access menu, select Snapping.
If the function is enabled, there will be a check mark visible.
Snapping settings can be overridden by holding the [Shift] key.](https://image.slidesharecdn.com/storyboardpro2sp1userguide-141107045119-conversion-gate01/85/Storyboard-pro-2_sp1_user_guide-266-320.jpg)
![Chapter 9: Animatic Animating the Camera
265
Spreading Camera Motion Across Panels of a Scene
A camera movement is not restricted to a panel. Keyframes for a particular camera movement can span multiple panels within the same scene.
Modifying a camera movement to span across panels of a scene:
1.In the Timeline view, select the panel that contains the camera movement you would like to span multiple panels.
2.Select the keyframe you want to move to a new panel.
3.Drag the selected keyframe to another panel within the scene.
Keyframe Synching
When you change the duration of your panels, add, delete or drag and drop scenes and panels, it will affect the placement of your keyframes. You have 3 keyframe synching options that will affect keyframes when changing the duration of panels. Depending on what option you have set, your keyframes will be repositioned accordingly.
The following examples demonstrate resizing panels by dragging, but the options will affect your keyframes in the same way, regardless of what method you use to change the duration of your panel.
The three options for keyframe synching are:
•Setting Keyframe Synching to None
•Setting Keyframe Synching to Relative to Panels
•Setting Keyframe Synching to Relative to Shot
Setting Keyframe Synching Options
Where to change keyframe synching settings:
1.In the Timeline view, right-click (Windows) or [Ctrl]+click (Mac OS X) the area where the camera keyframes are and locate the three keyframe synching options.
2.Choose one of the three options. The active selection will have a check mark beside it.](https://image.slidesharecdn.com/storyboardpro2sp1userguide-141107045119-conversion-gate01/85/Storyboard-pro-2_sp1_user_guide-267-320.jpg)

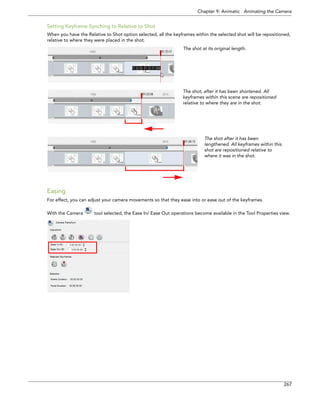
![268
Storyboard Pro 2 User Guide
Ease In
To set ease in for a keyframe:
1.In the Timeline view, click to select the keyframe you wish to set ease in parameters.
2.From the Tools toolbar or the Tools menu, choose the Camera tool.
3.In the Ease In section of the Tool Properties view, use the arrows or enter the duration of the ease in after the first frame in which the gradual change in camera or layer movement begins. For example, if you want to slowly accelerate to the normal camera or layer speed from frame 1-10, enter a value of 10.
Ease Out
To set ease out for a keyframe:
1.In the Timeline view, click to select the keyframe you wish to set ease out parameters.
2.From the Tools toolbar or the Tools menu, choose the Camera tool.
3.In the Ease Out section of the Tool Properties view, use the arrows or enter the duration of the ease out after the first frame in which the gradual change in camera or layer movement begins.
4.Enter the number of frames before the last frame in which the change in camera or layer movement is gradual.
Deleting Keyframes
To delete keyframes from the Timeline view:
1.Select the keyframe or keyframes you wish to delete.
2.Do one of the following:
From the top menu, select Storyboard > Remove Camera Keyframe at Current Frame.
From the top menu, select Edit > Delete Selected Camera Keyframes.
Select the Camera tool, and in the Tool Properties view, click on the Delete Selected Keyframe button.
Use the default keyboard shortcut [Delete].
Resetting the Camera Animation
If necessary, you can remove all the keyframes in your scene, and revert back to the original static camera.
To reset Camera Animation:
1.In the Timeline view, click to select the scene you want to reset the camera animation for.
2.Do one of the following:
Select the Camera tool, and in the Tool Properties view, click on the Reset Camera button.
From the top menu, select Storyboard > Reset Camera.
At this point, all your camera keyframes for the selected scene will be deleted and your scene’s static camera will be reset.](https://image.slidesharecdn.com/storyboardpro2sp1userguide-141107045119-conversion-gate01/85/Storyboard-pro-2_sp1_user_guide-270-320.jpg)
![Chapter 9: Animatic Animating the Camera
269
Camera by Panel Compatibility Mode Preferences
If you were working with a copy of Storyboard Pro v1.6 and you upgraded to the current version, it is possible that you may wish to keep working with the camera keyframes settings as you did before you upgraded. You can do this by enabling the Camera by Panel Compatibility Mode option.
Enabling the Camera by Panel Compatibility Mode option
To Enable the Camera by Panel Compatibility Mode option:
1.Open the Preferences Panel:
Select Edit > Preferences (Windows) or Storyboard Pro > Preferences (Mac OS X).
You can also use the default keyboard shortcut [Ctrl]+[U] (Windows) or []+[U] (Mac OS X).
2.In the Preferences Panel, click on the Camera tab.
3.In the Keyframes and Control Points section, enable the Camera by Panel Compatibility Mode option.
4.Click on OK. This feature requires you to relaunch the software so be sure to do so.
Once the software is relaunched, you will notice some important changes with how the camera keyframes and panels are handled:
When a new panel is created, camera keyframes are added at the beginning and end of the panel automatically.
When creating a new panel, the camera frame will be placed to match the camera of the previous panel.
The reset camera button changes behavior. Instead of deleting all camera keyframes from the selected scene, it will reset the start and end camera of the selected panel.
The Static Camera tool becomes available.](https://image.slidesharecdn.com/storyboardpro2sp1userguide-141107045119-conversion-gate01/85/Storyboard-pro-2_sp1_user_guide-271-320.jpg)
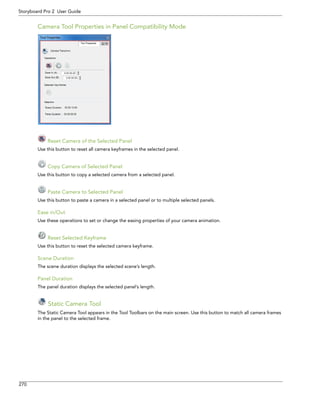
![Chapter 9: Animatic Animating the Camera
271
Allow Advanced Camera Operations Option
You can add more options to the camera’s tool properties by enabling the Allow Advanced Camera Operations in the preferences.
To Enable the Allow Advanced Camera Operation option:
1.Open the Preferences Panel:
Select File > Preferences (Windows) or Storyboard Pro > Preferences (Mac OS X).
You can also use the default keyboard shortcut [Ctrl]+[U] (Windows) or []+[U] (Mac OS X).
2.In the Preferences Panel, click on the Camera tab.
3.In the Keyframes and Control Points section, enable the Allow Advanced Camera Operation option.
4.Click on OK. This feature requires you to relaunch the software so be sure to do so.
Once the software is relaunched, you will notice some that some new buttons are available in the Camera’s Tool properties window:
Add Keyframe at the Beginning of Current Panel
Use this button to add a keyframe at the beginning of the currently selected panel.
Add Keyframe at Current Frame
Use this button to add a keyframe at the current frame. The current frame is determined by the position of the red Current Frame slider in the Timeline.
Add Keyframe at the End of Current Panel
Use this button to add a keyframe at the end of the currently selected panel.
Delete Selected Keyframe
Use this button to delete the selected camera keyframe.](https://image.slidesharecdn.com/storyboardpro2sp1userguide-141107045119-conversion-gate01/85/Storyboard-pro-2_sp1_user_guide-273-320.jpg)


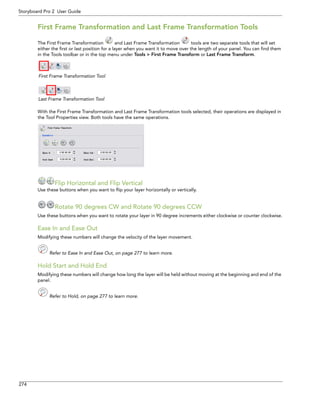
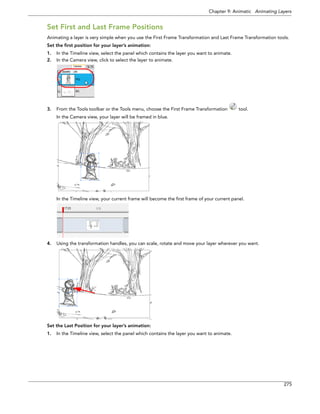


![Chapter 9: Animatic Sound
279
Sound
When you decide that you want to add sound to your storyboard, you must first prepare the sound outside of Storyboard Pro.
To work with sounds in Toon Boom Storyboard Pro, add one or more sound tracks into which you import the sound sequences.
You can then organize the sounds by organizing sound tracks, mixing sound levels and editing the part of the sound sequence you will use.
You can preview your panels with sound at any time, by playing back an animatic of the current panel or the entire storyboard using the controls in the Play toolbar.
To import sounds and view sound tracks, display the Timeline workspace.
This section is divided as follows:
•Managing Sound Tracks, on page 279
•Adding and Deleting Sound Sequences, on page 282
•Sound Display, on page 283
•Sound Scrubbing, on page 284
•Adjusting the Sound Length, on page 284
Managing Sound Tracks
You can create a sound track in which you can import one or more sounds. You can add an unlimited number of tracks to your sound track to help you organize your work. For instance, you can have a track for all dialogue or a separate track for each character’s dialogue. You can create a track for ambient sound, music or significant sound effects.
This section is divided as follows:
•Adding a Sound Track, on page 279
•Muting a Sound Track, on page 280
•Linking a Sound Track, on page 280
•Deleting a Sound Track, on page 281
Adding a Sound Track
You can add new sound tracks to your project. You must work in the Timeline view.
To add a sound track:
1.Display the Timeline view.
2.Do one of the following:
Select Sound > New Sound Track.
Right-click (Windows) or [Ctrl]-click (Mac OS X) the area below the Timeline thumbnails and select New Sound Track.
In the Sound toolbar, press New Sound Track button.
After you have added a new sound track you are ready to import a sound.
Refer to Import Sound, on page 293 for more information.](https://image.slidesharecdn.com/storyboardpro2sp1userguide-141107045119-conversion-gate01/85/Storyboard-pro-2_sp1_user_guide-281-320.jpg)

![Chapter 9: Animatic Sound
281
Linking and Unlinking All Sound Tracks
You can link all sound tracks to the current panel to keep sound sequences in-sync during editing. Once linked, you can unlink all the sound tracks from the panel at any time. This feature is useful when you want to quickly link or unlink the sound track from your panels.
To link all sound tracks:
1.In the Sound menu
2.Select Sound > Link All Sound Tracks.
Notice that all of the sound tracks are now linked to the animation. This is indicated by the sound icon becoming active.
To unlink all sound tracks:
1.In the Sound menu
2.Select Sound > Link All Sound Tracks.
Notice that all of the sound tracks are now unlinked from the animation. This is indicated by the sound icon becoming inactive.
Deleting a Sound Track
You can delete a sound track at any time. When you delete a sound track, all of the sounds included in this sound track are also deleted. You must work in the Timeline view.
To delete a sound track:
1.In the Timeline view, select the sound track you want to delete.
2.Do one of the following:
Select Sound > Delete Current Sound Track.
Right-click (Windows) or [Ctrl]-click (Mac OS X) the sound track and select Delete Current Sound Track.
In the Sound toolbar, press the Delete Current Sound Track button.
The selected sound track is deleted from the Timeline view.
Sound linked.
Sound unlinked.](https://image.slidesharecdn.com/storyboardpro2sp1userguide-141107045119-conversion-gate01/85/Storyboard-pro-2_sp1_user_guide-283-320.jpg)
![282
Storyboard Pro 2 User Guide
Adding and Deleting Sound Sequences
Once you have created sound tracks, you can now import sound sequences. Sound sequences are edited bits of sound which are already edited and are in digital format, ready for import.
This section is divided as follows:
•Importing a Sound Sequence, on page 282
•Deleting a Sound Sequence, on page 282
Importing a Sound Sequence
You can import a sound sequence (WAV, AIF, AIFF, or MP3) into a sound track at the first frame or at the current frame. If the sound sequence doesn’t already exist in your project, Storyboard Pro copies the file from its present location to the audio folder in your storyboard project folder. You must work in the Timeline view.
To import a sound sequence:
1.In the Timeline view, select the sound track where you want to import the sound.
2.Do one of the following:
Select Sound > Import Sound Sequence.
Right-click (Windows) or [Ctrl]-click (Mac OS X) the sound track and select Import Sound Sequence.
In the Sound toolbar, press Import Sound Sequence button.
The Import Sound Sequence dialog box opens.
3.Select the sound sequence you want to import by typing in the file path or using the Browse button to search for the file you want to use.
4.In the Target Sound Track section, specify whether you want to create a sound track and import the sequence into it or import the sequence into the selected sound track.
5.In the Target Frame section, select at which frame the sound will begin.
If you selected Current Sound Track option, specify the Import Rule:
Overwrite Existing Sound Sequences: by default, when you import a sound, it will replace sounds that exist in the target frames.
Fill Next Available Frames: import the sound sequence into the first available empty frames after any existing sound selection.
6.Select the Set as default and don’t show dialogue again option if you want to use the current settings the next time you import sound and open a browse box to select a sound automatically.
Deleting a Sound Sequence
To delete a sound sequence:
1.In the Timeline view, select the sound sequence or sequences you wish to delete.
2.Do one of the following:
Right-click (Windows) or [Ctrl]+click (Mac OS X) the sound sequence and select
Delete Selected Sequences.
In the Sound toolbar, press Delete Sound Sequence button.
Use the default keyboard shortcut [Delete].](https://image.slidesharecdn.com/storyboardpro2sp1userguide-141107045119-conversion-gate01/85/Storyboard-pro-2_sp1_user_guide-284-320.jpg)
![Chapter 9: Animatic Sound
283
Sound Display
These are the different features that will help make things clear while working with sound.
This section is divided as follows:
•Show Waveform, on page 283
•Show Volume Envelope, on page 283
Show Waveform
1.To show the waveform of the sound sequences, do one of the following:
From the top menu, select Sound > Show Waveform or right-click (Windows) or [Ctrl]+click (Mac OS X) in the sound track area of the Timeline view and choose Show Waveform.
In the Sound toolbar’s extra buttons, click on the Show Waveform button.
Now the sound is displayed as waveform.
Show Volume Envelope
Once the waveform is displayed, you can also choose to display the playback sound level for each sound sequence.
To display and adjust the volume levels of a sound sequence:
1.From the top menu, select Sound > Show Waveform. This option must be set first.
From the top menu, select Sound > Show Volume Envelope or right-click (Windows) or
[Ctrl]+click (Mac OS X) in the sound track area of the Timeline view and choose Show Volume Envelope. In the Sound toolbar’s extra buttons, click on the Show Volume button.
A blue line, indicating the sound level, is displayed for each sound sequence. White squares mark the points at which the sound changes to a new level.
2.Click the line to add a new marker, or drag an existing marker to adjust the volume at a specific frame.
The slope of the line indicates how quickly the sound changes from one level to another. If the slope is steep, the change is abrupt. If the slope is less inclined, the volume changes at a more gradual rate.](https://image.slidesharecdn.com/storyboardpro2sp1userguide-141107045119-conversion-gate01/85/Storyboard-pro-2_sp1_user_guide-285-320.jpg)
![284
Storyboard Pro 2 User Guide
Sound Scrubbing
Turn on Sound Scrubbing to listen to the sound as you drag the red Current Frame slider forward and backward.
To turn on sound scrubbing:
From the top menu select Sound > Sound Scrubbing or right-click (Windows) or [Ctrl]+click (Mac OS X) of the Timeline view and choose Sound Scrubbing. In the Sound toolbar’s extra buttons, click on the Sound Scrubbing button.
With Sound Scrubbing, your sound will play forward or backwards as you scrub through the Timeline view.
Adjusting the Sound Length
Most of the editing must be done to your sound before it is imported into Storyboard Pro. There are however, a few tools to help make minor adjustments.
This section is divided as follows:
•Shortening and Extending Sound Sequences, on page 284
•Split Sound Sequence at Current Frame, on page 285
Shortening and Extending Sound Sequences
You can snip the beginning and/or end of the sound sequence if there is too much in your project.
1.Verify that the volume is on for the view and the sound track you want to work with. You may find it easier to edit the sound by customizing the display to show the sound’s waveform.
2.Do one of the following:
Drag the cursor that appears at the start frame to the position where you want to set the new start of the clip. This will cut the beginning of the original file from playback.
Drag the cursor that appears at the end frame to the position where you want to the clip to end. This will cut the end of the original file from playback.
You can play back the sound to hear the edited version of the sequence. The original sound sequence is not modified. You can drag the boundaries of the edited sequence closer to or all the way back to their original positions to use more of the sound sequence.](https://image.slidesharecdn.com/storyboardpro2sp1userguide-141107045119-conversion-gate01/85/Storyboard-pro-2_sp1_user_guide-286-320.jpg)
![Chapter 9: Animatic Sound
285
Split Sound Sequence at Current Frame
You can cut one clip into many pieces if you wish to move parts of a sound to another location.
To split a sound sequence in two:
1.Move the red Current Frame slider to the frame where you want to begin the second sound sequence that will result from the split.
2.From the top menu, select Sound > Split Sequence at Current Frame or right-click (Windows) or [Ctrl]+click (Mac OS X) in the sound track area of the Timeline view and choose Split Sequence at Current Frame.
Now the sound sequence has been split, and both parts can be moved and controlled independently.](https://image.slidesharecdn.com/storyboardpro2sp1userguide-141107045119-conversion-gate01/85/Storyboard-pro-2_sp1_user_guide-287-320.jpg)
![286
Storyboard Pro 2 User Guide
Transitions between scenes
By default, transitions between scenes are defined as cuts - the action in the panel at the end of a shot finishes and immediately displays the next scene.
In Storyboard Pro, you can add one of two custom transitions between scenes:
•Wipe
•Dissolve
This section is divided as follows:
•Creating Transitions, on page 286
•Modifying a Transition, on page 288
•Deleting a Transition, on page 288
Creating Transitions
It’s simple to add a transition between scenes. Once created, then you can customize it.
To create a transition between two scenes:
1.In the Timeline view, click to select a panel in the scene you want to add a transition after.
2.Do one of the following to add a transition after the current scene:
From the Storyboard toolbar, choose the Create Transition button .
Select Storyboard > Create Transition from the top menu.
Right-click (Windows) or [Ctrl]-click (Mac OS X) the scene thumbnails and select Add Transition.](https://image.slidesharecdn.com/storyboardpro2sp1userguide-141107045119-conversion-gate01/85/Storyboard-pro-2_sp1_user_guide-288-320.jpg)

![288
Storyboard Pro 2 User Guide
Modifying a Transition
There are a several ways to modify a transition once you have created it.
Change Transition Type
Change the Transition type:
1.In the Timeline or Thumbnails view, click to select the transition.
2.Do one of the following:
In the Panel view, you will see the options for the selected transition. From the Type drop-down menu, choose Wipe or Dissolve.
Double-clicking on a transition in the Timeline view will change the transition type from either Wipe to Dissolve or vice versa.
Change Transition Duration
When resizing transitions in the Timeline view, the original ending frame will be preserved, while all the panels touching it will be modified.
Change the Transition duration:
1.In the Timeline view, click to select the transition.
2.Do one of the following:
Change the duration of a transition in the Timeline view by dragging either end to lengthen or shorten.
From the top menu, choose Storyboard > Change Transition Duration.
The New Transition Duration opens.
3.In the New Transition Duration box, type in a new duration in frames.
4.Click on the OK button.
Deleting a Transition
It’s simple to remove any transitions that are no longer necessary.
1.Click to select the Transition you wish to remove.
2.Do one of the following:
Use the default keyboard shortcut [Delete] to remove currently selected transition.
Right-click (Windows) or [Ctrl]-click (Mac OS X) the transition and choose Delete Transition from the menu.
From the top menu, choose Storyboard > Delete Transition.
Type of transition and duration or visible in the
panel view.](https://image.slidesharecdn.com/storyboardpro2sp1userguide-141107045119-conversion-gate01/85/Storyboard-pro-2_sp1_user_guide-290-320.jpg)
![Chapter 9: Animatic Playing Back Your Animatic
289
Playing Back Your Animatic
You can preview your project as an animatic in Toon Boom Storyboard Pro at any time during its development process. You will be able to preview visual content, including transformations, transitions and have it synchronized with sounds using the Playback toolbar.
To preview your animatic in Toon Boom Storyboard Pro:
1.In the Playback toolbar, turn on the Sound button. It is on when it appears pressed in.
2.If you want to see how the shots will look with dynamic camera movement, turn on the Camera Preview button. It is on when it appears pressed in. You will need this option on to preview Camera moves and transitions.
3.In the Timeline or Thumbnail view, select the panel where you want the playback to begin.
4.In the Playback toolbar, click on the Play Selection or Play buttons. You can also use the default keyboard shortcut [Shift]+[Return] to play the selection.
5.To play your project in a continuous loop, click on the Loop button.
6.You may also scroll through the Timeline view by dragging the red current frame slider.
7.Select Play > Previous Frame or Next Frame to skip and play back one frame at a time. You can also use the default keyboard shortcuts [.] and [,].](https://image.slidesharecdn.com/storyboardpro2sp1userguide-141107045119-conversion-gate01/85/Storyboard-pro-2_sp1_user_guide-291-320.jpg)
![290
Storyboard Pro 2 User Guide
Preferences
When preparing your animatic in Storyboard Pro, there are preferences you can set to help you work more efficiently.
To open the Preferences panel:
Windows: Select Edit > Preferences.
Mac OS X: Select Storyboard Pro > Preferences.
You can also use the default keyboard shortcut [Ctrl]+[U] (Windows) or []+[U] (Mac OS X).
This topic is divided as follows:
•Global UI, on page 290
•Camera, on page 291
•Tools, on page 292
•Import/Export, on page 293
Global UI
Display Duration in Time Code Format
•Thumbnail Panels in Drawing and Overview Layouts: When turned on this displays the duration in Time Code format in the Thumbnail panel headers. When turned off the duration is displayed in frames.
•Timeline Play head: When turned on this displays the duration in Time Code format when dragging the current frame slider in the Timeline view. When turned off the duration is displayed in frames.
•Timeline Ruler: When turned on this displays the duration in Time Code format in the Timeline ruler. When turned off the duration is displayed in frames.
•Changing Duration Overlapping Timing Info in Timeline View: When turned on this displays the duration in Time Code format when adjusting the length of a panel in the Timeline view. When turned off the duration is displayed in frames.](https://image.slidesharecdn.com/storyboardpro2sp1userguide-141107045119-conversion-gate01/85/Storyboard-pro-2_sp1_user_guide-292-320.jpg)


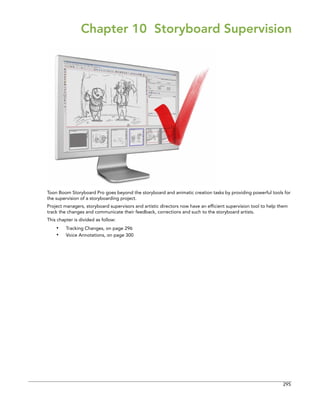
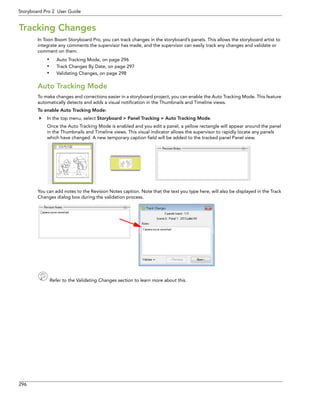
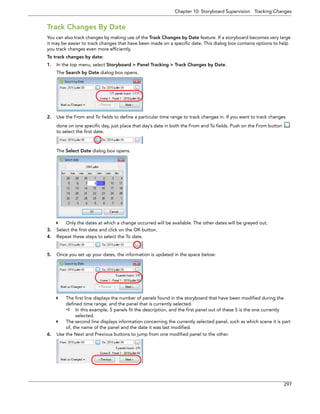

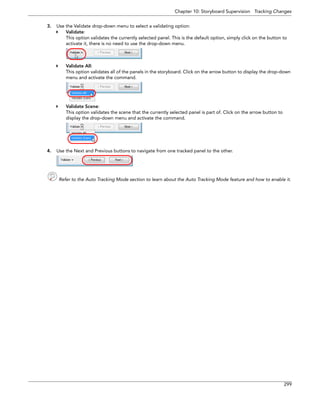

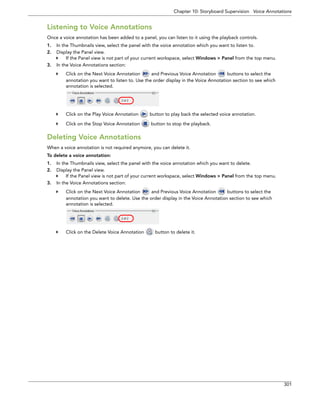


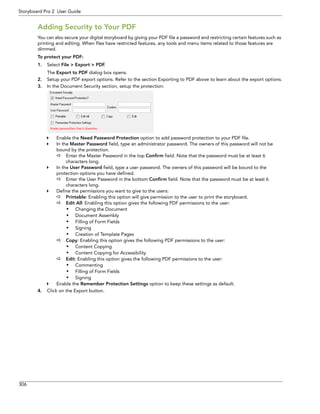
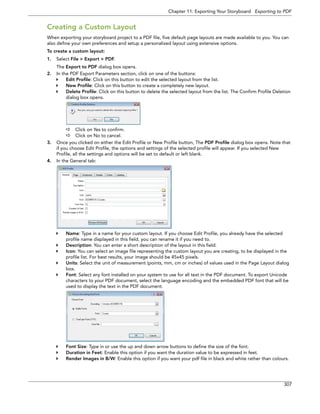


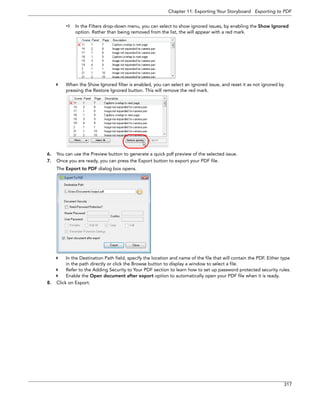
![318
Storyboard Pro 2 User Guide
Adding Snapshot Markers to a Panel
By default, only the first frame of each panel will be visible in the PDF file you export. Sometimes, you might need to display a specific frame or several frames from a panel. For example, on a panel that has a layer or camera movement. If you want to specify which frames in a panel will be visible in a PDF file, you must add snapshot markers to the panels.
Refer to the Animatic chapter to learn more about Layer and Camera moves.
To add a snapshot marker to a panel:
1.In the Timeline view, select the Panel to which you want to add a snapshot marker.
2.Drag the Timeline Slider to the exact position where you want to add the snapshot.
3.After you position the slider, do one of the following:
Select Storyboard > Add Snapshot.
Right-click (Windows) or [Ctrl]+Click (Mac OS X) on the panel and select Add Snapshot from the pop-up menu.
The Snapshot marker will appear in the timeline view. It is the blue arrow pointing down.
4.Repeat Step 2 and Step 3 for each snapshot marker you want to add to the panel.
Once you add snapshot markers to your panel, you can select and drag them around to reposition them.
Deleting Snapshot Markers from a Panel
You can remove snapshot markers from the currently selected panel.
To delete a snapshot marker:
1.Select the snapshot marker you want to delete. A hand cursor appears over the snapshot marker.
2.Drag the hand cursor outside of the panel in the Timeline View to remove the snapshot marker.](https://image.slidesharecdn.com/storyboardpro2sp1userguide-141107045119-conversion-gate01/85/Storyboard-pro-2_sp1_user_guide-320-320.jpg)


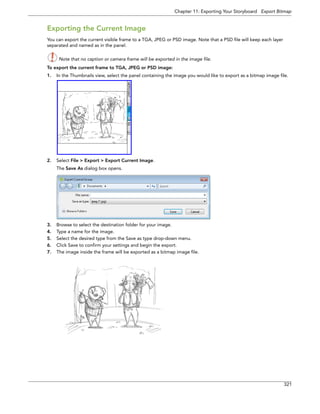


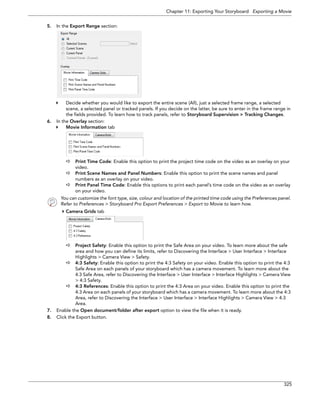


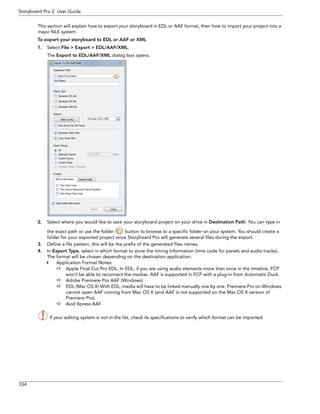


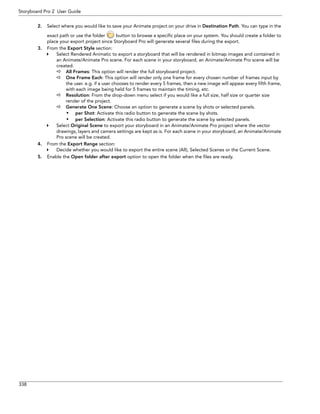

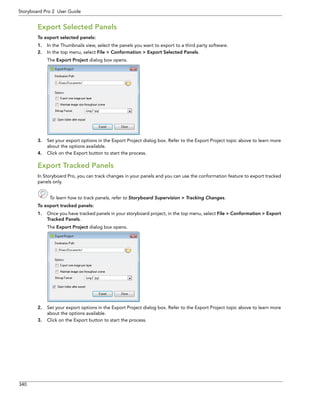

![342
Storyboard Pro 2 User Guide
Preferences
In Storyboard Pro, you will find preferences related to the export under the Import/Export tab.
To open the Preferences panel:
Windows: Select Edit > Preferences.
Mac OS X: Select Toon Boom Storyboard Pro > Preferences.
You can also use the default keyboard shortcut
[Ctrl]+[U] (Windows) or []+[U] (Mac OS X).
Storyboard Pro Export Preferences
Export to Movie
The following preferences are related to printed time code when using the File > Export > Movie command.
Refer to Exporting a Movie to learn more about this topic.
•Time Code Font: Use this drop-down menu to select the font in which you want the time code to print when using the Export > Movie feature. The drop-down menu will list all the fonts available on your system.
•Time Code Colour: By default the time code will print in black on your animatic. Click on the colour swatch to open the Select Colour dialog box in which you can pick the colour of your choice.
•Time Code Height: Use this option to set the height (percentage) of the time code font size.
•Time Code Position: Use this drop-down menu to set the position rule of the time code of your animatic.
Top Left
Top Centre
Top Right
Bottom Left
Bottom Left
Bottom Centre
Bottom Right](https://image.slidesharecdn.com/storyboardpro2sp1userguide-141107045119-conversion-gate01/85/Storyboard-pro-2_sp1_user_guide-344-320.jpg)