The document provides step-by-step instructions for using attracTV Studio to create and embed galleries of digital content (vidgets) on websites. It explains how to edit gallery properties, add and remove vidgets, save changes, and generate embed codes. Specific instructions are given for adding a YouTube video vidget by copying the video URL from YouTube. The overall process involves editing gallery content and settings, testing changes, and copying the generated embed code to display the gallery on an external site.
The document provides step-by-step instructions for using the attracTV Studio platform to create and customize video galleries with widgets (vidgets) and plugins. It describes the basic components and flow, including defining a gallery, adding vidgets and plugins, testing and embedding the gallery code on a website.
The document discusses lessons learned in content management from Savant Degrees, a consultancy. It addresses the problems of high IT project failure rates and the need to speak both the business and development languages. It also covers different forms of content systems, dimensions of content organization, and examples like Joomla, WordPress, Confluence and Magento. The document concludes with discussions of clickroute planning and search engine optimization.
Genkii is a company comprised of experienced programmers, artists, writers, and marketers specializing in virtual worlds, social media, iPhone/iPod development, and online marketing. Their flagship product is Sparkle, a 3D virtual world platform for iPhone/iPod touch that allows users to interact in customizable personal spaces with integrated community features like groups, activity feeds, and chat. Sparkle also includes focused communities for music, games, education, and friends. Genkii plans to expand Sparkle to browsers on Windows, Mac, Wii, and Android devices.
The document provides step-by-step instructions for using the attracTV Studio platform to create and customize video galleries with interactive widgets (vidgets). It outlines the basic components and workflow which includes defining a gallery, adding vidgets and plugins, testing and editing the gallery, and generating embed code.
JFDI.asia’s co-founder Meng Wong is a serial entrepreneur and established business angel. He tells the story of how the pre-seed accelerator phenomenon has evolved, what seem to be the vital ingredients and how JFDI.asia fills a gap among complementary early-stage schemes in Asia.
Brugge, Belgium is a small city with a population of 120,000 people that was founded in 862 AD. Its downtown area has been declared a UNESCO world heritage site and it is known as the "Venice of the North" due to its water channels running through the city.
Nine days after Hurricane Katrina, a group of volunteer street medics arrived in New Orleans and began providing medical assistance to residents. They established the Common Ground Health Clinic to offer free healthcare services. Initially operating out of a donated space, the clinic grew to serve over 150 patients per day. It has since expanded services and now sees approximately 200 patients per week for primary care and other free medical services. The clinic has recorded over 60,000 patient visits since opening in 2006.
Founders Drinks: Generating ROI with digital marketing (by Techsailor)e27
For August 2013's Founders Drinks, we saw Singapore-based digital marketing agency Techsailor's Leon Leong share about how digital campaigns can generate ROIs for startups and companies.
"Thai E-Commerce: Learnings and Trends"
by Tiwa York, Managing Director E-Commerce, Sanook
Presented at Thailand Satellite 2013
More information: e27.co/echelon
The challenges of live events scalabilityGuy Tomer
Guy Tomer, founder of attracTV, discusses the challenges of supporting large online live events with TV participation. AttracTV supported an online music awards show with over 1 million streams and 100,000 concurrent users. Key challenges included scaling to support these large user numbers, handling steep increases in users, managing large amounts of data, maintaining high availability, testing at this scale, and controlling costs. Tomer emphasizes planning for horizontal scalability, keeping things simple, testing under realistic conditions, continuous monitoring, and using cloud infrastructure to handle demand flexibly at an affordable cost.
Magento2 Image Gallery- https://store.webkul.com/Magento2-Image-Gallery.html
Magento2 Image Gallery module allows the admin to add/manage images into various gallery and galleries into various groups according to requirement. Admin can easily manage photo gallery and gallery groups on their site. In this module everything is configured by admin. Magento2 Image Gallery is the best Gallery module for Magento2 platform.
Features of Magento2 Image Gallery-
-Ability to add/manage images into various gallery.
-Assign galleries into various groups.
-Add various effects for display images.
-Awesome controls you can zoom images, change images using mouse enter etc.
-The code is fully open & you can customize it according to your need.
-Multi Lingual support / All language working including RTL.
Compatible with Multistore.
This document summarizes the features of the YouTube Video Magento Extension. The extension allows users to import videos from their YouTube account and display them on their Magento store. Videos can be imported from a YouTube channel, playlist, or using a YouTube video ID. Imported videos can then be displayed on a video gallery page, homepage, CMS pages, or product pages. Store owners can manage the videos from the admin panel, selecting which videos appear on the homepage or product pages.
1) The document outlines the four main steps to use the SlideShare component in Joomla: installation, uploading slides, displaying slides on pages, and slide display configuration.
2) Key steps for installation include installing the SlideShare module and component, and adding the API key.
3) Uploading slides involves adding, editing, publishing and deleting categories and slides.
4) Displaying slides requires adding links to menus and configuring link menu item details.
5) Slide display configuration allows editing parameters like number of slides displayed.
1) To use SlideShare component, the user must install the SlideShare module and component through the Joomla administration panel extensions menu.
2) The user can then upload slides into categories. They can add, edit, publish, unpublish slides.
3) The user can add SlideShare links to menus to display slides on pages. They can configure link details and parameters like the number of slides displayed.
4) The installation process involves getting an API key from SlideShare and inputting display configuration settings.
1) The document outlines the four main steps to use the SlideShare component in Joomla: installation, uploading slides, displaying slides on pages, and slide display configuration.
2) Key steps for installation include installing the SlideShare module and component, and adding the API key.
3) Uploading slides involves adding, editing, publishing and deleting categories and slides under the Presentation Manager.
4) Displaying slides requires adding a link to the menu and configuring link menu item details.
5) Slide display configuration allows editing parameters like number of slides displayed.
1) To use SlideShare component, the user must install the SlideShare module and component through the Joomla administration panel extensions menu.
2) The user can then upload and manage slides and categories. Slides can be added, edited, published, unpublished and deleted.
3) The user adds a SlideShare link to their site menu to display slides on pages. Display settings like the number of slides and layout can be configured.
1) To use SlideShare component, the user must install the SlideShare module and component through the Joomla administration panel extensions menu.
2) The user can then upload slides into categories. They can add, edit, publish, or unpublish slides.
3) The user can display slides on pages by adding SlideShare links to menus. They can configure link options and parameters for slide displays.
1) The document outlines the four steps to use the SlideShare component in Joomla: installation, uploading slides, displaying slides on pages, and slide display configuration.
2) For installation, the SlideShare module and component must be installed through the extension manager. An API key from SlideShare.net is also required.
3) Uploading slides involves adding, editing, publishing and deleting categories and slides through the presentation manager.
4) Displaying slides includes adding slideshare links to menus, and editing link properties and access levels.
5) Slide display configuration allows modifying the number of slides displayed and slide layout through menu item parameters.
1) To use SlideShare component, the user must install the SlideShare module and component through the Joomla administration panel extensions menu.
2) The user can then upload slides into categories. They can add, edit, publish, unpublish slides.
3) The user can add SlideShare links to menus to display slides on pages. They can configure link options and parameters to control the slide display.
1) The document outlines the four steps to use the SlideShare component in Joomla: installation, uploading slides, displaying slides on pages, and slide display configuration.
2) For installation, the SlideShare module and component must be installed through the extension manager. An API key from SlideShare.net is also required.
3) Uploading slides involves adding, editing, publishing and deleting categories and slides through the presentation manager.
4) Displaying slides includes adding slideshare links to menus, and editing link properties and access levels.
5) Slide display configuration allows modifying the number of slides displayed and slide layout through menu item parameters.
1) To use SlideShare component, the user must install the SlideShare module and component through the Joomla administration panel extensions menu.
2) The user can then upload slides into categories. They can add, edit, publish, unpublish slides.
3) The user can add SlideShare links to menus to display slides on pages. They can configure link options and parameters to control the slide display.
1) To use SlideShare component, the user must install the SlideShare module and component through the Joomla administration panel extensions menu.
2) The user can then upload slides, organize them into categories, and publish or unpublish slides.
3) Slides can be displayed on pages by adding SlideShare links to menus and configuring display parameters like the number of slides and slide layout.
1) To use SlideShare component, the user must install the SlideShare module and component through the Joomla administration panel extensions menu.
2) The user can then upload slides into categories. They can add, edit, publish, unpublish slides.
3) The user can add SlideShare links to menus to display slides on pages. They can configure link options and parameters to customize the slide display.
The document provides instructions for installing and using the SlideShare component in Joomla. It outlines four main steps: 1) Installation of the SlideShare module and component, which involves downloading packages and entering API keys; 2) Uploading slides by adding, editing, publishing and categorizing them; 3) Displaying slides on pages by adding links to menus; 4) Configuring slide display parameters. The instructions provide detailed steps for each section including screenshots and explanations.
1) The document outlines the four main steps to use the SlideShare component in Joomla: installation, uploading slides, displaying slides on pages, and slide display configuration.
2) Key steps for installation include installing the SlideShare module and component, and adding the API key.
3) Uploading slides involves adding, editing, publishing and deleting categories and slides under the Presentation Manager.
4) Displaying slides requires adding a link to the menu and configuring link menu item details.
5) Slide display configuration allows editing parameters like number of slides displayed.
Специалност: "Компютърна техника и технологии"gdavidkov
1) The document outlines the four steps to use the SlideShare component in Joomla: installation, uploading slides, displaying slides on pages, and slide display configuration.
2) For installation, the SlideShare module and component must be installed through the extension manager. An API key from SlideShare.net is also required.
3) Uploading slides involves adding, editing, publishing and deleting categories and slides through the presentation manager.
4) Displaying slides includes adding slideshare links to menus, and editing link properties and access levels.
5) Slide display configuration allows modifying the number of slides displayed and slide layout through menu item parameters.
The document provides instructions for installing and using the SlideShare component in Joomla. There are four main steps:
1) Installation of the SlideShare module and component which involves downloading packages from the extensions menu and completing the installation process.
2) Uploading slides by adding, editing, publishing and deleting categories and slides using the presentation manager.
3) Displaying slides on pages by adding links to menus and configuring link details and access settings.
4) Configuring slide display parameters by editing settings like auto-approval and entering API keys obtained from SlideShare.
1) To use SlideShare component, the user must install the SlideShare module and component through the Joomla administration panel extensions menu.
2) The user can then upload slides into categories. They can add, edit, publish, unpublish slides.
3) The user can add SlideShare links to menus to display slides on pages. They can configure link options and parameters to customize the slide display.
The document provides instructions for installing and using the SlideShare component in Joomla. It outlines four main steps: 1) Installation of the SlideShare module and component, which involves downloading packages and entering API keys; 2) Uploading slides by adding, editing, publishing and categorizing them; 3) Displaying slides on pages by adding links to menus; 4) Configuring slide display parameters. The instructions provide detailed steps for each section including screenshots and explanations.
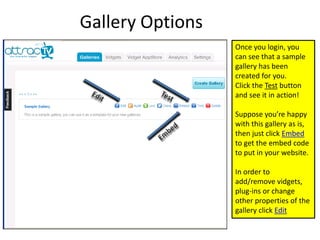
2. Gallery List
Once you login, you
can see that a sample
gallery has been
created for you.
Click the Test button
and see it in action!
Suppose you’re happy
with this gallery as is,
then just click Embed
to get the embed code
to put in your website.
In order to
add/remove vidgets,
plug-ins or change
other properties of the
gallery click Edit
3. Edit Gallery
After clicking Edit you
get to the Edit Gallery
screen. In this screen
the main job is done:
1. Setting the Gallery
properties
2. Adding removing
vidgets
3. Setting the relevant
plug-ins
After every step you
can click Save and then
Test to test your
changes.
Now click Gallery
Vidgets to add a new
vidget
4. Gallery Vidgets List
In the Gallery Vidgets
screen you see the list
of vidgets attached to
your gallery, you can
sort them,
enable/disable them in
the gallery, Edit a
vidget and remove
/add new ones.
There are two types of
vidgets – standard and
menu vidgets. Menu
vidgets enable the user
to open a vidget on
demand.
5. Edit Vidget
After you click “Edit”
on a certain vidget in
the gallery, the “Edit
Vidget” modal window
opens.
6. Add Vidget To Gallery
After you click “Add
Vidget” a modal
window opens with a
table of available
vidget applications.
You can choose to
create a new instance
or re-use existing one
from any vidget.
If an instance from that
vidget already exists in
this gallery you will
notice an “Existing in
Gallery” indicator.
After you’re done
adding vidgets to the
gallery don’t forget to
save the gallery.
7. Saving The Gallery
After you added
vidgets to the gallery
you have to enable
them in order for them
to become active for
clients.
After that you must
click save/save-and-
close for your changes
to take affect.
8. Vidgets List Screen
A single vidget may be
attached to multiple
galleries. Due to that
fact, vidgets can be
Create a created and managed
vidget independently from
any specific gallery.
From the Vidgets
screen you can add
and remove vidget
instances and manage
their content.
11. Embed Code Generator
The embed code
generator screen is the
place you configure
and then grab the html
embed code to put in
your website.
First choose the vidget
gallery that with wish
to embed and the type
of video player you
use, then a relevant set
of additional options
opens. Once you’ve set
the preferences click
“Update And Preview”
and then grab the
code. Here’s an
example how to do it
with a video from
YouTube
12. Embed Code With YouTube Video
Using a video from
YouTube is simple:
1. Go to the relevant
video page in YouTube
and click embed
2. Copy the URL to the
video that should look
like
http://www.youtube.com
/v/VIDEO_ID
3. Open the Embed
Code generator in the
studio, in the example
setup choose YouTube.
4. Update the file to
the URL you copied
from YouTube
5. Click
Update&Preview and
you’re ready to copy
the embed code
13. Grab The Embed Code
Copy the embed code
and put it in your
website.