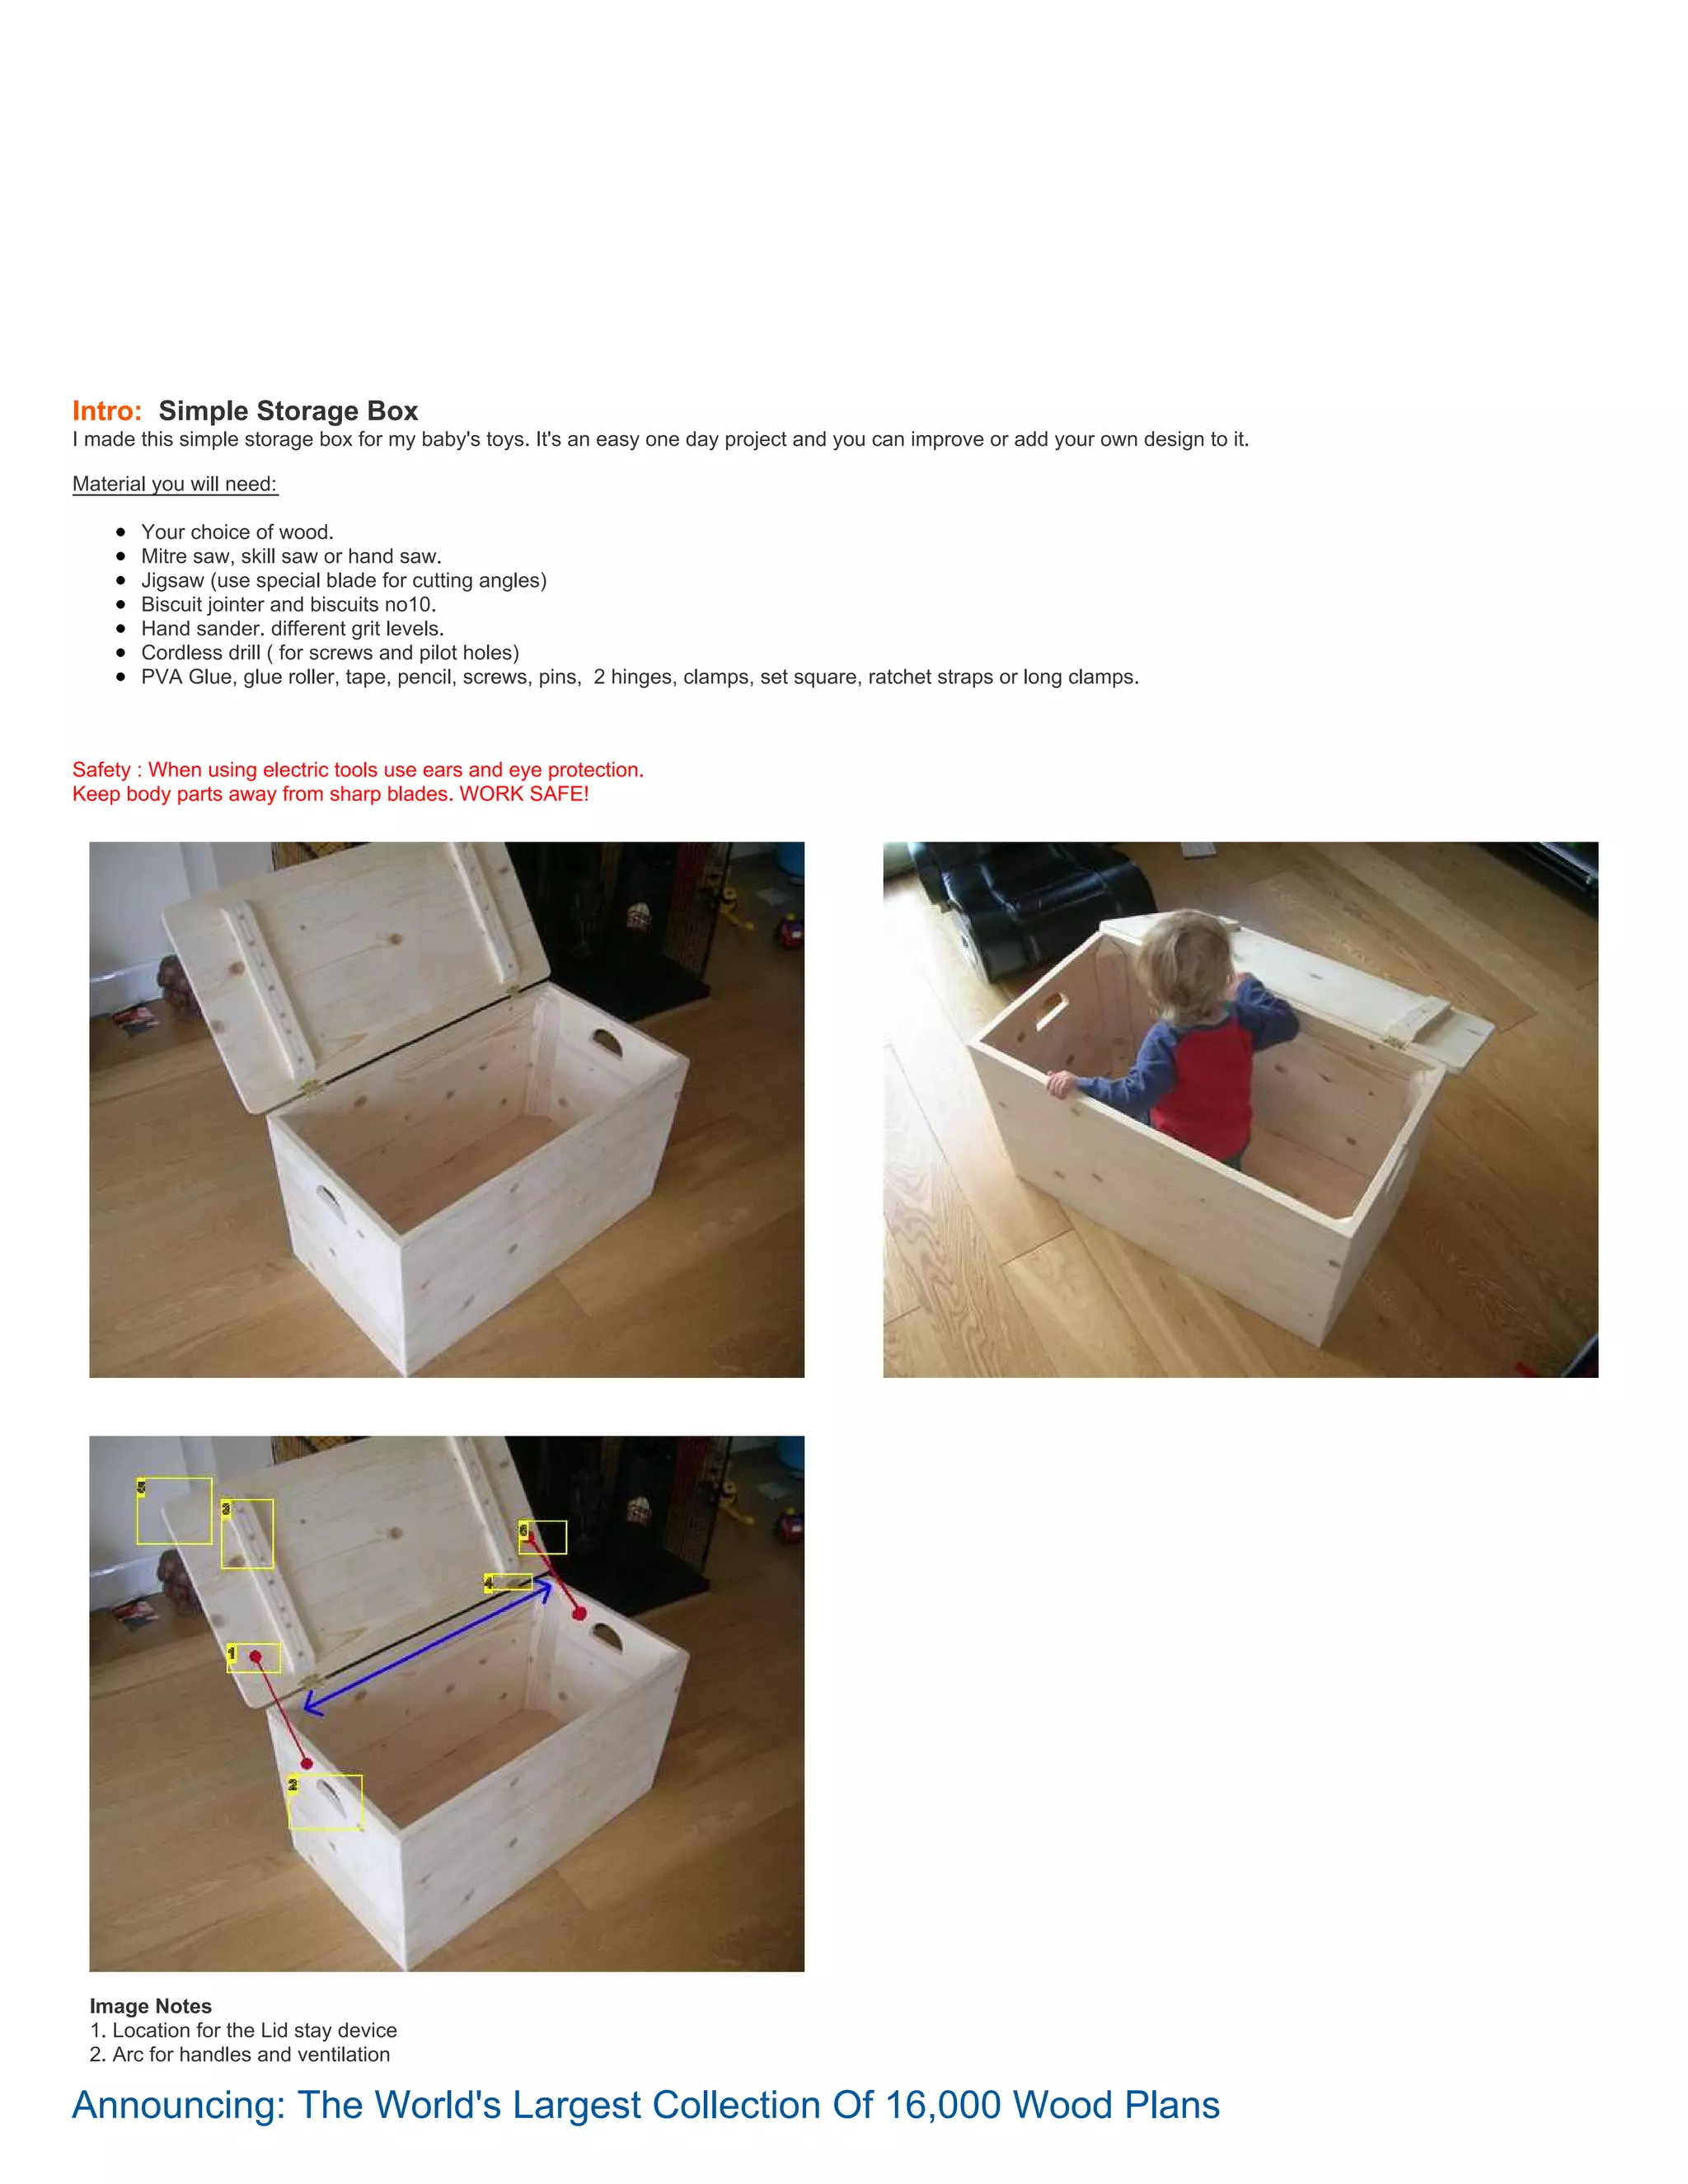
Intro: Simple Storage Box
I made this simple storage box for my baby's toys. It's an easy one day project and you can improve or add your own design to it.
Material you will need:
Your choice of wood.
Mitre saw, skill saw or hand saw.
Jigsaw (use special blade for cutting angles)
Biscuit jointer and biscuits no10.
Hand sander. different grit levels.
Cordless drill ( for screws and pilot holes)
PVA Glue, glue roller, tape, pencil, screws, pins, 2 hinges, clamps, set square, ratchet straps or long clamps.
Safety : When using electric tools use ears and eye protection.
Keep body parts away from sharp blades. WORK SAFE!
Image Notes
1. Location for the Lid stay device
2. Arc for handles and ventilation
Announcing: The World's Largest Collection Of 16,000 Wood Plans
3. Support for lid. Use screws and glue, drill shallow 10mm pilot holes, cover with
hardwood plugs .
4. Hinges in place
5. Round all corners with jigsaw
6. Lid stay
Step 1: Choose box material
You can make the box from a few cheap materials such as soft wood, plywood, mdf board and more. After deciding what material you are using think about the
pratical size of the box and what will be its purpose. I made my box size Length=800mm x Width=380mm x Height=450 that is a good size for keeping all my baby toys
tidy in one box. I chose to use soft wood 19mmx144mm.
Start by cutting your length and width size using a mitre saw or hand saw.
Don't forget to subtract the thickness of the material x 2 from your width to achieve your box width design.
Use a long set square to mark the lines between the joints, those lines will guide you when using your biscuit jointer
Transforming Brand Perception and Boosting Profitability
Simple storage box
1. Home Sign Up! Browse Community Submit
All Art Craft Food Games Green Home Kids Life Music Offbeat Outdoors Pets Photo Ride Science Tech
Simple Storage Box
by NutandBolt on May 13, 2010
Table of Contents
Simple Storage Box ............................................................................................................ 1
Intro: Simple Storage Box .................................................................................................... 2
Step 1: Choose box material .................................................................................................. 3
Step 2: Using a biscuit jointer ................................................................................................. 4
Step 3: Cut support angles ................................................................................................... 5
Step 4: Box-Lid ............................................................................................................ 6
Step 5: Check box is square and make the box base ................................................................................ 7
Step 6: Enjoy your storage box ................................................................................................ 8
Step 7: Lid stay. ........................................................................................................... 10
Related Instructables ........................................................................................................ 11
Comments ................................................................................................................ 12
2. Author:NutandBolt FLAMING FURNACE
I have too many hobbies and never enough time.
My blogs: <(°¿°)>
----------------------------
Paracord projects:
www.paracord-projects.blogspot.com
-----------------------------
Flaming Furnace (new blog)
www.flamingfurnace.blogspot.com
Intro: Simple Storage Box
I made this simple storage box for my baby's toys. It's an easy one day project and you can improve or add your own design to it.
Material you will need:
Your choice of wood.
Mitre saw, skill saw or hand saw.
Jigsaw (use special blade for cutting angles)
Biscuit jointer and biscuits no10.
Hand sander. different grit levels.
Cordless drill ( for screws and pilot holes)
PVA Glue, glue roller, tape, pencil, screws, pins, 2 hinges, clamps, set square, ratchet straps or long clamps.
Safety : When using electric tools use ears and eye protection.
Keep body parts away from sharp blades. WORK SAFE!
Image Notes
1. Location for the Lid stay device
2. Arc for handles and ventilation
Announcing: The World's Largest Collection Of 16,000 Wood Plans
3. 3. Support for lid. Use screws and glue, drill shallow 10mm pilot holes, cover with
hardwood plugs .
4. Hinges in place
5. Round all corners with jigsaw
6. Lid stay
Step 1: Choose box material
You can make the box from a few cheap materials such as soft wood, plywood, mdf board and more. After deciding what material you are using think about the
pratical size of the box and what will be its purpose. I made my box size Length=800mm x Width=380mm x Height=450 that is a good size for keeping all my baby toys
tidy in one box. I chose to use soft wood 19mmx144mm.
Start by cutting your length and width size using a mitre saw or hand saw.
Don't forget to subtract the thickness of the material x 2 from your width to achieve your box width design.
Use a long set square to mark the lines between the joints, those lines will guide you when using your biscuit jointer.
Image Notes
1. Cutting board for box walls
Image Notes
1. Pencil mark
4. 2. pencil mark
Step 2: Using a biscuit jointer
Choose your biscuits (don't eat them!!! ) I used no 10. Set your jointer height so the blade will be in the center of the timber and set the depth of the blade to be in
the center of your biscuit.
Most important: work on a SUPER FLAT surface or your joints will not match. Hold the jointer using the red guide line against your pencil mark on the timber, turn
jointer on and push it into the timber moving about 5mm left and right to create a wider joint in case you miss the mark.
After all joints are ready make a dry assembly to see if it all fits nicely together.
Use PVA wood glue, don't be shy make sure you get good glue coverage in all joints, use a glue roller to spread it all evenly.
Attach all parts to each other and wipe excess glue with damp cloth.
On a flat surface use clamps to pull parts together, what will happen is the timber will lift up like a banana so use 2 thick lengths of timber and clamp them pushing
the work piece downwards.
Image Notes
1. No' 10 biscuits
2. Biscuit jointer
Image Notes
1. Jointer center mark infront of pencil mark. After using jointer dry assemble parts.
On this video I'm showing you how to use a biscuit jointer:
Announcing: The World's Largest Collection Of 16,000 Wood Plans
5. Image Notes
1. Biscuits ready with glue. Use glue roller to get good glue coverage.
2. PVA glue
Image Notes
1. Clamp pulling joints together. Use 2 on each side, I have only one in this image.
2. Clamps on flat surface pressing glued joints down.
3. This is the length part of the box
Image Notes
1. This is the width part of the box.
Step 3: Cut support angles
Here I used 2*2 timber cut in the center with my mitre saw to create the support angles for the inner box.
Screw 2 screws in an angle to support the timber. keep the screws away from the path of the blade.
The support timber is for your own safety, keep your hands AWAY from the blade.
The corner of the 2*2 should by aligned with saw blade.
When cutting make a few passes on the 2*2 don't force the blade in one go.
Cut angle end (for decorative purpose).
Sand the 4 angles.
6. Image Notes
1. The center cut line has to be aligned with mitre saw blade.
2. Screw at an angle into the support timber. KEEP SCREW AWAY FROM BLADE
PATH.
3. Screw at an angle into the support timber. KEEP SCREW AWAY FROM BLADE
PATH.
4. Support timber
Image Notes
1. Support timber
2. 2 angles ready
Image Notes
1. Cut angle end (decorative purpose)
Image Notes
1. Sand all angles
Step 4: Box-Lid
Same again using a biscuits to join lid parts. Try adding a few extra biscuits making the joints closer to each other since the lid will be opend and closed many times.
Announcing: The World's Largest Collection Of 16,000 Wood Plans
7. Image Notes
1. Joints - dry assembly
Image Notes
1. Biscuit in joint
Step 5: Check box is square and make the box base
I ran out of big clamps so I took my emergency ratchet straps and used them to secure the box after gluing all sides.
If you want you can use screws or nails for the sides.
After securing the ratchet straps check your box is square by mesuring from one diagonal corner to the other.
When tightening the straps don't forget to place small blocks under the ratchet metal part as they will mark the soft wood when pressed against it .
Use your mitre saw and cut 20-30mm strips to support the base of the box.
Glue support strips, small pin-nails or screws are optional.
Glue box base. I made the base of the box from left overs of my wooden floor.
After the glue is dry use a small sander and sand all box parts starting from low grit to high grit (fine) .
Image Notes
1. Check box square diagonaly from one corner to the adjacent corner.
2. Timber block to protect soft wood from ratchet strap.
3. Block of timber under ratchet clamp.
Image Notes
1. Box base support strips.
8. Image Notes
1. Support strips glued
Image Notes
1. Box base made from wooden floor left overs.
Image Notes
1. Box base in place.
Step 6: Enjoy your storage box
Glue the support corners in.
Attach small hinges.
Round lid corners with jigsaw.
Make 2 segments / arcs on the sides of the box for lifting. when using the jigsaw use special blade for cutting angles.
Attach 2 straps to the inner box lid as support, glue, screw and close with hard wood plugs. You can paint this simple box, add mouldings or use electric router to
create a few shapes or writings on the box.
Be creative my baby sure is.
Announcing: The World's Largest Collection Of 16,000 Wood Plans
9. Image Notes
1. Corner support angle glued in place
Image Notes
1. Happy chap loves the box
10. Image Notes
1. Location for the Lid stay device
2. Arc for handles and ventilation
3. Support for lid. Use screws and glue, drill shallow 10mm pilot holes, cover with
hardwood plugs .
4. Hinges in place
5. Round all corners with jigsaw
6. Lid stay
Image Notes
1. All corners rounded with jigsaw
Step 7: Lid stay.
I add this step after comments regarding lid stay for child safety.
I am not going to promote products and brand names any one can Google "lid stay" will find many different lid stay devices all over the net.
I attached a few images for safety devices and where to attach it on the box.
Regarding the danger of suffocation it will not happen if you cut vent holes (like the arc for handles on the sides of the box).
Image Notes
1. Location for the Lid stay device
2. Arc for handles and ventilation
3. Support for lid. Use screws and glue, drill shallow 10mm pilot holes, cover with
hardwood plugs .
4. Hinges in place
5. Round all corners with jigsaw
6. Lid stay
Announcing: The World's Largest
Collection Of 16,000 Wood Plans
11. Related Instructables
How to make a
stackable
wooden storage
box (Photos) by
ausable
Cardboard
shelves &
storage by st
A simple trolley
(or dolly) for
lidded plastic
storage boxes
(Photos) by
timhodson
Free Storage
Boxes! by
MichaelSena
Easy "Free"
Magazine
Storage by
aznliu
A Faster, Easier
Way to Make
Boxes by
Creativeman
Announcing: The World's Largest Collection Of 16,000 Wood Plans