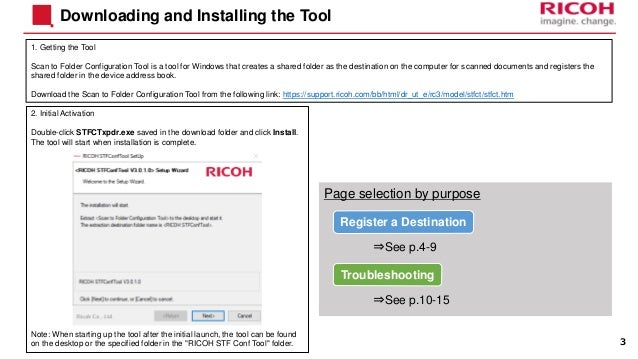
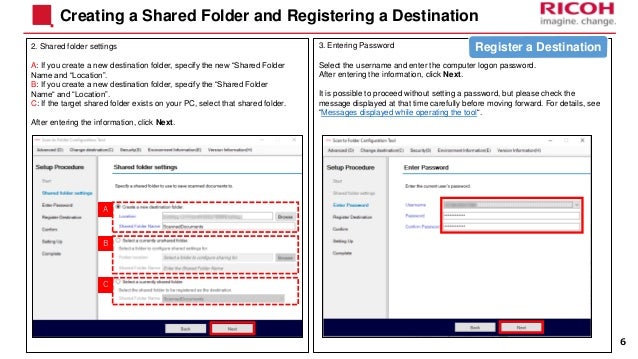
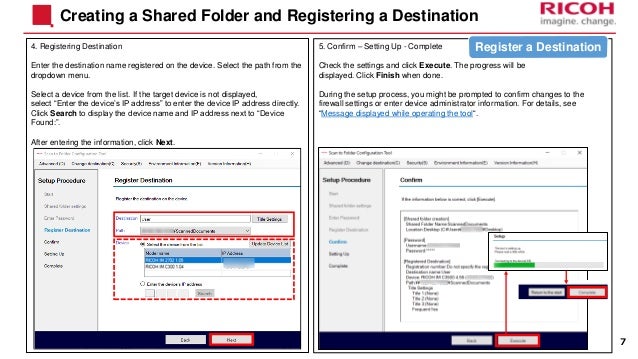
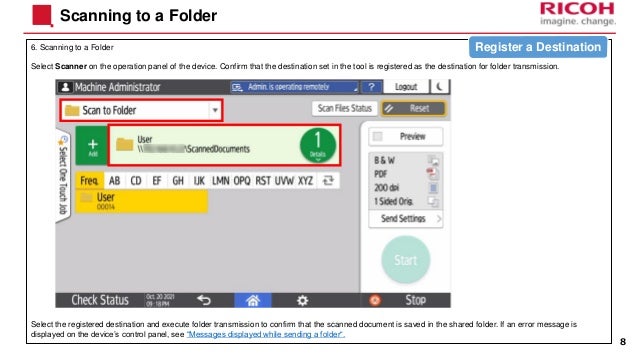
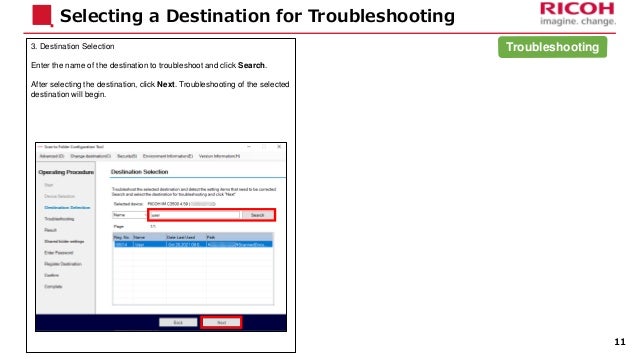
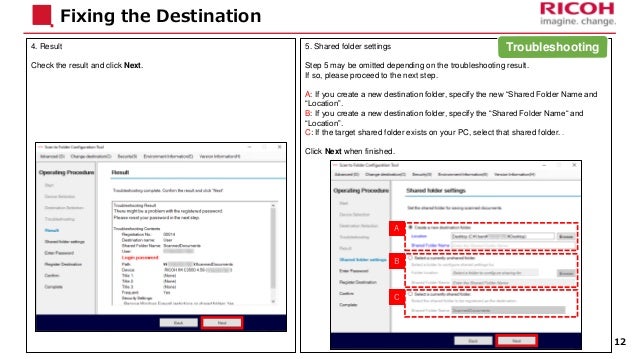
The document provides instructions for downloading and installing a Scan to Folder Configuration Tool to configure scan destinations on a device. It describes registering a new shared folder destination on a computer to scan documents to, and troubleshooting issues with an existing configured destination. The steps include downloading and launching the tool, creating or selecting a shared folder, entering login credentials, searching for and selecting a device, configuring and registering the destination name and path, and testing a scan. It also provides messages that may appear during setup or troubleshooting and solutions to common issues like blocked ports or incorrect login information.


![Messages Displayed While Operating the Device
18
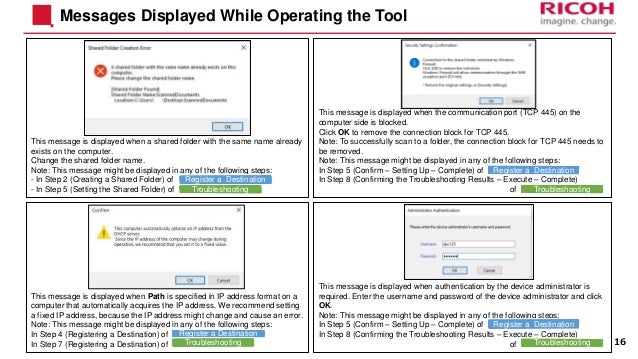
If the destination path name is not entered correctly in this machine or the firewall settings of
the destination PC do not permit access from this machine, this message will be displayed
after scan is executed.
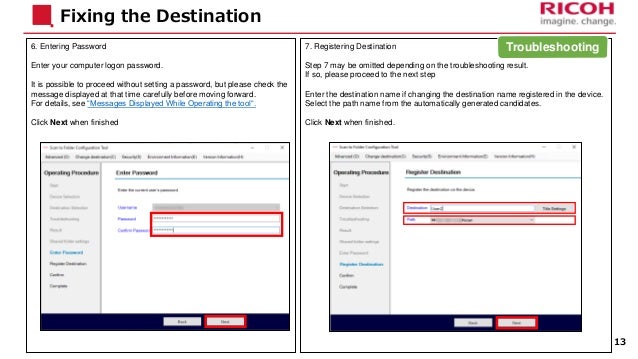
Touch the [Scan Files Status] button and follow the on-screen instructions to correct the
settings.
Note: Not applicable for some models
Touch the [Connection Error…] button
Touch the [Current Address Book] button
Touch the “Destinations” tab, then “Folder” Correct the IP address or computer name in “Path” and Touch "OK".
Note: Enter the name or IP address of the computer where the shared folder
was created.](https://image.slidesharecdn.com/scantofoldereasysetupguide-220628093921-aca6a780/95/Scan-to-Folder-Easy-Setup-Guide-pdf-18-638.jpg)
![Messages Displayed While Operating the Device
19
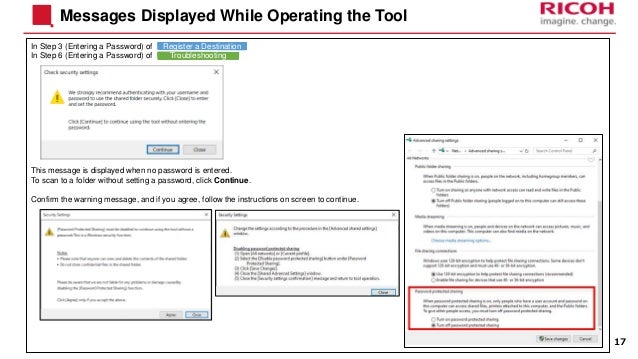
If the login user name and the password of the destination PC is not entered correctly in this
machine, this message will be displayed after scan is executed.
Touch the [Scan Files Status] button and follow the on-screen instructions to correct the
settings.
Note: Not applicable for some models
Touch the [Connection Error…] button
Touch the [Current Address Book] button
Touch the “Destinations” tab, then “Folder” Correct “Login User Name” or “Login Password” and touch "OK".
Note: Enter “Login User Name” or “Login Password” of the computer where
the shared folder was created.](https://image.slidesharecdn.com/scantofoldereasysetupguide-220628093921-aca6a780/95/Scan-to-Folder-Easy-Setup-Guide-pdf-19-638.jpg)


![[DSC Europe 25] Dusan Nesic - Securing Tomorrow’s Infrastructure: Why Cyber-P...](https://cdn.slidesharecdn.com/ss_thumbnails/qikbszfftyowjm2q6duw-1-251211083848-8f2ead6b-thumbnail.jpg?width=640&height=640&fit=bounds)
![[DSC Europe 25] Marija Vlajkovic & Andrea Radonjanin - Integration of AI tool...](https://cdn.slidesharecdn.com/ss_thumbnails/qf1jrglttoc3bm8s3aop-final-integration-of-ai-tools-251208151905-394f3a6a-thumbnail.jpg?width=640&height=640&fit=bounds)


![[DSC Europe 25] Dusan Pavlov - There Is No Spoon: Inferring Vision from Neura...](https://cdn.slidesharecdn.com/ss_thumbnails/wg0v1umoqjm4nnbd3p0v-there-is-no-spoon-251205085715-6d81d6c5-thumbnail.jpg?width=640&height=640&fit=bounds)


![[DSC Europe 25] Max Talanov - Non digital NNs.pptx](https://cdn.slidesharecdn.com/ss_thumbnails/wif8tr3gtua74qvtopke-non-digital-nns-251205090438-26b0eea6-thumbnail.jpg?width=640&height=640&fit=bounds)

![[DSC Europe 25] Debmalya Biswas - Agentification: the art of transforming man...](https://cdn.slidesharecdn.com/ss_thumbnails/r5azlggvtqiaiiusrqdr-4-251212103249-5a12c89b-thumbnail.jpg?width=640&height=640&fit=bounds)
![[DSC Europe 25] Dragana Ilic - AI for Big Data in Astronomy.pptx](https://cdn.slidesharecdn.com/ss_thumbnails/8palya86qaatvjhva1ms-2-dragana-ilic-ai-ilic-251208151906-652b819c-thumbnail.jpg?width=640&height=640&fit=bounds)
![[DSC Europe 25] Branko Dzakula - From Defense to Attack: How AI Redefines Cyb...](https://cdn.slidesharecdn.com/ss_thumbnails/80bdzdxpr3ky2g0qvyk9-8-251211083048-ce5fc1ee-thumbnail.jpg?width=640&height=640&fit=bounds)
![[DSC Europe 25] Milan Sekuloski - Data, Defence, and Development: Cybersecuri...](https://cdn.slidesharecdn.com/ss_thumbnails/dfrkwwx4qly6atqpbl4z-4-251209104645-c3d4b0ca-thumbnail.jpg?width=640&height=640&fit=bounds)


