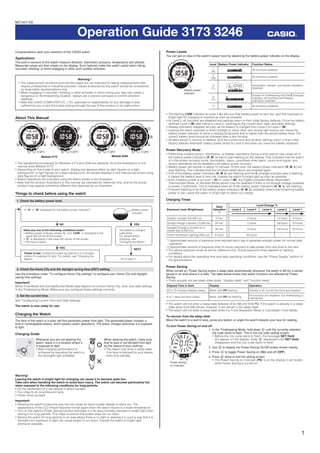
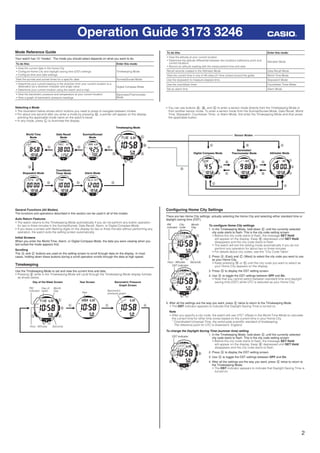
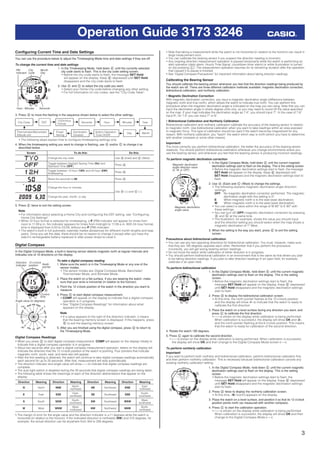
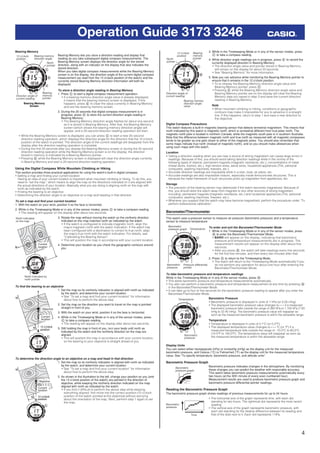
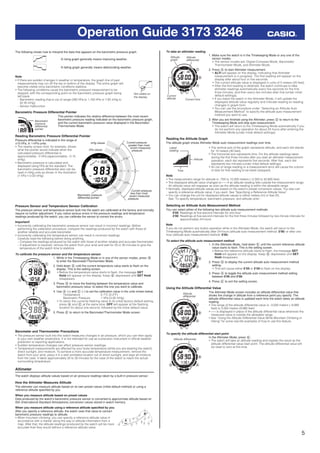
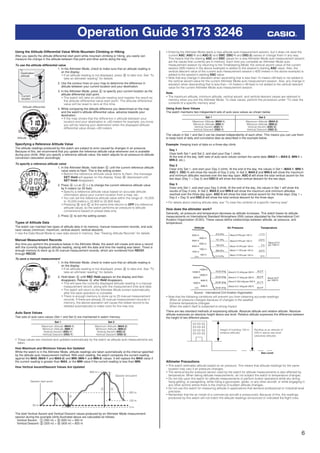
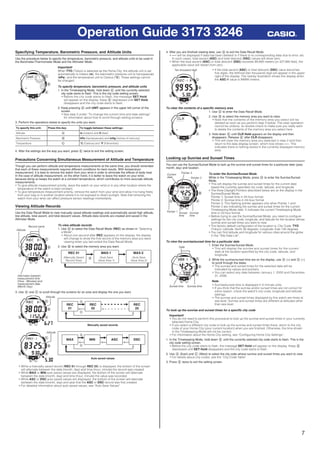
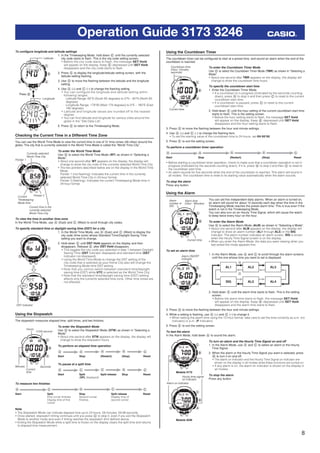
SlideShare a Scribd company logo
1
Operation Guide 3173 3246
Congratulations upon your selection of this CASIO watch.
Applications
The built-in sensors of this watch measure direction, barometric pressure, temperature and altitude.
Measured values are then shown on the display. Such features make this watch useful when hiking,
mountain climbing, or when engaging in other such outdoor activities.
Warning !
• The measurement functions built into this watch are not intended for taking measurements that
require professional or industrial precision. Values produced by this watch should be considered
as reasonable representations only.
• When engaging in mountain climbing or other activities in which losing your way can create a
dangerous or life-threatening situation, always use a second compass to confirm direction
readings.
• Note that CASIO COMPUTER CO., LTD. assumes no responsibility for any damage or loss
suffered by you or any third party arising through the use of this product or its malfunction.
About This Manual
• The operational procedures for Modules 3173 and 3246 are identical. All of the illustrations in this
manual show Module 3173.
• Depending on the model of your watch, display text appears either as dark figures on a light
background, or light figures on a dark background. All sample displays in this manual are shown using
dark figures on a light background.
• Button operations are indicated using the letters shown in the illustration.
• Note that the product illustrations in this manual are intended for reference only, and so the actual
product may appear somewhat different than depicted by an illustration.
Things to check before using the watch
1. Check the battery power level.
Is “H” or “M” displayed for the battery power indicator?
Go to step 2.
Power is low. Charge the watch by placing it in a location
where it is exposed to light. For details, see “Charging the
Watch”.
NO YES
YES
Does any one of the following conditions exist?
• Battery power indicator shows “L” and “LOW” is displayed in the
upper left corner of the screen.
• “C” is displayed in the lower left corner of the screen.
• The face is blank.
The watch is charged
sufficiently.
For details about
charging, see
“Charging the Watch”.
NEXT
Battery power
indicator
2. Check the Home City and the daylight saving time (DST) setting.
Use the procedure under “To configure Home City settings” to configure your Home City and daylight
saving time settings.
Important!
World Time Mode and Sunrise/Sunset Mode data depend on correct Home City, time, and date settings
in the Timekeeping Mode. Make sure you configure these settings correctly.
3. Set the current time.
See “Configuring Current Time and Date Settings”.
The watch is now ready for use.
Charging the Watch
The face of the watch is a solar cell that generates power from light. The generated power charges a
built-in rechargeable battery, which powers watch operations. The watch charges whenever it is exposed
to light.
Charging Guide
Whenever you are not wearing the
watch, leave it in a location where it
is exposed to light.
• Best charging performance is
achieved by exposing the watch to
the strongest light available.
When wearing the watch, make sure
that its face is not blocked from light
by the sleeve of your clothing.
• The watch may enter a sleep state
if its face is blocked by your sleeve
even only partially.
Warning!
Leaving the watch in bright light for charging can cause it to become quite hot.
Take care when handling the watch to avoid burn injury. The watch can become particularly hot
when exposed to the following conditions for long periods.
• On the dashboard of a car parked in direct sunlight
• Too close to an incandescent lamp
• Under direct sunlight
Important!
• Allowing the watch to become very hot can cause its liquid crystal display to black out. The
appearance of the LCD should become normal again when the watch returns to a lower temperature.
• Turn on the watch’s Power Saving function and keep it in an area normally exposed to bright light when
storing it for long periods. This helps to ensure that power does not run down.
• Storing the watch for long periods in an area where there is no light or wearing it in such a way that it is
blocked from exposure to light can cause power to run down. Expose the watch to bright light
whenever possible.
(Light)(Light) (Light)
Module 3173
(Light)
Module 3246
(Light)(Light) (Light)
Module 3173
(Light)
Module 3246
Power Levels
You can get an idea of the watch’s power level by observing the battery power indicator on the display.
Level Battery Power Indicator Function Status
1
(H)
All functions enabled.
2
(M) All functions enabled.
3
(L)
l l l l l l
l
llllllll
l
l l
Illumination, beeper, and sensor operation
disabled.
4
(C)
Except for timekeeping and the C (charge)
indicator, all functions and display
indicators disabled.
5 All functions disabled.
• The flashing LOW indicator at Level 3 (L) tells you that battery power is very low, and that exposure to
bright light for charging is required as soon as possible.
• At Level 5, all functions are disabled and settings return to their initial factory defaults. Once the battery
reaches Level 2 (M) after falling to Level 5, reconfigure the current time, date, and other settings.
• Display indicators reappear as soon as the battery is charged from Level 5 to Level 2 (M).
• Leaving the watch exposed to direct sunlight or some other very strong light source can cause the
battery power indicator to show a reading temporarily that is higher than the actual battery level. The
correct battery level should be indicated after a few minutes.
• All data stored in memory is deleted, and the current time and all other settings return to their initial
factory defaults whenever battery power drops to Level 5 and when you have the battery replaced.
Power Recovery Mode
• Performing multiple sensor, illumination, or beeper operations during a short period may cause all of
the battery power indicators (H, M, and L) to start flashing on the display. This indicates that the watch
is in the power recovery mode. Illumination, alarm, countdown timer alarm, hourly time signal, and
sensor operations will be disabled until battery power recovers.
• Battery power will recover in about 15 minutes. At this time, the battery power indicators (H, M, L) will
stop flashing. This indicates that the functions listed above are enabled again.
• If all of the battery power indicators (H, M, L) are flashing and the C (charge) indicator also is flashing,
it means the battery level is very low. Expose the watch to bright light as soon as possible.
• Even if battery power is at Level 1 (H) or Level 2 (M), the Digital Compass Mode, Barometer/
Thermometer Mode, or Altimeter Mode sensor may be disabled if there is not enough voltage available
to power it sufficiently. This is indicated when all of the battery power indicators (H, M, L) are flashing.
• Frequent flashing of all of the battery power indicators (H, M, L) probably means that remaining battery
power is low. Leave the watch in bright light to allow it to charge.
Charging Times
Exposure Level (Brightness)
Daily
Operation
*1
Level Change *2
Level 5 Level 4 Level 3 Level 2 Level 1
Outdoor sunlight (50,000 lux) 5 min. 2 hours 12 hours 4 hours
Sunlight through a window (10,000 lux) 24 min. 5 hours 59 hours 16 hours
Daylight through a window on a
cloudy day (5,000 lux)
48 min. 9 hours 120 hours 32 hours
Indoor fluorescent lighting (500 lux) 8 hours 95 hours – – – – – –
*1 Approximate amount of exposure time required each day to generate enough power for normal daily
operation.
*2 Approximate amount of exposure time (in hours) required to take power from one level to the next.
• The above exposure times all are for reference only. Actual exposure times depend on lighting
conditions.
• For details about the operating time and daily operating conditions, see the “Power Supply” section of
the Specifications.
Power Saving
When turned on, Power Saving enters a sleep state automatically whenever the watch is left for a certain
period in an area where it is dark. The table below shows how watch functions are affected by Power
Saving.
• There actually are two sleep state levels: “display sleep” and “function sleep”.
Elapsed Time in Dark Display Operation
60 to 70 minutes (display sleep) Blank, with PS flashing Display is off, but all functions are enabled.
6 or 7 days (function sleep) Blank, with PS not flashing
All functions are disabled, but timekeeping is
maintained.
• The watch will not enter a sleep state between 6:00 AM and 9:59 PM. If the watch is already in a sleep
state when 6:00 AM arrives, however, it will remain in the sleep state.
• The watch will not enter a sleep state while it is in the Stopwatch Mode or Countdown Timer Mode.
To recover from the sleep state
Move the watch to a well-lit area, press any button, or angle the watch towards your face for reading.
To turn Power Saving on and off
1. In the Timekeeping Mode, hold down E until the currently selected
city code starts to flash. This is the city code setting screen.
• Before the city code starts to flash, the message SET Hold
will appear on the display. Keep E depressed until SET Hold
disappears and the city code starts to flash.
2. Use D to display the Power Saving On/Off screen shown nearby.
3. Press A to toggle Power Saving on (On) and off (OFF).
4. Press E twice to exit the setting screen.
• The Power Saving on indicator (PS) is on the display in all modes
while Power Saving is turned on.
Battery power
indicator
Battery power
indicator
Power saving
on indicator
Power saving
on indicator
MO1007-EB
2
Operation Guide 3173 3246
Mode Reference Guide
Your watch has 10 “modes”. The mode you should select depends on what you want to do.
To do this: Enter this mode:
• View the current date in the Home City
• Configure Home City and daylight saving time (DST) settings
• Configure time and date settings
Timekeeping Mode
View the sunrise and sunset times for a specific date Sunrise/Sunset Mode
• Determine your current bearing or the direction from your current location to a
destination as a direction indicator and angle value
• Determine your current location using the watch and a map
Digital Compass Mode
• View the barometric pressure and temperature at your current location
• View a graph of barometric pressure readings
Barometer/Thermometer
Mode
To do this: Enter this mode:
• View the altitude at your current location
• Determine the altitude differential between two locations (reference point and
current location)
• Record an altitude reading with the measurement time and date
Altimeter Mode
Recall records created in the Altimeter Mode Data Recall Mode
View the current time in one of 48 cities (31 time zones) around the globe World Time Mode
Use the stopwatch to measure elapsed time Stopwatch Mode
Use the countdown timer Countdown Timer Mode
Set an alarm time Alarm Mode
General Functions (All Modes)
The functions and operations described in this section can be used in all of the modes.
Auto Return Features
• The watch returns to the Timekeeping Mode automatically if you do not perform any button operation
for two or three minutes in the Sunrise/Sunset, Data Recall, Alarm, or Digital Compass Mode.
• If you leave a screen with flashing digits on the display for two or three minutes without performing any
operation, the watch exits the setting screen automatically.
Initial Screens
When you enter the World Time, Alarm, or Digital Compass Mode, the data you were viewing when you
last exited the mode appears first.
Scrolling
The A and C buttons are used on the setting screen to scroll through data on the display. In most
cases, holding down these buttons during a scroll operation scrolls through the data at high speed.
Timekeeping
Use the Timekeeping Mode to set and view the current time and date.
• Pressing E while in the Timekeeping Mode will cycle through the Timekeeping Mode display formats
as shown below.
Year
Barometric
pressure graph
Day of the Week Screen Year Screen Barometric Pressure
Graph Screen
PM
indicator
Day of
week
Month
Day
SecondsHour : Minutes
Configuring Home City Settings
There are two Home City settings: actually selecting the Home City and selecting either standard time or
daylight saving time (DST).
To configure Home City settings
1. In the Timekeeping Mode, hold down E until the currently selected
city code starts to flash. This is the city code setting screen.
• Before the city code starts to flash, the message SET Hold
will appear on the display. Keep E depressed until SET Hold
disappears and the city code starts to flash.
• The watch will exit the setting mode automatically if you do not
perform any operation for about two or three minutes.
• For details about city codes, see the “City Code Table”.
2. Press A (East) and C (West) to select the city code you want to use
as your Home City.
• Keep pressing A or C until the city code you want to select as
your Home City appears on the display.
3. Press D to display the DST setting screen.
4. Use A to toggle the DST settings between OFF and On.
• Note that you cannot switch between standard time and daylight
saving time (DST) while UTC is selected as your Home City.
5. After all the settings are the way you want, press E twice to return to the Timekeeping Mode.
• The DST indicator appears to indicate that Daylight Saving Time is turned on.
Note
• After you specify a city code, the watch will use UTC* offsets in the World Time Mode to calculate
the current time for other time zones based on the current time in your Home City.
* Coordinated Universal Time, the world-wide scientific standard of timekeeping.
The reference point for UTC is Greenwich, England.
To change the Daylight Saving Time (summer time) setting
1. In the Timekeeping Mode, hold down E until the currently selected
city code starts to flash. This is the city code setting screen.
• Before the city code starts to flash, the message SET Hold
will appear on the display. Keep E depressed until SET Hold
disappears and the city code starts to flash.
2. Press D to display the DST setting screen.
3. Use A to toggle the DST settings between OFF and On.
4. After all the settings are the way you want, press E twice to return to
the Timekeeping Mode.
• The DST indicator appears to indicate that Daylight Saving Time is
turned on.
PM
indicator
City
code
Month
Day
SecondsHour : Minutes
DST indicator
PM
indicator
City
code
Month
Day
SecondsHour : Minutes
DST indicator
DST indicatorDST indicator
Selecting a Mode
• The illustration below shows which buttons you need to press to navigate between modes.
• For about one second after you enter a mode by pressing D, a pointer will appear on the display
pointing the applicable mode name on the watch's bezel.
• In any mode, press L to illuminate the display.
• You can use buttons A, B, and C to enter a sensor mode directly from the Timekeeping Mode or
from another sensor mode. To enter a sensor mode from the Sunrise/Sunset Mode, Data Recall, World
Time, Stopwatch, Countdown Timer, or Alarm Mode, first enter the Timekeeping Mode and then press
the applicable button.
World Time
Mode
Data Recall
Mode
Sunrise/Sunset
Mode
Stopwatch Mode
Countdown
Timer Mode Alarm Mode
Altimeter Mode
Barometer/
Thermometer ModeDigital Compass Mode
Timekeeping Mode
Sensor ModesWorld Time
Mode
Data Recall
Mode
Sunrise/Sunset
Mode
Stopwatch Mode
Countdown
Timer Mode Alarm Mode
Altimeter Mode
Barometer/
Thermometer ModeDigital Compass Mode
Timekeeping Mode
Sensor Modes
3
Operation Guide 3173 3246
Configuring Current Time and Date Settings
You can use the procedure below to adjust the Timekeeping Mode time and date settings if they are off.
To change the current time and date settings
1. In the Timekeeping Mode, hold down E until the currently selected
city code starts to flash. This is the city code setting screen.
• Before the city code starts to flash, the message SET Hold
will appear on the display. Keep E depressed until SET Hold
disappears and the city code starts to flash.
2. Use A and C to select the city code you want.
• Select your Home City code before changing any other setting.
• For full information on city codes, see the “City Code Table”.
3. Press D to move the flashing in the sequence shown below to select the other settings.
Thermometer/Barometer/
Altitude unit
Power
Saving
Illumination
Duration
Button Operation
Tone On/Off
Day Month
City Code DST
12/24-Hour
Format
Seconds Hour Minutes Year
• The following steps explain how to configure timekeeping settings only.
4. When the timekeeping setting you want to change is flashing, use A and/or C to change it as
described below.
Screen To do this: Do this:
Change the city code Use A (East) and C (West).
Toggle between Daylight Saving Time (On) and
Standard Time (OFF).
Press A.
Toggle between 12-hour (12H) and 24-hour (24H)
timekeeping.
Press A.
50 Reset the seconds to 00 Press A.
Change the hour or minutes
Use A (+) and C (–).
Change the year, month, or day
5. Press E twice to exit the setting screen.
Note
• For information about selecting a Home City and configuring the DST setting, see “Configuring
Home City Settings”.
• While 12-hour format is selected for timekeeping, a P (PM) indicator will appear for times from
noon to 11:59 p.m. No indicator appears for times from midnight to 11:59 a.m. With 24-hour format,
time is displayed from 0:00 to 23:59, without any P (PM) indicator.
• The watch’s built-in full automatic calendar makes allowances for different month lengths and leap
years. Once you set the date, there should be no reason to change it except after you have the
watch’s rechargeable battery replaced or after power drops to Level 5.
Digital Compass
In the Digital Compass Mode, a built-in bearing sensor detects magnetic north at regular intervals and
indicates one of 16 directions on the display.
To take a digital compass reading
1. Make sure the watch is in the Timekeeping Mode or any one of the
sensor modes.
• The sensor modes are: Digital Compass Mode, Barometer/
Thermometer Mode, and Altimeter Mode.
2. Place the watch on a flat surface. If you are wearing the watch, make
sure that your wrist is horizontal (in relation to the horizon).
3. Point the 12 o'clock position of the watch in the direction you want to
measure.
4. Press C to start digital compass measurement.
• COMP will appear on the display to indicate that a digital compass
operation is in progress.
• See “Digital Compass Readings” for information about what
appears on the display.
Note
• If a value appears to the right of the direction indicator, it means
that the bearing memory screen is displayed. If this happens, press
E to exit the bearing memory screen.
5. After you are finished using the digital compass, press D to return to
the Timekeeping Mode.
Digital Compass Readings
• When you press C to start digital compass measurement, COMP will appear on the display initially to
indicate that a digital compass operation is in progress.
• About two seconds after you start a digital compass measurement operation, letters on the display will
indicate the direction that the 12 o’clock position of the watch is pointing. Four pointers that indicate
magnetic north, south, east, and west also will appear.
• After the first reading is obtained, the watch will continue to take digital compass readings automatically
each second for up to 20 seconds. After that, measurement will stop automatically.
• The direction indicator and angle value will show - - - to indicate that digital compass readings are
complete.
• The auto light switch is disabled during the 20 seconds that digital compass readings are being taken.
• The following table shows the meanings of each of the direction abbreviations that appear on the
display.
Direction Meaning Direction Meaning Direction Meaning Direction Meaning
N North NNE North-
northeast
NE Northeast ENE East-
northeast
E East ESE East-
southeast
SE Southeast SSE South-
southeast
S South SSW South-
southwest
SW Southwest WSW West-
southwest
W West WNW West-
northwest
NW Northwest NNW North-
northwest
• The margin of error for the angle value and the direction indicator is ±11 degrees while the watch is
horizontal (in relation to the horizon). If the indicated direction is northwest (NW) and 315 degrees, for
example, the actual direction can be anywhere from 304 to 326 degrees.
PM
indicator
City
code
Month
Day
SecondsHour : Minutes
PM
indicator
City
code
Month
Day
SecondsHour : Minutes
NW
0WNW
W
WSW
SW
SSW
S
SSE
SE
ESE
E
ENE
NE
NNE
N
NNW
90180
270
12 o’clock
position
Current
time
North
pointer
Direction
indicator
Angle value (in degrees)
NW
0WNW
W
WSW
SW
SSW
S
SSE
SE
ESE
E
ENE
NE
NNE
N
NNW
90180
270
12 o’clock
position
Current
time
North
pointer
Direction
indicator
Angle value (in degrees)
• Note that taking a measurement while the watch is not horizontal (in relation to the horizon) can result in
large measurement error.
• You can calibrate the bearing sensor if you suspect the direction reading is incorrect.
• Any ongoing direction measurement operation is paused temporarily while the watch is performing an
alert operation (daily alarm, Hourly Time Signal, countdown timer alarm) or while illumination is turned
on (by pressing L). The measurement operation resumes for its remaining duration after the operation
that caused it to pause is finished.
• See “Digital Compass Precautions” for important information about taking direction readings.
Calibrating the Bearing Sensor
You should calibrate the bearing sensor whenever you feel that the direction readings being produced by
the watch are off. There are three different calibration methods available: magnetic declination correction,
bidirectional calibration, and northerly calibration.
• Magnetic Declination Correction
With magnetic declination correction, you input a magnetic declination angle (difference between
magnetic north and true north), which allows the watch to indicate true north. You can perform this
procedure when the magnetic declination angle is indicated on the map you are using. Note that you can
input the declination angle in whole degree units only, so you may need to round off the value specified
on the map. If your map indicates the declination angle as 7.4°, you should input 7°. In the case of 7.6°
input 8°, for 7.5° you can input 7° or 8°.
• Bidirectional Calibration and Northerly Calibration
Bidirectional calibration and northerly calibration calibrate the accuracy of the bearing sensor in relation
to magnetic north. Use bidirectional calibration when you want to take readings within an area exposed
to magnetic force. This type of calibration should be used if the watch becomes magnetized for any
reason. With northerly calibration, you “teach” the watch which way is north (which you have to determine
with another compass or some other means).
Important!
The more correctly you perform bidirectional calibration, the better the accuracy of the bearing sensor
readouts. You should perform bidirectional calibration whenever you change environments where you
use the bearing sensor, and whenever you feel that the bearing sensor is producing incorrect readings.
To perform magnetic declination correction
1. In the Digital Compass Mode, hold down E until the current magnetic
declination settings start to flash on the display. This is the setting screen.
• Before the magnetic declination settings start to flash, the message
SET Hold will appear on the display. Keep E depressed until
SET Hold disappears and the magnetic declination settings start to
flash.
2. Use A (East) and C (West) to change the settings.
• The following explains magnetic declination angle direction
settings.
OFF: No magnetic declination correction performed. The magnetic
declination angle with this setting is 0°.
E: When magnetic north is to the east (east declination)
W: When magnetic north is to the west (west declination)
• You can select a value within the range of W 90° to E 90° with
these settings.
• You can turn off (OFF) magnetic declination correction by pressing
A and C at the same time.
• The illustration, for example, shows the value you should input
and the direction setting you should select when the map shows a
magnetic declination of 1° West.
3. When the setting is the way you want, press E to exit the setting
screen.
Precautions about bidirectional calibration
• You can use any two opposing directions for bidirectional calibration. You must, however, make sure
that they are 180 degrees opposite each other. Remember that if you perform the procedure
incorrectly, you will get wrong bearing sensor readings.
• Do not move the watch while calibration of either direction is in progress.
• You should perform bidirectional calibration in an environment that is the same as that where you plan
to be taking direction readings. If you plan to take direction readings in an open field, for example,
calibrate in an open field.
To perform bidirectional calibration
1. In the Digital Compass Mode, hold down E until the current magnetic
declination settings start to flash on the display. This is the setting
screen.
• Before the magnetic declination settings start to flash, the
message SET Hold will appear on the display. Keep E depressed
until SET Hold disappears and the magnetic declination settings
start to flash.
2. Press D to display the bidirectional calibration screen.
• At this time, the north pointer flashes at the 12 o’clock position
and the display will show -1- to indicate that the watch is ready to
calibrate the first direction.
3. Place the watch on a level surface facing any direction you want, and
press C to calibrate the first direction.
• - - - is shown on the display while calibration is being performed.
When calibration is successful, the display will show OK and -2-,
and the north pointer flashing at the 6 o’clock position. This means
that the watch is ready for calibration of the second direction.
4. Rotate the watch 180 degrees.
5. Press C again to calibrate the second direction.
• - - - is shown on the display while calibration is being performed. When calibration is successful,
the display will show OK and then change to the Digital Compass Mode screen (- - -).
To perform northerly calibration
Important!
If you want to perform both northerly and bidirectional calibration, perform bidirectional calibration first,
and then perform northerly calibration. This is necessary because bidirectional calibration cancels any
existing northerly calibration setting.
1. In the Digital Compass Mode, hold down E until the current magnetic
declination settings start to flash on the display. This is the setting
screen.
• Before the magnetic declination settings start to flash, the
message SET Hold will appear on the display. Keep E depressed
until SET Hold disappears and the magnetic declination settings
start to flash.
2. Press D twice to display the northerly calibration screen.
• At this time, -N- (north) appears on the display.
3. Place the watch on a level surface, and position it so that its 12 o’clock
position points north (as measured with another compass).
4. Press C to start the calibration operation.
• - - - is shown on the display while calibration is being performed.
When calibration is successful, the display will show OK and then
change to the Digital Compass Mode (- - -).
Magnetic declination
angle direction value
(E, W, or OFF)
Magnetic declination
angle value
Magnetic declination
angle direction value
(E, W, or OFF)
Magnetic declination
angle value
l l l
lllll
lll
lllll
l l l
lllll
lll
lllll
ll l l
lllll
lll
lllll
l l l
lllll
lll
lllll
l l l
lllll
lll
lllll
l l l
lllll
lll
lllll
ll l l
lllll
lll
lllll
l l l
lllll
lll
lllll
4
Operation Guide 3173 3246
Bearing Memory
Bearing Memory lets you store a direction reading and display that
reading as you take subsequent digital compass measurements. The
Bearing Memory screen displays the direction angle for the stored
direction, along with an indicator on the display that also indicates the
stored direction.
When you take digital compass measurements while the Bearing Memory
screen is on the display, the direction angle of the current digital compass
measurement (as read from the 12 o'clock position of the watch) and the
currently stored Bearing Memory direction information will both be
displayed.
To store a direction angle reading in Bearing Memory
1. Press C to start a digital compass measurement operation.
• If a bearing memory direction angle value is already displayed,
it means that the bearing memory screen is displayed. If this
happens, press E to clear the value currently in Bearing Memory
and exit the bearing memory screen.
2. During the 20 seconds that digital compass measurement is in
progress, press E to store the current direction angle reading in
Bearing Memory.
• The Bearing Memory direction angle flashes for about one second
as it is stored in Bearing Memory. After that, the Bearing Memory
screen (which shows the bearing memory direction angle) will
appear, and a 20-second direction reading operation will start.
• While the Bearing Memory screen is displayed, you can press C to start a new 20-second
direction reading operation, which displays the direction angle for the direction that the 12 o’clock
position of the watch is pointed. The direction angle of the current readings will disappear from the
display after the direction reading operation is complete.
• During the first 20 seconds after you display the Bearing Memory screen or during the 20-second
direction reading operation while the Bearing Memory screen is on the display, the direction
stored in memory is indicated by a Bearing Memory pointer.
• Pressing E while the Bearing Memory screen is displayed will clear the direction angle currently
in Bearing Memory and start a 20-second direction reading operation.
Using the Digital Compass While Mountain Climbing or Hiking
This section provides three practical applications for using the watch’s built-in digital compass.
• Setting a map and finding your current location
Having an idea of your current location is important when mountain climbing or hiking. To do this, you
need to “set the map”, which means to align the map so the directions indicated on it are aligned with
the actual directions of your location. Basically what you are doing is aligning north on the map with
north as indicated by the watch.
• Finding the bearing to an objective
• Determining the direction angle to an objective on a map and heading in that direction
To set a map and find your current location
1. With the watch on your wrist, position it so the face is horizontal.
2. While in the Timekeeping Mode or in any of the sensor modes, press C to take a compass reading.
• The reading will appear on the display after about two seconds.
3. Rotate the map without moving the watch so the northerly direction
indicated on the map matches north as indicated by the watch.
• If the watch is configured to indicate magnetic north, align the
map’s magnetic north with the watch indication. If the watch has
been configured with a declination to correct to true north, align
the map’s true north with the watch indication. For details, see
“Calibrating the Bearing Sensor”.
• This will position the map in accordance with your current location.
4. Determine your location as you check the geographic contours around
you.
To find the bearing to an objective
1. Set the map so its northerly indication is aligned with north as indicated
by the watch, and determine your current location.
• See “To set a map and find your current location” for information
about how to perform the above step.
2. Set the map so the direction you want to travel on the map is pointed
straight in front of you.
3. With the watch on your wrist, position it so the face is horizontal.
4. While in the Timekeeping Mode or in any of the sensor modes, press
C to take a compass reading.
• The reading will appear on the display after about two seconds.
5. Still holding the map in front of you, turn your body until north as
indicated by the watch and the northerly direction on the map are
aligned.
• This will position the map in accordance with your current location,
so the bearing to your objective is straight ahead of you.
To determine the direction angle to an objective on a map and head in that direction
1. Set the map so its northerly indication is aligned with north as indicated
by the watch, and determine your current location.
• See “To set a map and find your current location” for information
about how to perform the above step.
2. As shown in the illustration to the left, change your position so you (and
the 12 o’clock position of the watch) are pointed in the direction of
objective, while keeping the northerly direction indicated on the map
aligned with north as indicated by the watch.
• If you find it difficult to perform the above step while keeping
everything aligned, first move into the correct position (12 o’clock
position of the watch pointed at the objective) without worrying
about the orientation of the map. Next, perform step 1 again to set
the map.
12 o’clock
position
Bearing memory
direction angle
North
pointer
Direction angle of
current reading
Bearing Memory
Screen
Bearing
memory
pointer
12 o’clock
position
Bearing memory
direction angle
North
pointer
Direction angle of
current reading
Bearing Memory
Screen
Bearing
memory
pointer
N
N
Current
location
North indicated
on the map
North indicated by
north pointer
N
N
Current
location
North indicated
on the map
North indicated by
north pointer
N
N
Objective
Current
location
12 o’clock
position
N
N
Objective
Current
location
12 o’clock
position
N
N
Objective
Current
location
12 o’clock
position
N
N
Objective
Current
location
12 o’clock
position
3. While in the Timekeeping Mode or in any of the sensor modes, press
C to take a compass reading.
4. While direction angle readings are in progress, press E to record the
currently displayed direction in Bearing Memory.
• The direction angle value and pointer stored in Bearing Memory
will remain on the display for about 20 seconds.
• See “Bearing Memory” for more information.
5. Now you can advance while monitoring the Bearing Memory pointer to
ensure that it remains in the 12 o’clock position.
• To re-display the Bearing Memory direction angle value and
Bearing Memory pointer, press C.
• Pressing E while the Bearing Memory direction angle value and
Bearing Memory pointer are on the display will clear the Bearing
Memory data you saved in step 3 and save the current direction
reading in Bearing Memory.
Note
• When mountain climbing or hiking, conditions or geographic
contours may make it impossible for you to advance in a straight
line. If this happens, return to step 1 and save a new direction to
the objective.
Digital Compass Precautions
This watch features a built-in magnetic bearing sensor that detects terrestrial magnetism. This means that
north indicated by this watch is magnetic north, which is somewhat different from true polar north. The
magnetic north pole is located in northern Canada, while the magnetic south pole is in southern Australia.
Note that the difference between magnetic north and true north as measured with all magnetic compasses
tends to be greater as one gets closer to either of the magnetic poles. You should also remember that
some maps indicate true north (instead of magnetic north), and so you should make allowances when
using such maps with this watch.
Location
• Taking a direction reading when you are near a source of strong magnetism can cause large errors in
readings. Because of this, you should avoid taking direction readings while in the vicinity of the
following types of objects: permanent magnets (magnetic necklaces, etc.), concentrations of metal
(metal doors, lockers, etc.), high tension wires, aerial wires, household appliances (TVs, personal
computers, washing machines, freezers, etc.).
• Accurate direction readings are impossible while in a train, boat, air plane, etc.
• Accurate readings are also impossible indoors, especially inside ferroconcrete structures. This is
because the metal framework of such structures picks up magnetism from appliances, etc.
Storage
• The precision of the bearing sensor may deteriorate if the watch becomes magnetized. Because of
this, you should store the watch away from magnets or any other sources of strong magnetism,
including: permanent magnets (magnetic necklaces, etc.) and household appliances (TVs, personal
computers, washing machines, freezers, etc.).
• Whenever you suspect that the watch may have become magnetized, perform the procedure under “To
perform bidirectional calibration”.
Barometer/Thermometer
This watch uses a pressure sensor to measure air pressure (barometric pressure) and a temperature
sensor to measure temperature.
To enter and exit the Barometer/Thermometer Mode
1. While in the Timekeeping Mode or in any of the sensor modes, press
B to enter the Barometer/Thermometer Mode.
• BARO will appear on the display, indicating that barometric
pressure and temperature measurements are in progress. The
measurement results will appear on the display after about five
seconds.
• After you press B, the watch will take readings every five seconds
for the first five minutes, and then every two minutes after that.
2. Press D to return to the Timekeeping Mode.
• The watch will return to the Timekeeping Mode automatically if you
do not perform any operation for about one hour after entering the
Barometer/Thermometer Mode.
To take barometric pressure and temperature readings
While in the Timekeeping Mode or in any of the sensor modes, press B.
• This starts barometric pressure and temperature measurements automatically.
• You also can perform a barometric pressure and temperature measurement at any time by pressing B
in the Barometer/Thermometer Mode.
• It can take up to four or five seconds for the barometric pressure reading to appear after you enter the
Barometer/Thermometer Mode.
Barometric Pressure
• Barometric pressure is displayed in units of 1 hPa (or 0.05 inHg).
• The displayed barometric pressure value changes to - - - if a measured
barometric pressure falls outside the range of 260 hPa to 1,100 hPa (7.65
inHg to 32.45 inHg). The barometric pressure value will reappear as
soon as the measured barometric pressure is within the allowable range.
Temperature
• Temperature is displayed in units of 0.1°C (or 0.2°F).
• The displayed temperature value changes to - - - °C (or °F) if a
measured temperature falls outside the range of –10.0°C to 60.0°C
(14.0°F to 140.0°F). The temperature value will reappear as soon as
the measured temperature is within the allowable range.
Display Units
You can select either hectopascals (hPa) or inchesHg (inHg) as the display unit for the measured
barometric pressure, and Celsius (°C) or Fahrenheit (°F) as the display unit for the measured temperature
value. See “To specify temperature, barometric pressure, and altitude units”.
Barometric Pressure Graph
Barometric pressure indicates changes in the atmosphere. By monitoring
these changes you can predict the weather with reasonable accuracy.
This watch takes barometric pressure measurements automatically every
two hours (at the 30th minute of every even numbered hour).
Measurement results are used to produce barometric pressure graph and
barometric pressure differential pointer readings.
Reading the Barometric Pressure Graph
The barometric pressure graph shows readings of previous measurements for up to 24 hours.
• The horizontal axis of the graph represents time, with each dot
standing for two hours. The rightmost dot represents the most recent
reading.
• The vertical axis of the graph represents barometric pressure, with
each dot standing for the relative difference between its reading and
that of the dots next to it. Each dot represents 1 hPa.
12 o’clock
position
Bearing
memory
pointerNorth
pointer
Direction angle of
current reading
Bearing memory
direction angle
value
12 o’clock
position
Bearing
memory
pointerNorth
pointer
Direction angle of
current reading
Bearing memory
direction angle
value
Temperature
Barometric
pressure graph
Barometric
pressure
Pressure differential
pointer
Temperature
Barometric
pressure graph
Barometric
pressure
Pressure differential
pointer
Temperature
Barometric
pressure
Temperature
Barometric
pressure
Barometric
pressure graph
Barometric
pressure graph
Barometric
pressure
Time
Barometric
pressure
Time
5
Operation Guide 3173 3246
The following shows how to interpret the data that appears on the barometric pressure graph.
A rising graph generally means improving weather.
A falling graph generally means deteriorating weather.
Note
• If there are sudden changes in weather or temperature, the graph line of past
measurements may run off the top or bottom of the display. The entire graph will
become visible once barometric conditions stabilize.
• The following conditions cause the barometric pressure measurement to be
skipped, with the corresponding point on the barometric pressure graph being
left blank.
– Barometric reading that is out of range (260 hPa to 1,100 hPa or 7.65 inHg to
32.45 inHg)
– Sensor malfunction
Barometric Pressure Differential Pointer
This pointer indicates the relative difference between the most recent
barometric pressure reading indicated on the barometric pressure graph,
and the current barometric pressure value displayed in the Barometer/
Thermometer Mode.
Reading Barometric Pressure Differential Pointer
Pressure differential is indicated in the range of
±10 hPa, in 1-hPa units.
• The nearby screen shot, for example, shows
what the pointer would indicate when the
calculated pressure differential is
approximately –5 hPa (approximately –0.15
inHg).
• Barometric pressure is calculated and
displayed using hPa as the standard. The
barometric pressure differential also can be
read in inHg units as shown in the illustration
(1 hPa = 0.03 inHg).
Pressure Sensor and Temperature Sensor Calibration
The pressure sensor and temperature sensor built into the watch are calibrated at the factory and normally
require no further adjustment. If you notice serious errors in the pressure readings and temperature
readings produced by the watch, you can calibrate the sensor to correct the errors.
Important!
• Incorrectly calibrating the barometric pressure sensor can result in incorrect readings. Before
performing the calibration procedure, compare the readings produced by the watch with those of
another reliable and accurate barometer.
• Incorrectly calibrating the temperature sensor can result in incorrect readings.
Carefully read the following before doing anything.
– Compare the readings produced by the watch with those of another reliable and accurate thermometer.
– If adjustment is required, remove the watch from your wrist and wait for 20 or 30 minutes to give the
temperature of the watch time to stabilize.
To calibrate the pressure sensor and the temperature sensor
1. While in the Timekeeping Mode or in any of the sensor modes, press B
to enter the Barometer/Thermometer Mode.
2. Hold down E until the current temperature value starts to flash on the
display. This is the setting screen.
• Before the temperature value starts to flash, the message SET
Hold will appear on the display. Keep E depressed until SET Hold
disappears.
3. Press D to move the flashing between the temperature value and
barometric pressure value, to select the one you want to calibrate.
4. Use A (+) and C (–) to set the calibration value in the units shown below.
Temperature 0.1°C (0.2°F)
Barometric Pressure 1 hPa (0.05 inHg)
• To return the currently flashing value to its initial factory default setting,
press A and C at the same time. OFF will appear at the flashing
location for about one second, followed by the initial default value.
5. Press E to return to the Barometer/Thermometer Mode screen.
Barometer and Thermometer Precautions
• The pressure sensor built into this watch measures changes in air pressure, which you can then apply
to your own weather predictions. It is not intended for use as a precision instrument in official weather
prediction or reporting applications.
• Sudden temperature changes can affect pressure sensor readings.
• Temperature measurements are affected by your body temperature (while you are wearing the watch),
direct sunlight, and moisture. To achieve a more accurate temperature measurement, remove the
watch from your wrist, place it in a well ventilated location out of direct sunlight, and wipe all moisture
from the case. It takes approximately 20 to 30 minutes for the case of the watch to reach the actual
surrounding temperature.
Altimeter
The watch displays altitude values based on air pressure readings taken by a built-in pressure sensor.
How the Altimeter Measures Altitude
The altimeter can measure altitude based on its own preset values (initial default method) or using a
reference altitude specified by you.
When you measure altitude based on preset values
Data produced by the watch’s barometric pressure sensor is converted to approximate altitude based on
ISA (International Standard Atmosphere) conversion values stored in watch memory.
When you measure altitude using a reference altitude specified by you
After you specify a reference altitude, the watch uses that value to convert
barometric pressure readings to altitude.
• When mountain climbing, you can specify a reference altitude value in
accordance with a marker along the way or altitude information from a
map. After that, the altitude readings produced by the watch will be more
accurate than they would without a reference altitude value.
Not visible on
the display.
Not visible on
the display.
Barometric
pressure
differential
pointer
Barometric
pressure
differential
pointer
Barometric pressure
differential pointer
inHg values
hPa values
Current pressure
greater than most
recent measured
pressure
Current pressure
less than most
recent measured
pressure
Barometric pressure
differential pointer
inHg values
hPa values
Current pressure
greater than most
recent measured
pressure
Current pressure
less than most
recent measured
pressure
l l l l l
l
llllll
l
l l l l l l
l
llllll
l
l
l l l
lll
lllllll
lll
l l l l l l
lll
lllllll
lll
l l l
ll l l l l
l
llllll
l
l l l l l l
l
llllll
l
l
l l l
lll
lllllll
lll
l l l l l l
lll
lllllll
lll
l l l
400
A
B
400
A
B
To take an altimeter reading
1. Make sure the watch is in the Timekeeping Mode or any one of the
sensor modes.
• The sensor modes are: Digital Compass Mode, Barometer/
Thermometer Mode, and Altimeter Mode.
2. Press A to start Altimeter measurement.
• ALTI will appear on the display, indicating that Altimeter
measurement is in progress. The first reading will appear on the
display after about four or five seconds.
• The current altitude value is displayed in units of 5 meters (20 feet).
• After the first reading is obtained, the watch continues to take
altimeter readings automatically every five seconds for the first
three minutes, and then every two minutes after that (under initial
default settings).
• If you leave the watch in the Altimeter Mode, it will update the
displayed altitude value regularly and indicate reading-to-reading
changes in graph form.
• You can use the procedure under “Selecting an Altitude Auto
Measurement Method” to specify the altitude auto measurement
method you want to use.
3. After you are finished using the Altimeter, press D to return to the
Timekeeping Mode and stop auto measurement.
• The watch will return to the Timekeeping Mode automatically if you
do not perform any operation for about 24 hours after entering the
Altimeter Mode (under initial default settings).
Reading the Altitude Graph
The altitude graph shows Altimeter Mode auto measurement readings over time.
• The vertical axis of the graph represents altitude, and each dot stands
for 10 meters (40 feet).
• The horizontal axis represents time. For the altitude readings taken
during the first three minutes after you start an altimeter measurement
operation, each dot represents five seconds. After that, each dot
represents two minutes (under initial default settings).
• An out of range reading or a measurement error will cause the column
of dots for that reading to be blank (skipped).
Note
• The measurement range for altitude is –700 to 10,000 meters (–2,300 to 32,800 feet).
• The displayed altitude value changes to - - - if an altitude reading falls outside the measurement range.
An altitude value will reappear as soon as the altitude reading is within the allowable range.
• Normally, displayed altitude values are based on the watch’s preset conversion values. You also can
specify a reference altitude value, if you want. See “Specifying a Reference Altitude Value”.
• You can change the unit for displayed altitude values to either meters (m) or feet (ft).
See “To specify temperature, barometric pressure, and altitude units”.
Selecting an Altitude Auto Measurement Method
You can select either of the following two altitude auto measurement methods.
0’05: Readings at five-second intervals for one hour
2’00: Readings at five-second intervals for the first three minutes followed by two-minute intervals for
approximately 24 hours
Note
If you do not perform any button operation while in the Altimeter Mode, the watch will return to the
Timekeeping Mode automatically after 24 hours (altitude auto measurement method: 2’00) or after one
hour (altitude auto measurement method: 0’05).
To select the altitude auto measurement method
1. In the Altimeter Mode, hold down E until the current reference altitude
value starts to flash. This is the setting screen.
• Before the reference altitude starts to flash, the message SET
Hold will appear on the display. Keep E depressed until SET
Hold disappears.
2. Press D to display the current altitude auto measurement method
setting.
• This will cause either 0’05 or 2’00 to flash on the display.
3. Press A to toggle the altitude auto measurement method setting
between 0’05 and 2’00.
4. Press E to exit the setting screen.
Using the Altitude Differential Value
The Altimeter Mode screen includes an altitude differential value that
shows the change in altitude from a reference point you specify. The
altitude differential value is updated each time the watch takes an altitude
reading.
• The range of the altitude differential value is –3,000 meters (–9,980
feet) to 3,000 meters (9,980 feet).
• - - - is displayed in place of the altitude differential value whenever the
measured value is outside the allowable range.
• See “Using the Altitude Differential Value While Mountain Climbing or
Hiking” for some real-life examples of how to use this feature.
To specify the altitude differential start point
In the Altimeter Mode, press E.
• The watch will take an altitude reading and register the result as the
altitude differential value start point. The altitude differential value will
be reset to zero at this time.
Altitude
differential
Altitude
graph
Current
altitude Current time
Altitude
differential
Altitude
graph
Current
altitude Current time
Altitude
Latest
reading
Time
Altitude
Latest
reading
Time
l l l
lll
lllllll
lll
l l l l l l
lll
lllllll
lll
l l l ll l l
lll
lllllll
lll
l l l l l l
lll
lllllll
lll
l l l
Altitude
differential
Altitude
differential
Altitude differentialAltitude differential
6
Operation Guide 3173 3246
Using the Altitude Differential Value While Mountain Climbing or Hiking
After you specify the altitude differential start point while mountain climbing or hiking, you easily can
measure the change in the altitude between that point and other points along the way.
To use the altitude differential value
1. In the Altimeter Mode, check to make sure that an altitude reading is
on the display.
• If an altitude reading is not displayed, press A to take one. See “To
take an altimeter reading” for details.
2. Use the contour lines on your map to determine the difference in
altitude between your current location and your destination.
3. In the Altimeter Mode, press E to specify your current location as the
altitude differential start point.
• The watch will take an altitude reading and register the result as
the altitude differential value start point. The altitude differential
value will be reset to zero at this time.
4. While comparing the altitude difference you determined on the map
and the watch’s altitude differential value, advance towards your
destination.
• If the map shows that the difference in altitude between your
location and your destination is +80 meters for example, you know
you will be nearing your destination when the displayed altitude
differential value shows +80 meters.
Specifying a Reference Altitude Value
The altitude readings produced by this watch are subject to error caused by changes in air pressure.
Because of this, we recommend that you update the reference altitude value whenever one is available
during your climb. After you specify a reference altitude value, the watch adjusts its air-pressure-to-altitude
conversion calculation accordingly.
To specify a reference altitude value
1. In the Altimeter Mode, hold down E until the current reference altitude
value starts to flash. This is the setting screen.
• Before the reference altitude value starts to flash, the message
SET Hold will appear on the display. Keep E depressed until
SET Hold disappears.
2. Press A (+) or C (–) to change the current reference altitude value
by 5 meters (or 20 feet).
• Specify a reference altitude value based on accurate altitude
information about your current location from a map, etc.
• You can set the reference altitude value within the range of –10,000
to 10,000 meters (–32,800 to 32,800 feet).
• Pressing A and C at the same time returns to OFF (no reference
altitude value), so the watch performs air pressure to altitude
conversions based on preset data only.
3. Press E to exit the setting screen.
Types of Altitude Data
The watch can maintain two types of altitude data in its memory: manual measurement records, and auto
save values (minimum, maximum, vertical ascent, vertical descent).
• Use the Data Recall Mode to view data stored in memory. See “Viewing Altitude Records” for details.
Manual Measurement Records
Any time you perform the procedure below in the Altimeter Mode, the watch will create and store a record
with the currently displayed altitude reading, along with the date and time the reading was taken. There is
enough memory to store up to 25 manual measurement records, which are numbered from REC01
through REC25.
To save a manual measurement
1. In the Altimeter Mode, check to make sure that an altitude reading is
on the display.
• If an altitude reading is not displayed, press A to take one. See “To
take an altimeter reading” for details.
2. Hold down A until REC Hold appears on the display and then
disappears. Release A after Hold disappears.
• This will save the currently displayed altitude reading in a manual
measurement record, along with the measurement time and date.
• The watch will return to the Altimeter Mode screen automatically
after the save operation is complete.
• There is enough memory to store up to 25 manual measurement
records. If there are already 25 manual measurement records in
memory, the above operation will cause the oldest record to be
deleted automatically to make room for the new one.
Auto Save Values
Two sets of auto save values (Set 1 and Set 2) are maintained in watch memory.
Set 1 Set 2
Maximum Altitude (MAX-1)
Minimum Altitude (MIN-1)
Vertical Ascent (ASC-1)
Vertical Descent (DSC-1)
Maximum Altitude (MAX-2)
Minimum Altitude (MIN-2)
Vertical Ascent (ASC-2)
Vertical Descent (DSC-2)
• These values are checked and updated automatically by the watch as altitude auto measurements are
taken.
How Maximum and Minimum Values Are Updated
While the watch is in the Altimeter Mode, altitude readings are taken automatically at the interval specified
by the altitude auto measurement method. With each reading, the watch compares the current reading
against the MAX (MAX-1 and MAX-2) and MIN (MIN-1 and MIN-2) values. It will replace the MAX value if
the current reading is greater than MAX, or the MIN value if the current reading is less than MIN.
How Vertical Ascent/Descent Values Are Updated
Session start point
20 m
0 m
120 m
320 m
620 m
Session end point
The total Vertical Ascent and Vertical Descent values produced by an Altimeter Mode measurement
session during the example climb illustrated above are calculated as follows.
Vertical Ascent: q (300 m) + e (620 m) = 920 m
Vertical Descent: w (320 m) + r (500 m) = 820 m
Current
location
Destination
altitude
Current
location
Destination
altitude
Altitude differential
Altitude
Altitude differential
Altitude
l l l l
ll
lllllllll
ll
l l l l l l l l
ll
lllllllll
ll
l l l l ll l l l
ll
lllllllll
ll
l l l l l l l l
ll
lllllllll
ll
l l l l
• Entering the Altimeter Mode starts a new altitude auto measurement session, but it does not reset the
current ASC (ASC-1 and ASC-2) and DSC (DSC-1 and DSC-2) values or change them in any way.
This means that the starting ASC and DSC values for a new Altimeter Mode auto measurement session
are the values that currently are in memory. Each time you complete an Altimeter Mode auto
measurement session by returning to the Timekeeping Mode, the vertical ascent value of the current
session (920 meters in the above example) is added to the session’s starting ASC value. Also, the
vertical descent value of the current auto measurement session (–820 meters in the above example) is
added to the session’s starting DSC value.
• Note that any change in elevation when ascending that is less than 15 meters (49 feet) is not added to
the vertical ascent value for the current Altimeter Mode auto measurement session. Also, any change in
elevation when descending that is less than –15 meters (–49 feet) is not added to the vertical descent
value for the current Altimeter Mode auto measurement session.
Note
• The maximum altitude, minimum altitude, vertical ascent, and vertical descent values are retained in
memory when you exit the Altimeter Mode. To clear values, perform the procedure under “To clear the
contents of a specific memory area”.
Using Auto Save Values
The watch maintains two independent sets of auto save values as shown below.
Set 1 Set 2
Maximum Altitude (MAX-1)
Minimum Altitude (MIN-1)
Vertical Ascent (ASC-1)
Vertical Descent (DSC-1)
Maximum Altitude (MAX-2)
Minimum Altitude (MIN-2)
Vertical Ascent (ASC-2)
Vertical Descent (DSC-2)
The values in Set 1 and Set 2 can be cleared independently of each other. This means you can use them
to keep track of daily and cumulative data as described in the example below.
Example: Keeping track of data on a three-day climb
Day 1
Clear both Set 1 and Set 2, and start your Day 1 climb.
At the end of the day, both sets of auto save values contain the same data (MAX-1 = MAX-2, MIN-1 =
MIN-2, etc.).
Day 2
Clear only Set 1, and start your Day 2 climb. At the end of the day, the values in Set 1 (MAX-1, MIN-1,
ASC-1, DSC-1) will show the results of Day 2 only. In Set 2, MAX-2 and MIN-2 will show the maximum
and minimum altitudes reached over the two-day span. ASC-2 will show the total vertical ascent for the
two days (Day 1 + Day 2) and DSC-2 will show the total vertical descent for the two days.
Day 3
Clear only Set 1, and start your Day 3 climb. At the end of the day, the values in Set 1 will show the
results of Day 3 only. In Set 2, MAX-2 and MIN-2 will show the maximum and minimum altitudes
reached over the three-day span. ASC-2 will show the total vertical ascent for the three days (Day 1 +
Day 2 + Day 3) and DSC-2 will show the total vertical descent for the three days.
• For details about clearing altitude data, see “To clear the contents of a specific memory area”.
How does the altimeter work?
Generally, air pressure and temperature decrease as altitude increases. This watch bases its altitude
measurements on International Standard Atmosphere (ISA) values stipulated by the International Civil
Aviation Organization (ICAO). These values define relationships between altitude, air pressure, and
temperature.
0 m
500 m
1000 m
1500 m
2000 m
2500 m
3000 m
3500 m
4000 m
899 hPa
795 hPa
701 hPa
616 hPa
8.5°C
2°C
–4.5°C
–11°C
15°C1013 hPa
About 6.5°C
per 1000 m
About 8 hPa per 100 m
About 9 hPa per 100 m
About 10 hPa per 100 m
About 11 hPa per 100 m
About 12 hPa per 100 m
Altitude Air Pressure Temperature
0 ft.
2000 ft.
4000 ft.
6000 ft.
8000 ft.
10000 ft.
12000 ft.
14000 ft.
25.84 inHg
22.23 inHg
19.03 inHg
44.7°F
30.5°F
16.2°F
59.0°F29.92 inHg
About 3.6°F
per 1000 ft.
About 0.15 inHg per 200 ft.
About 0.17 inHg per 200 ft.
About 0.192 inHg per 200 ft.
About 0.21 inHg per 200 ft.
Source: International Civil Aviation Organization
• Note that the following conditions will prevent you from obtaining accurate readings:
When air pressure changes because of changes in the weather
Extreme temperature changes
When the watch itself is subjected to strong impact
There are two standard methods of expressing altitude: Absolute altitude and relative altitude. Absolute
altitude expresses an absolute height above sea level. Relative altitude expresses the difference between
the height of two different places.
Height of building 130 m
(relative altitude)
Rooftop at an altitude of
230 m above sea level
(absolute altitude)
Sea Level
Altimeter Precautions
• This watch estimates altitude based on air pressure. This means that altitude readings for the same
location may vary if air pressure changes.
• The semiconductor pressure sensor used by the watch for altitude measurements is also affected by
temperature. When taking altitude measurements, do not subject the watch to temperature changes.
• Do not rely upon this watch for altitude measurements or perform button operations while sky diving,
hang gliding, or paragliding, while riding a gyrocopter, glider, or any other aircraft, or while engaging in
any other activity where there is the chance of sudden altitude changes.
• Do not use this watch for measuring altitude in applications that demand professional or industrial level
precision.
• Remember that the air inside of a commercial aircraft is pressurized. Because of this, the readings
produced by this watch will not match the altitude readings announced or indicated the flight crew.
7
Operation Guide 3173 3246
Specifying Temperature, Barometric Pressure, and Altitude Units
Use the procedure below to specify the temperature, barometric pressure, and altitude units to be used in
the Barometer/Thermometer Mode and the Altimeter Mode.
Important!
When TYO (Tokyo) is selected as the Home City, the altitude unit is set
automatically to meters (m), the barometric pressure unit to hectopascals
(hPa), and the temperature unit to Celsius (°C). These settings cannot
be changed.
To specify temperature, barometric pressure, and altitude units
1. In the Timekeeping Mode, hold down E until the currently selected
city code starts to flash. This is the city code setting screen.
• Before the city code starts to flash, the message SET Hold
will appear on the display. Keep E depressed until SET Hold
disappears and the city code starts to flash.
2. Keep pressing D until UNIT appears in the upper left corner of the
screen.
• See step 3 under “To change the current time and date settings”
for information about how to scroll through setting screens.
3. Perform the operations below to specify the units you want.
To specify this unit: Press this key: To toggle between these settings:
Altitude A m (meters) and ft (feet)
Barometric Pressure B hPa (hectopascals) and inHg (inches of mercury)
Temperature C °C (Celsius) and °F (Fahrenheit)
4. After the settings are the way you want, press E twice to exit the setting screen.
Precautions Concerning Simultaneous Measurement of Altitude and Temperature
Though you can perform altitude and temperature measurements at the same time, you should remember
that each of these measurements requires different conditions for best results. With temperature
measurement, it is best to remove the watch from your wrist in order to eliminate the effects of body heat.
In the case of altitude measurement, on the other hand, it is better to leave the watch on your wrist,
because doing so keeps the watch at a constant temperature, which contributes to more accurate altitude
measurements.
• To give altitude measurement priority, leave the watch on your wrist or in any other location where the
temperature of the watch is kept constant.
• To give temperature measurement priority, remove the watch from your wrist and allow it to hang freely
from your bag or in another location where it is not exposed to direct sunlight. Note that removing the
watch from your wrist can affect pressure sensor readings momentarily.
Viewing Altitude Records
Use the Data Recall Mode to view manually saved altitude readings and automatically saved high altitude,
low altitude, total ascent, and total descent values. Altitude data records are created and saved in the
Altimeter Mode.
To view altitude records
1. Use D to select the Data Recall Mode (REC) as shown in “Selecting
a Mode”.
• About one second after REC appears on the display, the display
will change to show the first record of the memory area you were
viewing when you last exited the Data Recall Mode.
2. Use B to select the memory area you want.
REC 01
(Manually Saved
Record Area)
(Auto Save
Value Area 1)
MAX-1
(Auto Save
Value Area 2)
MAX-2
3. Use A and C to scroll through the screens for an area and display the one you want.
REC
01
REC
02
REC
25
Manually saved records
MAX MIN ASC DSC
Auto saved values
• While a manually saved record (REC 01 through REC 25) is displayed, the bottom of the screen
will alternate between the date (month, day) and time (hour, minute) the record was created.
• While MAX or MIN auto saved values are displayed, the bottom of the screen will alternate
between the date (month, day) and time (hour, minute) the value was recorded.
• While ASC or DSC auto saved values are displayed, the bottom of the screen will alternate
between the date (month, day) and year that the ASC or DSC record was first created.
• For detailed information about auto saved values, see “Auto Save Values”.
lll
llll
llll
llll
llll
llll
lllll
l
ll
lll
llll
lll
lll
lll
llll
lll
l
llll
llll
llll
llll
llll
llll
lllll
l
ll
lll
llll
lll
lll
lll
llll
lll
l
Record name
Altitude
Alternates between
measurement time
(Hour : Minutes) and
measurement date
(Month Day)
Record name
Altitude
Alternates between
measurement time
(Hour : Minutes) and
measurement date
(Month Day)
AltitudeAltitude
AltitudeAltitude
4. After you are finished viewing data, use D to exit the Data Recall Mode.
• ---- will be displayed if data has been deleted or if there is no corresponding data due to error, etc.
In such cases, total ascent (ASC) and total descent (DSC) values will show zero.
• When the total ascent (ASC) or total descent (DSC) exceeds 99,995 meters (or 327,980 feet), the
applicable value will restart from zero.
• If the total ascent (ASC) or total descent (DSC) value becomes
five digits, the leftmost (ten thousand) digit will appear in the upper
right of the display. The nearby illustration shows the display when
the ASC-1 value is 99995 meters.
To clear the contents of a specific memory area
1. Use D to enter the Data Recall Mode.
2. Use B to select the memory area you want to clear.
• Note that the contents of the memory area you select will be
deleted as soon as you perform step 3 below. The clear operation
cannot be undone, so double check to make sure you really want
to delete the contents of the memory area you select here.
3. Hold down E until CLR Hold appears on the display and then
disappears. Release E after CLR disappears.
• This will clear the memory area you selected in step 2 and then
return to the data display screen, which now shows ----. This
indicates there is nothing stored in the currently displayed memory
area.
Looking up Sunrise and Sunset Times
You can use the Sunrise/Sunset Mode to look up the sunrise and sunset times for a particular date (year,
month, day) and location.
To enter the Sunrise/Sunset Mode
While in the Timekeeping Mode, press D to enter the Sunrise/Sunset
Mode.
• This will display the sunrise and sunset times for the current date
based the currently specified city code, latitude, and longitude.
• The three Daylight Pointers described below are on the display in the
Sunrise/Sunset Mode.
Pointer 1: Sunset time in 24-hour format
Pointer 2: Sunrise time in 24-hour format
Pointer 3: This flashing pointer appears only when Pointer 1 and
Pointer 2 are indicating the sunrise and sunset times for the current
Timekeeping Mode date. It indicates the current Timekeeping Mode
time in 24-hour format.
• Before trying to use the Sunrise/Sunset Mode, you need to configure
settings for the city code, longitude, and latitude for the location whose
sunrise and sunset times you want to view.
• The factory default configuration of the location is: City Code: TYO
(Tokyo); Latitude: North 36 degrees; Longitude: East 140 degrees.
• You can find latitude and longitude for various cities around the globe
in the “Site Data List”.
To view the sunrise/sunset time for a particular date
1. Enter the Sunrise/Sunset Mode.
• This will display the sunrise and sunset times for the current
date at the location specified by the city code, latitude, and
longitude.
2. While the sunrise/sunset time are on the display, use A (+) and C (–)
to scroll through the dates.
• The sunrise and sunset times for the selected date will be
indicated by values and pointers.
• You can select any date between January 1, 2000 and December
31, 2099.
Note
• Sunrise/sunset time is displayed in 5-minute units.
• If you think that the sunrise and/or sunset times are not correct for
some reason, check the watch’s city code, longitude and latitude
settings.
• The sunrise and sunset times displayed by this watch are times at
sea level. Sunrise and sunset times are different at altitudes other
than sea level.
To look up the sunrise and sunset times for a specific city code
Important!
• You do not need to perform this procedure to look up the sunrise and sunset times in your currently
selected Home City.
• If you select a different city code to look up the sunrise and sunset times there, return to the city
code of your Home City (your current location) when you are finished. Otherwise, the time shown
in the Timekeeping Mode will not be correct.
• For information about the Home City setting, see “Configuring Home City Settings”.
1. In the Timekeeping Mode, hold down E until the currently selected city code starts to flash. This is the
city code setting screen.
• Before the city code starts to flash, the message SET Hold will appear on the display. Keep E
depressed until SET Hold disappears and the city code starts to flash.
2. Use A (East) and C (West) to select the city code whose sunrise and sunset times you want to view.
• For details about city codes, see the “City Code Table”.
3. Press E twice to exit the setting screen.
Ten thousand digitTen thousand digit
Current
date
Pointer 3
Pointer 2
Sunrise
time
Sunset
time
Pointer 1
Current
date
Pointer 3
Pointer 2
Sunrise
time
Sunset
time
Pointer 1
Date
Sunset time Sunrise time
Date
Sunset time Sunrise time
8
Operation Guide 3173 3246
To configure longitude and latitude settings
1. In the Timekeeping Mode, hold down E until the currently selected
city code starts to flash. This is the city code setting screen.
• Before the city code starts to flash, the message SET Hold
will appear on the display. Keep E depressed until SET Hold
disappears and the city code starts to flash.
2. Press E to display the longitude/latitude setting screen, with the
latitude setting flashing.
3. Use D to move the flashing between the latitude and the longitude
setting.
4. Use A (+) and C (–) to change the flashing setting.
• You can configure the longitude and latitude setting within
following ranges.
Latitude Range: 65°S (South 65 degrees) to 0°N – 65°N (North 65
degrees)
Longitude Range: 179°W (West 179 degrees) to 0°E – 180°E (East
180 degrees)
• Latitude and longitude values are rounded off to the nearest
degree.
• You can find latitude and longitude for various cities around the
globe in the “Site Data List”.
5. Press E to return to the Timekeeping Mode.
Checking the Current Time in a Different Time Zone
You can use the World Time Mode to view the current time in one of 31 time zones (48 cities) around the
globe. The city that is currently selected in the World Time Mode is called the “World Time City”.
To enter the World Time Mode
Use D to select the World Time Mode (WT) as shown in “Selecting a
Mode”.
• About one second after WT appears on the display, the display will
change to show the city code of the currently selected World Time City.
• The two pointers described below are on the display in the World Time
Mode.
Pointer 1 (not flashing): Indicates the current time in the currently
selected World Time City in 24-hour format.
Pointer 2 (flashing): Indicates the current Timekeeping Mode time in
24-hour format.
To view the time in another time zone
In the World Time Mode, use A (East) and C (West) to scroll through city codes.
To specify standard time or daylight saving time (DST) for a city
1. In the World Time Mode, use A (East) and C (West) to display the
city code (time zone) whose Standard Time/Daylight Saving Time
setting you want to change.
2. Hold down E until DST Hold appears on the display and then
disappears. Release E after DST Hold disappears.
• This toggles the city code you selected in step 1 between Daylight
Saving Time (DST indicator displayed) and standard time (DST
indicator not displayed).
• Using the World Time Mode to change the DST setting of the
city code that is selected as your Home City also will change the
Timekeeping Mode time DST setting.
• Note that you cannot switch between standard time/daylight
saving time (DST) while UTC is selected as the World Time City.
• Note that the standard time/daylight saving time (DST) setting
affects only the currently selected time zone. Other time zones are
not affected.
Using the Stopwatch
The stopwatch measures elapsed time, split times, and two finishes.
To enter the Stopwatch Mode
Use D to select the Stopwatch Mode (STW) as shown in “Selecting a
Mode”.
• About one second after STW appears on the display, the display will
change to show the stopwatch hours.
To perform an elapsed time operation
A A A A C
Start Stop (Restart) (Stop) Reset
To pause at a split time
A C C A C
Start Split
(SPL displayed)
Split release Stop Reset
To measure two finishes
A C A C C
Start Split
First runner finishes.
Display time of first
runner
Stop
Second runner
finishes.
Split release
Display time of
second runner
Reset
Note
• The Stopwatch Mode can indicate elapsed time up to 23 hours, 59 minutes, 59.99 seconds.
• Once started, stopwatch timing continues until you press C to stop it, even if you exit the Stopwatch
Mode to another mode and even if timing reaches the stopwatch limit defined above.
• Exiting the Stopwatch Mode while a split time is frozen on the display clears the split time and returns
to elapsed time measurement.
Latitude
Longitude
Press D.
Latitude
Longitude
Press D.
Pointer 1
Currently selected
World Time City
Current time in the
currently selected
World Time City
Pointer 2Current
Timekeeping
Mode time
Pointer 1
Currently selected
World Time City
Current time in the
currently selected
World Time City
Pointer 2Current
Timekeeping
Mode time
DST indicatorDST indicator
Hours
1/100 second
SecondsMinutes
Current
time
Hours
1/100 second
SecondsMinutes
Current
time
Using the Countdown Timer
The countdown timer can be configured to start at a preset time, and sound an alarm when the end of the
countdown is reached.
To enter the Countdown Timer Mode
Use D to select the Countdown Timer Mode (TMR) as shown in “Selecting a
Mode”.
• About one second after TMR appears on the display, the display will
change to show the countdown time hours.
To specify the countdown start time
1. Enter the Countdown Timer Mode.
• If a countdown is in progress (indicated by the seconds counting
down), press A to stop it and then press C to reset to the current
countdown start time.
• If a countdown is paused, press C to reset to the current
countdown start time.
2. Hold down E until the hour setting of the current countdown start time
starts to flash. This is the setting screen.
• Before the hour setting starts to flash, the message SET Hold
will appear on the display. Keep E depressed until SET Hold
disappears and the hour setting starts to flash.
3. Press D to move the flashing between the hour and minute settings.
4. Use A (+) and C (–) to change the flashing item.
• To set the starting value of the countdown time to 24 hours, set 0H 00’00.
5. Press E to exit the setting screen.
To perform a countdown timer operation
A A A A C
Start Stop (Restart) (Stop) Reset
• Before starting a countdown timer operation, check to make sure that a countdown operation is not in
progress (indicated by the seconds counting down). If it is, press A to stop it and then C to reset to
the countdown start time.
• An alarm sounds for five seconds when the end of the countdown is reached. This alarm will sound in
all modes. The countdown time is reset to its starting value automatically when the alarm sounds.
To stop the alarm
Press any button.
Using the Alarm
You can set five independent daily alarms. When an alarm is turned on,
an alarm will sound for about 10 seconds each day when the time in the
Timekeeping Mode reaches the preset alarm time. This is true even if the
watch is not in the Timekeeping Mode.
You can also turn on an Hourly Time Signal, which will cause the watch
to beep twice every hour on the hour.
To enter the Alarm Mode
Use D to select the Alarm Mode (ALM) as shown in “Selecting a Mode”.
• About one second after ALM appears on the display, the display will
change to show an alarm number (AL1 through AL5) or the SIG
indicator. The alarm number indicates an alarm screen. SIG is shown
when the Hourly Time Signal screen is on the display.
• When you enter the Alarm Mode, the data you were viewing when you
last exited the mode appears first.
To set an alarm time
1. In the Alarm Mode, use A and C to scroll through the alarm screens
until the one whose time you want to set is displayed.
AL1 AL2 AL3
SIG AL5 AL4
2. Hold down E until the alarm time starts to flash. This is the setting
screen.
• Before the alarm time starts to flash, the message SET Hold
will appear on the display. Keep E depressed until SET Hold
disappears and the alarm time starts to flash.
3. Press D to move the flashing between the hour and minute settings.
4. While a setting is flashing, use A (+) and C (–) to change it.
• When setting the alarm time using the 12-hour format, take care to set the time correctly as a.m. (no
indicator) or p.m. (P indicator).
5. Press E to exit the setting screen.
To test the alarm
In the Alarm Mode, hold down A to sound the alarm.
To turn an alarm and the Hourly Time Signal on and off
1. In the Alarm Mode, use A and C to select an alarm or the Hourly
Time Signal.
2. When the alarm or the Hourly Time Signal you want is selected, press
B to turn it on and off.
• The alarm on indicator and the Hourly Time Signal on indicator are
shown on the display in all modes while these functions are turned on.
• If any alarm is on, the alarm on indicator is shown on the display in
all modes.
To stop the alarm
Press any button.
Current time
Countdown time
(Hour, minutes,
seconds)
Current time
Countdown time
(Hour, minutes,
seconds)
Alarm
number or
SIG
Alarm time
(Hour : Minutes)
Current time
Alarm
number or
SIG
Alarm time
(Hour : Minutes)
Current time
Alarm ON/OFF
indicator
Alarm ON/OFF
indicator
Module 3173
Module 3246
Hourly time signal
on indicator
Alarm on indicator
Module 3173
Module 3246
Hourly time signal
on indicator
Alarm on indicator
9
Operation Guide 3173 3246
Illumination
The display of the watch is illuminated for easy reading in the dark.
The watch’s auto light switch turns on illumination automatically when
you angle the watch towards your face.
• The auto light switch must be turned on for it to operate.
To turn on illumination manually
Press L in any mode to illuminate the display.
• You can use the procedure below to select either one second or three
seconds as the illumination duration. When you press L, the display
will remain illuminated for about one second or three seconds,
depending on the current illumination duration setting.
• The above operation turns on illumination regardless of the current
auto light switch setting.
• Illumination is disabled while configuring sensor measurement mode
settings, and during bearing sensor calibration.
To change the illumination duration
1. In the Timekeeping Mode, hold down E until the currently selected city code starts to flash. This is the
city code setting screen.
• Before the city code starts to flash, the message SET Hold will appear on the display. Keep E
depressed until SET Hold disappears and the city code starts to flash.
2. Keep pressing D until LT1 or LT3 is displayed in the upper left corner of the display.
• See step 3 under “To change the current time and date settings” for information about how to
scroll through setting screens.
3. Press A to toggle the illumination duration between three seconds (LT3 displayed) and one second
(LT1 displayed).
4. After the settings are the way you want, press E twice to exit the setting screen.
About the Auto Light Switch
Turning on the auto light switch causes illumination to turn on,
whenever you position your wrist as described below in any mode.
Moving the watch to a position that is parallel to the ground and
then tilting it towards you more than 40 degrees causes
illumination to turn on.
Warning!
• Always make sure you are in a safe place whenever you are
reading the display of the watch using the auto light switch. Be especially careful when running
or engaged in any other activity that can result in accident or injury. Also take care that sudden
illumination by the auto light switch does not startle or distract others around you.
• When you are wearing the watch, make sure that its auto light switch is turned off before riding
on a bicycle or operating a motorcycle or any other motor vehicle. Sudden and unintended
operation of the auto light switch can create a distraction, which can result in a traffic accident
and serious personal injury.
Note
• This watch features a “Full Auto EL Light”, so the auto light switch operates only when available light is
below a certain level. It does not illuminate the display under bright light.
• The auto light switch is always disabled, regardless of its on/off setting, when any one of the following
conditions exists.
While an alarm is sounding
During sensor measurement
While a bearing sensor calibration operation is being performed in the Digital Compass Mode
While a sunrise or sunset time is being calculated
To turn the auto light switch on and off
In the Timekeeping Mode, hold down L for about three seconds to toggle
the auto light switch on (A.EL displayed) and off (A.EL not displayed).
• The auto light switch on indicator (A.EL) is on the display in all modes
while the auto light switch is turned on.
• The auto light switch turns off automatically whenever battery power
drops to Level 4.
Illumination Precautions
• Frequent display illumination can run down the battery quickly and require charging.
The following guidelines give an idea of the charging time required to recover from a single illumination
operation.
Approximately five minutes exposure to bright sunlight coming in through a window
Approximately 50 minutes exposure to indoor fluorescent lighting
• The electro-luminescent panel that provides illumination loses power after very long use.
• Illumination may be hard to see when viewed under direct sunlight.
• Illumination turns off automatically whenever an alarm sounds.
• Frequent use of illumination runs down the battery.
Auto light switch precautions
• Wearing the watch on the inside of your wrist, movement of your arm, or vibration of your arm can
cause frequent activation of the auto light switch and illumination of the display. To avoid running down
the battery, turn off the auto light switch whenever engaging in activities that might cause frequent
illumination of the display.
• Note that wearing the watch under your sleeve while the auto light switch is turned on can cause
frequent illumination of the display and can run down the battery.
• Illumination may not turn on if the face of the watch is more than 15 degrees above
or below parallel. Make sure that the back of your hand is parallel to the ground.
• Illumination turns off after the preset illumination duration, even if you keep the
watch pointed towards your face.
• Static electricity or magnetic force can interfere with proper operation of the auto
light switch. If illumination does not turn on, try moving the watch back to the
starting position (parallel with the ground) and then tilt it back towards your face
again. If this does not work, drop your arm all the way down so it hangs at your
side, and then bring it back up again.
• You may notice a very faint clicking sound coming from the watch when it is shaken
back and forth. This sound is caused by mechanical operation of the auto light
switch, and does not indicate a problem with the watch.
More than
40°
Wear the watch on the
outside of your wrist
More than
40°
Wear the watch on the
outside of your wrist
Auto light switch on
indicator
Auto light switch on
indicator
Button Operation Tone
The button operation tone sounds any time you press one of the watch’s buttons. You can turn the button
operation tone on or off as desired.
• Even if you turn off the button operation tone, the alarm, Hourly Time Signal, and Countdown Timer
Mode alarm all operate normally.
To turn the button operation tone on and off
1. In the Timekeeping Mode, hold down E until the currently selected
city code starts to flash. This is the city code setting screen.
• Before the city code starts to flash, the message SET Hold
will appear on the display. Keep E depressed until SET Hold
disappears and the city code starts to flash.
2. Keep pressing D until MUTE or KEY is displayed in the upper left
corner of the display.
• See step 3 under “To change the current time and date settings”
for information about how to scroll through setting screens.
3. Press A to toggle the button operation tone on (KEY ) and off (MUTE).
4. After the settings are the way you want, press E twice to exit the
setting screen.
Note
• The mute indicator is displayed in all modes when the button
operation tone is turned off.
Troubleshooting
Time Setting
■ The current time setting is off by one hour.
You may need to change your Home City’s standard time/daylight saving time (DST) setting. Use the
procedure under “To change the current time and date settings” to change the standard time/daylight
saving time (DST) setting.
Sensor modes
■ I can’t change the temperature, barometric pressure, and altitude units.
When TYO (Tokyo) is selected as the Home City, the altitude unit is set automatically to meters (m), the
barometric pressure unit to hectopascals (hPa), and the temperature unit to Celsius (°C). These settings
cannot be changed.
■ “ERR” appears on the display while I am using a sensor .
Subjecting the watch to strong impact can cause sensor malfunction or improper contact of internal
circuitry. When this happens, ERR (error) will appear on the display and sensor operations will be disabled.
Digital
Compass
Measurement
Barometric
Pressure/Temperature
Measurement
Altitude
Measurement
• If ERR appears while a measurement operation is being performed in a sensor mode, restart the measurement.
If ERR appears on the display again, it can mean there is something wrong with the sensor.
• Even if battery power is at Level 1 (H) or Level 2 (M), the Digital Compass Mode, Barometer/
Thermometer Mode, or Altimeter Mode sensor may be disabled if there is not enough voltage available
to power it sufficiently. In this case, ERR will appear on the display. This does not indicate malfunction,
and sensor operation should resume once battery voltage returns to its normal level.
• If ERR keeps appearing during measurement, it could mean there is a problem with the applicable
sensor.
■ ERR appears on the display after I perform bidirectional calibration or northerly calibration.
If - - - appears and then changes to ERR (error) on the calibration screen, it means that there is something
wrong with the sensor.
• If ERR disappears after about one second, try performing the calibration again.
• If ERR keeps appearing, contact your original dealer or nearest authorized CASIO distributor to have
the watch checked.
■ ERR appears on the display after I perform northerly calibration.
The ERR message indicates there may be some problem with the sensor. The ERR message also may
be due to movement of the watch while the calibration procedure is being performed. Try performing
calibration again, taking care to ensure that the watch is not moved.
If this does not solve the problem, the problem may be due to some nearby source of terrestrial
magnetism. Try performing the calibration procedure again from the beginning.
Whenever you have a sensor malfunction, take the watch to your original dealer or nearest authorized
CASIO distributor as soon as possible.
■ What causes incorrect direction readings?
• Incorrect bidirectional calibration. Perform bidirectional calibration.
• Nearby source of strong magnetism, such as a household appliance, a large steel bridge, a steel
beam, overhead wires, etc., or an attempt to perform direction measurement on a train, boat, etc. Move
away from large metal objects and try again. Note that digital compass operation cannot be performed
inside a train, boat, etc.
■ What causes different direction readings to produce different results at the same location?
Magnetism generated by nearby high-tension wires is interfering with detection of terrestrial magnetism.
Move away from the high-tension wires and try again.
■ Why am I having problems taking direction readings indoors?
A TV, personal computer, speakers, or some other object is interfering with terrestrial magnetism
readings. Move away from the object causing the interference or take the direction reading outdoors.
Indoor direction readings are particularly difficult inside ferro-concrete structures. Remember that you will
not be able to take direction readings inside of trains, airplanes, etc.
■ The barometric pressure differential pointer does not appear on the display when I enter the
Barometer/Thermometer Mode.
• This could indicate sensor error. Try pressing B again.
• The barometric pressure differential pointer is not displayed when the displayed current barometric
value is outside of the allowable measurement range (260 to 1,100 hPa).
World Time Mode
■ The time for my World Time City is off in the World Time Mode.
This could be due to incorrect switching between standard time and daylight saving time. See “To specify
standard time or daylight saving time (DST) for a city” for more information.
Charging
■ The watch does not resume operation after I expose it to light.
This can happen after the power level drops to Level 5. Continue exposing the watch to light until the
battery power indicator shows “H” or “M”.
l l l l l
l
llllll
l
l l l l l l
l
llllll
l
l ll l l l l
l
llllll
l
l l l l l l
l
llllll
l
l
Mute indicator
Module 3173
Module 3246
Mute indicator
Module 3173
Module 3246
10
Operation Guide 3173 3246
Specifications
Accuracy at normal temperature: ±15 seconds a month
Timekeeping: Hour, minutes, seconds, p.m. (P), year, month, day, day of the week
Time format: 12-hour and 24-hour
Calendar system: Full Auto-calendar pre-programmed from the year 2000 to 2099
Other: 3 display formats (Day of the week, Year, Barometric pressure graph); Home City code (can be
assigned one of 48 city codes); Standard Time / Daylight Saving Time (summer time)
Digital Compass: 20 seconds continuous measurement; 16 directions; Angle value 0° to 359°; Four
direction pointers; Calibration (bidirectional, northerly); Magnetic declination correction; Bearing
Memory
Barometer:
Measurement and display range:
260 to 1,100 hPa (or 7.65 to 32.45 inHg)
Display unit: 1 hPa (or 0.05 inHg)
Measurement timing: Daily from midnight, at two hour intervals (12 times per day); Every five seconds
in the Barometer/Thermometer Mode
Other: Calibration; Manual measurement (button operation); Barometric pressure graph; Barometric
pressure differential pointer
Thermometer:
Measurement and display range: –10.0 to 60.0°C (or 14.0 to 140.0°F)
Display unit: 0.1°C (or 0.2°F)
Measurement timing: Every five seconds in the Barometer/Thermometer Mode
Other: Calibration; Manual measurement (button operation)
Altimeter:
Measurement range: –700 to 10,000 m (or –2,300 to 32,800 ft.) without reference altitude
Display range: –10,000 to 10,000 m (or –32,800 to 32,800 ft.)
Negative values can be caused by readings produced based on a reference altitude or due to
atmospheric conditions.
Display unit: 5 m (or 20 ft.)
Current Altitude Data: 5-second intervals for 1 hour (0’05), or 5-second interval for first 3 minutes
followed by 2-minute interval for next 24 hours (2’00)
Altitude Memory Data:
Manually saved records: 25 (altitude, date, time)
Auto saved values: Two sets (memory areas) each of high altitude and its measurement date and
time, low altitude and its measurement date and time, total ascent and its save start date and
time, total descent and its save start date and time
Other: Reference altitude setting; Altitude graph; Altitude differential; Altitude auto measurement
method (0’05 or 2’00)
Bearing Sensor Precision:
Direction: Within ±10°
Values are guaranteed for a temperature range of –10°C to 40°C (14°F to 104°F).
North pointer: Within ±2 digital segments
Pressure Sensor Precision:
Conditions (Altitude) Altimeter Barometer
Fixed
temperature
0 to 6000 m
0 to 19680 ft.
± (altitude differential × 2%
+ 15 m) m
± (altitude differential × 2%
+ 50 ft.) ft.
± (pressure differential × 2%
+ 2 hPa) hPa
± (pressure differential × 2%
+ 0.059 inHg) inHg6000 to 10000 m
19680 to 32800 ft.
± (altitude differential × 2%
+ 25 m) m
± (altitude differential × 2%
+ 90 ft.) ft.
Effect of
variable
temperature
0 to 6000 m
0 to 19680 ft.
± 50 m every 10°C
± 170 ft. every 50°F ± 5 hPa every 10°C
± 0.148 inHg every 50°F6000 to 10000 m
19680 to 32800 ft.
± 70 m every 10°C
± 230 ft. every 50°F
• Values are guaranteed for a temperature range of –10°C to 40°C (14°F to 104°F).
• Precision is lessened by strong impact to either the watch or the sensor, and by temperature extremes.
Temperature Sensor Precision:
±2°C (±3.6°F) in range of –10°C to 60°C (14.0°F to 140.0°F)
Sunrise/Sunset: Sunrise time and sunset time for specific date, Daylight pointers
World Time: 48 cities (31 time zones)
Other: Daylight Saving Time/Standard Time
Stopwatch:
Measuring unit: 1/100 second
Measuring capacity: 23:59' 59.99"
Measuring modes: Elapsed time, split time, two finishes
Countdown Timer:
Measuring unit: 1 second
Countdown start time setting range: 1 minute to 24 hours (1-hour increments and 1-minute
increments)
Alarms: 5 Daily alarms; Hourly time signal
Illumination: EL Backlight (electro-luminescent panel); Selectable illumination duration (approximately 1
second or 3 seconds); Auto Light Switch (Full Auto EL Light operates only in the dark)
Other: Battery power indicator; Power Saving; Low-temperature resistance (–10°C/14°F); Button
operation tone on/off
Power Supply: Solar cell and one rechargeable battery
Approximate battery operating time: 6 months (from full charge to Level 4) under the following
conditions:
• Watch not exposed to light
• Internal timekeeping
• Display on 18 hours per day, sleep state 6 hours per day
• 1 illumination operation (1.5 seconds) per day
• 10 seconds of alarm operation per day
• 10 digital compass operations per week
• 1 hour of altimeter measurement at 5-second interval, once per month
• 2 hours of barometric pressure measurement per day
Frequent use of illumination runs down the battery. Particular care is required when using the auto
light switch.
Site Longitude Latitude
Abu Dhabi 54°E 24°N
Addis Ababa 39°E 9°N
Adelaide 139°E 35°S
Amsterdam 5°E 52°N
Anchorage 150°W 61°N
Athens 24°E 38°N
Bangkok 100°E 14°N
Beirut 35°E 34°N
Boston 71°W 42°N
Brasilia 48°W 16°S
Buenos Aires 58°W 35°S
Cairo 31°E 30°N
Chicago 88°W 42°N
Christchurch 173°E 43°S
Dakar 17°W 15°N
Damascus 36°E 33°N
Delhi 77°E 29°N
Denver 105°W 40°N
Detroit 83°W 42°N
Dhaka 90°E 24°N
Dubai 55°E 25°N
Dublin 6°W 53°N
Edmonton 114°W 54°N
El Paso 106°W 32°N
Fernando de Noronha 32°W 4°S
Frankfurt 9°E 50°N
Guam 145°E 13°N
Hamburg 10°E 54°N
Hanoi 106°E 21°N
Helsinki 25°E 60°N
Hong Kong 114°E 22°N
Honolulu 158°W 21°N
Houston 95°W 30°N
Istanbul 29°E 41°N
Jakarta 107°E 6°S
Jeddah 39°E 21°N
Kabul 69°E 35°N
Karachi 67°E 25°N
Kathmandu 85°E 28°N
Kuala Lumpur 102°E 3°N
Kuwait 48°E 29°N
Las Vegas 115°W 36°N
Lima 77°W 12°S
Site Longitude Latitude
Lisbon 9°W 39°N
London 0°E 51°N
Los Angeles 118°W 34°N
Madrid 4°W 40°N
Manila 121°E 15°N
Melbourne 145°E 38°S
Mexico City 99°W 19°N
Miami 80°W 26°N
Milan 9°E 45°N
Montreal 74°W 45°N
Nairobi 37°E 1°S
Nauru 167°E 1°S
New Orleans 90°W 30°N
New York 74°W 41°N
Noumea 166°E 22°S
Pago Pago 171°W 14°S
Panama City 80°W 9°N
Papeete 150°W 18°S
Paris 2°E 49°N
Perth 116°E 32°S
Phnom Penh 105°E 12°N
Port Vila 168°E 18°S
Praia 24°W 15°N
Pyongyang 126°E 39°N
Rio De Janeiro 43°E 23°S
Rome 12°E 42°N
San Francisco 122°W 38°N
Santiago 71°W 33°S
Sao Paulo 47°W 24°S
Seattle 122°W 48°N
Seoul 127°E 38°N
Singapore 104°E 1°N
St. Johns 53°W 48°N
Stockholm 18°E 59°N
Sydney 151°E 34°S
Taipei 122°E 25°N
Tehran 51°E 36°N
Tokyo 140°E 36°N
Vancouver 123°W 49°N
Vienna 16°E 48°N
Wellington 175°E 41°S
• Based on data as of December 2008.
Site Data List
City Code Table
City Code City
UTC Offset/
GMT Differential
PPG Pago Pago –11
HNL Honolulu –10
ANC Anchorage –9
YVR Vancouver
–8
LAX Los Angeles
YEA Edmonton
–7
DEN Denver
MEX Mexico City
–6
CHI Chicago
NYC New York –5
SCL Santiago
–4
YHZ Halifax
YYT St. Johns –3.5
RIO Rio De Janeiro –3
FEN
Fernando de
Noronha
–2
RAI Praia –1
UTC
0LIS Lisbon
LON London
MAD Madrid
+1
PAR Paris
ROM Rome
BER Berlin
STO Stockholm
ATH Athens
+2CAI Cairo
JRS Jerusalem
City Code City
UTC Offset/
GMT Differential
MOW Moscow
+3
JED Jeddah
THR Tehran +3.5
DXB Dubai +4
KBL Kabul +4.5
KHI Karachi +5
DEL Delhi +5.5
KTM Kathmandu +5.75
DAC Dhaka +6
RGN Yangon +6.5
BKK Bangkok +7
SIN Singapore
+8
HKG Hong Kong
BJS Beijing
TPE Taipei
SEL Seoul
+9
TYO Tokyo
ADL Adelaide +9.5
GUM Guam
+10
SYD Sydney
NOU Noumea +11
WLG Wellington +12
• Based on data as of December 2009.
• The rules governing global times (GMT differential
and UTC offset) and summer time are determined
by each individual country.

More Related Content

Viewers also liked

WhitneyAlana.Portfolio
WhitneyAlana.PortfolioWhitneyAlana.Portfolio
WhitneyAlana.PortfolioWhitney Parker
 
Job 1 las gas
Job 1 las gasJob 1 las gas
Job 1 las gas
Yansen Imanuel
 
Coconurture
CoconurtureCoconurture
Coconurture
coconuture
 
17.2 modern classification
17.2 modern classification17.2 modern classification
17.2 modern classification
Pickerington High School Central
 
The Pagan Babies
The Pagan BabiesThe Pagan Babies
The Pagan BabiesAlyssa Turk
 
Provire illustratie kering
Provire illustratie keringProvire illustratie kering
Provire illustratie kering
Ingo de Kievit
 
Catro Camiños e os Mallos
Catro Camiños e os MallosCatro Camiños e os Mallos
Catro Camiños e os Mallos
felixlongueirafafian
 
Historia del mal ¿genios, ángeles o demonios
Historia del mal  ¿genios, ángeles o demonios Historia del mal  ¿genios, ángeles o demonios
Historia del mal ¿genios, ángeles o demonios
UNED
 
Coconurture
CoconurtureCoconurture
Coconurture
coconuture
 
Frases fetes yasmin
Frases   fetes yasminFrases   fetes yasmin
Frases fetes yasmin
ceiplacreu torrefarrera
 
0278_Market engagment VIS2a6
0278_Market engagment VIS2a60278_Market engagment VIS2a6
0278_Market engagment VIS2a6James Gear
 
17.1 history of classification
17.1 history of classification17.1 history of classification
17.1 history of classification
Pickerington High School Central
 
Revista numero 13 de la asociación candás marinero .marzo2015
Revista numero 13 de la asociación candás marinero .marzo2015Revista numero 13 de la asociación candás marinero .marzo2015
Revista numero 13 de la asociación candás marinero .marzo2015
Jose Antonio Gonzalez Cuervo
 
Vlogging session from Blog Camp Birmingham April 2015
Vlogging session from Blog Camp Birmingham April 2015Vlogging session from Blog Camp Birmingham April 2015
Vlogging session from Blog Camp Birmingham April 2015
Helpful Mum
 

Viewers also liked (15)

Pendahuluan
PendahuluanPendahuluan
Pendahuluan
 
WhitneyAlana.Portfolio
WhitneyAlana.PortfolioWhitneyAlana.Portfolio
WhitneyAlana.Portfolio
 
Job 1 las gas
Job 1 las gasJob 1 las gas
Job 1 las gas
 
Coconurture
CoconurtureCoconurture
Coconurture
 
17.2 modern classification
17.2 modern classification17.2 modern classification
17.2 modern classification
 
The Pagan Babies
The Pagan BabiesThe Pagan Babies
The Pagan Babies
 
Provire illustratie kering
Provire illustratie keringProvire illustratie kering
Provire illustratie kering
 
Catro Camiños e os Mallos
Catro Camiños e os MallosCatro Camiños e os Mallos
Catro Camiños e os Mallos
 
Historia del mal ¿genios, ángeles o demonios
Historia del mal  ¿genios, ángeles o demonios Historia del mal  ¿genios, ángeles o demonios
Historia del mal ¿genios, ángeles o demonios
 
Coconurture
CoconurtureCoconurture
Coconurture
 
Frases fetes yasmin
Frases   fetes yasminFrases   fetes yasmin
Frases fetes yasmin
 
0278_Market engagment VIS2a6
0278_Market engagment VIS2a60278_Market engagment VIS2a6
0278_Market engagment VIS2a6
 
17.1 history of classification
17.1 history of classification17.1 history of classification
17.1 history of classification
 
Revista numero 13 de la asociación candás marinero .marzo2015
Revista numero 13 de la asociación candás marinero .marzo2015Revista numero 13 de la asociación candás marinero .marzo2015
Revista numero 13 de la asociación candás marinero .marzo2015
 
Vlogging session from Blog Camp Birmingham April 2015
Vlogging session from Blog Camp Birmingham April 2015Vlogging session from Blog Camp Birmingham April 2015
Vlogging session from Blog Camp Birmingham April 2015
 

Similar to Relógio cassio wr10 bar

Casio gshock gx56bb1 manual
Casio gshock gx56bb1 manualCasio gshock gx56bb1 manual
Casio gshock gx56bb1 manual
andonis-artist
 
Instruction Manual | Burris BTC 35 / BTC 50 | Optics Trade
Instruction Manual | Burris BTC 35 / BTC 50 | Optics TradeInstruction Manual | Burris BTC 35 / BTC 50 | Optics Trade
Instruction Manual | Burris BTC 35 / BTC 50 | Optics Trade
Optics-Trade
 
e81 citizen .pdf
e81 citizen .pdfe81 citizen .pdf
e81 citizen .pdf
Saumil17
 
Instruction Manual | Guide TA Series | Optics Trade
Instruction Manual | Guide TA Series | Optics TradeInstruction Manual | Guide TA Series | Optics Trade
Instruction Manual | Guide TA Series | Optics Trade
Optics-Trade
 
Gro clock instructions
Gro clock instructionsGro clock instructions
Gro clock instructions
MohammadSaifulIslam45
 
Instruction Manual | Guide TD210 Thermal Imaging Monocular | Optics Trade
Instruction  Manual | Guide TD210 Thermal Imaging Monocular | Optics TradeInstruction  Manual | Guide TD210 Thermal Imaging Monocular | Optics Trade
Instruction Manual | Guide TD210 Thermal Imaging Monocular | Optics Trade
Optics-Trade
 
fx-115ES PLUS fx-991ES PLUS C User’s Guide
fx-115ES PLUS fx-991ES PLUS C User’s Guidefx-115ES PLUS fx-991ES PLUS C User’s Guide
fx-115ES PLUS fx-991ES PLUS C User’s Guide
Leynerie Joanino
 
Citizen promaster sky pmv65 2271 instruction manual
Citizen promaster sky pmv65 2271 instruction manualCitizen promaster sky pmv65 2271 instruction manual
Citizen promaster sky pmv65 2271 instruction manual
andonis-artist
 
Instruction Manual | InfiRay ZH38 | Optics Trade
Instruction Manual | InfiRay ZH38 | Optics TradeInstruction Manual | InfiRay ZH38 | Optics Trade
Instruction Manual | InfiRay ZH38 | Optics Trade
Optics-Trade
 
Casio fx-991EX classWiz user manual and commands.
Casio fx-991EX classWiz user manual and commands.Casio fx-991EX classWiz user manual and commands.
Casio fx-991EX classWiz user manual and commands.
FarhanAhmade
 
Fx 570 991-es_plus_en
Fx 570 991-es_plus_enFx 570 991-es_plus_en
Fx 570 991-es_plus_en
University of Chittagong
 
Instruction | Manual | Pulsar | Core | digi | nv | clip | on | Optics | Trade...
Instruction | Manual | Pulsar | Core | digi | nv | clip | on | Optics | Trade...Instruction | Manual | Pulsar | Core | digi | nv | clip | on | Optics | Trade...
Instruction | Manual | Pulsar | Core | digi | nv | clip | on | Optics | Trade...
Optics-Trade
 
Casio qw5158
Casio qw5158Casio qw5158
Casio qw5158
Victor Luis
 
Máy Điện Di CRYO STAMP
Máy Điện Di CRYO STAMPMáy Điện Di CRYO STAMP
Máy Điện Di CRYO STAMP
Thiết bị thẩm mỹ HANA KBN
 
Instruction Manual ATN X-Sight HD Series Weapon Sights | Optics Trade
Instruction Manual ATN X-Sight HD Series Weapon Sights | Optics TradeInstruction Manual ATN X-Sight HD Series Weapon Sights | Optics Trade
Instruction Manual ATN X-Sight HD Series Weapon Sights | Optics Trade
Optics-Trade
 
Bushnell Night visison Monoculars Instruction Manual | Optics Trade
Bushnell Night visison Monoculars Instruction Manual | Optics TradeBushnell Night visison Monoculars Instruction Manual | Optics Trade
Bushnell Night visison Monoculars Instruction Manual | Optics Trade
Optics-Trade
 
Light sensor with lcd display user manual
Light sensor with lcd display user manualLight sensor with lcd display user manual
Light sensor with lcd display user manualDomotica daVinci
 
Instruction Manual | Burris BTH 25/35/50
Instruction Manual | Burris BTH 25/35/50Instruction Manual | Burris BTH 25/35/50
Instruction Manual | Burris BTH 25/35/50
Optics-Trade
 
Siemens room stat instructions
Siemens room stat instructionsSiemens room stat instructions
Siemens room stat instructions
Maria Isabel
 
Siemens room stat instructions
Siemens room stat instructionsSiemens room stat instructions
Siemens room stat instructions
Maria Isabel
 

Similar to Relógio cassio wr10 bar (20)

Casio gshock gx56bb1 manual
Casio gshock gx56bb1 manualCasio gshock gx56bb1 manual
Casio gshock gx56bb1 manual
 
Instruction Manual | Burris BTC 35 / BTC 50 | Optics Trade
Instruction Manual | Burris BTC 35 / BTC 50 | Optics TradeInstruction Manual | Burris BTC 35 / BTC 50 | Optics Trade
Instruction Manual | Burris BTC 35 / BTC 50 | Optics Trade
 
e81 citizen .pdf
e81 citizen .pdfe81 citizen .pdf
e81 citizen .pdf
 
Instruction Manual | Guide TA Series | Optics Trade
Instruction Manual | Guide TA Series | Optics TradeInstruction Manual | Guide TA Series | Optics Trade
Instruction Manual | Guide TA Series | Optics Trade
 
Gro clock instructions
Gro clock instructionsGro clock instructions
Gro clock instructions
 
Instruction Manual | Guide TD210 Thermal Imaging Monocular | Optics Trade
Instruction  Manual | Guide TD210 Thermal Imaging Monocular | Optics TradeInstruction  Manual | Guide TD210 Thermal Imaging Monocular | Optics Trade
Instruction Manual | Guide TD210 Thermal Imaging Monocular | Optics Trade
 
fx-115ES PLUS fx-991ES PLUS C User’s Guide
fx-115ES PLUS fx-991ES PLUS C User’s Guidefx-115ES PLUS fx-991ES PLUS C User’s Guide
fx-115ES PLUS fx-991ES PLUS C User’s Guide
 
Citizen promaster sky pmv65 2271 instruction manual
Citizen promaster sky pmv65 2271 instruction manualCitizen promaster sky pmv65 2271 instruction manual
Citizen promaster sky pmv65 2271 instruction manual
 
Instruction Manual | InfiRay ZH38 | Optics Trade
Instruction Manual | InfiRay ZH38 | Optics TradeInstruction Manual | InfiRay ZH38 | Optics Trade
Instruction Manual | InfiRay ZH38 | Optics Trade
 
Casio fx-991EX classWiz user manual and commands.
Casio fx-991EX classWiz user manual and commands.Casio fx-991EX classWiz user manual and commands.
Casio fx-991EX classWiz user manual and commands.
 
Fx 570 991-es_plus_en
Fx 570 991-es_plus_enFx 570 991-es_plus_en
Fx 570 991-es_plus_en
 
Instruction | Manual | Pulsar | Core | digi | nv | clip | on | Optics | Trade...
Instruction | Manual | Pulsar | Core | digi | nv | clip | on | Optics | Trade...Instruction | Manual | Pulsar | Core | digi | nv | clip | on | Optics | Trade...
Instruction | Manual | Pulsar | Core | digi | nv | clip | on | Optics | Trade...
 
Casio qw5158
Casio qw5158Casio qw5158
Casio qw5158
 
Máy Điện Di CRYO STAMP
Máy Điện Di CRYO STAMPMáy Điện Di CRYO STAMP
Máy Điện Di CRYO STAMP
 
Instruction Manual ATN X-Sight HD Series Weapon Sights | Optics Trade
Instruction Manual ATN X-Sight HD Series Weapon Sights | Optics TradeInstruction Manual ATN X-Sight HD Series Weapon Sights | Optics Trade
Instruction Manual ATN X-Sight HD Series Weapon Sights | Optics Trade
 
Bushnell Night visison Monoculars Instruction Manual | Optics Trade
Bushnell Night visison Monoculars Instruction Manual | Optics TradeBushnell Night visison Monoculars Instruction Manual | Optics Trade
Bushnell Night visison Monoculars Instruction Manual | Optics Trade
 
Light sensor with lcd display user manual
Light sensor with lcd display user manualLight sensor with lcd display user manual
Light sensor with lcd display user manual
 
Instruction Manual | Burris BTH 25/35/50
Instruction Manual | Burris BTH 25/35/50Instruction Manual | Burris BTH 25/35/50
Instruction Manual | Burris BTH 25/35/50
 
Siemens room stat instructions
Siemens room stat instructionsSiemens room stat instructions
Siemens room stat instructions
 
Siemens room stat instructions
Siemens room stat instructionsSiemens room stat instructions
Siemens room stat instructions
 

Recently uploaded

All Trophies at Trophy-World Malaysia | Custom Trophies & Plaques Supplier
All Trophies at Trophy-World Malaysia | Custom Trophies & Plaques SupplierAll Trophies at Trophy-World Malaysia | Custom Trophies & Plaques Supplier
All Trophies at Trophy-World Malaysia | Custom Trophies & Plaques Supplier
Trophy-World Malaysia Your #1 Rated Trophy Supplier
 
Importance of BWTS in the Maritime Industry
Importance of BWTS in the Maritime IndustryImportance of BWTS in the Maritime Industry
Importance of BWTS in the Maritime Industry
Blessed Marine Automation
 
Are Gutters Necessary? Explore the details now!
Are Gutters Necessary? Explore the details now!Are Gutters Necessary? Explore the details now!
Are Gutters Necessary? Explore the details now!
AmeliaLauren3
 
WORK PERMIT IN BULGARIA | Work Visa Services
WORK PERMIT IN BULGARIA | Work Visa ServicesWORK PERMIT IN BULGARIA | Work Visa Services
WORK PERMIT IN BULGARIA | Work Visa Services
RKIMT
 
Delightful Finds: Unveiling the Power of Gifts Under 100
Delightful Finds: Unveiling the Power of Gifts Under 100Delightful Finds: Unveiling the Power of Gifts Under 100
Delightful Finds: Unveiling the Power of Gifts Under 100
JoyTree Global
 
Earthmovers: Top Earth Moving Equipments
Earthmovers: Top Earth Moving EquipmentsEarthmovers: Top Earth Moving Equipments
Earthmovers: Top Earth Moving Equipments
earthmoverinternatio
 
Office Business Furnishings | Office Equipment
Office Business Furnishings |  Office EquipmentOffice Business Furnishings |  Office Equipment
Office Business Furnishings | Office Equipment
OFWD
 
Top Best Astrologer +91-9463629203 LoVe Problem SolUtion specialist In InDia ...
Top Best Astrologer +91-9463629203 LoVe Problem SolUtion specialist In InDia ...Top Best Astrologer +91-9463629203 LoVe Problem SolUtion specialist In InDia ...
Top Best Astrologer +91-9463629203 LoVe Problem SolUtion specialist In InDia ...
gitapress3
 
Waikiki Sunset Catamaran ! MAITAI Catamaran
Waikiki Sunset Catamaran !  MAITAI CatamaranWaikiki Sunset Catamaran !  MAITAI Catamaran
Waikiki Sunset Catamaran ! MAITAI Catamaran
maitaicatamaran
 
Solar Panel For Home Price List In india
Solar Panel For Home Price List In indiaSolar Panel For Home Price List In india
Solar Panel For Home Price List In india
janhaviconaxweb
 
The Jamstack Revolution: Building Dynamic Websites with Static Site Generator...
The Jamstack Revolution: Building Dynamic Websites with Static Site Generator...The Jamstack Revolution: Building Dynamic Websites with Static Site Generator...
The Jamstack Revolution: Building Dynamic Websites with Static Site Generator...
Softradix Technologies
 
Unlocking Insights: AI-powered Enhanced Due Diligence Strategies for Increase...
Unlocking Insights: AI-powered Enhanced Due Diligence Strategies for Increase...Unlocking Insights: AI-powered Enhanced Due Diligence Strategies for Increase...
Unlocking Insights: AI-powered Enhanced Due Diligence Strategies for Increase...
RNayak3
 
Get your dream bridal look with top North Indian makeup artist - Pallavi Kadale
Get your dream bridal look with top North Indian makeup artist - Pallavi KadaleGet your dream bridal look with top North Indian makeup artist - Pallavi Kadale
Get your dream bridal look with top North Indian makeup artist - Pallavi Kadale
Pallavi Makeup Artist
 
Chandigarh call garal serives 9512450098
Chandigarh call garal serives 9512450098Chandigarh call garal serives 9512450098
Chandigarh call garal serives 9512450098
Chandigarh export services garal
 
Colors of Wall Paint and Their Mentally Properties.pptx
Colors of Wall Paint and Their Mentally Properties.pptxColors of Wall Paint and Their Mentally Properties.pptx
Colors of Wall Paint and Their Mentally Properties.pptx
Brendon Jonathan
 
SECUREX UK FOR SECURITY SERVICES AND MOBILE PATROL
SECUREX UK FOR SECURITY SERVICES AND MOBILE PATROLSECUREX UK FOR SECURITY SERVICES AND MOBILE PATROL
SECUREX UK FOR SECURITY SERVICES AND MOBILE PATROL
securexukweb
 
Inspect Edge & NSPIRE Inspection Application - Streamline Housing Inspections
Inspect Edge & NSPIRE Inspection Application - Streamline Housing InspectionsInspect Edge & NSPIRE Inspection Application - Streamline Housing Inspections
Inspect Edge & NSPIRE Inspection Application - Streamline Housing Inspections
inspectedge1
 
DOJO Training Center - Empowering Workforce Excellence
DOJO Training Center - Empowering Workforce ExcellenceDOJO Training Center - Empowering Workforce Excellence
DOJO Training Center - Empowering Workforce Excellence
Himanshu
 
Best Catering Event Planner Miso-Hungry.pptx
Best Catering Event Planner  Miso-Hungry.pptxBest Catering Event Planner  Miso-Hungry.pptx
Best Catering Event Planner Miso-Hungry.pptx
Miso Hungry
 
Comprehensive Water Damage Restoration Services
Comprehensive Water Damage Restoration ServicesComprehensive Water Damage Restoration Services
Comprehensive Water Damage Restoration Services
kleenupdisaster
 

Recently uploaded (20)

All Trophies at Trophy-World Malaysia | Custom Trophies & Plaques Supplier
All Trophies at Trophy-World Malaysia | Custom Trophies & Plaques SupplierAll Trophies at Trophy-World Malaysia | Custom Trophies & Plaques Supplier
All Trophies at Trophy-World Malaysia | Custom Trophies & Plaques Supplier
 
Importance of BWTS in the Maritime Industry
Importance of BWTS in the Maritime IndustryImportance of BWTS in the Maritime Industry
Importance of BWTS in the Maritime Industry
 
Are Gutters Necessary? Explore the details now!
Are Gutters Necessary? Explore the details now!Are Gutters Necessary? Explore the details now!
Are Gutters Necessary? Explore the details now!
 
WORK PERMIT IN BULGARIA | Work Visa Services
WORK PERMIT IN BULGARIA | Work Visa ServicesWORK PERMIT IN BULGARIA | Work Visa Services
WORK PERMIT IN BULGARIA | Work Visa Services
 
Delightful Finds: Unveiling the Power of Gifts Under 100
Delightful Finds: Unveiling the Power of Gifts Under 100Delightful Finds: Unveiling the Power of Gifts Under 100
Delightful Finds: Unveiling the Power of Gifts Under 100
 
Earthmovers: Top Earth Moving Equipments
Earthmovers: Top Earth Moving EquipmentsEarthmovers: Top Earth Moving Equipments
Earthmovers: Top Earth Moving Equipments
 
Office Business Furnishings | Office Equipment
Office Business Furnishings |  Office EquipmentOffice Business Furnishings |  Office Equipment
Office Business Furnishings | Office Equipment
 
Top Best Astrologer +91-9463629203 LoVe Problem SolUtion specialist In InDia ...
Top Best Astrologer +91-9463629203 LoVe Problem SolUtion specialist In InDia ...Top Best Astrologer +91-9463629203 LoVe Problem SolUtion specialist In InDia ...
Top Best Astrologer +91-9463629203 LoVe Problem SolUtion specialist In InDia ...
 
Waikiki Sunset Catamaran ! MAITAI Catamaran
Waikiki Sunset Catamaran !  MAITAI CatamaranWaikiki Sunset Catamaran !  MAITAI Catamaran
Waikiki Sunset Catamaran ! MAITAI Catamaran
 
Solar Panel For Home Price List In india
Solar Panel For Home Price List In indiaSolar Panel For Home Price List In india
Solar Panel For Home Price List In india
 
The Jamstack Revolution: Building Dynamic Websites with Static Site Generator...
The Jamstack Revolution: Building Dynamic Websites with Static Site Generator...The Jamstack Revolution: Building Dynamic Websites with Static Site Generator...
The Jamstack Revolution: Building Dynamic Websites with Static Site Generator...
 
Unlocking Insights: AI-powered Enhanced Due Diligence Strategies for Increase...
Unlocking Insights: AI-powered Enhanced Due Diligence Strategies for Increase...Unlocking Insights: AI-powered Enhanced Due Diligence Strategies for Increase...
Unlocking Insights: AI-powered Enhanced Due Diligence Strategies for Increase...
 
Get your dream bridal look with top North Indian makeup artist - Pallavi Kadale
Get your dream bridal look with top North Indian makeup artist - Pallavi KadaleGet your dream bridal look with top North Indian makeup artist - Pallavi Kadale
Get your dream bridal look with top North Indian makeup artist - Pallavi Kadale
 
Chandigarh call garal serives 9512450098
Chandigarh call garal serives 9512450098Chandigarh call garal serives 9512450098
Chandigarh call garal serives 9512450098
 
Colors of Wall Paint and Their Mentally Properties.pptx
Colors of Wall Paint and Their Mentally Properties.pptxColors of Wall Paint and Their Mentally Properties.pptx
Colors of Wall Paint and Their Mentally Properties.pptx
 
SECUREX UK FOR SECURITY SERVICES AND MOBILE PATROL
SECUREX UK FOR SECURITY SERVICES AND MOBILE PATROLSECUREX UK FOR SECURITY SERVICES AND MOBILE PATROL
SECUREX UK FOR SECURITY SERVICES AND MOBILE PATROL
 
Inspect Edge & NSPIRE Inspection Application - Streamline Housing Inspections
Inspect Edge & NSPIRE Inspection Application - Streamline Housing InspectionsInspect Edge & NSPIRE Inspection Application - Streamline Housing Inspections
Inspect Edge & NSPIRE Inspection Application - Streamline Housing Inspections
 
DOJO Training Center - Empowering Workforce Excellence
DOJO Training Center - Empowering Workforce ExcellenceDOJO Training Center - Empowering Workforce Excellence
DOJO Training Center - Empowering Workforce Excellence
 
Best Catering Event Planner Miso-Hungry.pptx
Best Catering Event Planner  Miso-Hungry.pptxBest Catering Event Planner  Miso-Hungry.pptx
Best Catering Event Planner Miso-Hungry.pptx
 
Comprehensive Water Damage Restoration Services
Comprehensive Water Damage Restoration ServicesComprehensive Water Damage Restoration Services
Comprehensive Water Damage Restoration Services
 

Relógio cassio wr10 bar

  • 1. 1 Operation Guide 3173 3246 Congratulations upon your selection of this CASIO watch. Applications The built-in sensors of this watch measure direction, barometric pressure, temperature and altitude. Measured values are then shown on the display. Such features make this watch useful when hiking, mountain climbing, or when engaging in other such outdoor activities. Warning ! • The measurement functions built into this watch are not intended for taking measurements that require professional or industrial precision. Values produced by this watch should be considered as reasonable representations only. • When engaging in mountain climbing or other activities in which losing your way can create a dangerous or life-threatening situation, always use a second compass to confirm direction readings. • Note that CASIO COMPUTER CO., LTD. assumes no responsibility for any damage or loss suffered by you or any third party arising through the use of this product or its malfunction. About This Manual • The operational procedures for Modules 3173 and 3246 are identical. All of the illustrations in this manual show Module 3173. • Depending on the model of your watch, display text appears either as dark figures on a light background, or light figures on a dark background. All sample displays in this manual are shown using dark figures on a light background. • Button operations are indicated using the letters shown in the illustration. • Note that the product illustrations in this manual are intended for reference only, and so the actual product may appear somewhat different than depicted by an illustration. Things to check before using the watch 1. Check the battery power level. Is “H” or “M” displayed for the battery power indicator? Go to step 2. Power is low. Charge the watch by placing it in a location where it is exposed to light. For details, see “Charging the Watch”. NO YES YES Does any one of the following conditions exist? • Battery power indicator shows “L” and “LOW” is displayed in the upper left corner of the screen. • “C” is displayed in the lower left corner of the screen. • The face is blank. The watch is charged sufficiently. For details about charging, see “Charging the Watch”. NEXT Battery power indicator 2. Check the Home City and the daylight saving time (DST) setting. Use the procedure under “To configure Home City settings” to configure your Home City and daylight saving time settings. Important! World Time Mode and Sunrise/Sunset Mode data depend on correct Home City, time, and date settings in the Timekeeping Mode. Make sure you configure these settings correctly. 3. Set the current time. See “Configuring Current Time and Date Settings”. The watch is now ready for use. Charging the Watch The face of the watch is a solar cell that generates power from light. The generated power charges a built-in rechargeable battery, which powers watch operations. The watch charges whenever it is exposed to light. Charging Guide Whenever you are not wearing the watch, leave it in a location where it is exposed to light. • Best charging performance is achieved by exposing the watch to the strongest light available. When wearing the watch, make sure that its face is not blocked from light by the sleeve of your clothing. • The watch may enter a sleep state if its face is blocked by your sleeve even only partially. Warning! Leaving the watch in bright light for charging can cause it to become quite hot. Take care when handling the watch to avoid burn injury. The watch can become particularly hot when exposed to the following conditions for long periods. • On the dashboard of a car parked in direct sunlight • Too close to an incandescent lamp • Under direct sunlight Important! • Allowing the watch to become very hot can cause its liquid crystal display to black out. The appearance of the LCD should become normal again when the watch returns to a lower temperature. • Turn on the watch’s Power Saving function and keep it in an area normally exposed to bright light when storing it for long periods. This helps to ensure that power does not run down. • Storing the watch for long periods in an area where there is no light or wearing it in such a way that it is blocked from exposure to light can cause power to run down. Expose the watch to bright light whenever possible. (Light)(Light) (Light) Module 3173 (Light) Module 3246 (Light)(Light) (Light) Module 3173 (Light) Module 3246 Power Levels You can get an idea of the watch’s power level by observing the battery power indicator on the display. Level Battery Power Indicator Function Status 1 (H) All functions enabled. 2 (M) All functions enabled. 3 (L) l l l l l l l llllllll l l l Illumination, beeper, and sensor operation disabled. 4 (C) Except for timekeeping and the C (charge) indicator, all functions and display indicators disabled. 5 All functions disabled. • The flashing LOW indicator at Level 3 (L) tells you that battery power is very low, and that exposure to bright light for charging is required as soon as possible. • At Level 5, all functions are disabled and settings return to their initial factory defaults. Once the battery reaches Level 2 (M) after falling to Level 5, reconfigure the current time, date, and other settings. • Display indicators reappear as soon as the battery is charged from Level 5 to Level 2 (M). • Leaving the watch exposed to direct sunlight or some other very strong light source can cause the battery power indicator to show a reading temporarily that is higher than the actual battery level. The correct battery level should be indicated after a few minutes. • All data stored in memory is deleted, and the current time and all other settings return to their initial factory defaults whenever battery power drops to Level 5 and when you have the battery replaced. Power Recovery Mode • Performing multiple sensor, illumination, or beeper operations during a short period may cause all of the battery power indicators (H, M, and L) to start flashing on the display. This indicates that the watch is in the power recovery mode. Illumination, alarm, countdown timer alarm, hourly time signal, and sensor operations will be disabled until battery power recovers. • Battery power will recover in about 15 minutes. At this time, the battery power indicators (H, M, L) will stop flashing. This indicates that the functions listed above are enabled again. • If all of the battery power indicators (H, M, L) are flashing and the C (charge) indicator also is flashing, it means the battery level is very low. Expose the watch to bright light as soon as possible. • Even if battery power is at Level 1 (H) or Level 2 (M), the Digital Compass Mode, Barometer/ Thermometer Mode, or Altimeter Mode sensor may be disabled if there is not enough voltage available to power it sufficiently. This is indicated when all of the battery power indicators (H, M, L) are flashing. • Frequent flashing of all of the battery power indicators (H, M, L) probably means that remaining battery power is low. Leave the watch in bright light to allow it to charge. Charging Times Exposure Level (Brightness) Daily Operation *1 Level Change *2 Level 5 Level 4 Level 3 Level 2 Level 1 Outdoor sunlight (50,000 lux) 5 min. 2 hours 12 hours 4 hours Sunlight through a window (10,000 lux) 24 min. 5 hours 59 hours 16 hours Daylight through a window on a cloudy day (5,000 lux) 48 min. 9 hours 120 hours 32 hours Indoor fluorescent lighting (500 lux) 8 hours 95 hours – – – – – – *1 Approximate amount of exposure time required each day to generate enough power for normal daily operation. *2 Approximate amount of exposure time (in hours) required to take power from one level to the next. • The above exposure times all are for reference only. Actual exposure times depend on lighting conditions. • For details about the operating time and daily operating conditions, see the “Power Supply” section of the Specifications. Power Saving When turned on, Power Saving enters a sleep state automatically whenever the watch is left for a certain period in an area where it is dark. The table below shows how watch functions are affected by Power Saving. • There actually are two sleep state levels: “display sleep” and “function sleep”. Elapsed Time in Dark Display Operation 60 to 70 minutes (display sleep) Blank, with PS flashing Display is off, but all functions are enabled. 6 or 7 days (function sleep) Blank, with PS not flashing All functions are disabled, but timekeeping is maintained. • The watch will not enter a sleep state between 6:00 AM and 9:59 PM. If the watch is already in a sleep state when 6:00 AM arrives, however, it will remain in the sleep state. • The watch will not enter a sleep state while it is in the Stopwatch Mode or Countdown Timer Mode. To recover from the sleep state Move the watch to a well-lit area, press any button, or angle the watch towards your face for reading. To turn Power Saving on and off 1. In the Timekeeping Mode, hold down E until the currently selected city code starts to flash. This is the city code setting screen. • Before the city code starts to flash, the message SET Hold will appear on the display. Keep E depressed until SET Hold disappears and the city code starts to flash. 2. Use D to display the Power Saving On/Off screen shown nearby. 3. Press A to toggle Power Saving on (On) and off (OFF). 4. Press E twice to exit the setting screen. • The Power Saving on indicator (PS) is on the display in all modes while Power Saving is turned on. Battery power indicator Battery power indicator Power saving on indicator Power saving on indicator MO1007-EB
  • 2. 2 Operation Guide 3173 3246 Mode Reference Guide Your watch has 10 “modes”. The mode you should select depends on what you want to do. To do this: Enter this mode: • View the current date in the Home City • Configure Home City and daylight saving time (DST) settings • Configure time and date settings Timekeeping Mode View the sunrise and sunset times for a specific date Sunrise/Sunset Mode • Determine your current bearing or the direction from your current location to a destination as a direction indicator and angle value • Determine your current location using the watch and a map Digital Compass Mode • View the barometric pressure and temperature at your current location • View a graph of barometric pressure readings Barometer/Thermometer Mode To do this: Enter this mode: • View the altitude at your current location • Determine the altitude differential between two locations (reference point and current location) • Record an altitude reading with the measurement time and date Altimeter Mode Recall records created in the Altimeter Mode Data Recall Mode View the current time in one of 48 cities (31 time zones) around the globe World Time Mode Use the stopwatch to measure elapsed time Stopwatch Mode Use the countdown timer Countdown Timer Mode Set an alarm time Alarm Mode General Functions (All Modes) The functions and operations described in this section can be used in all of the modes. Auto Return Features • The watch returns to the Timekeeping Mode automatically if you do not perform any button operation for two or three minutes in the Sunrise/Sunset, Data Recall, Alarm, or Digital Compass Mode. • If you leave a screen with flashing digits on the display for two or three minutes without performing any operation, the watch exits the setting screen automatically. Initial Screens When you enter the World Time, Alarm, or Digital Compass Mode, the data you were viewing when you last exited the mode appears first. Scrolling The A and C buttons are used on the setting screen to scroll through data on the display. In most cases, holding down these buttons during a scroll operation scrolls through the data at high speed. Timekeeping Use the Timekeeping Mode to set and view the current time and date. • Pressing E while in the Timekeeping Mode will cycle through the Timekeeping Mode display formats as shown below. Year Barometric pressure graph Day of the Week Screen Year Screen Barometric Pressure Graph Screen PM indicator Day of week Month Day SecondsHour : Minutes Configuring Home City Settings There are two Home City settings: actually selecting the Home City and selecting either standard time or daylight saving time (DST). To configure Home City settings 1. In the Timekeeping Mode, hold down E until the currently selected city code starts to flash. This is the city code setting screen. • Before the city code starts to flash, the message SET Hold will appear on the display. Keep E depressed until SET Hold disappears and the city code starts to flash. • The watch will exit the setting mode automatically if you do not perform any operation for about two or three minutes. • For details about city codes, see the “City Code Table”. 2. Press A (East) and C (West) to select the city code you want to use as your Home City. • Keep pressing A or C until the city code you want to select as your Home City appears on the display. 3. Press D to display the DST setting screen. 4. Use A to toggle the DST settings between OFF and On. • Note that you cannot switch between standard time and daylight saving time (DST) while UTC is selected as your Home City. 5. After all the settings are the way you want, press E twice to return to the Timekeeping Mode. • The DST indicator appears to indicate that Daylight Saving Time is turned on. Note • After you specify a city code, the watch will use UTC* offsets in the World Time Mode to calculate the current time for other time zones based on the current time in your Home City. * Coordinated Universal Time, the world-wide scientific standard of timekeeping. The reference point for UTC is Greenwich, England. To change the Daylight Saving Time (summer time) setting 1. In the Timekeeping Mode, hold down E until the currently selected city code starts to flash. This is the city code setting screen. • Before the city code starts to flash, the message SET Hold will appear on the display. Keep E depressed until SET Hold disappears and the city code starts to flash. 2. Press D to display the DST setting screen. 3. Use A to toggle the DST settings between OFF and On. 4. After all the settings are the way you want, press E twice to return to the Timekeeping Mode. • The DST indicator appears to indicate that Daylight Saving Time is turned on. PM indicator City code Month Day SecondsHour : Minutes DST indicator PM indicator City code Month Day SecondsHour : Minutes DST indicator DST indicatorDST indicator Selecting a Mode • The illustration below shows which buttons you need to press to navigate between modes. • For about one second after you enter a mode by pressing D, a pointer will appear on the display pointing the applicable mode name on the watch's bezel. • In any mode, press L to illuminate the display. • You can use buttons A, B, and C to enter a sensor mode directly from the Timekeeping Mode or from another sensor mode. To enter a sensor mode from the Sunrise/Sunset Mode, Data Recall, World Time, Stopwatch, Countdown Timer, or Alarm Mode, first enter the Timekeeping Mode and then press the applicable button. World Time Mode Data Recall Mode Sunrise/Sunset Mode Stopwatch Mode Countdown Timer Mode Alarm Mode Altimeter Mode Barometer/ Thermometer ModeDigital Compass Mode Timekeeping Mode Sensor ModesWorld Time Mode Data Recall Mode Sunrise/Sunset Mode Stopwatch Mode Countdown Timer Mode Alarm Mode Altimeter Mode Barometer/ Thermometer ModeDigital Compass Mode Timekeeping Mode Sensor Modes
  • 3. 3 Operation Guide 3173 3246 Configuring Current Time and Date Settings You can use the procedure below to adjust the Timekeeping Mode time and date settings if they are off. To change the current time and date settings 1. In the Timekeeping Mode, hold down E until the currently selected city code starts to flash. This is the city code setting screen. • Before the city code starts to flash, the message SET Hold will appear on the display. Keep E depressed until SET Hold disappears and the city code starts to flash. 2. Use A and C to select the city code you want. • Select your Home City code before changing any other setting. • For full information on city codes, see the “City Code Table”. 3. Press D to move the flashing in the sequence shown below to select the other settings. Thermometer/Barometer/ Altitude unit Power Saving Illumination Duration Button Operation Tone On/Off Day Month City Code DST 12/24-Hour Format Seconds Hour Minutes Year • The following steps explain how to configure timekeeping settings only. 4. When the timekeeping setting you want to change is flashing, use A and/or C to change it as described below. Screen To do this: Do this: Change the city code Use A (East) and C (West). Toggle between Daylight Saving Time (On) and Standard Time (OFF). Press A. Toggle between 12-hour (12H) and 24-hour (24H) timekeeping. Press A. 50 Reset the seconds to 00 Press A. Change the hour or minutes Use A (+) and C (–). Change the year, month, or day 5. Press E twice to exit the setting screen. Note • For information about selecting a Home City and configuring the DST setting, see “Configuring Home City Settings”. • While 12-hour format is selected for timekeeping, a P (PM) indicator will appear for times from noon to 11:59 p.m. No indicator appears for times from midnight to 11:59 a.m. With 24-hour format, time is displayed from 0:00 to 23:59, without any P (PM) indicator. • The watch’s built-in full automatic calendar makes allowances for different month lengths and leap years. Once you set the date, there should be no reason to change it except after you have the watch’s rechargeable battery replaced or after power drops to Level 5. Digital Compass In the Digital Compass Mode, a built-in bearing sensor detects magnetic north at regular intervals and indicates one of 16 directions on the display. To take a digital compass reading 1. Make sure the watch is in the Timekeeping Mode or any one of the sensor modes. • The sensor modes are: Digital Compass Mode, Barometer/ Thermometer Mode, and Altimeter Mode. 2. Place the watch on a flat surface. If you are wearing the watch, make sure that your wrist is horizontal (in relation to the horizon). 3. Point the 12 o'clock position of the watch in the direction you want to measure. 4. Press C to start digital compass measurement. • COMP will appear on the display to indicate that a digital compass operation is in progress. • See “Digital Compass Readings” for information about what appears on the display. Note • If a value appears to the right of the direction indicator, it means that the bearing memory screen is displayed. If this happens, press E to exit the bearing memory screen. 5. After you are finished using the digital compass, press D to return to the Timekeeping Mode. Digital Compass Readings • When you press C to start digital compass measurement, COMP will appear on the display initially to indicate that a digital compass operation is in progress. • About two seconds after you start a digital compass measurement operation, letters on the display will indicate the direction that the 12 o’clock position of the watch is pointing. Four pointers that indicate magnetic north, south, east, and west also will appear. • After the first reading is obtained, the watch will continue to take digital compass readings automatically each second for up to 20 seconds. After that, measurement will stop automatically. • The direction indicator and angle value will show - - - to indicate that digital compass readings are complete. • The auto light switch is disabled during the 20 seconds that digital compass readings are being taken. • The following table shows the meanings of each of the direction abbreviations that appear on the display. Direction Meaning Direction Meaning Direction Meaning Direction Meaning N North NNE North- northeast NE Northeast ENE East- northeast E East ESE East- southeast SE Southeast SSE South- southeast S South SSW South- southwest SW Southwest WSW West- southwest W West WNW West- northwest NW Northwest NNW North- northwest • The margin of error for the angle value and the direction indicator is ±11 degrees while the watch is horizontal (in relation to the horizon). If the indicated direction is northwest (NW) and 315 degrees, for example, the actual direction can be anywhere from 304 to 326 degrees. PM indicator City code Month Day SecondsHour : Minutes PM indicator City code Month Day SecondsHour : Minutes NW 0WNW W WSW SW SSW S SSE SE ESE E ENE NE NNE N NNW 90180 270 12 o’clock position Current time North pointer Direction indicator Angle value (in degrees) NW 0WNW W WSW SW SSW S SSE SE ESE E ENE NE NNE N NNW 90180 270 12 o’clock position Current time North pointer Direction indicator Angle value (in degrees) • Note that taking a measurement while the watch is not horizontal (in relation to the horizon) can result in large measurement error. • You can calibrate the bearing sensor if you suspect the direction reading is incorrect. • Any ongoing direction measurement operation is paused temporarily while the watch is performing an alert operation (daily alarm, Hourly Time Signal, countdown timer alarm) or while illumination is turned on (by pressing L). The measurement operation resumes for its remaining duration after the operation that caused it to pause is finished. • See “Digital Compass Precautions” for important information about taking direction readings. Calibrating the Bearing Sensor You should calibrate the bearing sensor whenever you feel that the direction readings being produced by the watch are off. There are three different calibration methods available: magnetic declination correction, bidirectional calibration, and northerly calibration. • Magnetic Declination Correction With magnetic declination correction, you input a magnetic declination angle (difference between magnetic north and true north), which allows the watch to indicate true north. You can perform this procedure when the magnetic declination angle is indicated on the map you are using. Note that you can input the declination angle in whole degree units only, so you may need to round off the value specified on the map. If your map indicates the declination angle as 7.4°, you should input 7°. In the case of 7.6° input 8°, for 7.5° you can input 7° or 8°. • Bidirectional Calibration and Northerly Calibration Bidirectional calibration and northerly calibration calibrate the accuracy of the bearing sensor in relation to magnetic north. Use bidirectional calibration when you want to take readings within an area exposed to magnetic force. This type of calibration should be used if the watch becomes magnetized for any reason. With northerly calibration, you “teach” the watch which way is north (which you have to determine with another compass or some other means). Important! The more correctly you perform bidirectional calibration, the better the accuracy of the bearing sensor readouts. You should perform bidirectional calibration whenever you change environments where you use the bearing sensor, and whenever you feel that the bearing sensor is producing incorrect readings. To perform magnetic declination correction 1. In the Digital Compass Mode, hold down E until the current magnetic declination settings start to flash on the display. This is the setting screen. • Before the magnetic declination settings start to flash, the message SET Hold will appear on the display. Keep E depressed until SET Hold disappears and the magnetic declination settings start to flash. 2. Use A (East) and C (West) to change the settings. • The following explains magnetic declination angle direction settings. OFF: No magnetic declination correction performed. The magnetic declination angle with this setting is 0°. E: When magnetic north is to the east (east declination) W: When magnetic north is to the west (west declination) • You can select a value within the range of W 90° to E 90° with these settings. • You can turn off (OFF) magnetic declination correction by pressing A and C at the same time. • The illustration, for example, shows the value you should input and the direction setting you should select when the map shows a magnetic declination of 1° West. 3. When the setting is the way you want, press E to exit the setting screen. Precautions about bidirectional calibration • You can use any two opposing directions for bidirectional calibration. You must, however, make sure that they are 180 degrees opposite each other. Remember that if you perform the procedure incorrectly, you will get wrong bearing sensor readings. • Do not move the watch while calibration of either direction is in progress. • You should perform bidirectional calibration in an environment that is the same as that where you plan to be taking direction readings. If you plan to take direction readings in an open field, for example, calibrate in an open field. To perform bidirectional calibration 1. In the Digital Compass Mode, hold down E until the current magnetic declination settings start to flash on the display. This is the setting screen. • Before the magnetic declination settings start to flash, the message SET Hold will appear on the display. Keep E depressed until SET Hold disappears and the magnetic declination settings start to flash. 2. Press D to display the bidirectional calibration screen. • At this time, the north pointer flashes at the 12 o’clock position and the display will show -1- to indicate that the watch is ready to calibrate the first direction. 3. Place the watch on a level surface facing any direction you want, and press C to calibrate the first direction. • - - - is shown on the display while calibration is being performed. When calibration is successful, the display will show OK and -2-, and the north pointer flashing at the 6 o’clock position. This means that the watch is ready for calibration of the second direction. 4. Rotate the watch 180 degrees. 5. Press C again to calibrate the second direction. • - - - is shown on the display while calibration is being performed. When calibration is successful, the display will show OK and then change to the Digital Compass Mode screen (- - -). To perform northerly calibration Important! If you want to perform both northerly and bidirectional calibration, perform bidirectional calibration first, and then perform northerly calibration. This is necessary because bidirectional calibration cancels any existing northerly calibration setting. 1. In the Digital Compass Mode, hold down E until the current magnetic declination settings start to flash on the display. This is the setting screen. • Before the magnetic declination settings start to flash, the message SET Hold will appear on the display. Keep E depressed until SET Hold disappears and the magnetic declination settings start to flash. 2. Press D twice to display the northerly calibration screen. • At this time, -N- (north) appears on the display. 3. Place the watch on a level surface, and position it so that its 12 o’clock position points north (as measured with another compass). 4. Press C to start the calibration operation. • - - - is shown on the display while calibration is being performed. When calibration is successful, the display will show OK and then change to the Digital Compass Mode (- - -). Magnetic declination angle direction value (E, W, or OFF) Magnetic declination angle value Magnetic declination angle direction value (E, W, or OFF) Magnetic declination angle value l l l lllll lll lllll l l l lllll lll lllll ll l l lllll lll lllll l l l lllll lll lllll l l l lllll lll lllll l l l lllll lll lllll ll l l lllll lll lllll l l l lllll lll lllll
  • 4. 4 Operation Guide 3173 3246 Bearing Memory Bearing Memory lets you store a direction reading and display that reading as you take subsequent digital compass measurements. The Bearing Memory screen displays the direction angle for the stored direction, along with an indicator on the display that also indicates the stored direction. When you take digital compass measurements while the Bearing Memory screen is on the display, the direction angle of the current digital compass measurement (as read from the 12 o'clock position of the watch) and the currently stored Bearing Memory direction information will both be displayed. To store a direction angle reading in Bearing Memory 1. Press C to start a digital compass measurement operation. • If a bearing memory direction angle value is already displayed, it means that the bearing memory screen is displayed. If this happens, press E to clear the value currently in Bearing Memory and exit the bearing memory screen. 2. During the 20 seconds that digital compass measurement is in progress, press E to store the current direction angle reading in Bearing Memory. • The Bearing Memory direction angle flashes for about one second as it is stored in Bearing Memory. After that, the Bearing Memory screen (which shows the bearing memory direction angle) will appear, and a 20-second direction reading operation will start. • While the Bearing Memory screen is displayed, you can press C to start a new 20-second direction reading operation, which displays the direction angle for the direction that the 12 o’clock position of the watch is pointed. The direction angle of the current readings will disappear from the display after the direction reading operation is complete. • During the first 20 seconds after you display the Bearing Memory screen or during the 20-second direction reading operation while the Bearing Memory screen is on the display, the direction stored in memory is indicated by a Bearing Memory pointer. • Pressing E while the Bearing Memory screen is displayed will clear the direction angle currently in Bearing Memory and start a 20-second direction reading operation. Using the Digital Compass While Mountain Climbing or Hiking This section provides three practical applications for using the watch’s built-in digital compass. • Setting a map and finding your current location Having an idea of your current location is important when mountain climbing or hiking. To do this, you need to “set the map”, which means to align the map so the directions indicated on it are aligned with the actual directions of your location. Basically what you are doing is aligning north on the map with north as indicated by the watch. • Finding the bearing to an objective • Determining the direction angle to an objective on a map and heading in that direction To set a map and find your current location 1. With the watch on your wrist, position it so the face is horizontal. 2. While in the Timekeeping Mode or in any of the sensor modes, press C to take a compass reading. • The reading will appear on the display after about two seconds. 3. Rotate the map without moving the watch so the northerly direction indicated on the map matches north as indicated by the watch. • If the watch is configured to indicate magnetic north, align the map’s magnetic north with the watch indication. If the watch has been configured with a declination to correct to true north, align the map’s true north with the watch indication. For details, see “Calibrating the Bearing Sensor”. • This will position the map in accordance with your current location. 4. Determine your location as you check the geographic contours around you. To find the bearing to an objective 1. Set the map so its northerly indication is aligned with north as indicated by the watch, and determine your current location. • See “To set a map and find your current location” for information about how to perform the above step. 2. Set the map so the direction you want to travel on the map is pointed straight in front of you. 3. With the watch on your wrist, position it so the face is horizontal. 4. While in the Timekeeping Mode or in any of the sensor modes, press C to take a compass reading. • The reading will appear on the display after about two seconds. 5. Still holding the map in front of you, turn your body until north as indicated by the watch and the northerly direction on the map are aligned. • This will position the map in accordance with your current location, so the bearing to your objective is straight ahead of you. To determine the direction angle to an objective on a map and head in that direction 1. Set the map so its northerly indication is aligned with north as indicated by the watch, and determine your current location. • See “To set a map and find your current location” for information about how to perform the above step. 2. As shown in the illustration to the left, change your position so you (and the 12 o’clock position of the watch) are pointed in the direction of objective, while keeping the northerly direction indicated on the map aligned with north as indicated by the watch. • If you find it difficult to perform the above step while keeping everything aligned, first move into the correct position (12 o’clock position of the watch pointed at the objective) without worrying about the orientation of the map. Next, perform step 1 again to set the map. 12 o’clock position Bearing memory direction angle North pointer Direction angle of current reading Bearing Memory Screen Bearing memory pointer 12 o’clock position Bearing memory direction angle North pointer Direction angle of current reading Bearing Memory Screen Bearing memory pointer N N Current location North indicated on the map North indicated by north pointer N N Current location North indicated on the map North indicated by north pointer N N Objective Current location 12 o’clock position N N Objective Current location 12 o’clock position N N Objective Current location 12 o’clock position N N Objective Current location 12 o’clock position 3. While in the Timekeeping Mode or in any of the sensor modes, press C to take a compass reading. 4. While direction angle readings are in progress, press E to record the currently displayed direction in Bearing Memory. • The direction angle value and pointer stored in Bearing Memory will remain on the display for about 20 seconds. • See “Bearing Memory” for more information. 5. Now you can advance while monitoring the Bearing Memory pointer to ensure that it remains in the 12 o’clock position. • To re-display the Bearing Memory direction angle value and Bearing Memory pointer, press C. • Pressing E while the Bearing Memory direction angle value and Bearing Memory pointer are on the display will clear the Bearing Memory data you saved in step 3 and save the current direction reading in Bearing Memory. Note • When mountain climbing or hiking, conditions or geographic contours may make it impossible for you to advance in a straight line. If this happens, return to step 1 and save a new direction to the objective. Digital Compass Precautions This watch features a built-in magnetic bearing sensor that detects terrestrial magnetism. This means that north indicated by this watch is magnetic north, which is somewhat different from true polar north. The magnetic north pole is located in northern Canada, while the magnetic south pole is in southern Australia. Note that the difference between magnetic north and true north as measured with all magnetic compasses tends to be greater as one gets closer to either of the magnetic poles. You should also remember that some maps indicate true north (instead of magnetic north), and so you should make allowances when using such maps with this watch. Location • Taking a direction reading when you are near a source of strong magnetism can cause large errors in readings. Because of this, you should avoid taking direction readings while in the vicinity of the following types of objects: permanent magnets (magnetic necklaces, etc.), concentrations of metal (metal doors, lockers, etc.), high tension wires, aerial wires, household appliances (TVs, personal computers, washing machines, freezers, etc.). • Accurate direction readings are impossible while in a train, boat, air plane, etc. • Accurate readings are also impossible indoors, especially inside ferroconcrete structures. This is because the metal framework of such structures picks up magnetism from appliances, etc. Storage • The precision of the bearing sensor may deteriorate if the watch becomes magnetized. Because of this, you should store the watch away from magnets or any other sources of strong magnetism, including: permanent magnets (magnetic necklaces, etc.) and household appliances (TVs, personal computers, washing machines, freezers, etc.). • Whenever you suspect that the watch may have become magnetized, perform the procedure under “To perform bidirectional calibration”. Barometer/Thermometer This watch uses a pressure sensor to measure air pressure (barometric pressure) and a temperature sensor to measure temperature. To enter and exit the Barometer/Thermometer Mode 1. While in the Timekeeping Mode or in any of the sensor modes, press B to enter the Barometer/Thermometer Mode. • BARO will appear on the display, indicating that barometric pressure and temperature measurements are in progress. The measurement results will appear on the display after about five seconds. • After you press B, the watch will take readings every five seconds for the first five minutes, and then every two minutes after that. 2. Press D to return to the Timekeeping Mode. • The watch will return to the Timekeeping Mode automatically if you do not perform any operation for about one hour after entering the Barometer/Thermometer Mode. To take barometric pressure and temperature readings While in the Timekeeping Mode or in any of the sensor modes, press B. • This starts barometric pressure and temperature measurements automatically. • You also can perform a barometric pressure and temperature measurement at any time by pressing B in the Barometer/Thermometer Mode. • It can take up to four or five seconds for the barometric pressure reading to appear after you enter the Barometer/Thermometer Mode. Barometric Pressure • Barometric pressure is displayed in units of 1 hPa (or 0.05 inHg). • The displayed barometric pressure value changes to - - - if a measured barometric pressure falls outside the range of 260 hPa to 1,100 hPa (7.65 inHg to 32.45 inHg). The barometric pressure value will reappear as soon as the measured barometric pressure is within the allowable range. Temperature • Temperature is displayed in units of 0.1°C (or 0.2°F). • The displayed temperature value changes to - - - °C (or °F) if a measured temperature falls outside the range of –10.0°C to 60.0°C (14.0°F to 140.0°F). The temperature value will reappear as soon as the measured temperature is within the allowable range. Display Units You can select either hectopascals (hPa) or inchesHg (inHg) as the display unit for the measured barometric pressure, and Celsius (°C) or Fahrenheit (°F) as the display unit for the measured temperature value. See “To specify temperature, barometric pressure, and altitude units”. Barometric Pressure Graph Barometric pressure indicates changes in the atmosphere. By monitoring these changes you can predict the weather with reasonable accuracy. This watch takes barometric pressure measurements automatically every two hours (at the 30th minute of every even numbered hour). Measurement results are used to produce barometric pressure graph and barometric pressure differential pointer readings. Reading the Barometric Pressure Graph The barometric pressure graph shows readings of previous measurements for up to 24 hours. • The horizontal axis of the graph represents time, with each dot standing for two hours. The rightmost dot represents the most recent reading. • The vertical axis of the graph represents barometric pressure, with each dot standing for the relative difference between its reading and that of the dots next to it. Each dot represents 1 hPa. 12 o’clock position Bearing memory pointerNorth pointer Direction angle of current reading Bearing memory direction angle value 12 o’clock position Bearing memory pointerNorth pointer Direction angle of current reading Bearing memory direction angle value Temperature Barometric pressure graph Barometric pressure Pressure differential pointer Temperature Barometric pressure graph Barometric pressure Pressure differential pointer Temperature Barometric pressure Temperature Barometric pressure Barometric pressure graph Barometric pressure graph Barometric pressure Time Barometric pressure Time
  • 5. 5 Operation Guide 3173 3246 The following shows how to interpret the data that appears on the barometric pressure graph. A rising graph generally means improving weather. A falling graph generally means deteriorating weather. Note • If there are sudden changes in weather or temperature, the graph line of past measurements may run off the top or bottom of the display. The entire graph will become visible once barometric conditions stabilize. • The following conditions cause the barometric pressure measurement to be skipped, with the corresponding point on the barometric pressure graph being left blank. – Barometric reading that is out of range (260 hPa to 1,100 hPa or 7.65 inHg to 32.45 inHg) – Sensor malfunction Barometric Pressure Differential Pointer This pointer indicates the relative difference between the most recent barometric pressure reading indicated on the barometric pressure graph, and the current barometric pressure value displayed in the Barometer/ Thermometer Mode. Reading Barometric Pressure Differential Pointer Pressure differential is indicated in the range of ±10 hPa, in 1-hPa units. • The nearby screen shot, for example, shows what the pointer would indicate when the calculated pressure differential is approximately –5 hPa (approximately –0.15 inHg). • Barometric pressure is calculated and displayed using hPa as the standard. The barometric pressure differential also can be read in inHg units as shown in the illustration (1 hPa = 0.03 inHg). Pressure Sensor and Temperature Sensor Calibration The pressure sensor and temperature sensor built into the watch are calibrated at the factory and normally require no further adjustment. If you notice serious errors in the pressure readings and temperature readings produced by the watch, you can calibrate the sensor to correct the errors. Important! • Incorrectly calibrating the barometric pressure sensor can result in incorrect readings. Before performing the calibration procedure, compare the readings produced by the watch with those of another reliable and accurate barometer. • Incorrectly calibrating the temperature sensor can result in incorrect readings. Carefully read the following before doing anything. – Compare the readings produced by the watch with those of another reliable and accurate thermometer. – If adjustment is required, remove the watch from your wrist and wait for 20 or 30 minutes to give the temperature of the watch time to stabilize. To calibrate the pressure sensor and the temperature sensor 1. While in the Timekeeping Mode or in any of the sensor modes, press B to enter the Barometer/Thermometer Mode. 2. Hold down E until the current temperature value starts to flash on the display. This is the setting screen. • Before the temperature value starts to flash, the message SET Hold will appear on the display. Keep E depressed until SET Hold disappears. 3. Press D to move the flashing between the temperature value and barometric pressure value, to select the one you want to calibrate. 4. Use A (+) and C (–) to set the calibration value in the units shown below. Temperature 0.1°C (0.2°F) Barometric Pressure 1 hPa (0.05 inHg) • To return the currently flashing value to its initial factory default setting, press A and C at the same time. OFF will appear at the flashing location for about one second, followed by the initial default value. 5. Press E to return to the Barometer/Thermometer Mode screen. Barometer and Thermometer Precautions • The pressure sensor built into this watch measures changes in air pressure, which you can then apply to your own weather predictions. It is not intended for use as a precision instrument in official weather prediction or reporting applications. • Sudden temperature changes can affect pressure sensor readings. • Temperature measurements are affected by your body temperature (while you are wearing the watch), direct sunlight, and moisture. To achieve a more accurate temperature measurement, remove the watch from your wrist, place it in a well ventilated location out of direct sunlight, and wipe all moisture from the case. It takes approximately 20 to 30 minutes for the case of the watch to reach the actual surrounding temperature. Altimeter The watch displays altitude values based on air pressure readings taken by a built-in pressure sensor. How the Altimeter Measures Altitude The altimeter can measure altitude based on its own preset values (initial default method) or using a reference altitude specified by you. When you measure altitude based on preset values Data produced by the watch’s barometric pressure sensor is converted to approximate altitude based on ISA (International Standard Atmosphere) conversion values stored in watch memory. When you measure altitude using a reference altitude specified by you After you specify a reference altitude, the watch uses that value to convert barometric pressure readings to altitude. • When mountain climbing, you can specify a reference altitude value in accordance with a marker along the way or altitude information from a map. After that, the altitude readings produced by the watch will be more accurate than they would without a reference altitude value. Not visible on the display. Not visible on the display. Barometric pressure differential pointer Barometric pressure differential pointer Barometric pressure differential pointer inHg values hPa values Current pressure greater than most recent measured pressure Current pressure less than most recent measured pressure Barometric pressure differential pointer inHg values hPa values Current pressure greater than most recent measured pressure Current pressure less than most recent measured pressure l l l l l l llllll l l l l l l l l llllll l l l l l lll lllllll lll l l l l l l lll lllllll lll l l l ll l l l l l llllll l l l l l l l l llllll l l l l l lll lllllll lll l l l l l l lll lllllll lll l l l 400 A B 400 A B To take an altimeter reading 1. Make sure the watch is in the Timekeeping Mode or any one of the sensor modes. • The sensor modes are: Digital Compass Mode, Barometer/ Thermometer Mode, and Altimeter Mode. 2. Press A to start Altimeter measurement. • ALTI will appear on the display, indicating that Altimeter measurement is in progress. The first reading will appear on the display after about four or five seconds. • The current altitude value is displayed in units of 5 meters (20 feet). • After the first reading is obtained, the watch continues to take altimeter readings automatically every five seconds for the first three minutes, and then every two minutes after that (under initial default settings). • If you leave the watch in the Altimeter Mode, it will update the displayed altitude value regularly and indicate reading-to-reading changes in graph form. • You can use the procedure under “Selecting an Altitude Auto Measurement Method” to specify the altitude auto measurement method you want to use. 3. After you are finished using the Altimeter, press D to return to the Timekeeping Mode and stop auto measurement. • The watch will return to the Timekeeping Mode automatically if you do not perform any operation for about 24 hours after entering the Altimeter Mode (under initial default settings). Reading the Altitude Graph The altitude graph shows Altimeter Mode auto measurement readings over time. • The vertical axis of the graph represents altitude, and each dot stands for 10 meters (40 feet). • The horizontal axis represents time. For the altitude readings taken during the first three minutes after you start an altimeter measurement operation, each dot represents five seconds. After that, each dot represents two minutes (under initial default settings). • An out of range reading or a measurement error will cause the column of dots for that reading to be blank (skipped). Note • The measurement range for altitude is –700 to 10,000 meters (–2,300 to 32,800 feet). • The displayed altitude value changes to - - - if an altitude reading falls outside the measurement range. An altitude value will reappear as soon as the altitude reading is within the allowable range. • Normally, displayed altitude values are based on the watch’s preset conversion values. You also can specify a reference altitude value, if you want. See “Specifying a Reference Altitude Value”. • You can change the unit for displayed altitude values to either meters (m) or feet (ft). See “To specify temperature, barometric pressure, and altitude units”. Selecting an Altitude Auto Measurement Method You can select either of the following two altitude auto measurement methods. 0’05: Readings at five-second intervals for one hour 2’00: Readings at five-second intervals for the first three minutes followed by two-minute intervals for approximately 24 hours Note If you do not perform any button operation while in the Altimeter Mode, the watch will return to the Timekeeping Mode automatically after 24 hours (altitude auto measurement method: 2’00) or after one hour (altitude auto measurement method: 0’05). To select the altitude auto measurement method 1. In the Altimeter Mode, hold down E until the current reference altitude value starts to flash. This is the setting screen. • Before the reference altitude starts to flash, the message SET Hold will appear on the display. Keep E depressed until SET Hold disappears. 2. Press D to display the current altitude auto measurement method setting. • This will cause either 0’05 or 2’00 to flash on the display. 3. Press A to toggle the altitude auto measurement method setting between 0’05 and 2’00. 4. Press E to exit the setting screen. Using the Altitude Differential Value The Altimeter Mode screen includes an altitude differential value that shows the change in altitude from a reference point you specify. The altitude differential value is updated each time the watch takes an altitude reading. • The range of the altitude differential value is –3,000 meters (–9,980 feet) to 3,000 meters (9,980 feet). • - - - is displayed in place of the altitude differential value whenever the measured value is outside the allowable range. • See “Using the Altitude Differential Value While Mountain Climbing or Hiking” for some real-life examples of how to use this feature. To specify the altitude differential start point In the Altimeter Mode, press E. • The watch will take an altitude reading and register the result as the altitude differential value start point. The altitude differential value will be reset to zero at this time. Altitude differential Altitude graph Current altitude Current time Altitude differential Altitude graph Current altitude Current time Altitude Latest reading Time Altitude Latest reading Time l l l lll lllllll lll l l l l l l lll lllllll lll l l l ll l l lll lllllll lll l l l l l l lll lllllll lll l l l Altitude differential Altitude differential Altitude differentialAltitude differential
  • 6. 6 Operation Guide 3173 3246 Using the Altitude Differential Value While Mountain Climbing or Hiking After you specify the altitude differential start point while mountain climbing or hiking, you easily can measure the change in the altitude between that point and other points along the way. To use the altitude differential value 1. In the Altimeter Mode, check to make sure that an altitude reading is on the display. • If an altitude reading is not displayed, press A to take one. See “To take an altimeter reading” for details. 2. Use the contour lines on your map to determine the difference in altitude between your current location and your destination. 3. In the Altimeter Mode, press E to specify your current location as the altitude differential start point. • The watch will take an altitude reading and register the result as the altitude differential value start point. The altitude differential value will be reset to zero at this time. 4. While comparing the altitude difference you determined on the map and the watch’s altitude differential value, advance towards your destination. • If the map shows that the difference in altitude between your location and your destination is +80 meters for example, you know you will be nearing your destination when the displayed altitude differential value shows +80 meters. Specifying a Reference Altitude Value The altitude readings produced by this watch are subject to error caused by changes in air pressure. Because of this, we recommend that you update the reference altitude value whenever one is available during your climb. After you specify a reference altitude value, the watch adjusts its air-pressure-to-altitude conversion calculation accordingly. To specify a reference altitude value 1. In the Altimeter Mode, hold down E until the current reference altitude value starts to flash. This is the setting screen. • Before the reference altitude value starts to flash, the message SET Hold will appear on the display. Keep E depressed until SET Hold disappears. 2. Press A (+) or C (–) to change the current reference altitude value by 5 meters (or 20 feet). • Specify a reference altitude value based on accurate altitude information about your current location from a map, etc. • You can set the reference altitude value within the range of –10,000 to 10,000 meters (–32,800 to 32,800 feet). • Pressing A and C at the same time returns to OFF (no reference altitude value), so the watch performs air pressure to altitude conversions based on preset data only. 3. Press E to exit the setting screen. Types of Altitude Data The watch can maintain two types of altitude data in its memory: manual measurement records, and auto save values (minimum, maximum, vertical ascent, vertical descent). • Use the Data Recall Mode to view data stored in memory. See “Viewing Altitude Records” for details. Manual Measurement Records Any time you perform the procedure below in the Altimeter Mode, the watch will create and store a record with the currently displayed altitude reading, along with the date and time the reading was taken. There is enough memory to store up to 25 manual measurement records, which are numbered from REC01 through REC25. To save a manual measurement 1. In the Altimeter Mode, check to make sure that an altitude reading is on the display. • If an altitude reading is not displayed, press A to take one. See “To take an altimeter reading” for details. 2. Hold down A until REC Hold appears on the display and then disappears. Release A after Hold disappears. • This will save the currently displayed altitude reading in a manual measurement record, along with the measurement time and date. • The watch will return to the Altimeter Mode screen automatically after the save operation is complete. • There is enough memory to store up to 25 manual measurement records. If there are already 25 manual measurement records in memory, the above operation will cause the oldest record to be deleted automatically to make room for the new one. Auto Save Values Two sets of auto save values (Set 1 and Set 2) are maintained in watch memory. Set 1 Set 2 Maximum Altitude (MAX-1) Minimum Altitude (MIN-1) Vertical Ascent (ASC-1) Vertical Descent (DSC-1) Maximum Altitude (MAX-2) Minimum Altitude (MIN-2) Vertical Ascent (ASC-2) Vertical Descent (DSC-2) • These values are checked and updated automatically by the watch as altitude auto measurements are taken. How Maximum and Minimum Values Are Updated While the watch is in the Altimeter Mode, altitude readings are taken automatically at the interval specified by the altitude auto measurement method. With each reading, the watch compares the current reading against the MAX (MAX-1 and MAX-2) and MIN (MIN-1 and MIN-2) values. It will replace the MAX value if the current reading is greater than MAX, or the MIN value if the current reading is less than MIN. How Vertical Ascent/Descent Values Are Updated Session start point 20 m 0 m 120 m 320 m 620 m Session end point The total Vertical Ascent and Vertical Descent values produced by an Altimeter Mode measurement session during the example climb illustrated above are calculated as follows. Vertical Ascent: q (300 m) + e (620 m) = 920 m Vertical Descent: w (320 m) + r (500 m) = 820 m Current location Destination altitude Current location Destination altitude Altitude differential Altitude Altitude differential Altitude l l l l ll lllllllll ll l l l l l l l l ll lllllllll ll l l l l ll l l l ll lllllllll ll l l l l l l l l ll lllllllll ll l l l l • Entering the Altimeter Mode starts a new altitude auto measurement session, but it does not reset the current ASC (ASC-1 and ASC-2) and DSC (DSC-1 and DSC-2) values or change them in any way. This means that the starting ASC and DSC values for a new Altimeter Mode auto measurement session are the values that currently are in memory. Each time you complete an Altimeter Mode auto measurement session by returning to the Timekeeping Mode, the vertical ascent value of the current session (920 meters in the above example) is added to the session’s starting ASC value. Also, the vertical descent value of the current auto measurement session (–820 meters in the above example) is added to the session’s starting DSC value. • Note that any change in elevation when ascending that is less than 15 meters (49 feet) is not added to the vertical ascent value for the current Altimeter Mode auto measurement session. Also, any change in elevation when descending that is less than –15 meters (–49 feet) is not added to the vertical descent value for the current Altimeter Mode auto measurement session. Note • The maximum altitude, minimum altitude, vertical ascent, and vertical descent values are retained in memory when you exit the Altimeter Mode. To clear values, perform the procedure under “To clear the contents of a specific memory area”. Using Auto Save Values The watch maintains two independent sets of auto save values as shown below. Set 1 Set 2 Maximum Altitude (MAX-1) Minimum Altitude (MIN-1) Vertical Ascent (ASC-1) Vertical Descent (DSC-1) Maximum Altitude (MAX-2) Minimum Altitude (MIN-2) Vertical Ascent (ASC-2) Vertical Descent (DSC-2) The values in Set 1 and Set 2 can be cleared independently of each other. This means you can use them to keep track of daily and cumulative data as described in the example below. Example: Keeping track of data on a three-day climb Day 1 Clear both Set 1 and Set 2, and start your Day 1 climb. At the end of the day, both sets of auto save values contain the same data (MAX-1 = MAX-2, MIN-1 = MIN-2, etc.). Day 2 Clear only Set 1, and start your Day 2 climb. At the end of the day, the values in Set 1 (MAX-1, MIN-1, ASC-1, DSC-1) will show the results of Day 2 only. In Set 2, MAX-2 and MIN-2 will show the maximum and minimum altitudes reached over the two-day span. ASC-2 will show the total vertical ascent for the two days (Day 1 + Day 2) and DSC-2 will show the total vertical descent for the two days. Day 3 Clear only Set 1, and start your Day 3 climb. At the end of the day, the values in Set 1 will show the results of Day 3 only. In Set 2, MAX-2 and MIN-2 will show the maximum and minimum altitudes reached over the three-day span. ASC-2 will show the total vertical ascent for the three days (Day 1 + Day 2 + Day 3) and DSC-2 will show the total vertical descent for the three days. • For details about clearing altitude data, see “To clear the contents of a specific memory area”. How does the altimeter work? Generally, air pressure and temperature decrease as altitude increases. This watch bases its altitude measurements on International Standard Atmosphere (ISA) values stipulated by the International Civil Aviation Organization (ICAO). These values define relationships between altitude, air pressure, and temperature. 0 m 500 m 1000 m 1500 m 2000 m 2500 m 3000 m 3500 m 4000 m 899 hPa 795 hPa 701 hPa 616 hPa 8.5°C 2°C –4.5°C –11°C 15°C1013 hPa About 6.5°C per 1000 m About 8 hPa per 100 m About 9 hPa per 100 m About 10 hPa per 100 m About 11 hPa per 100 m About 12 hPa per 100 m Altitude Air Pressure Temperature 0 ft. 2000 ft. 4000 ft. 6000 ft. 8000 ft. 10000 ft. 12000 ft. 14000 ft. 25.84 inHg 22.23 inHg 19.03 inHg 44.7°F 30.5°F 16.2°F 59.0°F29.92 inHg About 3.6°F per 1000 ft. About 0.15 inHg per 200 ft. About 0.17 inHg per 200 ft. About 0.192 inHg per 200 ft. About 0.21 inHg per 200 ft. Source: International Civil Aviation Organization • Note that the following conditions will prevent you from obtaining accurate readings: When air pressure changes because of changes in the weather Extreme temperature changes When the watch itself is subjected to strong impact There are two standard methods of expressing altitude: Absolute altitude and relative altitude. Absolute altitude expresses an absolute height above sea level. Relative altitude expresses the difference between the height of two different places. Height of building 130 m (relative altitude) Rooftop at an altitude of 230 m above sea level (absolute altitude) Sea Level Altimeter Precautions • This watch estimates altitude based on air pressure. This means that altitude readings for the same location may vary if air pressure changes. • The semiconductor pressure sensor used by the watch for altitude measurements is also affected by temperature. When taking altitude measurements, do not subject the watch to temperature changes. • Do not rely upon this watch for altitude measurements or perform button operations while sky diving, hang gliding, or paragliding, while riding a gyrocopter, glider, or any other aircraft, or while engaging in any other activity where there is the chance of sudden altitude changes. • Do not use this watch for measuring altitude in applications that demand professional or industrial level precision. • Remember that the air inside of a commercial aircraft is pressurized. Because of this, the readings produced by this watch will not match the altitude readings announced or indicated the flight crew.
  • 7. 7 Operation Guide 3173 3246 Specifying Temperature, Barometric Pressure, and Altitude Units Use the procedure below to specify the temperature, barometric pressure, and altitude units to be used in the Barometer/Thermometer Mode and the Altimeter Mode. Important! When TYO (Tokyo) is selected as the Home City, the altitude unit is set automatically to meters (m), the barometric pressure unit to hectopascals (hPa), and the temperature unit to Celsius (°C). These settings cannot be changed. To specify temperature, barometric pressure, and altitude units 1. In the Timekeeping Mode, hold down E until the currently selected city code starts to flash. This is the city code setting screen. • Before the city code starts to flash, the message SET Hold will appear on the display. Keep E depressed until SET Hold disappears and the city code starts to flash. 2. Keep pressing D until UNIT appears in the upper left corner of the screen. • See step 3 under “To change the current time and date settings” for information about how to scroll through setting screens. 3. Perform the operations below to specify the units you want. To specify this unit: Press this key: To toggle between these settings: Altitude A m (meters) and ft (feet) Barometric Pressure B hPa (hectopascals) and inHg (inches of mercury) Temperature C °C (Celsius) and °F (Fahrenheit) 4. After the settings are the way you want, press E twice to exit the setting screen. Precautions Concerning Simultaneous Measurement of Altitude and Temperature Though you can perform altitude and temperature measurements at the same time, you should remember that each of these measurements requires different conditions for best results. With temperature measurement, it is best to remove the watch from your wrist in order to eliminate the effects of body heat. In the case of altitude measurement, on the other hand, it is better to leave the watch on your wrist, because doing so keeps the watch at a constant temperature, which contributes to more accurate altitude measurements. • To give altitude measurement priority, leave the watch on your wrist or in any other location where the temperature of the watch is kept constant. • To give temperature measurement priority, remove the watch from your wrist and allow it to hang freely from your bag or in another location where it is not exposed to direct sunlight. Note that removing the watch from your wrist can affect pressure sensor readings momentarily. Viewing Altitude Records Use the Data Recall Mode to view manually saved altitude readings and automatically saved high altitude, low altitude, total ascent, and total descent values. Altitude data records are created and saved in the Altimeter Mode. To view altitude records 1. Use D to select the Data Recall Mode (REC) as shown in “Selecting a Mode”. • About one second after REC appears on the display, the display will change to show the first record of the memory area you were viewing when you last exited the Data Recall Mode. 2. Use B to select the memory area you want. REC 01 (Manually Saved Record Area) (Auto Save Value Area 1) MAX-1 (Auto Save Value Area 2) MAX-2 3. Use A and C to scroll through the screens for an area and display the one you want. REC 01 REC 02 REC 25 Manually saved records MAX MIN ASC DSC Auto saved values • While a manually saved record (REC 01 through REC 25) is displayed, the bottom of the screen will alternate between the date (month, day) and time (hour, minute) the record was created. • While MAX or MIN auto saved values are displayed, the bottom of the screen will alternate between the date (month, day) and time (hour, minute) the value was recorded. • While ASC or DSC auto saved values are displayed, the bottom of the screen will alternate between the date (month, day) and year that the ASC or DSC record was first created. • For detailed information about auto saved values, see “Auto Save Values”. lll llll llll llll llll llll lllll l ll lll llll lll lll lll llll lll l llll llll llll llll llll llll lllll l ll lll llll lll lll lll llll lll l Record name Altitude Alternates between measurement time (Hour : Minutes) and measurement date (Month Day) Record name Altitude Alternates between measurement time (Hour : Minutes) and measurement date (Month Day) AltitudeAltitude AltitudeAltitude 4. After you are finished viewing data, use D to exit the Data Recall Mode. • ---- will be displayed if data has been deleted or if there is no corresponding data due to error, etc. In such cases, total ascent (ASC) and total descent (DSC) values will show zero. • When the total ascent (ASC) or total descent (DSC) exceeds 99,995 meters (or 327,980 feet), the applicable value will restart from zero. • If the total ascent (ASC) or total descent (DSC) value becomes five digits, the leftmost (ten thousand) digit will appear in the upper right of the display. The nearby illustration shows the display when the ASC-1 value is 99995 meters. To clear the contents of a specific memory area 1. Use D to enter the Data Recall Mode. 2. Use B to select the memory area you want to clear. • Note that the contents of the memory area you select will be deleted as soon as you perform step 3 below. The clear operation cannot be undone, so double check to make sure you really want to delete the contents of the memory area you select here. 3. Hold down E until CLR Hold appears on the display and then disappears. Release E after CLR disappears. • This will clear the memory area you selected in step 2 and then return to the data display screen, which now shows ----. This indicates there is nothing stored in the currently displayed memory area. Looking up Sunrise and Sunset Times You can use the Sunrise/Sunset Mode to look up the sunrise and sunset times for a particular date (year, month, day) and location. To enter the Sunrise/Sunset Mode While in the Timekeeping Mode, press D to enter the Sunrise/Sunset Mode. • This will display the sunrise and sunset times for the current date based the currently specified city code, latitude, and longitude. • The three Daylight Pointers described below are on the display in the Sunrise/Sunset Mode. Pointer 1: Sunset time in 24-hour format Pointer 2: Sunrise time in 24-hour format Pointer 3: This flashing pointer appears only when Pointer 1 and Pointer 2 are indicating the sunrise and sunset times for the current Timekeeping Mode date. It indicates the current Timekeeping Mode time in 24-hour format. • Before trying to use the Sunrise/Sunset Mode, you need to configure settings for the city code, longitude, and latitude for the location whose sunrise and sunset times you want to view. • The factory default configuration of the location is: City Code: TYO (Tokyo); Latitude: North 36 degrees; Longitude: East 140 degrees. • You can find latitude and longitude for various cities around the globe in the “Site Data List”. To view the sunrise/sunset time for a particular date 1. Enter the Sunrise/Sunset Mode. • This will display the sunrise and sunset times for the current date at the location specified by the city code, latitude, and longitude. 2. While the sunrise/sunset time are on the display, use A (+) and C (–) to scroll through the dates. • The sunrise and sunset times for the selected date will be indicated by values and pointers. • You can select any date between January 1, 2000 and December 31, 2099. Note • Sunrise/sunset time is displayed in 5-minute units. • If you think that the sunrise and/or sunset times are not correct for some reason, check the watch’s city code, longitude and latitude settings. • The sunrise and sunset times displayed by this watch are times at sea level. Sunrise and sunset times are different at altitudes other than sea level. To look up the sunrise and sunset times for a specific city code Important! • You do not need to perform this procedure to look up the sunrise and sunset times in your currently selected Home City. • If you select a different city code to look up the sunrise and sunset times there, return to the city code of your Home City (your current location) when you are finished. Otherwise, the time shown in the Timekeeping Mode will not be correct. • For information about the Home City setting, see “Configuring Home City Settings”. 1. In the Timekeeping Mode, hold down E until the currently selected city code starts to flash. This is the city code setting screen. • Before the city code starts to flash, the message SET Hold will appear on the display. Keep E depressed until SET Hold disappears and the city code starts to flash. 2. Use A (East) and C (West) to select the city code whose sunrise and sunset times you want to view. • For details about city codes, see the “City Code Table”. 3. Press E twice to exit the setting screen. Ten thousand digitTen thousand digit Current date Pointer 3 Pointer 2 Sunrise time Sunset time Pointer 1 Current date Pointer 3 Pointer 2 Sunrise time Sunset time Pointer 1 Date Sunset time Sunrise time Date Sunset time Sunrise time
  • 8. 8 Operation Guide 3173 3246 To configure longitude and latitude settings 1. In the Timekeeping Mode, hold down E until the currently selected city code starts to flash. This is the city code setting screen. • Before the city code starts to flash, the message SET Hold will appear on the display. Keep E depressed until SET Hold disappears and the city code starts to flash. 2. Press E to display the longitude/latitude setting screen, with the latitude setting flashing. 3. Use D to move the flashing between the latitude and the longitude setting. 4. Use A (+) and C (–) to change the flashing setting. • You can configure the longitude and latitude setting within following ranges. Latitude Range: 65°S (South 65 degrees) to 0°N – 65°N (North 65 degrees) Longitude Range: 179°W (West 179 degrees) to 0°E – 180°E (East 180 degrees) • Latitude and longitude values are rounded off to the nearest degree. • You can find latitude and longitude for various cities around the globe in the “Site Data List”. 5. Press E to return to the Timekeeping Mode. Checking the Current Time in a Different Time Zone You can use the World Time Mode to view the current time in one of 31 time zones (48 cities) around the globe. The city that is currently selected in the World Time Mode is called the “World Time City”. To enter the World Time Mode Use D to select the World Time Mode (WT) as shown in “Selecting a Mode”. • About one second after WT appears on the display, the display will change to show the city code of the currently selected World Time City. • The two pointers described below are on the display in the World Time Mode. Pointer 1 (not flashing): Indicates the current time in the currently selected World Time City in 24-hour format. Pointer 2 (flashing): Indicates the current Timekeeping Mode time in 24-hour format. To view the time in another time zone In the World Time Mode, use A (East) and C (West) to scroll through city codes. To specify standard time or daylight saving time (DST) for a city 1. In the World Time Mode, use A (East) and C (West) to display the city code (time zone) whose Standard Time/Daylight Saving Time setting you want to change. 2. Hold down E until DST Hold appears on the display and then disappears. Release E after DST Hold disappears. • This toggles the city code you selected in step 1 between Daylight Saving Time (DST indicator displayed) and standard time (DST indicator not displayed). • Using the World Time Mode to change the DST setting of the city code that is selected as your Home City also will change the Timekeeping Mode time DST setting. • Note that you cannot switch between standard time/daylight saving time (DST) while UTC is selected as the World Time City. • Note that the standard time/daylight saving time (DST) setting affects only the currently selected time zone. Other time zones are not affected. Using the Stopwatch The stopwatch measures elapsed time, split times, and two finishes. To enter the Stopwatch Mode Use D to select the Stopwatch Mode (STW) as shown in “Selecting a Mode”. • About one second after STW appears on the display, the display will change to show the stopwatch hours. To perform an elapsed time operation A A A A C Start Stop (Restart) (Stop) Reset To pause at a split time A C C A C Start Split (SPL displayed) Split release Stop Reset To measure two finishes A C A C C Start Split First runner finishes. Display time of first runner Stop Second runner finishes. Split release Display time of second runner Reset Note • The Stopwatch Mode can indicate elapsed time up to 23 hours, 59 minutes, 59.99 seconds. • Once started, stopwatch timing continues until you press C to stop it, even if you exit the Stopwatch Mode to another mode and even if timing reaches the stopwatch limit defined above. • Exiting the Stopwatch Mode while a split time is frozen on the display clears the split time and returns to elapsed time measurement. Latitude Longitude Press D. Latitude Longitude Press D. Pointer 1 Currently selected World Time City Current time in the currently selected World Time City Pointer 2Current Timekeeping Mode time Pointer 1 Currently selected World Time City Current time in the currently selected World Time City Pointer 2Current Timekeeping Mode time DST indicatorDST indicator Hours 1/100 second SecondsMinutes Current time Hours 1/100 second SecondsMinutes Current time Using the Countdown Timer The countdown timer can be configured to start at a preset time, and sound an alarm when the end of the countdown is reached. To enter the Countdown Timer Mode Use D to select the Countdown Timer Mode (TMR) as shown in “Selecting a Mode”. • About one second after TMR appears on the display, the display will change to show the countdown time hours. To specify the countdown start time 1. Enter the Countdown Timer Mode. • If a countdown is in progress (indicated by the seconds counting down), press A to stop it and then press C to reset to the current countdown start time. • If a countdown is paused, press C to reset to the current countdown start time. 2. Hold down E until the hour setting of the current countdown start time starts to flash. This is the setting screen. • Before the hour setting starts to flash, the message SET Hold will appear on the display. Keep E depressed until SET Hold disappears and the hour setting starts to flash. 3. Press D to move the flashing between the hour and minute settings. 4. Use A (+) and C (–) to change the flashing item. • To set the starting value of the countdown time to 24 hours, set 0H 00’00. 5. Press E to exit the setting screen. To perform a countdown timer operation A A A A C Start Stop (Restart) (Stop) Reset • Before starting a countdown timer operation, check to make sure that a countdown operation is not in progress (indicated by the seconds counting down). If it is, press A to stop it and then C to reset to the countdown start time. • An alarm sounds for five seconds when the end of the countdown is reached. This alarm will sound in all modes. The countdown time is reset to its starting value automatically when the alarm sounds. To stop the alarm Press any button. Using the Alarm You can set five independent daily alarms. When an alarm is turned on, an alarm will sound for about 10 seconds each day when the time in the Timekeeping Mode reaches the preset alarm time. This is true even if the watch is not in the Timekeeping Mode. You can also turn on an Hourly Time Signal, which will cause the watch to beep twice every hour on the hour. To enter the Alarm Mode Use D to select the Alarm Mode (ALM) as shown in “Selecting a Mode”. • About one second after ALM appears on the display, the display will change to show an alarm number (AL1 through AL5) or the SIG indicator. The alarm number indicates an alarm screen. SIG is shown when the Hourly Time Signal screen is on the display. • When you enter the Alarm Mode, the data you were viewing when you last exited the mode appears first. To set an alarm time 1. In the Alarm Mode, use A and C to scroll through the alarm screens until the one whose time you want to set is displayed. AL1 AL2 AL3 SIG AL5 AL4 2. Hold down E until the alarm time starts to flash. This is the setting screen. • Before the alarm time starts to flash, the message SET Hold will appear on the display. Keep E depressed until SET Hold disappears and the alarm time starts to flash. 3. Press D to move the flashing between the hour and minute settings. 4. While a setting is flashing, use A (+) and C (–) to change it. • When setting the alarm time using the 12-hour format, take care to set the time correctly as a.m. (no indicator) or p.m. (P indicator). 5. Press E to exit the setting screen. To test the alarm In the Alarm Mode, hold down A to sound the alarm. To turn an alarm and the Hourly Time Signal on and off 1. In the Alarm Mode, use A and C to select an alarm or the Hourly Time Signal. 2. When the alarm or the Hourly Time Signal you want is selected, press B to turn it on and off. • The alarm on indicator and the Hourly Time Signal on indicator are shown on the display in all modes while these functions are turned on. • If any alarm is on, the alarm on indicator is shown on the display in all modes. To stop the alarm Press any button. Current time Countdown time (Hour, minutes, seconds) Current time Countdown time (Hour, minutes, seconds) Alarm number or SIG Alarm time (Hour : Minutes) Current time Alarm number or SIG Alarm time (Hour : Minutes) Current time Alarm ON/OFF indicator Alarm ON/OFF indicator Module 3173 Module 3246 Hourly time signal on indicator Alarm on indicator Module 3173 Module 3246 Hourly time signal on indicator Alarm on indicator
  • 9. 9 Operation Guide 3173 3246 Illumination The display of the watch is illuminated for easy reading in the dark. The watch’s auto light switch turns on illumination automatically when you angle the watch towards your face. • The auto light switch must be turned on for it to operate. To turn on illumination manually Press L in any mode to illuminate the display. • You can use the procedure below to select either one second or three seconds as the illumination duration. When you press L, the display will remain illuminated for about one second or three seconds, depending on the current illumination duration setting. • The above operation turns on illumination regardless of the current auto light switch setting. • Illumination is disabled while configuring sensor measurement mode settings, and during bearing sensor calibration. To change the illumination duration 1. In the Timekeeping Mode, hold down E until the currently selected city code starts to flash. This is the city code setting screen. • Before the city code starts to flash, the message SET Hold will appear on the display. Keep E depressed until SET Hold disappears and the city code starts to flash. 2. Keep pressing D until LT1 or LT3 is displayed in the upper left corner of the display. • See step 3 under “To change the current time and date settings” for information about how to scroll through setting screens. 3. Press A to toggle the illumination duration between three seconds (LT3 displayed) and one second (LT1 displayed). 4. After the settings are the way you want, press E twice to exit the setting screen. About the Auto Light Switch Turning on the auto light switch causes illumination to turn on, whenever you position your wrist as described below in any mode. Moving the watch to a position that is parallel to the ground and then tilting it towards you more than 40 degrees causes illumination to turn on. Warning! • Always make sure you are in a safe place whenever you are reading the display of the watch using the auto light switch. Be especially careful when running or engaged in any other activity that can result in accident or injury. Also take care that sudden illumination by the auto light switch does not startle or distract others around you. • When you are wearing the watch, make sure that its auto light switch is turned off before riding on a bicycle or operating a motorcycle or any other motor vehicle. Sudden and unintended operation of the auto light switch can create a distraction, which can result in a traffic accident and serious personal injury. Note • This watch features a “Full Auto EL Light”, so the auto light switch operates only when available light is below a certain level. It does not illuminate the display under bright light. • The auto light switch is always disabled, regardless of its on/off setting, when any one of the following conditions exists. While an alarm is sounding During sensor measurement While a bearing sensor calibration operation is being performed in the Digital Compass Mode While a sunrise or sunset time is being calculated To turn the auto light switch on and off In the Timekeeping Mode, hold down L for about three seconds to toggle the auto light switch on (A.EL displayed) and off (A.EL not displayed). • The auto light switch on indicator (A.EL) is on the display in all modes while the auto light switch is turned on. • The auto light switch turns off automatically whenever battery power drops to Level 4. Illumination Precautions • Frequent display illumination can run down the battery quickly and require charging. The following guidelines give an idea of the charging time required to recover from a single illumination operation. Approximately five minutes exposure to bright sunlight coming in through a window Approximately 50 minutes exposure to indoor fluorescent lighting • The electro-luminescent panel that provides illumination loses power after very long use. • Illumination may be hard to see when viewed under direct sunlight. • Illumination turns off automatically whenever an alarm sounds. • Frequent use of illumination runs down the battery. Auto light switch precautions • Wearing the watch on the inside of your wrist, movement of your arm, or vibration of your arm can cause frequent activation of the auto light switch and illumination of the display. To avoid running down the battery, turn off the auto light switch whenever engaging in activities that might cause frequent illumination of the display. • Note that wearing the watch under your sleeve while the auto light switch is turned on can cause frequent illumination of the display and can run down the battery. • Illumination may not turn on if the face of the watch is more than 15 degrees above or below parallel. Make sure that the back of your hand is parallel to the ground. • Illumination turns off after the preset illumination duration, even if you keep the watch pointed towards your face. • Static electricity or magnetic force can interfere with proper operation of the auto light switch. If illumination does not turn on, try moving the watch back to the starting position (parallel with the ground) and then tilt it back towards your face again. If this does not work, drop your arm all the way down so it hangs at your side, and then bring it back up again. • You may notice a very faint clicking sound coming from the watch when it is shaken back and forth. This sound is caused by mechanical operation of the auto light switch, and does not indicate a problem with the watch. More than 40° Wear the watch on the outside of your wrist More than 40° Wear the watch on the outside of your wrist Auto light switch on indicator Auto light switch on indicator Button Operation Tone The button operation tone sounds any time you press one of the watch’s buttons. You can turn the button operation tone on or off as desired. • Even if you turn off the button operation tone, the alarm, Hourly Time Signal, and Countdown Timer Mode alarm all operate normally. To turn the button operation tone on and off 1. In the Timekeeping Mode, hold down E until the currently selected city code starts to flash. This is the city code setting screen. • Before the city code starts to flash, the message SET Hold will appear on the display. Keep E depressed until SET Hold disappears and the city code starts to flash. 2. Keep pressing D until MUTE or KEY is displayed in the upper left corner of the display. • See step 3 under “To change the current time and date settings” for information about how to scroll through setting screens. 3. Press A to toggle the button operation tone on (KEY ) and off (MUTE). 4. After the settings are the way you want, press E twice to exit the setting screen. Note • The mute indicator is displayed in all modes when the button operation tone is turned off. Troubleshooting Time Setting ■ The current time setting is off by one hour. You may need to change your Home City’s standard time/daylight saving time (DST) setting. Use the procedure under “To change the current time and date settings” to change the standard time/daylight saving time (DST) setting. Sensor modes ■ I can’t change the temperature, barometric pressure, and altitude units. When TYO (Tokyo) is selected as the Home City, the altitude unit is set automatically to meters (m), the barometric pressure unit to hectopascals (hPa), and the temperature unit to Celsius (°C). These settings cannot be changed. ■ “ERR” appears on the display while I am using a sensor . Subjecting the watch to strong impact can cause sensor malfunction or improper contact of internal circuitry. When this happens, ERR (error) will appear on the display and sensor operations will be disabled. Digital Compass Measurement Barometric Pressure/Temperature Measurement Altitude Measurement • If ERR appears while a measurement operation is being performed in a sensor mode, restart the measurement. If ERR appears on the display again, it can mean there is something wrong with the sensor. • Even if battery power is at Level 1 (H) or Level 2 (M), the Digital Compass Mode, Barometer/ Thermometer Mode, or Altimeter Mode sensor may be disabled if there is not enough voltage available to power it sufficiently. In this case, ERR will appear on the display. This does not indicate malfunction, and sensor operation should resume once battery voltage returns to its normal level. • If ERR keeps appearing during measurement, it could mean there is a problem with the applicable sensor. ■ ERR appears on the display after I perform bidirectional calibration or northerly calibration. If - - - appears and then changes to ERR (error) on the calibration screen, it means that there is something wrong with the sensor. • If ERR disappears after about one second, try performing the calibration again. • If ERR keeps appearing, contact your original dealer or nearest authorized CASIO distributor to have the watch checked. ■ ERR appears on the display after I perform northerly calibration. The ERR message indicates there may be some problem with the sensor. The ERR message also may be due to movement of the watch while the calibration procedure is being performed. Try performing calibration again, taking care to ensure that the watch is not moved. If this does not solve the problem, the problem may be due to some nearby source of terrestrial magnetism. Try performing the calibration procedure again from the beginning. Whenever you have a sensor malfunction, take the watch to your original dealer or nearest authorized CASIO distributor as soon as possible. ■ What causes incorrect direction readings? • Incorrect bidirectional calibration. Perform bidirectional calibration. • Nearby source of strong magnetism, such as a household appliance, a large steel bridge, a steel beam, overhead wires, etc., or an attempt to perform direction measurement on a train, boat, etc. Move away from large metal objects and try again. Note that digital compass operation cannot be performed inside a train, boat, etc. ■ What causes different direction readings to produce different results at the same location? Magnetism generated by nearby high-tension wires is interfering with detection of terrestrial magnetism. Move away from the high-tension wires and try again. ■ Why am I having problems taking direction readings indoors? A TV, personal computer, speakers, or some other object is interfering with terrestrial magnetism readings. Move away from the object causing the interference or take the direction reading outdoors. Indoor direction readings are particularly difficult inside ferro-concrete structures. Remember that you will not be able to take direction readings inside of trains, airplanes, etc. ■ The barometric pressure differential pointer does not appear on the display when I enter the Barometer/Thermometer Mode. • This could indicate sensor error. Try pressing B again. • The barometric pressure differential pointer is not displayed when the displayed current barometric value is outside of the allowable measurement range (260 to 1,100 hPa). World Time Mode ■ The time for my World Time City is off in the World Time Mode. This could be due to incorrect switching between standard time and daylight saving time. See “To specify standard time or daylight saving time (DST) for a city” for more information. Charging ■ The watch does not resume operation after I expose it to light. This can happen after the power level drops to Level 5. Continue exposing the watch to light until the battery power indicator shows “H” or “M”. l l l l l l llllll l l l l l l l l llllll l l ll l l l l l llllll l l l l l l l l llllll l l Mute indicator Module 3173 Module 3246 Mute indicator Module 3173 Module 3246
  • 10. 10 Operation Guide 3173 3246 Specifications Accuracy at normal temperature: ±15 seconds a month Timekeeping: Hour, minutes, seconds, p.m. (P), year, month, day, day of the week Time format: 12-hour and 24-hour Calendar system: Full Auto-calendar pre-programmed from the year 2000 to 2099 Other: 3 display formats (Day of the week, Year, Barometric pressure graph); Home City code (can be assigned one of 48 city codes); Standard Time / Daylight Saving Time (summer time) Digital Compass: 20 seconds continuous measurement; 16 directions; Angle value 0° to 359°; Four direction pointers; Calibration (bidirectional, northerly); Magnetic declination correction; Bearing Memory Barometer: Measurement and display range: 260 to 1,100 hPa (or 7.65 to 32.45 inHg) Display unit: 1 hPa (or 0.05 inHg) Measurement timing: Daily from midnight, at two hour intervals (12 times per day); Every five seconds in the Barometer/Thermometer Mode Other: Calibration; Manual measurement (button operation); Barometric pressure graph; Barometric pressure differential pointer Thermometer: Measurement and display range: –10.0 to 60.0°C (or 14.0 to 140.0°F) Display unit: 0.1°C (or 0.2°F) Measurement timing: Every five seconds in the Barometer/Thermometer Mode Other: Calibration; Manual measurement (button operation) Altimeter: Measurement range: –700 to 10,000 m (or –2,300 to 32,800 ft.) without reference altitude Display range: –10,000 to 10,000 m (or –32,800 to 32,800 ft.) Negative values can be caused by readings produced based on a reference altitude or due to atmospheric conditions. Display unit: 5 m (or 20 ft.) Current Altitude Data: 5-second intervals for 1 hour (0’05), or 5-second interval for first 3 minutes followed by 2-minute interval for next 24 hours (2’00) Altitude Memory Data: Manually saved records: 25 (altitude, date, time) Auto saved values: Two sets (memory areas) each of high altitude and its measurement date and time, low altitude and its measurement date and time, total ascent and its save start date and time, total descent and its save start date and time Other: Reference altitude setting; Altitude graph; Altitude differential; Altitude auto measurement method (0’05 or 2’00) Bearing Sensor Precision: Direction: Within ±10° Values are guaranteed for a temperature range of –10°C to 40°C (14°F to 104°F). North pointer: Within ±2 digital segments Pressure Sensor Precision: Conditions (Altitude) Altimeter Barometer Fixed temperature 0 to 6000 m 0 to 19680 ft. ± (altitude differential × 2% + 15 m) m ± (altitude differential × 2% + 50 ft.) ft. ± (pressure differential × 2% + 2 hPa) hPa ± (pressure differential × 2% + 0.059 inHg) inHg6000 to 10000 m 19680 to 32800 ft. ± (altitude differential × 2% + 25 m) m ± (altitude differential × 2% + 90 ft.) ft. Effect of variable temperature 0 to 6000 m 0 to 19680 ft. ± 50 m every 10°C ± 170 ft. every 50°F ± 5 hPa every 10°C ± 0.148 inHg every 50°F6000 to 10000 m 19680 to 32800 ft. ± 70 m every 10°C ± 230 ft. every 50°F • Values are guaranteed for a temperature range of –10°C to 40°C (14°F to 104°F). • Precision is lessened by strong impact to either the watch or the sensor, and by temperature extremes. Temperature Sensor Precision: ±2°C (±3.6°F) in range of –10°C to 60°C (14.0°F to 140.0°F) Sunrise/Sunset: Sunrise time and sunset time for specific date, Daylight pointers World Time: 48 cities (31 time zones) Other: Daylight Saving Time/Standard Time Stopwatch: Measuring unit: 1/100 second Measuring capacity: 23:59' 59.99" Measuring modes: Elapsed time, split time, two finishes Countdown Timer: Measuring unit: 1 second Countdown start time setting range: 1 minute to 24 hours (1-hour increments and 1-minute increments) Alarms: 5 Daily alarms; Hourly time signal Illumination: EL Backlight (electro-luminescent panel); Selectable illumination duration (approximately 1 second or 3 seconds); Auto Light Switch (Full Auto EL Light operates only in the dark) Other: Battery power indicator; Power Saving; Low-temperature resistance (–10°C/14°F); Button operation tone on/off Power Supply: Solar cell and one rechargeable battery Approximate battery operating time: 6 months (from full charge to Level 4) under the following conditions: • Watch not exposed to light • Internal timekeeping • Display on 18 hours per day, sleep state 6 hours per day • 1 illumination operation (1.5 seconds) per day • 10 seconds of alarm operation per day • 10 digital compass operations per week • 1 hour of altimeter measurement at 5-second interval, once per month • 2 hours of barometric pressure measurement per day Frequent use of illumination runs down the battery. Particular care is required when using the auto light switch. Site Longitude Latitude Abu Dhabi 54°E 24°N Addis Ababa 39°E 9°N Adelaide 139°E 35°S Amsterdam 5°E 52°N Anchorage 150°W 61°N Athens 24°E 38°N Bangkok 100°E 14°N Beirut 35°E 34°N Boston 71°W 42°N Brasilia 48°W 16°S Buenos Aires 58°W 35°S Cairo 31°E 30°N Chicago 88°W 42°N Christchurch 173°E 43°S Dakar 17°W 15°N Damascus 36°E 33°N Delhi 77°E 29°N Denver 105°W 40°N Detroit 83°W 42°N Dhaka 90°E 24°N Dubai 55°E 25°N Dublin 6°W 53°N Edmonton 114°W 54°N El Paso 106°W 32°N Fernando de Noronha 32°W 4°S Frankfurt 9°E 50°N Guam 145°E 13°N Hamburg 10°E 54°N Hanoi 106°E 21°N Helsinki 25°E 60°N Hong Kong 114°E 22°N Honolulu 158°W 21°N Houston 95°W 30°N Istanbul 29°E 41°N Jakarta 107°E 6°S Jeddah 39°E 21°N Kabul 69°E 35°N Karachi 67°E 25°N Kathmandu 85°E 28°N Kuala Lumpur 102°E 3°N Kuwait 48°E 29°N Las Vegas 115°W 36°N Lima 77°W 12°S Site Longitude Latitude Lisbon 9°W 39°N London 0°E 51°N Los Angeles 118°W 34°N Madrid 4°W 40°N Manila 121°E 15°N Melbourne 145°E 38°S Mexico City 99°W 19°N Miami 80°W 26°N Milan 9°E 45°N Montreal 74°W 45°N Nairobi 37°E 1°S Nauru 167°E 1°S New Orleans 90°W 30°N New York 74°W 41°N Noumea 166°E 22°S Pago Pago 171°W 14°S Panama City 80°W 9°N Papeete 150°W 18°S Paris 2°E 49°N Perth 116°E 32°S Phnom Penh 105°E 12°N Port Vila 168°E 18°S Praia 24°W 15°N Pyongyang 126°E 39°N Rio De Janeiro 43°E 23°S Rome 12°E 42°N San Francisco 122°W 38°N Santiago 71°W 33°S Sao Paulo 47°W 24°S Seattle 122°W 48°N Seoul 127°E 38°N Singapore 104°E 1°N St. Johns 53°W 48°N Stockholm 18°E 59°N Sydney 151°E 34°S Taipei 122°E 25°N Tehran 51°E 36°N Tokyo 140°E 36°N Vancouver 123°W 49°N Vienna 16°E 48°N Wellington 175°E 41°S • Based on data as of December 2008. Site Data List City Code Table City Code City UTC Offset/ GMT Differential PPG Pago Pago –11 HNL Honolulu –10 ANC Anchorage –9 YVR Vancouver –8 LAX Los Angeles YEA Edmonton –7 DEN Denver MEX Mexico City –6 CHI Chicago NYC New York –5 SCL Santiago –4 YHZ Halifax YYT St. Johns –3.5 RIO Rio De Janeiro –3 FEN Fernando de Noronha –2 RAI Praia –1 UTC 0LIS Lisbon LON London MAD Madrid +1 PAR Paris ROM Rome BER Berlin STO Stockholm ATH Athens +2CAI Cairo JRS Jerusalem City Code City UTC Offset/ GMT Differential MOW Moscow +3 JED Jeddah THR Tehran +3.5 DXB Dubai +4 KBL Kabul +4.5 KHI Karachi +5 DEL Delhi +5.5 KTM Kathmandu +5.75 DAC Dhaka +6 RGN Yangon +6.5 BKK Bangkok +7 SIN Singapore +8 HKG Hong Kong BJS Beijing TPE Taipei SEL Seoul +9 TYO Tokyo ADL Adelaide +9.5 GUM Guam +10 SYD Sydney NOU Noumea +11 WLG Wellington +12 • Based on data as of December 2009. • The rules governing global times (GMT differential and UTC offset) and summer time are determined by each individual country.