Download to read offline


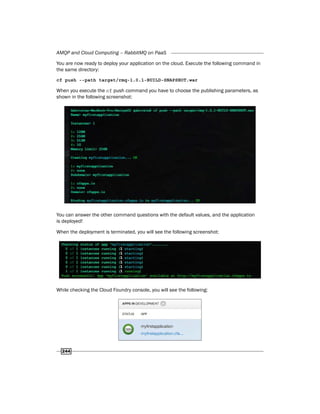
![Preface
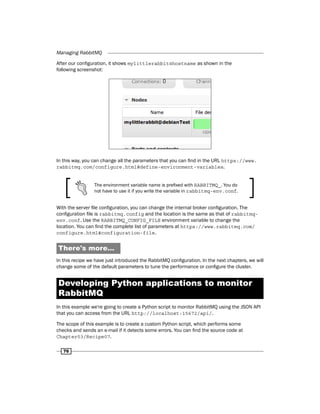
3
Conventions
In this book, you will find a number of styles of text that distinguish between different kinds of
information. Here are some examples of these styles, and an explanation of their meaning.
Code words in text, folder names, filenames, file extensions, pathnames, are shown as follows:
“Properly configure CLASSPATH and your preferred development environment”.
A block of code is set as follows:
ConnectionFactory factory = new ConnectionFactory();
String uri=”amqp://user:pass@hostname:port/vhost”;
factory.setUri(uri);
Any command-line input or output is written as follows:
java -cp ./bin rmqexample.Publish [Rabbitmq-host]
New terms and important words are shown in bold. Words that you see on the screen,
in menus or dialog boxes for example, appear in the text like this: “Configure the host by
navigating to Edit configuration | services | endpoint | new.”
Warnings or important notes appear in a box like this.
Tips and tricks appear like this.
Reader feedback
Feedback from our readers is always welcome. Let us know what you think about this book—
what you liked or may have disliked. Reader feedback is important for us to develop titles that
you really get the most out of.
To send us general feedback, simply send an e-mail to feedback@packtpub.com, and
mention the book title via the subject of your message.
If there is a topic that you have expertise in and you are interested in either writing or
contributing to a book, see our author guide on www.packtpub.com/authors.
Customer support
Now that you are the proud owner of a Packt book, we have a number of things to help you to
get the most from your purchase.](https://image.slidesharecdn.com/rabbitmqcookbook-240831160301-271d2aca/85/RabbitMQ-Cookbook-Introduction-for-beginners-16-320.jpg)

![Chapter 1
7
f
f Properly configure CLASSPATH and your preferred development environment (Eclipse,
NetBeans, and so on)
f
f Install the RabbitMQ server on a machine (this can be the same local machine)
The natural choice is to install it on your desktop (Windows, Linux, and Mac OS X are all fine
choices), but you can also install it on one or more external servers; for example, virtual
machines, physical servers, and Raspberry PI servers (http://www.raspberrypi.org/)
on cloud service providers.
In this book we are not providing instructions on the installation of
RabbitMQ itself. You can find detailed instructions on the RabbitMQ site.
Most of the examples will work connecting to the RabbitMQ broker running on the localhost. If
you have chosen to install or use RabbitMQ from a different machine, you will need to specify
its hostname as a command-line parameter of the examples themselves, for example:
java -cp ./bin rmqexample.Publish [Rabbitmq-host]
For the examples involving Python, you will need Python 2.7+ installed and the Pika library,
an AMQP implementation for Python (https://pypi.python.org/pypi/pika). The
fastest way to install Pika is by using PIP (https://pypi.python.org/pypi/pip). In the
command prompt, just type:
pip install pika
We will also present some recipes using .NET where the accent is mainly on interoperability.
You can download the working examples in their full form at http://www.packtpub.com/
support.
The recipes presented in this chapter will tackle all the basic concepts exposed by AMQP,
using RabbitMQ.
Connecting to the broker
Every application that uses AMQP needs to establish a connection with the AMQP broker. By
default, RabbitMQ (as well as any other AMQP broker up to version 1.0) works over TCP as a
reliable transport protocol on port 5672, that is, the IANA-assigned port.
We are now going to discuss how to create the connection. In all the subsequent recipes we
will refer to the connection and channel as the results of the operations presented here.](https://image.slidesharecdn.com/rabbitmqcookbook-240831160301-271d2aca/85/RabbitMQ-Cookbook-Introduction-for-beginners-20-320.jpg)
![Working with AMQP
12
f
f exclusive: This specifies whether the queue is restricted to only this connection.
f
f autoDelete: This specifies whether the queue will be automatically deleted by the
RabbitMQ broker as soon as it is not in use.
f
f arguments: This is an optional map of queue construction arguments.
In step 2 we have actually sent a message to the RabbitMQ broker.
The message body will never be opened by RabbitMQ. Messages are opaque entities for
the AMQP broker, and you can use any serialization format you like. We often use JSON, but
XML, ASN.1, standard or custom, ASCII or binary format, are all valid alternatives. The only
important thing is that the client applications should know how to interpret the data.
Let's now examine in depth the basicPublish() method of the Channel interface for the
overload used in our recipe:
void basicPublish(java.lang.String exchange,
java.lang.String routingKey, AMQP.BasicProperties props, byte[]
body) throws java.io.IOException
In our example the exchange argument has been set to the empty string "", that is, the
default exchange, and the routingKey argument to the name of the queue. In this case the
message is directly sent to the queue specified as routingKey. The body argument is set
to the byte array of our string, that is, just the message that we sent. The props argument is
set to null as a default; these are the message properties, discussed in depth in the recipe
Using message properties.
For example, in step 3 we have sent an identical message, but with props set to
MessageProperties.PERSISTENT_TEXT_PLAIN; in this way we have requested
RabbitMQ to mark this message as a persistent message.
Both the messages have been dispatched to the RabbitMQ broker, logically queued in the
myFirstQueue queue. The messages will stay buffered there until a client, (typically, a
different client) gets it.
If the queue has been declared with the durable flag set to true and the message has
been marked as persistent, it is stored on the disk by the broker. If one of the two conditions
is missing, the message is stored in the memory. In the latter case the buffered messages
won't survive a RabbitMQ restart, but the message delivery and retrieval will be much faster.
However, we will dig down on this topic in Chapter 8, Performance Tuning for RabbitMQ.
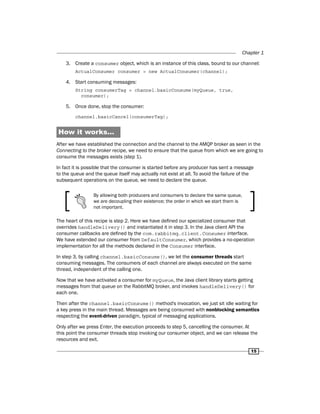
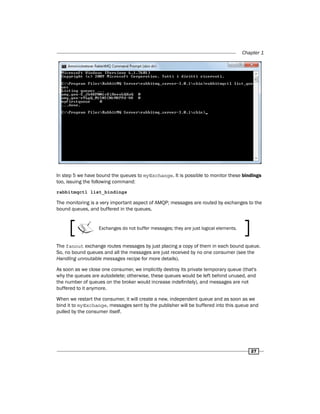
There's more…
In this section we will discuss the methods to check the status of RabbitMQ and whether a
queue already exists.](https://image.slidesharecdn.com/rabbitmqcookbook-240831160301-271d2aca/85/RabbitMQ-Cookbook-Introduction-for-beginners-25-320.jpg)
![Working with AMQP
14
Checking whether a queue already exists
In order to be sure that a specific queue already exists, replace channel.queueDeclare()
with channel.queueDeclarePassive(). The behavior of the two methods is the same
in case the queue already exists; but in case it doesn't, the first one will silently create it and
return back (that's actually the most frequently used case), the latter will raise an exception.
Consuming messages
In this recipe we are closing the loop; we have already seen how to send messages to
RabbitMQ—or to any AMQP broker—and now we are ready to learn how to retrieve them.
You can find the source code of the recipe at Chapter01/Recipe03/src/rmqexample/
nonblocking.
Getting ready
To use this recipe we need to set up the Java development environment as indicated in
the introduction.
How to do it…
In order to consume the messages sent as seen in the previous recipe, perform the
following steps:
1. Declare the queue where we want to consume the messages from:
String myQueue="myFirstQueue";
channel.queueDeclare(myQueue, true, false, false, null);
2. Define a specialized consumer class inherited from DefaultConsumer:
public class ActualConsumer extends DefaultConsumer {
public ActualConsumer(Channel channel) {
super(channel);
}
@Override
public void handleDelivery(
String consumerTag,
Envelope envelope,
BasicProperties properties,
byte[] body) throws java.io.IOException {
String message = new String(body);
System.out.println("Received: " + message);
}
}](https://image.slidesharecdn.com/rabbitmqcookbook-240831160301-271d2aca/85/RabbitMQ-Cookbook-Introduction-for-beginners-27-320.jpg)
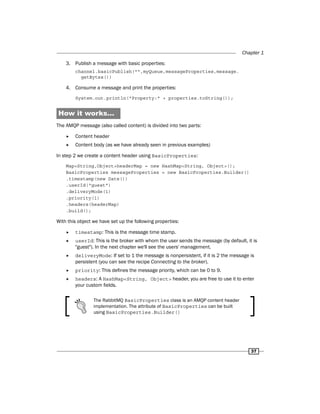
![Working with AMQP
18
4. Java: We are ready to serialize the newBooks instance with JSONwriter:
JSONWriter rabbitmqJson = new JSONWriter();
String jsonmessage = rabbitmqJson.write(newBooks);
5. Java: We can finally send our jsonmessage:
channel.basicPublish("",MyQueue,null,
jsonmessage.getBytes());
6. Python: To use the Pika library we must add the follow import:
import pika;
import json;
Python has a powerful built-in library for JSON.
7. Python: In order to create a connection to RabbitMQ, use the following code:
connection =
pika.BlockingConnection(pika.ConnectionParameters(rabbitmq_
host));
8. Python: Let's declare a queue, bind as a consumer, and then register a callback:
channel = connection.channel()
my_queue = "myJSONBodyQueue_4"
channel.queue_declare(queue=my_queue)
channel.basic_consume(consumer_callback, queue=my_queue,
no_ack=True)
channel.start_consuming()
How it works…
After we set up the environments (step 1 and step 2), we serialize the newbooks class with
the method write(newbooks). The method returns a JSON String (jsonmessage) as
shown in the following code snippet:
[
{
"author" : "John Doe",
"bookDescription" : "History VOL: 1",
"bookID" : 1
},
{
"author" : "John Doe",
"bookDescription" : "History VOL: 2",
"bookID" : 2
}
]](https://image.slidesharecdn.com/rabbitmqcookbook-240831160301-271d2aca/85/RabbitMQ-Cookbook-Introduction-for-beginners-31-320.jpg)
![Chapter 1
19
In step 4 we publish jsonmessage to the queue myJSONBodyQueue_4. Now the Python
Consumer can get the message from the same queue. Let's see how to do it in Python:
connection =
pika.BlockingConnection(pika.ConnectionParameters(rabbitmq_host));
channel = connection.channel()
queue_name = "myJSONBodyQueue_4"
channel.queue_declare(queue=my_queue)
..
channel.basic_consume(consumer_callback, queue=my_queue,
no_ack=True)
channel.start_consuming()
As we have seen in the Java implementation, we must create a connection and then create
a channel. With the method channel.queue_declare(queue=myQueue), we declare a
queue that is not durable, exclusive or autodelete. In order to change the queue's attribute,
it's enough to add the parameter in the queue_declare method as follows:
channel.queue_declare(queue=myQueue,durable=True)
When different AMQP clients declare the same queue, it's important that
all of them specify the same durable, exclusive, and autodelete attributes.
Otherwise, channel.queue_declare() will raise an exception.
With the method channel.basic_consume(), the client starts consuming messages from
the given queue, invoking the callback consumer_callback()where it will receive the
messages.
While the callbacks in Java were defined in the consumer interface, in Python they are just
passed to basic_consume(), in spite of the more functional, less declarative, and less
formal paradigm typical of Python.
The callback consumer_callback is as follows:
def consumer_callback(ch, method, properties, body):
newBooks=json.loads(body);
print" Count books:",len(newBooks);
for item in newBooks:
print 'ID:',item['bookID'], '-
Description:',item['bookDescription'],' -
Author:',item['author']
The callback takes the message, deserializes it with json.loads(), and then the newBooks
structure is ready to be read.](https://image.slidesharecdn.com/rabbitmqcookbook-240831160301-271d2aca/85/RabbitMQ-Cookbook-Introduction-for-beginners-32-320.jpg)
![Working with AMQP
22
public void handleDelivery(String consumerTag,
Envelope envelope,
AMQP.BasicProperties properties,
byte[] body) throws java.io.IOException {
String messageIdentifier =
properties.getCorrelationId();
String action = actions.get(messageIdentifier);
actions.remove(messageIdentifier);
String response = new String(body);
OnReply(action, response);
}
4. Start consuming reply messages invoking channel.basicConsume().
5. Prepare and serialize the requests (messageRequest in our example).
6. Initialize an arbitrary, unique message identifier (messageIdentifier).
7. Define what to do when the consumer gets the corresponding reply, by binding the
action with the messageIdentifier. In our example we do it by calling our custom
method consumer.AddAction().
8. Publish the message to requestqueue, setting its properties:
BasicProperties props = new BasicProperties.Builder()
.correlationId(messageIdentifier)
.replyTo(replyQueue).build();
channel.basicPublish("", requestQueue,
props,messageRequest.getBytes());
How it works…
In this example the RPC responder takes the role of an RPC server; the responder listens on
the requestQueue public queue (step 1), where the callers will place their requests.
Each caller, on the other hand, will consume the responder replies on its own private queue,
created in step 5.
When the caller sends a message (step 11), it includes two properties: the name of the
temporary reply queue (replyTo()) where it will be listening, and a message identifier
(correlationId()), needed by the caller to identify the call when the reply comes back.
In fact, in our example we have implemented an asynchronous RPC caller. The action to be
performed by the RpcCallerConsumer (step 6) when the reply comes back is recorded by
the nonblocking consumer by calling AddAction() (step 10).](https://image.slidesharecdn.com/rabbitmqcookbook-240831160301-271d2aca/85/RabbitMQ-Cookbook-Introduction-for-beginners-35-320.jpg)

![Chapter 1
33
How to do it…
In order to guarantee that the messages have been acknowledged by the consumer after
processing them, you can perform the following steps:
1. Declare a queue:
channel.queueDeclare(myQueue, true, false, false,null);
2. Bind the consumer to the queue, specifying false for the autoAck parameter of
basicConsume():
ActualConsumer consumer = new ActualConsumer(channel);
boolean autoAck = false; // n.b.
channel.basicConsume(MyQueue, autoAck, consumer);
3. Consume a message and send the ack:
public void handleDelivery(String consumerTag,Envelope
envelope, BasicPropertiesproperties,byte[] body) throws
java.io.IOException {
String message = new String(body);
this.getChannel().basicAck(envelope.getDeliveryTag(),false)
;
How it works…
After we created the queue (step 1), we added the consumer to the queue and defined the
ack behavior (step 2).
The parameter autoack = false informs the RabbitMQ client API that we are going to send
explicit ack ourselves.
After we have got a message from the queue, we must acknowledge to RabbitMQ that we
have received and properly processed the message calling channel.basicAck()(step 3).
The message will be removed from the queue only when RabbitMQ receives the ack.
If you don't send the ack back, the consumer continues to fetch
subsequent messages; however, when you disconnect the consumer,
all the messages will still be in the queue. Messages are not consumed
until RabbitMQ receives the corresponding ack. Try to comment out the
basicAck() call in the example to experiment this behavior.
The method channel.basicAck() has two parameters:
f
f deliveryTag
f
f multiple](https://image.slidesharecdn.com/rabbitmqcookbook-240831160301-271d2aca/85/RabbitMQ-Cookbook-Introduction-for-beginners-46-320.jpg)

![Working with AMQP
38
The header is ready and we can send a message using channel.
basicPublish("",myQueue, messageProperties,message.getBytes()), where
messageProperties is the message header and message is the message body.
In step 4 the consumer gets a message:
public void handleDelivery(String consumerTag,Envelope envelope,
BasicProperties properties,byte[] body) throws java.io.IOException {
System.out.println("***********message header****************");
System.out.println("Message sent at:"+ properties.getTimestamp());
System.out.println("Message sent by user:"+ properties.getUserId());
System.out.println("Message sent by App:"+properties.getAppId());
System.out.println("all properties :" + properties.toString());
System.out.println("**********message body**************");
String message = new String(body);
System.out.println("Message Body:"+message);
}
The parameter properties contains the message header and body contains its body.
There's more…
Using message properties we can optimize the performance. Writing audit information or log
information into the body is a typical error, because the consumer should parse the body to
get them.
The body message must only contain application data (for example, a Book class), while the
message properties can host other information related to the messaging mechanics or other
implementation details.
For example, if the consumer wants to log when a message has been sent you can use the
timestamp attribute, or if the consumer needs to distinguish a message according to a
custom tag, you can put it in the headers HashMap property.
See also
The class MessageProperties contains some pre-built BasicProperties class
for standard cases. Please check the official link at http://www.rabbitmq.com/
releases//rabbitmq-java-client/current-javadoc/com/rabbitmq/client/
MessageProperties.html
In this example we have just used some of the properties. You can get more information
at http://www.rabbitmq.com/releases//rabbitmq-java-client/current-
javadoc/com/rabbitmq/client/AMQP.BasicProperties.html.](https://image.slidesharecdn.com/rabbitmqcookbook-240831160301-271d2aca/85/RabbitMQ-Cookbook-Introduction-for-beginners-51-320.jpg)


![Chapter 3
67
mkdir certs private
chmod 700 private
echo 01 > serial
touch index.txt
2. Customize the openssl configuration file, which you can already find in Chapter03/
Recipe03/certificates/testca/openssl.cnf.
3. Create the self-signed CA certificates as done in Chapter03/Recipe03/
certificates/02_create_CA_certificates.sh:
openssl req -x509 -config openssl.cnf -newkeyrsa:2048
-days 365 -out cacert.pem -outform PEM
-subj /CN=MyTestCA/ -nodes
openssl x509 -in cacert.pem -out cacert.cer -outform DER
4. Create the RabbitMQ server private key as in Chapter03/Recipe03/
certificates/03_create_server_certificates.sh:
openssl genrsa -out key.pem 2048
5. Create the server certificate request:
openssl req -new -key key.pem -out req.pem -outform PEM
-subj /CN=$(hostname)/O=server/ -nodes
6. In the CA directory, sign the request to obtain the signed certificate:
openssl ca -config openssl.cnf -in ../server/req.pem –out
../server/cert.pem -notext -batch –extensions
server_ca_extensions
7. Copy from Chapter03/Recipe03/certificates, the CA certificate, the server
certificate, and the server private key, which we have just created, to the absolute
paths:
/usr/local/certificates/testca/cacert.pem
/usr/local/certificates/server/cert.pem
/usr/local/certificates/server/key.pem
8. Create the RabbitMQ configuration file, rabbitmq.config, in the appropriate
directory (/etc/rabbitmq) by copying it from Chapter03/Recipe03/rabbitmq.
config:
[
{rabbit, [
{ssl_listeners, [5671]},
{ssl_options, [
{cacertfile,"/usr/local/certificates/testca/cacert.pem"},
{certfile,"/usr/local/certificates/server/cert.pem"},](https://image.slidesharecdn.com/rabbitmqcookbook-240831160301-271d2aca/85/RabbitMQ-Cookbook-Introduction-for-beginners-80-320.jpg)
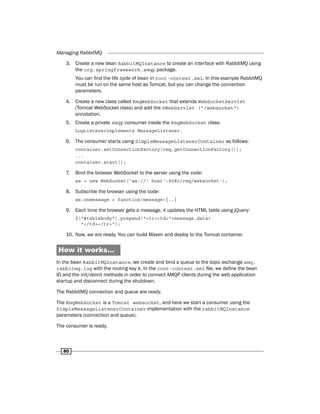
![Managing RabbitMQ
68
{keyfile,"/usr/local/certificates/server/key.pem"},
{verify,verify_peer},
{fail_if_no_peer_cert,false}]}
]}
].
9. Restart the RabbitMQ server:
rabbitmqctl stop
rabbitmq-server–detached.
When you restart a RabbitMQ node, the Erlang Node will also restart.
10. In the Java client, the connection to the server is now made, as shown in
Chapter03/Recipe03/src/rmqexample/Publish.java:
ConnectionFactory factory = new ConnectionFactory();
factory.setHost(hostname);
factory.setPort(5671);
factory.useSslProtocol();
Connection connection = factory.newConnection();
How it works…
We started this recipe by creating a CA with which we will sign the certificates for the server.
We have performed this step on the server, but in the real world, the CA and, in particular, its
private key (created in step 3) should be kept separate.
After the CA is ready, we have to prepare the server certificate as shown in steps 4-6.
We are almost done. We just need to copy the CA certificate, the server certificate, and
the server public key to the final path (step 7). We have chosen to store them in /usr/
local/certificates, but it is totally arbitrary since they are referenced in the RabbitMQ
configuration file, rabbitmq.config.
This file does not exist by default. It must be placed in the standard configuration directory,
usually in /etc/rabbitmq.
Apart from the security files, we have configured the RabbitMQ SSL port (5671), and a couple
of options in rabbitmq.config:
f
f Verify: When this is set to verify_peer, it tells RabbitMQ that if the client
presents a certificate, it will be checked and rejected if not valid (because the CA is
not the same or because it is expired)
f
f fail_if_no_peer_cert: When this is set to false, it tells RabbitMQ to accept
clients that do not present any certificate at all](https://image.slidesharecdn.com/rabbitmqcookbook-240831160301-271d2aca/85/RabbitMQ-Cookbook-Introduction-for-beginners-81-320.jpg)
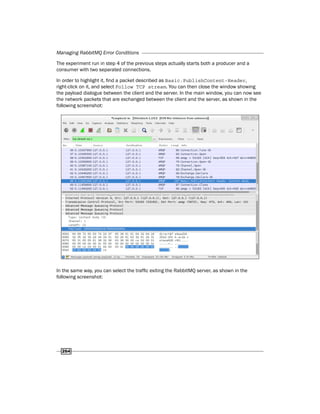
![Chapter 3
69
After we have restarted RabbitMQ (you must use rabbitmqctl stop and restart the
service), you can verify whether it has got the options by examining the logfile in /var/log/
rabbitmq. You should be able to find a line as follows:
started SSL Listener on [::]:5671
Furthermore, by opening the management plugin from a browser, you will be able to get
similar information (see the Managing RabbitMQ from a browser recipe), as shown in the
following screenshot:
At this point it is possible to connect via SSL from a client by just adding these two options to
the connection factory:
factory.setPort(5671);
factory.useSslProtocol();
Now the connection is encrypted using the keys configured in the server.
There's more…
Since we are using server certificates only, the communication between the server and the
client is encrypted, but we are not protected against MITM (man-in-the-middle) attacks.
If we want to let any client connect to the server and avoid MITM attacks, we can use the
same strategy as that used by HTTPS and the browsers, which is signing the certificates with
trusted third-party CAs and verifying the domain signed in the certificates. Otherwise, we can
just go on and read the next recipe.
Implementing client-side certificates
In case the RabbitMQ broker and client communicate through the Internet, it sounds
reasonable that only authorized clients can connect to the broker.](https://image.slidesharecdn.com/rabbitmqcookbook-240831160301-271d2aca/85/RabbitMQ-Cookbook-Introduction-for-beginners-82-320.jpg)

![Chapter 3
71
7. Change the rabbitmq.config option fail_if_no_peer_cert to true:
{fail_if_no_peer_cert,true}
8. Restart RabbitMQ:
rabbitmqctl stop
rabbitmq-server –detached
9. On the client side, set up a secure connection by setting up the SSL context:
char[] keyPassphrase = "client1234passwd".toCharArray();
KeyStoreks = KeyStore.getInstance("PKCS12");
ks.load(newFileInputStream("certificates/client/keycert.p12
"), keyPassphrase);
KeyManagerFactorykmf =
KeyManagerFactory.getInstance("SunX509");
kmf.init(ks, keyPassphrase);
char[] trustPassphrase = "passwd1234".toCharArray();
KeyStoretks = KeyStore.getInstance("JKS");
tks.load(newFileInputStream("certificates/keystore/rabbit.
jks"), trustPassphrase);
TrustManagerFactorytmf =
TrustManagerFactory.getInstance("SunX509");
tmf.init(tks);
SSLContext c = SSLContext.getInstance("SSLv3");
c.init(kmf.getKeyManagers(), tmf.getTrustManagers(), null);
ConnectionFactory factory = newConnectionFactory();
factory.setHost(hostname);
factory.setPort(5671);
factory.useSslProtocol(c);
Connection connection = factory.newConnection();
How it works…
For the client certificate to work, it must be signed with the same CA that has been used to
sign the server. Once the certificate is prepared, it is very useful to save it in a keystore, a
PKCS#12 store as shown in step 5.
The client needs the server certificate too—it contains the server public key—and so we
have prepared a keystore for this one too using a Java keystore with the Java keytool
command this time.](https://image.slidesharecdn.com/rabbitmqcookbook-240831160301-271d2aca/85/RabbitMQ-Cookbook-Introduction-for-beginners-84-320.jpg)


![Chapter 4
95
8. Create the ActualConsumer class needed to consume RabbitMQ messages
asynchronously as we have seen in Chapter 1, Working with AMQP, and override its
handleDelivery method:
public void handleDelivery(
String consumerTag,
Envelope envelope,
BasicProperties properties,
byte[] body) throws java.io.IOException {
String message = new String(body);
MapController.INSTANCE.AddCmdFromJson(message);
}
9. Create the RabbitmqHandler class, exposing the Connect() and Disconnect()
methods, which internally perform all the needed calls on the RabbitMQ API to let
the app start consuming messages asynchronously. Customize the connection
parameters included in this class as constants.
10. Create the UpdateMap class that is internal to the MainActivity instance of the
Runnable interface, which periodically performs the drawing operations on the map:
public class UpdateMap implements Runnable {
GoogleMapmMap;
publicUpdateMap(GoogleMapmMap_) {
mMap = mMap_;
}
@Override
public void run() {
MapController.INSTANCE.ExecuteCmds(mMap);
updateHandler.postDelayed(this, UPDATE_INTERVAL);
}
};
11. In the MainActivity class initially created by Eclipse, fill the OnCreate() method,
using the building blocks created up to now:
protected void onCreate(Bundle savedInstanceState) {
super.onCreate(savedInstanceState);
setContentView(R.layout.activity_main);
mMap = ((MapFragment)
getFragmentManager().findFragmentById(R.id.mapFragment))
.getMap();
mMap.setMapType(GoogleMap.MAP_TYPE_HYBRID);
updateMap = new UpdateMap(mMap);
updateHandler = new Handler();
updateHandler.postDelayed(updateMap, UPDATE_INTERVAL);](https://image.slidesharecdn.com/rabbitmqcookbook-240831160301-271d2aca/85/RabbitMQ-Cookbook-Introduction-for-beginners-108-320.jpg)


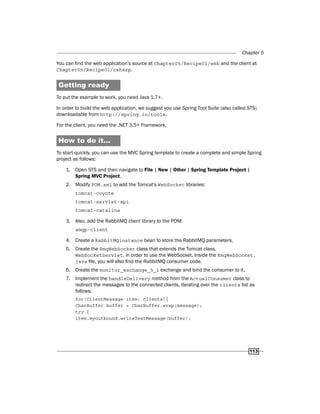
![Using RabbitMQ in Web Applications
114
8. On the client side, where the JavaScript runs into the browser, connect the
WebSocket instance using:
new WebSocket('ws://' + window.location.
host + window.location.pathname+ "websocket");
9. Implement the ws.onmessage() event to parse the JSON message and update the
charts:
var obj = jQuery.parseJSON(message.data);
xcpu =obj.CPU ;
xmem = obj.MEM;
xupdate = obj.UPDATETIME;
var data = google.visualization.arrayToDataTable([
['Label', 'Value'], ['Memory',
xmem],
['CPU', xcpu]]);
10. As a producer, we have created a .NET application in this example. In general,
the producer has to publish a JSON message to the monitor_exchange_5_1
exchange. The exchanged JSON message will look like the following code:
{"UPDATETIME":"23/06/2013
22:55:32","SERVERID":"1","CPU":10,"MEM":40}
Here the application is ready, but if you want to configure Spring Insight, you have to perform
the following steps:
11. Go to the server section, then click on new server wizard, and select vFabric server
as shown in the following screenshot:](https://image.slidesharecdn.com/rabbitmqcookbook-240831160301-271d2aca/85/RabbitMQ-Cookbook-Introduction-for-beginners-127-320.jpg)


![Chapter 6
131
How to do it…
In order to create a localhost cluster, we can perform the following steps:
1. From a root shell (Linux), start a second RabbitMQ instance with the following
command:
env RABBITMQ_NODENAME=node01 RABBITMQ_NODE_PORT=5673 RABBITMQ_
SERVER_START_ARGS="-rabbitmq_management listener [{port,15673}]"
rabbitmq-server -detached
2. Join this instance to the default one with the following commands:
rabbitmqctl -n node01 stop_app
rabbitmqctl -n node01 join_cluster rabbit@$HOSTNAME
rabbitmqctl -n node01 start_app
3. Check your running cluster with the following command:
rabbitmqctl cluster_status
4. Break the cluster back into individual nodes with the following commands:
rabbitmqctl -n node01 stop_app
rabbitmqctl -n node01 reset
rabbitmqctl -n node01 start_app
How it works…
It is possible to run more than one instance of the RabbitMQ server on one machine,
overriding some of the configuration options. In particular, it is mandatory to specify different
ports for the broker itself (5672, by default) and for the management plugin port (15672, by
default), if already installed.
This is accomplished by altering specific environment variables (refer to step 1). Currently, the
available RabbitMQ environment variables are as follows:
f
f RABBITMQ_MNESIA_BASE
f
f RABBITMQ_LOG_BASE
f
f RABBITMQ_NODENAME
f
f RABBITMQ_NODE_IP_ADDRESS
f
f RABBITMQ_NODE_PORT](https://image.slidesharecdn.com/rabbitmqcookbook-240831160301-271d2aca/85/RabbitMQ-Cookbook-Introduction-for-beginners-144-320.jpg)
![Developing Scalable Applications
132
You can find the detailed description of all of the preceding variables in the rabbitmq-
server manual page by typing the following command at the shell prompt:
man rabbitmq-server
Here, we are setting the RabbitMQ node name, its TCP port, and some custom arguments as
follows:
RABBITMQ_NODENAME=node01
RABBITMQ_NODE_PORT=5673
RABBITMQ_SERVER_START_ARGS="-rabbitmq_management listener [{port,15673}]"
On Windows, the command issued at step 1 can be executed as a sequence
of commands using the set command of the command line. You can copy
the following small script in a .bat file for this purpose:
set RABBITMQ_NODENAME=%1
set RABBITMQ_NODE_PORT=%2
set RABBITMQ_SERVER_START_ARGS="-rabbitmq_management
listener [{port,%3}]"
"SBIN_FULL_PATH_HERErabbitmq-server" -detached
At this point, the second server that we have run is still independent of the first one. We must
run the three commands shown in step 2, and then the two servers will be bound in a cluster.
On Windows, you have to use %COMPUTERNAME% in place of $HOSTNAME.
You can easily check this by running the examples in the book on this clustered environment.
The exchanges created on the node and used by the code are replicated in the newly
added node and vice versa. Just access the individual management plugins at http://
localhost:15672 and http://localhost:15673 and see this.
Alternatively, you can issue the rabbitmqctl commands toward a specific node with the
-n option, as performed in steps 2 and 4. If you do not use it, the command will be directed
toward the node named rabbitmq, which is the default RabbitMQ server.
There's more…
The two nodes magically start speaking to each other, thanks to the fact that they share the
same Erlang cookie since they are on the same machine.](https://image.slidesharecdn.com/rabbitmqcookbook-240831160301-271d2aca/85/RabbitMQ-Cookbook-Introduction-for-beginners-145-320.jpg)
![Chapter 6
137
Adding a RabbitMQ cluster automatically
Often, we need to prepare OS images that will join a RabbitMQ cluster once booted.
We can easily accomplish this task with some scripting, but RabbitMQ provides a simpler and
more elegant option already, which we are going to explore with this recipe.
Getting ready
In order to prepare this recipe, you need at least two hosts with RabbitMQ installed and
configured as standalone brokers.
The hosts must have the same version of RabbitMQ and Erlang.
How to do it…
In this recipe we start with two RabbitMQ core brokers that is a high-availability pair, which is
the minimum condition for the cluster to work and be highly reliable. Then we configure all the
other nodes as auto-configuring by writing the configuration to the rabbitmq.config file.
1. Configure the server hostnames as already shown in the Creating a simple cluster
recipe steps 1 to 4.
2. Let all the servers have the same Erlang cookie.
3. Start RabbitMQ on node01 and node02 and create a cluster from them, as seen in
the previous recipe.
4. If it has already been used, reset RabbitMQ on all the other nodes and halt it as
follows:
rabbitmqctl stop_app
rabbitmqctl reset
rabbitmqctl start_app
5. Set the content of the RabbitMQ configuration file, rabbitmq.config, on all the
other nodes (the final dot is the part of the configuration file):
[{rabbit,
[{cluster_nodes, {['rabbit@node01', 'rabbit@node02'],
ram}}]}].
6. Restart RabbitMQ on all the nodes as follows:
service rabbitmq-server start](https://image.slidesharecdn.com/rabbitmqcookbook-240831160301-271d2aca/85/RabbitMQ-Cookbook-Introduction-for-beginners-150-320.jpg)
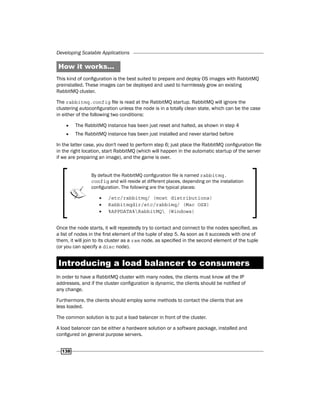
![Developing Scalable Applications
142
Creating clients of the cluster
When you create a simple cluster, the clients may need to specify more than one broker
address when connecting. In this recipe, we are going to see how to use the multiple address
connections with the RabbitMQ Java client.
Note that in case you have a load balancer in front of the cluster, as shown in the previous
recipe, you don't need to use multiple address connections. The load balancer performs this
work for you.
Getting ready
You need Java 1.6 or higher and Apache Maven.
How to do it…
Firstly, you need a simple cluster as seen in the Creating a simple cluster recipe.
Then you can connect your client using the following code:
Address[] addrArr = new Address[]{ new
Address("node01",portnode1), new Address("node02", portnode2)};
connection = factory.newConnection(addrArr);
How it works…
With the RabbitMQ libraries, you can pass more than one host/IP to the connection factory.
This feature can be used for small and big scenarios. For example, if you have two nodes and
you want to avoid using a DNS or load balancer, you can pass all the broker addresses directly
from the client. The client will try to connect to the first address. If the first address is down,
the client will try with the next one without raising exceptions.
The same schema can be applied with a complex architecture. For example, suppose you
have the following two hosts:
f
f myrmqcluster_production.internal.com
f
f myrmqcluster_maintenance.internal.com
The clients will always connect to the production system, but if the production system is in
maintenance, the clients will connect to the second address.](https://image.slidesharecdn.com/rabbitmqcookbook-240831160301-271d2aca/85/RabbitMQ-Cookbook-Introduction-for-beginners-155-320.jpg)


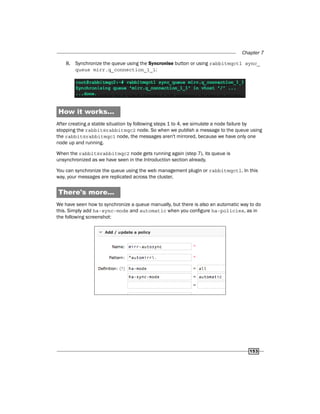
![Developing High-availability Applications
152
How to do it…
In order to see the behavior of unsynchronized queues, we will simulate a node failure
situation manually using the following steps:
1. Configure the mirroring for queues prefixed by mirr., as seen in the Mirroring queues
recipe (we call the rabbit@rabbitmqc1 and rabbit@rabbitmqc2 nodes).
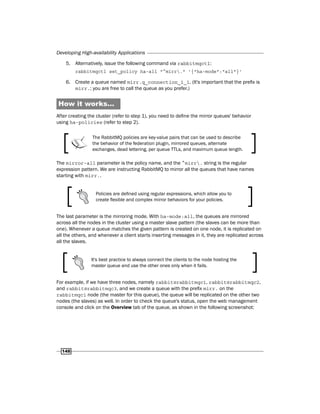
2. Create a queue named mirr.q_connection_1_1.
3. Check the queue's status from the web console; you should have the
following screenshot:
4. You can also check the queue using rabbitmqctl list_queues name policy
slave_pids. The result should be as follows:
mirr.q_connection_1_1 ha-all all
<rabbit@rabbitmqc1.2.2844.1>
[<rabbit@rabbitmqc2.2.3363.1>]
running
5. Shut down the rabbit@rabbitmqc2 node using rabbitmqctl stop_app
(actually it doesn't matter which node).
6. Publish non-persistent messages to the queue using the rabbit@rabbitmqc1 node.
7. Restart the application on the rabbit@rabbitmqc2 node using rabbitmqctl
start_app. Then, check the queue as shown in the following screenshot:](https://image.slidesharecdn.com/rabbitmqcookbook-240831160301-271d2aca/85/RabbitMQ-Cookbook-Introduction-for-beginners-165-320.jpg)

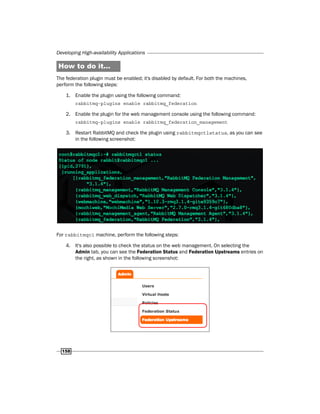
![Chapter 7
161
Getting ready
You need two RabbitMQ instances; name them rabbitmq@rabbitmqc1 and rabbitmq@
rabbitmqShovel.
How to do it…
You need to install the shovel plugin in one of the brokers (rabbitmq@rabbitmqShovel) by
performing the following steps:
1. Enable the plugin using rabbitmq-plugins enable rabbitmq_shovel.
2. Enable the plugin for web management using rabbitmq-plugins enable
rabbitmq_shovel_management.
3. Edit, or if it doesn't exist, create the rabbitmq.config file and add the shovel
configuration as follows:
[{rabbitmq_shovel,
[{shovels,
[{my_books_shovel,
[
{sources,
[{broker, "amqp://yourrabbitmqip"}]},
{destinations, [ {broker, "amqp://"}]}
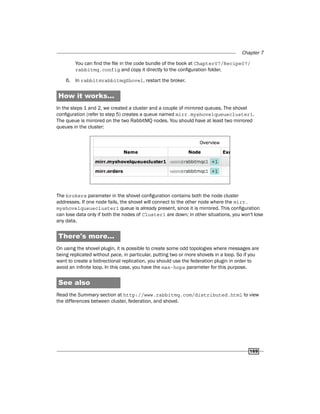
, {queue, <<"myBooksQueueCopy">>}](https://image.slidesharecdn.com/rabbitmqcookbook-240831160301-271d2aca/85/RabbitMQ-Cookbook-Introduction-for-beginners-174-320.jpg)
![Developing High-availability Applications
162
, {prefetch_count, 10}
, {reconnect_delay, 5}
]}
]}
]}
].
You can use the file from the book example's sources located at Chapter07/
Recipe05/simple_shovel_rabbitmq.config.
4. Restart broker.
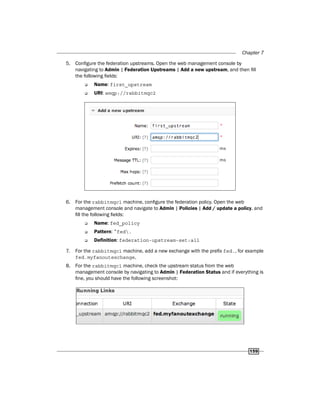
5. Create the queues as shown in the preceding diagram.
6. Check the shovel from web management.
How it works…
In this example, the plugin consumes messages from the myBooksQueueCopy queue located
at rabbitmq@rabbitmqc1 and publishes them to the myBooksQueueCopy queue located
at rabbitmq@rabbitmqShovel. The two brokers can be geographically separated since the
shovel plugin is actually an embedded RabbitMQ client consuming the messages from one
peer and republishing them to the other one.
The shovel starts at the RabbitMQ startup and in this example, it will start polling the source
queue contents, continuing to poll even if the queue itself is not defined.
The source and destination parameters are mandatory.
The plugin uses the localhost as the broker IP if it is not specified with
a URI (amqp://).
We need to create a copy of the queue because the messages are consumed by the
plugin. So the myBooksQueue queue is consumed by the application's consumer, and
myBooksQueueCopy is consumed by the shovel.
There's more…
The shovel is a low-level client and usually doesn't have an impact on the system's
performance. It has other parameters that you can see at http://www.rabbitmq.com/
shovel.html.](https://image.slidesharecdn.com/rabbitmqcookbook-240831160301-271d2aca/85/RabbitMQ-Cookbook-Introduction-for-beginners-175-320.jpg)
![Developing High-availability Applications
164
Getting ready
You need three brokers; we will name them rabbitmq@rabbitmqc1, rabbitmq@
rabbitmqShovelLondon, and rabbitmq@rabbitmqShovelRome.
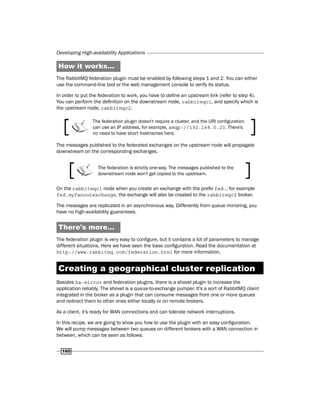
How to do it…
In this example the rabbitmq@rabbitmqc1 broker is the node that the shovels will connect
to and the plugin is not necessary, but we need to enable it for the others:
1. Enable the shovel plugin on the rabbitmq@rabbitmqShovelLondon and
rabbitmq@rabbitmqShovelRome nodes as seen in the Creating a geographical
cluster replication recipe.
2. Create one shovel script for the rabbitmq@rabbitmqShovelLondon node:
{sources, [ {broker, "amqp://rabbitmqc1IP"},
{declarations, [ 'queue.declare'
{routing_key, <<"london">>}
....
, {destinations, [ {broker, "amqp://"}]}
, {prefetch_count, 10}
,{publish_fields, [ {exchange, <<"my_exchange">>}, {routing_key,
<<"from_london_order">>} ]}
...
You can find the full configuration at Chapter07/Recipe06/london_shovel_
rabbitmq.config.
3. Create one shovel script for the rabbitmq@rabbitmqShovelRome node:
{sources, [ {broker, "amqp://rabbitmqc1IP"},
{declarations, [ 'queue.declare'
...
{routing_key, <<"rome">>}
...
, {destinations, [ {broker, "amqp://"}]}
, {prefetch_count, 10}
,{publish_fields, [ {exchange, <<"my_exchange">>}, {routing_key,
<<"from_rome_order">>} ]}
...
You can find the full configuration at Chapter07/Recipe06/rome_shovel_
rabbitmq.config.
4. Restart the brokers.
5. Publish two messages to myBooksExchange, one using the london routing key and
the other using the rome routing key.](https://image.slidesharecdn.com/rabbitmqcookbook-240831160301-271d2aca/85/RabbitMQ-Cookbook-Introduction-for-beginners-177-320.jpg)
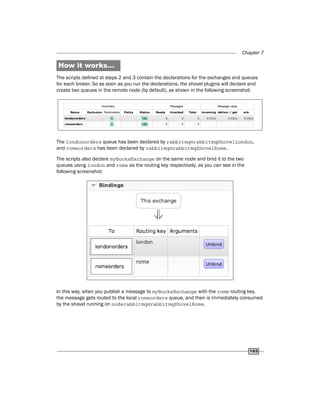

![Chapter 7
171
How to do it…
This example is composed of two Java programs, ProducerMain.java and
ConsumerMain.java, which you can find in the code bundle of the book under the path
Chapter09/Recipe08 using the ReliableProducer.java and ReliableConsumer.
java files respectively, the core classes of the example. The rest of the sources of the project
are mostly shared with the full view of the main components used in the example summarized
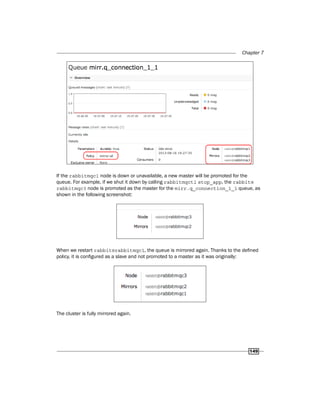
in the UML class diagram, as shown in the following screenshot:
The preceding screenshot shows the steps needed to develop such reliable clients.
Let's start with the common steps for both producers and consumers:
1. Write a general method that will keep trying to open a connection until it succeeds
(open the ReliableClient.java file):
protected void waitForConnection() throws
InterruptedException {
while (true) {
ConnectionFactory factory = new ConnectionFactory();
ArrayList<Address> addresses = new
ArrayList<Address>();
for (int i = 0; i<Constants.hosts.length; ++i) {
addresses.add(new Address(Constants.hosts[i],
Constants.port));
}
// randomize the order used to try the servers:
// distribute their usage](https://image.slidesharecdn.com/rabbitmqcookbook-240831160301-271d2aca/85/RabbitMQ-Cookbook-Introduction-for-beginners-184-320.jpg)
![Developing High-availability Applications
172
Collections.shuffle(addresses);
Address[] addrArr=new Address[Constants.hosts.length];
addresses.toArray(addrArr);
try {
connection = factory.newConnection(addrArr);
channel = connection.createChannel();
channel.exchangeDeclare(Constants.exchange, "direct",
false);
channel.queueDeclare(Constants.queue,
Constants.durableQueue, Constants.exclusiveQueue,
Constants.autodeleteQueue, null);
channel.queueBind(Constants.queue,
Constants.exchange,Constants.routingKey);
return;
} catch (Exception e) {
e.printStackTrace();
disconnect();
Thread.sleep(1000);
}
}
}
2. Write a disconnect method (open the ReliableClient.java file):
protected void disconnect() {
try {
if (channel != null && channel.isOpen()) {
channel.close();
channel = null;
}
if (connection != null && connection.isOpen()) {
connection.close();
connection = null;
}
} catch (IOException e) {
// just ignore
e.printStackTrace();
}
}
Then let's see how to put a reliable producer to work (open the
ReliableProducer.java file):](https://image.slidesharecdn.com/rabbitmqcookbook-240831160301-271d2aca/85/RabbitMQ-Cookbook-Introduction-for-beginners-185-320.jpg)
![Developing High-availability Applications
176
public synchronized long add(String data) {
++lastID;
dataQueue.add(new DataItem(data,lastID));
returnlastID;
}
...
}
Let's now see the steps needed in the ReliableConsumer class:
8. In this case too we override the connection method named ReliableClient.
WaitForConnection():
public class ReliableConsumer extends ReliableClient {
...
@Override
protected void waitForConnection() throws
InterruptedException {
super.waitForConnection();
try {
channel.basicConsume(Constants.queue, false, new
Consumer() {
@Override
public void handleCancel(String consumerTag) throws
IOException {
System.out.println("got handleCancel signal");
}
@Override
public void handleCancelOk(String consumerTag) {
System.out.println("got handleCancelOk signal");
}
@Override
public void handleConsumeOk(String consumerTag) {
System.out.println("got handleConsumeOK signal");
}
@Override
public void handleDelivery(String consumerTag,
Envelope envelope,BasicProperties properties,
byte[] body) throws IOException {](https://image.slidesharecdn.com/rabbitmqcookbook-240831160301-271d2aca/85/RabbitMQ-Cookbook-Introduction-for-beginners-189-320.jpg)
![Chapter 8
183
5. Create as many Runnable tasks as the number of threads. The producer is as follows:
for (int i = 0; i<threadNumber; i++) {
exService.execute(new Runnable() {
@Override
public void run() {
try {
publishMessages();
6. Create as many Runnable tasks as the number of threads. The consumer is as
follows:
for (int i = 0; i<threadNumber; i++) {
exService.execute(new Runnable() {
@Override
public void run() {
final Channel internalChannel;
try {
internalChannel = connection.createChannel();
@Override
public void handleDelivery(String consumerTag,
Envelope envelope, BasicProperties properties,
byte[] body) throws IOException {..}
How it works…
The ReliableClient class creates a queue called perf_queue_08/01, to which are
bound one producer and one consumer. Both the producer and the consumer open one
connection and create one channel for each thread. The channel can be shared between
more threads, but it's better to create one channel per thread to avoid synchronization times
and in some cases lock problems.
The channel cannot always be thread safe. It depends on the
implementation, for example, using the .NET client API you should lock
IModel before using its methods. Read the IModel should not be
shared between threads section at https://www.rabbitmq.com/
releases/rabbitmq-dotnet-client/v3.1.5/rabbitmq-
dotnet-client-3.1.5-user-guide.pdf.](https://image.slidesharecdn.com/rabbitmqcookbook-240831160301-271d2aca/85/RabbitMQ-Cookbook-Introduction-for-beginners-196-320.jpg)
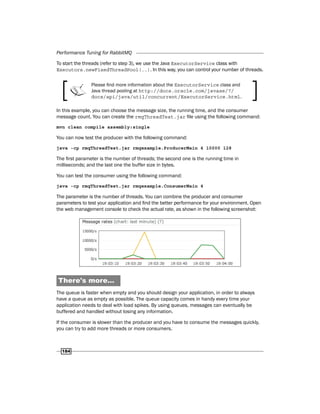
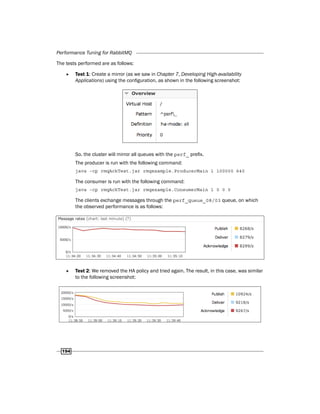
![Performance Tuning for RabbitMQ
186
How to do it…
In order to obtain the maximum performance from RabbitMQ, you can perform the
following steps:
1. Configure the watermark using:
rabbitmqctl set_vm_memory_high_watermark 0.6
Or directly in the rabbitmq.config file using:
[{rabbit, [{vm_memory_high_watermark, 0.6}]}].
2. Change the Linux ulimit parameter modifying the /etc/default/rabbitmq-
server file. Then, you can improve RabbitMQ itself by using HiPE.
3. Install the latest version of Erlang from http://www.erlang.org/download.
html.
4. Install HiPE in your system.
5. Check that HiPE is correctly activated; if not, you need to install Erlang from the
sources and activate it.
6. Activate Erlang HiPE in the RabbitMQ configuration file. Create the rabbitmq.
config file with this option or add it if the file already exists:
[
{rabbit, [{hipe_compile, true}]}
].
7. Restart RabbitMQ.
8. Check that in the RabbitMQ log file there is not a warning showing that HiPE has not
been activated:
=WARNING REPORT==== 6-Oct-2013::00:38:23 ===
Not HiPE compiling: HiPE not found in this Erlang installation.
How it works…
The watermark is the maximum memory used by RabbitMQ, by default it's 0.4 which means
40 percent of the installed physical memory. When the memory reaches the watermark the
broker stops accepting new connections and messages. The watermark value is approximate;
in some cases it could be overcome by the default 40 percent. Anyway, when the server has
lots of RAM, you can increase the value, for example, to 60 percent, just to tolerate the spikes.
With rabbitmqctl the change is temporary; when you modify the rabbitmq.config file,
the option is set permanently.](https://image.slidesharecdn.com/rabbitmqcookbook-240831160301-271d2aca/85/RabbitMQ-Cookbook-Introduction-for-beginners-199-320.jpg)

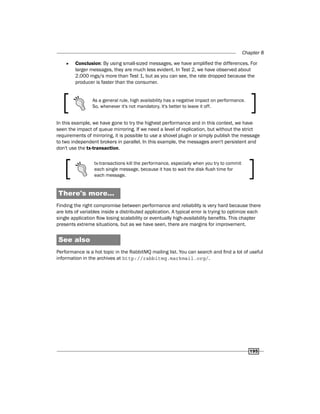
![Performance Tuning for RabbitMQ
188
After HiPE has been activated, as shown with details in the following screenshot, the same
test behaves considerably better:
Before you activate HiPE in the RabbitMQ configuration file, you can check if your local Erlang
installation has it by just invoking the erl command as follows:
# erl
Erlang R15B03 (erts-5.9.3.1) [source] [64-bit] [smp:2:2] [async-
threads:0] [hipe] [kernel-poll:false]
EshellV5.9.3.1 (abort with ^G)
1>
In case HiPE is present, you will see [hipe] among the options shown at startup.
In Debian wheeze systems, once the latest Erlang version from the Erlang-site
is downloaded, you can add the HiPE module by installing:
apt-get install erlang-base-hipe
The other distributions have similar packages available as well.
Otherwise, you need to install it from an external package or from the Erlang source code
by downloading it from http://www.erlang.org/download.html and installing it;
remember to specify the --enable-hipe option at the configure step.](https://image.slidesharecdn.com/rabbitmqcookbook-240831160301-271d2aca/85/RabbitMQ-Cookbook-Introduction-for-beginners-201-320.jpg)
![Performance Tuning for RabbitMQ
190
How to do it…
We skip the producer code because it's the same one shown in the Multithreading and
queues recipe. We still use the ReliableClient class as the base class. Let's see the
consumer by performing the following steps:
1. Create a maven project and add the RabbitMQ client dependency.
2. Create a consumer main class, which reads from args[] to manage the consumer
with the following four parameters:
threadNumber = Integer.valueOf(args[0]);
prefetchcount = Integer.valueOf(args[1]);
autoAck = (Integer.valueOf(args[2]) != 0);
print_thread_consumer
= (Integer.valueOf(args[3]) != 0);
3. Create a consumer that extends the ReliableClient class, and then set the
prefetch and noAck parameters:
internalChannel.basicQos(prefetch_count);
internalChannel.basicConsume(Constants.queue, autoAck..
How it works…
The prefetch-size is ignored if the noAck option is set, so we divide the recipe in the following
two sections:
f
f Prefetch
f
f noAck
The aim is to understand how to manage the client-side parameters to improve the
performance and the bandwidth.
Prefetch
To set the prefetch, use basicQos(prefetch_count) (refer to step 3).
We have already seen the channel QoS parameter in Chapter 1, Working with AMQP,
Distributing Messages to Many Consumers, where the messages are acknowledged one by
one, in order to correctly load balance the messages.
The prefetch count is the maximum number of unacknowledged messages: a large value
will let the client prefetch many messages in advance without waiting for the acks of the
messages being processed.](https://image.slidesharecdn.com/rabbitmqcookbook-240831160301-271d2aca/85/RabbitMQ-Cookbook-Introduction-for-beginners-203-320.jpg)

![Chapter 9
199
5. From a second terminal, type the following nc command:
nc localhost 61613
CONNECT
^@
SUBSCRIBE
destination:/queue/test
^@
How it works…
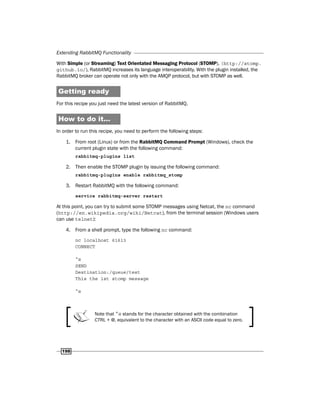
By listing the available plugins (step 1), we get an output as shown in the following screenshot:
These are all the built-in plugins available. The plugins marked with empty brackets are not
installed. The ones marked with [E] are plugins that are explicitly installed. The ones marked
with [e] are implicitly installed, that is, plugins are automatically installed because of their
dependencies on other plugins.](https://image.slidesharecdn.com/rabbitmqcookbook-240831160301-271d2aca/85/RabbitMQ-Cookbook-Introduction-for-beginners-212-320.jpg)
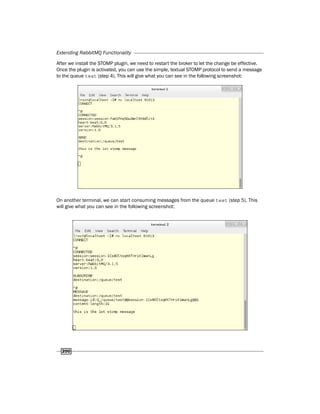
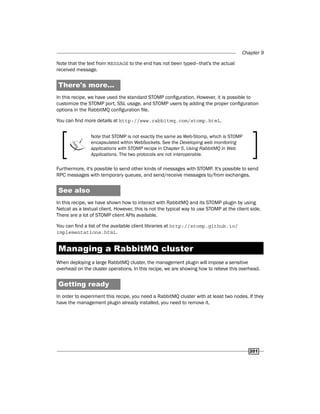
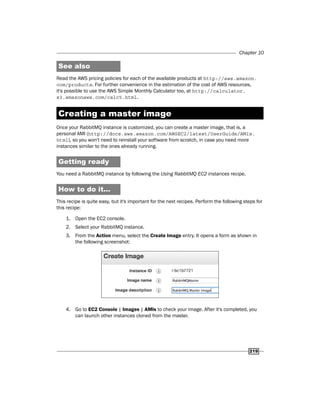
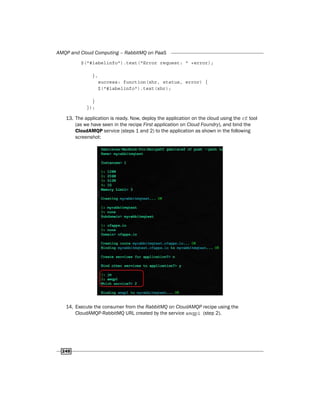
![Extending RabbitMQ Functionality
202
How to do it…
1. Install the management plugin on one of the nodes using the following command:
rabbitmq-plugins enable rabbitmq_management
2. Install the management agent plugin on all the other nodes using the following
command:
rabbitmq-plugins enable rabbitmq_management_agent
How it works…
After performing these steps, you will be able to monitor the entire cluster from the first node
only. The other nodes will have the agents updating the status of the console of the first node,
but you won't be able to access port 15672 on them.
Typically, you will install the full management plugin on a couple of nodes, such as frontend or
management nodes, and the management agent plugin on the rest of them.
Monitoring Shovel status
We have already seen in Chapter 7, Developing High-availability Applications, how to use the
Shovel plugin. In this recipe, we are going to see how to monitor its correct behavior using an
appropriate plugin. This is an extension of the rabbitmq_management plugin.
Getting ready
To test this recipe, we need two RabbitMQ brokers running. We will refer to them in this recipe
as rabbit@node01 and rabbit@node02.
How to do it…
We assume that the two brokers are already running on their respective nodes. We will start
configuring the broker on node01 with the configuration file that you can eventually copy and
adapt from the one available in the book repository in Chapter07/Recipe05:
1. In the RabbitMQ configuration file, generally /etc/rabbit/rabbitmq.config,
insert the Shovel configuration:
[{rabbitmq_shovel,
[ {shovels, [ {my_books_shovel,
[
{sources, [ {broker, "amqp://node02"}]}
, {destinations, [ {broker, "amqp://"}]}](https://image.slidesharecdn.com/rabbitmqcookbook-240831160301-271d2aca/85/RabbitMQ-Cookbook-Introduction-for-beginners-215-320.jpg)
![Chapter 9
203
, {queue, <<"myBooksQueueCopy">>}
, {prefetch_count, 10}
, {reconnect_delay, 5}
]}]}].
2. Activate the needed plugins by typing the commands:
rabbitmq-plugins enable rabbitmq_management
rabbitmq-plugins enable rabbitmq_shovel
rabbitmq-plugins enable rabbitmq_shovel_management
3. Restart the broker for the changes to take effect using the following command:
service rabbitmq-server restart
4. Access the RabbitMQ management interface at the following URL:
http://node01:15672/
5. From the management interface, create the myBooksQueueCopy queue on both
node01 and node02.
6. In the Management interface, navigate to Admin | Shovel Status.
How it works…
When we activate the Shovel plugin, it is possible to monitor its correct behavior by using
the rabbitmq_shovel_management plugin. Once we activate the plugin, since the
redirected queue does not exist, you will be able to see an error condition. This is shown in the
following screenshot:](https://image.slidesharecdn.com/rabbitmqcookbook-240831160301-271d2aca/85/RabbitMQ-Cookbook-Introduction-for-beginners-216-320.jpg)

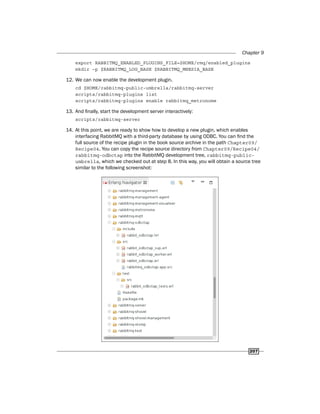
![Extending RabbitMQ Functionality
206
6. Complete the setup of the configuration of the ODBC driver to access this database.
To do this, insert the following lines into the file /etc/odbc.ini:
[rmqDSN]
Driver = PostgreSQL
Description = PostgreSQL data source for RabbitMQ
Servername = localhost
Port = 5432
Protocol = 8.4
Database = rmqdb
7. We can now test the ODBC connection with the isql command, but we can test it
directly with Erlang too. This can be done by invoking erl and issuing the following
commands:
odbc:start()
odbc:connect("DSN=rmqDSN;UID=rmq_plugin_user;PWD=rmq_plugin
_password", [])
At this point, we have prepared what's needed to see the plugin that we are
developing in action. Now, we will see how to enable the metronome plugin. This is
presented in the official RabbitMQ documentation (http://www.rabbitmq.com/
plugin-development.html:
8. Checkout the RabbitMQ development source's tree using the following command:
cd $HOME
hg clone http://hg.rabbitmq.com/rabbitmq-public-umbrella
cd rabbitmq-public-umbrella
make co
9. Build the metronome plugin using the following command:
cd rabbitmq-metronome
make
10. Install the plugin with its requisites in the development broker.
cd ../rabbitmq-server
mkdir plugins
cd plugins
ln –s ../../rabbitmq-metronome
ln–s../../rabbitmq-erlang-client
11. In order to avoid the override of the eventual production installation, even though
we are not using the root user, we need to stop the eventual production server,
set some environment variables, and create the corresponding directories to let
RabbitMQ start as standard user:
export RABBITMQ_LOG_BASE=$HOME/rmq/log
export RABBITMQ_MNESIA_BASE=$HOME/rmq/mnesia](https://image.slidesharecdn.com/rabbitmqcookbook-240831160301-271d2aca/85/RabbitMQ-Cookbook-Introduction-for-beginners-219-320.jpg)
![Extending RabbitMQ Functionality
208
15. To start developing a new plugin, copy and rename these files from an existing plugin as
rabbitmq-metronome or rabbitmq-shovel. The makefile will be left unmodified.
16. Adapt the package.mk file to reflect the needed dependencies and the test modules.
17. Edit rabbitmq_odbctap.app.src. This file contains the resources used by the
Erlang project, both general and custom that in our example must be set to contain
the following configuration:
{application, rabbitmq_odbctap,
[{description, "Embedded Rabbit ODBC tap"},
{vsn, "0.0.0"},
{modules, []},
{registered, []},
{mod, {rabbit_odbctap, []}},
{env, [{dsn,"DSN"},
{user,"guest"},
{password, "guest"},
{queue, "tapped_queue"}
]},
{applications, [kernel, stdlib, rabbit, amqp_client]}]}.
18. Customize rabbit_odbctap.erl, the entry point for the module, to let it start,
configure the plugin itself, and stop.
19. Customize rabbit_odbctap_sup.erl, the source for the Erlang supervisor node,
by defining the callbacks for the Erlang supervisor behavior.
20. Implement the plugin logics in rabbit_odbctap_worker.erl. This is the entry
point of the actual module, which in our specific case will connect to the RabbitMQ
host broker internally, bind to a queue, and consume the contained messages to a
specific database table via ODBC.
21. Data definitions (that is, Erlang records) common to many modules can be placed
in the include directory. For example, in rabbit_odbctap.hrl, you can find the
definition of the Erlang record odbctap_config, which is used by both rabbit_
odbctap.erl and rabbit_odbctap_worker.erl.
22. Prepare one or more test modules. In our example, you can find just a skeleton in
rabbit_odbctap_tests.erl.
23. Compile the plugin and perform the automated tests.
cd $HOME/rabbitmq-public-umbrella/rabbimq-odbctap
make
make test
24. Install the plugin in the development server.
cd ../rabbitmq-server/plugins
ln –s ../../rabbitmq-odbctap .](https://image.slidesharecdn.com/rabbitmqcookbook-240831160301-271d2aca/85/RabbitMQ-Cookbook-Introduction-for-beginners-221-320.jpg)
![Extending RabbitMQ Functionality
210
password = Password,
queue = Queue},
Config.
The calls to application:get_env/1 let the module automatically access the definitions
that can be set as follows:
f
f In the Erlang resource file, rabbitmq_odbctap.app.src, the env key is set at
compile time:
...
{env, [{dsn,"DSN"},
{user,"guest"},
{password, "guest"},
{queue, "tapped_queue"}
]},
...
f
f In the rabbitmq.config file, read at runtime, which follows the typical RabbitMQ
(that is, Erlang) format , specifying a rabbitmq_odbctap key as in the following code:
[{rabbitmq_odbctap,
[{dsn, "rmqDSN"},
{user,"rmq_plugin_user"},
{password, "rmq_plugin_password"},
{queue, "tapped_queue"}]}].
You can find the complete files in both the forms in the book archive directory.
The rabbit_odbctap_worker.erl worker module implements the gen_server behavior.
You can find more information at http://www.erlang.org/doc/design_principles/
gen_server_concepts.html.
In our module, once the module is started, init/2 gets called. Then it connects to the
defined ODBC connector by using the ODBC client Erlang API http://www.erlang.org/
doc/apps/odbc/ and fires up the RabbitMQ consumer. It's important to note that in this
case the embedded RabbitMQ client connects to the local broker, embedded within the same
Erlang virtual machine, with the call:
{ok, Connection} = amqp_connection:start(#amqp_params_direct{})
In this way, the plugin uses the internal Erlang connections and protocols with a much
more efficient messaging solution, since the marshalling from/to the AMQP wire protocol
is totally avoided.
To log some information to the RabbitMQ log file, you can use rabbit_
log:info/2 and similar calls, as shown in the init/2 definition.](https://image.slidesharecdn.com/rabbitmqcookbook-240831160301-271d2aca/85/RabbitMQ-Cookbook-Introduction-for-beginners-223-320.jpg)


![RabbitMQ on AWS
216
8. Follow the wizard, taking care to use the same region, otherwise you will find neither
your key pair nor your security group (steps 3 and 4).
9. Connect via SSH to the instance using the following command:
ssh -i rabbitmqkey.pemubuntu@[public DNS instance]
If you are using Windows, please follow the guide at http://docs.aws.amazon.
com/AWSEC2/latest/UserGuide/putty.html.
Once connected, you can install RabbitMQ as always.
10. Add the RabbitMQ Debian repository to the apt-get configuration file by appending to
the /etc/apt/sources.list file the following code line:
deb http://www.rabbitmq.com/debian/ testing main
11. Install RabbitMQ with the following commands:
wget http://www.rabbitmq.com/rabbitmq-signing-key-public.asc
sudo apt-key add rabbitmq-signing-key-public.asc
sudo apt-get -qy update
sudo apt-get -qy install rabbitmq-server
12. Stop RabbitMQ; now fix the hostname issue by executing the following command:
sudo -s
echo"rabbit1"> /etc/hostname
echo"127.0.0.1 rabbit1">> /etc/hosts
hostname -F /etc/hostname
13. Install the RabbitMQ web management console.
14. Restart RabbitMQ.
How it works…
The AWS infrastructure contains different regions, and when you use AWS EC2 you must
choose one, where your instances will be run. In this recipe we use the Northern Virginia
region (step 2), and then create a key pair that you will use for SSH connections.
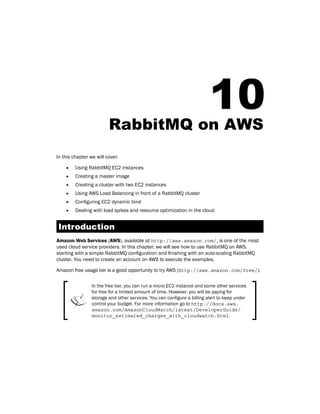
It is possible to import an existing key if needed. See http://docs.
aws.amazon.com/AWSEC2/latest/UserGuide/ec2-key-pairs.
html#how-to-generate-your-own-key-and-import-it-to-aws.
You need to create a security group to open the TCP ports accessible from the Internet; this is
a generic firewall configuration that we will use for our instance. We open the SSH port (22),
the RabbitMQ port (5672), and the RabbitMQ web management port (15672).](https://image.slidesharecdn.com/rabbitmqcookbook-240831160301-271d2aca/85/RabbitMQ-Cookbook-Introduction-for-beginners-229-320.jpg)
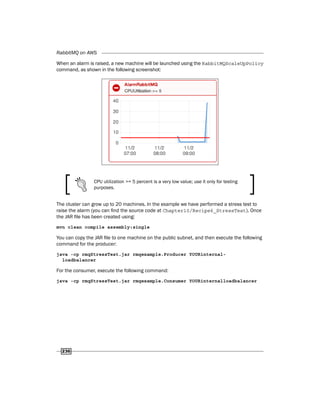
![Chapter 10
217
Well, the AWS environment is ready and we can install it on our machine: at http://uec-
images.ubuntu.com/releases/12.04.3/release/ you can find some Ubuntu
cloud AMIs.
Choose the Northern Virginia AMI region to use the key pairs and
security group previously created (steps 3 and 4).
Once you click on the Launch button (step 6) and execute the AWS instance creation wizard,
you just need to select the security group configured in step 5.
The Ubuntu instance will start when the wizard finishes. Check the instance status on the AWS
EC2 console:
In order to use SSH connections, you need the public hostname; you can take it on the
instance details, specified as public DNS. Alternatively, you can directly click on the Connect
button as shown in the following screenshot:
We can use the SSH connection when the instance is ready by executing the following
command:
ssh -i rabbitmqkey.pem ubuntu@[public DNS instance]
The default username is ubuntu for the images created from the AMI
used in the recipe. Usually the default username (that can be root,
admin, ec2-user and more) is specified in the AMI description.](https://image.slidesharecdn.com/rabbitmqcookbook-240831160301-271d2aca/85/RabbitMQ-Cookbook-Introduction-for-beginners-230-320.jpg)

![Chapter 10
223
Now you can launch two RabbitMQ instances from your image (step 5), and choose the VPC
private network in this wizard step:
After completing the step 6 you should have a situation as shown in the following screenshot:
In our case the internal machines have the following IPs:
f
f 10.0.1.132
f
f 10.0.1.174
You can access the two private EC2 instances only from the EC2 NAT instance machine, using:
[ec2-user@natmachine key]$ sudo ssh -i rabbitmqkey.pem
ubuntu@10.0.1.132 (or 10.0.1.174).
Inside the VPC, it's possible to use VPC's private DNS and create the cluster you have to
execute by using the following code:
rabbitmqctl join_cluster rabbit@ip-10-0-1-132
Clustering node 'rabbit@ip-10-0-1-174' with 'rabbit@ip-10-0-1-132'
...
...done.
Ok, now your private cluster is ready, and you can use it only from the
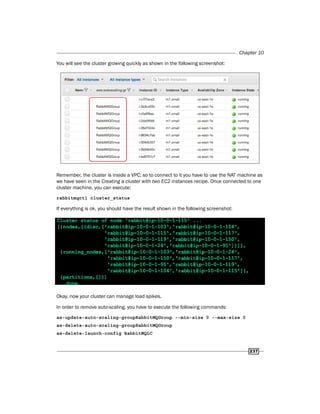
public subnet.](https://image.slidesharecdn.com/rabbitmqcookbook-240831160301-271d2aca/85/RabbitMQ-Cookbook-Introduction-for-beginners-236-320.jpg)


![RabbitMQ on AWS
230
There's more…
Using a single master node to join new nodes could be a single point of failure; if the master is
down, no new machines can join the cluster.
An internal load balancer can avoid this problem. We can query the balancer to retrieve the
available nodes, and use one of them to join the new ones.
For example, with a Python (version 2.7.x) script, we can call the /nodes web API to retrieve
the available nodes, as follows:
url = 'http://internalloadbalancer:15672/api/nodes'
print prefix + 'Get json info from ..' + url
request = urllib2.Request(url)
base64_string = base64.encodestring('%s:%s' % ('guest',
'guest')).replace('n', '')
request.add_header("Authorization", "Basic %s" % base64_string)
data = json.load(urllib2.urlopen(request))
Then, check the first running node and join it as follows:
for r in data:
if r.get('running'):
print(prefix + 'found running node to bind..')
fromsubprocess import call
call(["rabbitmqctl", "stop_app"])
call(["rabbitmqctl", "reset"])
call(["rabbitmqctl", "join_cluster",r.get('name')])
call(["rabbitmqctl", "start_app"])
break
pass
You can replace the Bash script with this Python script. For a load balancer, you can always
use the AWS load balancer by using the internal flag, as shown in the following screenshot:
You can find the Python script at Chapter10/Recipe05/rabbitmq_startup.py.](https://image.slidesharecdn.com/rabbitmqcookbook-240831160301-271d2aca/85/RabbitMQ-Cookbook-Introduction-for-beginners-243-320.jpg)
![RabbitMQ on AWS
232
How to do it…
As in the previous recipes, we use Ubuntu 12.04.3 LTS Cloud. Perform the following steps to
create an auto-scaling RabbitMQ cluster:
1. Create a VPC as we did in the Creating a cluster with two EC2 instances recipe,
without creating the cluster.
2. Create an internal AWS load balancer as we have seen in the Configuring EC2
dynamic bind recipe.
3. Create a Python script to join the new machine to the cluster using the following code:
fromsubprocess import call
call(["rabbitmqctl", "stop_app"])
call(["rabbitmqctl", "reset"])
try:
url = 'http://yourinternallb:15672/api/nodes'
request = urllib2.Request(url)
4. You can find the full source code from the book code repository in the book repository
archive at Chapter10/Recipe6.
5. Store the script on AWS S3. Open the S3 console and upload the script file, for
example, https://s3.amazonaws.com/rabbitmq_startup/rabbitmq_
startup.py as shown in the following screenshot:
6. Create a new master machine and insert the following commands in the boot script /
etc/rc.local:
wget
https://s3.amazonaws.com/rabbitmq_startup/rabbitmq_startup.py
-O /tmp/rabbitmq_startup.py
sudo python /tmp/rabbitmq_startup.py
Then, create a new master image.
7. Choose a machine to manage the auto-scaling; you can use your local PC or an AMI.
We suggest you use an AMI machine, for example, the NAT machine.](https://image.slidesharecdn.com/rabbitmqcookbook-240831160301-271d2aca/85/RabbitMQ-Cookbook-Introduction-for-beginners-245-320.jpg)


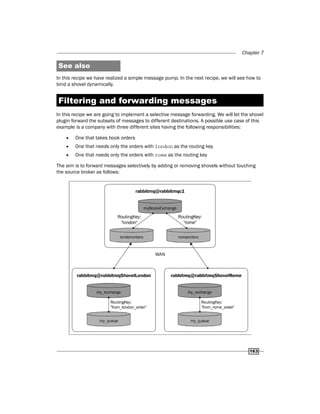
The RabbitMQ Cookbook provides over 70 practical recipes for developing messaging applications using RabbitMQ, along with various real-life examples. It covers key topics like AMQP, managing RabbitMQ, integrating with different technologies, and creating scalable and high-availability applications. The book is intended for software developers with some experience in distributed applications and includes recipes for various programming languages and cloud platforms.


![[@NaukriEngineering] Messaging Queues](https://cdn.slidesharecdn.com/ss_thumbnails/queueprocessing-161111064335-thumbnail.jpg?width=640&height=640&fit=bounds)


![谷歌留痕技术教程[ 𝙩𝙤𝙥 𝟮𝟯𝟯. 𝙘 𝙤𝙢 ]](https://cdn.slidesharecdn.com/ss_thumbnails/top233-260130173900-2eb784f9-thumbnail.jpg?width=640&height=640&fit=bounds)


