Creative Connections 
Itasca State Park Program for Kids 


Lianna Koberoski 
Program Manager 
Warren Wilson College 
2015 


36750 Main Park Drive 
Park Rapids, MN 
(218) 699-7251 


Table of Contents   
1 
Creative Connections 
Table of Contents 
 
Topic                                                                                                      Page Number 
Executive Summary…………………………………………………………………………...  3 
Introduction and Statement of Need………………………………………………….  5 
Philosophy………………………………………………………………………………………….  13 
Goals and Objectives………………………………………………………………………….  16 
Schedule…………………………………………………………………………………………….  19 
Pre‐Course Information……………………………………………………………………..  30 
Leadership………………………………………………………………………………………...  47 
Marketing…………………………………………………………………………………………..  54 
Equipment List……………….………………………………………………………………….  58 
Supply List………………………………………………………………………………………….  61 
Budget……………………………………………………………………………………………….  66 
Evaluation………………………………………………………………………………………..  69 
Resources………………………………………………………………………………………….  80 
Lesson Plans……………………………………………………………………………………...  83 


2 


Executive Summary   
3 
Creative Connections 
Executive Summary 
 
Creative Connections is a three week summer program for elementary students in which 
kids will explore the environment of Itasca State Park by studying the park’s history, completing 
arts and crafts projects that utilize leaves, flowers and other natural materials, participating in 
Service Projects to benefit the park, and trying outdoor recreational activities such as hiking, 
camping, canoeing, and fishing.  Through these lessons the kids will become more engaged 
with, and will develop a personal connection to, nature and Itasca State Park.   
 
This program starts with a first session on June 15th and ends on July 3rd, and a second 
session which begins July 13th and ends July 31st.  We meet Monday through Friday starting at 
9:00 am and ending at 3:00 pm.  Creative Connections has a consistent schedule.  We start 
every morning with a warm‐up activity and end every day with a group reflection.  Throughout 
the day we have time for multiple lessons, snacks and lunch.   
 
Creative Connections is based on a child’s need to spend time in nature.  We believe 
that spending time in nature is beneficial to a child’s healthy physical and mental development. 
Creative Connections will strengthen their bond with nature and the environment, which will 
lead to more environmentally conscious adults in the future.  Today’s generation is becoming 
more distant to the land they live on with current technology usage and organized activities. 
Our goal is to connect children back to nature and allow them to explore and become familiar 
with the place they live in, as it is good for their mind, body and spirit, allows them to release 
their creative energy and establishes a sense of responsibility towards the environment.  


4 


Introduction and Statement of Need 
 
   
5 
Creative Connections 
Introduction and Statement of Need 
 
Introduction  
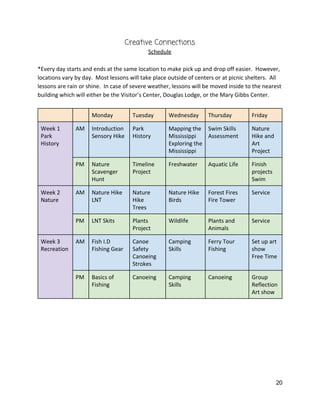
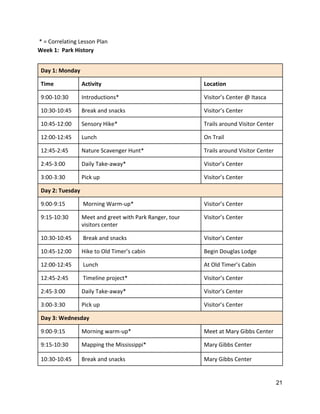
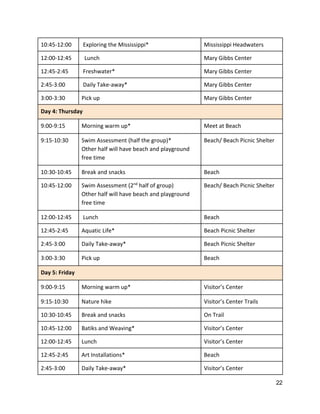
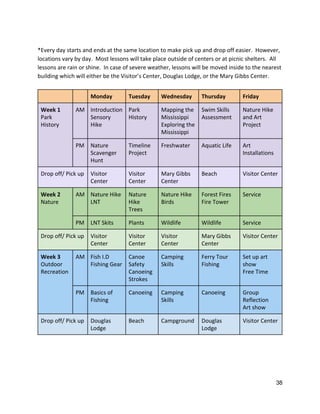
Creative Connections is a summer program for elementary students that will expose 
them to the beneficial elements of nature.  Through Creative Connections, kids will make 
personal connections to nature, increase their creativity and physical and mental fitness, and 
learn to be environmentally responsible.  This will all be achieved by learning about Itasca State 
Park, completing arts and crafts projects with natural materials, and participating in outdoor 
recreational activities.  
As today’s generation typically spends more time indoors than outdoors, Creative 
Connections helps kids to rediscover and explore their natural surroundings.  As Louv (2005) 
said, “Children need nature for the healthy development of their senses, and, therefore, for 
learning and creativity” (p. 54).  Creative Connections aims to expose children directly to nature 
as it allows them to creatively interpret their play into something that may reflect events in 
their lives, and it helps establish more self‐confidence, reduce stress, and settle inner conflict. 
Creative Connections will focus on nature throughout the program and will utilize this 
connection to increase children’s learning, creativity, and respect for nature, as well as their 
mental and physical health.  
 
Who 
Creative Connections is designed for elementary students in grades 3‐5.  Any child of 
this age may participate as space is available; there is a limit of 20 students per session.  We 
aim to accept all children who would benefit from our program.  At this age, children are full of 
curiosity and have high levels of creativity.  They begin to think of places in a positive or 
negative light.  According to Berenson (2005), an art critic, “creativity begins with the natural 
genius of childhood and the ‘spirit of place’” (as cited in Louv, 2005, p. 85).  Children need this 
exposure to nature and opportunity for creativity at a young age as that is when they are most 
receptive.  Utilizing aspects of nature in art, either for inspiration or in the materials themselves 
helps to strengthen cognitive abilities and allows children to look at situations in new ways.  Art 
6 
is beneficial to a child’s learning as it provides new ways that appeal to the senses and 
encourages their learning by engaging all their senses at once (Song, 2010).   
Elementary aged students are at a crucial point in their physical and mental 
development, where they actually need to spend time in nature.  Nature deficit disorder, as 
described by Richard Louv, outlines detrimental effects of the absence of nature in human lives 
as including; “diminished use of the senses, attention difficulties, and higher rates of physical 
and emotional illness” (p. 34).  Children continue to be diagnosed with issues such as 
depression, ADHD, anxiety and obesity, and a general solution for these issues can be more 
time spent in nature.  Creative Connections will encourage activities in nature and may be 
beneficial or preventative to children suffering from or on the verge of these problems.   
 
What 
Creative Connections focuses on using nature to help children discover their inner 
creativity, increase their physical and mental fitness, and learn to respect and care for the 
earth.  Throughout the duration of this program, kids will try many different things and learn 
about a variety of topics.  Campers will try canoeing, fishing, camping and hiking, discover the 
history of Itasca State Park, and learn about the environment around them by completing art 
projects.  Children will be introduced to the concept of environmental stewardship and will 
complete a service project together to benefit the park.  This variety of activities will make their 
experiences in nature exciting and will encourage them to spend more time outdoors 
connecting to nature.   
Creative Connections uses art projects as a form of creativity.  Art has been shown to be 
very beneficial to a child’s learning, and art created in nature or using nature can inspire 
students.  Therefore, these presentations can instill excitement in the students and will actively 
engage their brains in learning (Song, 2010).  Tying in other artist’s work, such as those like 
Andy Goldsworthy and Patrick Dougherty, and looking at large‐scale art installations can inspire 
students in their own projects as well as teach them about nature’s processes (M. Athens, 
personal communication, February 10, 2015).  Creative Connections will use nature to inspire 
7 
the kid’s art projects.  Campers will find their own natural materials to use, as well as complete 
projects that relate to the topic being covered to further comprehension.   
Creative Connections will introduce children to the concept of environmental 
stewardship.  Campers will participate in a lesson covering the Leave No Trace principles, and 
they will set personal goals so that they may help the environment.  The kids will also 
participate in two different service projects to give back to the park and the earth.  Campers 
will spend part of the day planting new trees and plants, and the second part of their day 
picking up trash and cleaning up campsites.  These service projects will reinforce the 
importance of helping the earth and will show campers that their actions matter and that they 
can make a difference.  As discussed by Strife (2012), children these days are aware of the big 
issues harming the earth such as climate change, but they feel as if they cannot do anything to 
help.  Creative Connections will help kids realize that even the smallest of actions matter and 
can help the earth.   
Outdoor recreational activities are a third part of Creative Connections.  Children will be 
introduced to canoeing, fishing, and camping, and will go swimming and hiking.  Through these 
activities campers will become more physically active and learn what their bodies are capable 
of.  According to Louv, there has been a rise in child obesity that correlates with a rise in 
organized sports.  He concluded that children are missing out on unstructured activity in nature, 
which is extremely beneficial as it exercises the mind and body, is less focused on time and 
includes more varied activity.  It is also beneficial to children’s mental health and can reduce 
symptoms of depression and anxiety, which occurs more frequently in children now than in 
other generations.  As children of this generation lead more “sedentary, indoor lifestyles, 
doctors treat more and more children for diabetes, attention disorders, and depression.  They 
see fewer broken bones but more repetitive stress injuries from computers and video games” 
(Cleaver, 2007, p. 21).  Creative Connections will motivate children to find fun in the outdoors 
and leave their screens and technology behind, which will benefit their bodies and minds.   
Creative Connections will help children broaden their general understanding of the 
world and can help them think about their place in it.  Friedrich Froebel, the founder of 
Kindergarten, believed that “through nature children would...learn about themselves and their 
8 
unity with the world” (Strauch‐Nelson, 2012, p. 35).  As children spend more time in nature, 
they will make personal connections to it, realize that they are a part of the world and believe 
that they can make a difference in how the earth is affected by humankind.  Creative 
Connections strives to utilize nature as a learning tool by allowing children to connect to it, play 
in it, and enjoy it by doing art projects, participating in recreational activities and learning about 
the place in which they live and how to care for it.   
 
When and where 
Creative Connections will offer two 3‐week sessions during the months of June and July. 
The students will come to Itasca State Park from 9‐3, Monday through Friday, for all three 
weeks.    The summer months provide an ideal set up, as the program will run during more 
favorable weather conditions that will allow for activities such as canoeing and swimming to be 
enjoyed.  This is also a time when the plants of the park come into leaf, and there is more 
natural activity present in the woods.  The season also provides different options for kids during 
the summer when their parents may be working.  The length of the program allows enough 
time for the children to really become involved and excited about nature, as well as become 
comfortable in the setting and with the group.   
Itasca State Park is a very popular place to visit in the summer as it offers many outdoor 
activities.  There are canoe and kayak rentals which will be vital for our canoeing lessons, as 
well as a swimming beach.  The park is known for the Headwaters of the Mississippi River and 
has a place to cross the start of the river as it begins its journey from Lake Itasca to the Gulf of 
Mexico.  The first stop upon coming into Itasca is the Visitor’s Center, which includes many 
interactive displays covering the history of the park.  This Visitor’s Center is where many of our 
days will start and where we will have our end of session art show.  It includes a classroom in 
the back, which will serve as a rain location.  There are many other historic sites around the 
park as well as many miles of trails which we will hike on.  Since Itasca is located in a coniferous 
forest, fires can be a threat to the area.  The Fire Tower is both a historic and educational 
landmark which we will be visiting as we cover land conservation (Minnesota DNR, 2015). 
9 
Itasca park has many interesting and important features that will be included in the lessons of 
this program and will give the kids a more enriching experience.   
 
Why 
  Creative Connections works with the younger generation to connect them to nature by 
using nature as creative inspiration, introducing outdoor activities, and establishing 
environmental stewardship.  This is beneficial to the development of children’s senses, physical 
and mental health, and the preservation of our future earth.   
Creative Connections is designed for a crucial point in a developing child’s life.  During 
elementary school, children’s brains and minds are developing.   In Creative Connections, we 
strive to actively engage children in their learning by incorporating art activities with lessons. 
As said by Frank Wilson, “Much of our learning comes from doing, from making, from feeling 
with our hands” (Wilson as cited in Louv, 2005, p. 66).  This method encourages children to 
apply all their senses to art, which in turn will help them understand content better.  Creative 
Connections will incorporate much work with the hands through art projects, which will result 
the campers engaging in deeper creative thinking and developing a larger understanding of the 
intersections of art and nature.   
Outdoor activities can hugely influence a child’s physical and mental health. Becoming 
more involved and spending time in nature is very beneficial for this age as “natural settings are 
essential for healthy child development, because they stimulate all the senses and integrate 
formal play with formal learning” (Moore as cited in Louv, 2005, p. 85).  According to Louv, 
children are developing higher rates of mental instability, and nature can aid in children’s 
mental and physical development.  Children are lacking a connection to nature, which is 
effecting them in so many ways that Louv coined the term Nature Deficit Disorder for this issue. 
This explains how inadequate amounts of unstructured play in nature, can lead to increased 
development of issues such as anxiety, depression, and obesity. In this generation, children are 
becoming less familiar with their natural environment, and spending more time indoors.  As this 
indicates that nature deficit disorder is on the rise, Creative Connections supports the need for 
10 
children to spend time in nature by participating in outdoor activities as it is beneficial to their 
mental and physical health, and supports child development.   
Establishing a sense of commitment to nature at a young age is important not only for 
the current generation but for the health of the earth.  Kids need to realize at a young age that 
everything they do impacts the earth in some way.  This will encourage children to think 
through their decisions and learn to make good decisions that will help everyone.  Educating 
children about correct ways to care for the earth will benefit the earth and will teach them 
about caring and compassion.  Simply teaching kids about the problems earth is facing is not 
enough, as this may make them feel that saving the earth is a lost cause (Strife, 2012).  Creative 
Connections will stress the importance of being a good environmental steward because every 
little bit helps, and every child can make a difference.  Children who learn to care for the earth 
at a young age may grow into adults who are committed to saving the earth in the future.   


11 
References: 
 
Cleaver, S. (2007). Classrooms Are Going green:  How Green Classrooms Are Reconnecting Kids  
with Nature. ​Instructor. ​117(3‐), 20‐24.  
 
Minnesota DNR. (2015). Retrieved from  
http://www.dnr.state.mn.us/state_parks/itasca/index.html 
 
Richard Louv. (2005). ​Last Child in the Woods: Saving our children from Nature‐Deficit Disorder​.  
Chapel Hill, NC: Algonquin Books. 
 
Song. Y. K. (2010). Art in Nature and Schools: Nils‐Udo. ​Journal of Aesthetic Education. ​44(3).  
96‐108. 
 
Strauch‐Nelson. W. (2012). Reuniting Art and Nature in the Life of the Child. ​Art Education.  
65(3). 33‐38. 
 
Strife. S.J. (2012). Children’s Environmental Concerns: Expressing Ecophobia.  ​The Journal of  
Environmental Education. ​43(1), 37‐54.  
 
 
Interview: 
 
MaryAnn Athens, Art Teacher at Evergreen Charter School, Feb 10 2015.   
 
   
12 


Program Philosophy 
 
   
13 
Creative Connections 
Philosophy 
  
We believe that children require immersion in nature at a young age.  Spending time in nature 
is important to their physical and mental development, and can help foster an interest and 
passion for nature that will carry on throughout their life.  As participants learn about the 
environment through interactions with nature and art projects, they will find themselves 
developing a connection to a place.  We value educating children in an experiential way so that 
they may learn content, but also learn about themselves in the process.  We believe that art 
and nature coexist and that nature can be found in art, while art can also be seen in nature.  We 
encourage children to find these connections and seek out creative ways to look at the world.   
  
❖  ​Connection to Place 
We believe that quality time spent in nature is very beneficial for personal growth and 
development.  Time spent in nature creates a connection with the place in which we live as we 
begin to learn about all that functions around us.  We believe that it is important to find an 
appreciation for our surroundings, which will allow us to feel more connected to nature and 
lead more fulfilling and happy lifestyles.  
 
❖ Experiential Education 
We believe that education should be memorable, fun, and exciting.  As we combine the topics 
of nature and art, we incorporate hands on activities and varied levels of thinking and creativity 
that help establish a deeper, more personal relationship to the subject matter.  We value 
personal learning and development as well as experiential learning.   
 
❖ Creativity 
We find that providing a creative outlet for children is a great learning experience.  By learning 
certain skill sets, children are able to accomplish much on their own through individual creative 
thinking.  We encourage our participants to try new ideas or find ways to make their ideas 
work.  Creativity and imagination are crucial to personal development and confidence.  We 
foster individuality and personal growth through student‐driven projects.  
 
❖  ​Environmental Stewardship 
We believe that it is essential to establish the importance of caring for our Earth in children at a 
young age.  Children are very receptive to new information, and when taught early on to care 
for the world, they are capable of carrying on that knowledge throughout their lives.  Raising 
environmentally aware children leads to a healthier planet and conservation of the 
environment in the future.   
 
14 
 
❖ Physical Activity 
In this generation, children may be participating in more organized sports, but they are lacking 
free activity and general exercise.  We believe that a healthy child is one who spends time being 
physically active, but in enjoyable play.  We believe that it is important for children to get 
exercise, but in a less organized way; with fewer rules and more variation in the activity.  We 
find that outdoor activities are beneficial for children and give them the exercise they need.   
 
   
15 


Goals and Objectives 
 
   
16 
Creative Connections 
Goals and Objectives 
 
❖ Creative interpretation 
 
By the end of the program, participants will: 
1. Demonstrate artistic skills by developing a unique style and completing multiple art 
projects within the course of the program. 
2. Discover their creative spirit by gathering materials from the woods of Itasca with 
intention and a vision in mind. 
3. Develop creative methods to solve any problems they may come across while working 
on their projects so that they may complete them.  
  
❖ Connect to Itasca State Park 
 
By the end of the program, participants will: 
1. Identify at least 5 native plant species of the park by putting leaf collections into a 
journal 
2. Identify at least 5 wild animals of the park by sketching them in their journal. 
3.    Outline the history of Itasca state park by creating a timeline as a group. 
4.   Summarize the route of the Mississippi River by tracing it on a map. 
 
❖ Environmental Stewardship 
 
By the end of the program, participants will: 
1. Recognize their positive and negative impact on the environment by participating in a 
park cleanup/maintenance service project during the program. 
2. Show how they can help the environment by cleaning up after themselves and planting 
new species.   
3. Apply the Leave No Trace principles to their daily lives by interpreting the principles into 
skits and setting goals to accomplish them.  
  
❖ Outdoor Recreational Activities 
 
By the end of the program, participants will: 
1. Demonstrate adept canoeing skills on a lake by learning basic paddle strokes, boat 
safety and ways to communicate with their partner. 
17 
2. Practice safe fishing techniques by following instructions and being aware of their 
surroundings. 
3. Show enthusiasm for hiking by being a good sport and making observations while on 
hikes.  
  
❖ Personal Growth and Development 
 
By the end of the program, participants will be able to: 
1. Assess their development throughout the program by participating in self‐reflections at 
the beginning and end of the course. 
2. Reflect on their learning by participating in daily group discussions on valuable 
“take‐aways” from the day.  
3. Discover their newfound understanding of the natural world by examining their work 
created and completed during the program.  


18 


Schedule 
 
   
19 
Creative Connections 
Schedule 
 
*Every day starts and ends at the same location to make pick up and drop off easier.  However, 
locations vary by day.  Most lessons will take place outside of centers or at picnic shelters.  All 
lessons are rain or shine.  In case of severe weather, lessons will be moved inside to the nearest 
building which will either be the Visitor’s Center, Douglas Lodge, or the Mary Gibbs Center.   
 
    Monday  Tuesday  Wednesday  Thursday  Friday 
Week 1 
Park 
History 
AM  Introduction 
Sensory Hike 
Park 
History 
Mapping the 
Mississippi 
Exploring the 
Mississippi 
Swim Skills 
Assessment 
Nature 
Hike and 
Art 
Project 
PM  Nature 
Scavenger 
Hunt 
Timeline 
Project 
Freshwater  Aquatic Life  Finish 
projects 
Swim 
Week 2 
Nature 
AM  Nature Hike 
LNT 
Nature 
Hike 
Trees 
Nature Hike 
Birds 
Forest Fires 
Fire Tower 
Service 
PM  LNT Skits  Plants 
Project 
Wildlife  Plants and 
Animals 
Service 
Week 3 
Recreation 
AM  Fish I.D 
Fishing Gear 
Canoe 
Safety 
Canoeing 
Strokes 
Camping 
Skills 
Ferry Tour 
Fishing 
Set up art 
show 
Free Time 
PM  Basics of 
Fishing 
Canoeing  Camping 
Skills 
Canoeing 
 
Group 
Reflection 
Art show 


20 
 * = Correlating Lesson Plan 
Week 1:  Park History 
 
Day 1: Monday 
Time  Activity  Location 
9:00‐10:30  Introductions*  Visitor’s Center @ Itasca 
10:30‐10:45  Break and snacks  Visitor’s Center 
10:45‐12:00  Sensory Hike*  Trails around Visitor Center 
12:00‐12:45  Lunch  On Trail 
12:45‐2:45  Nature Scavenger Hunt*  Trails around Visitor Center 
2:45‐3:00  Daily Take‐away*  Visitor’s Center 
3:00‐3:30  Pick up  Visitor’s Center 
Day 2: Tuesday 
9:00‐9:15   Morning Warm‐up*  Visitor’s Center 
9:15‐10:30  Meet and greet with Park Ranger, tour 
visitors center 
Visitor’s Center 
10:30‐10:45   Break and snacks  Visitor’s Center 
10:45‐12:00  Hike to Old Timer’s cabin  Begin Douglas Lodge 
12:00‐12:45   Lunch  At Old Timer’s Cabin 
12:45‐2:45   Timeline project*  Visitor’s Center 
2:45‐3:00   Daily Take‐away*  Visitor’s Center 
3:00‐3:30  Pick up  Visitor’s Center 
Day 3: Wednesday 
9:00‐9:15  Morning warm‐up*  Meet at Mary Gibbs Center 
9:15‐10:30  Mapping the Mississippi*  Mary Gibbs Center 
10:30‐10:45    Break and snacks  Mary Gibbs Center 
21 
10:45‐12:00    Exploring the Mississippi*  Mississippi Headwaters 
12:00‐12:45    Lunch  Mary Gibbs Center 
12:45‐2:45   Freshwater*  Mary Gibbs Center 
2:45‐3:00   Daily Take‐away*  Mary Gibbs Center 
3:00‐3:30  Pick up  Mary Gibbs Center 
Day 4: Thursday 
9:00‐9:15  Morning warm up*  Meet at Beach 
9:15‐10:30 
 
Swim Assessment (half the group)* 
Other half will have beach and playground 
free time 
Beach/ Beach Picnic Shelter 
10:30‐10:45    Break and snacks  Beach 
10:45‐12:00  Swim Assessment (2​nd​
 half of group) 
Other half will have beach and playground 
free time 
Beach/ Beach Picnic Shelter 
12:00‐12:45   Lunch  Beach 
12:45‐2:45  Aquatic Life*  Beach Picnic Shelter 
2:45‐3:00  Daily Take‐away*  Beach Picnic Shelter 
3:00‐3:30  Pick up  Beach 
Day 5: Friday 
9:00‐9:15  Morning warm up*  Visitor’s Center 
9:15‐10:30  Nature hike  Visitor’s Center Trails 
10:30‐10:45   Break and snacks  On Trail 
10:45‐12:00  Batiks and Weaving*  Visitor’s Center 
12:00‐12:45  Lunch  Visitor’s Center 
12:45‐2:45  Art Installations*  Beach 
2:45‐3:00  Daily Take‐away*  Visitor’s Center 
22 
3:00‐3:30  Pick up  Visitor’s Center 
 
Week 2: Nature 
 
Day 6: Monday 
Time  Activity  Location 
9:00‐9:15  Morning warm up*  Meet at Douglas Lodge 
9:15‐10:30  Nature hike  Brower Trail 
10:30‐10:45  Break and snacks  On Trail 
10:45‐12:00  LNT*  Douglas Lodge 
12:00‐12:45   Lunch  Douglas Lodge 
12:45‐2:45  LNT Part II*  Douglas Lodge 
2:45‐3:00  Daily Take‐away*  Douglas Lodge 
3:00‐3:30  Pick up  Douglas Lodge 
Day 7: Tuesday 
9:00‐9:15  Morning warm up*  Visitor’s Center 
9:15‐10:30  Nature hike  Bohall Trail 
10:30‐10:45  Break and snacks   On Trail 
10:45‐12:00  Trees*  Big White Pine and Big Red 
Pine Trails 
12:00‐12:45  Lunch  On Trail 
12:45‐2:45  Plants*  Visitor’s Center 
2:45‐3:00  Daily Take‐away*  Visitor’s Center 
3:00‐3:30  Pick up  Visitor’s Center 
Day 8: Wednesday 
23 
9:00‐9:15  Morning warm up*  Meet at Douglas Lodge 
 9:15‐10:30  Nature hike  Dr. Robert’s Trail 
10:30‐10:45   Break and snacks  On Trail 
10:45‐12:00    Birds*  Dr. Robert’s Trail 
12:00‐12:45   Lunch    Douglas Lodge 
12:45‐2:45  Wildlife*  Douglas Lodge 
2:45‐3:00  Daily Take‐away*  Douglas Lodge 
3:00‐3:30  Pick up  Douglas Lodge 
Day 9: Thursday 
9:00‐9:15  Morning warm up*  Mary Gibbs Center 
9:15‐10:30  Forest Fires*  Mary Gibbs Center 
10:30‐10:45  Break and snacks  Mary Gibbs Center 
10:45‐12:00   Hike out to fire tower  Aiton Heights Trail 
12:00‐12:45  Lunch  On Trail 
12:45‐2:45  Wildlife Part II*  Mary Gibbs Center 
2:45‐3:00  Daily Take‐away*  Mary Gibbs Center 
3:00‐3:30  Pick up  Mary Gibbs Center 
Day 10: Friday 
9:00‐9:15  Morning warm up*  Meet at Visitor’s Center 
9:15‐10:30  Service Project Planting Trees*  Visitor’s Center 
10:30‐10:45  Break and snacks  Visitor’s Center 
10:45‐12:00  Service Project Planting Trees*  Douglas Lodge 
12:00‐12:45  Lunch  Douglas Lodge 
12:45‐2:45  Service Project Cleaning Campsites*  Main Campground 
2:45‐3:00  Daily Take‐away*  Visitor’s Center 
24 
3:00‐3:30  Pick up  Visitor’s Center 
  
Week 3:  Outdoor Recreation 
 
Day 11: Monday 
Time  Activity  Location 
9:00‐9:15   Morning warm up*  Meet at Douglas Lodge 
9:15‐10:30  Fish Identification*  Douglas Lodge 
10:30‐10:45    Break and snacks  Douglas Lodge 
10:45‐12:00  Fishing Safety and Gear*  Douglas Lodge 
12:00‐12:45   Lunch  Douglas Lodge 
12:45‐2:45  Fishing Basics*  Fishing Pier 
2:45‐3:00  Daily Take‐away*  Douglas Lodge 
3:00‐3:30  Pick up  Douglas Lodge 
Day 12: Tuesday 
9:00‐9:15   Morning warm up*  Meet at Beach 
9:15‐10:30  Canoe safety*  Beach 
10:30‐10:45  Break and snacks  Beach 
10:45‐12:00  Canoeing Strokes*  Beach 
12:00‐12:45  Lunch  Beach 
12:45‐2:45  Canoeing practice (5 canoes in water at a 
time, the other half will have playground 
freetime.  Switch after one hour.) 
Beach 
2:45‐3:00  Daily Take‐away*  Beach picnic shelter 
3:00‐3:30  Pick up  Beach 
Day 13: Wednesday 
25 
9:00‐9:15  Morning warm up*  Meet at Campground 
9:15‐10:30  Camping Skills*  Campground 
10:30‐10:45  Break and snacks  Campground 
10:45‐12:00  Camp Cooking*  Campground 
12:00‐12:45  Lunch   Campground 
12:45‐2:45  Camping Skills Part II*  Campground 
2:45‐3:00  Daily Take‐away*  Campground 
3:00‐3:30  Pick up  Campground 
Day 14: Thursday 
9:00‐9:15   Morning warm up*  Meet at Douglas Lodge 
9:15‐10:30  Ferry Tour of Lake Itasca  Boating Pier 
10:30‐10:45   Break and snacks  Fishing Pier 
10:45‐12:00   Fishing  Fishing Pier 
12:00‐12:45   Lunch  Beach 
12:45‐2:45   Canoeing   Beach 
2:45‐3:00  Daily Take‐away*  Douglas Lodge 
3:00‐3:30  Pick up  Douglas Lodge 
Day 15: Friday 
9:00‐9:15  Morning warm up*  Meet at Visitor’s Center 
9:15‐10:00  Short hike  Visitor’s Center Trails 
10:00‐10:30  Set up for art show  Visitor’s Center 
10:30‐10:45   Break and snacks  Visitor’s Center 
10:45‐11:45    Canoeing/swimming/fishing (their choice, 
can switch after 30 minutes) 
Beach 
26 
11:45‐12:00  Showers/prep for lunch  Beach 
12:00‐12:45  Picnic lunch  Beach 
12:45‐2:00   Reflection and Farewell*  Outside Visitor’s Center 
2:00‐3:00   Art show  Visitor’s Center 


27 
Creative Connections 
Trip Control Plan 
 
Locations of lessons in Itasca State Park: 
1. Visitor’s Center 
2. Mary Gibbs Center 
3. Headwaters 
4. Beach 
5. Douglas Lodge 
6. Brower Trail (2.2 miles) ‐ from Douglas Lodge 
a. Hiking on Monday, June 22th and July 20th, from 9:15 ‐ 10:45 am 
7. Bohall Trail (5.8 miles) ‐ off Wilderness Drive 
a. Hiking on Tuesday, June 23th and July 21st from 9:15 ‐ 10:45 am 
8. Big White Pine Trail (200 feet) ‐ off Wilderness Drive 
a. Hiking on Tuesday, June 23th and July 21st, from 10:45 ‐ 12:45 noon 
9. Dr. Robert’s Trail (2 miles) ‐ from Douglas Lodge 
a. Hiking on Tuesday, June 16th and July 14th, from 10:45 ‐ 12:45 noon 
b. Hiking on Wednesday, June 24th and July 22nd, from 9:15 ‐ 12:00 noon 
10. Aiton Heights Trail (1 mile) ‐ Off wilderness Drive 
a. Hiking on Thursday, June 25th and July 23rd from 10:45 ‐ 12:45 noon 
11. Main Campground 
12. Fishing Pier 
 
Emergency Procedure: 
I. Emergency Plan from accident site to van:  walk out, assisted carry, call for outside 
assistance ‐ EMS, Visitor Center 
II. Plan from Visitor Center to Hospital:  Head South on County Highway 122, keep a slight 
right onto County Highway 122/County Road 1.  Turn Left onto US‐71 South.  Turn Right 
onto 6th Street West, turn left onto Pleasant Avenue, hospital is on the right.  Hospital 
located about 25 minutes away.   
 
*All staff members will carry cell phones, and Lead Facilitator will hold a radio to the nearest 
Ranger Station.   
 
Emergency Contact Numbers: 
Creative Connections Program Director cell phone:   
Visitor Center Front Desk phone:  (218) 699‐7521 
St. Joseph’s Hospital, Park Rapids:  (218) 732‐3311 
Emergency: 911 
28 
   
29 


Pre-course Information 
 
   
30 
Creative Connections 
Pre‐Course Outline 
 
I.  Creative Connections ​brochures, poster, flyers and ads will be distributed to schools, 
libraries and YMCAs by March 1st.  Registration information will be provided on all 
information items.  The deadline to register for interest and receive an application will 
be April 1st.  Applicants may contact ​Creative Connections​ with any questions 
regarding the program and to register for the interest list.  Once on the interest list, they 
will receive the application via email.  Applications are due by May 1st.  Accepted 
applicants will receive the 2nd packet by mail, which will contain forms needing to be 
returned by mail or directly to the park by June 1st.   
 
II. Packet # I: 
● Cover Letter 
● Application 
 
III. Packet # 2:   
● Acceptance Letter 
● Value Contract 
● Schedule 
● Payment 
● Medical Release Form 
● Liability Form 
● Media Release Form 
● Map and Directions 
● Daily Check list 


31 
Creative Connections 
 
Dear Parents/Guardians, 
 
Thank you for sharing your interest in Creative Connections!  If you are looking for a 
unique summer camp opportunity for your child, this program may be for you.  If your child 
spends a lot of time indoors, and needs a nudge to get outside and have a good time, Creative 
Connections is a great summer option that is located in the beautiful and inspiring Itasca State 
Park.   
 
Creative Connections is for 3rd‐5th grade students and lasts for three weeks out of the 
summer.  There are two sessions offered for your convenience in summer planning.  The first 
session is Monday, June 15​th​
 through Friday, July 3​rd​
, and the second session is Monday, July 
13th through Friday, July 31.  Days start at 9:00 am and end at 3:00 pm every day, 
Monday‐Friday.  The cost to participate in this program is $300 with payment due by June 1st. 
Lunches and snacks will be provided daily for your child.   
 
Throughout the program, kids will become deeply involved with all aspects of nature. 
They will learn about the history of the Itasca, the plants and animals found in it, and different 
activities offered there.  They will complete art projects to reflect their learning on different 
topics and work on Service projects to benefit the park and the environment.  They will learn to 
give back to world they live in and will establish sustainable living goals.  The kids will be 
introduced to activities such as fishing, hiking, camping, and canoeing which will increase their 
physical activity and encourage them to find fun in the outdoors.  Creative Connections believes 
that we can influence the future generation to becoming more environmentally aware and 
active to benefit their lives as well as the Earths.   
 
We would love to work with your child this summer, and watch them grow a connection 
to nature through our program.  If you think Creative Connections is a good fit for your child, 
and you would like to see them grow through this program, please submit the following 
application no later than May 1st by mail, or email, and we will contact you when we have 
processed it.   
 
Thank you, 
Lianna Koberoski, Program Director 
Creative Connections 
36750 Main Park Drive,  
Park Rapids, MN 56470 
(218) 699‐7251 
32 
Creative Connections Application  
 
Child Information: 
T‐Shirt Size: ___________ 
Full Name  First:  Last:  
Age:  DOB:   Gender: 
 
Parent/Guardian Information:   
What is the best way to contact you? _______________________________________________ 
Who has permission to pick up your child? ___________________________________________ 
 
Parent/Guardian 1  Name:   First  Last 
Relationship to Child:   email: 
Occupation:   
Home Phone:    Work Phone:  Cell Phone:  
Home address:    #  Road 
City  State  Zip 
 
Parent/Guardian 2  Name:   First  Last 
Relationship to Child:   email: 
Occupation:   
Home Phone:    Work Phone:  Cell Phone:  
Home address:    #  Road 
City  State  Zip 
 
How did you learn of Creative Connections?  Check all that apply.   
Internet __________ 
Flyer _____________ 
Newsletter ________ 
Brochure ________ 
Word of mouth _________ 
Other ______ List ______________________ 
 
33 
Questionnaire: About your child 
 
What kind of activities does your child enjoy? 
______________________________________________________________________________
______________________________________________________________________________
______________________________________________________________________________ 
 
How does your child relate with their peers? 
______________________________________________________________________________
______________________________________________________________________________
______________________________________________________________________________ 
 
Why does your child want to participate in Creative Connections? 
______________________________________________________________________________
______________________________________________________________________________
______________________________________________________________________________ 
 
What do you want your child to get out of this program? 
______________________________________________________________________________
______________________________________________________________________________
______________________________________________________________________________
______________________________________________________________________________ 
 
Does your child have any special needs, disabilities, or require any accommodations? 
______________________________________________________________________________
______________________________________________________________________________
______________________________________________________________________________ 
 
Please list any allergies your child may have, and the extent to which they are allergic. 
______________________________________________________________________________
______________________________________________________________________________
______________________________________________________________________________ 
 
Does your child have any Medical conditions our staff should be aware of? 
______________________________________________________________________________
______________________________________________________________________________
______________________________________________________________________________ 
 
 
34 
Please describe your child’s comfort level around water and swimming. 
______________________________________________________________________________
______________________________________________________________________________
______________________________________________________________________________
______________________________________________________________________________ 
 
Has your child ever had organized swimming lessons?  yes _____  no ______ 
 
If so, which skill level have they most recently completed? 
______________________________________________________________________________ 


35 
Dear (personalized), 
 
Congratulations!  You have been accepted to participate in ​Creative Connections​!  To prepare 
for a fantastic summer experience, we need you to take some time to complete the attached 
paperwork that will help both of us get ready for a great time. 
 
Please read through the attached packet and return the necessary forms to the address at the 
bottom of the page by June 1st.  At this time, we will also need you to send in your payment for 
the program.  If you have any questions, look over the payment/fees form enclosed.   
 
Our time together will begin on Monday (personalized, June 15, July 13) at 9 a.m.  We have 
enclosed a map showing the way from Bemidji or Park Rapids to Itasca State Park.  We will be 
meeting at the Visitor Center the first day, which is the first stop after entering the park.  Refer 
to the schedule for locations of drop off and pick up which will be different on some days.   
 
If you have any questions about anything, please feel free to contact me, and I will do my best 
to help you out! 
 
Looking forward to working with your child this summer! 
 
 
Lianna Koberoski, Program Director 
Creative Connections 
 
 
Enclosures (8): 
 
Things we need returned by June 1st: 
● Value Contract 
● Payment of $300 
● Medical Release Form 
● Liability Form 
● Media Release Form 
Things for you to keep: 
● Schedule 
● Map and Directions 
● Daily Check list 
 
36750 Main Park Drive,  
Park Rapids, MN 56470 
(218) 699‐7251   
36 
Creative Connections 
Value Contract 
 
These values are how our program will function and how we expect participants 
to act throughout.  Please discuss each point with your child and sign below. 
This will be reviewed on the first day so that everyone understands what is 
expected.   
 
● Positive Attitude 
● Respect for self and others 
● Enthusiasm for learning 
● Cooperation  
● Flexibility 
● Listening when others are talking 
● Creative thinking 
● Willingness to try new things 


Signature of Child __________________________________________________ 
 
Signature of Parent _​_________________________________________________________ 
 
Date ​_________________________________ 
   
37 
 
*Every day starts and ends at the same location to make pick up and drop off easier.  However, 
locations vary by day.  Most lessons will take place outside of centers or at picnic shelters.  All 
lessons are rain or shine.  In case of severe weather, lessons will be moved inside to the nearest 
building which will either be the Visitor’s Center, Douglas Lodge, or the Mary Gibbs Center.   
 
    Monday  Tuesday  Wednesday  Thursday  Friday 
Week 1 
Park 
History 
AM  Introduction 
Sensory 
Hike 
Park 
History 
Mapping the 
Mississippi 
Exploring the 
Mississippi 
Swim Skills 
Assessment 
Nature Hike 
and Art 
Project 
PM  Nature 
Scavenger 
Hunt 
Timeline 
Project 
Freshwater  Aquatic Life  Art 
Installations 
Drop off/ Pick up  Visitor 
Center 
Visitor 
Center 
Mary Gibbs 
Center 
Beach  Visitor Center 
Week 2 
Nature 
AM  Nature Hike 
LNT 
Nature 
Hike 
Trees 
Nature Hike 
Birds 
Forest Fires 
Fire Tower 
Service 
PM  LNT Skits  Plants   Wildlife  Wildlife  Service 
Drop off/ Pick up  Visitor 
Center 
Visitor 
Center 
Visitor 
Center 
Mary Gibbs 
Center 
Visitor Center 
Week 3 
Outdoor 
Recreation 
AM  Fish I.D 
Fishing Gear 
Canoe 
Safety 
Canoeing 
Strokes 
Camping 
Skills 
Ferry Tour 
Fishing 
Set up art 
show 
Free Time 
PM  Basics of 
Fishing 
Canoeing  Camping 
Skills 
Canoeing 
 
Group 
Reflection 
Art show 
Drop off/ Pick up  Douglas 
Lodge 
Beach  Campground  Douglas 
Lodge 
Visitor Center 
   
38 
Creative Connections 
Payment Form 
 
Creative Connections accepts personal checks, VISA and MasterCard as payment for this 
program.  Your signature below acknowledges that you have read and understand the Payment 
Methods and Refund Policy.  The cost to participate in this program is $300, due by June 1st.   
 
Participant’s Name ______________________________________________________________ 
Parent/Guardian________________________________________________________________ 
Method of Payment (circle one):     Check          Credit Card 
Payment Plan (circle one):    Check enclosed                Online               In person 
Personal Check #:________________                   Enclosed for $_______________ 
 
If paying online, please visit;  ​http://www.Itasca.state.park.com/creative_connections/payment 
 
Refund Policy 
Complete payment is non‐refundable.  If, under the circumstance of withdrawal from the 
program, amount refundable is $150.   
 
I have read and understand the Payment Methods and Refund Policy stated above.  I have 
enclosed my payment, or plan to pay online or in person. 
 
Parent/Guardian Signature_______________________________________________________ 
Date_______________________________ 


39 
Creative Connections 
Medical Treatment Authorization 
 
Child’s Name: __________________________________________________________ 
Home Address: _________________________________________________________  
Date of Birth:______________________________ Gender: _____________ 
 
Emergency Contact Information 
Name: ____________________________________ 
Relationship to child: _____________________________________________________ 
Cell Phone: _____________________________ Work Phone: _____________________ 
 
Medical Information 
Primary Care Physician’s Name: ___________________________________________  
Phone #: (____)________________ 
Medical Insurance Provider: __________________________ Policy #: ____________  
 
AUTHORIZATION AND CONSENT OF PARENT(S) OR LEGAL GUARDIAN(S) As  
custodian of the aforementioned child, I grant my authorization and consent for a  
designated adult to administer general first aid treatment for minor injuries or illnesses.  
If the injury or illness is severe, I authorize him or her to seek professional emergency  
personnel to attend, transport, and treat the minor and to issue consent for any medical  
care deemed advisable by a licensed medical professional or institution. I authorize the  
designated adult to exercise best judgment upon the advice of medical or emergency  
personnel. 
  
Date Signed:______________________  
Parent / Guardian Signature: _________________ 
Printed name: __________________________ 
 
   
40 
Creative Connections 
Health Form 
 
(This form must be completed and signed by a qualified health professional) 
 
Any individual attending or working with Creative Connections must have had a physical examination in the previous 
two years, and all required immunizations should be up to date before the beginning of their period of attendance. (A 
copy of the current school physical form may be used for this section.) 
 
Physical:   
(Name) ____________________________________ has been examined on (date)___________. 
DOB: _____________ Height: __________ Weight: _________ BP: __________ HR: __________ 
Existing medical conditions?    Yes    No 
Please explain: _________________________________________________________________ 
______________________________________________________________________________ 
Allergies:    Yes    No 
Please specify: _________________________________________________________________ 
______________________________________________________________________________ 
Is there any factor preventing the individual from participating fully in the program?   Yes   No 
Please specify any limitations: _____________________________________________________ 
______________________________________________________________________________ 
Is there anything else we should know?       Yes     No      Please attach another sheet if necessary. 
 
Immunizations: 
Tetanus/Diphtheria/Pertussis Booster:    Yes    No                  Date: ________________ 
Measles, Mumps, and Rubella:    Yes   No                   Date: ________________ 
Hepatitis B:    Yes   No                Date: ________________ 
**Please complete this section AND attach a copy of the Immunization Record to this form** 
 
Medications: 
*EACH MEDICATION MUST BE IN ITS ORIGINAL CONTAINER* 
Prescription medication directions and authorization: (Must be completed and signed by physician) 
Is the individual on any prescription medications? YesNo 
Medication and dosage _________________________Reason for giving________________________ 
Directions for administration (routine or PRN) _____________________________________________ 
___________________________________________________________________________________ 


Physician’s Signature: ____________________________ 
 
Telephone: ____________________________ 
41 
Creative Connections 
Liability Release Form 
 
I,___________________________ the Parent/Guardian of ______________________________ 
understand that participation in activities included in the program Creative Connections could 
include actions or tasks which might be hazardous to the participant named above. 
 
I, the undersigned, do hereby release, forever discharge and agree to hold harmless Creative 
Connections, its directors, and employees, from any and all liability, claims or demands for 
accidental personal injury, sickness or death, as well as property damage and expenses, of any 
nature whatsoever which may be incurred by the undersigned and the Participant while 
involved in the program.  
 
I, the parent or legal guardian of this Participant, hereby grant my permission for the 
Participant to participate fully in program activities, including trips around the park premises.  
 
Furthermore, I, on behalf of my minor Participant, hereby assume all risk of accidental personal 
injury, sickness, death, damage and expense as a result of participation in recreation and 
outdoor activities involved therein. The undersigned further hereby agrees to hold harmless 
and indemnify Creative Connections for any liability sustained by said program as the result of 
the negligent, willful or intentional acts of said Participant, including expenses incurred 
attendant thereto. 
 
 
Name of Parent or Guardian:__________________ 
Signature of Parent or Guardian:_________________________ Date:_________ 


42 
Creative Connections 
Media Release Form 
 
Parent Release Form for Children/Youth Media Recording related to ​Creative Connections 
 
I,______________________________________ the undersigned, do hereby grant or deny 
permission to use the image of my child, ________________________ , as marked by my 
selection(s) below.  
Such use includes the display, distribution, publication, transmission, or otherwise use of 
photographs, images, and/or video taken of my child for use in materials that include, but may 
not be limited to, printed materials such as brochures and newsletters, videos, and digital 
images such as those on the Web site.  
 
____Deny permission to use my child’s image at all. 
 
____Grant permission to use my child’s image in the following ways (mark all that apply):  
 
 ____ 1. Limited usage: I want my child’s image used within the setting only (not in the larger 
community).  
 ____ 2. Limited usage: I want my child’s image used for educational materials only (not 
marketing).  
 ____ 3. Limited usage: I want my child’s image used on printed materials only (no digital or 
video use).  
 ____ 4. Unrestricted usage: I give unrestricted permission for my child’s image to be used in 
print, video, and digital media. I agree that these images may be used by for a variety of 
purposes and that these images may be used without further notifying me. I do understand 
that the child’s last name will not be used in conjunction with any video or digital images.  
 
 
Parent/Guardian signature___________________________________  
Date: _______________________ 


43 
Driving Directions to Itasca State Park 
 
36750 Main Park Drive 
Park Rapids, MN 56470 
 
From Bemidji, MN 
 
1. Head east on 6th Street toward Bemidji Avenue/US‐2 Old. 
2. Turn right at the first cross street onto Bemidji Avenue/US‐2 Old.  Continue on this road 
for 1.5 miles.   
3. Continue onto Washington Avenue for 3.3 miles.  
4. Continue onto US‐71 South for 12.2 miles. 
5. Take a slight right toward MN‐200 West/US 71 South. 
6. Take a slight right onto MN‐200 West/US‐71 South and continue for 16 miles. 
7. Turn right onto County Road 1.   
8. Take a slight left onto County Highway 122 for 1.3 miles.   


44 
From Park Rapids, MN 
 
1. Head east on 1st Street West towards Park Avenue South. 
2. Turn left at the 1st cross street onto US‐71 North/Park Avenue North, and continue on 
this road for 18.5 miles. 
3. Turn left onto Country Road 1. 
4. Take a slight left onto County Highway 122.   


45 
Creative Connections  
Daily Checklist 
 
*Please dress your child appropriately for the weather.   
 
Required every day: 
● Tennis Shoes or Hiking Boots 
● 32 oz reusable Water bottle 
● Backpack 
● Sunscreen and Bug‐spray 
● Any medications your child must take throughout the day 
● Sweatshirt or extra warm layer 
Water days: (includes swimming, canoeing and fishing) 
● Bathing suit (girls require a one‐piece) 
● Towel 
● Water shoes with backs (flip‐flops not acceptable) 
Optional: 
● Hat 
● Sunglasses 
 
*​Please do not send cell phones, ipods, gaming devices or any other electronics with 
your child.   
*Lunches and snacks will be provided for your child.   


46 


Leadership 
   
47 
Creative Connections 
Position Title:  Counselor 
 
Number of Positions: 4 
 
Dates of Position:  
Staff training:  June 8th, 2015 ‐ June 13th, 2015 (mandatory for all staff) 
Program: June 15th‐ July 3rd and July 11th ‐ August 1st, 2015 
 
Supervisor: Program Director, Lead Facilitator 
 
Job Description: 
As a Counselor for Creative Connections, you will work directly with the campers and 
the Lead Facilitator.  You will assist in teaching lesson plans, gather materials for lessons, and 
provide supervision for the campers.  If you enjoy spending time with kids and being outdoors, 
this is a great job for you.  You will be outside every day helping to teach the kids about arts and 
crafts, Itasca State Park, and outdoor recreational activities.  Good Communication skills and 
experience in all areas are preferred.   
 
Specific Responsibilities: 
● Assist Lead Facilitator with lessons 
● Keep kids controlled and with the group 
● Settle conflicts and work individually with kids 
● Supervise kids around water 
● Assist kids in learning to canoe and fish 
● Assist kids with arts and crafts projects 
 
Specific Qualifications: 
● CPR/First Aid training, Preferred Lifeguard 
● Minimum age 18, preferred 1 year of college 
● Enjoy spending time outdoors, Fishing and canoeing experience preferred 
● Interest in education, ODL/ Education major preferred 
● Must possess a valid drivers license and have a clean driving record 
 
Benefits:  
Salary = $2,000 
Possible housing options available in the Park 
Great teaching experience and a summer of working in a beautiful park with professionals 
 
48 
 
Schedule: 
 
Staff Training: 
Must arrive by noon, Monday June 8th, 2015. 
Monday will be a get‐situated, gear check and pack day. 
Tuesday at 9:00 am, leave for canoe trip 
Thursday evening arrive back from canoe trip 
Friday:  Training Sessions 
Saturday:  Exploration of the Park 
Sunday: off 
 
Program: 
Monday‐Friday:  First session June 15th, ends July 3rd.   
Saturdays and Sundays off during the session.   
After first session, you will have Saturday through Saturday off, and use Sunday for preparation. 
Second Session begins July 13th, ends July 31 
Saturday after second session will be used for any clean‐up, paychecks, and evaluations.   
 
   
49 
Creative Connections 
Position Title:  Lead Facilitator 
 
Number of Positions: 1 
 
Dates of Position:   
Leadership Training:  June 1st‐June 5th, 2015 (Mandatory for Lead Facilitator) 
Staff Training:  June 8th‐ June 13th, 2015 (Mandatory for all staff) 
Program: June 15th‐ July 3rd and July 11th ‐ August 1st, 2015 
 
Supervisor: Program Director 
 
Job Description: 
As Lead Facilitator for Creative Connections, you will be facilitating all lessons throughout the 
program and working directly with the kids and the counselors.  You will teach lessons, lead 
hikes, facilitate reflections and present nature as a wonderful place to spend time for the kids. 
You will teach lessons on arts and crafts, plants and animals, park history, canoeing, fishing, 
camping, and lead service projects.  You will work directly with Park Rangers of Itasca to 
incorporate them into the lessons and participate in the program.  You will work with the 
Program Director to plan, and evaluate the program to enhance future sessions.   
 
Specific Responsibilities: 
● Facilitate lessons of varied activities to elementary age kids 
● Facilitate group hikes, reflections and discussions 
● Ensure safety of participants around water and while outdoors 
● Assist in leading staff training and canoe expedition 
● Communicate thoughtfully with participant’s parents about the progress of their child 
● Work with the Program Director to evaluate the program and make improvements 
 
Specific Qualifications: 
● Lifeguard/CPR/First Aid training, preferred WFR 
● Bachelors Degree in ODL or Environmental Education 
● Experience in teaching Arts and Crafts, Canoeing, Fishing, and Camping 
● 2 years of relevant experience 
● Must possess a valid driver’s license and have a clean driving record 
 
Benefits: Salary = $4,000 for the summer 
Possible housing options in the Park 
Gain experience working with kids 
50 
Schedule: 
 
Training: 
Must arrive by noon on June 1st 
Mon‐Friday will be intensive training on lessons and facilitation.   
Staff training will be held Monday June 8th‐ Saturday June 13th.   
 
Program: 
Monday June 15th‐ July 3rd is the first session, and July 11th ‐ August 1st, 2015 is the second 
session. 
The week in between sessions will be spent evaluating, planning and preparing for the second 
session.   
You will have most weekends off. 
 
   
51 
Creative Connections 
Position Title:  Program Director 
 
Number of Positions: 1 
 
Dates of Position: January 1st ‐ September 1st, Full time 
 
Supervisor:  Executive Director 
 
Job Description:   
Program Director for Creative Connections is a full time permanent position, reporting to the 
Executive Director.  As Program Director, you will be responsible for the development and 
implementation of this outdoor experiential learning program.  You will be in charge of the 
marketing, budgeting, planning and implementation of the program, and will work pre‐season 
on these items.  You will hire staff members and work directly with them throughout the 
duration of the program.  After the end of program, you will work to evaluate and improve the 
program for future sessions.   
 
 Specific Responsibilities: 
● Market Creative Connections to gain interest and new participants for each summer 
● Recruit, interview, hire, oversee, and train new programming staff 
● Develop, implement and manage the Experiential Education aspects of the program 
● Organize and implement all curriculum and materials for program 
● Maintain permits, registrations and teaching tools 
● Budget the program 
● Communicate with Itasca State Park staff to implement program and utilize their 
resources 
 
Specific Qualifications: 
● Degree in Environmental Education, Outdoor Leadership, Education or related field 
● Ability to supervise, guide and oversee staff as shown from previous experience 
● Must have strong leadership, supervision, teaching and program management skills 
● Experience in teaching elementary age students and working with young adults 
● Ability to organize and implement an active, hands on outdoor environmental education 
program 
● A passion for teaching kids, nature, outdoor activities and arts and crafts 
● Strong oral communication skills 
● Lifeguard certification, CPR/First Aid/AED, preferred WFR certification. 
● Must have a valid driver’s license with a clean driving record 
52 
 
Benefits: Salary = $32,000 a year 
September ‐ December off 
Spend the summer months in the beautiful park of Itasca 
 
Schedule: 
This is a full time position beginning in January and ending in August. 
Will begin work in January with marketing strategies. 
You will have September‐December off. 
 
Program dates are:   
June 15​th​
 through Friday, July 3​rd​
 and Monday, July 13th through Friday, July 31st.   


53 


Marketing 
 
   
54 
Creative Connections 
Marketing Plan 
 
Dates of program: 
Session 1:  Monday, June 15​th​
 through Friday, July 3​rd​
. 
Session 1:  Monday, July 13​th​
 through Friday, July 31​st​
.  
 
Audience:​ Parents, teachers, students, legal guardians 
 
Goal of Marketing​: Creative Connections goal is to utilize a variety of marketing techniques to 
reach the parents, teachers, and children who would be interested in our program.  We are 
getting the word out to as many 3​rd​
‐5​th​
 grade students as we can, so that our participants are 
children who may be spending too much time indoors and are looking for a reason to get 
outside. 
 
Strategy Statement:​ Creative Connections plans on using multiple strategies to market our 
program.  We will distribute flyers and brochures to elementary schools, libraries, and the 
YMCA to reach elementary age children and their parents.  These will be placed around Itasca 
State Park so that visitors may hear of it while enjoying the park and become more interested. 
Because the park attracts many visitors, this will help spread the word.  We will target local 
newsletters in schools, Itasca State Park and the Bemidji/Park Rapids Community Education 
Summer Program.  These newsletters are intended for younger children and will help them and 
their parents plan their summers. 
 ​Marketing Plan  
 
Strategy  Action: ​Place description and information on the Park website under 
“Education/Safety” and “Kids Outdoors” 
Goal: ​20 participants per summer session.   There are two sessions per 
summer. 
Timeline:  
1/1/15:  Begin draft of program description and info. 
1/15/15: Review program ad. 
1/30/15: Post program ad to Park Webpage 
Measurement: ​Qualitative:  through a question on our program evaluation 
form asking how participants found out about Creative Connections 
Internet 
Flyers  Action:  ​Create 200 flyers to put up on signs around Itasca State Park.  Also 
put them up in local elementary schools, libraries, and the YMCA of both 
Park Rapids and Bemidji.   
55 
Goal: ​20 participants per summer session.   There are two sessions per 
summer. 
Timeline:   
2/1/15: Begin flyer design 
2/15/15: Review Flyer design 
3/1/15: Finalize, print and post flyers 
Measurement: ​Qualitative: Through a question on our program evaluation 
form asking how participants found about Creative Connections 
Newsletters  Action:  ​Put a description of Creative Connections and sign‐up information 
in school newsletters, the Park newsletter, and Community Education 
Summer newsletter.  
Goal:  ​20 participants per summer session.   There are two sessions per 
summer. 
Timeline:   
1/1/15:  Search for newsletters to place ad in, and begin designing ad. 
1/20/15: Review advertisement 
2/1/15: Finalize advertisement and submit to newsletters in time for their 
spring/summer editions.  
Measurement:  ​Qualitative:   Through a question on our program 
evaluation form asking how participants found about Creative Connections 
Brochure  Action:  ​Create 200 brochures to be placed in displays around Itasca State 
Park.  These brochures will also be distributed to local elementary schools 
to be sent home with kids, as well as placed in libraries and the YMCA of 
Park Rapids and Bemidji. 
Goal: ​20 participants per summer session.   There are two sessions per 
summer. 
Timeline:  
2/1/15: Begin brochure design 
2/20/15: Review brochure design 
3/1/15: Finalize, print and distribute brochures 
Measurement: ​Qualitative:   Through a question on our program 
evaluation form asking how participants found about Creative Connections  
Word of 
Mouth 
Action:  ​Word of Creative Connections will spread as Visitors to Itasca will 
learn about it through our flyers and brochures, and information will be 
distributed widely.   
56 
Goal: ​20 participants per summer session.   There are two sessions per 
summer. 
Timeline:  ​year‐round  
Measurement: ​Qualitative and quantitative.   
Public 
Presentation 
Action:  ​Present program information to a public audience to get the word 
out about Creative Connections.   
Goal: ​20 participants per summer session.  There are two sessions per 
summer.   
Timeline:  
3/1/15:  Begin work on presentation 
3/9/15:  Present 
Measurement: ​Quantitative:  By how many people show up for the 
presentation.   
T‐Shirts  Action:  ​Distribute T‐shirts to staff and participants of program as a way to 
advertise. 
Goal: ​20 participants per summer session.  There are two sessions per 
summer.   
Timeline: 
3/1/15:  Begin T‐shirt Design 
4/1/15:  Finalize T‐shirt Design 
5/1/15:  Submit T‐shirt Order 
Measurement: ​Qualitative:  Through a question on our program evaluation 
form asking how participants found about Creative Connections  


57 


Equipment List 
   
58 
Creative Connections 
Equipment 
 
Item  Quantity  Unit Price  Total 
Fishing Poles  24  $13.00  $312.00 
Canoes (rental)  12  $45 per day x 3 days x 2 
sessions 
$3,240 
Paddles (provided with 
canoe rental) 
24  $0.00  $0.00 
Life Jackets   24  $15.00  $360.00 
Tents  5  $40.00  $200.00 
Camping Stoves  2  $40.00  $80.00 
Shovels  24  $25.00  $600.00 
Display Easel  1  $35.00  $35.00 
Binoculars  20  $25.00  $500.00 
MN Bird Field Guide  10  $15.00  $150.00 
Screwdrivers  10  $4.00  $40.00 
MN Fish Field Guide  10  $15.00  $150.00 
Dissecting Tool Kit  1 set  $10.00  $10.00 
Dissection Pan  1  $20.00  $20.00 
Iron  1  $25.00  $25.00 
MN Tree Field Guide  5  $15.00  $75.00 
Ironing Board  1  $40.00  $40.00 
Tweezers  10  $3.00  $30.00 
Kids Gardening Gloves  20 pairs  $7.00  $140.00 
Watering Hose  1  $25.00  $25.00 
59 
Rakes  8  $15.00  $120.00 
Wheelbarrows  4  $35.00  $140.00 
MN Wildlife Field Guide  10  $15.00  $150.00 
Square Electric Skillet  3  $30.00  $90.00 
Rubber Aprons  6  $15.00  $90.00 
Plastic Tubs for Dye  3  $15.00  $45.00 
Pot with lid (4 qt)  2  $12.00  $24.00 
Frying Pan  1  $25.00  $25.00 
Stirring Spoons  1 set of 3  $7.00  $7.00 
Cutting Board  1  $15.00  $15.00 
Garlic Press  1  $10.00  $10.00 
Bread Knife  1  $10.00  $10.00 
Oven Mitts  2 pairs  $12.00  $24.00 
Bear Bag  1  $30.00  $30.00 
Hand shovel  2  $5.00  $10.00 
Apple Cutter  1  $10.00  $10.00 
Grand Total:  $7,202 


60 


Supply List 
   
61 
Creative Connections 
Supply List 
 
Item  Quantity  Unit Price  Total 
Sets of 10 Markers  10  $4.00  $40.00 
Boxes of 24 colored 
Pencils 
10  $3.00  $30.00 
Boxes of 24 Crayons  10  $4.00  $40.00 
Composition Journals  20  $4.00  $80.00 
Poster Boards 22x28”  10  $1.00  $10.00 
Fishing Hooks  50  $0.10  $5.00 
Bobbers  30  3 for $1.00  $10.00 
Fishing Weights  1 bag of 540  $10.00  $10.00 
Fishing Line  1 spool  $8.00  $8.00 
Needle Nose Pliers  5  $4.00  $20.00 
AquaMira  3 packages  $8.00  $24.00 
Air dry Clay  6 tubs (2.5 lbs each)  $4.00  $24.00 
Shoe box lids  20  free  free 
Clay saucers 5”x4”  20  $2.00  $40.00 
Pens  1 box of 60  $4.00  $4.00 
Pencils  1 box of 30  $5.00  $5.00 
Large Notepad 
27x34” 
2  $32.00  $64.00 
Long paper 48” wide 
x 200’ 
1 roll  $17.00  $17.00 
Clipboards  20  $1.00  $20.00 
Whistles  1 pack of 10  $4.00  $4.00 
62 
Scotch Tape  pack of 3 rolls  $2.00  $2.00 
Clothespins  1 pack of 100  $7.00  $7.00 
Tin Cans  12  free  free 
White cotton 
bandanas 
20  $0.49  $10.00 
Envelopes  1 box of 40  $3.00  $3.00 
Paraffin Blocks  6 lbs  $25.50  $25.50 
Acrylic Yarn  2 skeins  $3.00  $6.00 
Stirring Sticks  1 pack of 50  $3.50  $3.50 
Rubber Gloves  6 pairs  $2.00  $12.00 
S&S Worldwide Cold 
water dye 
assorted colors  $37.00  $37.00 
Clothesline 200 ft  1  $10.00  $10.00 
Paint Brushes  1 bag of 24  $6.00  $6.00 
Blindfolds  20  $0.91  $19.00 
Diamond Braid Rope 
100 ft 
1   $9.00  $9.00 
Birdhouse Gourds  20  $3.00  $60.00 
Tempera paint  1 box assorted pack 
of 12 
$30.00  $30.00 
Aluminum Paint Pans  20  $0.33  $7.00 
Scissors  20  $4.00  $80.00 
Perch for dissection  1   $5.00  $5.00 
White Paper Towels  1 roll  $2.00  $2.00 
Wax Paper  1 roll  $5.00  $5.00 
Flowers  2 bunches  free  free 
63 
Glue  10 bottles  $4.30  $43.00 
9 x12” Tagboard  1 pack of 100  $11.30  $11.30 
Double Stick Tape  1 pack of 3  $5.00  $5.00 
Tree Seedlings  10  $7.00  $70.00 
Wooden Stakes  1 pack of 30   $15.00  $15.00 
Twine  1 ball  $40.00  $40.00 
Garbage Bags  1 box of 40  $8.00  $8.00 
Plastic containers  10  recycled   free 
Mason jar rims  20  $0.41  $8.50 
Plaster of paris  1 tub of 8 lbs  $11.00  $11.00 
Marking Flags  1 bundle of 100  $7.00  $7.00 
Crisco Spray  2 cans  $7.50  $15.00 
Permanent marker  1 pack of 5   $4.30  $4.30 
5x8” notecards  1 pack of 100  $7.00  $7.00 
Matches  1 box  $4.00  $4.00 
Firewood  2 bundles  $5.00  $10.00 
Peanut Butter  2 jars  $3.00  $6.00 
Baby Carrots  2 lbs  $4.00  $4.00 
Spaghetti Noodles  2 boxes  $2.00  $4.00 
French Bread  4 loaves  $1.50  $6.00 
Garlic  2 cloves  $1.00  $2.00 
Butter  1 box  $5.00  $5.00 
Tomato Sauce  2 jars  $3.00  $6.00 
Mac’n’cheese mix  2 boxes  $5.00  $10.00 
64 
Ground Beef  2 lbs  $6.00  $12.00 
Apples  2 bags of 12  $4.00  $8.00 
Marshmallows  1 bag  $2.00  $2.00 
Graham Crackers  1 box  $3.00  $3.00 
Hershey’s Chocolate  1 package of 6 bars  $3.00  $3.00 
Aluminum Foil  1 roll  $5.00  $5.00 
Estimated Total cost:  $1,129.10 


65 


Budget 
   
66 
 
Creative Connections 
Budget 
 
Salaries: 
Program Director annual 
Main Facilitator 
($12/hour x 8 hours a day for 15 days, 
2 sessions) 
2 weeks of training pre‐camp  
Counselors x 4 
($9/hour x 8 hours a day for 16 days, 
2 sessions) 
1 week of training pre‐camp 
 
$32,000 
 
$2,520 
$1,500 
$4,020 
 
$1,890 
$110 
$2,000x4 = 8,000 


$44,020 
Travel: 
Van Rental (2) (transport around park) 
$90/per day x 15 days, 2 sessions 
Gas 
$2.50/gallon = $82.50 for 1 tank 
33 miles driving per session 
 
 
$5,400 
 
 
$330 


$5,730 
Food: 
$7/person per day x 15 days, 2 
sessions 
20 participants plus 5 staff 


$2,625  


$5,250 
Equipment: 
See Equipment List 
 
$7,202 
 
$7,202 
Supplies: 
See Supply List, 2 sessions 
 
$1,129.10 
 
$2,258.20 
Fees:   
Fishing License for staff 
$22 per person x 5 staff 
Canoe Registration 
$10.50 per canoe x 12 canoes 
 
 
$110 
 
$126 


$236 
Insurance: 
Liability:   
Workman’s Comp: 5% gross payroll 
 
$2,000 
$2,201 
 
 
$4,201 
Sub Total: $68,897.20 
67 
Promotion: 
10% of Subtotal 
$6,889.72   
$6,889.72 
Overhead: 
10% of Subtotal 
$6,889.72   
$6,889.72 
Grand Total:  $82,676.64 


68 


Evaluation 
   
69 
Creative Connections 
Evaluation Plan 
 
Participants 
Evaluation Tool  Method 
Formative: 
1. Application Questions (Application)   


2. Talk with parents 


3. Daily Take‐Aways (Lesson Plans) 


4. Journal Entries (Lesson Plans) 


5.  Swimming Assessment (Lesson Plan) 


1. Parents/guardians will respond to 
questions regarding their child’s 
interests.  This will help instructors 
modify activities around their 
interests. 
2. When parents come to drop off and 
pick up their children, we will 
encourage them to share their 
concerns or feedback about their 
child’s progress as this will help to 
build relationships within the 
community as well as receive 
feedback about the program and the 
child. 
3. At the end of every day, Creative 
Connections will have everyone 
gather in a circle and share one thing 
they learned or a lesson they really 
enjoyed.  This will help instructors 
understand where the students are 
developmentally as well as assess 
what activities are effective and most 
memorable.   
4. Each student will keep a journal in 
which they reflect upon certain 
questions regarding the activities. 
These prompts will help instructors 
view children’s growth as well as look 
at areas that need more focus. 
5. Students will complete a swim 
assessment at the beginning of the 
session in order for instructors to see 
how well the child can swim and view 
their comfort level around water. 
This is important as many later 
activities take place around water.   
 
70 
Summative 
1. Closing  


2. Art show 


3. Program Evaluation Forms 
1. After lunch on the last day, we will 
have a closing ceremony and group 
reflection.  We will reflect upon our 
learning and our group as whole.  This 
will help staff see how far the group 
has come and allow the students one 
more chance to bond. 
2. On the last day, an Art show will be 
held including all the kid’s work from 
the whole session.  Parents will be 
invited and the kids will be expected 
to explain their work to visitors.  This 
will help students reflect upon their 
work and allow staff to observe the 
kids telling all they have learned. 
3. At the end of the program, students 
will fill out an in depth evaluation 
form regarding the content and 
quality of the program and staff.  The 
instructors will help facilitate the 
evaluation. 
 
Parents 
Evaluation Tool  Method 
Formative: 
1. Talk with parents 


Summative: 
1. Program and Staff Evaluation Forms  
 
1. When parents come to drop off and 
pick up their children, we will 
encourage them to share their 
concerns or feedback about their 
child’s progress as this will help to 
build relationships within the 
community as well as receive 
feedback about the program and the 
child. 
 
1. At the end of the program, parents 
will receive evaluation forms 
regarding the program and the staff. 
They will be asked to fill them out and 
return them anonymously to a folder 
during the art show.   
 
71 
Staff 
 
Evaluation Tool  Method 
Formative: 
1. Pre‐instructor training 


2. Instructor Meeting 


Summative: 
1. Meeting with Staff/Director 


2. Program Evaluation (Form) 
 
1. Before an instructor is to begin 
facilitation in this program, they will 
go through a training designed to 
inform them of proper teaching 
techniques and how to work well with 
kids.  They will also get an overview of 
the lessons to become more familiar 
with them.  This will help staff 
become aware of what is going on in 
the program as well as what is 
expected from them. 
2. The instructors will have daily 
meetings before the start of every 
day.  They will discuss the daily 
schedule, and check in with each 
other as this is a good way to make 
sure everyone is on the same page. 
 
 
1. At the midpoint and end of each 
session, staff will meet one on one 
with the program director to discuss 
their performance and what has been 
going well or what can be improved. 
They will discuss differences written 
on the staff self‐evaluation and the 
Program Director’s Staff evaluation. 
2. At the end of each the session, staff 
will fill out a program evaluation 
form.  This will help to enhance future 
sessions as well provide constructive 
feedback for both the program and 
employer.   


72 
Creative Connections 
Student Program and Staff Evaluation Form 
 
Please complete each question by circling the answer that best describes your experience. 
 
1. Did you have fun at Creative Connections?  NO!  no  yes  YES! 
2.   Did you enjoy the Arts and Crafts?  NO!  no  yes  YES! 
3.   Did you enjoy the outdoor activities?  NO!  no  yes  YES! 
4.   Did you enjoy spending time in Itasca?  NO!  no  yes  YES! 
5.   Did you make any new friends?  NO!  no  yes  YES! 
6.   Did you learn any new skills?  NO!  no  yes  YES! 
7.   Did you like your instructors?  NO!  no  yes  YES! 
8.   Would you do it again?  NO!  no  yes  YES! 
 
Write about your favorite activity. 
______________________________________________________________________________
______________________________________________________________________________
______________________________________________________________________________ 
______________________________________________________________________________ 
Was there anything you wanted to do but didn’t get to? 
______________________________________________________________________________
______________________________________________________________________________
______________________________________________________________________________ 
______________________________________________________________________________ 
 
73 
What did you learn about yourself? 
______________________________________________________________________________
______________________________________________________________________________
______________________________________________________________________________ 
______________________________________________________________________________ 
Write about your thoughts about your counselors. 
______________________________________________________________________________
______________________________________________________________________________
______________________________________________________________________________ 
______________________________________________________________________________ 


74 
Creative Connections 
Parent/Guardian Program and Staff Evaluation Form 
 
Dear Parents/Guardians, please complete and return this evaluation form to the envelope by 
the door.  Your feedback is greatly appreciated! 
 
1. Please tell us what has gone well.  What has your child enjoyed about camp? 
______________________________________________________________________________
______________________________________________________________________________
______________________________________________________________________________ 
2. Is there anything you would like to see done differently? 
______________________________________________________________________________
______________________________________________________________________________
______________________________________________________________________________ 
3. Did you feel prepared for the program before it began?  If not, please explain what you 
would have liked to know additionally. 
______________________________________________________________________________
______________________________________________________________________________
______________________________________________________________________________ 
4. Did you feel we were able to communicate effectively throughout the program? 
______________________________________________________________________________
______________________________________________________________________________
______________________________________________________________________________ 
5. Please describe any changes you have seen in your child through the duration of the 
program. 
______________________________________________________________________________
______________________________________________________________________________
______________________________________________________________________________ 
6. Were the staff helpful and approachable? 
______________________________________________________________________________
______________________________________________________________________________
______________________________________________________________________________ 
7.  Do you have any more comments or feedback? 
______________________________________________________________________________
______________________________________________________________________________
______________________________________________________________________________ 


75 
Creative Connections 
Staff Program and Evaluation Form 
 
Please answer the following questions truthfully as this will help us give future staff a better 
experience.   
 
1. Did you feel well prepared for the program?  If not, what would have helped? 
______________________________________________________________________________
______________________________________________________________________________
______________________________________________________________________________ 
2. Were the lessons clear and easy to understand/teach? 
______________________________________________________________________________
______________________________________________________________________________
______________________________________________________________________________ 
3. Did you feel supported in your role as a staff member?  If not, what could we have done 
differently? 
______________________________________________________________________________
______________________________________________________________________________
______________________________________________________________________________ 
4. Please list: 
a. One Positive:_______________________________________________________ 
b. One Negative:______________________________________________________ 
c. One Change:_______________________________________________________ 
 
5. How was the energy between co‐instructors? 
______________________________________________________________________________
______________________________________________________________________________
______________________________________________________________________________ 
 
   
76 
Creative Connections 
Staff Self‐Evaluation Form 
 
1. What are some things you think you did well throughout the program? 
______________________________________________________________________________
______________________________________________________________________________
______________________________________________________________________________ 
 
2. What are some things you think you could work on? 
______________________________________________________________________________
______________________________________________________________________________
______________________________________________________________________________ 
 
3. What did you learn from this experience? 
______________________________________________________________________________
______________________________________________________________________________
______________________________________________________________________________ 
 
4. Did you enjoy your experience? Why/Why not? 
______________________________________________________________________________
______________________________________________________________________________
______________________________________________________________________________ 
 
5. Would you consider working with us next summer?  Why or Why not? 
______________________________________________________________________________
______________________________________________________________________________
______________________________________________________________________________ 
 
6. What could the Lead Facilitator or Program Director have done differently to help or 
support you through this program? 
______________________________________________________________________________
______________________________________________________________________________
______________________________________________________________________________ 
 
7. What was your favorite/least favorite part of this program? 
______________________________________________________________________________
______________________________________________________________________________
______________________________________________________________________________ 
 
77 
Creative Connections 
Program Director Staff Evaluation 
 
Name of Staff Member:___________________________________________________________ 
 
1. What did this staff member do well throughout the program? 
______________________________________________________________________________
______________________________________________________________________________
______________________________________________________________________________ 
 
2. What could they work on? 
______________________________________________________________________________
______________________________________________________________________________
______________________________________________________________________________ 
 
3. How did you see them change/grow from their experiences? 
______________________________________________________________________________
______________________________________________________________________________
______________________________________________________________________________ 
 
4. In what areas would you like to see this staff member step up more in leadership? 
______________________________________________________________________________
______________________________________________________________________________
______________________________________________________________________________ 
 
*Please fill out the following skills evaluation for each counselor. 


78 
Counselor Skill Evaluation 
 
Scale:  1 = Does not meet expectations 
2 = Partially meets expectations, could use improvement 
3 = Consistently meets expectations 
4 = Exceeds expectations 
 
Teaching Skills 
Manages time well and sticks to the schedule…………………………………………….  1  2  3  4 
Presents lessons in a clear and concise manner…………………………………………..  1  2  3  4 
Is attentive to kids and manages behavior appropriately…………………………….  1  2  3  4 
Invites questions and curiosity and provides clarification…………………………...  1  2  3  4 
Creates a positive and energetic environment for learning………………………...  1  2  3  4 
Interpersonal Skills 
Works cooperatively with Lead Facilitator and Co‐Counselors…………………….  1  2  3  4 
Flexible to changing plans………………………...………………………...……………………..  1  2  3  4 
Shows respect for individual differences, experiences, and ideas………………..  1  2  3  4 
Accepts and acts upon constructive feedback………………………...………………….  1  2  3  4 
Communicates effectively with staff, students and parents………………………..  1  2  3  4 
Technical Skills 
Provides good ideas and techniques for arts and crafts projects…………………  1  2  3  4 
Teaches Paddling skills correctly and effectively………………………...………………  1  2  3  4 
Demonstrates proper fishing skills………………………...………………………...…………  1  2  3  4 
Shows experience and knowledge of basic camping skills…………………………..  1  2  3  4 
Competent in knowledge of native plants and animals……………………………….  1  2  3  4 


79 


Resources 
   
80 
Creative Connections 
Resources 
 
Athens, M., Art Teacher at Evergreen Charter School, Feb 10 2015.   
 
American Canoe Association. (n.d). Retrieved from  
http://c.ymcdn.com/sites/www.americancanoe.org/resource/resmgr/sei‐educational_r
esources/beginners_guide_aca.pdf 
 
Bledsoe, K.E., Norvell, C., Goodman, N. (2004). ​365 Nature Crafts & Activities​. New York, NY:  
Backpack Books.  
 
Bunting, C.J. (2006). ​Interdisciplinary Teaching Through Outdoor Education. ​Champaign, IL:  
Human Kinetics​.   
 
Cleaver, S. (2007). Classrooms Are Going green:  How Green Classrooms Are Reconnecting Kids  
with Nature. ​Instructor. ​117(3‐), 20‐24.  
 
Cornell, J. (1989). ​Sharing Nature with Children II.​ Nevada City, CA: Dawn Publications.  
 
Cornell, J. (1998). ​Sharing Nature with Children​. Nevada City, CA: Dawn Publications.  
 
Family Friend Poems. (2006‐2015). Retrieved from  
http://www.familyfriendpoems.com/poem/the‐way‐of‐nature  
 
Itasca: State Park and Map guide. (n.d). Retrieved from  
http://files.dnr.state.mn.us/destinations/state_parks/itasca/park_guide.pdf 
 
Kowalski, K.M. (2000). ​The Everything Kids’ Nature Book​. New York, NY: Scholastic Inc.  
 
Leave No Trace. (2012). Retrieved from ​https://lnt.org/teach/focus‐youth‐and‐teens 
 
Minnesota Department of Natural Resources Park Info. (2015). Retrieved from  
http://www.dnr.state.mn.us/state_parks/itasca/narrative.html 
 
 
Minnesota DNR. (2015). Retrieved from  
http://www.dnr.state.mn.us/state_parks/itasca/index.html 
 
81 
Minnesota DNR. (2015). Retrieved from ​http://www.dnr.state.mn.us/animals/index.html 
 
Minnesota Historical Society, Itasca State Park. (1992). Retrieved from  
h​ttp://www.mnhs.org/places/nationalregister/stateparks/Itasca.php 
 
MNOpedia The Creation of Itasca State Park. (2008). Retrieved from  
http://www.mnopedia.org/event/creation‐itasca‐state‐park 
 
National Park Service. (2015). Retrieved from​ http://www.nps.gov/miss/riverfacts.htm 
 
The Nature Conservancy. (2015). Retrieved from  
http://www.nature.org/ourinitiatives/habitats/riverslakes/placesweprotect/mississippi‐
river.xml 
 
Nichols, C., Swim Instructor at Camp Thunderbird for Girls, via Facebook received 13  
February 2015.   
 
Poetry in Nature. (2007‐2015).  Retrieved from  
http://www.poetryinnature.com/nature/poetry.asp?poem=4717#ixzz3Rqu2K91v  
 
Project WILD. (2012). ​Project Wild​. Houston TX: Council for Environmental Education 2012.   
 
Richard Louv. (2005). ​Last Child in the Woods: Saving our children from Nature‐Deficit Disorder​.  
Chapel Hill, NC: Algonquin Books. 
 
Song. Y. K. (2010). Art in Nature and Schools: Nils‐Udo. ​Journal of Aesthetic Education. ​44(3).  
96‐108. 
 
Strauch‐Nelson. W. (2012). Reuniting Art and Nature in the Life of the Child. ​Art Education.  
65(3). 33‐38. 
 
Strife. S.J. (2012). Children’s Environmental Concerns: Expressing Ecophobia.  ​The Journal of  
Environmental Education. ​43(1), 37‐54.  
 
WWC E​co Team. (n.d) Lesson 1:  River Basins.  
WWC Eco Team. (n.d)  Lesson 6:  Pollination.   
82 


Lesson Plans 
 
   
83 
Activity:  Introductions 
 
Time:​ 1.5 hour 
Location:  ​Visitor Center 
Materials: 
Each child will need: 
● Animal Scramble Card (print cards as 4x6 images, images can be repeated if needed) 
● Clothespin 
● Getting acquainted sheet  
● Pens or pencils 
 
Objectives: 
This lesson aims to introduce the program and get to know all the participants 
By the end of this lesson, students will: 
● Feel more comfortable with the group 
● Have learned some names  
● Know rules and expectations 
 
Procedure: 
Warm‐up: 15 minutes 
1. Begin by playing Wild Animal Scramble as a warm‐up.  First gather all the kids in a circle 
and introduce yourself.  Then say the game you will be playing is called Wild Animal 
Scramble.   
2. Walk around the outside of the circle and pin a picture (attached) on each child’s back 
while explaining the game.  Or have another staff member pin pictures on while you 
explain. 
3. Tell the children that upon starting the game, they should ask each other for clues about 
what their animal is.  They cannot look at their own animal, and may ask only yes or no 
questions. 
4. Explain that asking about characteristics will be more helpful than guessing species right 
away.  For example, asking “Do I have Wings?”  is more helpful that asking “Am I a 
Butterfly?” 
5. Once they feel they know what their animal is, they can guess.  If they are right, their 
teammate helps them pin their picture on the front of their shirt. 
6. Continue game until everyone has guessed their animal. 
 
Introductions: 10 minutes 
7. After the game, move on to introducing the program and the staff.   
84 
8.  Have each staff member step forward and introduce themselves.  They can share their 
name, and favorite thing about nature. 
9.  Talk about Creative Connections and welcome the kids.  Let them know you are happy 
they are here, and you are excited for the upcoming three weeks.   
 
General Expectations:  20 minutes 
9.  Be sure to cover basics of the day, such as; meals and snacks, general daily schedule, and 
themes of the weeks. 
10.  Get a feel for what each child is excited about by asking, “Who is most excited 
for...canoeing, fishing, hiking, swimming, arts and crafts, etc.”  and having them raise their 
hands. 
11.  Go over the Value contract that they all signed in their application process to reinforce 
expected behavior. 
 
Name Game: 15 minutes 
12.  After getting through introductions, move on to ice breakers and name games. 
13.  To learn the kids names, play the picnic name game.  Going around the circle, each child 
will say their name and something they are bringing to a picnic that starts with the same 
letter of their name.  For example, Jared can bring Jello. 
 
Getting Acquainted: 15 minutes 
14. After Learning names, pass out the Getting Acquainted game sheet (attached) and 
writing utensils.   
15.  Explain that their goal is to talk to as many people as possible and fill out their sheet 
with as many different names as they can.  They should try to talk to everyone and not 
linger too long with one partner. 
16.  After they seem to have finished, ask them to share about something they learned 
about one other person in the group.   
 
Game: 15 minutes 
17. End the game time with a fast moving game. 
18.  Get the kids back into a circle and explain how to play Snake tag. 
19.  In this version of tag, there are 2 people who are “it”.  These people are the snake 
heads.  Upon tagging another person, that person must attach to the snake head and 
becomes part of the snake.  The children attach to each other by holding hands, and must 
then try to tag more people while remaining connected.   
20.  Pick two children to be it, and then start the game.  Allow them to play until all children 
are part of the snake.  If there is time, restart and play again with two different snake heads. 
 
85 


Evaluation: 
● Participation and enthusiasm in activities will show their comfort level with the group 
and their engagement in the activities.   
 
Sources: 
 
Cornell, J. (1989). ​Nature Activities. ​Sharing Nature with Children II. (pp. 72). Nevada City, CA:  
Dawn Publications.  
 
Cornell, J. (1998). ​Nature Activities. ​Sharing Nature with Children. (pp. 86). Nevada City, CA:  
Dawn Publications.  


86 
 
 
87 
 
 
88 
 
 
89 


90 


91 


92 


93 
 
 
94 
 
 
95 


96 
Getting Acquainted 
1. Has something specific they want to learn from nature. 
 
 
2.  Sits quietly every day and observes nature. 
 
 
3.  Has seen an endangered species. Species?  
 
 
4.  Has slept in a tipi. 
 
 
5.  Has helped an injured tree or animal. 
 
 
6.  Has an exciting or inspiring nature experience to share. 
 
 
7.  Has a favorite nature activity.  What? 
 
 
8.  Has been lost in the outdoors. 
 
 
9.  If stranded on a deserted island has three books they would choose… 
 
 
10.  Can recite a poem, song or passage about nature. 
 
 
11.  If you had to become an animal or plant, what would you choose? 
 
 
12.  Has a compelling reason why he likes to share nature. 
 
 
13.  Has overcome some personal limitation while in nature. 
   
97 
Activity:  Sensory Hike 
 
Time:​ 1 hour 15 minutes 
Location:​ hiking trails 
Materials: 
● Roped trail 
Each student will need: 
● Blindfold 
● Pen or pencil 
● Letter to self and envelope 
● Clipboard 
 
Objectives: 
This lesson aims to allow students to get out on the trails of Itasca, and immerse 
themselves in nature by using all their senses.  
 
By the end of this lesson, students will: 
● Have experienced a short trail hike. 
●  Used all of their senses to complete a string trail while blindfolded 
● Reflected upon their connection to nature in a written letter to themselves 
 
Procedure: 
This lesson requires set‐up prior to the hike. 
1.  Find an area off the main trail that offers a variety of experiences. Some things to look for or 
include might be; fallen moss covered logs, dry pine needles, low hanging branches, large rocks 
etc.  Important themes to keep in mind are variety and mystery. 
2.  Decide which side of the string the children will walk on.  They will stay on this side 
throughout the whole trail. 
3.  Set up the trail by wrapping the rope around trees or other objects you want the children to 
come across.  The trail should be at waist‐height for children.  Make it fairly long, but not too 
long as it will take longer to complete while blindfolded.  You might want to give it a test run 
before the lesson. 
 
Hike 10 minutes 
4.  Gather group together and walk on the trail to the point where your blind trail begins.  
5.  Stop here and make sure everyone is still together.  It would be a good idea to have an adult 
at the end of the group. 
 
 
98 
Focus attention: 5 minutes 
6.  Have the children sit along the side of the trail a few feet apart from each other. 
7.  Tell them to close their eyes and listen to the sounds around them.  Have them raise a finger 
for every new sound they hear. 
8.  After a few minutes have passed, have them open their eyes and compare how many sounds 
each child heard.  Who heard the most?  This activity will help the kids get into a calmer state 
and be readily quiet for the blind trail. 
 
Activity: 40 minutes 
9.  Explain that they will now be using all their senses but their eyes to complete a trail through 
the forest.  Tell them that they will keep one hand on the rope at all times and should not 
switch sides of the rope.  They can feel around with the other hand as they walk.  
10.  Pass out blindfolds and help the kids tie them on. 
11.  Start a few at a time by placing their hand on the rope.  Remind them that this is a quiet 
activity and they should be listening, smelling and feeling as they walk.   So they do not become 
crowded on the trail, faster moving kids can be moved around the slower movers with your 
guidance. 
12.  Have an adult waiting at the end of the trail to receive everyone when they finish. 
13.  As they finish, help them take off their blindfold. 
14.  Give them an envelope with the letter inside, and tell them to find a quiet place to write.  
15.  After all have finished the trail, give them some time to finish their letters.  If others have 
already finished, tell them to sit quietly and observe all that is around them.  They can try to 
hear as many sounds as they can again if they would like.  
 
Reflection: 20 minutes 
16.  Once it seems like everyone has finished, quietly call them back to group up.  Collect their 
letters and write their names on the envelope.   
17.  Ask them, how long they thought the trail was, and if they think they could find their way 
back to the main trail. 
18.  Head back to the main trail and ask them about their discoveries along the way. 
19.  Hike back to the main area for lunch.  
 
Evaluation: 
● Completion of the letter will show that they had time to reflect after the blind trail 
experience. 
● The questions and discussion at the end will show that they took note of their 
observations.  
 
 
99 
Sources:   
 
Cornell, J. (1998). ​Section I, Section 2. ​Sharing Nature with Children​ ​(pp. 31, 40). Nevada City,  
CA: Dawn Publications.   
 
Cornell, J. (1989). ​Stage Four. ​Sharing Nature with Children​ ​(pp. 117). Nevada City, CA: Dawn  
Publications.   


100 
 
Letter to Self 
Write a Letter to yourself telling everything you want to remember about this 
experience a few weeks from now.  Your letter will be completely confidential.  You will get it 
back on the last day of this program.   
 
To myself: 
 
______________________________________________________________________________
______________________________________________________________________________
______________________________________________________________________________
______________________________________________________________________________
______________________________________________________________________________
______________________________________________________________________________
______________________________________________________________________________
______________________________________________________________________________
______________________________________________________________________________
______________________________________________________________________________
______________________________________________________________________________
______________________________________________________________________________
______________________________________________________________________________
______________________________________________________________________________
______________________________________________________________________________
______________________________________________________________________________
______________________________________________________________________________
______________________________________________________________________________ 
 
Yours Truly, 
_________________________   
101 
Activity: Nature Scavenger Hunt 
 
Time:​ 2 hours 
Location:  ​Trails surrounding the Visitor’s Center 
Materials: 
Each group will need: 
● 1 Clipboard 
● 1 Bag 
● 1 Pen/pencil 
● 1 Attached scavenger hunt list 
● 1 Whistle 
Each child will need: 
● Journal 
● Coloring utensils 
● Glue or tape 
 
Objectives: 
This lesson aims to get kids active while outside, and to get them excited about being in Nature, 
while being observant and identifying things found in nature. 
 
By the end of the lesson, students will be able to: 
● Identify a list of items found in nature 
● Understand the purpose of certain items found in nature 
● Find their way around a few trails and back to the starting point 
 
Procedure: 
 
Intro and Rules:  10 minutes 
1.  Break the group up into smaller groups of 3 by passing out notecards with a tree name 
written on them.  Examples could include: Birch, Pine, Maple, Oak, Aspen, and Elm.  These will 
be their team names.   
2.  Pass out a clipboard, attached list, pencil, and bag to all groups. 
3.  Explain that their task is to find everything on their list, or as many items as possible before 
their time is up. 
4.  They have 30 Minutes to collect the items. 
5.  They should be able to pick the items up and place them in their baggie. 
6.  Explain that the items they are collecting should not be still needed by nature.  For example, 
they should not pick a green leaf off of a tree, but should rather pick up a brown leaf from the 
forest floor.  The list is tailored so that most items they are looking for are already unused.  
102 
7.  Explain their boundaries, which are to stay on the trail loop that surrounds the Visitors 
center.  They should stay on the trail as much as possible, and if they do get lost, tell them to 
stay where they are and blow one long tweet on their whistle.   
8.  Once the time is up, you will blow three short tweets on your whistle, which will let them 
know to make their way back to the trail‐head. 
 
Activity: 30 minutes 
9.  To avoid starting the groups all at once and from the same place, start them facing different 
directions. 
10.  After they have started, be present along the trail to keep all the groups accounted for. 
11.  After 25 minutes, blow the whistle and make sure everyone is accounted for back at the 
Visitors center. 
 
Discussion:  30 minutes 
12.  Have the groups pull everything out of their bags and lay the items out around them. 
13.  Go through the list and have each group show you an item.  Check to see if every group has 
found the item and identified it correctly. 
14.  Clarify any confusing objects that were identified incorrectly, or be prepared to explain or 
show any objects that were not found. 
15.  As you look at the objects, talk about where were they found and what is their purpose?  
 
Reflection:  40 minutes 
16.  Pass out notebooks/journals to each child.  Have them write their name on the cover. 
17.  Explain that they will use these journals throughout the whole session, and they are for a 
collection of their learning. 
18.  Give them the first prompt in their journal:  Pick two objects found on your scavenger hunt 
and describe them.  Encourage them to draw pictures of the objects, and write what it is called, 
where it was found, and what its purpose is.  
19.  If the group agrees on it, they can tape or glue the object into their notebook. 
30 minutes 
20.  Allow them to work in their journals for 30 minutes. 
 
Clean‐up:  10 minutes 
21.  Allow 10 minutes to clean up, and put unused natural objects back in the woods.  
 
Evaluation: 
● Completion of the journal prompt at the end of the lesson will show that students have 
identified objects in nature and understand their use and purpose in nature.  
 
103 
 
Sources: 
 
Bledsoe, K.E., Norvell, C., Goodman, N. (2004). Our Precious Planet. In S. Milford & K.B. Sagert  
(Eds.), 365 Nature Crafts & Activities (pp. 31). New York, NY: Backpack Books.  
 
Cornell, J. (1998). ​Section IV: Learning is fun. ​Sharing Nature with Children. (pp. 84). Nevada  
City, CA: Dawn Publications.  
 
Kowalski, K.M. (2000). Life in the Forest. The Everything Kids’ Nature Book (pp. 35). New York,  
NY: Scholastic Inc. 


104 
 
Scavenger Hunt 
Collect only things that you can return safely and without damage. 
 
● Pine Cone 
● Thorn 
● Bone 
● Something round 
● Part of an egg 
● Something fuzzy 
● Something sharp 
● A piece of fur 
● Something perfectly straight 
● Something beautiful 
● Something that makes a noise 
● Something that reminds you of yourself 
● Something soft 
● Pine needles 
● 4 different kinds of leaves 
● Leaf with insect holes 
● Something white 
● Something Gray 
● Heart shaped rock 
● 5 pieces of man‐made litter 
● Feather 
● Seed pod 
● Birch bark (found on the ground) 
● A nut 
● Clover 
● Something that you find intriguing 
 
   
105 
Activity: Daily Take‐Away 
 
Time:​ 15 minutes 
Location:​ location of last lesson plan 
Materials:  
● Sharing stick 
 
Objectives: 
This lesson aims to allow students to reflect upon their day 
By the end of this lesson, students will: 
● Be able to share one thing that they learned and enjoyed from the day.  
 
Procedure: 
This lesson plan will be used every day for the end of day daily reflection.  Follow the lesson plan 
accordingly and end with the appropriate poem for each day.  
1. Gather group into a circle.  Have everyone sit down and close their eyes. 
2. Tell them to think to themselves for two minutes about all they did during the day and 
what they most enjoyed and learned from their experiences. 
3. After two minutes have passed, tell everyone to open their eyes. 
4. Ask for volunteers to share what they learned from their day.  Not all children have to 
share, but they should be encouraged to do so.  
5. Pass around the sharing stick and remind them that whoever has the stick is the one 
doing the talking.  Everyone else should be quiet and listening.  
6. Listen to each individual child share their “take away” until all have shared or there are 
no more volunteers. 
7. Take the sharing stick back so you can read the end of day poem. 
 
Evaluation: 
● Participation in the sharing circle will demonstrate what they have learned from the day, 
and what they will take away with them and remember.  
Sources: 
Cornell, J. (1989). Nature Activities. ​Sharing Nature with Children II ​(120). Nevada City, CA:  
Dawn Publications.  
 
Family Friend Poems. (2006‐2015). Retrieved from  
http://www.familyfriendpoems.com/poem/the‐way‐of‐nature  
 
Poetry in Nature. (2007‐2015).  Retrieved from  
http://www.poetryinnature.com/nature/poetry.asp?poem=4717#ixzz3Rqu2K91v  
106 
Poems 
 
Day 1:  The Way of Nature  
By Trisha Prisad 
Oh the trees, 
See them cluster, 
They give you shade, 
That's the way of nature. 
 
They feed you, 
At the right time, 
They feed you with the right things, 
That's the way of nature. 
 
The earth rotates, 
Around the sun, 
It causes day and night all long, 
That's the way of nature. 
 
The stars and moon, 
Pop out at night, 
And there they glow, 
With all the light, 
That's the way of nature. 
 
The clouds in the sky, 
That look like sheep, 
They clash together, 
And thunder seeps, 
That's the way of nature. 
 
Oh! The animals, 
See them play, 
With all their might, 
They go their way, 
That's the way of nature. 
 
The blue ocean, 
Spreads so far, 
It has no end, 
Like a war, 
That's the way of nature. 
 
 
The mountains high, 
Could touch the sky, 
Of different size and colors, 
That's the way of nature. 
 
Day 2:   Hear Earth 
By Anonymous 
Beautiful is the smile  
That catches every glimpse  
No wonder its Nature's art  
Sign of the Happy Heart  
 
Sweet are the Fruits that trees bear  
Green is the Grass, the land may wear  
No wonder its Nature's art  
Sign of the Happy Earth  
 
Walking the paths of life apace  
Trying to make your own space  
Fulfilling the dreams that are innate  
Heart is where inner feelings originate  
 
Strong, deep roots hold high trees  
Grow free and bounty, as One sees  
Seasons change and nothing is strange  
Everything change and age  
 
What seems truly beautiful  
Needs to be beautiful within  
 
What flourishes and nourishes everything  
Needs to be flourished and nourished 
 
107 
 
Day 3:  A World Without Rain 
By Elijah O 
In a world without rain, 
all the grass turned brown, 
trees cracked and burned, 
clouds disappeared, 
and the birds flew away. 
In a world without rain, 
Spring turned to Fall, 
night became day, 
the sun was a ruthless giver of heat 
mountains crumbled, 
and the land swallowed the sea.  
 
 
Day 4:  Water 
By Kavanagh A. McGeough 
Plunge into the glinting fjord,  
Dive into the deep rushing river,  
Glide across the muddy swamp,  
Float in the green lake,  
Submerge in the salty ocean,  
Freeze in the icy sound,  
Immerse in the soggy channel,  
The winding river is gushing into the Arctic 
ocean,  
A swirling puddle reflects traffic,  
Multicolored,  
Changing life,  
Sustaining water. 
 
Day 5:  The Natures Power 
By Keira 
Natures gifts are all around, 
Yellow, green, red and brown, 
Mirrored water that reflex my frown, 
Butterflies flying in the dusky dawn, 
Orchids blooming in the early morn, 
Insects scuffling around the bush, 
Dames that provide water to give nature a 
push, 
America provides a life for all, 
For flowers and creatures big or small 
Day 6: Look Outside  
By Josie Greveling 
Look Outside, see the trees 
Watch the flowers in the breeze 
Things won't be like this in a year or two 
If polluting is all we do 
Seize the night 
Seize the day 
Things won't always be this way 
Thousands of people are dying 
In the night you hear children crying 
Let's stop the war 
Our people are sore 
The world can't help itself 
Who cares about your wealth 
Help me to help you 
Show the world what you can do. 
 
Day 7:  Whispering Pines 
By A.T.C 
The wind blows,  
And the trees whisper my name.  
A sound of serenity bounces on and off my 
ear drum.  
 
I hear peace,  
And nothing else.  
The soothing sound relaxes me as the trees 
dance with the wind.  
 
Inhale,  
Exhale,  
I take a deep breath.  
 
My eyes open as I finally comprehend,  
It all depends,  
If you’re ready or not,  
But it will come.   
 
108 
 
Day 8:  A Butterfly Life 
By Sarah Zylstra 
As the caterpillar sleeps inside its cocoon 
Like a baby wrapped in her blanket  
She waits and waits until she blooms  
Into a beautiful new life  
With wings of deep sapphire blue 
She takes her first flight, soaring high 
Into the clear cornflower sky 
She flutters over to perch on the pink flowers  
To sip the sweet nectar of pure gold  
But this butterfly is daintier than a ballerina  
Like a leaf in the wind, but controlled 
So delicate and fragile 
But so free, so free this butterfly will always 
be. 
 
Day 9:  Life the Way it Should Be 
By Taylor Jordao 
Tell me what do you see 
Purple, green, and gold, 
Mountain peaks that touch the sky 
Little black birds flying by 
 
Sun setting in the west 
Flowers in the east, 
Calm, relaxing breeze 
And forests filled with trees 
 
Tell me what do you see 
The sky starts to fade as night approaches 
Animals will soon come out 
The spring is ending without a doubt 
 
Fall is coming near 
Cold weather's on its way, 
Flowers start to die  
Birds go south, bye bye. 
 
Tell me what do you see 
Happiness, love, and beauty, 
Everyone is free 
Life the way it should be. 
Day 10:  The Birds of the Air  
By Joseph Cornell 
The birds of the air are my brothers, 
All flowers my sisters, 
The trees are my friends. 
  
All living creatures, 
Mountains and Streams, 
I take unto my care. 
  
For this earth is our mother, 
Hidden in the sky is the spirit above. 
  
I share one life with all who are here; 
To everyone I give my love, 
To everyone I give my love.   
 
Day 11:  Earthworms 
By Karen Magnuson 
Dad and I used to catch worms the 
evening before we went fishing, 
we stalked slowly about the yard 
with a flashlight and an 
ice cream pail filled with dirt 
and watched the grass for the 
pink flesh of the juicy nightcrawlers. 
 
I remember the first one I caught, 
its body curled around my fingers 
like a phone cord, 
and I marveled at the ridges of its skin 
how its body's fragile plumpness felt 
when it tried to get away before 
I released it into the pail. 
 
(Later, I learned that Aristotle called 
them the 'intestines of the earth,' 
they could digest their own body weight 
in soil every 24 hours, and are among 
the most defenseless, 
yet successful of creatures.) 
 
 
109 
When we baited our lines, 
I admired their strength 
as they struggled against the 
fate they could not know, 
wondering if God would be mad 
if we didn't catch any fish. 
 
Day 12:  Summer Days, Rainy Nights 
By Daniel W. Flood 
I would sit outside on a sunny day  
Take a deep breath and feel the  
Sweet, crisp summer air passes over  
My tongue and down my airway  
I'd hold it in for a moment in time  
Enjoying the taste and smell of  
The summer air and wishing  
That my life could stop on a dime  
Wishing that I could have that day  
That moment forever enjoying the  
Peaceful tranquility of what god has  
Put forth in such a mysterious way  
As the breeze blew and the leaves  
Rustled in the wind, rain began to  
Fall and the peace of the early day  
Turns to night on what I perceive  
I'd stand up and walk out into the rain  
Watching as the rain falls slowly to me  
I feel the cold droplets run down my face  
This is an image that is drawn within my 
brain 
 
 
Day 13:  Beautiful Earth 
By Kathye Perry 
What a wonderful joy it is to see,  
The beauty of nature and its majesty.  
 
Everything blends, entwines and embraces,  
Spaced precisely in their designated places.  
 
What a marvel to see, I wish I were a bee,  
Flying free,  
Smelling life's roses, no particular place to 
be. 
How can it be, such a marvel to see  
When it’s possessed by such as you and me?  
 
Ours to have, cherish, and protect,  
Not to pollute, take for granted, nor neglect.  
 
Enjoy the earth, treat it kind  
After all it is ours, yes... yours and mine. 
 
Day 14:  As Time Passes By 
By Alice G 
The butterflies are floating through the air. 
The grass is green, 
and the trees are tall. 
As the wind whistles through my hair, 
I let life pass me by. 
As time ticks and the clock goes by, 
the flowers grow taller as life passes me by. 
And I dream of floating right on by. 
But now it's time to stop dreaming, 
and wake up to a hot summer day. 


110 
Activity: Morning Warm ups 
 
Time:​ 15 minutes per activity 
Location:  ​Outside the visitor’s center 
Materials:   
● Most activities do not require any materials 
● Only materials needed are blindfolds 
 
Objectives: 
This lesson aims to start the day off by engaging the students and awakening their enthusiasm 
for the activities of the day.   
 
By the end of this lesson, students will: 
● Be awake and energetic 
 
Procedure: 
1.  Gather group in a morning circle 
2.  Choose one of the following attached activities 
3.  Facilitate the activity 
4.  Wrap it up and introduce the morning activity/lesson 
 
Evaluation: 
● Once the children are all having fun and participating in the game, the goal has been 
met.  
 
Sources: 
 
Bledsoe, K.E., Norvell, C., Goodman, N. (2004). 365 Nature Crafts & Activities. New York, NY:  
Backpack Books.   
 
Cornell, J. (1989). ​Sharing Nature with Children II.​ Nevada City, CA: Dawn Publications.  
 
Cornell, J. (1998). ​Sharing Nature with Children​. Nevada City, CA: Dawn Publications.  


111 
Day 2:  ​Sleeping Giant: 
1. Pick one child to be the sleeping giant.  The rest of the group will be stalkers. 
2. The Giant sits blindfolded on the ground, guarding an object of great value that rests in 
front of them.  Use a hat, flag, pretty stone etc.   
3. The Giant has fallen asleep while guarding their treasure. 
4. The stalkers form a ring around the giant and start to advance as quietly as possible. 
They can go barefoot if they like.   
5. They must get close enough to touch the treasure without waking up the giant. 
6. If the giant hears someone approaching they point in that direction and, if caught, that 
person must go back to the edge of the circle.   
  
Day 3: ​Camera: 
1. One player takes the role of photographer and the other is the camera. 
2. Have children pair up, and the person playing the camera close their eyes. 
3. The photographer guides the camera on a search for pictures. 
4. The photographer can move the camera to look at whatever they want. 
5. One tap on the camera’s shoulder means to open their eyes.  A second tap means close. 
This takes a picture. 
6. Have the camera take five pictures and then switch places with their partner. 
 
Day 4: ​Walk like the Animals 
1. Decide on a starting and finishing line and divide the group up into 4 groups of 5. 
2. Have each team start on the beginning line and assign each person on the team a 
different animal. 
3. Animals could be:  crab, chimp, frog, bear, snake, fish. 
4. Choose harder animals to imitate such as a snake or fish to challenge them. 
5. On signal the first person in line walks like their animal to the finish and back, and tags 
off to the next person in line until all have gone. 
 
Day 5: ​Caterpillar Walk 
1. Blindfold all the players and have them stand in two lines of ten.   
2. Have them put their hands on the person’s shoulders in front of them.  Lead them to an 
area a little ways away and let them explore with their hands. 
3. Lead them back to where you started. 
4. Take off their blindfolds and have them try to find the place they were just at.   
 
Day 6: ​Fox and Mouse 
1. Break the group up into two smaller groups. 
2. Have both groups form a circle, and one person go in the center as the fox. 
112 
3. The fox closes their eyes, and one of the mice (from the edge of the circle) walks in an 
inner circle around the fox and back to their space. 
4. The fox can then open their eyes and tries to guess which person was the mouse.   
 
Day 7:  ​Build a Tree 
1. Players act out the various parts of a tree. 
2. Heartwood: ​choose two or three taller players to play the heartwood.  Have them stand 
with their backs to each other and explain that this is the heartwood, the inner core and 
strength of the tree.  The player’s job is to stand tall and strong. 
3. Taproot: ​ask several people to play the taproots.  They will sit at the base of the 
heartwood, facing outward.  Tell them, you are the taproot, you are a very long root 
deep in the ground, reaching water. 
4. Lateral Roots: ​Choose several people to lay on the ground as the lateral roots.  Have 
them lie on their backs with their feet up against the trunk and their bodies extending 
away from the tree.  Tell them:  you are the lateral roots growing outward around the 
tree like branches but underground.  You help hold the tree upright.   
5. Sapwood:  ​Have a small group play the sapwood.  Choose enough people to make a 
circle around the heartwood, facing inward and holding hands.  Tell them, you are the 
sapwood or xylem.  You draw water up from the roots and lift it into the highest 
branches. 
6. Cambium/Phloem:  ​Select a group to play cambium.  Have them form a circle around 
the sapwood also facing inward and holding hands.  Tell them:  You are the cambium or 
phloem and you help bring nutrients from the trees branches down to the roots.  You 
also add a new ring every year as the tree grows.   
 
Day 8: ​Animal Parts: 
1. Divide the group into groups of 4 or 5.   
2. Ask each team to select an animal that they find interesting. 
3. Then tell them that each group will have to immitate the body of their animal. 
4. Give the teams time to practice portraying their animal.   
5. Have each group perform their animal while the other groups try to guess what they 
are.   
  
Day 9:  ​Predator Prey 
1. Form a circle with the kids 
2. Blindfold two of the children and have them stand in the center of the circle. 
3. Ask one of the children to name a predator that lives in the area. 
4. Ask the other child to name a prey. 
5. The Predator tries to capture his prey by listening for them and tagging them. 
113 
6. The children at the edge of the circle will tap one of them twice if either get too close to 
the edge.   
7. Tighten up the circle or add more prey to make the game more interesting. 
 
Day 10: ​Mystery Motions 
1. To play this game have the kids stand in a circle. 
2. One person leaves the circle while you pick someone to be “it”.  Make sure everyone in 
the circle knows who it is. 
3. Have the other person come back and stand in the middle of the circle. 
4. The person who is “it” starts a rhythm or motion like snapping or waving their hands. 
everyone else must follow them.   
5. They continue to switch motions and everyone follows until the person in the middle 
guesses who is the one changing the movements.   
 
Day 11: ​Oh Deer 
1. Pick 5 kids to be the deer, the rest are resources. 
2. Line up the deer and the resources up on opposite sides facing away from each other to 
begin with.   
3. Tell the deer and the resources to be either shelter (hands over head like a house), food 
(hands over belly), water (hands over mouth)  
4. When you say Oh Deer, the two sides will turn and face each other, run towards each 
other and find someone with their same resource. 
5. Whatever deer don’t find a resource, joins the resource team.  The deer who find a 
resource bring their resource to their side. 
6. The game continues until most deer are gone, or most resources are gone.   
 
Day 12: ​Stretches 
1. Since today might be hard on the arms as kids learn to canoe, start the morning with 
stretches. 
2. Stretch all parts of the body, the arms, legs, and do some yoga! 
 
Day 13: ​Bat Tag 
1. Bats find their food by echolocation, sound!  Have two people be the bats, and put 
blindfolds on. 
2. All the others, insects, spread out. 
3. When the bat squeaks, the insects must make a chirping noise back 
4. The bats are allowed to move around, but the insects are not.   
5. The bats have to find the insects by listening to their chirps.   
 
114 
Day 14: ​Hawk eye 
1. One person is chosen to be the hawk.  They stand and close their eyes and count to fifty. 
2. The rest of the kids find a place to hide.  They must hide as well as they can while still 
being able to see the person who is the hawk. 
3. When the hawk has counted to fifty, they open their eyes and try to find the children 
hiding from the place they are standing.   
 
Day 15: Play one of the kids favorite activities or morning warm up games on the last day.   


115 
Activity: Timeline 
 
Time: ​2 hours 
Location:  ​Visitor Center 
Materials: 
● Coloring utensils 
● Segments of Big pieces of paper 
● Tape 
 
Objectives: 
This lesson aims to teach kids about the history of the park 
 
By the end of the lesson, students will: 
● Summarize the history of the park from foundation to present day 
● Be able to talk about their segment of the timeline more thoroughly 
 
Procedure: 
 
Intro:  5 minutes:   
1. After touring the Visitor’s Center and examining all the historical interactive exhibits, the 
kids should have a pretty good idea of the major events that have happened in the 
Park’s history.  Explain to them that they will use their knowledge and the exhibits to 
create a Timeline about the park. 
2. Break the group up into pairs and assign one of the main events to each pair.  Tell them 
that they are responsible for depicting this event as clearly as possible, by drawing or 
writing or whatever they think will convey the happening.   
 
Pre‐project study:  20 minutes 
3. Allow them some time to explore the exhibits specific to their event and take notes that 
they may need.   
 
Activity:  40 minutes 
4. Pass out big pieces of paper to each pair, and allow them to illustrate their event on the 
paper.  They can go back and look at their event if need be in the exhibits. 
 
Discussion:  40 minutes 
5. Once everyone has completed their event, lay them out on the floor and have them put 
the events in chronological order. 
116 
6. Once they think they have it right, double check, and then have them write the year of 
their event at the top of their paper.  
7. Go through the Timeline once more as a complete and accurate description of the park’s 
history, and tape the pieces together.  Have each pair of children explain their piece in 
the timeline to the rest of the group.   
8. Hang the Timeline on the wall for them everyone to see.  
 
Reflection:  15 minutes 
9. Pass out their journals and have them write down three events from the timeline that 
they think are most important to the park.   
10. Go around the group and ask for volunteers to share one event that they think is most 
important to the park and explain why.   
 
Evaluation: 
● Accurate completion of the timeline shows they have applied their learning from the 
interactive displays. 
● Participation in discussion and explanation of part to group shows that they understand 
the history in their part.   
 
Sources: 
 
Itasca: State Park and Map guide. (n.d). Retrieved from  
http://files.dnr.state.mn.us/destinations/state_parks/itasca/park_guide.pdf 
 
Minnesota Department of Natural Resources Park Info. (2015). Retrieved from  
http://www.dnr.state.mn.us/state_parks/itasca/narrative.html 
 
Minnesota Historical Society, Itasca State Park. (1992). Retrieved from  
h​ttp://www.mnhs.org/places/nationalregister/stateparks/Itasca.php 
 
MNOpedia The Creation of Itasca State Park. (2008). Retrieved from  
http://www.mnopedia.org/event/creation‐itasca‐state‐park 


117 
Timeline: 
6000 BCE ‐ Indigenous people inhabit northern Minnesota around Lake Itasca. 
 
Bison Kill Site: Archaeologists have dated back 7,000 years – prehistoric peoples hunted 
bison in the area 
 
1200 CE ‐ The Blackduck people establish a village on the northern shores of Lake Itasca 
 
1700s ‐ Ojibwe groups move into northern Minnesota, where the Dakota already reside. The 
Dakota depart for the prairie to the south. 
 
1714 ‐ Preachers Grove –stand of red pines that began after forest fire in 1714 – a religious 
convention once held there.  
 
1803 ‐ President Thomas Jefferson negotiates the Louisiana Purchase with France. The sale 
includes land around Lake Itasca. 
 
1832 ‐ The Ojibwe leader Ozaawindib brings Henry Schoolcraft to the Mississippi River’s 
source.  ​Henry Rowe Schoolcraft arrived at source of Mississippi River.  Itasca named from 
Latin roots of truth and head by verITAS Caput meaning true head.  
 
1888 ‐ Jacob Brower, John Lyendecker, and William Avery spend time in the Lake Itasca 
region, becoming captivated by the towering pines and rugged landscape.  ​Jacob V. Brower 
came and wanted to save the pine forests. 
 
1889 ‐ Brower and others survey the Itasca basin during the spring for the Minnesota 
Historical Society. Alfred J. Hill writes a letter to the​St. Paul Dispatch​ that generates public 
awareness about Itasca. 
 
1890 ‐ Joseph A. Wheelock writes a letter in the January 22 edition of the ​St. Paul Pioneer 
Press​ urging public support for establishing Itasca State Park. 
 
Turning Point 
 
March 2, 1891 ‐ Senator John B. Sanborn introduces an Itasca bill prepared by Brower. He 
meets opposition from senators who favor lumber interests 
 
April 20, 1891 ‐ Governor William Merriam signs the Itasca State Park bill on April 20, 1891, 
beginning the State of Minnesota’s involvement in land preservation.Governor William 
Merriam signs the Itasca park bill after the House approves it. Initial park boundaries 
surround Lake Itasca seven miles north and south and five miles east and west. 
 
May 4, 1891 ‐ Governor Merriam appoints Brower as the first commissioner of Itasca State 
Park, a position he holds for four years. 
118 
 
1892 ‐ Brower begins land negotiations with the federal government, railroads, and lumber 
companies 
 
August 3, 1892 ‐ The U.S. Congress approves the transfer of federally owned land within the 
Itasca State Park boundaries to Minnesota state control. 
 
1895 ‐ Brower’s tenure as park commissioner ends. 
 
1903 ‐ Mary Gibbs becomes park commissioner after the death of her father, commissioner 
John Gibbs. She holds the position for two‐and‐a‐half confrontational months 
 
1905 ‐ Douglas Lodge becomes the first park building specifically constructed for overnight 
guests. It features a rustic‐style design that blends into the environment. 
 
1920 ‐ Commercial logging ends in Itasca, ushering in a new phase in park management. 
 
1934 ‐ Old Timer’s Cabin: located on Dr. Roberts Trail is first building constructed by the 
Civilian Conservation Corps at the park in  
 
1941 ‐ Mississippi Headwaters dam constructed by the CCC 
 
1965 ‐ Itasca declared a Natural National Landmark 
 
   
119 
Activity:  Mapping the Mississippi  
 
Time:​ 1 hour 15 minutes 
Location:​  Mary Gibbs Center 
Materials:   
● Large piece of paper 
● Coloring utensils 
● Maps of the United states, and individual states that the Mississippi goes through 
 
Objectives: 
This lesson aims to help students focus on the big picture and look at the U.S as a whole.  They 
will trace the entire route of the Mississippi and think about the importance of the river to the 
United States. 
 
By the end of this lesson, students will: 
● Know the complete route of the Mississippi River 
● Understand the importance of the river to the U.S 
● Understand their place on the Mississippi 
● Be able to read a basic map 
 
Procedure: 
 
Introduction:  20 minutes 
1.  Lay out maps and allow children to explore them 
2.  Ask them to locate the Mississippi River on each map 
3.  Have them put the state maps together so that they are all connected.  Then have them 
draw the Mississippi River on the Maps. 
4.  Have them point out the starting point of the Mississippi.  Allow them to recognize that 
this is where they are. 
5.  Have them find the ending point of the Mississippi.  Allow them to recognize this is very 
far away, 2,340 miles, down to the Gulf of Mexico 
 
Activity:  10 minutes 
6.  In their journals, have them sketch the route of the Mississippi as best as they can.  
7.  Label:  Star where they are, State names, Gulf of Mexico, Missouri River? 
 
Discussion:  20 minutes 
8.  Have a discussion concerning the importance of the river to the U.S 
120 
● Communities along the river use it as a source of freshwater and to dispose of 
industrial waste. 
● Provides drinking water to 18 million people 
● Flows through the grain belt (Midwest) and allows for distribution of crops by barges. 
● Home and resource for a large amount of wildlife.  Used by birds as they migrate south 
for direction.  
● Connects the north to south, and to the west via the Missouri river. 
 
Reflection:  10 minutes 
9.  Have the students respond to this prompt in their journal 
● Why is the Mississippi river so important and what does it mean to you? 
 
Evaluation: 
● The completion of the journal prompt shows their thoughtfulness regarding the 
importance of the Mississippi 
● Sketching the route of the Mississippi and tracing it on the maps allows them to 
understand the path of the river.  
 
Sources: 
 
National Park Service. (2015). Retrieved from​ http://www.nps.gov/miss/riverfacts.htm 
 
The Nature Conservancy. (2015). Retrieved from  
http://www.nature.org/ourinitiatives/habitats/riverslakes/placesweprotect/mississippi‐
river.xml 


121 
 
122 


123 
 
124 
 
125 
 
126 
 
127 
 
128 
 
 
129 
 
130 
 
131 
Activity: Exploring the Mississippi 
 
Time:​ 1 hour 15 minutes 
Location:​  Mississippi River 
Materials: 
Each student will need 
● Their personal journal 
● Pen or pencil 
 
Objectives: 
This lesson aims to allow the kids to explore the area of the start of the Mississippi. 
 
By the end of this lesson, students will: 
● Create their own map of the Mississippi headwaters 
● Write down their observations of the natural elements around the headwaters 
● Observe nature and think about their surroundings 
 
Procedure: 
 
Introduction:  10 minutes 
1.  Pass out journals and pencils to each child 
2.  Explain that they will be going to the start of the great Mississippi river, and they have some 
exploring to do.  
3.  Have the children buddy up with someone else and tell them that they are to stay with their 
buddies at all times for safety reasons. 
4.  Explain that once you all reach the headwaters there is a place where they can cross the 
river by walking over the rocks. 
5.  Tell them that in their journals, they should record any observations they have about the 
natural elements at the headwaters.  An observation is about things they may notice.  They can 
draw or write these things they notice.  They can draw or write about things such as the rocks, 
plants, animals etc.  Let them know their goal is to record five different observations about the 
land. 
6.  Explain that they should also draw a map in their journals that shows the layout of the 
headwaters.  Their map should include the river, any crossing points, the riparian buffer, 
benches, or anything else they notice and want to include in their map. 
 
Transportation:  10 minutes 
7.  Once the activity is explained, gather the group, and take the Headwaters trail to the 
beginning of the river. 
132 
 
 
Activity:  30 minutes 
8.  Allow the kids to explore the area and write in their journals 
 
Transportation:  10 minutes 
9.  Gather the kids up into a group and make sure all are accounted for through a buddy check. 
10.  Begin the walk back to the Mary Gibbs center.  
 
Discussion/Reflection: 15 minutes  
11.  Once back at the center seat the kids in a circle.   
12.  Ask them to describe their most interesting observations.   
 
Evaluation: 
● Completion of the journal entry will show that they took the time to observe nature and 
think about it, as well as take in their surroundings and think about how the area was 
laid out.  
 
Source: 
 
Bledsoe, K.E., Norvell, C., & Goodman, N. (2004). Our Precious Planet. In S. Milford & K.B. Sagert  
(Eds.), 365 Nature Crafts & Activities (pp. 199). New York, NY: Backpack Books.  


133 
Activity: Freshwater  
 
Time: ​ 2 hours 
Location: ​Mary Gibbs Center 
Materials: 
● Individual journals 
● 2‐3 packages of AquaMira 
● 5 poster boards 
● 5 packs of markers 
● 5 bottles for water 
 
Objectives: 
This lesson aims to teach students about freshwater as a resource.  They will learn methods to 
safely drink it when outdoors, the quantity of freshwater in the world, and the water cycle.  
 
By the end of this lesson, students will: 
● Relate the water cycle to the water they use in their life. 
● Demonstrate proper water purification techniques when outdoors 
● Summarize the amount of freshwater on earth and understand it as a limited natural 
resource 
 
Procedure: 
Pre‐test:  5 minutes 
1. Begin by asking the kids what they know about the water cycle. 
● Where does the water you drink come from? 
 
Introduction: 15 minutes 
2. Go through all the steps of the water cycle, and define the terms: 
● Condensation:  Water vapor in the air gets cold, changes from a gas back into liquid, and 
forms clouds 
● Precipitation:  Water has condensed enough that it is more dense than the clouds and 
begins to fall from the sky as rain, sleet, hail or snow. 
●  Collection:  fallen water is collected into rivers, lakes, streams and the ocean. 
● Evaporation:  Liquid water changes into water vapor and becomes steam. 
3. Instruct kids to take out their journals and sketch an image of what they think the water 
cycle looks like.  Have them label these four words in their drawing. 
 
Visualization: 15 minutes 
4.  Once all the kids have finished, have them close their journals and close their eyes.   
134 
5.  Tell children to close their eyes and imagine that they are a drop of water falling from the 
sky… they land on the roof, flow into the gutter and on to the ground… across the grass 
and soil and into the beginning of the Mississippi River where they meet up with other 
drops and begin to flow faster… over rocks, past fish, under bridges… looking up they 
see trees hanging over the​ ​river and houses nearby.. they hear cars zipping by and a 
train off in the distance… they start to slow down as the river gets wider and wider… 
they are flowing down to the Mississippi River… they meander slowly past factories and 
many cities until finally they reach the Gulf of Mexico and splash into the warm tropical 
waters.. 
6.  Have the kids open their eyes, and quietly write or draw in their journals what it feels like 
to be a drop of water.   
 
Activity 1: 40 minutes 
7.  As they are finishing, pass out a big poster board and markers to each group.   
8.  Tell them to draw 100 circles all about the same size on their poster. 
9.  Allow them time to do this and then tell them to color 97 of the circles all the same color. 
These circles stand for all the saltwater on earth.   
10.  Tell them to make a key for their poster as they go to explain what all the colors mean.   
11.  Then tell them to color 2 circles another color.  These two circles stand for all the frozen 
water on earth. 
12.  Ask How many circles are left? 
13.  The one circle left stands for all the freshwater on earth.  Have them color it a third 
color.  This circle has to provide all the water humans need for drinking, watering crops, 
taking showers, washing clothes or dishes.  Any water they may use throughout their 
day.   
14.  Discuss the importance of keeping water clean and not throwing trash into it or 
polluting it because there is limited fresh water on the earth.   
15.  Ask the children, Can you drink water straight from a lake?  Explain that there are 
bacterias that live in the water in lakes and rivers that can sometimes be harmful if we 
drink them.  
16.  Explain that as a precaution, if we drink water from a lake or river, it needs to be 
cleaned or purified beforehand. 
 
Activity 2: 45 minutes 
17.  Lead kids down to the river to collect one bottle of water per group. 
18.  Walk back up to the top of the bank, and demonstrate how to use AquaMira to purify 
the water. 
19.  Allow each group to use AquaMira to purify their water. 
20.  Wait the correct amount of time according to the directions. 
135 
21.  Tell them that their water is now safe to drink! 
22.  Head back to the Mary Gibbs center for group reflection.   
 
Evaluation: 
● Completion of their journal entries will show that they understand the water cycle and 
where water comes from. 
● Completion of the poster will demonstrate that they realize there is limited freshwater 
on earth and they should take care of it. 
● Using AquaMira correctly shows that they have learned to purify water from a natural 
source.   
Sources: 
 
Bledsoe, K.E., Norvell, C., Goodman, N. (2004). Water, Water, Everywhere. In S. Milford & K.B.  
Sagert (Eds.), 365 Nature Crafts & Activities (p. 193). New York, NY: Backpack Books.  
 
Kowalski, K.M. (2000). The World of Nature. The Everything Kids’ Nature Book (p.11). New York,  
NY: Scholastic Inc.  
 
WWC E​co Team. (n.d) Lesson 1:  River Basins 
 
   
136 
Activity: Swim Assessment 
 
Time:  ​1 hour 15 minutes 
Location: ​Beach 
Materials:  
Each child will need: 
● Life Jacket 
 
Objectives: 
This lesson aims to evaluate the current swim skill level in participants to see how well they can 
swim and how comfortable they are in the water.   
 
By the end of this lesson, students will: 
● Demonstrate their ability to float on their front and back 
● Show they can put their whole face underwater and do a bob 
● Demonstrate any strokes they know: backstroke, front stroke, elementary back stroke, 
or breast stroke. 
● Demonstrate their ability to tread water 
 
Procedure: 
Swimming ability of each participant should be somewhat known before assessment from their 
application forms.  Split the group into 10 kids to be tested at a time.  Those being tested 
together should be of similar age or similar skill level according to their applications.  Have one 
lifeguard armed with a clipboard to check off completed skills for each child.  After the 
assessment, the checklist will be evaluated to determine where each child is at.  The kids will be 
split up by skill level and issued red, yellow, and green wristbands.  Red = cannot swim at all and 
MUST wear life jacket at all times.  Yellow = weak swimmer and should wear life jacket for free 
swim.  Green = strong swimmer and only needs life jacket for canoeing.   
 
Prep:  10 minutes 
1. Allow kids time to change into their swimsuits. 
 
Assessment:  45 minutes 
2. Station three lifeguards in the water before children enter. 
3.  Begin by fitting each child with a life jacket.  A properly fitted life jacket will be snug, and 
will not slip over their head if lifted by the shoulder straps.   
4. Tell kids to enter the water up to their chests.  They can walk or swim for this. 
5.  Have them swim out just past where they would be able to touch, turn around and swim 
back.  Station a lifeguard at the distance to where they should turn around. 
137 
6.  Have them remove their life jackets on shore and re‐enter the water up to their chests.   
7. Have them go underwater completely and do 5 bobs.  Demonstrate a bob before 
instructing them to do it.   
8. After they have done this, demonstrate to them how to float on their back.  Then instruct 
them to do so and help as needed. 
9.  Next, they will be floating on their stomachs.  Demonstrate how this looks and then 
watch them do it.  
10.  After they have floated, instruct them to swim however they want for 10 minutes 
straight.  Show front stroke and back stroke to remind them of some examples.   
11.  Evaluate if they are able to swim the full ten minutes without stopping or touching the 
bottom. 
12.  Next have them tread water for 2 minutes.  Before they begin, allow them to catch 
their breath while you explain the arm and leg motions of treading water.   
13.  Evaluate if they are able to effectively tread water for 2 minutes straight. 
14.  Once they have finished treading water, they are done with the test and can exit the 
water.   
 
Transition:  20 minutes 
15.  Allow time for the kids to shower off and change.   
 
Evaluation: 
● Completion of the set of swim skills evaluated will ensure passing the assessment, and 
ability to participate in canoeing lessons and free swim times 
● Failure to complete swim skill will lead to individual swimming lessons during free swim 
to strengthen their skills and allow them to participate in canoeing unit.   
 
Source: 
 
Chris Nichols, Swim Instructor at Camp Thunderbird for Girls, via Facebook received 13  
February 2015.   
 
   
138 
Activity: Aquatic Life 
 
Time​: 2 hours 
Location:  ​Outdoors 
Materials: 
● Animal and plant I.D cards (print out 5 sets of cards) 
● Journals 
● Coloring Utensils 
Each child will need: 
● 1 handful of twigs 
● 1 small ball of clay 
● 1 shoe box lid 
● 1 ceramic saucer 
● Any other materials they would like to collect 
 
Objectives: 
This lesson aims to introduce different water plants and animals found in Minnesota.  
 
By the end of this lesson, students will​: 
● Be able to describe what makes up an aquatic habitat 
● Be able to recognize 5 aquatic creatures 
● Be able to recognize 2 aquatic plants 
● Identify the Loon as the MN State Bird 
● Build their own beaver den   
 
Procedure: 
 
Intro:  20 minutes 
1. Ask the kids what kind of animals they think live in or around water?  They should 
understand that mammals can be aquatic animals as well, and that they don’t have to 
live IN the water to be aquatic creatures. 
2. Ask the kids what kind of plants grow in the water?   
3. Brainstorm a list of aquatic life.  The list could include: 
 
Animals 
● Fish 
● River Otter 
● Beaver 
Plants 
● Cattails 
● Lilly pads 
● Algae 
● Seaweed (pondweed) 
139 
● Muskrat 
● Raccoon 
● Birds: Loons, Herons, ducks, swans 
● Wild rice 
● Reeds 
3.   Ask the kids, What do all these species share in common?  They all need a body of water 
to survive. 
4.   Go through what they need the water for; their habitat which includes; food resource, 
location for shelter or home, water, space to live and thrive.   
 
Activity 1:  20 minutes 
5.  Break up the kids into pairs of 2.   
6.   Each pair should get a complete set of plant and animal flash cards.  
7.   While they are in pairs, have them examine all the cards and write the species in their 
journals.   
6.   Have them then pick a plant and an animals and sketch in their journals the habitat that 
includes both the plant and the animal.   
 
Reflection: 10 minutes 
7.   Ask for some of the children to share their aquatic habitat with the group. 
8.   After some of the kids have shared, talk more thoroughly about the Loon as it is the 
Minnesota State Bird.  Go over the information found on the Loon I.D card. 
 
Activity 2:  20 minutes 
9.  Merge the pairs into groups of 4. 
10.  They should bring their sets of cards with them and combine the cards into a memory 
game. 
11.  Have them mix all their cards up, and arrange them facedown on the ground.  
12.  Tell them to take turns picking two cards each, until they find matches. 
13.  You can make it more difficult by yelling “Shuffle” every now and then which will 
require them to mix the cards around, thus changing the locations of known cards.   
14.  Continue this game until they have found all the pairs.  
 
Activity 3: 30 minutes 
15.  While you collect their cards, instruct the kids to gather a handful or two of small sticks 
for the next project. 
16. Once they are all back, distribute a ball of clay, a shoe box lid, and a saucer to each child.   
17. Explain that they will be creating their own beaver habitat.   
18.  Ask them what they remember learning about beavers from the I.D cards.   
140 
19.  Show them how to roll the clay and the sticks together to make a twiggy yet sticky 
consistency.  Tell them this will be the den and they can shape it however they like. 
20.  Explain that the saucer serves as a pond for the beaver, and the shoebox will be a base 
for their habitat. 
21.  Allow them to put these parts together, and then let them know that they can go 
collect other materials to complete their habitat.  These may include grass, rocks, 
leaves, mud etc. 
22.  Let them build up their habitat however they like. 
 
Clean‐up:  10 minutes 
23.  When most have finished or are finishing, begin cleaning up the materials.  Put natural 
materials back where they were found, and unnatural materials in the trash or back in 
their containers.   
 
Reflection:  10 minutes 
24.  Bring the kids back into a circle and ask them to show their beaver habitats and point 
out the parts that make up a habitat; food, shelter, water, space. 
25.  Ask them to recall as many water species as they can.  You can hold up some cards and 
ask for their names as well.   
26.  Ask what the Minnesota State Bird is.   
 
Evaluation: 
● Completion of the journal entries show what they have learned about an individual 
plant and animal. 
● Playing the memory game reinforces their familiarity with the different species.   
● Completion of the beaver den, and accurate description of the components of a habitat 
shows understanding of habitats and one specific to a beaver.   
 
Sources: 
 
Bledsoe, K.E., Norvell, C., Goodman, N. (2004). The Animal Kingdom. In S. Milford & K.B. Sagert  
(Eds.), 365 Nature Crafts & Activities (p. 167). New York, NY: Backpack Books.  
 
Minnesota DNR. (2015). Retrieved from ​http://www.dnr.state.mn.us/animals/index.html 


141 
 
 
Common Name: ​Cattail 
Location:​ Marshes, shorelines 
Hints to identify:​ Look for the fuzzy 
brown "cattail" near the top of the 
stalk. Leaves are long, flat, and about 
1­inch wide. 
Importance of plant:  
● Helps stabilize marshy borders 
of lakes and ponds 
● Helps protect shorelines from 
wave erosion 
● Northern pike may spawn along 
shore behind the cattail fringe  
● Provides cover and nesting sites 
for waterfowl and marsh birds 
such as the red­winged 
blackbird 
● Stalks and roots are eaten by 
muskrats and beavers 
Management: ​To preserve as much 
cattail habitat as possible, the DNR 
permits the removal of these plants 
only in a small area to provide boat 
access to deeper lake water.  
 
 
Common Name:  ​Lilypads  
Location: ​Grows rooted in mucky or 
silty bottoms up to 5 feet deep 
Hints to identify:​ White flower with 
rows of petals surrounding a yellow 
center, surrounded by round, floating 
leaves 
Importance of plant: 
● Provides excellent habitat for 
largemouth bass and sunfish 
● Good fishing areas  
● Seeds are eaten by waterfowl 
Management:  ​Because of its value 
as fish habitat and as a decorative 
plant, the white water lily is usually 
best left alone.  
142 


Common Name: ​Algae 
Location:​ Lakes, and along shore 
Hints to identify:​ Microscopic ­ Look 
for a change in water color, "blooms" 
color the water green or turquoise 
blue.  
Importance of plant:  
● Provides food for certain small 
aquatic animals and young fish.  
Management strategy:​ Abundant 
growth indicates that a lake has 
excessive nutrients, usually 
phosphorus. 


Common Name: ​Pondweed 
Location: ​Found in lakes and 
streams, often grow near drop­offs. 
Hints to identify:​ Leaves alternate 
along the stem. Often grow in patches 
or beds, usually what you hit while 
swimming 
Importance of plants:  
● Broad­leaf pondweeds provide 
excellent habitat for panfish, 
largemouth bass, muskellunge, 
and northern pike;  
● bluegills nest near these plants 
and eat insects and other small 
animals found on the leaves;  
● walleyes use these pondweeds 
for cover. 
Management:​ These plants are 
important fish habitat, so it is best to 
let them be. 
 
 
143 
 
Common name: ​Reeds 
Location: ​Marshes, shorelines, sand 
and gravel bars 
Hints to identify: ​A long, tubular 
stem without leaves, or a triangular 
stem that may have long leaves 
similar to those of tall grasses. 
Importance of plant:  
● Excellent fish habitat 
● Provide spawning areas for 
northern pike and, in early 
spring, provide nesting cover for 
largemouth bass and bluegills.  
● Attract marsh birds and 
songbirds and provide food for 
ducks, geese, and swans. 
Management:​To preserve natural 
habitat, the DNR allows the removal of 
reeds only in a small area to provide 
boat access to deeper lake water.  


Common Name: ​Mallard Duck 
General description: ​A large duck 
that's most easily recognized by the 
male's glossy green head and white 
neck collar. 
Sounds: ​Mallards are very vocal. 
Hens use a loud, long series of quacks; 
drakes have a low­pitched "wheat" 
call. 
Food 
Grasses, aquatic plants and insects, 
corn, grains, snails and wild rice. 
Fun facts 
Mallards swim with their tail held 
above the water, so when trouble 
comes, they can spring directly out of 
the water and into the air. 
 
144 


Common Name: ​River Otter 
General description: ​The otter is 
perfectly suited for an aquatic life. 
Long and sleek, it has short legs, 
webbed feet, and a long tapered tail. 
The fur is a rich brown, moderately 
short, and very dense. 
Food 
Otters eat a variety of small aquatic 
organisms such as fish, clams, 
muskrats, and turtles. 
Habitat and range 
The river otter is Minnesota's largest 
aquatic carnivore that lives in most 
northern Minnesota lakes, ponds, and 
streams.  
Fun facts 
Otters are playful, often wrestling or 
spending hours sliding down muddy or 
snow­packed stream banks. They also 
play by nudging sticks across the 
water, and by dropping pebbles to the 
bottom and retrieving them.  
 
 
Common Name: ​Sunfish 
Minnesota has several sunfish species, 
but the most popular with anglers are 
the bluegill and the pumpkinseed. 
Sunfish live in most lakes of Minnesota 
and are recognized for their blue and 
orange scales.   
 
Sunfish are popular to catch, and good 
to eat! 


145 


Common Name: ​Raccoon 
General description:​ Raccoons are 
the size of a small dog and have heavy 
fur streaked in brown, black, and gray. 
They have bushy ringed tails and their 
paws make hand­like prints in the mud 
or snow. Their black eye stripes 
resemble a mask. 
Sounds:​ Raccoons hiss and growl and 
screech like an owl. 
Food 
crayfish, frogs, insects, fruits, and bird 
eggs are staples in its diet. 
Fun facts 
A raccoon is a powerful fighter that can 
kill an attacking dog twice its weight. 
 
 
Common Name:  ​Beaver 
General description:​ The beaver is a 
large rodent that has large orange 
teeth and a flat paddle­shaped tail. 
The pelt of beaver is composed of 
long, coarse guard hairs over a thick, 
wooly undercoat. 
Sounds:​ Beavers make several 
sounds­­churrs, mumbles, whines, 
snorts, hisses­­as well as slapping 
their tails against the water to sound 
an alarm. 
Food 
Beavers eat leaves, buds, twigs, fruit, 
ferns, stems, and the roots of water 
plants.  
Fun facts 
With their strong jaws and teeth, 
beavers can chew through a six­inch 
tree in 15 minutes. A single beaver 
can chew down hundreds of trees each 
year. 
 
146 


Common Name:  ​Loon 
General description: ​Larger than a 
mallard but smaller than a goose, this 
water bird has a thick neck and a long, 
black bill. Its legs are set far back on 
its body, so it has an awkward gait on 
land.  
Sounds: ​The common loon has four 
calls.  
● The tremolo, which sounds a bit 
like maniacal laughter, is an 
aggressive call.  
● The wail is a long, drawn­out 
sound.  
● The hoot, a shorter call, is used 
to communicate among parents 
and young.  
● The yodel is sounded by male 
loons guarding their territory 
Food 
Loons like fish: panfish, perch, 
minnows, suckers, trout, & bullheads. 
Fun facts 
● The red in the loon's eye helps it 
to see underwater. 
● Scientists think loons can live for 
30 years or more 


147 
Activity: Batiks and weaving 
 
Time: ​1 hour 15 minutes 
Location: ​Visitor’s Center 
Materials:  
● 20 Blank white cotton bandanas 
● 12 Tin cans 
● Crayons 
● Beeswax or Paraffin 
● 3 Square deep‐dish griddle 
● 24 Paint brushes 
● Clothesline and clothespins 
● 3 packages of Cold water dye 
● 6 pairs of Rubber gloves 
● 6 Aprons 
● 3 Plastic Tubs for dye 
● 3 Stirring sticks 
● Small skeins of yarn (each about 5 feet long) 
 
Objectives: 
This lesson aims to explore the uses of natural materials in art.   
 
By the end of this lesson, students will: 
● Create their own batiked bandana 
● Create a weaving out of natural materials 
● Understand and demonstrate the techniques of batiking and weaving 
 
Procedure: 
Begin melting the crayons during snack as the crayons can sometimes take a while to melt.  Set 
up 4 cans in each griddle and put water in the bottom of the griddle.  Turn up the heat and put a 
different color of crayon in each can.  Mix in some Paraffin or beeswax as this will add volume 
but not dilute the color of the crayons.   
 
Intro: 5 minutes 
1. Have the kids place all the leaves they collected in the center for everyone to share. 
2. Give each child a piece of bandana and explain that they will be creating batiks on them. 
Explain that the technique of batiking comes from Indonesia and consists of applying 
wax to the fabric and then dyeing over the top.  The wax creates a resistance to the dye 
so the places that are waxed will be a different color than the dye.   
148 
 
Activity 1: 35 minutes 
3. Have them lay out any of the leaves they like on the fabric and trace their outline with a 
crayon.   
4. Put 2‐3 paintbrushes in each can of wax. 
5. Show them how to use the paintbrushes to spread the wax onto their fabric.  Explain 
that they can fill in the whole leaf, outline it, or color in the background with the wax. 
Explain that they should coat the area they are covering in wax completely.  They can 
also paint on branches or other decorations. 
6. Once they have finished painting on the wax, allow it dry and cool for a few minutes.   
7. Next, you need to mix the dye, which you you can do while explaining to the kids how 
you are doing it.  Simply mix the dye with water according to the directions on the 
package into a large plastic tub.  Be aware that splashes will not come out of clothes.   
8. Have 2 kids dye their fabric at a time, and give them aprons and rubber gloves to wear. 
9. Have them crumple up their fabric and place in the dye for a few minutes.  The longer it 
stays in the dye, the darker the color they will get.   
10. Remove the fabric from the water and have the kids hang it on a clothesline outside. 
11. The fabric will have to dry and will then need to be ironed between newspaper to 
remove the wax.  This can be done for the kids as it is a long process.  Just let them 
know that they will get their bandanas back in a few days.  
 
Activity 2: 40 minutes 
12.  After all the bandanas have been hung on the clotheslines, send the kids back into the 
woods with a mission of finding the perfect “slingshot stick”.  In other words, a forked 
stick. 
13. When they return, explain that they will be creating a weaving on this stick and pass out 
small skeins of yarn. 
14. Explain that a weaving consists of a warp and a weft.  The warp is going to be the yarn 
and this is what the weft is woven on.   
15. Show them how to wrap the yarn evenly spaced around the two sides of the split stick 
so that the space between the two sides creates a sort of web (see image below). 
16. Then explain to them that the weft they will use will come from nature.  They can use 
anything they can find such as different grasses, stems, feathers etc.   
17. Send them back out around the field to pick these things for about 5‐10 minutes. 
18. Call them back in and have them begin weaving.  Instruct them individually on the over, 
under method of weaving.   
149 
 
 
Reflection: 5 minutes 
19. Spend a few minutes at the end to look at everyone’s weavings and ask kids about 
what they put in their weaving and why. 
 
Evaluation: 
● Completing the bandanas by using wax and dye will show they understand how a batik 
is made. 
● Using different leaves in the batik will show that they are able to incorporate nature into 
art. 
● Creating a weaving with various materials will show their thoughtfulness in choosing 
which natural materials to use and applying them in art.   
 
Source: 
 
Bledsoe, K.E., Norvell, C., Goodman, N. (2004). Trees: Nature’s Giants. In S. Milford & K.B.  
Sagert (Eds.), 365 Nature Crafts & Activities (pp. 134). New York, NY: Backpack Books.  
   
150 
Activity: Art Installations 
 
Time: ​2 hours 
Location: ​Visitor Center 
Materials: 
● 40 different Images of artist’s work  
● 2 pages of Loose‐leaf paper for each child 
● 20 pencils 
● Materials from nature 
● Camera 
 
Objectives: 
This lesson aims to introduce temporary art installations in nature. 
 
By the end of this lesson, students will: 
● Recognize the work of various natural artists 
● Work together to build and sculpt their own art installation in nature 
● Feel inspired by the beauty of nature 
 
Procedure: 
 
Intro:  5 minutes 
1. Ask the kids, Can anyone tell me what Robert Smithson, Andy Goldsworthy and Patrick 
Dougherty have in common?  Does anyone know what they do or have heard of them before? 
2. Tell the kids that they are all artists who create pieces out of material found in nature.  They 
are called Earth Artists, and most of their pieces are temporary and fall apart quickly.   
 
Activity 1:  40 minutes 
3. Pass out images of various pieces from these artists to each student.  Give each child two 
pieces of artwork. 
4. Give the kids a few minutes to examine the pictures they have in their hands, and then have 
them trade with people to look at other pieces. 
5. Tell them they should try to look at everyone’s pictures as they are trying to find and collect 
their two favorite pieces.  Tell them they can trade images with each other as they look.   
6. After about ten minutes or if they seem to finish sooner, have them return to their seats. 
7. Pass out pieces of paper and a pencil to each child.   
8. Ask them, if you could create anything out of all natural materials, what would you make? 
Where would you put it? 
9. Have them sketch one image that can be anywhere they want, and a second image that has to 
be located in Itasca. 
10. After they have finished their drawings, have them make a circle and lay their Itasca pieces in 
the middle. 
11. Give them a few minutes to look at each sketch. 
151 
12. Explain that you will do an anonymous vote on the sketches to determine which piece is the 
coolest. 
13. Hold up one picture at a time, tell the kids to close their eyes and raise their hands to vote for 
that picture.  Count hands and write on the back of the picture.  Tell them to put their hands 
down and open their eyes.  Hold up the next picture and continue until all have been voted 
on. 
14. Count up the votes and find the one with the most votes. 
15. Tell the kids that they will be creating this piece.   
 
Transportation:  15 minutes 
16. Go to the location of the piece according to the sketch. 
 
Activity 2: 1 hour 
17. When everyone gets there, ask them what materials they will need to find, and what should 
be done first.   
18. Assign the kids tasks such as gathering or building and facilitate the construction of the 
installation.   
19. Help the kids plan what to do throughout the process.  Allow them to realize that not every 
aspect of this piece may be possible and let them improvise their own ideas and incorporate 
them as they work.   
20. After they feel they have completed their version of the piece, have everyone gather around it 
and take their picture. 
21. Explain that this art installation might last for a little bit, but it will wear down every day and 
will not last forever.   
22. Clean up the area of work and return to the Visitor Center. 
23. In the vehicles, ask the kids: 
a. Whose work did their piece most resemble?  
b. What was most challenging about the installation?   
c. What was most fun about it?   
d. Did it turn out the way they expected?  
 
Evaluation: 
● Designing two different installation ideas will show that the kids recognize what is possible in 
certain locations. 
● Working together to create an installation will show teamwork  
● Reflection questions at the end will demonstrate their thoughts about the whole process and 
the idea of art installations in nature.   
 
Source: 
 
Athens MaryAnn , Art Teacher at Evergreen Charter School, Feb 10 2015.   
 
   
152 
Activity:  Leave No Trace Intro 
 
Time: ​1 hour 15 minutes 
Location:  ​Douglas Lodge 
Materials:  
● Student journals 
 
Objectives: 
This lesson aims to help students become aware of the choices they make each time they play 
outside and to understand the principles of Leave No Trace.   
 
By the end of this lesson, students will: 
● Distinguish between games that are damaging and not damaging to the environment 
● Invent and play games that do not affect the environment 
● Summarize the importance of minimal impact on the environment 
● Explain Leave No Trace  
 
Procedure: 
Introduction:  15 minutes 
1. Ask students to think of ways to play outside that do not cause serious or permanent 
damage to the environment.  Also think of ways that are damaging to the environment. 
Damage could affect nonliving things, like graffiti on a wall, or it could be damaging to 
plants and animals such as carving initials into a tree.   
2. Outside, look for evidence of games that have damaged the environment.  This may be 
difficult to find in a preserved park area, so if there is none to be found, imagine some 
situations and ask what could have caused the damage and how it could have been 
prevented. 
 
Activity 1: 35 minutes 
3. Introduce the concept of playing games that do not seriously harm the environment.   
4. Ask students to work together in groups of five to invent a game that does not harm the 
environment.  The students could also invent games that help the environment as well. 
5. Ask each group to present and teach their game to the other students.  Play each of 
their games, and discuss how each one impacts the environment. 
 
Activity 2: 20 minutes  
6. Introduce Leave No Trace.  
7. Go over each principle and have the kids write them in their journals. 
● Know before you go 
153 
● Choose the Right Path 
● Trash your Trash 
● Leave what you Find 
● Be careful with Fire 
● Respect Wildlife 
● Be Kind to Other Visitors 
 
8. Ask the kids what these statements mean to them, and allow them to come up with 
their own definitions.   
9. Ask the students to talk about their feelings about the importance of impacting nature 
as little as possible while spending time in it.   
 
Reflection: 5 minutes 
10. In their journals, have the kids write down or draw ways that they can spend time in 
nature with minimal impact.   
 
Evaluation: 
● Playing the games invented by the kids will show they have thought about how their 
actions affect nature. 
● Defining and writing about LNT will show the kids have thought about how LNT works 
and how they can leave minimal impact on the environment. 
 
Source: 
 
Leave No Trace. (2012). Retrieved from ​https://lnt.org/teach/focus‐youth‐and‐teens 
 
Project WILD. (2012). Responsible Action and Service.  (pp. 433). Houston TX: Council for  
Environmental Education 2012.  


154 
Activity:  LNT/Environmental Ethics 
 
Time: ​2 hours 
Location: ​Douglas Lodge 
Materials:   
● Student Journals 
● Large notepad 
 
Objectives: 
This lesson aims to further break down the components of Leave No Trace and provide the 
opportunity for kids to examine personal lifestyles in light of their effects on the environment. 
 
By the end of this lesson, students will: 
● Act out and understand each component of Leave No Trace 
● Distinguish between actions that are harmful and beneficial to the environment 
● Evaluate the appropriateness and feasibility of making changes in their own behaviors 
related to the environment. 
 
Procedure: 
 
Activity 1:  30 minutes 
1. Bring back the list of Leave No Trace concepts from the morning lesson. 
● Know before you go 
● Choose the Right Path 
● Trash your Trash 
● Leave what you Find 
● Be careful with Fire 
● Respect Wildlife 
● Be Kind to Other Visitors 
2. Break up the kids into 7 groups, there should be 6 groups of three, and one group of 
two.  Try to mix the ages as much as possible. 
3. Write each of the seven principles of LNT on small pieces of paper and put into a bowl or 
hat.  Allow each group to pick a slip of paper. 
4. They then have 10 minutes to plan their skit to act out the principle.   
5. Have each group act out their skit for the rest of the kids while they try to guess what 
topic the group had.  Keep the list up for them to reference.   
6. After all the skits have gone, wrap up the activity by covering the list and asking the kids 
to list all seven principles from memory.   
 
155 
 
 
Transition: 10 minutes   
7. Move on to the next activity which will cover environmental ethics by moving the group 
into a circle and playing a quick game to break up the topics. 
8. Have the kids sit in a circle and explain the game.  You will read an action or activity that 
the kids may do that impacts the environment.  If the kids participate in that action, 
they must switch places with another child in the circle who also participates in that 
action.  For example:  You could read “I turn off the water when I brush my teeth” and 
any child who does this should stand up and run to an open space in the circle where 
someone else was sitting.   
Samples of actions to read: 
● I turn off the lights when I leave the room. 
● I wear my clothes multiple times before washing them. 
● I take short showers. 
● I pick up trash when I see it. 
● I play outside instead of watching TV. 
● I plant flowers or trees. 
● I ride my bike instead of driving places when I can. 
● I Leave No Trace when I am out in nature. 
 
Activity 2 Intro: 15 minutes   
9. When you have gotten through the list, and the kids have gotten some of their jitters 
out, begin a discussion with them about the effects each of us has on the environment. 
Use examples from the list above.  
10.  Next, ask each student to identify something they have done to help wildlife and the 
environment that they did not have to do.  Ask why they chose to do that task 
voluntarily.  Talk about what ​ethic or ethical standard​ prompted this decision. 
 
Brainstorm:  15 minutes 
11. Have the students brainstorm a list of the daily effects each of us has on the 
environment.  Write this brainstorm on the large notepad.  This can include our use of 
water, electricity and energy, the effects caused by production and manufacture of our 
clothes and food, and the environmental consequences of our recreation and 
entertainment choices.   
12. Discuss how all living things affect the environment.  Ask how some human 
environmental impact is different from the impact caused by other living things. 
13. Discuss how ethics can influence human effects on wildlife and the environment. 
 
156 
 
Personal reflection: 35 minutes 
14. Take a moment and have the kids close their eyes.  Give them 2‐5 minutes to follow 
themselves through a typical day.  Have them think about the natural resources they 
use throughout the day, and the choices they make that affect the environment.  If they 
could, what would they change about their daily life in order to have a more beneficial, 
or less harmful effect on the environment.   
15. Ask how a personal code of environmental ethics might guide them as they make 
decisions about the daily effects they just listed.   
16. Ask each student to find a quiet place and work alone to devise a “Personal Code of 
Environmental Ethics”  This code may be written in their journals.  Emphasize the 
importance of the code being for the person who creates it and recognize that everyone 
has different habits and may need to work on different things.  The code may consider 
preventing issues that are harmful to the environment, and practicing more actions that 
are beneficial to the environment.   
17. Call the kids back to a circle by approaching each child and quietly asking if they would 
like to return to the group. 
 
Group Reflection:  15 minutes 
18. Ask for volunteers to share their codes with the group.  They can share the whole thing, 
or just a few parts of it.   
19. Encourage the children to put their codes into use and try to keep track of how easy or 
difficult it is to live by them.   
20. Discuss how Leave No Trace may apply to their “Personal Codes of environmental 
ethics” 
 
Evaluation: 
● The skits of LNT will show comprehension of the Principles and how they can be applied 
in the children’s lives. 
● The brainstormed list of effects on the environment will show they recognize how their 
actions affect the environment and if it is a positive or negative effect. 
● The Personal code will show the kids have thought about how they can make changes in 
their daily lives to help the environment.   
 
Source: 
 
Project WILD. (2012). Responsible Action and Service.  (pp. 433). Houston TX: Council for  
Environmental Education 2012.  
 
157 
Activity:  Trees 
 
Time: ​1 hour 15 minutes 
Location: ​Big White Pine Trail 
Materials:   
● 10 Blindfolds 
● 5 Tree field guides 
Each child will need: 
● Crayons 
● 3 sheets of plain white paper 
● Journal 
 
Objectives: 
This lesson aims to identify and become more familiar with trees. 
 
By the end of this lesson, students will: 
● Point out the parts of tree 
● Use all their senses but sight to explore a tree 
● Use a field guide to identify a tree 
● Observe the largest White Pine in Minnesota 
● Comprehend a coniferous forest 
 
Procedure: 
Intro: 10 minutes 
1. Lead the group up to any tree near you.  Ask them to tell you the parts of the tree that 
they know.  Parts that they do not know, or can not explain, you can explain to them. 
Be sure to cover: 
2. As you cover all the parts, make sure you point them out on the tree. 
● Leaves: They make their food (sugar) from water and carbon dioxide by using 
chlorophyll which is the green pigment.  The whole process is powered by the 
sun. 
● Roots: They anchor the tree into the soil and soak up water for the leaves to use. 
● Trunk: The main stem that smaller stems called branches grow out of.  Function 
as the inner transport system.   
○ Inside the trunk are channels called ​Xylem ​and​ Phloem.   
○ Xylem:  carries water from roots up to branches and leaves. 
○ Phloem:  carries food from leaves down to rest of plant.   
● Bark:  This acts as the trees skin and forms the outer protective layer.   
 
158 
 
Activity:  30 minutes 
3. After going over the parts of the tree, have each child grab a partner. 
4. Give each pair a blindfold and have one person put it on. 
5. Tell one partner to turn the blindfolded person around two or three times.   
6. Then explain that the partner will ​carefully ​lead the blindfolded person to any tree they 
want.   
7. The blindfolded person will then have as much time as they want, but no more than 10 
minutes, to explore the tree, to feel the texture of the bark, find bumps or hollows, and 
find patches of moss or other features of the tree.   
8. When the blindfolded person is done, the partner leads them in a zig‐zag path away 
from the tree and turns them around a few more times. 
9. The blindfolded person takes the blindfold off and tries to find the same tree. 
10. Ask them, what did you notice about your tree that you never noticed before? 
11. Then have the partners switch places so the other person has a turn. 
 
Reflection:  15 minutes 
12. After both partners have gone, have them identify their tree.   
13. They should sit in front of the tree and:   
● Make a sketch of it in their journal, have them label the parts of their tree. 
● Use a field guide to find what kind of species it is and write this on their sketch.   
● Make a bark rubbing of its bark (see 13) 
● Collect either the leaves or pine needles from it.  Have them collect at least 5 
leaves, or groupings of needles.  These leaves will be used in the afternoon 
lesson.   
14. Give them three sheets of paper and some crayons, and show them how to make a bark 
rubbing.  This is done by putting a sheet of paper over the bark on the tree, and rubbing 
the side of a crayon over the paper until the pattern of the bark shows through.  They 
should make a rubbing of the bark of their own tree, and if they have time can find two 
more trees to make bark rubbings of.   
 
Hike:  20 minutes 
15. Pack up all the supplies used in the activity. 
16. Go on the short hike up to see the Big White Pine which is the tallest in Minnesota.  
17. As they are looking at the Pine, or during the hike, explain how this is a coniferous 
forest, as it is full of pine trees.  Explain the difference between a coniferous tree and a 
deciduous tree. 
18. Hike back to the vans.   
 
159 
 
Evaluation: 
● Labelling the parts of the tree in their journal shows they understand what the parts are 
and can find them on a tree 
● Being able to find the tree they explored while blindfolded will show that they applied 
all their senses to really observe the tree.   
● Asking the question, “What did you notice about your tree that you didn’t before” 
shows that they applied their senses to exploring the tree and thought about what they 
were observing while blindfolded. 
● Properly identifying their tree will show they learned to use a field guide. 
 
Sources: 
 
Bledsoe, K.E., Norvell, C., Goodman, N. (2004). Trees: Nature’s Giants. In S. Milford & K.B.  
Sagert (Eds.), 365 Nature Crafts & Activities (p. 132). New York, NY: Backpack Books.  
 
Kowalski, K.M. (2000). Life in the Forest. The Everything Kids’ Nature Book (p.29). New York, NY:  
Scholastic Inc.  
 
   
160 
Activity: Plants and flowers 
 
Time: ​ 2 hours 
Location: ​Visitor’s Center 
Materials: 
● Leaves picked from the morning 
● 1 Roll of White Paper Towels 
● 1 Roll of Wax Paper 
● 1 Iron 
● 1 Ironing Board 
● 2 Bunches of Flowers 
● Journals 
● 20 Pencils 
● 10 Bottles of Glue 
● 20 Pieces of 8 ½ x11 Tagboard 
● 4 Poster Boards 
● 4 Sets of Markers 
● 5 Scissors 
● 10 Tweezers 
● 1 roll of Double Stick Tape 
 
Objectives: 
This lesson aims to identify trees and learn about the parts of flowers.   
 
By the end of this lesson, students will: 
● Preserve leaves and look at leaves of different trees 
● Recognize poison ivy and understand it as a harmful plant 
● Recognize the Lady Slipper as MN’s State Flower 
● Be able to identify the parts of a flower 
● Create their own flower from parts of other flowers 
 
Procedure: 
Lesson Intro: 5 minutes 
1. Begin the lesson, by having the kids pull out the leaves they collected from their tree in 
the morning. 
2. Tell them that you will be preserving the leaves to add to their journals, as well as make 
a collective poster of the different trees.  
161 
3. Explain that they will be called up one at a time to the ironing board and they should 
bring their leaves and their journal.  ​Since this is done one child at a time, it will be 
done simultaneously with the flower project.   
 
Leaf preservation process: (included in 1 hour with flower activity) 
4. Have one child come to the ironing board at a time.   
5. Put down a paper towel, and lay wax paper on top. 
6. Have the child lay out 2 of their leaves on the wax paper without overlapping them. 
7. Put down another layer of wax paper and then paper towel on top. 
8. Iron on medium for 30 seconds, keeping the iron moving.  flip the stack over and iron for 
30 more seconds.  ​Children should be closely supervised during this process, or it 
should be done for them. 
9. Once the leaves have cooled, the kids can cut them apart, and attach one of them to a 
page in their journal with double stick tape.  Have them do this at the ironing board. 
Save the other leaf in a pile on the ironing board to be put on a poster later.   
 
Intro to plants/flowers:  15 minutes 
10. While some children are ironing their leaves, begin the plant/flower project. 
11. Start by asking the kids if any of them have had poison ivy before. 
12. Explain that poison ivy is a plant that is very common in northern Minnesota, and it is 
filled with poisonous oils.  If they touch the plant, the oils get on their skin and can cause 
painful, itchy blisters that will spread very easily.   
13. Show them a picture of poison ivy and say the rhyme that helps identify it.  “Leaves of 
three, let it be”   
14. Move on the talk about the Minnesota State Flower, the Pink and White Lady Slipper.   
15. Explain that these flowers are quite rare and are a protected species.  If they ever see 
them in the wild, they should NOT pick them.  Show them a picture of the flower and 
say that if you ever find one on a hike, you will make sure to point it out.   
 
Activity 1 Flowers: (1 hour) 
16. Pass around, a handful of picked flowers.  They can be wild or not.  
17.  Go over the different parts of the flowers.  First, ask what parts the children know.  Be 
sure to cover: 
● Petals: Colorful part of the flower that attracts animals 
● Pistil: Part of the flower that makes eggs that grow into seeds  
● Stamen: Part of the flower that makes pollen 
● Anther: Tip of the stamen that holds the pollen 
18. Walk the children through a flower dissection so they are able to find all the parts of the 
flower.   
162 
a. Remove the petals from the flower 
b. Remove the stamens 
c. Find the anther (at the tip of the stamen) 
d. Rub the anther on a space of your journal.  What are these grains? (pollen) 
e. Find the pistil 
f. Use your fingernail to break open the base of the pistil.  What do you see? 
(eggs/seeds) Raise your hand if you need help.   
19. After they have dissected the flower, explain that they are going to create their own 
flower. 
20. Pass out some fresh flowers, but let them know that they can use the parts they already 
have.   
21. Give them a piece of tagboard and glue and tell them to glue the parts of the flower 
back together to create their own crazy, new flower. 
22. Take a picture of each of them with the flower since it will not last for long. 
23. Have them write a story about their flower in their journal explaining how their flower 
looks, feels, smells, and if it has a special purpose.   
 
Activity 2 Trees:  40 minutes 
24. Pass out the preserved leaves and four sheets of poster board.  Have them work in 
groups of 5 to attach their leaves to the poster, write the name of the tree, and what 
they observed about the tree under each leaf.   
25. Once they have finished that, you can hang the posters around the room for everyone 
to look at.  Give them a few minutes to look at the posters and read about the different 
trees.   
26. Have them write in their journal the names of five different trees and describe what the 
leaves look like 
 
Evaluation: 
● Writing a story about their flower will help them think about why they created the 
flower they did 
● Putting together a flower from the parts of other flowers will help them think about the 
parts of flowers and including all of them. 
● Writing down different trees and descriptions of their leaves will help them remember 
how to identify different tree species.  
● Creating posters of tree leaves with others will help them learn from others about trees.   
● Repeating a rhyme about poison ivy will help them identify it in the wild.   


163 
Sources: 
 
Bledsoe, K.E., Norvell, C., Goodman, N. (2004). Flower Fun. In S. Milford & K.B. Sagert (Eds.),  
365 Nature Crafts & Activities (p. 121). New York, NY: Backpack Books.  
 
Kowalski, K.M. (2000). Life in the Forest. The Everything Kids’ Nature Book (p.30). New York, NY:  
Scholastic Inc.  
 
WWC Eco Team. (n.d) Lesson 6: Pollination 
 
   
164 
Activity: Birds 
 
Time: ​1  hour 15 minutes 
Location:  ​Dr. Robert’s Trail 
Materials: 
● 20 pairs of Binoculars  
● 10 Whistles 
● 10 Minnesota Bird Field Guides 
● 20 copies Birding list (attached) 
● 20 clipboards 
● 20 Birdhouse gourds 
● 10 Screwdrivers 
● 20 paintbrushes 
● Various acrylic paint colors 
● Pans for mixing paint 
● 1 skein of yarn 
● 2 scissors 
 
Objectives: 
This lesson aims to learn about birds by observation.   
 
By the end of this lesson, students will: 
● Create their own birdhouse to put up at home 
● Observe and identify bird species 
 
Procedure: 
 
Intro Birding:  10 minutes 
1. Gather the group in  a circle and ask how many have observed birds before?  How many 
have gone out looking for birds?  Explain that a birder is someone who watches birds 
and often keeps a list of all the birds they have seen.   
2. Pass out clipboards and the Bird Checklist.   
3. Explain that you will all be going out to look for birds.  Let them know that the quieter 
they are, the more birds they may see.   
4. Have them pair up and pass out bird field guides and whistles for each pair.   
5. Tell them that they should see how many birds they can find and identify.  One person 
should keep track of how many birds they see total, and they both can share the book to 
identify the bird.   
6. Once the bird is identified, they can write it down on their list 
165 
7. Let them know that you will all start off as a group, but they can stop along the way 
wherever they need to.   
8. Tell them that they have 20 minutes to find birds and that they should meet at the head 
of the trail when they hear the whistle blown.  Remind them that if they get lost, they 
should blow their whistle and stay where they are. 
 
Activity:  20 minutes 
9. Begin walking on the trail and point out the first one or two birds you may see.  Then let 
the kids do the searching. 
10. As the kids break off from the group, keep doubling back to account for everyone. 
11. After 15 minutes have passed, blow your whistle and head back to the trail‐head.   
 
Reflection: 5 minutes 
12. Make sure all the pairs are accounted for and walk back to the clearing by the fishing 
pier.  This is where they will begin the birdhouses. 
13. Ask the kids: 
a. How many birds did they see?   
b. What bird was the coolest to identify? 
c. What characteristics helped them identify each bird? 
 
Intro Birdhouses:  5 minutes 
14. Ask the kids what they know about a bird’s home.  Explain that birds may build their 
own nests, but we can help them by making birdhouses for them to move into.  This will 
save them energy in building a home, and will provide a safe space for them to raise 
their young. 
 
Activity 2:  40 minutes 
15. Pass out the pre‐cut birdhouse gourds and screwdrivers.  Tell them that these are called 
birdhouse gourds because they make great birdhouses!  Explain that you have already 
cut the hole in them, and the inside is filled with seeds that need to be scraped out.   
16. Show them how they can use the screwdriver to scrape out the seeds and clean the 
inside.   
17. Then they can paint the gourd however they want and tie a string around the neck for it 
to hang. 
18. When the gourds have dried, they should be sprayed with a sealer so the paint won’t be 
washed away in the first rain. 
19. Tell the kids that their finished birdhouses will be kept for them to display in the art 
show at the end of the session, but then they can hang them at home! 
 
166 
 
Clean‐up:  5 minutes 
20. Once the kids start to finish their birdhouses, have them clean up their space;  collect 
gourd seeds in a bag, and collect paintbrushes to be washed at the Lodge.  Pick up any 
trash around the area. 
 
Evaluation: 
● Discussing their favorite birds will show that they used the field guide to identify the 
birds and that they found the observations interesting. 
● Discussing the types of homes for birds will show that they understand the types of 
shelters birds use.   
 
Sources: 
 
Bledsoe, K.E., Norvell, C., Goodman, N. (2004). Trees: Nature’s Giants. In S. Milford & K.B.  
Sagert (Eds.), 365 Nature Crafts & Activities (pp. 134). New York, NY: Backpack Books. 
 
Minnesota Department of Natural History. (2015). Retrieved from  
http://files.dnr.state.mn.us/destinations/state_parks/itasca/bird_checklist.pdf 


167 
 
 
Bird List 
Keep track of how many birds you see, and which ones you are able to identify!  Write the 
name of the bird on the line.  If you identify more that 6 birds, write their names below! 
 
 
Bird # 1:___________________________________________________________ 
 
Bird # 2:___________________________________________________________ 
 
Bird # 3:___________________________________________________________ 
 
Bird #4:___________________________________________________________ 
 
Bird #5:___________________________________________________________ 
 
Bird #6:___________________________________________________________ 


Total Number of Birds seen: ______________________________ 


168 
Activity: Wildlife 
 
Time: ​2 hours 
Location:​ Douglas Lodge 
Materials: 
● 20 Animal note cards 
● 10 plastic containers 
● 20 mason jar rims 
● 1 bag plaster of paris 
● 10 stirring sticks 
● 20 flags/marking tape 
● 1 bottle of water 
● 10 animals field guide 
● 1 can of Crisco Spray 
● 1 permanent marker 
● 60 note cards with pen marks 
● 10 boxes of Colored pencils 
● Journals 
 
Objectives: 
This lesson aims to learn about the wild animals that are found in the area through interactive 
games and explorations.   
 
By the end of this lesson, students will: 
● Identify animal tracks 
● Create plaster molds of animal tracks 
 
Procedure: 
This lesson may require some scouting ahead of time.  Go out and look for tracks first before 
beginning the lesson so you know where you can actually find tracks with the kids.  Try to find 
multiple locations that are not too far away so that everyone can keep a plaster mold 
eventually.   
   
Intro Warm‐up game:  10 minutes 
1. Begin the lesson by explaining the rules of Noah’s Ark.   
2. Gather everyone into a circle.  Explain that they will be getting a card with the name of 
an animal on it.  There is another person in the circle who has the same animal.  Tell 
them that talking is prohibited and they must act like their animal to find their match. 
169 
Once they have found their match they should enter the ark! (This can be any landmark 
such as passing between two trees)  
3. Pass out the notecards and allow the children to read them, then collect them again. 
4. Give the “go” signal and watch all the players act like animals! 
5. After a few minutes, tell them they can make the noises of their animals. 
6. Wait until all groups have found their pairs and have entered the ark. 
 
Activity 1:  1 hour 
7. Sit the kids down in the “ark” and explain the next activity.  They should stay with their 
match from Noah’s Ark as they will work with this person for the next activity. 
8. Ask them where they think the animals hide out during the day?  Why do we not see 
them as often when we are out?   
9. Explain that even if we can’t see real animals, we can find traces of them and find where 
they have been.   
10. Explain that we will be going on a search for traces of wildlife, particularly the tracks 
they leave behind with their paws. 
11. Give each pair a plastic container, a stir stick, a flag, 2 mason jar rims, and a field guide. 
Have them put these items in their backpacks. 
12. Head out on a hike to the locations you have previously scouted.  You don’t have to 
point out the tracks for them, just remind them to keep their eyes peeled for footprints 
as you walk.   
13. As they find the tracks, have whoever spotted the track make the mold.  If one child is 
finding all the tracks, let others step in so that everyone makes their own mold.   
14. When a track has been found, first have them identify it in their book as you pour some 
plaster of paris in their plastic tub.  Pour in a bit of water, and have them mix it up.   
15. Show them to put the mason jar rim around the track to contain the plaster.  Spray with 
Crisco first so the dirt won’t stick as much, and then pour the plaster into the circle. 
Don’t let it overflow! 
16. Have them stick a flag next to the mold with their name on it so they remember which 
one they made.   
17. Continue hiking until all the locations have been visited and everyone has made a mold. 
Try to use places that have a lot of tracks so that multiple molds can be made at each. 
18. Explain that the tracks will have to dry, and you will come back later for them.   
19. Ask them what kind of animal made the majority of the tracks? 
 
Activity 2:  30 minutes 
20. When you get back to the Lodge, pass out 3 marked index cards to each child.  Explain 
that they will be drawing animals on the three index cards.  One should be for the head, 
170 
the next for the body, and the third for the legs.  Explain that the marks signify how 
wide their animal should be.   
21. Have them draw a real animal on the index cards 
22. Collect all the cards keeping heads, bodies, and legs separate.  Shuffle each of these 
piles. 
23. Walk around the circle and hold them out face down.  Have two other staff members 
take the other two piles, and let the  kids pick one card from each stack. 
24. Tell them that the cards they have just picked make up a new imaginary animal! 
25. Pass out their journals and have them write a story about their new animal and how the 
animals different body parts help them survive in its habitat. 
26. Ask a few kids to share their animal and one thing about it. 
27. Collect the imaginary animals by putting each one in an envelope with the child’s name 
on it so it can be displayed later in the art show.   
 
Wrap‐up:  20 minutes 
28. After this has finished up, it is time to go collect the animal tracks. 
29. Walk out to the locations and have the kids pull up their tracks along with the mason jar 
rim and the flag.   
30. Return to the Lodge after all have been collected.  Keep the tracks to be evaluated the 
next day.   
 
Evaluation: 
● Using the field guide to identify the animal tracks show that they can use one correctly 
and are beginning to recognize animals of the area and their tracks. 
● Drawing real animals on the notecards show that they know of animals from the area. 
● Creating a story about their imaginary animals shows that they can apply knowledge of 
other animals to create the traits of a new one.  
 
Sources: 
Bledsoe, K.E., Norvell, C., Goodman, N. (2004). The Animal Kingdom. In S. Milford & K.B. Sagert  
(Eds.), 365 Nature Crafts & Activities (p. 163). New York, NY: Backpack Books.  
 
Cornell, J. (1998). Learning is Fun. ​Sharing Nature with Children II ​(pp. 89). Nevada City, CA:  
Dawn Publications.  
 
Kowalski, K.M. (2000). The Nature of Life. The Everything Kids’ Nature Book (pp. 24). New York,  
NY: Scholastic Inc. 
 
 
171 
List of animals for Noah’s Ark cards 
 
Deer 
Skunk 
Frog 
Squirrel 
Rabbit 
Porcupine 
Moose 
Bear 
Owl 
Snake 
Deer 
Skunk 
Frog 
Squirrel 
Rabbit 
Porcupine 
Moose 
Bear 
Owl 
Snake 


172 
Activity: Forest Fires 
 
Time: ​1 hour 15 minutes 
Location: ​Mary Gibbs Center 
Materials: 
● Large notepad and stand 
● Art Supplies 
● Long paper for a mural 
 
Objectives: 
This lesson aims to study the impact of forest fires. 
 
By the end of this lesson, students will: 
● Identify positive and negative consequences of forest fires 
● Describe some of the changes fires can make in an ecosystem 
 
Procedure: 
Bring in our Park Ranger friend from the Timeline lesson to discuss forest fires with the kids. 
They may also bring with them Smokey the Bear who is an icon for raising awareness of forest 
fires.   
 
Introduction:  20 minutes 
1. Introduce the Park Ranger to the group.   
2. Begin the activity with a discussion about forest fires.  ​(Park Ranger may help with this) 
Point out that while the effects of fire may be harmful to some wildlife species, the fire 
may benefit other species. 
3. Brainstorm possible positive and negative effects of forest fires.  Keep the list on the 
large notepad stand for students to see.   
Possible topics to include: 
Positive: 
● Maintains and enhances forest 
● Increases soil productivity by 
recycling nutrients in 
undergrowth 
● Prepares soil for germination of 
seeds 
● Activates heat dependent seed to 
grow such as pines and spruce 
● Opens up habitat by generating 
new growth and diversifying food  
Negative: 
● Wildlife may die or lose their 
habitat 
● Loss of vegetation 
● Loss of food and shelter for 
wildlife 
● Increased silt and sediment in the 
water  
173 
Exploration:  20 minutes 
4. Break the class into small groups, enough to cover each topic listed on the notepad. 
5. Provide lots of different books and info cards for them to research their topic.  They can 
also use the Park Ranger as their resource. 
6. Pass out their journals and have them record any interesting information they come 
across.   
 
Activity:  20 minutes 
7. After they have completed researching, break them up further into three groups.  The 
three groups will focus on before, during, and after a forest fire. 
8. Roll out the mural paper, and divide it into thirds.   
9. Have each group work on their section and draw a forest as seen before, during and 
after a forest fire.  Tell them they must include in the drawings, the trees, plants, 
animals, ground, and sky.   
10. If they have questions about what something should look like in their section, encourage 
them to ask each other to find out the answer.  For example if someone didn’t know 
what happened to the trees after a forest fire, the person who researched that could 
answer them.  
 
Visit and Reflection:  15 minutes 
11. If Smokey the Bear is available, have him come in to reflect with the kids and answer 
any more questions they have. 
12. If Smokey the Bear is not available, have the Park Ranger stand in. 
13. Ask the kids reflective questions: 
● Why are fires helpful to healthy forests? 
● What does a fire do to the ecosystem of a forest? 
● What are some positive and negative effects of forest fires? 
● What are some species affected by a forest fire?  
 
Evaluation: 
● The questions at the end of the lesson with the Park Ranger/Smokey the Bear serve as 
an evaluation of their understanding of forest fires. 
 
Source: 
 
Project WILD. (2012). Human Impacts.  (pp. 314). Houston TX: Council for Environmental  
Education 2012.   
 
   
174 
Activity: Wildlife part 2 
 
Time: ​2 hours 
Location: ​Mary Gibbs Center 
Materials: 
● Animal Track casts from previous day 
● Copies of common animal track sheet (attached) 
● Magazine or newspaper pictures of a wide variety of animals 
● Poster board  
● Glue 
● Scissors 
 
Objectives: 
This lesson aims to reflect on the tracks made from the day before and further explore the 
Wildlife of Itasca. 
 
By the end of this lesson, students will: 
● Categorize their animal track casts 
● Recognize 4 animal tracks common in Itasca 
● Distinguish between wildlife and domesticated animals 
● Recognize that wildlife occurs in a variety of forms 
 
Procedure: 
 
Discussion:  30 minutes 
1. Re‐distribute the casts made from the previous day. 
2. Have the kids group the tracks according to animal to get a clear idea of how many 
different animal tracks they actually found. 
3. Discuss the different characteristics of the tracks and how they indicate the lifestyle and 
size of the animal.  (webbed feet for water, splayed feet for traversing uneven ground, 
claws for grip or predation) 
4. Determine which tracks, if any were found near water.  If they were found near water, 
ask the kids what that animal could have been doing near the water.   
5. Pass out their journals, and copies of common animal tracks in the area.   
6. Have them draw and label at least four different tracks of animals found in Itasca.  They 
can look off the casts, or use the tracks on the worksheet.  


175 
Activity:  1 hour 20 minutes 
7.  As they are finishing their drawings, begin to pass out magazines and newspapers, and 
scissors. 
8. Ask the kids to go through the magazines and newspapers and cut out all the pictures of 
animals that they can find.  Remind them of the definition of an animal:  any living 
organism other than a plant.   
9. Have them place the picture they cut out in a pile in the middle of the circle.   
10. When they seem to have gotten through most of the articles, or have a large pile of 
animals cut out, pick up all the magazines and have them pick up the scraps and garbage 
around them.   
11. Spread out the pictures of the animals and ask, Which animals are wild, and which are 
domesticated.   
12. Have them sort the pictures into wild and domesticated as you discuss the difference 
between the two.  Be sure to explain: 
a.  Domesticated animals are those that humans have kept in captivity and bred for 
special purposes.  This process takes place over a long period of time and all 
domesticated animals have their origins in wild ancestors.  Tame animals are 
pets, but not all domesticated animals are “tame”.   
b. Wild animals  live in a natural state and provide its own food, shelter and other 
needs.  These animals are not tame and get their needs from their own suitable 
habitat.   
13. Once they believe that they have the animals correctly sorted, pass out 2 pieces of 
construction paper to each.  Have them create their own domesticated and wild animal 
collage.   
14. Have them indicate in some way on the collages the animals that are found in Itasca. 
They could outline, or star these animals, just so that they recognize the animals that 
are common in the area.   
 
Reflection: 10 minutes 
15. Once everyone has finished, look at all the collages and discuss which animals in them 
are found in Itasca and which are not.  Where do the other animals live? 
 
Evaluation: 
● The discussion on animal tracks and the sketches in their journals will demonstrate that 
they are able to recognize and interpret animal tracks 
● Correctly sorting the animals into wild and domesticated will show that they understand 
the difference 
● Indicating which animals are from Itasca on their collages will show that they recognize 
native animals and exotic animals. 
176 
Source: 
 
Project WILD. (2012). Ecological Knowledge.  (pp. 7, 30). Houston TX: Council for Environmental  
Education 2012.   


177 


178 
Activity: Service Project Planting Trees 
 
Time: ​1 hour 15 minutes 
Location: ​Visitor Center and Douglas Lodge 
Materials: 
● 20 Shovels 
● 20 pairs of kids gardening gloves 
● 5‐10 Tree Seedlings/bushes 
● 20 Wooden Stakes 
● 1 ball of Twine 
● 1 Watering Hose 
 
Objectives: 
This lesson aims to teach kids how to plant trees as well as complete a Service Project for Itasca.   
 
By the end of this lesson, students will: 
● Plant trees and shrubs around the Visitor Center and Douglas Lodge 
● Realize the importance in giving back to a community 
 
Procedure: 
As this lesson takes place at both the Visitor Center and Douglas Lodge, certain steps will not 
have to be repeated when beginning at the second location.   
 
Intro: 15 minutes 
1. Explain to the kids that today you will be working to plant some trees for the park. 
Introduce the Park Ranger that you will be working with as they will be instructing the 
group where to plant things.   
2. Tell the group that since Itasca has allowed them all to come out every day and use the 
park, it is time to help them out by planting these trees.  The trees will help the 
environment as well as add some variety to the landscape around the Visitor Center and 
Douglas Lodge.   
3. Explain that you will be starting at the Visitor Center, and after snack, will head to 
Douglas Lodge. 
4. Turn things over to the Park Ranger, who will place the trees and shrubs where they 
need to be planted and explain that the plants are all placed and the kids just have to 
plant them where they are sitting. 


179 
Activity:  1 hour 
5. Split the kids up into groups of four.  Assign each group a tree and give a short demo on 
how to dig the hole for the tree.   
6. The hole should be deep enough to cover the roots of the tree.   
7. Walk around and help the kids dig as needed.   
8. When groups finish digging their hole, individually help them to put the seedling in the 
hole.   
9. Put the seedling into the hole making sure all the roots are in the hole and spread out 
evenly so they are not bent. 
10. Fill in the hole with dirt and stomp down well to get rid of air pockets.  Add dirt until the 
ground is level.   
11. Use the last of the dirt to create a wall around the tree.  This will create a moat when 
the tree is watered and will help keep the water on the tree and not spreading all over. 
12. Pull the hose over and water the tree right away. 
13. If the tree feels unstable, especially if it is thin, it can be supported by driving two or 
three wooden stakes into the ground around it and using elastic ties to hold the tree in 
place.  
14. Continue until all the trees have been planted.  
 
Evaluation: 
● Completion of the service project will show they have worked diligently to give back to 
Itasca, and understand the process of planting trees.  
 
Source: 
 
Bledsoe, K.E., Norvell, C., Goodman, N. (2004). Trees: Nature’s Giants. In S. Milford & K.B.  
Sagert (Eds.), 365 Nature Crafts & Activities (p. 126). New York, NY: Backpack Books.  


180 
Activity: Campground Clean‐up 
 
Time: ​2 hours 
Location: ​Main Campground 
Materials: 
● 20 pairs of gloves 
● 6 Garbage Bags 
● 8 Rakes 
● 3 Shovels 
● 4 Wheelbarrows 
 
Objectives: 
This lesson aims to give back to the park by cleaning up campsites 
 
By the end of this lesson, students will: 
● Understand the importance of implementing LNT while camping 
● Practice methods to clean‐up and maintain a campsite 
 
Procedure: 
 
Intro:  20 minutes 
1. Upon arriving at the campground, have the kids briefly assess and explore to decide 
what needs to be done  The Park Ranger can also walk around with them and point out 
what needs to be done. 
2. Explain that these campsites are available for anyone to stay at.  People who stay here 
should think about LNT while at the campground, but many do not.  That is why you are 
there to clean‐up after them.  Explain that if everyone observed LNT while camping 
there would not have to be volunteers like themselves who had to come in and clean up 
the campsites. 
3. Break the kids up into work crews to get different jobs done. 
 
Clean‐up: 1 hour 40 minutes 
4. Divide them up to pick up trash, clean out fire pits, rake up sticks and leaves from main 
tent areas, and haul leaf litter to be dumped into bordering woods.  Have one staff 
member be the leader of each work crew. 
5. Those picking up trash will need gloves and garbage bags.   
6. Those cleaning out fire pits will need rakes, shovels, and a wheelbarrow. 
7. Those raking will need rakes and a wheelbarrows. 
181 
8. The last crew will be the ones moving the wheelbarrows back and forth between the 
sites and the designated deposit sites.   
9. Start everyone on the first four campsites, and work your way around the entire campground.   
 
 
Evaluation: 
● Clean‐up of the campsite with show that they understand the tasks needed to maintain 
a campsite. 
● Discussion of LNT and evidence of poor practice of LNT will help them realize how 
important it is to clean up after themselves while in nature.   
 
Source: 
 
None 
 
   
182 
Activity: Fish parts and Identification 
 
Time: ​1 hour 15 minutes 
Location: ​Douglas Lodge 
Materials: 
● 20 Fish Identification Worksheets   
● 10 Fish Field Guides 
● 1 Preserved Perch for dissection 
● Dissecting tools 
● 1 Dissecting trays 
● 20 Fish Anatomy Worksheets 
 
Objectives: 
This lesson aims to understand the anatomy of a fish, and begin to recognize species common 
to the lakes of Northern Minnesota 
 
By the end of this lesson, students will: 
● Identify the parts of a fish and their functions 
● Recognize 6 species of fish common in the lakes 
 
Procedure: 
 
Intro: 5 minutes 
1. Ask the kids, how many of them have gone fishing before?  Ask them, what types of fish 
did they catch? 
2. Explain that there are more than 45,000 identified species of fish, but we are going to 
focus on the few that can be found in the lakes of Minnesota. 
 
Activity 1: 20 minutes 
3. Have the kids pair up and pass out the Fish Identification sheet to each child.   
4. Have them work together to use their fish field guides to fill in the blanks about the fish.   
5. Ask them the following questions: 
a. Which fish they are most likely to catch when out fishing? (Bass, Crappie, Perch, 
Sunfish) 
b. Which fish is the longest fish? (Northern) 
c. Which fish is the smallest fish? (Perch) 
d. Which fish has the most colors? (sunfish) 
6. After these questions, have each pair find a seat at the table.   
 
183 
 
Activity 2:  45 minutes 
7. Pass out Fish Anatomy coloring guides. 
8. Explain to them that you are going to do a fish dissection demo so that they can see the 
different parts of the fish.  You might need volunteers every now and then to assist you! 
9. Tell them that as you point out the different parts of the fish they can color it in on their 
diagram.   
10. Make the initial cut to remove one side of the fish.  Cut from in front of the gills, along 
the lateral line, back down and along the stomach. 
11. Remove this piece of skin from the fish to display the internal organs. 
12. Using their worksheet as a guide point out some of the main features. 
13. You can call up a few volunteers to point out a few of the parts if they think they know 
where those parts are.  Give the volunteers a pair of tweezers to prod around in the 
organs to find what they are looking for.   
14. Briefly discuss the functions of the main parts as you point them out.  For example: 
a. Gills:  help the fish extract oxygen from the water so that they can breathe 
b. Tail:  Helps the fish with movement in the water 
c. Fins:  Help the fish steer while in the water 
d. Lateral Line:  Serves as a sensory system.   
 
Reflection:  5 minutes 
15. As they finish up coloring their pages, walk around and ask them to show you different 
parts of the fish on their drawing.   
 
Evaluation: 
● Finding information about the fish themselves will reinforce their knowledge of the fish 
and help them recognize the species better. 
● Observing a dissection and coloring in the anatomy of a fish at the same time will show 
that they understand the internal composition of a fish and can recognize the individual 
parts.   
 
Sources: 
 
Biology Corner. (n.d). Retrieved from  
http://www.biologycorner.com/worksheets/fishcolor.html  
 
Minnesota Department of Natural Resources. (2015). Retrieved from  
http://www.dnr.state.mn.us/fish/bass/index.html 
 
184 
 
Anatomy of a Fish 
 
Caudal Fin (blue)    Gills (red)   Muscles (red)  
Anal Fin (pink)   Heart (pink)   Vertebrae (yellow)  
Dorsal Fin (yellow)   Stomach (green)   Swim Bladder (blue)  
Pelvic Fin (green)   Esophagus (yellow)   Kidney (green)  
Pectoral Fin (orange)   Liver (brown)   Scales (purple)  
Operculum (brown)   Intestine (blue)     
Lateral Line System (black)   Reproductive Organs (orange)   


185 
 
Bass 
 
Where are they found? 
How many species of bass are there? 
List them: 
What do they eat? 
 
Crappie 
 
Where are they found? 
How many types of crappie are there? 
List them: 
What do they eat? 
186 
 
Northern Pike 
 
Where are they found? 
What other fish does the northern most closely resemble? 
How can you tell them apart? 
What do they eat? 
 
Walleye 
 
Where are they found? 
What other fish does the northern most closely resemble? 
How can you tell them apart? 
What do they eat? 
 
187 
 
Sunfish 
 
Where are they found? 
How many species of sunfish are there? 
List them: 
What do they eat? 
 
Yellow Perch 
 
Where are they found? 
What fish is the Perch closely related to? 
What is the Perch used for? 
What do they eat? 
 
   
188 
Activity: Fishing Safety and Gear 
 
Time: ​1 hour 15 minutes 
Location: ​Douglas Lodge 
Materials: 
● 20 Fishing poles 
● 20 Bobbers 
● 20 Hooks 
● 20 Weights 
 
Objectives: 
This lesson aims to go over fishing gear and safety precautions. 
 
By the end of this lesson, students will: 
● Understand the safety precautions when fishing and importance of awareness 
● Be able to identify and explain gear needed for fishing 
● Set up their own fishing pole 
 
Procedure: 
 
Intro:  5 minutes 
1. Begin by asking the kids, by a show of hands, how many have gone fishing before?  How 
many can identify the parts of a fishing pole? 
 
Activity:  1 hour 
2. Pass out fishing poles to each of the kids with the line attached and set in the reel but 
not complete with hooks or bobbers.   
3. Go over the parts of the rod and reel.  Refer to the image below. 
 
4. Explain that their line is set up on their pole, but not completely.   
5. Ask them what needs to go on the end of their line? 
6. Show a bobber and ask what they think this for?  Explain that the bobber will help them 
know when they have a fish on the line.  If a fish bites, it will start the swim away and 
the bobber will go underwater.  When there is no fish, the bobber floats on top of the 
water.   
189 
7. Demonstrate how to put a bobber on the line by pushing down on the top button, and 
threading the line through the top and bottom hooks. 
 
8. Pass out bobbers and assist the kids in putting their bobber on their line. 
9. Once they have put on the bobbers, pass out weights and ask what these are for. 
Explain that weights go below the bobber and help the hook and bait sink to where the 
fish swim.   
10. Demonstrate how to put on the weights by sliding the line into the groove along the 
side.  Assist the kids to put weights on.  The weights should sit about a foot above the 
end of the line.   
11.  After they have put their weights on, hold up a fishing hook.  Make sure they are all 
paying attention as this is very important and serious. 
12. Explain that a fishing hook is very sharp and is designed with a barb on the end so that 
once it is stuck in something it is very hard to pull out.  Tell them that this little hook can 
cause serious injury and it should never be swinging around freely or come close to 
anyone’s head.   
13. Demonstrate what casting is and tell them that it is very important to keep their hook in 
sight at all times, and know where their hook is going.  Explain that if you are walking 
around, be aware of the people fishing and keep their distance when others are casting. 
On the other hand, if they are casting, they should look behind them before they cast.  
14. Give a handful of hooks to each counselor and walk around to individually help the 
students tie on their hooks.   
15.  Once their hooks are tied on, show them how to secure their hook onto one of the 
bottom line guide hooks and reel the line taught so their hook does not swing around 
freely.   
 
Reflection:  10 minutes 
16. Ask them to point out to you different parts on their rod and reel.  Include parts of the 
actual fishing pole and the parts they attached themselves.   


190 
Evaluation: 
● Physically setting up their own fishing pole will help them understand how to do it and 
how their pole works. 
● Quizzing them on the parts of their pole will demonstrate their understanding of a 
fishing pole. 
 
Source:  ​none   
191 
Activity:  Fishing Basics 
 
Time: ​2 hours 
Location: ​Fishing Pier 
Materials: 
● 20 set up Fishing Poles 
● 5 Containers Waxworms 
● 5 Containers Nightcrawlers 
● 20 Lifejackets 
● needle nose pliers 
 
Objectives: 
This lesson aims to give kids practice fishing.  
 
By the end of this lesson, students will: 
● Bait their own hook 
● Practice their cast 
● Practice reeling 
● Try taking a fish off their line 
● Catch a fish! 
 
Procedure: 
 
Practice:  40 minutes 
1. Begin by passing out life jackets for every child and helping them put it on correctly. 
2. Demonstrate to the kids how to put a worm onto their hook.  Tell them if they poke the 
hook through the worm multiple times, kind of like an accordion, it will stay on longer.   
3. Help the kids put worms on their hooks.  Encourage them to try it themselves first 
before asking you for assistance.  Wax worms are small enough that a whole one can go 
on a hook, but nightcrawlers can be cut into multiple pieces as they are quite large.   
4. Demonstrate to the kids how to cast their line.  Put a thumb on the button of the reel, 
and the rest of your hand wraps around.  Press the button as you bring the pole behind 
you, and then release the button, but hold on to the pole as you swing it back in front of 
you.  The action is similar to throwing a ball.  
5. After you have cast your line out, demonstrate and explain how to reel it back in.  To 
reel in the line, press the button again and spin the lever clockwise until the bobber is at 
the tip of the pole. 
6. Tell the kids that they will practice casting and reeling in their line at least 5 times before 
they will try really fishing.   
192 
7. Spread the kids out a good distance from each other along the shore and the fishing 
pier.  have them practice their casts and reel back in.  You can walk around and give tips 
individually, just look out for flying hooks.   
8. Once they seem to be getting the hang of it, gather their attention again with a call and 
response.   
 
Fishing:  1 hour 
9. Explain that now they have almost mastered the techniques of fishing and can start to 
wait for a bite.   
10. Explain that when fishing, you cast your line, wait for your bobber to go down, and then 
begin reeling.  When the bobber goes down there is a fish on the end and it is important 
they hold onto their pole so it does not get pulled away by the fish! 
11. Allow them to return to their spots along the shore and the pier and start fishing.  Walk 
around and talk to them individually to make sure they understand what to do.   
12. After a bit of time, you can have the kids on the pier switch places with the kids on land. 
13. When somebody catches a fish, and have reeled it in, assist them in taking the fish off 
the line.  Talk them through it, or if they don’t want to touch the fish, you can do it for 
them.  If the fish has swallowed the hook, a needle nose pliers may come in handy to 
reach the hook and pull it out. 
14. Show the kids the fish that was caught, and ask if they recognize what kind of fish it it.   
15. If one child seems to be catching a lot of fish in their spot, switch in other kids to that 
spot who may not have caught any yet.   
 
Reflection:  20 minutes 
16. When the lesson is almost over, bring all the kids back to land and have them put their 
hook in the line guides as this is the correct way to store fishing poles when not in use.   
17. Ask the kids: 
a. What kinds of fish did they catch? 
b. What was it like when they caught the fish? 
c. What surprised them about fishing?  
 
Evaluation: 
● The amount of practice time in this lesson will ensure the kids can work on and improve 
their fishing technique. 
● The questions at the end will allow the kids to reflect upon their fishing experience. 
 
Source: ​none  
   
193 
Activity:  Canoe safety/basics 
 
Time:  ​1 hour 15 minutes 
Location:  ​On shore of the Beach 
Materials:  
● One canoe, 2 paddles and 2 life jackets for yourself and another staff member 
● 10 canoes ‐ one for every pair  
● 20 Life Jackets 
 
Objectives: 
This lesson aims to address safety concerns and basics of canoeing.   
 
By the end of this lesson, students will: 
● Properly enter and exit a canoe 
● Understand safe boat techniques and rules 
● Understand terminology of canoeing 
 
Procedure: 
 
Intro and set‐up:  15 minutes 
1. Ask the kids how many of them had gone canoeing before?  How many have seen a 
canoe, and where have they seen it?  Briefly explain that Native Americans used the first 
canoes to travel by water and carry their supplies.   
2. Pair the children up by ages, have one older and one younger child in each canoe. 
Partners can always be rearranged if original pairs seem to conflict.   
3. Get every child a life jacket.  A properly fitted life jacket will not slip over their head 
when lifted by the shoulder straps.  It should be tight across their chest, but not 
uncomfortable.  They will be practicing skills in their life jackets on land to become 
accustomed to wearing them as they must be worn at all times when on the water.   
4. Arrange the group and their canoes on the beach so that they have enough room to 
move freely and not hit anyone around them.  However, try to keep them close enough 
together so that they will be able to hear you talk.   
 
Terminology:  20 minutes 
5. Begin by going over the different parts of the canoe.  Point out the stern and bow of the 
canoe ​(see diagram)​ and explain that this is the back and the front.  This is where they 
will be sitting when in the canoe.   
6. Turn one canoe over and point out the keel of the boat ​(see diagram) ​ Explain that the 
keel helps keep the boat stable in the water and maintains the direction of travel.   
194 
7. Next explain the difference between starboard and port.  Starboard means right side, 
and port means left side.  Point out the sides on the canoe.  They will be the left and 
right sides when seated from the stern.  Explain that on a boat the starboard and port 
sides always stay the same no matter how you look at the canoe.  That way it is easier to 
know which side someone else is referring to.   
8. Point out the thwarts ​(see diagram) ​and explain that these simply help to brace the 
canoe and allow it to keep its shape.  The yoke is the center thwart and is used for 
portaging or carrying a canoe with one person. 


9. After going over the terms, test the kids by pointing to a part of the canoe and asking for 
it’s name. 
 
Skill Practice: 20 minutes  
10. Next, demonstrate to kids how to safely get in and out of a canoe.  Explain the rule 
about three points of contact and make sure you demonstrate this correctly.  One 
person holds the canoe sides from the back.  The other person steps into the center of 
the boat while holding both sides of the canoe.  The three points of contact are one 
hand on each side of the canoe, and feet in the center of the bottom.  While still holding 
onto the sides, the person stays low and centered and walks toward their seat where 
they can sit down.  
11. Exiting the canoe follows the same criteria:  three points of contact, stay low and 
centered. 
12. After demonstrating this technique to the kids, have them all practice getting in and out 
of their canoes two times each.  Make sure each partner gets a turn. 
13. Once they seem to have gotten this down, have them all sit in their canoes.   
195 
 
Safety:  15 minutes 
14. Ask them what they can tell you about being safe in a canoe. 
15. Listen to their responses and demonstrate consequences of each response.  For 
example if they say don’t stand up, demonstrate with another staff member how the 
boat becomes very tippy and may flip over if one person stands up in it.  These 
demonstrations can be made as fun and exciting as you dare.  They can take place on 
land or in the water, just as long as the kids understand how important it is to consider 
safety while in the canoe.   
16. While demonstrating what NOT to do in the canoe, make sure you cover; standing up, 
rocking the canoe, and communicating with your partner. 
17. After showing the kids all that could go badly while in a canoe, demonstrate the proper 
safe canoeing techniques which includes sitting calmly, and communicating with their 
partner.   
 
Reflection:  5 minutes 
18. After the demonstrations, ask the kids to recall some of the do’s and don’ts of canoeing.   
 
Evaluation: 
● Kids must properly demonstrate getting in and out of their canoe.  
● Recall the crucial safety rules of canoeing. 
● Point out the different parts of the canoe and refer to the terms correctly.   
 
Source: 
 
Bunting, C.J. (2006). ​Canoeing and Kayaking. ​Champaign, IL: Human Kinetics​.   


196 
Activity:  Canoe strokes 
 
Time:  ​1 hour 15 minutes 
Location:  ​On shore of the Beach 
Materials:  
● One canoe, 2 life jackets, and two paddles for you and another staff member 
● 10 canoes ‐ one for every pair  
Each child will need: 
● 1 Life Jacket 
● 1 Paddle 
 
Objectives: 
This lesson aims to cover the different canoe strokes and steering, as well as work on 
communication between canoe partners. 
 
By the end of this lesson, students will: 
● Practice proper canoe strokes and apply them correctly 
● Understand the technique behind steering their canoe 
● Effectively communicate with their partner 
 
Procedure: 
 
Set‐up: 5 minutes 
1. Set up this lesson in the same way as the previous lesson ​(refer to Canoe Safety steps 
1‐3) ​It should not take as long as in the morning as everything can be left out and the 
kids will remember their places.  
 
Paddling:  40 minutes 
2. Pass out paddles to each kid and remind them to keep one end on the ground when 
they are not practicing.   
3. Explain the different parts of the paddle 
● Grip:where they place one hand 
● Shaft:where the other hand goes 
● Blade: part that pulls the water 
 
197 
 
4.  Begin to introduce the Forward Stroke. 
5.  Have all the children enter their canoes properly and sit down. 
6.  Once they are all seated, show them how to hold their paddle;  One hand on the grip, 
the other shoulder distance apart down the shaft.   
7.  Demonstrate a forward stroke and explain what to do as you do it.  To do a forward 
stroke, keep the shaft as vertical as possible and hold the wide end of the blade 90 
degrees from your body.  The paddle should enter the water so that the wide portion is 
being pulled.  Place the blade in the water well in front of your knee, pull back on the 
paddle and twist your torso as you pull to power the stroke.  When the blade reaches 
your knee the stroke is done and you can pull it out of the water and reach forward 
again.   
8.  Demonstrate this motion for the kids, as actions make more sense than words, and allow 
them time to practice.  Go around and correct kids as they are practicing.   
9.  When they seem to have a pretty good handle on the forward stroke, introduce the 
backward stroke. 
10.  For the backward stroke, they hold the paddle in the same way, but reach behind them 
and twist their body, and then push forward using their twist to power the stroke.   
11.  Give them time to practice the stroke as you walk around and help as needed.   
12.  If they are catching on fairly quickly, you can introduce the draw stroke.  However if 
they are struggling, keep it to the forward and backward strokes and move on to step 
14.   
13.  The draw stroke is used to move sideways away from the bank or dock.  Put the blade 
in the water parallel to the canoe and pull yourself over to the blade. 
 
Partner skills: 20 minutes 
14.  After working on strokes, it is good to have the kids work together in their canoe pairs. 
15.  Explain that with two people in a canoe, they should each paddle on opposite sides. 
Tell them that they should paddle as together as they can as this will help the canoe 
move fast and straight.  Explain that the person in front (bow) sets the rhythm and picks 
the side, and the person in the back (stern) matches them.  If the person in the front 
switches sides, the person in the back should do so as well.  
16.  Give the kids about 5 minutes to test this out and practice paddling together.  
198 
17.  Explain that if both people paddle on the same side the canoe will begin to turn.  If they 
want to turn to the right, they should both paddle on the left, and if they want to turn to 
the left they should both paddle on the right.  
18.  If they want to make a sharp turn, the person in the back should either plant their 
paddle on the side that they want to turn while the person in the front paddles on the 
opposite side, OR the person in the back can paddle backwards on the side that they 
want to turn while the person in the front paddles again on the opposite side. 
19.  Don’t take too much time explaining the concepts of turning as it is learned more 
thoroughly by practicing in the actual water. 
 
Visualization:  10 minutes 
20. Take the kids through a mock canoe adventure. 
21.  They should be in their boats and will work on their strokes and turning as they act out 
what you are saying.   
22.  Start them out of their boats, and begin the adventure which could look something like 
this; 
One beautiful summer day, you and your friend decide to head to the lake to do some 
canoeing.  You arrive at the lake and bring your canoe onto the beach.  Approaching the water’s 
edge, you set your canoe down and both get in.  You begin to paddle your way out on the lake. 
You paddle and paddle as the sun shines down.  You start to get pretty warm, so you turn the 
canoe to the left and head towards some shade from the trees along the shore.  When you 
reach the shade, you float for a few seconds and enjoy the cool air.  Off to the right you see 
something in the water, you turn to the right to go investigate.  As you approach it, it suddenly 
disappears, and you figure it must have been a turtle!  You continue to paddle along the 
shoreline until you reach another dock.  Here you get out of your canoe so you can sit on the 
dock and dangle your toes in the water for a bit.  You get tired of that, and both get back into 
the canoe.  You pull away from the dock and turn the canoe around to head home.  It’s farther 
than you expected and you paddle and paddle….. until finally you reach the beach where you 
started.  You approach the beach, step out of your canoe, and pull it on shore.   
 
Evaluation: 
● The practice time allowed into this lesson will give them lots of time to work on their 
paddling strokes and improve on them. 
● The visualization will help the kids practice their strokes, apply steering  to how they use 
their strokes, and work with their partner.   


199 
Sources: 
 
American Canoe Association. (n.d). Retrieved from  
http://c.ymcdn.com/sites/www.americancanoe.org/resource/resmgr/sei‐educational_r
esources/beginners_guide_aca.pdf 
 
Bunting, C.J. (2006). ​Canoeing and Kayaking. ​Champaign, IL: Human Kinetics 


200 
Activity: Camping Skills AM 
 
Time: ​1 hour 15 minutes 
Location: ​Campground 
Materials: 
● 5 tents 
● 1 box of matches 
● Firewood 
 
Objectives: 
This lesson aims to introduce basic camping skills.   
 
By the end of this lesson, students will: 
● Set up a tent while working with a team 
● Be able to distinguish between good and bad campsites 
● Assist in starting a fire 
 
Procedure: 
 
Intro:  15 minutes 
1. Begin the lesson by asking how many have slept in a tent before?  Ask if they helped to 
set up that tent? 
2. Break up the group into 5 groups of 4.  Assign one counselor to assist each group. 
3. Have them sit with their group and ask them, what should they look for in the area 
where they want to put their tent? 
4. List the characteristics of a good and bad campsite.  Things to cover include: 
Good Campsite 
● Flat, even ground 
● Safe distance from the fire 
● Safe distance from a water source 
● Sheltered under a group of trees 
with no hanging branches 
● Spectacular views 
Bad Campsite: 
● Uneven ground with lots of roots of 
rocks poking up 
● Sloping ground 
● Dead tree branches above 
● Very close to a source of water 
● Very close to the fire pit 
 
5. Explain how dead hanging branches can be dangerous if they were to fall on the tent, 
sparks could fly from the fire, and if it rains during the night, a river or water source may 
flood.   
 
 
201 
Activity:  30 minutes 
6. Pass out a tent to each group, and tell them to go find their perfect campsite.  Remind 
them that since you are in an established campsite, they should stick to cleared areas 
and not create their own, new site.   
7. Tell them to find a campsite and work together to set up their tent.  The counselors can 
assist them with this process, but should focus only on settling conflict or providing 
helpful tips, and let them actually set up the tents.  
8. Have the counselors ask each group during the set up process, why they chose the site 
they did.  What characteristics were appealing about it? 
9. Once all the tents have been set up, call them back to the main campfire area. 
 
Activity 2:  30 minutes 
10. Explain that next you need help to build a fire.   
11. Hold up a piece of firewood and explain that a tiny flame from a match will not catch 
onto something that large right away.   
12. Send them on a search for tinder.  Explain to them that tinder consists of tiny twigs, dry 
grasses, birch bark, and small sticks.  It is all the little dry stuff that fire will catch onto 
quickly.   
13. Have them go gather tinder, and remind them to not pull any living sticks or bark off the 
trees, but rather look on the ground.   
14. After a few minutes, call them back and have them put their collections on the ground 
around you. 
15. Show them how to build up a fire, you must first start with the smallest and dryest 
pieces.  Lay out any birch bark, dry grass or pine needles they have collected.   
16. Then move on to the smaller twigs.  Explain that the formation you are building is called 
a tipi form.  To build this up, you alternate the directions of the twigs so that they stand 
up in the middle and form a tipi shape.  The kids can help with this step. 
17. As the tipi grows, you lay on larger and larger sticks.   
18. When the tipi has gotten up to about quarter sized in diameter sticks, have the kids step 
back as you light the bark, grass and needles in the middle. 
19. As it catches and spreads, you can add bigger pieces of firewood still following the tipi 
form and being careful not to collapse the current form you already have. 
20. Demonstrate what happens when you blow on the fire with long, slow breaths. (This 
feeds the fire with oxygen and helps it grow) 
21. Tell the kids that after snack break, you will use this fire to help cook their lunch over. 
22. Tell them that it is very important that they do not play near the fire as we don’t want 
anyone to fall in or get burned.  
23. Also remind them not to put sticks in the fire and pull them back out as we don’t want 
the fire to be spread, or hot sticks being waved around in the air.   
202 
24. Finally, Ask them what form was used to build the fire, and to explain what tinder is.   
 
Evaluation: 
● Choosing their own campsite and answering the counselors questions will show that 
they understand what makes a good campsite. 
● Setting up a tent successfully on their own will show teamwork and their ability to 
follow direction and learn new skills. 
● Gathering tinder will demonstrate that they understand what it consists of.   
 
Source: 
 
The Hiking Life. (2015). Retrieved from  
http://www.thehikinglife.com/skills/choosing‐a‐campsite/ 
   
203 
Activity: Camp Cooking 
 
Time: ​2 hours (will overlap into lunch time) 
Location: ​Campground 
Materials: 
● 2 Camp Stoves 
● 2 pots and lids 
● 1 frying pan 
● 3 stirring spoons 
● 1 cutting board 
● 20 apples 
● 2 jars peanut butter 
● 1 bag of baby carrots 
● 1 box of spaghetti noodles 
● 2 Loaves of French bread 
● 2 cloves garlic 
● 1 garlic press 
● 1 box of butter 
● 2 jars tomato sauce 
● 2 lbs ground beef 
● 1 package Mac’n’Cheese mix for 25 servings 
● 1 bag of marshmallows 
● 1 box of graham crackers 
● 1 package Hershey’s Chocolate 
● 5 Roasting sticks 
● 1 campfire 
● 1 roll aluminum foil 
● 2 pairs of hot mitts 
● 1 bread knife 
● 1 apple cutter 
 
Objectives: 
This lesson aims to give kids experience cooking at a campsite. 
 
By the end of this lesson, students will: 
● Set up a camp stove 
● Cook a complete meal  
● Clean up properly 
● Cook over a stove and a fire 
204 
 
Procedure: 
 
Intro:  10 minutes 
1. Pull out the two camp stoves and ask the kids if they know what they are.  Has anyone 
ever used them? 
2. Tell them that we will be cooking our whole lunch over the camp stoves and the fire. 
3. Show them how to unfold the camp stove and attach the propane tank to the side. 
4. Show them how to turn the burners on and off. 
5. Explain to them what food they will be cooking for lunch, and divide up the tasks among 
groups.  Keep the same tent groups from earlier. 
6. Tell them that they will be boiling water to cook pasta, making spaghetti meat sauce, 
macaroni and cheese, and garlic bread.  To go along with this meal they will have apples 
and carrot sticks.   
7. Have one team be in charge of boiling the water and cooking the pasta, another team in 
charge of Garlic bread, a third team in charge of mixing the sauces, and another team to 
keep track of the fire.  The last group can cut apples into slices and assemble the mess 
kits.   
8. Have one counselor stay with each group and help them with their task. 
 
Activity:  40 minutes 
9. The group making the pasta will need to fill the pots halfway with water, bring the water 
to a boil and then add the pasta to cook for 10 minutes. 
10. The group making the sauce will first have to brown the meat, and then add the tomato 
sauce and stir it all together.  They will have to add the cheese powder to the noodles 
when they are cooked and stir that up. 
11. The group making garlic bread will have to cut the bread in half lengthwise, put butter in 
the middle, press the garlic, and sprinkle garlic inside, and then wrap it in aluminum foil 
and put it over the fire just long enough to toast it.   
12. The group cutting apples will use the cutter and slice up the apples to put on people’s 
plates. 
13. The group in charge of the fire will add wood as necessary to keep it going, and will look 
for long sticks to be used for roasting marshmallows. 
 
Meal:  30 minutes 
14. Allow all the groups to finish cooking their part of the meal, and then have everyone 
grab their plates and form an assembly line.  The counselors at each station will serve 
the food. 
205 
15. While everyone eats, talk about how each food was made.  Have the kids from the 
different groups explain how they made the pasta, the sauce, the garlic bread etc. 
16. When everyone has finished eating, let them know it is time to clean up. 
 
Clean‐up: 20 minutes 
17. Have everyone wash their individual plates, and maybe those who weren’t as involved 
with the cooking grab an extra pot or pan.  Show them how to use pine needles to clean 
out the leftover food in the pots.  The needles act as scrubbers essentially.   
18. Then take the dishes to the water spout and rinse them.   
19. Remind them that they should go away from the campsite to scrub with pine needles so 
that the food that comes off will not attract animals to their camp site. 
20. The camp stoves will also have to be taken down. 
21. When they have cleaned up, let them know that you have one surprise, and bring out 
the s’more materials.   
 
S’mores and closing:  20 minutes 
22. By now the fire should have died down to a good marshmallow fire of mostly coals. 
Pass out the roasting sticks and a marshmallow for each kid.  Let them roast their 
marshmallows and then help them assemble their s’more.   
23. Put out the fire and ask them what their favorite part of the meal was.   
 
Evaluation: 
● Cooking the food and then discussing over their meal how every piece was made will 
help them understand how food can be cooked outside of a kitchen. 
● Cleaning up after the meal will teach them how to clean dishes outside effectively.   
 
Source:   ​none 


206 
Activity: Camping Skills PM 
 
Time: ​2 hours 
Location: ​Campground 
Materials: 
● Bear Bag 
● Rope 
● 3 feet lengths of rope for each child 
● Hand shovel 
● Tents and bags 
 
Objectives: 
This lesson aims to cover basic camping skills.   
 
By the end of this lesson, students will: 
● Effectively hang a bear bag 
● Learn important knots to tie for different reasons 
● Learn how to care for themselves in the wild 
● Collect their trash 
● Take down their tent 
● Clean up their campsite 
 
Procedure: 
 
Intro:  10 minutes 
1. After their meal, tell the kids that when they are out camping, they have to be aware of 
the animals that share the wilderness.  If they have any leftover food, what are ways 
they can think of to keep animals from finding their food? 
2. Allow them to brainstorm some ideas, and then bring out the bear bag. 
3. Tell them that this is a bear bag and it is used by many campers to keep their food safe. 
 
Activity:  30 minutes 
4. Have the kids bring any and all cooking supplies and leftover food to you. 
5. Place the food in the bag and then fill it up with cooking supplies.   
6. Tie one end of the rope to the handles of the bag, and the other end to something 
weighted but easy to throw like a water bottle.   
7. Explain that a bear bag works so that you can hang your food suspended from a tree 
branch.  When hung properly a bear or any other animal should not be able to reach it, 
and the bag masks the scent a little bit. 
207 
8. Explain that it is best to hang the bag a distance from the campsite so that if a bear is 
attracted to it, they will not find you at your campsite. 
9. Have the kids look for higher branches that the bag could be hung from. 
10. They can take turns throwing the water bottle to try to get it over the branch. 
11. Once they have succeeded, have them hoist the bag up by pulling on the rope.   
12. When the bag is hanging from the branch and is off the ground by about 6 feet, tie off 
the rope to a nearby tree. 
 
Activity:  40 minutes 
13. Once you have tied the bear bag, pass out lengths of rope to each kid and explain that it 
is important to know a few different knots when out camping for different times.  For 
example tying up a bear bag.   
14. Practice the following three knots:  The quick‐release, Two Half Hitches, and Bowline. 
15. As they tie the knots, have them come with situations that they might use these knots 
in.   
 
Two Half Hitches:  ideal for securing a rope directly against an object like a log, tree, post or 
rock.   
 
Bowline:  A fixed loop knot that is handy for hanging food or lowering items.   
 
208 
 
Quick Release knot:  useful for attaching things that may need to come apart quickly, like tying 
two canoes together, or a canoe to a dock.   
 
 
16.  Once they have mastered the knot tying, collect the ropes and move on to personal 
care. 
 
Personal Care: 20 minutes  
17.  Begin with something like:  When out camping, you are away from certain luxuries of 
your house.  What are some things you go without?  They should hit running water, and 
flushing toilets. 
209 
18.  Act out brushing your teeth for the kids.  Pretend to brush, swish, gargle, and then 
show them the proper way to spit when out camping.  Pour some water in your mouth, 
and spray it out in as fine a mist as you can.  Tell them that this is done so the 
toothpaste doesn’t sit on the plants in clumps and so that the scent of the toothpaste 
doesn’t attract any unwanted visitors.   
19.  Have them all take a drink of water and practice spraying it out far away.  DO NOT SPIT 
ON OR AT EACH OTHER! Have them spread out before they spit. 
20.  Next, pull out a hand shovel and show them how to dig a hole 6 inches deep.  Explain 
that this is what they poop in when they are out camping, and they should also place 
their toilet paper in the hole if it is disposable.  Explain that they should find a place that 
is away from a water source, and somewhat hidden to do their business.   
21.  Tell them that it is important to dig a deep enough hole and cover their poop properly 
so that bacteria is not spread to other unfortunate campers, and it is another 
component of Leaving no Trace.   
22.  Remind them that it is still important to sanitize their hands after pooping outside as 
germs are still an issue. 
 
Clean‐up:  30 minutes 
23.  Next, is time to clean up the campsite. 
24.  Remind the group that it is important to leave no trace behind as they leave the 
campsite. 
25.  Ask what needs to be done to clean the campsite? (take down tents, put out fire, pick 
up trash, take down bear bag, load up gear) 
26.  Have them all go to their tents with a counselor and take down and pack up their tents.   
27.  Have one big trash bag and have them all bring any trash they find to the bag. 
28.  Make sure the fire is completely out by pouring water on it. 
29.  Collect all the gear in one pile to be loaded up. 
30.  Ask the kids to make one final sweep of the campsite.  Can they tell they were ever 
there? 
 
Evaluation: 
● Practicing knot tying will show that they have learned three different knots and know 
when to use them. 
● Clean up at the end will show that they understand what it is like to Leave No Trace 
after they have camped.   
 
Source: 
 
The Hiking Life. (2015). Retrieved from ​http://www.thehikinglife.com/skills/fire/ 
210 
Activity: Reflection and Farewell 
 
Time: ​1 hour 15 minutes 
Location: ​Visitor Center 
Materials: 
● Envelopes containing letters 
● Sharing Stick 
● 20 Evaluation forms 
● 20 Clipboards 
● 20 Pencils 
 
Objectives: 
This lesson aims to reflect on the program as a whole and wrap up the session. 
 
By the end of this lesson, students will: 
● Have read their letters from the beginning of the session 
● Reflected on their personal growth and learning 
 
Procedure: 
 
Group Reflection: 20 minutes 
1. Begin by gathering all the kids in a circle.  Start by saying, we have come to our last day 
of this adventure, and have had a great time these past few weeks with you all. 
2. Take out the sharing stick and hold it as you speak.  Share with the kids one thing that 
you will take away from your experience the past three weeks at the camp with them. 
3. Give the kids a prompt to think about for a few minutes:  How have you grown and 
learned from your experience with Creative Connection? Then ask who wants the 
sharing stick. 
4. Pass it around the circle as hopefully everyone will want to share. 
 
Letter Reflection: 20 minutes 
5. After all who wants to share has gone, pass out the letter they wrote to themselves on 
their first day at the program.  Give them some time to read their letters. 
6. After they have read them, ask; how do you think you have changed since your first day 
with us after reading your letter? 
7. Allow anyone to share who wants to. 
 
Evaluations: 20 minutes 
8. After this, pass out evaluation forms, clipboards, and pencils. 
211 
9. Tell them filling out these forms as accurately and honestly as possible will help you a lot 
and it can help other kids have a great time in the program.   
10. Tell them that if they need help reading a question or do not understand a question 
they can ask.   
 
Game: 15 minutes 
11. With the remaining time, play one of their favorite games they learned at Creative 
Connections.  These may come from the Morning Warm up Lesson Plan.   
 
Evaluation: 
● The evaluation forms they fill out as well as their responses and sharings in the circle will 
show what they have gotten out of the program, and how they have changed and 
grown.   
 
Source: ​none 


212 

Program - Google Docs