This article looks at a specific "record-and-playback" testing tool, TestIm, and finds that it performs surprisingly well. It seems that the long-held view that such approaches are unreliable and lead to flaky tests is unfounded. The Phoenix Rises ...
3. INTRODUCTION
The early days of test automation were marked with attempts to develop
tooling that generated runnable UI tests by a process termed Record-Playback
(R-P).
Although the recording process proved, within limits, successful, in that tests
were indeed recorded, the successful and repeated execution of tests proved
very challenging. As the target application changed, even slightly, the recorded
tests were broken and essentially had to be re-recorded. Principally because of
this weakness, the overall approach fell into disuse.
Recently, the R-P approach has resurfaced, notably with tools such as that from
TestIm (here).
Whilst I was initially quite sceptical, I had the opportunity of developing some
PoC-type tests using this tool, for a very specific context - business users
exploring user workflows within a target web application in a User Acceptance
Test (UAT) setting.
I was pleasantly surprised by the outcome.
The Phoenix Rises.
Disclaimer:
The Author has no commercial connection with TestIm, does not represent
TestIm and all the statements given here cover its product’s use in a specific
context. There are other R-P tools that can be considered.
THE CONTEXT
The client was looking for some test automation support for business users in a
UAT setting. Naturally, they were not open to the sort of Test Automation that
would typically be used within a project, i.e. technology such as
Java/Selenide/BDD/IntelliJ.
The key wish was that actions by the UAT participant, essentially moving
through a business workflow, would be recorded, and could be replayed, exactly
as in the R-P model. There was also a wish to have easy editing on the tests
thus recorded.
The work described in the Article was an exploratory PoC performed using the
free version of TestIm. The hardware was Windows 11-based.
4. 2
WE ARE TESTING
As well as the key weaknesses pointed out above, the historical R-P approach
only provided, at best, a robotic walkthrough of a user’s actions, somewhat like
the Robotic Process Automation (RPA) tools currently available. The “Test” in
Test Automation was in fact absent because general-purpose validation was not
considered. The TestIm tool brings this aspect right to the foreground as we
shall see in what follows. Of course, the context needs to be borne in mind, UAT
participants are not “testers” and would not likely be validating everything in
sight but ensuring that the workflow recorded leads to the correct page and the
elements displayed are broadly correct, even in a small way, brings a strong
value.
In the author’s experience, UAT sessions have QA members on hand to support
the participants and record their experience with the target application as well
as issues/observations which are discussed and graded in a final session. These
supporters could well provide a short introduction to a topic like how to set up
simple validations.
BUSINESS WORKFLOW
Let us take a target (public) web application from the banking sector (here).
5. 3
This represents a straightforward landing page containing an option for the user
to switch spoken language.
If we switch to English and, for example, look at the process a non-client might
go through to open an online banking account, we come to the page as below:
The page now signals that the user has entered a workflow, and this is in fact
defined by an AppWay/FNZ (here) component. Once “Yes” is selected, we see:
6. 4
Gradually selecting or entering data in the various controls, and finally clicking
“Next” the user moves through the defined adaptive workflow to trigger the
online account opening. Clearly, since we are working with the public web site,
we cannot follow the process to its final conclusive step.
Even with this proviso, we can get some useful insights into the tool by running
it against such a public site.
Test Cases
TestIm operates as a Chrome extension and once installed by the normal
mechanisms, and the user is registered, tests are authored on a Test Editor
page.
For the web application being considered, two tests were authored. One
covered a user journey when the user is not an existing bank customer, whilst
the other covered the case when the user is an existing bank customer. In this
situation the Test Editor page looked as shown below:
7. 5
In this article, we will focus on the Test Case entitled “create-online-account-
EN-NonClient”. In this test case we envision a user of the website:
• Who wants to open an online account
• Who needs to interact with the bank in English
• Who is not already a client of the bank
After clicking record and moving through the corresponding steps, the Test
Case looks as follows:
8. 6
This, as all TestIm Test Cases, starts with a Setup block, highlighted above,
which in this example has had the “Base URL” property value specified as:
Another key feature of this Setup node, and of the tool in general, is that test
data can be configured. The specification is done via a link on the Setup node
Properties sidebar panel:
9. 7
Selecting this link takes us to a JavaScript Editor panel where we can specify, in
JS-compatible key-value pair format, data that we want to use anywhere in the
corresponding Test Case. In our test case the data looks as shown below:
The first section of this date (lines 2-10) defines basic data elements that we
will use in our test case. In the second section (lines 11-25) we are defining the
expected English/French/German values of visual elements on the “main” page
of the web application. Although, it would have been perhaps more flexible if
the tool had allowed a vanilla JSON structure, at least having the data and
validation elements we want to use, in one place, is a very big plus.
The next block in the test case is, what TestIm terms, a “shared group” of
steps, named “EN-Preamble”. We used this to gather together a number of steps
that would be common across tests:
10. 8
If we double-click this element to open it, the content shows as:
The steps contained in this group are shared with any other test case in the
overall project and takes the flow of the test from when the Startup block has
finished configuring the browser to where the Appway/FNZ workflow component
is displayed, and the test needs to do specific user workflow activities. The
individual steps have been recorded in the normal way and then grouped using
the “add group” mechanism available in the toolbar.
Following the “EN-Preamble” group, the steps are recorded in the normal way
offered by the tool.
11. 9
VALIDATIONS
In the shared group noted in the previous section, there is another group of
steps that deserves particular attention, “Page_TextValidation”. This grouping
of steps is where we validate some text elements on the “main” page.
Each of the steps is a predefined TestIm “Text Validation” element, each
validating the text of a different visual element on the main page. For example,
by running the test to a breakpoint within the validation group and adding an
additional validation element, the tool allows us to move over the application as
it is currently displayed and select an element we wish to validate, as shown
below:
Here we are “selecting” the top menu bar item labelled “Individual Clients”.
If for the test step block just added, we select the properties cog wheel, we
have the possibility of setting the value against which the comparison will be
performed:
12. 10
The value is already pre-populated in line with the text actually being displayed,
and this we replace by the individual language- and page-specific values
specified in the Startup block test data, e.g. “Individual Clients” ->
“$EN_MainPage_InstitutionalClients”. Additionally, as highlighted above, the
text validation step checks that the visual element is actually being displayed.
EXECUTION
Execution of any of our tests is very straightforward by using the “Run Test”
(F8) button in the test editor toolbar. In the case of the test named “create-
online-account-EN-NonClient”, the flow brings us, successfully, to the
application state as shown below:
14. 12
Login Example
The equivalent of the “Hello World!” example, used as a starting point for
teaching the details of a programming language, in the test automation space,
is the “Login” process. Keeping to the tradition, let’s look at how TestIm deals
with such a process, which we have looked at in detail, elsewhere, using
(BDD/Java/Selenide).
The application is the public TAAL console application (here), which requires the
user to log in. Naturally, the user must register first, and there is a link on the
landing page for that purpose.
The log-in page of the application is as shown below:
15. 13
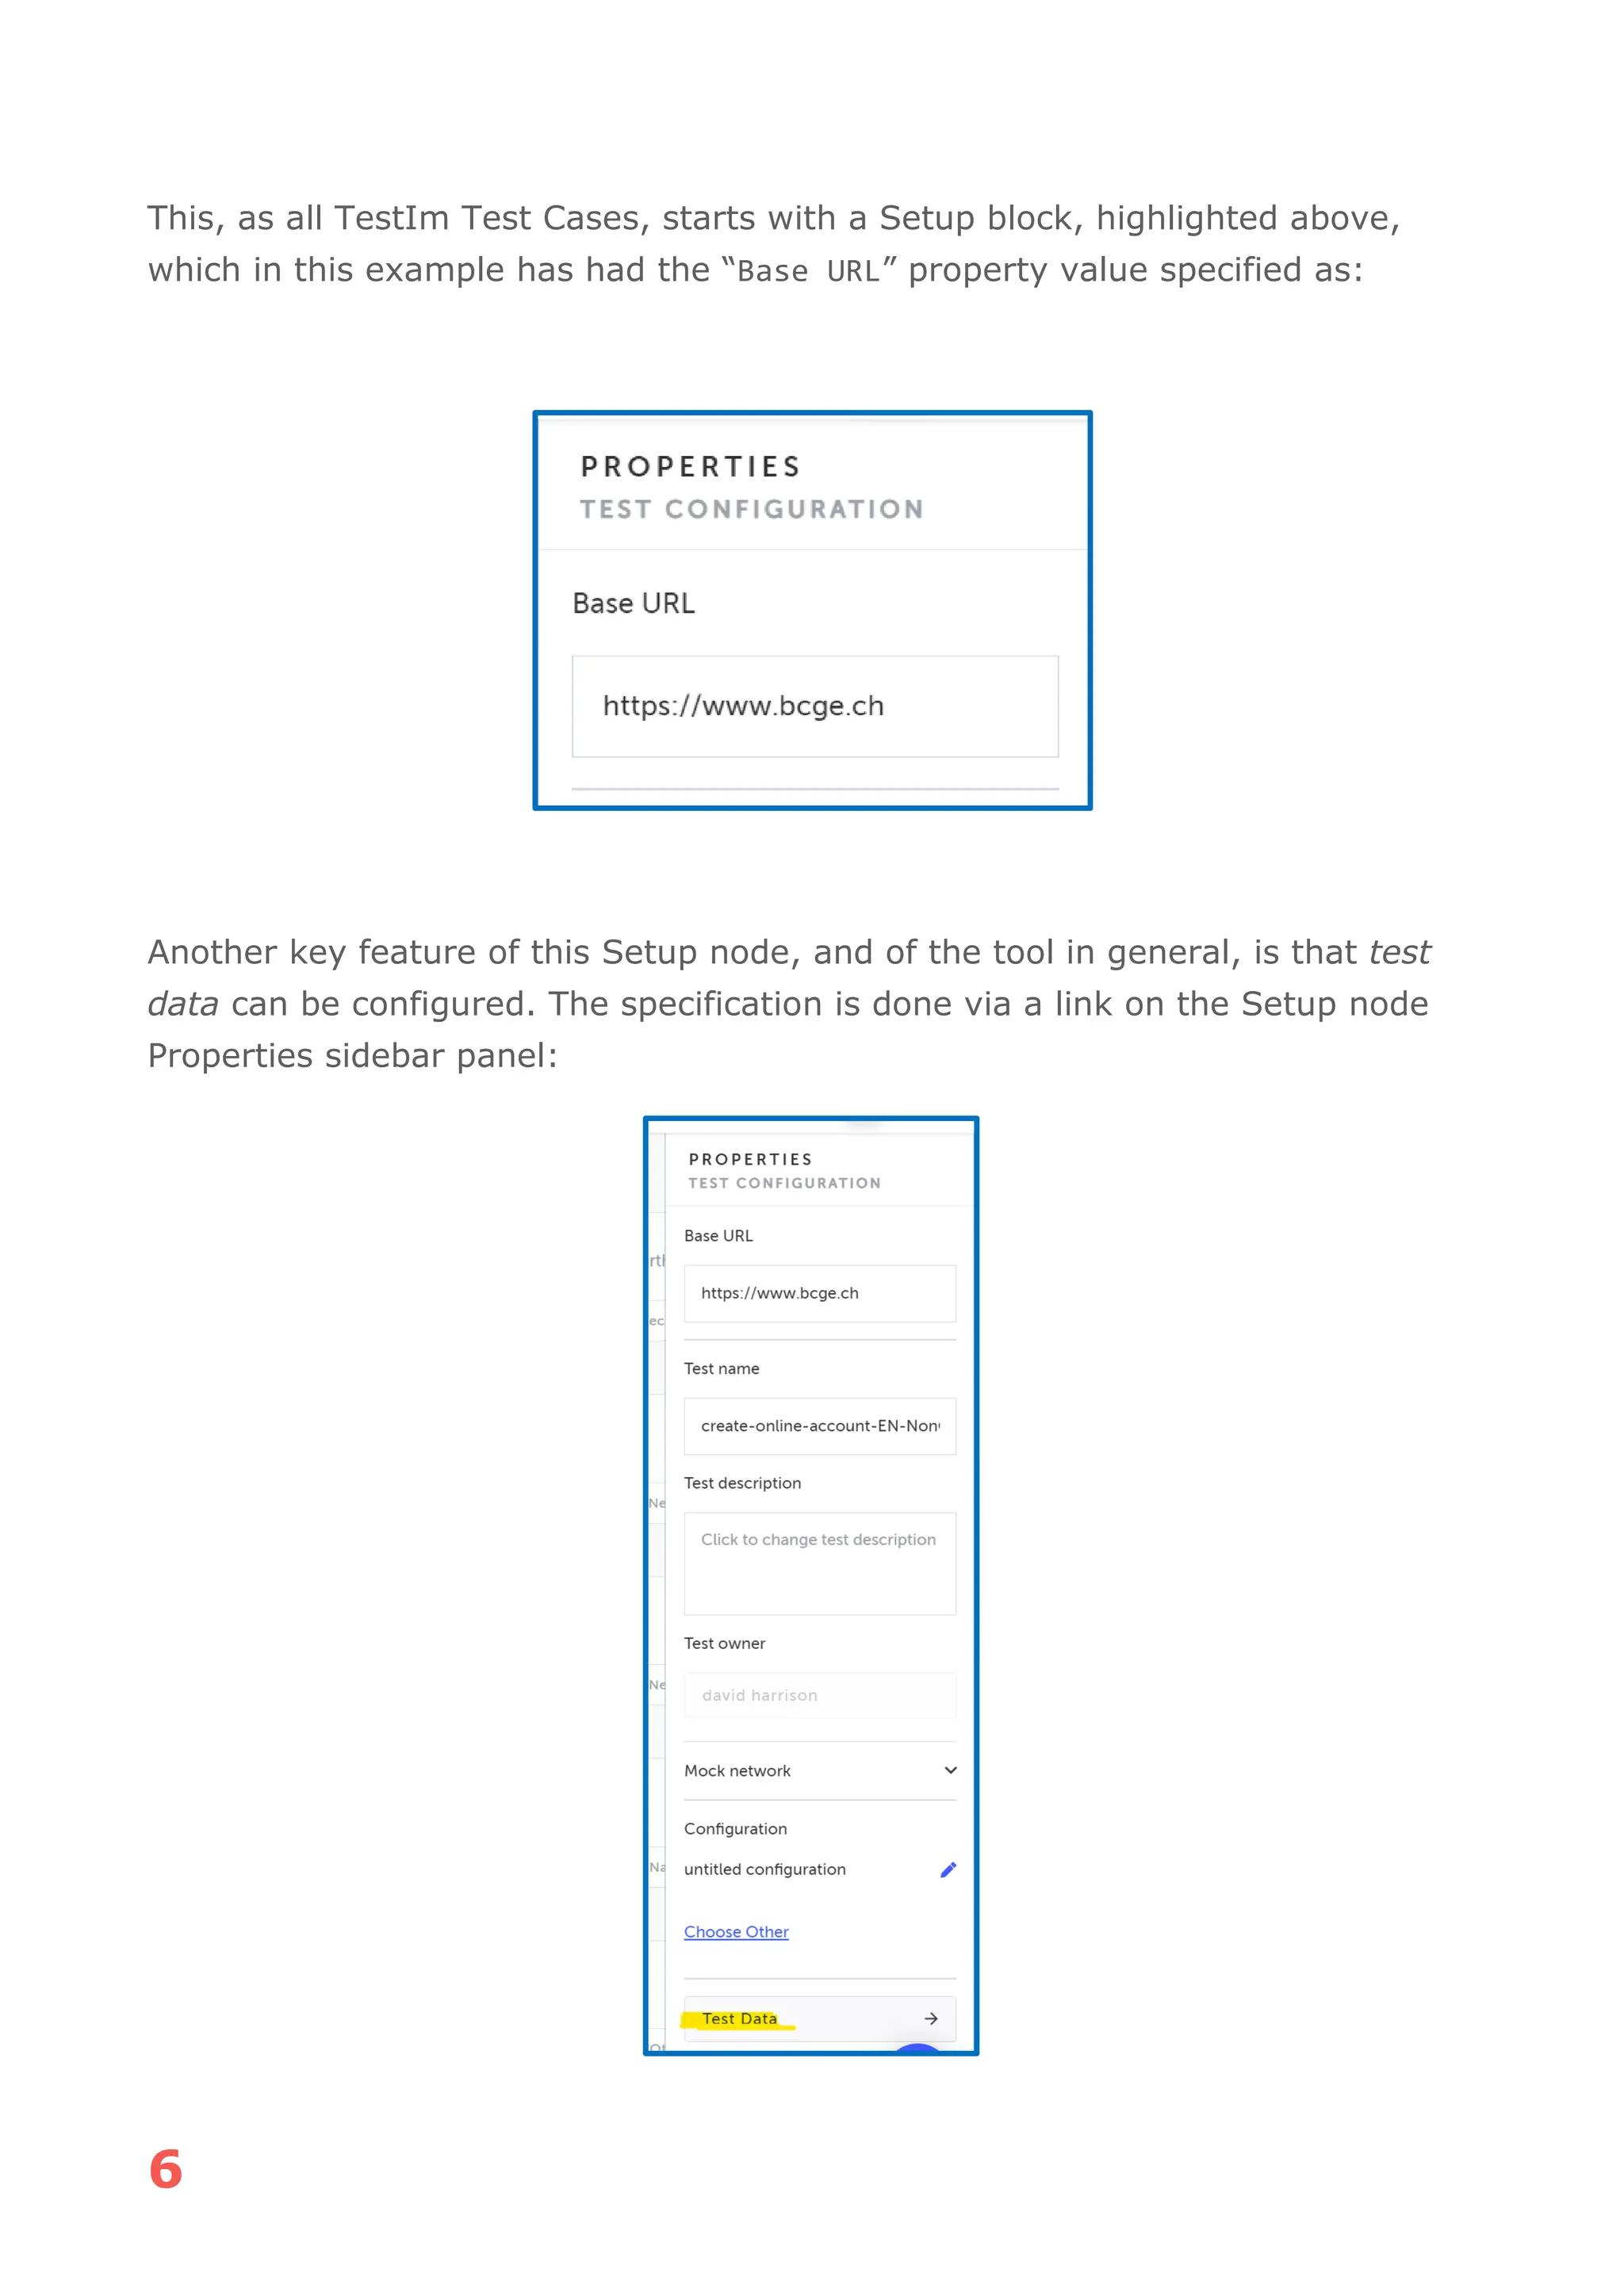
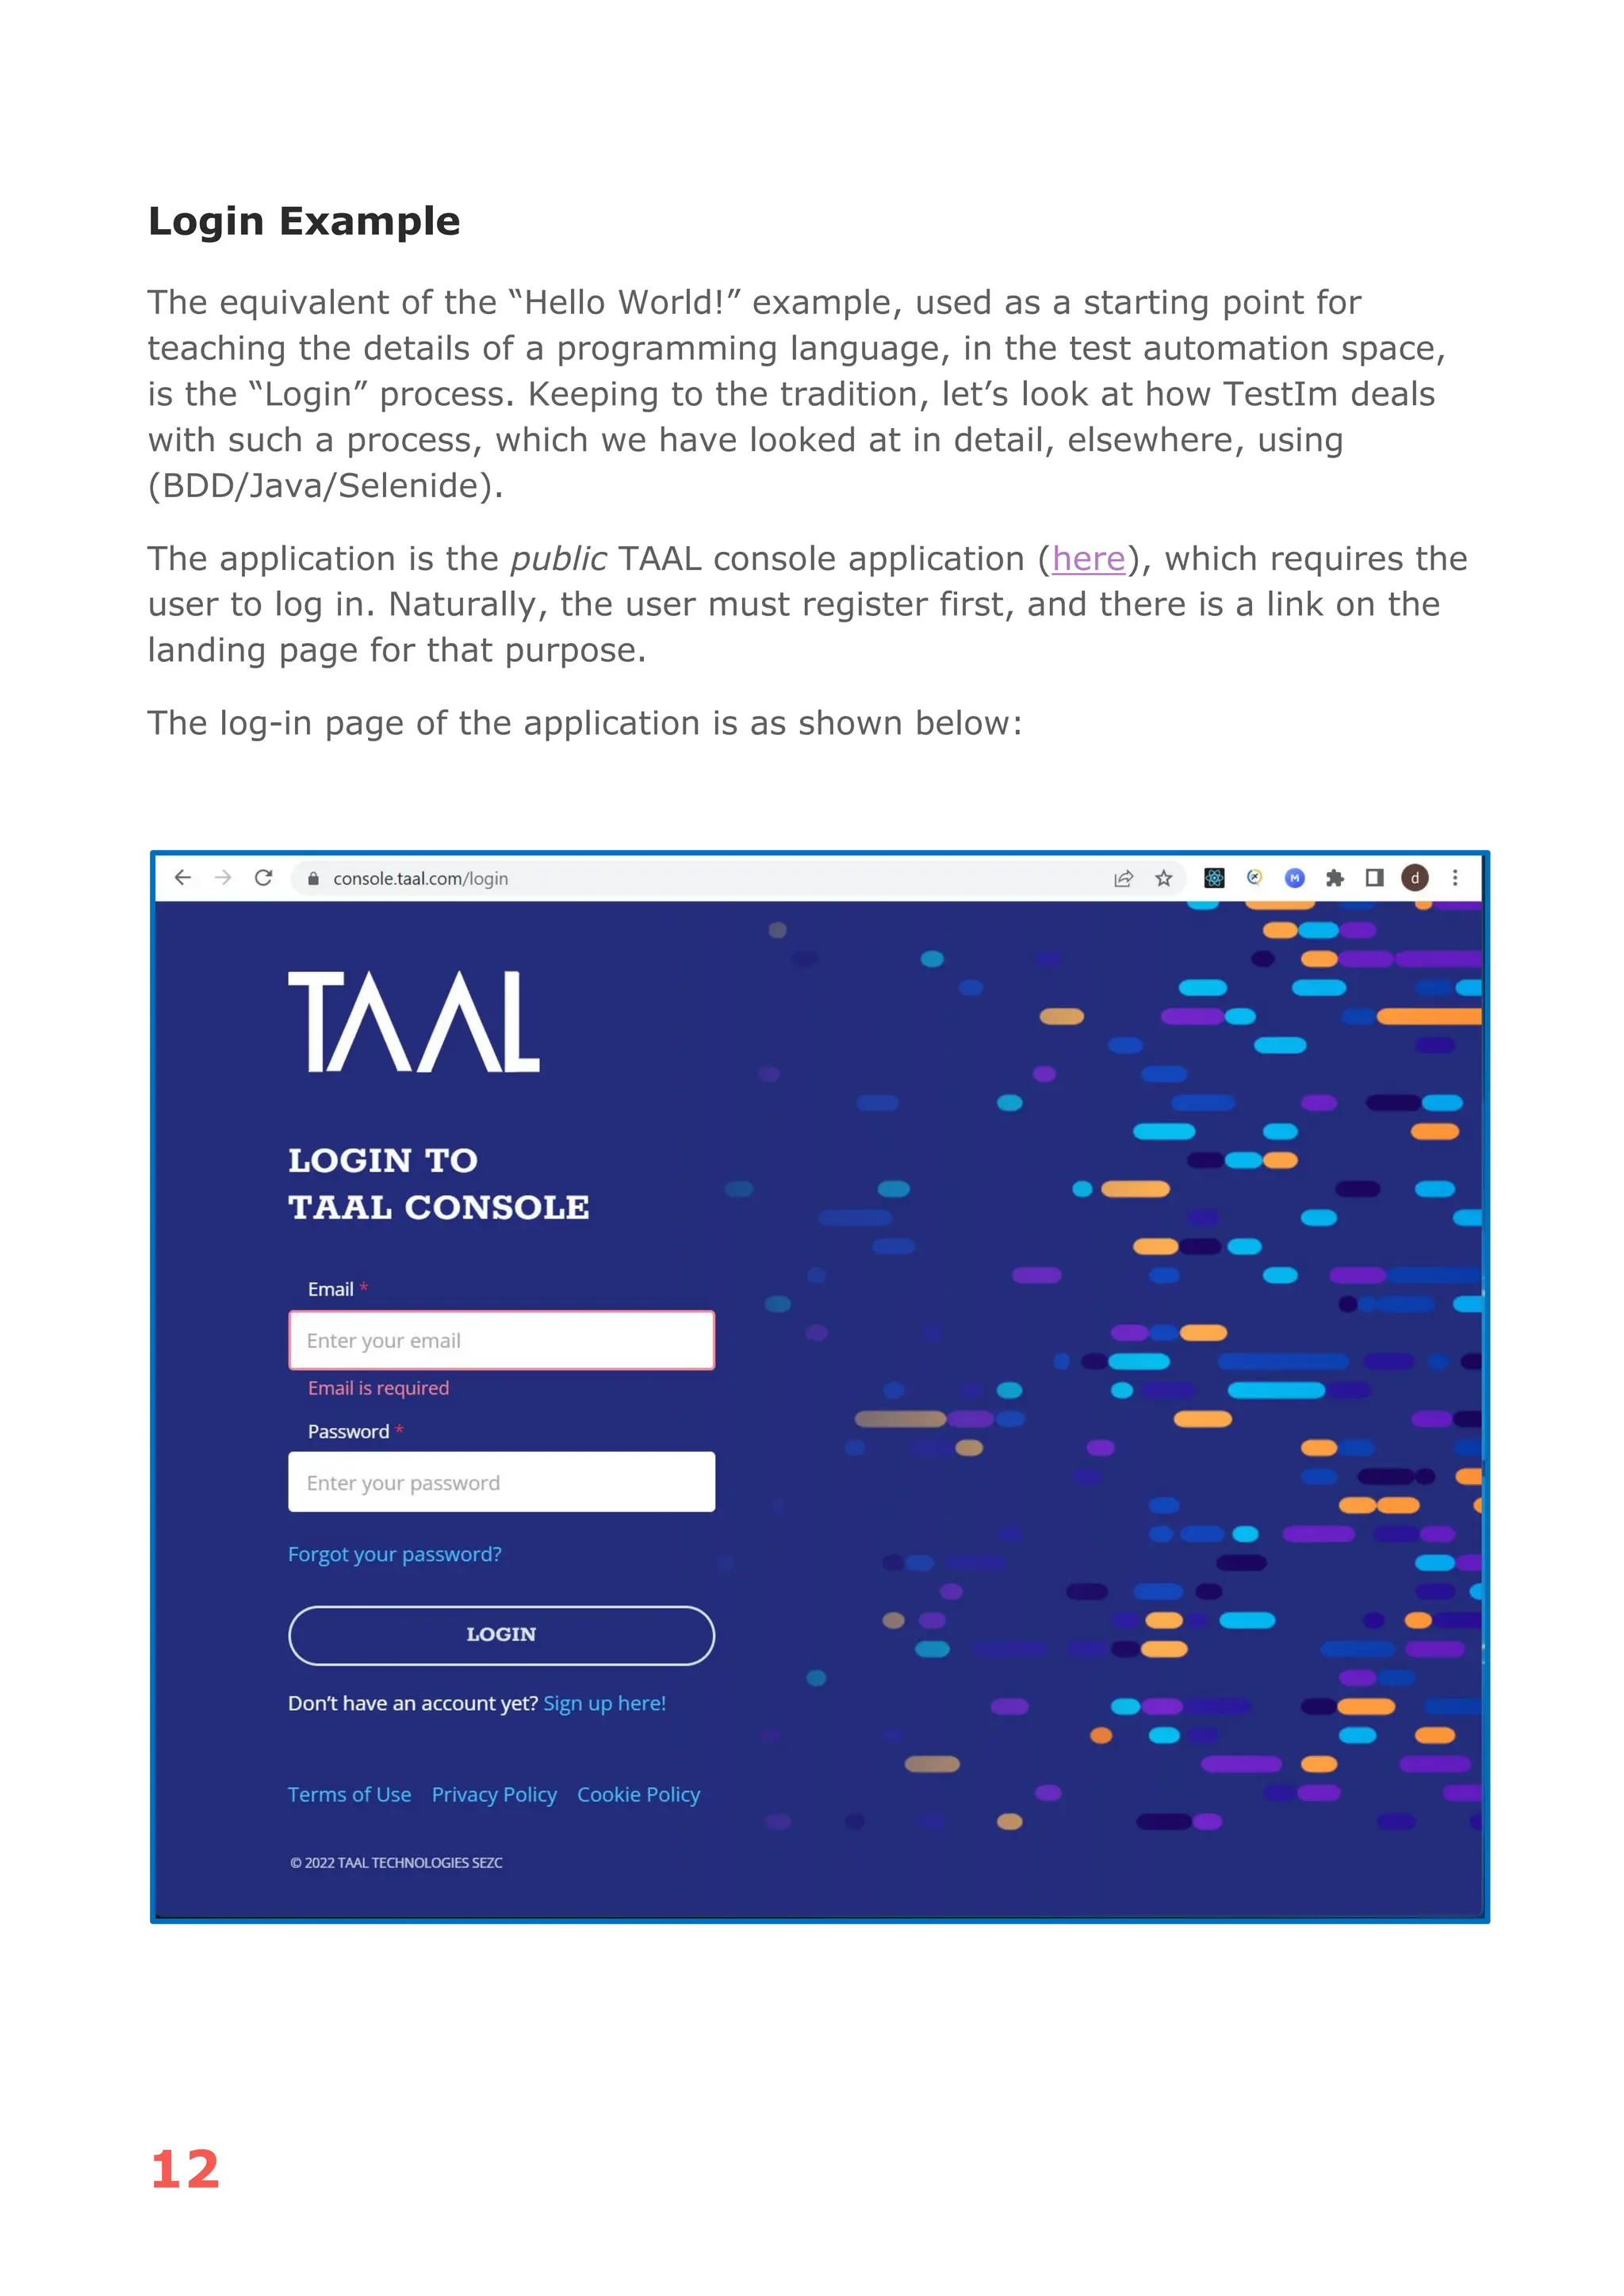
There are quite some aspects that need to be validated here, to ensure that the
basic login process offered by the panel is as designed.
Each of the TextBoxes have associated Hint Text which we need to ensure is
being displayed appropriately, as well as associated Error Text displayed if an
entered value is detected as inappropriate. In addition, there are several links
that need to be checked to ensure they lead to the correct pages. It is
worthwhile to note that the business actor has gone to some trouble ensuring
that the page operates in this way, and we as test automators need to ensure
compliance of the features with the business expectations.
In addition, we might see the correct login process as a trivial, but to be tested,
base case.
If we were approaching the testing of this Login process using
(BDD/Java/Selenide) the Scenario might look something like as shown below:
@CONSOLE_REACT_UI_2000.4 @CONSOLE @SMOKE
Scenario Outline: Check Login Panel operation
Given [2000.4] I click the Password TextBox
Then [2000.4] The Email Hint Text is displayed
When [2000.4] I click the Email TextBox
Then [2000.4] The Password Hint Text is displayed
When [2000.4] I enter "<invalid-email>" in Email TextBox
Then [2000.4] The Email Error Text "<email-error-text>" is displayed
When [2000.4] I enter "<valid-email>" in Email TextBox
Then [2000.4] The Email Error Text is not displayed
When [2000.4] I click the Email TextBox
Then [2000.4] The Password Hint Text is displayed
When [2000.4] I click the Password Recovery Link
Then [2000.4] The Password Recovery Page is displayed
When [2000.4] I click the browser back button
Then The Login page is displayed
When [2000.4] I click the Sign Up Link
Then [2000.4] The Sign Up Page is displayed
When [2000.4] I click the browser back button
Then The Login page is displayed
When [2000.4] I click the Terms of Use Link
Then [2000.4] The Terms of Use Page is displayed
When [2000.4] I Click the close link
Then The Login page is displayed
When [2000.4] I click the Privacy Policy Link
Then [2000.4] The Privacy Policy Page is displayed
When [2000.4] I Click the close link
Then The Login page is displayed
When [2000.4] I click the Cookie Policy Link
Then [2000.4] The Cookie Policy Page is displayed
When [2000.4] I Click the close link
Then The Login page is displayed
Examples:
| invalid-email | email-error-text | valid-email |
| jonsmith-yahoo.com | Enter a valid email | jonsmith@yahoo.com |
16. 14
In this BDD form, the general validation of items on a page is signalled where
the step text is in the form “The XXX Page is displayed”.
What would this Test Scenario look like in TestIm?
Where the “EN_TAAL_Preamble”, as we discussed above, contains a group of
steps referenced in the test when we want to assert that the basic login page is
in a valid state.
Additionally, the Setup test step has test data configured, as:
17. 15
In the situation where we are validating the legal documents, Terms Of Use,
Privacy Policy and Cookie Policy, in the (BDD/Java/Selenide) model of testing
we would validate all the data on the target page. In the case of our TestIm
example, we have not configured the data and validations to do this very
important step, choosing only to validate the main headings on each of these
pages.
One part of the test workflow proved to be a bit of a challenge to get right, that
of clicking the browser back button once the “Forgot Password” dialog is on
display:
As can be seen, this dialog does not overlay the basic Login panel or have a
“back” functionality.
To affect a “back” functionality, we needed to use a TestIm Custom Action, in
our test named “ClickBackButton”, in which a JavaScript function body as
shown below is defined:
18. 16
When this step executes the execution focus returns to the previous page in the
browser history.
19. 17
Remarks
The TestIm Chrome extension appears to be a solid tool worthy of consideration
by test automators.
As noted above, the context for which the author looked at TestIm, was to see
how it might be used by business actors in a form of “User Acceptance Test”. I
believe that in this context the tool has definitely the right characteristics.
For business actors, no doubt, a short workshop to get acquainted with the key
features of the tool would be necessary. The role of the QA team in setting up
some shared test step groups and test data should also be considered. They
should also be on hand to support the business actors as required.
One feature I think that TestIm might usefully consider is the layout of the Test
Editor window. The block array is very OK for a relatively small number of steps
but becomes a little difficult to follow once the step count grows. Perhaps a
mode switch from the current block grid to a scrollable textual list form would
be helpful. The list form should still have the properties cog wheel and deletion
buttons available to the right of the actual text.
The TestIm crew are to be commended on producing such a Phoenix!