PDC project guidelines
•Download as DOC, PDF•
1 like•1,430 views

The design process and project guidelines we use in our PDC's. It is used in combination with our PP on this topic so that students can see visual interpretations as well. It also relies on the Holistic Site Analysis Doc that gives students a framework for cataloguing their analysis and assessment phase.

Recommended
More Related Content
Similar to PDC project guidelines
Similar to PDC project guidelines (20)
More from Doug Crouch
More from Doug Crouch (20)
Recently uploaded
Recently uploaded (20)
PDC project guidelines
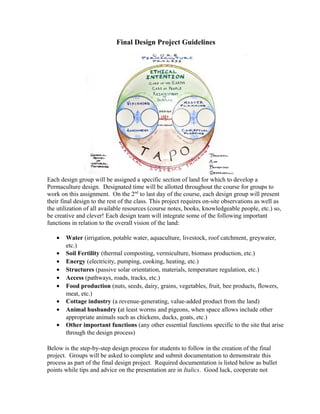
- 1. Final Design Project Guidelines Each design group will be assigned a specific section of land for which to develop a Permaculture design. Designated time will be allotted throughout the course for groups to work on this assignment. On the 2nd to last day of the course, each design group will present their final design to the rest of the class. This project requires on-site observations as well as the utilization of all available resources (course notes, books, knowledgeable people, etc.) so, be creative and clever! Each design team will integrate some of the following important functions in relation to the overall vision of the land: • Water (irrigation, potable water, aquaculture, livestock, roof catchment, greywater, etc.) • Soil Fertility (thermal composting, vermiculture, biomass production, etc.) • Energy (electricity, pumping, cooking, heating, etc.) • Structures (passive solar orientation, materials, temperature regulation, etc.) • Access (pathways, roads, tracks, etc.) • Food production (nuts, seeds, dairy, grains, vegetables, fruit, bee products, flowers, meat, etc.) • Cottage industry (a revenue-generating, value-added product from the land) • Animal husbandry (at least worms and pigeons, when space allows include other appropriate animals such as chickens, ducks, goats, etc.) • Other important functions (any other essential functions specific to the site that arise through the design process) Below is the step-by-step design process for students to follow in the creation of the final project. Groups will be asked to complete and submit documentation to demonstrate this process as part of the final design project. Required documentation is listed below as bullet points while tips and advice on the presentation are in Italics. Good luck, cooperate not
- 2. compete, and remember to have fun! Design Process Vision 1. Set Group Goals – Bullet list of group process-oriented goals and outlook. 2. Personal Strengths – Identify each group member’s skills. 3. First Impressions – Record neutral observations via photographs, sketches, notes, etc. (remember to utilize all senses during this step!) These observations will help with the introduction section of the design presentations. Assessment 4. Holistic Site Analysis – the client/ land interview with an analytical perspective. Decipher or interpret needs of the client and gain insight into the site’s context from the assigned sheet. Use it to help catalogue observations and research. 5. Observation then Interpretation – Protracted & Thoughtful Observation leads to site assessment. • Create a Base Map – include names, date, north indicator, location, key, scale, and anything that cannot be changed. • Sector Analysis Overlay - map wild energies such as sun, wind, pollution, etc. 6. Analysis of Flow – Visually represent how energies such as water, traffic and wildlife move through the landscape. This differs from the sector analysis, remember the restaurant example. • Analysis of Flow Overlay - map water flow, traffic flow, wildlife, and/or frost. Use arrows of different colors and thickness to delineate energy flow and its intensity. Remember to have a key. Make notes of any microclimates or unique features using words and bubbles. The Analysis of Flow can be combined with the Sector Analysis on the same overlay if appropriate. These will help with your introduction for the design presentations. Conceptual Planning 7. SWOT Analysis - Create a list of Strengths, Weaknesses, Opportunities & Threats of the site. This reflects on previous analysis tools and highlights factors of development such as social and economic conditions. 8. Elements & Functions Mind Map – Mind Maps track the brainstorming process while creating a visual representation of what would otherwise be invisible interrelationships. • Elements & Functions Mind Map - Functions for header bubbles include: Water, Soil Fertility, Energy, Structures, Access, Food Production, Cottage Industry, Animal
- 3. Husbandry, and Other Important Functions. Create a mind map that spells out how the important functions will be supported by many elements. It is a step that will allow you to envision the project as a whole and see how the connections bring redundancy.. 9. Schematic Design(s) – These are sketch orientated, big picture, pattern based thinking of how the development may unfold in an informal drawing. • Schematic Design Map = Write the list of elements on cards and use random assembly to see how elements will interconnect. A quick functional analysis of each element will help. Use arrows to indicate the matching of inputs and outputs. The mind map should help you to create the elements cards. Remember to lean on your PC principles list. Remember to time it, that this is not the final design, to be creative, and to stay pattern based rather than detail orientated. Master Planning 10. Habitat/ Infrastructure Defining Specs List- – From the schematic design map, you should bring more detail to the design. Begin selecting the species that define the habitat or the specifics of infrastructure that you seek to create: • For Example: Coppice woodlot = Black Locust, Hazel and Willow OR Passive Solar, Natural Building= cob structure, earthen floors, and rocket mass heater 11. Project Detail Designs - Each member of the design group takes on one detailed aspect of the overall design which they research and present (housing, earthworks, market garden, greywater system, etc.) • Project Detail Design Visuals – Each member creates close-up drawings and/or other visuals for a specific detail. Each member has 5 minutes to deliver this section of the presentation. Visuals greatly aid the process of demonstrating details in a limited amount of time. Design 12. The Final Design - An accurate, to-scale drawing of the final design. Determine the exact size, shape and location of all Elements decided upon during the creation of the Schematic Design Map. Demonstrate or explain five permaculture principles and how they fit into the design. • The Final Design Map - Accomplished through several overlays or a big piece of paper. Be sure to include the design of the systems for water supply, roads, paths, structures, vegetation, and animal husbandry Intermingle highlights of the Final Design throughout the entire presentation. 13. Phases of implementation - (1 – 2 years, 3 – 5 years, 6 – 10 years, 10 – 25
- 4. year plan) • Phases of Implementation Document - A written document explaining how the design will evolve over time. This may include planting strategies for a sequential installation, succession pathways for different phases, the evolution of construction projects, etc. It must include the human element of guilds. Who is going to take care of this design after it is implemented? 14. Practice Presentations This greatly enhances the overall learning process and improves the quality of a presentation. Consider timing and transitions between speakers as well as defining member roles for the presentation. 15. Design Project Presentations- come dressed appropriately for delivering a professional design to your client and your peers and instructors. Feedback will be given on both the design and presentation itself. The presentation format is: • 5 minutes - Introduction of your group and to the site through the base map and the accompanying analysis tools. • 5 minutes- A total review of the design with your finished map. Please use the language of design principles and patterns to explain the design accurately. • 20-25 minutes (5 minutes each person) – Each team member presents a detailed design pointing out key design challenges and explain how 3 permaculture principles have been creatively applied. • 5 minutes – Conclusion emphasizes the phases of implementation and management plan Final Design Project Documentation Checklist 1. Base Map 2. Sector Analysis Overlay 3. Analysis of Flow Overlay 4. Elements & Functions Mind Map 5. Schematic Design Map 6. Habitat Defining Species List 7. Project Detail Designs Visuals 8. Final Design Map 9. Phases of Implementation Document Observe. Analyze. Design. Make the connections.