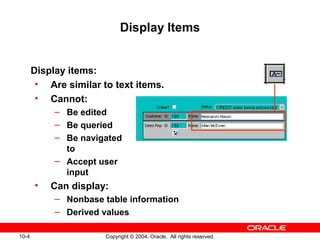
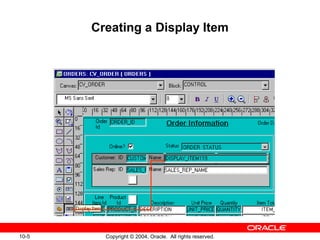
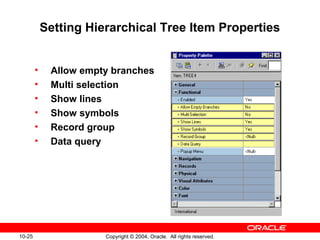
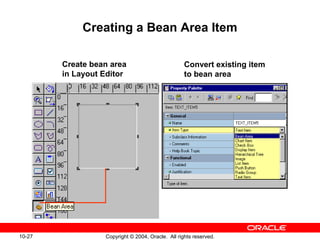
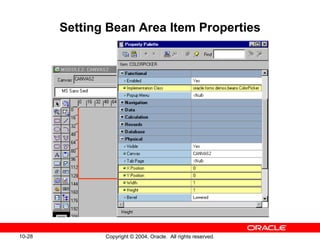
SlideShare a Scribd company logo
1 of 30
10
Copyright © 2004, Oracle. All rights reserved.
Creating Noninput Items
10-2 Copyright © 2004, Oracle. All rights reserved.
Objectives
After completing this lesson, you should be able to do
the following:
• Identify item types that do not allow input
• Create a display item
• Create an image item
• Create a button
• Create a calculated item
• Create a hierarchical tree item
• Create a bean area item
10-3 Copyright © 2004, Oracle. All rights reserved.
Noninput Items Overview
Item types that do not accept direct user input include:
• Display items
• Image items
• Buttons
• Calculated items
• Hierarchical tree items
• Bean area items
10-4 Copyright © 2004, Oracle. All rights reserved.
Display Items
Display items:
• Are similar to text items.
• Cannot:
– Be edited
– Be queried
– Be navigated
to
– Accept user
input
• Can display:
– Nonbase table information
– Derived values
10-5 Copyright © 2004, Oracle. All rights reserved.
Creating a Display Item
10-6 Copyright © 2004, Oracle. All rights reserved.
Image Items
Use image items to display images:
• From file system—supported file type
• From database—LONG RAW column or a BLOB
column
10-8 Copyright © 2004, Oracle. All rights reserved.
Image File Formats
Image item
Image files Image files
Read Write
PICT
TPIC
CALS
TIFF
GIF
JFIF
BMP
RAS
CALS
GIF
BMP
RAS
JPEG
TIFF
JFIF
JPEG
PICT
TPIC
10-9 Copyright © 2004, Oracle. All rights reserved.
Creating an Image Item
10-10 Copyright © 2004, Oracle. All rights reserved.
Setting Image-Specific Item Properties
• Image Format
• Image Depth
• Compression Quality
• Display Quality
• Sizing Style
• Show Horizontal
Scroll Bar
• Show Vertical
Scroll Bar
10-12 Copyright © 2004, Oracle. All rights reserved.
Push Buttons
Push buttons:
• Cannot display or represent data
• Are used to initiate an action
• Display as:
– Text button
– Iconic
10-13 Copyright © 2004, Oracle. All rights reserved.
Push Button Actions
Use buttons to:
• Move input focus
• Display an LOV
• Invoke an editor
• Invoke another window
• Commit data
• Issue a query
• Perform calculations
10-14 Copyright © 2004, Oracle. All rights reserved.
Creating a Push Button
10-15 Copyright © 2004, Oracle. All rights reserved.
Setting Push Button Properties
• Label
• Iconic
• Icon Filename
• Default Button
• Mouse Navigate
• Tooltip
• Tooltip Visual
Attribute Group
10-16 Copyright © 2004, Oracle. All rights reserved.
Calculated Items
What are calculated items?
• They accept item values that are based on
calculations.
• They are read-only.
• They can be expressed as:
– Formula
– Summary
10-17 Copyright © 2004, Oracle. All rights reserved.
Creating a Calculated Item by
Setting Properties
• Formula
– A calculated item value is the result of a horizontal
calculation.
– It involves bind variables.
• Summary
– A calculated item value is a vertical calculation.
– A summary is performed on values of a single item
over all rows in a block.
10-18 Copyright © 2004, Oracle. All rights reserved.
Setting Item Properties for the
Calculated Item
• Formula
– Calculation Mode
– Formula
• Summary
– Calculation Mode
– Summary Function
– Summarized Block
– Summarized Item
10-19 Copyright © 2004, Oracle. All rights reserved.
Summary Functions
• AVG
• COUNT
• MAX
• MIN
• STDDEV
• SUM
• VARIANCE
10-20 Copyright © 2004, Oracle. All rights reserved.
Calculated Item Based on a Formula
ORDERS
Item#
Prod
Id
Unit
Price Quantity
Item
Total
1
2
4
3
200
120
50
25
5
4
9
3
1,000
480
450
75
NVL((:order_items.unit_price *
:order_items.quantity),0)
Formula
item
Orders
Items
Description
10-21 Copyright © 2004, Oracle. All rights reserved.
Rules for Calculated Item Formulas
Create calculated item formulas according to the
following rules:
• A formula item must not invoke restricted built-ins.
• A formula item cannot execute any DML
statements.
• Do not terminate a PL/SQL expression with a
semicolon.
• Do not enter a complete PL/SQL statement in
assignment expressions.
10-22 Copyright © 2004, Oracle. All rights reserved.
Calculated Item Based on a Summary
ORDERS
1
2
4
3
200
120
50
25
5
4
9
3
1,000
480
450
75
2,005Order Total
Summarized
item
Summary
item
Item#
Prod
Id
Unit
Price Quantity
Item
TotalDescription
Orders
Items
10-23 Copyright © 2004, Oracle. All rights reserved.
Rules for Summary Items
• Summary item must reside in:
– The same block as the summarized item
– A control block with Single Record property set to
Yes
• Summarized item must reside in:
– A data block with Query All Records property or
Precompute Summaries property set to Yes
– A control block
• Datatype of summary item must be Number,
unless using MAX or MIN
10-24 Copyright © 2004, Oracle. All rights reserved.
Creating a Hierarchical Tree Item
10-25 Copyright © 2004, Oracle. All rights reserved.
Setting Hierarchical Tree Item Properties
• Allow empty branches
• Multi selection
• Show lines
• Show symbols
• Record group
• Data query
10-26 Copyright © 2004, Oracle. All rights reserved.
Bean Area Items
The Bean Area item enables you to:
• Add a JavaBean to a form
• Extend Forms functionality
• Interact with client machine
• Reduce network traffic
10-27 Copyright © 2004, Oracle. All rights reserved.
Creating a Bean Area Item
Create bean area
in Layout Editor
Convert existing item
to bean area
10-28 Copyright © 2004, Oracle. All rights reserved.
Setting Bean Area Item Properties
10-29 Copyright © 2004, Oracle. All rights reserved.
The JavaBean at Run Time
10-30 Copyright © 2004, Oracle. All rights reserved.
Summary
In this lesson, you should have learned that:
• The following item types do not allow input:
– Display items
– Image items
– Push buttons
– Calculated items
– Hierarchical tree items
– Bean area items
• You create noninput items by:
– Changing the type of an existing item and setting
certain properties
– Using the appropriate tool in the Layout Editor
10-31 Copyright © 2004, Oracle. All rights reserved.
Summary
• You can use:
– A display item to show nonbase table information
– An image item to display an image
– A push button to initiate action
– A calculated item to display the results of a formula
or a summary function of another item
– A hierarchical tree item to display related data in a
hierarchical fashion
– A bean area item to execute client-side Java code
10-32 Copyright © 2004, Oracle. All rights reserved.
Practice 10 Overview
This practice covers the following topics:
• Creating display items
• Creating an image item
• Creating iconic buttons
• Creating calculated items:
– Formula
– Summary
• Creating a bean area item

More Related Content

What's hot

Oracle 10g Forms Lesson 11
Oracle 10g Forms Lesson 11Oracle 10g Forms Lesson 11
Oracle 10g Forms Lesson 11KAMA3
 
Oracle forms les02
Oracle forms  les02Oracle forms  les02
Oracle forms les02Abed Othman
 
Oracle 10g Forms Lesson 13
Oracle 10g Forms Lesson 13Oracle 10g Forms Lesson 13
Oracle 10g Forms Lesson 13KAMA3
 
Oracle forms les01
Oracle forms  les01Oracle forms  les01
Oracle forms les01Abed Othman
 
Oracle forms developer 10g vol1
Oracle forms developer 10g vol1Oracle forms developer 10g vol1
Oracle forms developer 10g vol1abdull466
 
Oracle Forms Introduction
Oracle Forms IntroductionOracle Forms Introduction
Oracle Forms IntroductionSekhar Byna
 
Data base connectivity and flex grid in vb
Data base connectivity and flex grid in vbData base connectivity and flex grid in vb
Data base connectivity and flex grid in vbAmandeep Kaur
 
Data Connection using ADO DC
Data Connection using ADO DCData Connection using ADO DC
Data Connection using ADO DCPurbanjali Das
 
Dynamics AX 7 Development - IDE (Part I)
Dynamics AX 7 Development - IDE (Part I)Dynamics AX 7 Development - IDE (Part I)
Dynamics AX 7 Development - IDE (Part I)Bohdan Bilous
 
2012.10 Liferay Europe Symposium, Alistair Oldfield
2012.10 Liferay Europe Symposium, Alistair Oldfield2012.10 Liferay Europe Symposium, Alistair Oldfield
2012.10 Liferay Europe Symposium, Alistair OldfieldEmeldi Group
 
Understanding LINQ in C#
Understanding LINQ in C# Understanding LINQ in C#
Understanding LINQ in C# MD. Shohag Mia
 

What's hot (20)

Les20
Les20Les20
Les20
 
Les22
Les22Les22
Les22
 
Oracle 10g Forms Lesson 11
Oracle 10g Forms Lesson 11Oracle 10g Forms Lesson 11
Oracle 10g Forms Lesson 11
 
Les16
Les16Les16
Les16
 
Oracle forms les02
Oracle forms  les02Oracle forms  les02
Oracle forms les02
 
Oracle 10g Forms Lesson 13
Oracle 10g Forms Lesson 13Oracle 10g Forms Lesson 13
Oracle 10g Forms Lesson 13
 
Les18
Les18Les18
Les18
 
Les24
Les24Les24
Les24
 
Oracle forms les01
Oracle forms  les01Oracle forms  les01
Oracle forms les01
 
forms builder
forms builderforms builder
forms builder
 
Les01
Les01Les01
Les01
 
Inventor Content Center: Adding Information
Inventor Content Center:   Adding InformationInventor Content Center:   Adding Information
Inventor Content Center: Adding Information
 
Oracle forms developer 10g vol1
Oracle forms developer 10g vol1Oracle forms developer 10g vol1
Oracle forms developer 10g vol1
 
Intro
IntroIntro
Intro
 
Oracle Forms Introduction
Oracle Forms IntroductionOracle Forms Introduction
Oracle Forms Introduction
 
Data base connectivity and flex grid in vb
Data base connectivity and flex grid in vbData base connectivity and flex grid in vb
Data base connectivity and flex grid in vb
 
Data Connection using ADO DC
Data Connection using ADO DCData Connection using ADO DC
Data Connection using ADO DC
 
Dynamics AX 7 Development - IDE (Part I)
Dynamics AX 7 Development - IDE (Part I)Dynamics AX 7 Development - IDE (Part I)
Dynamics AX 7 Development - IDE (Part I)
 
2012.10 Liferay Europe Symposium, Alistair Oldfield
2012.10 Liferay Europe Symposium, Alistair Oldfield2012.10 Liferay Europe Symposium, Alistair Oldfield
2012.10 Liferay Europe Symposium, Alistair Oldfield
 
Understanding LINQ in C#
Understanding LINQ in C# Understanding LINQ in C#
Understanding LINQ in C#
 

Viewers also liked

Oracle forms les05
Oracle forms  les05Oracle forms  les05
Oracle forms les05Abed Othman
 
Oracle forms les18
Oracle forms  les18Oracle forms  les18
Oracle forms les18Abed Othman
 
Oracle forms les08
Oracle forms  les08Oracle forms  les08
Oracle forms les08Abed Othman
 
Oracle forms les013
Oracle forms  les013Oracle forms  les013
Oracle forms les013Abed Othman
 
Oracle forms les14
Oracle forms  les14Oracle forms  les14
Oracle forms les14Abed Othman
 
Oracle forms les22
Oracle forms  les22Oracle forms  les22
Oracle forms les22Abed Othman
 
Oracle forms les20
Oracle forms  les20Oracle forms  les20
Oracle forms les20Abed Othman
 
Oracle forms les17
Oracle forms  les17Oracle forms  les17
Oracle forms les17Abed Othman
 
Oracle forms les19
Oracle forms  les19Oracle forms  les19
Oracle forms les19Abed Othman
 
Oracle forms les11
Oracle forms  les11Oracle forms  les11
Oracle forms les11Abed Othman
 
Oracle forms les03
Oracle forms  les03Oracle forms  les03
Oracle forms les03Abed Othman
 
Oracle forms les09
Oracle forms  les09Oracle forms  les09
Oracle forms les09Abed Othman
 
Oracle forms les21
Oracle forms  les21Oracle forms  les21
Oracle forms les21Abed Othman
 
Oracle forms les23
Oracle forms  les23Oracle forms  les23
Oracle forms les23Abed Othman
 
Oracle forms les25
Oracle forms  les25Oracle forms  les25
Oracle forms les25Abed Othman
 
Oracle forms les24
Oracle forms  les24Oracle forms  les24
Oracle forms les24Abed Othman
 
Oracle forms les15
Oracle forms  les15Oracle forms  les15
Oracle forms les15Abed Othman
 
Oracle forms les16
Oracle forms  les16Oracle forms  les16
Oracle forms les16Abed Othman
 
Oracle forms les04
Oracle forms  les04Oracle forms  les04
Oracle forms les04Abed Othman
 

Viewers also liked (19)

Oracle forms les05
Oracle forms  les05Oracle forms  les05
Oracle forms les05
 
Oracle forms les18
Oracle forms  les18Oracle forms  les18
Oracle forms les18
 
Oracle forms les08
Oracle forms  les08Oracle forms  les08
Oracle forms les08
 
Oracle forms les013
Oracle forms  les013Oracle forms  les013
Oracle forms les013
 
Oracle forms les14
Oracle forms  les14Oracle forms  les14
Oracle forms les14
 
Oracle forms les22
Oracle forms  les22Oracle forms  les22
Oracle forms les22
 
Oracle forms les20
Oracle forms  les20Oracle forms  les20
Oracle forms les20
 
Oracle forms les17
Oracle forms  les17Oracle forms  les17
Oracle forms les17
 
Oracle forms les19
Oracle forms  les19Oracle forms  les19
Oracle forms les19
 
Oracle forms les11
Oracle forms  les11Oracle forms  les11
Oracle forms les11
 
Oracle forms les03
Oracle forms  les03Oracle forms  les03
Oracle forms les03
 
Oracle forms les09
Oracle forms  les09Oracle forms  les09
Oracle forms les09
 
Oracle forms les21
Oracle forms  les21Oracle forms  les21
Oracle forms les21
 
Oracle forms les23
Oracle forms  les23Oracle forms  les23
Oracle forms les23
 
Oracle forms les25
Oracle forms  les25Oracle forms  les25
Oracle forms les25
 
Oracle forms les24
Oracle forms  les24Oracle forms  les24
Oracle forms les24
 
Oracle forms les15
Oracle forms  les15Oracle forms  les15
Oracle forms les15
 
Oracle forms les16
Oracle forms  les16Oracle forms  les16
Oracle forms les16
 
Oracle forms les04
Oracle forms  les04Oracle forms  les04
Oracle forms les04
 

Similar to Oracle forms les10

Oracle 10g Forms Lesson 10
Oracle 10g Forms Lesson 10Oracle 10g Forms Lesson 10
Oracle 10g Forms Lesson 10KAMA3
 
Pivotal CRM for iPad
Pivotal CRM for iPadPivotal CRM for iPad
Pivotal CRM for iPadAptean
 
05QueryingPersistingData.ppt
05QueryingPersistingData.ppt05QueryingPersistingData.ppt
05QueryingPersistingData.pptGiangLuong39
 
Siebel Open UI Presentation
Siebel Open UI PresentationSiebel Open UI Presentation
Siebel Open UI PresentationAjeeth Pingle
 
Empowering Business Users: OBIEE 12c Visual Analyzer and Data Mashup
Empowering Business Users: OBIEE 12c Visual Analyzer and Data MashupEmpowering Business Users: OBIEE 12c Visual Analyzer and Data Mashup
Empowering Business Users: OBIEE 12c Visual Analyzer and Data MashupEdelweiss Kammermann
 
Introduction to Oracle SQL Database Systems.ppt
Introduction to Oracle SQL Database Systems.pptIntroduction to Oracle SQL Database Systems.ppt
Introduction to Oracle SQL Database Systems.pptDrZeeshanBhatti
 
Oracle Business Intelligence Enterprise Edition
Oracle Business Intelligence Enterprise EditionOracle Business Intelligence Enterprise Edition
Oracle Business Intelligence Enterprise EditionESRI Bulgaria
 
Introduction of Oracle
Introduction of Oracle Introduction of Oracle
Introduction of Oracle Salman Memon
 
Lesson7WebML.pdf
Lesson7WebML.pdfLesson7WebML.pdf
Lesson7WebML.pdfcifoxo
 
Oracle intro to designer abridged
Oracle intro to designer abridgedOracle intro to designer abridged
Oracle intro to designer abridgedFITSFSd
 
[Advantech] WebOP designer Tutorial step by step
[Advantech] WebOP designer Tutorial step by step [Advantech] WebOP designer Tutorial step by step
[Advantech] WebOP designer Tutorial step by step Ming-Hung Hseih
 
Beautiful UI in react native By - nativebase.io
Beautiful UI in react native By - nativebase.ioBeautiful UI in react native By - nativebase.io
Beautiful UI in react native By - nativebase.ioGeekyants
 
Les06 oracle business_intelligence_obiee
Les06 oracle business_intelligence_obieeLes06 oracle business_intelligence_obiee
Les06 oracle business_intelligence_obieesuriyae1
 
Getting Started with React, When You’re an Angular Developer
Getting Started with React, When You’re an Angular DeveloperGetting Started with React, When You’re an Angular Developer
Getting Started with React, When You’re an Angular DeveloperFabrit Global
 
Web adi webcast_v3
Web adi webcast_v3Web adi webcast_v3
Web adi webcast_v3Bala Nagella
 
Tutorial Expert How-To - Export-Import with Excel template
Tutorial Expert How-To - Export-Import with Excel templateTutorial Expert How-To - Export-Import with Excel template
Tutorial Expert How-To - Export-Import with Excel templatePascalDesmarets1
 

Similar to Oracle forms les10 (20)

Oracle 10g Forms Lesson 10
Oracle 10g Forms Lesson 10Oracle 10g Forms Lesson 10
Oracle 10g Forms Lesson 10
 
Les10
Les10Les10
Les10
 
Pivotal CRM for iPad
Pivotal CRM for iPadPivotal CRM for iPad
Pivotal CRM for iPad
 
05QueryingPersistingData.ppt
05QueryingPersistingData.ppt05QueryingPersistingData.ppt
05QueryingPersistingData.ppt
 
Siebel Open UI Presentation
Siebel Open UI PresentationSiebel Open UI Presentation
Siebel Open UI Presentation
 
Empowering Business Users: OBIEE 12c Visual Analyzer and Data Mashup
Empowering Business Users: OBIEE 12c Visual Analyzer and Data MashupEmpowering Business Users: OBIEE 12c Visual Analyzer and Data Mashup
Empowering Business Users: OBIEE 12c Visual Analyzer and Data Mashup
 
Introduction to Oracle SQL Database Systems.ppt
Introduction to Oracle SQL Database Systems.pptIntroduction to Oracle SQL Database Systems.ppt
Introduction to Oracle SQL Database Systems.ppt
 
Oracle Business Intelligence Enterprise Edition
Oracle Business Intelligence Enterprise EditionOracle Business Intelligence Enterprise Edition
Oracle Business Intelligence Enterprise Edition
 
Introduction of Oracle
Introduction of Oracle Introduction of Oracle
Introduction of Oracle
 
Lesson7WebML.pdf
Lesson7WebML.pdfLesson7WebML.pdf
Lesson7WebML.pdf
 
Oracle intro to designer abridged
Oracle intro to designer abridgedOracle intro to designer abridged
Oracle intro to designer abridged
 
[Advantech] WebOP designer Tutorial step by step
[Advantech] WebOP designer Tutorial step by step [Advantech] WebOP designer Tutorial step by step
[Advantech] WebOP designer Tutorial step by step
 
Beautiful UI in react native By - nativebase.io
Beautiful UI in react native By - nativebase.ioBeautiful UI in react native By - nativebase.io
Beautiful UI in react native By - nativebase.io
 
Les06 oracle business_intelligence_obiee
Les06 oracle business_intelligence_obieeLes06 oracle business_intelligence_obiee
Les06 oracle business_intelligence_obiee
 
VSTO
VSTOVSTO
VSTO
 
Getting Started with React, When You’re an Angular Developer
Getting Started with React, When You’re an Angular DeveloperGetting Started with React, When You’re an Angular Developer
Getting Started with React, When You’re an Angular Developer
 
D2 k word_format
D2 k word_formatD2 k word_format
D2 k word_format
 
Web adi webcast_v3
Web adi webcast_v3Web adi webcast_v3
Web adi webcast_v3
 
Tutorial Expert How-To - Export-Import with Excel template
Tutorial Expert How-To - Export-Import with Excel templateTutorial Expert How-To - Export-Import with Excel template
Tutorial Expert How-To - Export-Import with Excel template
 
Qlikview online training
Qlikview online trainingQlikview online training
Qlikview online training
 

Oracle forms les10

  • 1. 10 Copyright © 2004, Oracle. All rights reserved. Creating Noninput Items
  • 2. 10-2 Copyright © 2004, Oracle. All rights reserved. Objectives After completing this lesson, you should be able to do the following: • Identify item types that do not allow input • Create a display item • Create an image item • Create a button • Create a calculated item • Create a hierarchical tree item • Create a bean area item
  • 3. 10-3 Copyright © 2004, Oracle. All rights reserved. Noninput Items Overview Item types that do not accept direct user input include: • Display items • Image items • Buttons • Calculated items • Hierarchical tree items • Bean area items
  • 4. 10-4 Copyright © 2004, Oracle. All rights reserved. Display Items Display items: • Are similar to text items. • Cannot: – Be edited – Be queried – Be navigated to – Accept user input • Can display: – Nonbase table information – Derived values
  • 5. 10-5 Copyright © 2004, Oracle. All rights reserved. Creating a Display Item
  • 6. 10-6 Copyright © 2004, Oracle. All rights reserved. Image Items Use image items to display images: • From file system—supported file type • From database—LONG RAW column or a BLOB column
  • 7. 10-8 Copyright © 2004, Oracle. All rights reserved. Image File Formats Image item Image files Image files Read Write PICT TPIC CALS TIFF GIF JFIF BMP RAS CALS GIF BMP RAS JPEG TIFF JFIF JPEG PICT TPIC
  • 8. 10-9 Copyright © 2004, Oracle. All rights reserved. Creating an Image Item
  • 9. 10-10 Copyright © 2004, Oracle. All rights reserved. Setting Image-Specific Item Properties • Image Format • Image Depth • Compression Quality • Display Quality • Sizing Style • Show Horizontal Scroll Bar • Show Vertical Scroll Bar
  • 10. 10-12 Copyright © 2004, Oracle. All rights reserved. Push Buttons Push buttons: • Cannot display or represent data • Are used to initiate an action • Display as: – Text button – Iconic
  • 11. 10-13 Copyright © 2004, Oracle. All rights reserved. Push Button Actions Use buttons to: • Move input focus • Display an LOV • Invoke an editor • Invoke another window • Commit data • Issue a query • Perform calculations
  • 12. 10-14 Copyright © 2004, Oracle. All rights reserved. Creating a Push Button
  • 13. 10-15 Copyright © 2004, Oracle. All rights reserved. Setting Push Button Properties • Label • Iconic • Icon Filename • Default Button • Mouse Navigate • Tooltip • Tooltip Visual Attribute Group
  • 14. 10-16 Copyright © 2004, Oracle. All rights reserved. Calculated Items What are calculated items? • They accept item values that are based on calculations. • They are read-only. • They can be expressed as: – Formula – Summary
  • 15. 10-17 Copyright © 2004, Oracle. All rights reserved. Creating a Calculated Item by Setting Properties • Formula – A calculated item value is the result of a horizontal calculation. – It involves bind variables. • Summary – A calculated item value is a vertical calculation. – A summary is performed on values of a single item over all rows in a block.
  • 16. 10-18 Copyright © 2004, Oracle. All rights reserved. Setting Item Properties for the Calculated Item • Formula – Calculation Mode – Formula • Summary – Calculation Mode – Summary Function – Summarized Block – Summarized Item
  • 17. 10-19 Copyright © 2004, Oracle. All rights reserved. Summary Functions • AVG • COUNT • MAX • MIN • STDDEV • SUM • VARIANCE
  • 18. 10-20 Copyright © 2004, Oracle. All rights reserved. Calculated Item Based on a Formula ORDERS Item# Prod Id Unit Price Quantity Item Total 1 2 4 3 200 120 50 25 5 4 9 3 1,000 480 450 75 NVL((:order_items.unit_price * :order_items.quantity),0) Formula item Orders Items Description
  • 19. 10-21 Copyright © 2004, Oracle. All rights reserved. Rules for Calculated Item Formulas Create calculated item formulas according to the following rules: • A formula item must not invoke restricted built-ins. • A formula item cannot execute any DML statements. • Do not terminate a PL/SQL expression with a semicolon. • Do not enter a complete PL/SQL statement in assignment expressions.
  • 20. 10-22 Copyright © 2004, Oracle. All rights reserved. Calculated Item Based on a Summary ORDERS 1 2 4 3 200 120 50 25 5 4 9 3 1,000 480 450 75 2,005Order Total Summarized item Summary item Item# Prod Id Unit Price Quantity Item TotalDescription Orders Items
  • 21. 10-23 Copyright © 2004, Oracle. All rights reserved. Rules for Summary Items • Summary item must reside in: – The same block as the summarized item – A control block with Single Record property set to Yes • Summarized item must reside in: – A data block with Query All Records property or Precompute Summaries property set to Yes – A control block • Datatype of summary item must be Number, unless using MAX or MIN
  • 22. 10-24 Copyright © 2004, Oracle. All rights reserved. Creating a Hierarchical Tree Item
  • 23. 10-25 Copyright © 2004, Oracle. All rights reserved. Setting Hierarchical Tree Item Properties • Allow empty branches • Multi selection • Show lines • Show symbols • Record group • Data query
  • 24. 10-26 Copyright © 2004, Oracle. All rights reserved. Bean Area Items The Bean Area item enables you to: • Add a JavaBean to a form • Extend Forms functionality • Interact with client machine • Reduce network traffic
  • 25. 10-27 Copyright © 2004, Oracle. All rights reserved. Creating a Bean Area Item Create bean area in Layout Editor Convert existing item to bean area
  • 26. 10-28 Copyright © 2004, Oracle. All rights reserved. Setting Bean Area Item Properties
  • 27. 10-29 Copyright © 2004, Oracle. All rights reserved. The JavaBean at Run Time
  • 28. 10-30 Copyright © 2004, Oracle. All rights reserved. Summary In this lesson, you should have learned that: • The following item types do not allow input: – Display items – Image items – Push buttons – Calculated items – Hierarchical tree items – Bean area items • You create noninput items by: – Changing the type of an existing item and setting certain properties – Using the appropriate tool in the Layout Editor
  • 29. 10-31 Copyright © 2004, Oracle. All rights reserved. Summary • You can use: – A display item to show nonbase table information – An image item to display an image – A push button to initiate action – A calculated item to display the results of a formula or a summary function of another item – A hierarchical tree item to display related data in a hierarchical fashion – A bean area item to execute client-side Java code
  • 30. 10-32 Copyright © 2004, Oracle. All rights reserved. Practice 10 Overview This practice covers the following topics: • Creating display items • Creating an image item • Creating iconic buttons • Creating calculated items: – Formula – Summary • Creating a bean area item

Editor's Notes

  1. Introduction Overview Some Oracle Forms Developer item types do not accept user input (noninput items); however, they do provide an effective means of accessing data and initiating actions. This lesson describes how to create and use noninput items.
  2. Noninput Items Noninput items is a generic term for item types that do not accept direct user input. However, you can set the value of some noninput items by programmatic control. Noninput items can be divided into two groups—those that can display data and those that cannot. Noninput Items that can Display Data Display items Image items Calculated items Hierarchical tree items Noninput Items that Cannot Display Data Push Buttons The Bean Area item can fall into either of these categories, depending on the functionality of the implemented JavaBean. Using Noninput Items Use noninput items to enhance your application by displaying additional data, often from a nonbase table.
  3. Display Items What Are Display Items? A display item is similar to a text item, except that it cannot be edited or navigated to at runtime. A display item is a read-only text box whose value must be fetched or assigned programmatically. Display items: Display additional, nonbase table information Display derived data values
  4. Creating a Display Item A display item can be created by using: The Layout Editor The Create icon in the Object Navigator (creates a text item that you can convert to a display item) The Item Type property to convert an existing item into a display item Whichever method you choose, you can set the required item properties in the Property Palette. Set the Database Item property to No for a display item whose value is not stored in the base table.You can assign a format mask to a single-line display item by setting its Format Mask property. How to Create a Display Item From the Layout Editor To create a display item in the Layout Editor, perform the following steps: 1.Invoke the Layout Editor. 2.Display the desired canvas and ensure that the correct data block is set. 3.Select the Display Item tool. 4.Click the canvas at the position where the display item is required. 5.Double-click the new display item. The Property Palette displays. 6.Change the name from DISPLAY_ITEMXX to the required name. 7.Specify the other properties as required.
  5. Image Items Using Images You can use images as graphic objects within a form module. A graphics image displays automatically and cannot be manipulated at run time. It can be imported from the database or the file system. Alternatively, you can display images within image items. What is an Image Item? An image item is a special interface control that can store and display vector or scanned images. Just as text items store and display VARCHAR2, number, or date values, image items store and display images. Like other items that store values, image items can be either data block items or control items.
  6. Image Items (continued) Displaying Image Items You can populate an image item by using one of the following methods: Fetching from a LONG RAW or BLOB database column Using a trigger and a built-in to populate the image item programmatically Storing Images You can store images in either the database or the file system. When you insert images into the database by means of a save (commit), they are automatically compressed using Oracle image compression. Note: To conserve application server memory when displaying large image items, reduce the number of records that are buffered by manipulating the Number of Records Buffered data block property. Technical Note You can also populate an image item with a BFILE, but you will need to use DBMS_LOB to do so.
  7. Image File Formats Forms Builder supports the following image formats: To reduce network traffic, limit the number of image items and background images that must be downloaded from the application server. You can deploy them as JAR files to reduce network traffic, or you can download them in an alternative manner. For example, to display a company logo in your application, you could include the image in the HTML page that downloads at application startup rather than retrieving the image from the database or the file system. The HTML page can be cached.
  8. Creating an Image Item An image item can be created in three ways: By using the Image Item tool in the Layout Editor (as described in the next section) By using the Create icon in the Object Navigator (creates a text item that you can convert to an image item) By converting an existing item into an image item Steps to Create an Image Item from the Layout Editor 1.Invoke the Layout Editor. 2.Set the canvas and block to those on which you require the item to display. 3.Select the Image Item tool. 4.Click the canvas at the position where you want the image item to display. 5.Double-click the image item. The Property Palette displays. 6.Change the name from IMAGEXX to the required name. 7.Specify the other properties as required. Note: Remember to set the Database Item property to No for an image item whose value is not stored in the base table.
  9. Setting Image Specific Item Properties Set the following properties to affect the appearance and behavior of the image item: Image Format: Format in which image will be stored in the database Image Depth: Depth setting for image being read from or written to a file on the file system (Original, Monochrome, Gray, LUT , or RGB) Compression Quality: Degree of compressions for an image item being read from or written to a file (None, Minimum, Low, Medium, High, or Maximum) Display Quality: Resolution used to display the image item; controls trade off between quality and performance (High, Medium, or Low) Sizing Style: Determines how much of image displays when the image sized does not match the size of the item (Crop – cuts off edges of image so it fits in item display area; Adjust – scales image so it fits within the item display area) Show Horizontal/Vertical Scroll Bar: Displays scroll bars to enable scrolling of image that does not fit into the item display area
  10. Setting Image Specific Item Properties (continued) Note: Image items do not have a Data Type property. If you set an image item Database Item property to Yes, Forms Builder understands that the data type is LONG RAW.
  11. Push Buttons What Is a Push Button? A push button is an interface object that you click to initiate an action. A push button is usually displayed as a rectangle with a descriptive label inside. Push buttons cannot store or display values. You can enhance your form module further by adding push buttons to provide quick and direct access to the most needed operations. Push Button Styles Forms Builder supports two push button styles: Text button: Displayed with a text label on the push button Iconic button: Displayed with a bitmapped graphic on the push button, and often used in toolbars
  12. Push Button Actions Some typical actions that would be invoked by a push button include the following: Moving the input focus Displaying an LOV Invoking an editor Invoking another window Committing data Issuing a query Performing calculations Note: Push buttons do not accept input focus on some window managers. On these platforms, the Keyboard Navigable property has no effect, and users can only interact with the items by using a mouse. Clicking a push button does not move the input focus on these platforms. The input focus remains in the item that was active before user clicked the push button.
  13. Creating a Push Button A push button can be created by using: The Push Button tool in the Layout Editor The Create icon in the Object Navigator (creates a text item that you can convert to a push button) How to Create a Push Button From the Layout Editor To create a push button from the Layout Editor, perform the following steps: 1.Invoke the Layout Editor. 2.Set the canvas and block to those on which you require the push button to display. 3.Select the Push Button tool. 4.Click the canvas at the position where you want the push button to display. 5.Double-click the push button. The Property Palette displays. 6.Change the name from PUSH_BUTTONXX to the required name. 7.Specify the other properties as required. Note You can use the mouse to resize and move the push button once you have created it. Icon image files for iconic buttons must be in GIF or JPEG format.
  14. Setting Properties for the Push Button Label: Text label that appears on the button at run time Iconic: Whether the button displays as an icon instead of as a label Icon Filename: Name of the file that contains the icon resource (filename only without the extension, such as “list”, not “list.gif”) Default Button: Whether this is the default push button for the block, which can be selected implicitly by pressing [Select] without the need to navigate or use the mouse Mouse Navigate: Whether Forms navigates to the item when you click on it with the mouse Tooltip: Help text that should appear in a tool tip beneath the button when the mouse moves over it Tooltip Visual Attribute Group: Named visual attribute to apply to the tool tip at run time Note: The default push button may be bordered or highlighted in a unique fashion to distinguish it from other push buttons.
  15. Calculated Items With a calculated item you can declaratively base item values on calculations involving one or more variable values. For example, you can use a calculated item to display a running total of employees’ total compensation. Any item that can store a value can be used as a calculated item by setting its required property values.
  16. Creating a Calculated Item A calculated item can be created by: Setting the calculation specific properties of any existing item that can store a value Creating a new item in the Layout Editor and setting its calculation specific properties Using the Create icon in the Object Navigator and setting its calculation specific properties Calculation Modes Calculations can be expressed as a formula or as a summary of all items in a block. Forms Builder supports the following calculation modes: Formula: The calculated item value is the result of a horizontal calculation involving one or more bind variables, such as form items, global variables, and parameters. Summary: The calculated item value is a vertical calculation involving the values of a single item over all rows within a single block. Note: A calculated item is read only. End users cannot insert or modify calculated items. You should, therefore, generally use display items as calculated items.
  17. Setting Item Properties for the Calculated Item Unlike the other items covered so far in this lesson, there is no Item Type property value called Calculated Item. The calculation-specific properties of an item make it a calculated item. Text items and display items both support calculated items. The following properties are specific to calculated items: Calculation Mode: The method of computing the calculated item values (None, Formula, or Summary) Formula: A single PL/SQL expression that determines the calculated value of a formula calculated item; can compute a value or call a subprogram Summary Function: The type of summary function (discussed on next page) to be performed on the summary calculated item Summarized Block: The block over which all rows will be summarized in order to assign a value to the summary calculated item; if not specified, current block is assumed Summarized Item: The item whose value is summarized in order to assign a value to the calculated item; required if the Calculation Mode is Summary
  18. Summary Functions You can use the standard SQL aggregate functions for summary items: AVG: The average value (arithmetic mean) of the summarized item over all records in the block COUNT: Count of all non-null instances of the summarized item over all records in the block MAX/MIN: Maximum/minimum value of the summarized item over all records in the block STDDEV: The standard deviation of the summarized item’s values over all records in the block SUM: Sum of all values of the summarized item over all records in the block VARIANCE: The variance (square of the standard deviation) of the summarized item’s values over all records in the block
  19. Calculated Item Based on a Formula To create a calculated item based on a formula, perform the following steps: 1.Create a new item in the Object Navigator. 2.Open the Property Palette of the item. 3.Set the Calculation Mode property to Formula. 4.Click More for the Formula property and enter the PL/SQL expression to define the formula. Note: A formula item cannot be a database item because its value is computed by Forms, not queried from a database column.
  20. Rules for Calculated Item Formulas When writing formulas for calculated items, observe the following rules: The formula (and any user-written subprogram that calls it) must not invoke any restricted built-ins. The formula (and any user-written subprogram that calls it) cannot execute any DML statements. Do not terminate the PL/SQL expression with a semicolon. If the PL/SQL expression involves an assignment, do not enter the complete PL/SQL statement. Forms Builder assigns the actual assignment code internally. Example Suppose you have a formula item called Gross_Comp in the EMPLOYEES block of a form. If you set the Formula property to: NVL(:employees.salary,0) * NVL(:employees.commission_pct,0) Forms Builder will internally convert this expression into a complete statement as: :employees.gross_comp := (NVL(:employees.salary,0) *NVL(:employees.commission_pct,0));
  21. Calculated Item Based on a Summary To create a calculated item based on a summary, perform the following steps: 1.Create a new item in the Object Navigator. 2.Open the Property Palette of an item. 3.Set the Calculation Mode property to Summary. 4.Select the required function from the Summary Function pop-up list. 5.From the Summarized Block pop-up list, select a block over which all rows will be summarized. 6.From the Summarized Item pop-up list, select an item to be summarized. Note: A summary item is the calculated item to which you assign a value. A summarized item is the item whose values are summarized and then assigned to the summary item.
  22. Rules for Summary Items When creating calculated items based on a summary, observe the following rules: The summary item must reside in the same block as the summarized item, or in a control block whose Single Record property is set to Yes. The summarized item must reside in a control block, or in a data block whose Query All Records property or the Precompute Summaries property is set to Yes.Note: This ensures that records fetched in the block and the summarized value are consistent. Otherwise, another user may possibly update a record that has not been fetched yet. Set the Data Type property for a summary item to Number, unless the summary function is Max or Min, in which case the datatype must mirror that of its associated summarized item. For example, a calculated item that displays the most recent (maximum) date in the HIRE_DATE column must have a datatype of Date. If the summarized item values are based on a formula, the summarized item must reside in a block whose Query All Records property is set to Yes.
  23. Creating a Hierarchical Tree Item A hierarchical tree is an item that displays data in the form of a standard navigator. How to Create a Hierarchical Tree Item To create a hierarchical tree item, do one of the following: In the Layout Editor: Click the Hierarchical Tree icon. Click and drag the mouse on the canvas to create the hierarchical tree object. Set other hierarchical tree-related properties as required. In the Object Navigator: Create a new item by using the Create icon. Open the item’s Property Palette and set the Item Type property to Hierarchical Tree. Set other hierarchical tree related properties as required.
  24. Setting Hierarchical Tree Item Properties Hierarchical Tree properties include the following: Item Type: Must be set to Hierarchical Tree Allow Empty Branches: Whether branch nodes may exist with no children (if set to FALSE, branch nodes with no children will be converted to leaf nodes; if set to TRUE, an empty branch will be displayed as a collapsed node) Multi Selection: Whether multiple nodes may be selected at one time Show Lines: Whether a hierarchical tree displays lines leading up to each node Show Symbols: Whether a hierarchical tree should display + or - symbols in front of each branch node Record Group: Name of the record group from which the hierarchical tree derives its values Data Query: Specifies the query-based data source Several built-ins are available to manipulate hierarchical trees. These are discussed in Lesson 15, which discusses how to implement a hierarchical tree in a form. Note: A hierarchical tree must be the only item in the data block.
  25. Bean Area Items A JavaBean is a component written in Java that can plug into any applet or Java application. The bean area item enables you to extend Forms functionality by adding a JavaBean to your form. With JavaBeans, you can interact with the client machine, performing such functions as: Obtaining information about the client machine Uploading client files to the server machine Modifying the user interface on the client Checking the spelling of a text item Displaying a progress bar, clock, calendar, or color picker with which the operator may be able to interact and select values Some of this functionality, such as the calendar, is possible using Forms native functionality. However, using a JavaBean enables client interaction without generating network traffic. Although JavaBeans can be used to input data, as in the case of the Calendar JavaBean, the bean area item itself does not accept user input.
  26. Creating a Bean Area You create a bean area using the Bean Area tool in the Layout Editor. Click the tool and drag out an area on the canvas. At first the area will look like an empty rectangle. You can also create a bean area from any existing item by changing its item type to Bean Area in the Property Palette.
  27. Setting Properties for the Bean Area The most important Bean Area property is Implementation Class. This property is used to specify the fully qualified name of the Java class that the Bean Area item should instantiate. If the JavaBean has a visible component, Forms Builder displays the JavaBean within the Bean Area item in the Layout Editor once the Implementation Class is set. You can set the size and position of the bean area visually in the Layout Editor, or by changing the X/Y Position, Width, and Height properties. Some JavaBeans have no visible component. To avoid the distraction of a large empty rectangle on the form, you can set the properties so that the bean displays as a tiny dot in the corner of the canvas. Alternatively, you can set its Visible property to No, which ensures that the Bean Area does not display at run time, although you still see it in the Layout Editor. Note: With enhanced JavaBean, it is not necessary to set the Implementation Class at design time. Instead, you can programmatically register the bean at run time. This is discussed in Lesson 16.
  28. The JavaBean at Run Time At run time, the user can interact with the JavaBean to perform the functionality that you have programmatically defined. In the preceding example, there is a button that invokes the ColorPicker JavaBean. When the operator selects a color from the color picker, it is used to set the background color of the canvas. This programmatic interaction is discussed in Lesson 16.
  29. Summary In this lesson, you should have learned that: Display items display nonbase table information or derived values. Image items store and display vector or scanned bitmapped images. Push Buttons initiate an action. Calculated items base item values on calculations. Calculations can be expressed in one of the following modes: Formula Summary Hierarchical trees display information in an Object Navigator style display. Bean Area items enable you to integrate Java components into your application. You create the above item types by: Using the appropriate tool in the Layout Editor Clicking Create in the Object Navigator (this creates a text item that you can covert to a different item type) Changing the item type and/or setting appropriate properties on existing items
  30. Practice 10 Overview In this practice session, you will add several items in the CUSTOMERS and ORDERS forms: display items, image item, push buttons, and calculated items. In the ORDERS form: Create two display items in the ORDER_ITEMS block. Create an image item in the CONTROL block. Create an iconic button in the CONTROL block. Base the Item_Total item in the ORDER_ITEMS block on a formula. Create a control item in the CONTROL block. Base this item value on a summary that displays the total value of an order. In the CUSTOMERS form Create an iconic button in the CONTROL block. Create a bean area. Save and run the ORDERS and CUSTOMERS forms. Note: For solutions to this practice, see Practice 10 in Appendix A, “Practice Solutions.”
  31. Practice 10 1.In the ORDER_ITEMS block of the ORDGXX form, create a display item called Description. Set the Prompt property to Description and display the prompt centered above the item. Rearrange the items in the layout so that all are visible. 2.Create an image item called Product_Image in the CONTROL block of the ORDGXX form. (Use the Control block because you do not want to pick up the Current Record Visual Attribute Group of the ORDER_ITEMS block, and this is a non base table item.) Position this and the other items you create in this practice so that your form looks like the screenshot.Note: The image will not display in the image item at this point; you will add code to populate the image item in Practice 20. 3.Create another display item, Image_Description, in the ORDER_ITEMS block. This should synchronize with the Description item. Set the Maximum Length property to the same value as the Description item. 4.In the CONTROL block of the ORDGXX form, create an iconic button called Product_LOV_Button. Use the list file (do not include the .ico or .gif extension). Set the Keyboard Navigable property and the Mouse Navigate property to No. To display item total information, set the following properties for the Item_Total item in the ORDER_ITEMS block:Set the Item Type to Display Item.Set the Calculation Mode property to Formula.Set the Formula property to: nvl(:ORDER_ITEMS.quantity,0) * nvl(:ORDER_ITEMS.unit_price,0)
  32. Practice 10 (continued) 6.To display the total of the item totals, create a new nonbase table item in the CONTROL block.Set the Position, Size, and Prompt properties according to the screenshot.Set the Format Mask property to 9G999G990D99.Set the Justification property to Right.Set the Number of Items Displayed property to 1.Set the Keyboard Navigable property to No. Make CONTROL.total a summary item and display summaries of the Item_Total values in the ORDER_ITEMS block. Ensure that you have set the Query All Records property to Yes for the ORDER_ITEMS block. 7.Click Run Form to run your form and test the changes. Perform a query in the ORDGXX form to ensure that the new items do not cause an error. Did you remember to switch off the Database Item property for items that do not correspond to columns in the base table? Also, check that the calculated items function correctly. 8.In the CUSTGXX form, create an iconic button similar to the one created in question 4, in the CONTROL block. Use the list file (do not include the .ico or .gif extension). Name the push button Account_Mgr_Lov_Button, and place it next to Account_Mgr_ID. 9.In the CUSTGXX form, create a bean area in the CONTROL block and name it Colorpicker. This bean has no visible component on the form, so set it to display as a tiny dot in the upper left corner of the canvas. Ensure that users cannot navigate to the bean area item with either the keyboard or mouse. You will not set an implementation class; in Lesson 19 you learn how to programmatically instantiate the JavaBean at run time. 10.Save and compile the form. Click Run Form to run your form and test the changes.